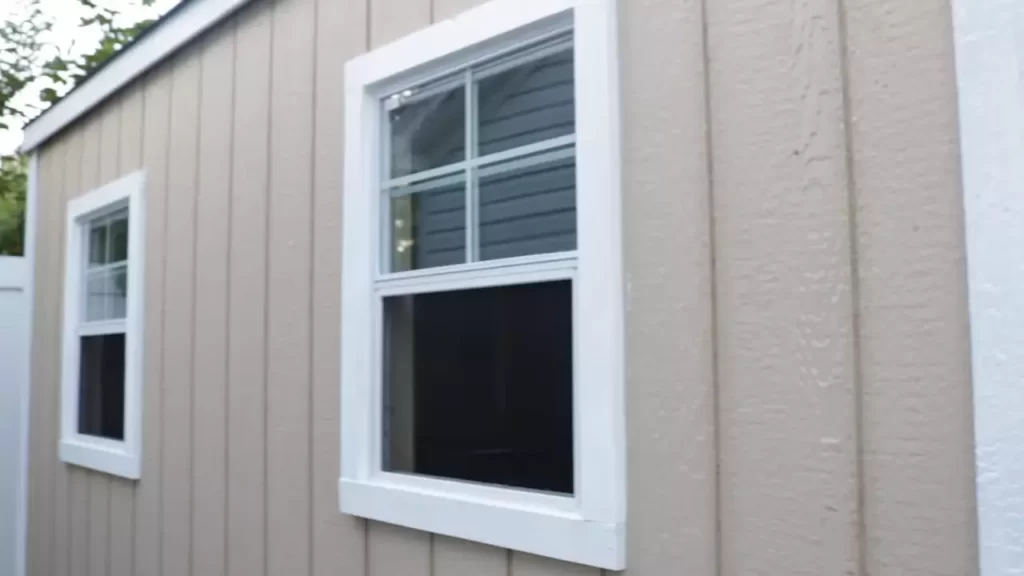
To install a window in a shed, measure the opening and purchase a window that fits. Remove any siding or insulation obstructing the area, position the window in the opening, and secure it with screws or nails.
Seal the edges with caulk or weatherstripping, and test the window to ensure it opens and closes properly. Sheds are versatile structures that can serve various purposes, from storage to workshops. Adding a window to a shed not only enhances natural light but also improves ventilation.
Installing a window in a shed is a straightforward process that can be completed with just a few tools and materials. This article will guide you through the necessary steps to install a window in your shed and enjoy its benefits. From measuring the opening to sealing the edges, you’ll find all the information you need to successfully complete this DIY project. So, let’s get started and bring more light and fresh air into your shed space.
Choosing The Right Window For Your Shed:
Installing windows in your shed not only enhances its appearance but also provides natural light and ventilation. However, choosing the right window for your shed can be a daunting task. In this section, we will discuss some important factors to consider when selecting a window, the importance of measuring accurately, and the different types of window options available.
Factors to consider when selecting a window:
Before purchasing a window for your shed, several factors should be taken into account:
- Size: Determine the appropriate size of the window based on the dimensions of your shed. Consider both the width and height, ensuring that the window will fit properly.
- Material: Windows are available in various materials such as wood, vinyl, and aluminum. Each material has its own pros and cons in terms of durability, maintenance, and aesthetics. Choose the material that suits your preferences and the shed’s style.
- Functionality: Consider how you intend to use the window. If you want it to open and close, opt for a window with a hinged or sliding mechanism. If ventilation is a priority, consider windows with adjustable vents or louvers.
- Energy Efficiency: Energy-efficient windows can help insulate your shed and minimize heat loss or gain. Look for windows with low-emissivity (low-E) glass and proper sealing to enhance energy efficiency.
- Security: Ensure that the window you choose has adequate security features, such as sturdy locks, to protect your shed from potential break-ins.
The importance of measuring accurately:
Accurate measurements are crucial when installing a window in your shed. Before purchasing a window, measure the rough opening where the window will be installed. Take precise measurements of the width, height, and depth of the opening to ensure a proper fit. Failure to measure accurately may result in difficulties during the installation process and may require additional adjustments or replacements.
Understanding the different types of window options:
Windows come in various styles and designs. Understanding the different types will help you choose the one that best suits your shed:
| Type | Description |
|---|---|
| Single-Hung | A window with a fixed top sash and a moveable bottom sash, which can be opened vertically. |
| Double-Hung | Similar to a single-hung window, but both the top and bottom sashes can be opened and closed. |
| Casement | A hinged window that swings open and shut like a door, providing maximum ventilation and unobstructed views. |
| Awning | Similar to casement windows, but hinged on the top and opening outward, allowing ventilation even during light rain. |
| Fixed | A non-operable window that is designed to let in light but cannot be opened. |
Consider the style, functionality, and suitability of each window type based on your shed’s purpose and personal preferences.
By carefully considering the factors mentioned above and understanding the different window options available, you can choose the perfect window for your shed that meets your requirements and enhances its overall appeal.
Preparing Your Shed For Window Installation:
If you’re planning to install a window in your shed, it’s crucial to properly prepare the space for this task. By taking the time to clear the area, ensure proper ventilation and insulation, and check the shed’s structural integrity, you’ll set the foundation for a successful window installation project. Follow these steps to get your shed ready for the window installation.
Clearing the Area Around the Window Opening:
Before starting the window installation process, it’s important to clear the area around the window opening. This will provide you with the necessary space to work effectively and minimize any potential hazards. Here are a few things you should do:
- Remove any objects or debris that might obstruct the window installation process.
- Clean the window opening thoroughly to ensure a smooth and secure fit for the new window.
Ensuring Proper Ventilation and Insulation:
Ventilation and insulation are essential factors to consider when installing a window in your shed. They play a crucial role in maintaining a comfortable and functional space. Here’s what you need to do:
- Assess the existing ventilation in your shed. If it’s inadequate, consider installing additional vents to improve airflow.
- Inspect the insulation of your shed walls. If necessary, add or upgrade insulation to regulate temperature and prevent moisture build-up.
Checking the Structural Integrity of the Shed:
The structural integrity of your shed is paramount for a successful window installation. Ensuring that the shed is stable and secure will prevent any potential issues down the line. It’s important to:
- Carefully examine the shed walls and framing for any signs of damage, such as rot or cracks.
- Repair or reinforce any weak or compromised areas to provide a solid foundation for the window installation.
- Double-check that the shed walls are straight and level to ensure a proper fit for the new window.
By taking the time to prepare your shed for window installation, you’ll set yourself up for a seamless and successful project. Remember to clear the area around the window opening, ensure proper ventilation and insulation, and check the shed’s structural integrity. With these steps completed, you’ll be ready to move forward with the actual window installation process.
Tools And Materials Needed For Window Installation:
Installing a window in your shed can not only enhance its appearance but also improve the ventilation and natural light inside. If you’re planning to take on this DIY project, it’s essential to have the right tools and materials on hand. This article will guide you through the necessary items you’ll need for a successful window installation.
Essential tools for the job
Before you begin installing a window in your shed, it’s important to gather the essential tools that will make the process easier and more efficient. Here are the tools you’ll need:
- A tape measure to accurately measure the dimensions of the window opening.
- A pencil for marking the areas where you’ll be making cuts or drilling holes.
- A level to ensure the window is installed straight and level.
- A drill with appropriate drill bits for creating the necessary holes.
- Screwdrivers to secure the window frame.
- A caulking gun for sealing any gaps and ensuring a watertight installation.
- A utility knife for cutting and trimming materials.
- A pry bar to remove any existing trim or window frames.
- Safety goggles and gloves to protect yourself during the installation.
Window installation kits and accessories
In addition to the essential tools, using a window installation kit can simplify the process and ensure a professional-looking result. These kits typically include the necessary components for installing and securing the window. Here are some common window installation accessories you may find in a kit:
- Window flashing: This is a crucial component that prevents water from entering the shed. It’s typically made of durable, weather-resistant materials such as vinyl or aluminum.
- Shimming materials: Shims are used to ensure the window is level and plumb within the opening. They are usually made of wood or plastic.
- Mounting brackets: These brackets help secure the window frame and are often included in window installation kits.
- Trim pieces: Once the window is installed, trim pieces can be added for a finished look. These may include sill, casing, and apron pieces.
- Sealant and adhesive: To seal the window and prevent drafts, a high-quality sealant and adhesive are essential. Look for products suitable for outdoor use and compatible with the materials you’re working with.
Optional materials for customization
If you want to customize the window installation to fit your shed’s design or specific needs, there are additional materials you may consider. These optional materials can add a personal touch and enhance the functionality of your shed’s window. Here are some examples:
| Material | Purpose |
|---|---|
| Decorative window grilles | Enhance the aesthetics of the window |
| Solar film | Reduce glare and protect against UV rays |
| Sash locks and hinges | Improve security and ease of use |
| Window tinting film | Enhance privacy and reduce heat transfer |
| Window screens | Keep insects out while allowing fresh air in |
Keep in mind that these optional materials may require additional tools or specific installation techniques. It’s important to carefully read any instructions provided and follow the manufacturer’s recommendations for a proper installation.
By gathering the essential tools and materials, along with considering any optional customization, you’ll be well-prepared to install a window in your shed. This DIY project can be rewarding and significantly improve the functionality and visual appeal of your space. So, roll up your sleeves, grab your tools, and get ready to enjoy the benefits of a shed window installation!
Step-By-Step Window Installation Process:
Installing a window in your shed is a great way to bring natural light and ventilation to your space. Whether you are replacing an existing window or adding a new one, the process can be relatively simple if you follow these step-by-step instructions. In this blog post, we will guide you through the window installation process, from removing the existing window (if applicable) to installing the window frame.
Removing Existing Window (if applicable)
If your shed already has a window that needs to be replaced, the first step is to remove the old window. Follow these steps to remove the existing window:
- Carefully remove any window coverings or blinds that may be in place.
- Inspect the window frame for any screws or nails that may be holding it in place. If found, use a screwdriver or pry bar to remove them.
- Gently tap the frame from the inside to loosen it, starting from one corner and working your way around.
- Once the frame is loose, carefully lift it out of the opening and set it aside.
Measuring and Marking the Window Position
Before cutting the opening for your new window, it’s important to measure and mark the window position accurately. Follow these steps:
- Decide on the desired size and location of the window.
- Using a tape measure, measure the width and height of the window opening.
- Based on the measurements, mark the center point of the opening on both the vertical and horizontal edges.
- Using a straightedge, connect the center markings to create an outline of the window opening.
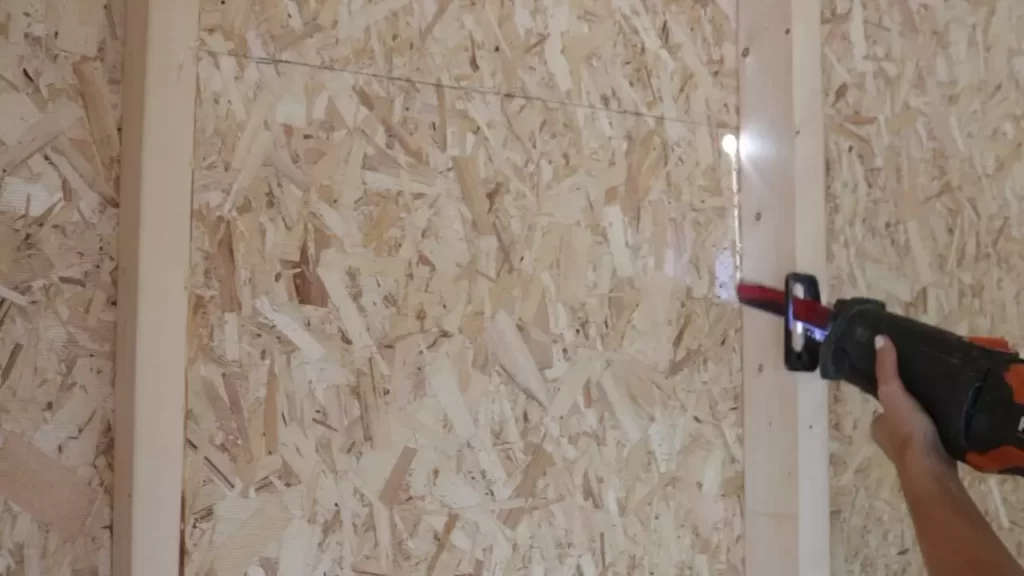
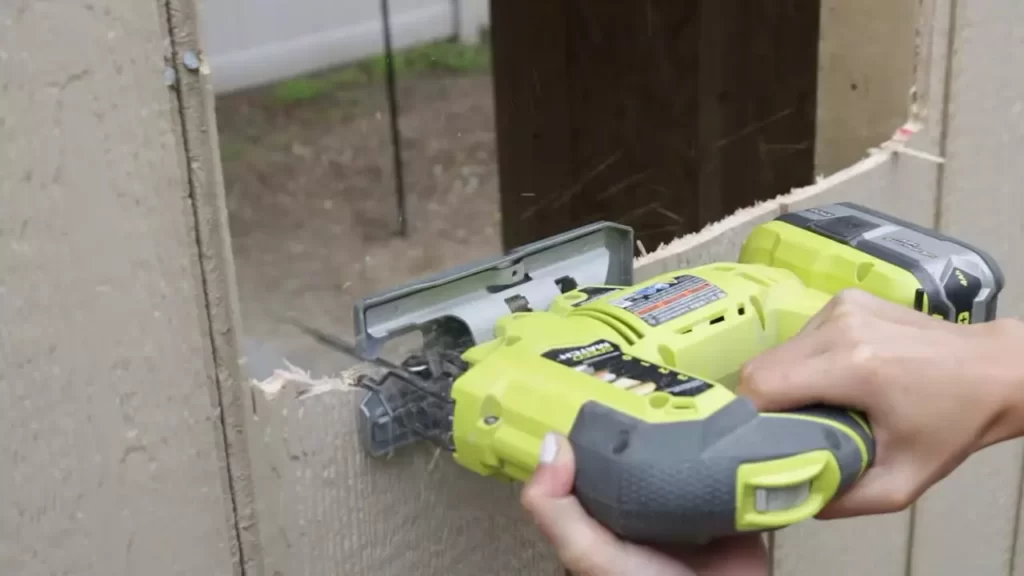
Cutting the Opening in the Shed Wall
Now that you have your window position marked, it’s time to cut the opening in the shed wall. Follow these steps:
- Put on safety goggles and gloves to protect yourself.
- Using a jigsaw or circular saw, carefully cut along the outline of the window opening.
- Remove any excess debris or insulation from the opening.
- Inspect the opening to ensure it is clean and free of any obstructions.
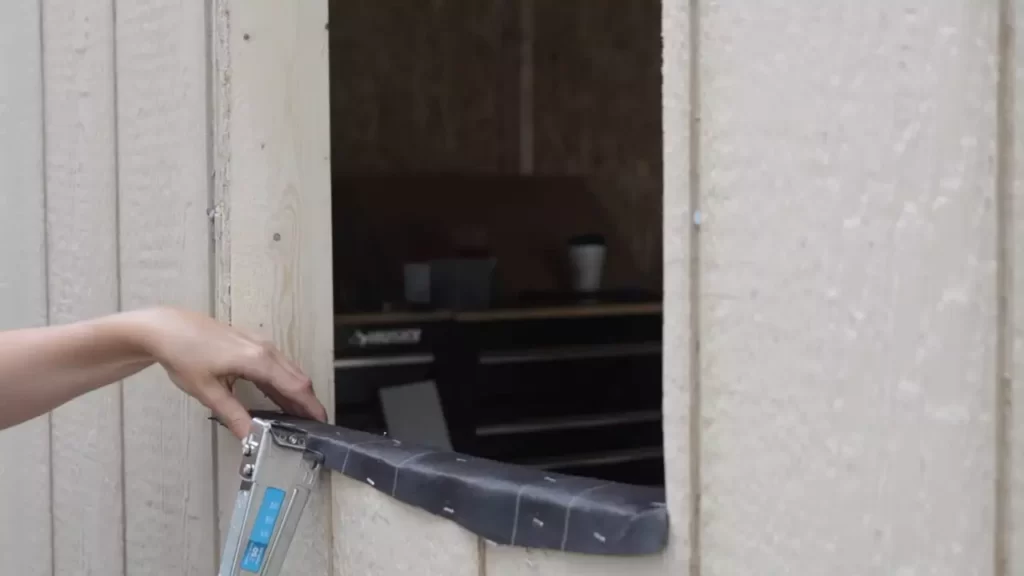
Installing the Window Frame
After preparing the opening, it’s time to install the window frame. Follow these steps:
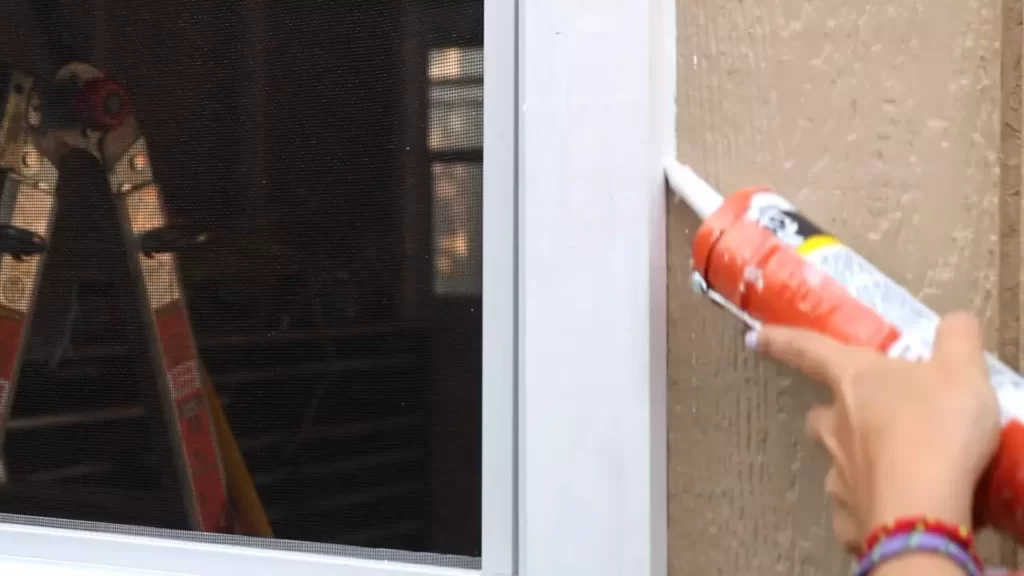
- Apply a bead of exterior-grade silicone caulk along the perimeter of the window opening.
- Place the window frame into the opening, ensuring it is centered and level.
- Secure the frame by inserting screws through the pre-drilled holes in the frame and into the shed wall.
- Check that the window frame is securely in place and adjust if necessary.
With the window frame installed, you can now move on to installing the window sashes and completing any finishing touches to complete the installation process.
Installing a window in your shed may seem like a daunting task, but by following these step-by-step instructions, you can do it with confidence. Remember to take your time, measure accurately, and prioritize safety throughout the process. Enjoy the benefits of natural light and fresh air in your shed with your newly installed window!
Ensuring Proper Sealing And Insulation
Proper sealing and insulation are crucial when installing a window in your shed. They help create a tight fit that prevents air and water leaks, as well as ensure proper temperature control inside the shed. In this section, we will discuss two important aspects of sealing and insulation: using weatherstrips and caulking for a secure fit, and insulating the window for temperature control. Additionally, we will explore how to test for any air or water leaks to ensure your window is properly sealed.
Using weatherstrips and caulking for a secure fit
Weatherstrips and caulking are essential for achieving a secure fit when installing a window in your shed. Weatherstrips act as a barrier against drafts and water, while caulking fills in any gaps and helps create an airtight seal. Follow these steps to ensure a secure fit:
- Clean the window frame and remove any debris or old caulking.
- Apply weatherstrips along the edges of the window frame, ensuring they are tight and properly aligned.
- Use a high-quality caulking gun to apply a continuous bead of caulk along the outer edge of the window frame.
- Smooth the caulk using a caulk smoothing tool or your finger, ensuring it fills in all gaps completely.
- Allow the caulk to dry according to the manufacturer’s instructions before moving on to the next step.
By using weatherstrips and caulking, you can create a secure fit that prevents air and water infiltration, enhancing the overall performance of your shed window.
Insulating the window for temperature control
Insulating your shed window is vital for maintaining a comfortable temperature inside the shed, regardless of the weather outside. Here’s how you can insulate your shed window:
- Measure the dimensions of your window and cut a piece of insulating foam board to fit.
- Apply adhesive to the back of the foam board and press it firmly against the window, ensuring it covers the entire surface.
- For added insulation, you can also apply a layer of window film or use insulating curtains that can be pulled closed during extreme weather conditions.
Insulating your shed window will help regulate the temperature inside, making it more comfortable and energy-efficient.
Testing for any air or water leaks
After installing your shed window and ensuring proper sealing and insulation, it’s important to test for any air or water leaks. This will help you identify and fix any potential weaknesses. Follow these steps to test for leaks:
- Close the window and examine the edges for any visible gaps or cracks.
- Light a candle or use a smoke pencil and carefully pass it along the edges of the window frame.
- If the flame flickers or the smoke wavers, it indicates air leakage. Use caulk or weatherstrips to seal any gaps.
- To test for water leaks, spray water along the window frame from outside. Check the inside of the shed for any signs of water infiltration.
- If water is found, ensure proper caulking and weatherstripping are applied to prevent leaks.
Testing for air and water leaks is an essential step in the installation process. It helps ensure that your shed window is properly sealed and insulated, providing long-lasting protection against the elements.
Customizing And Finishing Touches:
Adding window treatments for privacy and aesthetics
Once you have successfully installed a window in your shed, you may want to consider adding window treatments to enhance both privacy and aesthetics. Window treatments not only provide you with the necessary privacy but also add a touch of style to your shed. Here are a few ideas to get you started:
- Install blinds or shades that can be easily adjusted to control the amount of light and privacy you desire.
- Hang curtains or drapes in vibrant patterns or colors to inject a pop of personality into your shed.
- Consider using frosted or stained glass window films to create a unique look while still maintaining privacy.
Painting or staining the window frame
Painting or staining the window frame is an excellent way to customize the appearance of your shed and make it blend seamlessly into its surroundings. Here are a few steps to follow when painting or staining your window frame:
- Begin by cleaning the window frame thoroughly, removing any dirt or debris.
- Make sure to cover the glass portion of the window with masking tape or plastic to avoid any accidental paint or stain splatters.
- Apply a primer suitable for the material of your window frame, and allow it to dry completely.
- Choose a paint color or stain that matches your shed’s overall aesthetic and apply it evenly to the window frame. For a natural wood look, consider using a weather-resistant stain.
- Allow the paint or stain to dry completely before removing any protective coverings or tape.
Enhancing security features for peace of mind
When installing a window in your shed, it is essential to prioritize the security of your belongings. Enhancing the security features of your shed window can provide you with peace of mind. Here are a few measures you can take:
- Install window locks to prevent unauthorized access. There are various options available, including sash locks, key-operated locks, and sliding window locks.
- Consider reinforcing the glass with laminated or tempered glass, making it more resistant to break-ins.
- Install window security film, which adds an extra layer of protection by making the glass more difficult to shatter.
- Consider installing window bars or grilles for added security and deterrence against intruders.
Maintenance And Care:
Regular cleaning and maintenance tips:
To ensure that your shed window remains in good condition and functions properly, regular cleaning and maintenance is essential. Here are some tips to help you keep your shed window looking its best:
- Clean the window regularly: Start by removing any dust, dirt, or debris from the window’s surface using a soft brush or cloth. Then, mix a mild detergent with water and gently scrub the window with a sponge or non-abrasive brush. Rinse thoroughly with clean water and wipe dry with a lint-free cloth.
- Check for any signs of damage: Inspect the window regularly for any chips, cracks, or broken parts. If you notice any damage, it’s important to address it promptly to prevent further problems.
Repairing or replacing damaged windows:
Even with proper care, shed windows may occasionally suffer damage and require repair or replacement. Here’s what you need to know:
- Repairing minor damage: Small chips or cracks in the window glass can often be repaired using a commercial glass repair kit. These kits typically include a resin that can fill the damaged area and restore the window’s integrity.
- Replacing severely damaged windows: If the window is severely damaged beyond repair, or if parts such as the frames or hinges are broken, it may be necessary to replace the entire window. Contact a professional if you’re unsure about the process or need assistance.
Protecting the window from harsh weather conditions:
Your shed window is exposed to various weather elements, so it’s important to take steps to protect it from potential damage. Here are some tips:
- Apply a weather-resistant sealant: Before installing the window, make sure to apply a weather-resistant sealant around the frame. This will help prevent water leakage and protect the window from moisture-related damage.
- Install storm shutters or protective covers: Consider installing storm shutters or protective covers to shield the window from extreme weather conditions such as strong winds, heavy rain, or snow. These additional layers of protection can help extend the lifespan of your shed window.
Remember, regular maintenance and care can go a long way in keeping your shed window in optimal condition. By following these tips, you can ensure that your window remains functional, aesthetically pleasing, and resistant to the harsh elements it may face.
Frequently Asked Questions On How To Install Window In Shed
Can I Install Windows In A Shed?
Yes, you can install windows in a shed. It can bring in natural light and improve ventilation.
How To Build A Window Into A Shed?
To build a window in a shed, first, measure the desired window size. Then, mark the dimensions on the shed’s wall. Cut out the marked area using a saw. Install a window frame in the opening and secure it with screws.
Finally, place the window pane in the frame and seal the edges with caulk for weatherproofing.
How Much Does It Cost To Put Windows In A Shed?
The cost of putting windows in a shed varies depending on factors like window size and type. On average, it can range from $100 to $500 per window, including installation. However, prices can go higher or lower based on specific requirements and location.
How Do You Install A Window In A Shed Door?
To install a window in a shed door, first measure the opening and purchase a window of the appropriate size. Remove the door panel and cut the opening to fit the window. Apply caulk around the edges, then place the window in the opening and secure it with screws.
Finally, replace the door panel.
Conclusion
Installing a window in your shed is a straightforward process that can enhance both the functionality and aesthetic appeal of the structure. By following the step-by-step guidelines provided, you can successfully complete this DIY project without the need for professional assistance.
Remember to choose a suitable window style, gather the necessary tools, measure accurately, and follow the installation steps meticulously. With a clear plan and careful execution, you can enjoy the benefits of natural light and ventilation in your shed for years to come.
Happy woodworking!