To install window box planters, first, choose a suitable location and mark the spots for drilling. Then, use a drill to make holes in the wall or window sill.
Place the brackets in the holes and secure them tightly. Finally, attach the planter to the brackets and ensure it is level and stable. Window box planters are a wonderful way to add charm and beauty to your home’s exterior.
Whether you want to display vibrant flowers, luscious herbs, or even small vegetables, these planters offer a convenient and attractive solution. Installing window box planters may seem like a daunting task, but with the right tools and a little know-how, you can easily tackle this DIY project.
We will guide you through the step-by-step process of installing window box planters, so you can enhance your home’s curb appeal with a touch of nature. So let’s dive right in and get started on transforming your windows into stunning displays of greenery.
Choosing The Right Window Box Planter
When it comes to adding some charm and greenery to your windows, nothing beats window box planters. These beautiful containers not only enhance the look of your house but also provide a perfect spot for growing flowers, herbs, and even small vegetables. However, selecting the right window box planter can be a daunting task with so many options available in the market. To help you make the best choice, consider these factors when selecting a window box planter:

Factors to consider when selecting a window box planter
- Material: Window box planters are available in various materials like wood, plastic, metal, and fiberglass. Each material has its own advantages and considerations. Wood window boxes have a traditional charm and can be stained or painted to match your house’s style. Plastic window boxes are affordable and lightweight, making them easy to install and maintain. Metal window boxes are durable and can add a modern touch to your windows. Fiberglass window boxes are lightweight and resistant to rot and insects.
- Size: Another important factor to consider is the size of the window box planter. It should be proportionate to the size of your window and the available space. Measure the width and depth of your window to determine the appropriate size. Make sure there is enough space for the plants to grow and flourish.
- Drainage: Proper drainage is crucial for the health of your plants. Look for window box planters that have drainage holes to prevent water from pooling. Alternatively, you can choose self-watering window boxes that come with built-in reservoirs to provide a constant water supply to your plants.
- Maintenance: Consider the level of maintenance you are willing to commit to. Some materials require more upkeep than others. Wood window boxes may need regular sealing or painting, while plastic and metal window boxes are generally low maintenance. Fiberglass window boxes are also low maintenance and can be easily cleaned with a hose or damp cloth.
- Budget: Lastly, consider your budget when selecting a window box planter. Prices can vary widely depending on the material, size, and brand. Decide how much you are willing to spend and look for options that fit within your budget.
How to match the window box planter with your house’s style
Now that you know the factors to consider when selecting a window box planter, it’s important to match it with your house’s style to create a cohesive and appealing look. Here are a few tips on how to do just that:
- Consider the architecture: Take cues from your house’s architecture when choosing a window box planter. If your house has a traditional or rustic style, wooden window boxes would be a great choice. For modern or contemporary houses, sleek metal or fiberglass window boxes can make a stylish statement.
- Color coordination: Pay attention to the color of your house’s exterior and choose a window box planter that complements it. You can go for a contrast by selecting a planter in a color that stands out from your house, or opt for a matching color that blends seamlessly with the surroundings.
- Texture and detailing: Look for window box planters that have textures or details that echo the elements of your house’s exterior. For example, if your house has intricate woodwork, a window box with carved details can be a perfect match. If your house has a clean and minimalist design, choose a window box with a sleek and simple design.
- Coordinate with plant choices: Consider the type of plants you want to grow in your window box planter and choose a planter that complements their colors and textures. For vibrant and colorful flowers, a neutral-toned window box can help them stand out. If you prefer a monochromatic or minimalistic look, choose a window box in a similar color palette.
By considering these factors and matching the window box planter with your house’s style, you can create a visually appealing and harmonious look that adds beauty and charm to your windows.
Understanding The Dimensions And Materials
When it comes to installing window box planters, understanding the dimensions and materials is crucial. The size and depth of the planter will determine how well your plants thrive, and the material you choose will dictate the longevity and overall aesthetic of the window box. In this section, we will delve into the different materials used in window box planters and their advantages. Additionally, we will discuss the process of measuring the size and depth to ensure the perfect fit for your window box planter.
Different materials used in window box planters and their advantages
There are several materials commonly used for window box planters, each with its own distinct advantages. Here are a few popular options:
| Material | Advantages |
|---|---|
| Wood | 1. Natural and rustic look 2. Provides good insulation 3. Allows for easy customization and painting 4. Affordable and readily available |
| Metal | 1. Modern and sleek appearance 2. Durable and weather-resistant 3. Lightweight and easy to mount 4. Less susceptible to rotting or warping |
| Plastic | 1. Lightweight and easy to handle 2. Resistant to rot and insects 3. Requires minimal maintenance 4. Wide variety of colors and styles |
Each material has its own unique advantages, so choose the one that best suits your personal preference and the overall style of your home. Consider factors such as durability, aesthetics, and maintenance requirements when making your decision.
Measuring the size and depth of the window box planter
Before purchasing or building a window box planter, you need to accurately measure the size and depth to ensure a proper fit. Follow these steps to get the measurements right:
- Measure the width of your window. This will determine the maximum width your window box planter can be without obstructing the view or interfering with opening and closing the window.
- Decide on the depth of the planter. Consider the type of plants you want to grow and their root space requirements. Most window box planters have a depth of 6 to 12 inches.
- Measure the distance between the mounting brackets or hooks. This will determine the length of your window box planter.
By taking precise measurements, you can ensure that your window box planter fits perfectly and provides a stable foundation for your plants.
Preparing For Installation
Preparing for installation is an important step when it comes to installing window box planters. This ensures that you have everything you need and that the area is ready for installation. In this section, we will discuss gathering the necessary tools and materials as well as how to prepare the window area for installation.
Gathering the necessary tools and materials
Before you start the installation process, it is essential to gather all the necessary tools and materials. Here is a list of what you will need:
- Window box planter
- Tape measure
- Level
- Pencil or marker
- Electric drill
- Screws
- Screwdriver or drill bit
- Window brackets or brackets included with the window box planter
- Soil mix
- Plants or flowers
- Watering can
Make sure you have all these tools and materials ready before starting the installation. This will save you time and ensure a smooth installation process.
How to prepare the window area for installation
Preparing the window area for installation is essential to ensure a proper fit and secure installation. Follow these steps to prepare the window area:
- Measure the width of your window and determine the appropriate size of the window box planter.
- Clean the window area, removing any dirt, dust, or debris.
- Mark the mounting locations for the brackets on the window frame using a pencil or marker. Ensure that the brackets are evenly spaced and aligned with the width of the window box planter.
- Drill pilot holes into the marked locations on the window frame using an electric drill. The size of the pilot holes should match the size of the screws you are using.
- Attach the brackets to the window frame using the screws and a screwdriver or drill bit. Make sure the brackets are securely fastened.
- Place the window box planter onto the brackets and ensure it is level using a level. Adjust the brackets if necessary.
- Fill the window box planter with a suitable soil mix, leaving enough space for the plants or flowers.
- Plant your desired plants or flowers in the window box planter, following the planting instructions for each specific plant.
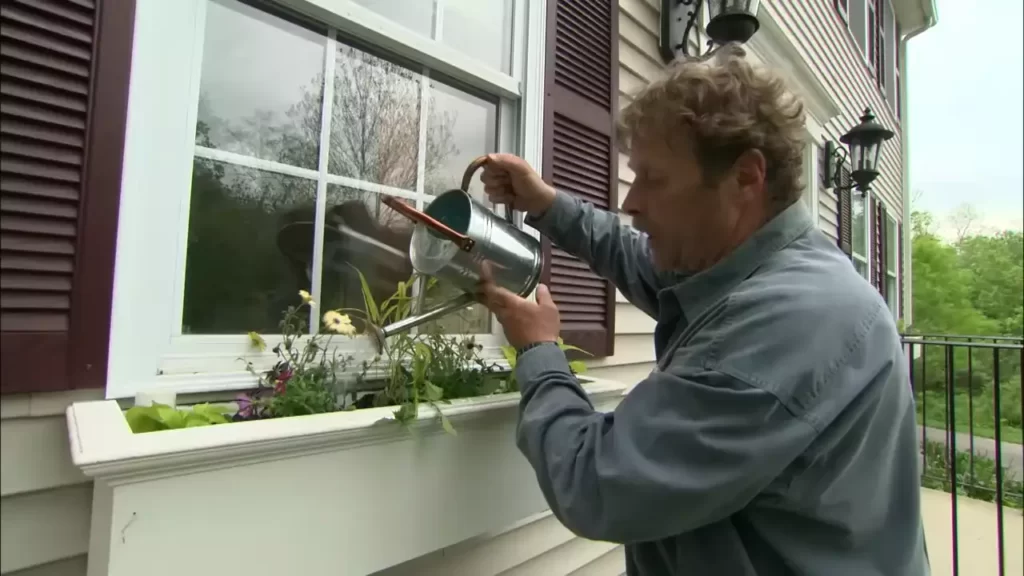
- Water the plants or flowers using a watering can, ensuring they are adequately hydrated.
By following these steps, you will have successfully prepared the window area for the installation of your window box planter. Now you can enjoy the beautiful addition of flowers or plants outside your window.
Installing Window Box Planters: Step-By-Step Guide
Adding window box planters can instantly transform the exterior of your home, adding a touch of charm and beauty. Installing these planters may seem like a daunting task, but with this step-by-step guide, you’ll have them securely in place in no time. Follow these instructions to ensure a successful installation.
Step 1: Marking the location for installation
The first step in installing window box planters is determining the ideal location for them. Take into consideration factors such as sunlight exposure and visual appeal. Once you’ve decided on the location, mark it using a pencil or painter’s tape.
Step 2: Pre-drilling holes for drainage and securing brackets
- Measure and mark the spots where you’ll need to pre-drill holes for drainage. These holes will prevent water from accumulating in the planters, protecting the plants from root rot. Ensure that the holes are evenly spaced and large enough for proper drainage.
- Next, determine the placement of the brackets that will hold the window box planter. The brackets should be positioned evenly along the length of the window sill. Use a level to ensure they are straight.
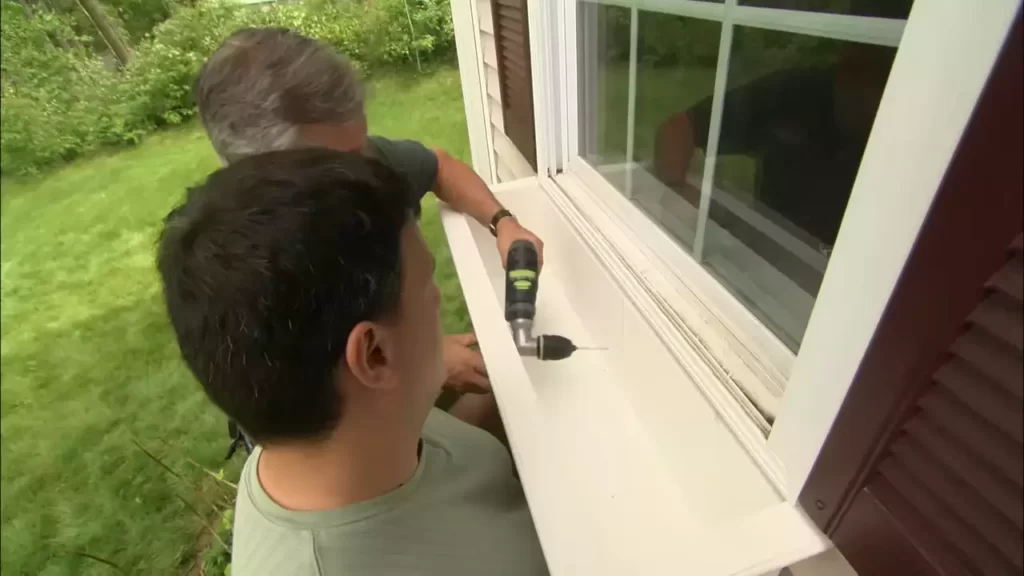
- Pre-drill holes for the brackets, making sure to choose an appropriate drill bit size for the screws you’ll be using.
- Secure the brackets into place by using screws that are suitable for the material of your window sill. Ensure that the brackets are tightly attached and level.
Step 3: Attaching brackets to the window sill
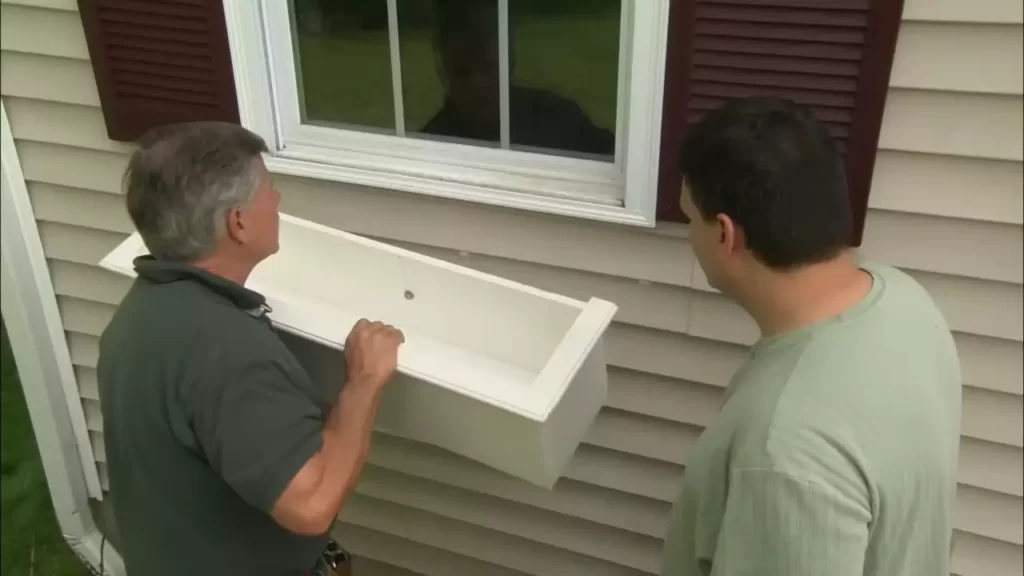
- Hold the window box planter up against the brackets to determine the best placement and height.
- Mark the spots where the brackets will touch the planter.
- Using the appropriate screws or bolts, attach the brackets to the planter. Ensure that they are securely screwed in and aligned with the marks you made.
Step 4: Installing the window box planter securely
- With the brackets now attached to both the window sill and the planter, carefully lift the planter and slide it into place on top of the brackets.
- Make any necessary adjustments to ensure that the planter is level and securely in place.
- Double-check that all brackets are supporting the weight of the planter evenly and that it is properly aligned.
- Once you are satisfied with the placement, make sure to tighten any screws or bolts that may have become loose during the installation process.
By following these step-by-step instructions, you can install window box planters with ease. Not only will they enhance the curb appeal of your home, but they’ll also provide a beautiful space for you to display your favorite flowers and plants.
Caring For Window Box Planters
Watering and drainage tips for healthy plants
Proper watering is essential for the health and vitality of your window box plants. To ensure optimal growth, it’s important to follow a few simple watering and drainage tips:
- Choose the right soil: Start by selecting a high-quality potting mix with good drainage properties. This will prevent water from pooling and help your plants thrive.
- Adequate drainage holes: Ensure that your window box has sufficient drainage holes to allow excess water to escape. This will prevent waterlogging, which can lead to root rot and other problems.
- Water consistently: Regularly check the moisture level of the soil in your window box. Aim to keep it slightly moist, but not overly saturated. Avoid underwatering or overwatering, as both can negatively impact plant health.
- Watch for signs of dehydration: Pay attention to your plants and look for signs of dehydration, such as wilted leaves or dry soil. If you notice these signs, increase the frequency of watering.
In addition to proper watering and drainage, it’s important to regularly maintain and clean your window box planters to keep them in top condition.
Proper maintenance and cleaning of window box planters
Maintaining and cleaning your window box planters will not only enhance their appearance but also promote plant health. Here are a few maintenance tips to keep in mind:
- Regular pruning and deadheading: Trim and remove any dead or wilted foliage from your plants. This will encourage new growth and help maintain overall plant health.
- Keep pests at bay: Inspect your window boxes regularly for signs of pests, such as aphids or snails. If you notice any infestations, take appropriate measures to eliminate them before they cause significant damage.
- Seasonal replanting: Depending on the plants you choose for your window box, they may need to be replaced seasonally. Removing old plants and introducing fresh ones will keep your window box vibrant and blooming.
- Regular cleaning: Over time, dirt, algae, and other debris can accumulate on the surface of your window box. To keep it looking its best, wipe it down regularly with a damp cloth or sponge.
By following these simple watering and maintenance tips, you can ensure that your window box planters not only add beauty to your home but also provide a healthy and thriving environment for your plants.
Enhancing The Look Of Window Box Planters
Choosing the right plants for your window box
Enhancing the look of window box planters is all about selecting the perfect plants that will add color, texture, and interest to your outdoor space. But with so many options available, how do you choose the right plants for your window box? Here are a few tips:
- Consider the sunlight: Different plants have different sunlight requirements. Before selecting your plants, be mindful of the amount of sunlight your window box receives. If it’s in a shady area, opt for shade-loving plants like impatiens or begonias. For sunny locations, consider sun-loving flowers such as petunias or geraniums.
- Think about the size: It’s important to choose plants that won’t outgrow your window box. Look for compact varieties or those labeled as suitable for containers. This will ensure that your window box remains visually appealing without overcrowding the space.
- Mix and match: Adding a variety of plants with different heights, textures, and colors will create a visually stunning window box. Consider combining tall plants for height, trailing plants for cascading effect, and medium-height plants for filling in the space.
- Take the climate into account: Make sure to select plants that are suitable for your climate and will thrive in your specific region. Some plants may not tolerate extreme heat or cold, so be mindful of the weather conditions in your area.
Adding decorative elements and accessories for a personalized touch
Once you’ve chosen the right plants, it’s time to add those finishing touches that will truly enhance the look of your window box planters. Adding decorative elements and accessories not only adds a personal touch but also creates a cohesive design that complements your overall outdoor aesthetic. Here are some ideas:
- Colorful containers: Consider using vibrant and eye-catching containers that match the color palette of your plants. This will create a visually pleasing contrast and make your window box stand out.
- Ornamental accents: Spice things up by adding ornamental accents such as small statues, decorative stones, or colorful plant markers.
- Seasonal decoration: Change up your window box décor with the seasons. Add miniature pumpkins and gourds for fall, festive ornaments for winter, or colorful blooms for spring and summer.
- Accessorize with trailing vines: Introduce trailing vines like ivy or sweet potato vine to add a touch of whimsy and create a flowing, cascading effect.
Remember, the key is to reflect your personal style and create a look that brings joy every time you see your window box planters. So get creative, experiment, and enjoy the process of enhancing the look of your window box planters.
Troubleshooting Common Issues
While installing window box planters can be a rewarding experience, it’s essential to be prepared for potential challenges that may arise. In this section, we will address some common issues and provide effective solutions. By understanding how to deal with drainage problems and prevent pests and diseases, you can ensure the longevity and health of your window box planters.
Dealing with drainage problems
Proper drainage is crucial for healthy plants in window box planters. Without adequate drainage, excess water can accumulate, leading to root rot and other potential issues. Here are a few tips to help you overcome drainage problems:
- Choose the right planter material: Opt for planters made of porous materials such as clay or natural fibers. These materials allow water to escape and prevent waterlogged soil.
- Add drainage holes: If your window box planter doesn’t have drainage holes, it’s important to create some. Use a drill to make small holes along the bottom of the planter. This will allow excess water to escape.
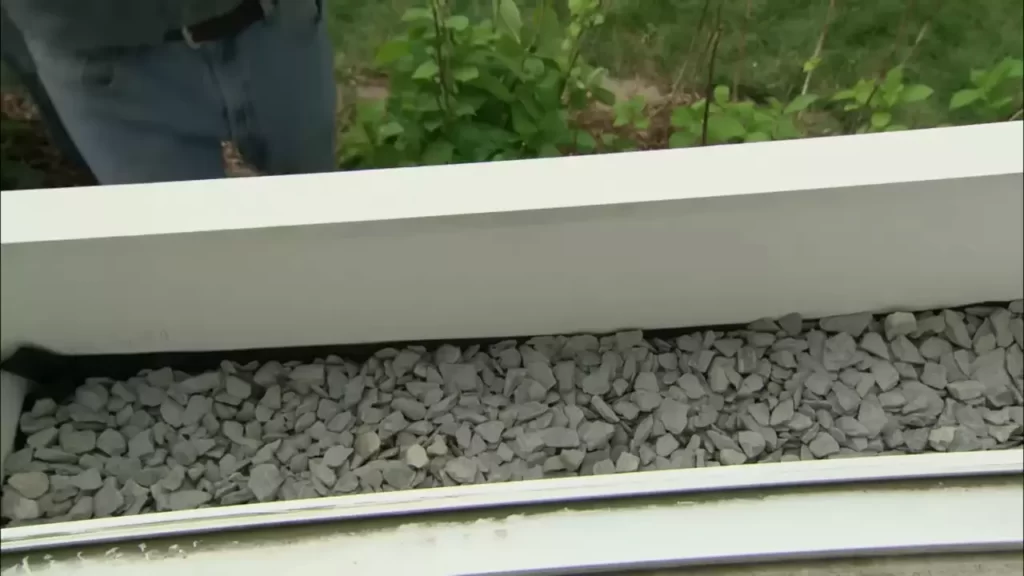
- Use a drainage layer: To further enhance drainage, place a layer of rocks or gravel at the bottom of your planter before adding soil. This layer will help prevent water from accumulating at the bottom.
- Monitor watering: Avoid overwatering your plants as this can lead to waterlogged soil. Check the moisture level regularly by sticking your finger into the soil. Only water when the top inch of the soil feels dry.
Preventing pests and diseases in window box planters
Pests and diseases can quickly take a toll on your window box planters if not addressed promptly. Here are some preventive measures to ensure your plants stay healthy:
- Clean and sanitize: Regularly clean your window box planters by removing any fallen leaves or debris. Sanitize the planters using a mild bleach solution to kill bacteria and fungi.
- Choose disease-resistant plants: Select plants that are known to be resistant to common diseases in your area. This will decrease the risk of infection and minimize the need for chemical interventions.
- Implement companion planting: Some plants naturally repel pests, while others attract beneficial insects that prey on pests. Consider incorporating companion plants like marigolds or basil to deter pests naturally.
- Inspect regularly: Regularly inspect your plants for signs of pests or diseases, such as discoloration, wilting, or chewed leaves. Early detection can help prevent further damage.
- Encourage air circulation: Proper airflow can reduce the likelihood of fungal diseases. Avoid overcrowding your plants and ensure they have sufficient space to breathe.
By troubleshooting common issues related to drainage, pests, and diseases, you can enjoy thriving and beautiful window box planters. Implement these tips to maintain the overall health and vitality of your plants.
Frequently Asked Questions For How To Install Window Box Planters
How Do You Secure A Window Sill Planter?
To secure a window sill planter, follow these steps:
1. Start by measuring the width of your windowsill.
2. Choose a planter that fits securely on the sill without any overhang.
3. Consider using adhesive hooks or brackets to anchor the planter to the window frame.
4. Ensure the planter is properly balanced and stable before adding plants or soil.
5. Regularly check the stability of the planter and make adjustments as needed.
How Deep Should A Window Planter Box Be?
A window planter box should be at least 6-8 inches deep to accommodate the root system of most plants. This depth allows for proper drainage and promotes healthy plant growth.
Do Window Flower Boxes Need Drainage Holes?
Yes, window flower boxes need drainage holes. These holes allow excess water to escape, preventing root rot and ensuring proper drainage for healthy plant growth. Without drainage holes, water can accumulate in the box, leading to waterlogged soil and potential damage to the plants.
How Do You Support A Window Box?
Supporting a window box is essential for its stability. You can use brackets or corbels to secure it to the wall, ensuring it can bear the weight. Additionally, using a sturdy material like wrought iron or wood can provide added support.
Remember to regularly check and maintain the support to keep your window box secure.
Conclusion
Installing window box planters is a simple and effective way to add beauty and greenery to your home. By following these step-by-step instructions, you can create a stunning display that enhances your curb appeal. Remember to choose the right materials, properly prepare the area, and select the right plants for your climate.
With a little time and effort, you can enjoy the benefits of window box planters year-round. So, go ahead and transform your windows into a vibrant showcase of nature’s beauty!