To install vinyl soffit, measure and cut the panels to fit, attach the J-channel and F-channel, and secure the soffit panels in place with screws or nails. Vinyl soffit is a popular choice for finishing the underside of eaves and porch ceilings.
Not only does it improve the appearance of your home, but it also provides ventilation and protects against moisture damage. Installing vinyl soffit is a relatively simple process that can be done with a few tools and some basic carpentry skills.
In this guide, we will walk you through the steps to install vinyl soffit to enhance the exterior of your home.
Factors To Consider When Selecting Vinyl Soffit
Selecting the right vinyl soffit is crucial for a successful installation. There are several factors that you should take into consideration to ensure you choose a product that not only meets your needs but also enhances the appearance and durability of your home. From material quality to color options, each aspect plays a significant role in the overall outcome. Let’s dive deeper into these factors to make an informed decision when it comes to installing vinyl soffit.
Material Quality
The material quality of the vinyl soffit you choose is of utmost importance. It determines the durability, strength, and longevity of the product. When selecting vinyl soffit, opt for high-quality materials that are resistant to cracking, warping, and fading. Look for soffit panels made from premium-grade vinyl that can withstand the elements and offer exceptional performance over time. Investing in a superior quality material ensures that your vinyl soffit will last for years to come.
Style and Design Options
Another factor to consider is the style and design options available for vinyl soffit. Choose a style that complements the architecture and aesthetics of your home. Whether you prefer a traditional, contemporary, or modern look, there are various styles and designs to choose from. Consider the overall theme of your home’s exterior, such as the siding and trim, to ensure that the soffit seamlessly integrates and enhances the visual appeal of your property.
Color Options
Color plays a significant role in the overall appearance of your home. When selecting vinyl soffit, consider the color options available. Choose a color that harmonizes with the existing exterior elements of your home, such as the siding, fascia, and roof. Additionally, think about your preferences and the desired curb appeal you want to achieve. Whether you prefer bold, vibrant hues or more subtle, neutral tones, select a color that enhances the overall aesthetics of your home.
Soffit Ventilation
Ventilation is a crucial aspect of a well-functioning home. Consider the soffit ventilation options when selecting vinyl soffit. Look for products that provide proper airflow and ventilation to prevent moisture buildup and keep your home’s interior comfortable. Ensure that the vinyl soffit you choose has built-in vents or offers compatibility with separate vent systems. Adequate ventilation helps maintain the structural integrity of your home and prevents issues such as mold and mildew growth.
Budget Considerations
Lastly, it’s essential to consider your budget when selecting vinyl soffit. Determine how much you are willing to invest in the project and find a product that aligns with your budget. Consider the long-term benefits and value that the vinyl soffit will bring to your home. Remember, higher quality materials and additional features may come with a slightly higher initial cost, but they can save you money in the long run by reducing maintenance and replacement expenses.
By taking these factors into consideration, you can confidently choose the right vinyl soffit for your home. Remember to prioritize material quality, explore style and design options, consider the available color choices, ensure proper ventilation, and account for your budget. With the right selection, your vinyl soffit installation will not only improve the aesthetics of your home but also provide long-lasting durability and functionality.
Essential Tools For Vinyl Soffit Installation
Installing vinyl soffit is a great way to enhance the appearance and functionality of your home’s exterior. However, to ensure a successful installation process, you will need a few essential tools. In this section, we will explore the must-have tools for a smooth vinyl soffit installation.
Tape Measure
One of the most basic yet critical tools for vinyl soffit installation is a tape measure. You will use it to accurately measure the length and width of the soffit panels, ensuring a precise fit. This tool is an absolute necessity to prevent any unnecessary errors or gaps between the panels.
Circular Saw or Jigsaw
A circular saw or jigsaw will come in handy when it’s time to cut the vinyl soffit panels to the required length. These power tools offer precision and efficiency, enabling you to make clean and accurate cuts. Just be sure to use the appropriate blade designed for cutting vinyl material.
Utility Knife
A utility knife is another essential tool for vinyl soffit installation. It will be useful for scoring and cutting the soffit panels, especially when dealing with smaller sections or intricate cuts. Having a sharp utility knife ensures clean edges and facilitates a seamless installation process.
Drill with Bits
A drill with bits is necessary for attaching the soffit panels to the underlying surface. Make sure to have a variety of drill bits on hand, including ones suitable for the type of material you will be drilling into. This tool will allow you to securely fasten the panels, ensuring they stay in place even in challenging weather conditions.
Ladder or Scaffolding
A sturdy ladder or scaffolding is crucial to reach the elevated areas where the vinyl soffit installation will take place. Safety should always be a priority, so choose a ladder or scaffolding that provides stability and support while working at heights. Consider the height and accessibility of your project when deciding which option is most suitable.
Safety Equipment: Gloves, Safety Glasses, Ear Protection
Lastly, it’s essential to prioritize safety by using gloves, safety glasses, and ear protection. Gloves will protect your hands from cuts and ensure a firm grip, while safety glasses shield your eyes from debris. Additionally, ear protection will help reduce exposure to loud noises that may occur during the installation process.
By having these essential tools at your disposal, you’ll be well-prepared for a successful vinyl soffit installation. Remember to prioritize safety at all times and take the necessary precautions to ensure a seamless and aesthetically pleasing result.

Required Materials For Vinyl Soffit Installation
When it comes to installing vinyl soffit, it’s essential to have all the necessary materials on hand. This will ensure a smooth and efficient installation process, resulting in a beautiful finished product. In this section, we will discuss the various materials you will need to successfully install vinyl soffit.
Vinyl Soffit Panels
The first and most important material required for vinyl soffit installation is the vinyl soffit panels themselves. These panels come in a variety of styles and colors, allowing you to choose the one that best matches your home’s exterior. Be sure to measure accurately and purchase enough panels to cover the entire length of your soffit area.
Fascia Trim
In addition to the vinyl soffit panels, you will also need fascia trim. This trim is installed along the edge of the soffit, providing a clean and finished appearance. Fascia trim is available in different widths and styles, so be sure to choose one that complements your overall aesthetic.
F-Channel
The next material you will need is F-channel, which is used to secure the soffit panels to the underside of the roof eave. The F-channel acts as a support system, ensuring that the panels remain securely in place. Measure the length of your roof eave and purchase enough F-channel to cover the entire area.
J-Channel
In addition to F-channel, you will also need J-channel for the sides of your soffit. J-channel is installed vertically along the sides, providing a secure edge for the soffit panels to attach to. Measure the height of your soffit area and purchase enough J-channel to cover the entire height.
Nails or Screws
When it comes to securing the vinyl soffit panels and trim, you will need nails or screws. These fasteners are used to attach the panels to the F-channel and the trim to the soffit. Be sure to choose nails or screws that are corrosion-resistant and designed specifically for vinyl soffit installation.
Vinyl Soffit Vents
Lastly, if your soffit area requires ventilation, you will need vinyl soffit vents. These vents allow air to flow freely through the soffit, preventing moisture buildup and maintaining proper ventilation. Measure the area that requires ventilation and choose the appropriate size and quantity of vinyl soffit vents.
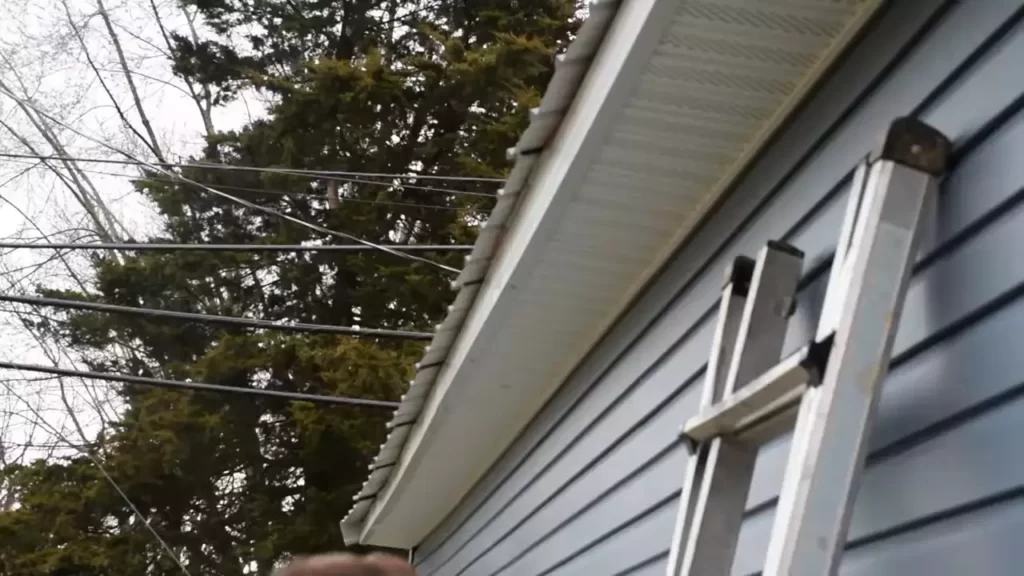
Inspecting And Repairing The Existing Soffit
When it comes to installing vinyl soffit, the first step is to inspect and repair the existing soffit. Inspecting the condition of the soffit will help you identify any damaged areas that need to be addressed before proceeding with the installation. By doing this, you ensure that the new vinyl soffit will be installed on a solid foundation, resulting in a longer-lasting and aesthetically pleasing finish.
Identifying Damaged Areas
Before you start removing the existing soffit, it’s important to identify any damaged areas that require attention. Take a close look at the soffit to check for signs of rot, water damage, or separation. Look for discoloration, peeling paint, or any visible gaps between the soffit panels. These are indicators of potential issues that need to be addressed before proceeding with the installation. It’s important to note down the specific locations of the damaged areas so that you can focus on repairing or replacing them later on.
Removing and Replacing Damaged Soffit
After identifying the damaged areas, the next step is to remove the old soffit and replace it with new panels. To begin, carefully remove any trim or molding that may be covering the edges of the soffit panels. Using a pry bar or a similar tool, gently pry off the damaged soffit panels one by one. Be cautious not to damage the surrounding materials or the fascia board during this process. Once the damaged panels are removed, measure the size needed for the replacements, ensuring a proper fit. Cut the new soffit panels according to the measurements and insert them in place, securing them properly using appropriate fasteners and following the manufacturer’s instructions. Repeat this process for all the damaged sections until the entire soffit is repaired and ready for the installation of the vinyl soffit.
Repairing Fascia Board
In addition to replacing the damaged soffit, it’s necessary to inspect and repair the fascia board if it shows any signs of wear or damage. The fascia board is an important component that provides support for the soffit and ensures a secure installation. To repair the fascia board, start by removing any rotted or weakened sections. Cut out the damaged areas and replace with new boards of matching size and material. Ensure that the new fascia boards are properly attached and aligned before proceeding with the installation of the vinyl soffit. This step is essential in maintaining the structural integrity of the soffit system and preventing any potential issues in the future.
By meticulously inspecting and repairing the existing soffit, you lay the foundation for a successful vinyl soffit installation. Taking the time to address any damaged areas and repair the fascia board ensures a sturdy base for the new soffit and contributes to the overall longevity and aesthetics of your property.

Cleaning And Measuring The Installation Area
One important step in installing vinyl soffit is to clean and measure the installation area properly. This ensures that the soffit panels fit accurately and provide a clean and seamless look to your home. In this section, we will go through the process of removing debris, measuring the length and width of the soffit, and determining the number of panels required.
Removing Debris
Before installing vinyl soffit, it is crucial to remove any debris or dirt from the installation area. This will ensure that the soffit adheres properly and avoids any issues later on. Follow these steps to clean the area:
- Start by carefully inspecting the soffit area and remove any loose or protruding nails.
- Use a broom or a brush to sweep away any dust, dirt, or cobwebs from the area. Make sure to reach all corners and edges of the soffit.
- If there are any stubborn stains or marks, you can use a mild detergent and water solution to gently clean the area. Rinse thoroughly and let it dry completely before proceeding with the installation.
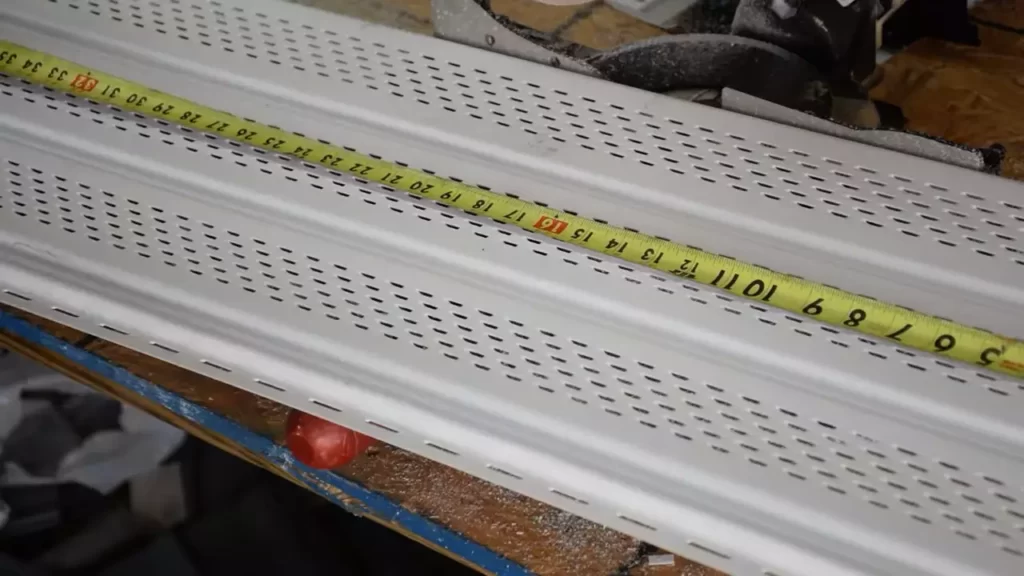
Measuring the Length and Width of the Soffit
Accurate measurements are essential for a successful installation of vinyl soffit. Follow these steps to measure the length and width:
- Using a tape measure, measure the length of the soffit area from one end to the other. Take note of the measurement in inches.
- Next, measure the width of the soffit area from the bottom edge to the eave. Again, note down the measurement in inches.
Determining the Number of Panels Required
Once you have the measurements, you can calculate the number of panels required for the installation. Here’s how:
- Divide the length measurement by the width of the soffit panel to determine the number of panels needed horizontally.
- Round up the result to the nearest whole number to ensure you have enough panels to cover the entire length.
- For the number of panels needed vertically, divide the width measurement by the width of the soffit panel and round up to the nearest whole number.
- Multiply the number of panels needed horizontally by the number of panels needed vertically to get the total number of panels required for the installation.
By properly cleaning and measuring the installation area, you set the foundation for a successful vinyl soffit installation. This ensures that the panels fit accurately and provide a clean and polished look to your home’s exterior.
Installing The F-Channel And J-Channel
When it comes to installing vinyl soffit, one crucial step is attaching both the F-Channel and J-Channel. These channels play a significant role in ensuring a secure and clean installation. In this guide, we will walk you through the process of attaching the F-Channel to the fascia board and the J-Channel to the sides of the house.
Attaching the F-Channel to the Fascia Board
The F-Channel acts as a receiver for the soffit panels, providing them with a sturdy base. Here’s how you can attach the F-Channel to the fascia board:
- Clean the fascia board thoroughly, removing any dirt or debris that could interfere with the installation.
- Measure the length of the fascia board and cut the F-Channel to fit accordingly.
- Align the F-Channel along the bottom edge of the fascia board, ensuring it sits flush and level.
- Secure the F-Channel in place using stainless steel screws, making sure to leave some space for expansion and contraction of the vinyl soffit.
By securely attaching the F-Channel, you create a solid foundation for the soffit panels, preventing any sagging or damage in the future.
Attaching the J-Channel to the Sides of the House
The J-Channel acts as a receiver for the vertical edges of the soffit panels, providing them with support and a finished look. Here’s how you can attach the J-Channel to the sides of your house:
- Clean the area where the J-Channel will be installed, ensuring there is no debris or obstructions.
- Measure and cut the J-Channel to the appropriate length, allowing for a slight overlap at the corners.
- Place the J-Channel vertically against the wall, aligning it with the bottom edge of the soffit panel.
- Secure the J-Channel in place using nails or screws, ensuring it is level and securely attached.
Attaching the J-Channel to the sides of your house provides a neat and professional appearance while holding the soffit panels securely in place.
By following these steps, you can successfully install the F-Channel and J-Channel, providing a strong foundation and professional finish to your vinyl soffit installation.
Cutting And Installing The Vinyl Soffit Panels
If you’re looking to enhance the exterior of your home and provide it with a clean and finished look, installing vinyl soffit panels is a great option. Not only do these panels add aesthetic appeal, but they also serve a functional purpose by protecting the underlying structure of your roof. In this section, we will guide you through the process of cutting and installing vinyl soffit panels, ensuring a seamless and professional finish.
Measuring and Marking the Panels
The first step in installing vinyl soffit panels is to measure and mark the panels accurately. This ensures a precise fit and minimizes the need for excessive cutting. Follow these steps:
- Start by measuring the length of the area where the soffit panel will be installed. Use a tape measure and record the measurements to the nearest inch.
- Next, mark the measured length on the backside of the soffit panel using a pencil. Make sure to mark both the top and bottom edges of the panel.
- Repeat this process for each panel that needs to be installed, ensuring each one is marked correctly.
Cutting the Panels to Size
Once you have marked the panels, it’s time to cut them to the appropriate size. Follow these steps:
- Using a utility knife or tin snips, carefully cut along the marked lines on the backside of the soffit panel. Make sure to apply steady pressure and keep the tool in a straight line.
- Continue cutting until the panel is separated into the desired size.
- Repeat this process for each panel, ensuring they are all cut to the correct measurements.
Inserting the Panels into the Channels
With the panels cut to size, it’s now time to insert them into the channels. Follow these steps:
- Begin by inserting one end of the soffit panel into the corresponding channel. Apply gentle pressure and ensure the panel slides smoothly into place.
- Once one end is in, carefully bend the panel and insert the other end into the opposite channel.
- Work your way along the length of the panel, making sure each section is securely inserted into the channels.
- Repeat this process for each panel until the entire area is covered.
Congratulations! You have successfully cut and installed vinyl soffit panels. By following these steps, you can achieve a professional finish while enhancing the exterior of your home. Now, your home is not only protected but also looks fantastic!

Installing Fascia Trim
Fascia trim is an essential component in the installation of vinyl soffit. It not only provides a clean and finished look to your home’s exterior, but it also serves to protect the soffit and eaves from weather damage. In this section, we will guide you through the process of cutting and fitting the fascia trim and securing it with nails or screws. By following these steps, you can ensure a professional-looking installation that will enhance the overall appeal of your home.
Cutting and Fitting the Fascia Trim
The first step in installing fascia trim is to accurately measure and cut the pieces to the appropriate length. Using a tape measure, carefully measure the length of the soffit area where the trim will be installed. It is important to make precise measurements to ensure a snug fit and a clean appearance.
Once you have determined the correct length, mark the trim board with a pencil or marker. To make a straight cut, you can use a circular saw, a miter saw, or a hand saw, depending on your preference and the tools available to you. Ensure that you wear appropriate safety goggles and gloves while cutting the trim.
After cutting the fascia trim to the desired length, the next step is to fit it into place. Start by positioning the trim board against the soffit, ensuring that it is aligned and level. Adjust the trim as needed to ensure a precise fit. It may be necessary to make additional cuts or adjustments to achieve the desired fit.
Securing the Trim with Nails or Screws
Once the fascia trim is properly fitted, it is time to secure it in place. There are two main options for fastening the trim: nails or screws. To determine which option is best for your installation, consider the specific requirements of your project and the recommendations of the manufacturer.
To secure the trim with nails, use a hammer and galvanized nails. Drive the nails through the trim and into the underlying structure, making sure to space them evenly. Be careful not to overdrive the nails, as this can cause damage to the trim. If using screws, pre-drill the holes to prevent splitting of the trim and ensure a secure fastening.
Regardless of your chosen method, it is important to use the appropriate size and type of fasteners to ensure a proper and long-lasting installation. Consult the manufacturer’s guidelines for specific recommendations.
By following these steps for cutting and fitting the fascia trim, as well as securing it with nails or screws, you can achieve a professional-looking installation of vinyl soffit. Taking the time to accurately measure, cut, and secure the trim will result in a finished appearance that enhances the aesthetic appeal and weather resistance of your home.
Installing Soffit Vents
When it comes to installing vinyl soffit, one crucial aspect is ensuring proper ventilation. Soffit vents play a vital role in allowing air to flow in and out of your attic, preventing moisture buildup and protecting your home from potential damage. In this guide, we will walk you through the process of installing soffit vents, including determining the number and placement of vents, cutting holes for the vents, and finally, installing the vents in the soffit panels.
Determining the Number and Placement of Vents
The first step in installing soffit vents is determining how many vents you will need and where to place them. The number of vents required depends on the size of your attic and the type of ventilation system you have. As a general rule of thumb, it is recommended to have at least one square foot of ventilation area per 150 square feet of attic space.
Here’s a simple method to calculate the number of vents needed:
- Measure the length and width of your attic space in feet.
- Multiply the length by the width to get the total square footage.
- Divide the total square footage by 150 to determine the minimum required ventilation area.
- Based on the size and type of vent you plan to install, calculate the number of vents required to meet the minimum ventilation area.
Once you have determined the number of vents, the next step is to decide on their placement. Placement plays a crucial role in ensuring proper airflow throughout your attic. It is recommended to install vents evenly on both sides of your home to promote balanced ventilation. Additionally, consider strategically placing vents near the eaves and the ridge for optimal air circulation.
Cutting Holes for the Vents
Now that you have determined the number and placement of vents, it’s time to cut holes for the vents in the soffit panels. Here’s a step-by-step process for cutting holes:
- Measure and mark the locations for the vent holes on the soffit panels, based on the previously determined placement.
- Use a drill to create starter holes at the marked locations.
- With the help of a jigsaw or a hole saw, carefully cut along the marked lines to create the vent holes.
- Remove any excess material and smooth the edges of the vent holes using sandpaper or a file.
Maintain caution when cutting the holes to prevent any damage to the surrounding soffit panels and ensure precise cuts for a clean and professional finish.
Installing the Vents in the Soffit Panels
Once the vent holes are cut, it’s time to install the vents into the soffit panels. Here’s how you can do it:
- Align the vents with the holes, ensuring they fit securely.
- Apply a bead of caulking around the edges of the vent to create a watertight seal.
- Secure the vents in place by using screws or nails, following the manufacturer’s instructions.
- Repeat the process for all the remaining vent holes.
After installing all the vents, perform a visual inspection to ensure they are securely in place and there are no gaps or loose edges. Properly installed vents will allow air to flow freely while keeping moisture and pests out.
Installing soffit vents is a critical step in maintaining a well-ventilated attic and protecting your home from potential issues. By following these steps, you can ensure a successful installation and enjoy the benefits of proper ventilation for years to come.
Inspecting The Installation
Checking for Proper Fit and Alignment
Once you have gathered all the necessary tools and materials for your vinyl soffit installation, the next step is to inspect the installation area to ensure a proper fit and alignment. Checking for proper fit is essential since any gaps or misalignments can compromise the overall effectiveness and aesthetics of your soffit. Here’s what you need to do:
- Measure the dimensions of the area where you will be installing the vinyl soffit. This will help you determine the required size and quantity of materials needed.
- Inspect the existing soffit or fascia for any signs of damage, rot, or decay. It’s crucial to address these issues before installing the new soffit to ensure a sturdy and durable installation.
- Ensure that the surface where the soffit will be installed is clean and free from any debris, dirt, or loose paint. A smooth and even surface will provide better adhesion and prevent potential problems in the future.
- Take the time to examine the condition of the surrounding structures, such as gutters or downspouts. It’s important to identify any potential obstructions or interferences that may affect the installation process or compromise the functionality of the soffit.
- Double-check the alignment of the soffit panels with the fascia board or wall. The panels should be level and parallel to the ground for a visually appealing and seamless appearance. Use a level tool to ensure an accurate alignment.
Ensuring Adequate Ventilation
In addition to checking for fit and alignment, it is crucial to ensure adequate ventilation for your vinyl soffit installation. Proper ventilation helps prevent moisture buildup, mold growth, and other potential issues. Follow these tips for ensuring adequate ventilation:
- Inspect the existing ventilation system in your attic or eaves. Make sure there are no obstructions or blockages that could impede the airflow.
- Consider installing or replacing soffit vents to promote efficient airflow. Soffit vents allow fresh air to enter and stale air to exit, preventing moisture buildup in the attic or eaves.
- Calculate the required number of soffit vents based on the size and layout of your installation area. This will help ensure adequate air circulation and ventilation.
- Place the soffit vents evenly along the installation area, spacing them appropriately according to the manufacturer’s recommendations.
- Inspect the vents regularly after installation to ensure they remain free from debris, dust, or any other blockages that could hinder proper ventilation.
By thoroughly inspecting the installation area for proper fit and alignment, as well as ensuring adequate ventilation, you can ensure a successful vinyl soffit installation that not only enhances the beauty of your home but also provides long-lasting protection from the elements.
Maintenance Tips For Vinyl Soffit
Vinyl soffit is a popular choice for many homeowners due to its durability, low maintenance requirements, and aesthetic appeal. To ensure that your vinyl soffit remains in optimal condition, it is important to perform regular maintenance tasks. Here are some essential maintenance tips to keep your vinyl soffit looking its best:
Cleaning the Soffit
Regularly cleaning your vinyl soffit is crucial to prevent the buildup of dirt, dust, and mold, which can greatly impact its appearance. To clean your soffit, follow these steps:
- Start by removing any loose debris using a soft-bristle brush or a handheld broom.
- Next, mix a solution of mild detergent and warm water.
- Dip a soft cloth or sponge in the solution and gently scrub the soffit, paying close attention to any heavily soiled areas.
- Rinse the soffit thoroughly with a garden hose, ensuring that all soap residue is removed.
- Allow the soffit to air dry completely before proceeding.
Inspecting for Damage and Repairing as Needed
Regular inspection of your vinyl soffit is essential to identify any signs of damage or wear. By identifying and addressing issues early on, you can prevent further damage and increase the longevity of your soffit. Follow these steps to inspect and repair your vinyl soffit:
- Visually inspect the soffit for any cracks, holes, or areas of discoloration.
- If you notice any damage, mark the area for repair.
- Prepare a vinyl caulking compound according to the manufacturer’s instructions.
- Apply the caulking compound to the damaged area, ensuring complete coverage.
- Smooth the caulking compound using a putty knife or a similar tool.
- Allow the compound to dry completely before painting or applying any other finishes.
By following these maintenance tips for your vinyl soffit, you can keep it looking its best and prolong its lifespan. Regular cleaning and inspection will help prevent costly repairs and ensure that your home maintains its beautiful exterior.
Frequently Asked Questions On How To Install Vinyl Soffit
How Is Vinyl Soffit Installed?
To install vinyl soffit, first, start by measuring and cutting the soffit panels according to the dimensions. Then, secure the panels to the soffit with nails or screws. Make sure to overlap the panels for proper water drainage. Finally, install the trim pieces to complete the precise installation.
What Holds Vinyl Soffit In Place?
Vinyl soffit is held in place by an installation system that utilizes channels, clips, or nails. These components secure the soffit to the underside of the eaves or overhangs of a building. They provide stability and ensure that the vinyl soffit remains securely in place.
How Do You Install Vinyl Soffit With J Channel?
To install vinyl soffit with J channel, follow these steps:
- Measure and cut the soffit panels to fit.
- Install the J channel along the perimeter of the soffit area.
- Attach the soffit panels into the J channel by sliding them in and locking them into place.
- Use nails or screws to secure the panels.
- Repeat the process until all panels are installed.
Can I Staple Vinyl Soffit?
Yes, you can staple vinyl soffit.
Conclusion
To properly install vinyl soffit, follow the step-by-step guide provided in this blog post. By taking the time to carefully execute each instruction, you can ensure a seamless installation process. Remember to accurately measure, properly cut, and securely attach the soffit to achieve a durable and visually appealing result.
With the right tools and techniques, you can successfully complete this project and enhance the overall look and functionality of your home’s exterior.