To install an under cabinet microwave, watch a concise video guide that provides accurate step-by-step instructions. In the video, you’ll learn how to mount the microwave securely, connect the electrical wiring, and ensure proper ventilation.
This comprehensive tutorial will help you install your under-cabinet microwave with ease.
Preparing The Space And Gathering The Necessary Tools
Before installing an under cabinet microwave, it is important to prepare the space and gather the necessary tools. This ensures a smooth and efficient installation process. In this section, we will guide you through the steps of measuring the available space, ensuring proper electrical outlets and ventilation, as well as gathering the tools and materials needed for the installation.
Measuring the available space
The first step in installing an under cabinet microwave is to accurately measure the available space. This will help you determine the appropriate size and model of microwave that will fit seamlessly into your kitchen. To do this, follow these simple steps:
- Clear the area: Remove any items or clutter from the cabinet space where the microwave will be installed. This will give you a clear and accurate measurement.
- Measure the width: Use a tape measure to measure the width of the space horizontally. Measure the distance between the two side walls or the inner edges of the cabinets.
- Measure the height: Measure the height of the space vertically. Measure from the bottom of the cabinet to the bottom of the cabinet above it.
- Measure the depth: Measure the depth of the space from the back wall to the front of the cabinet.

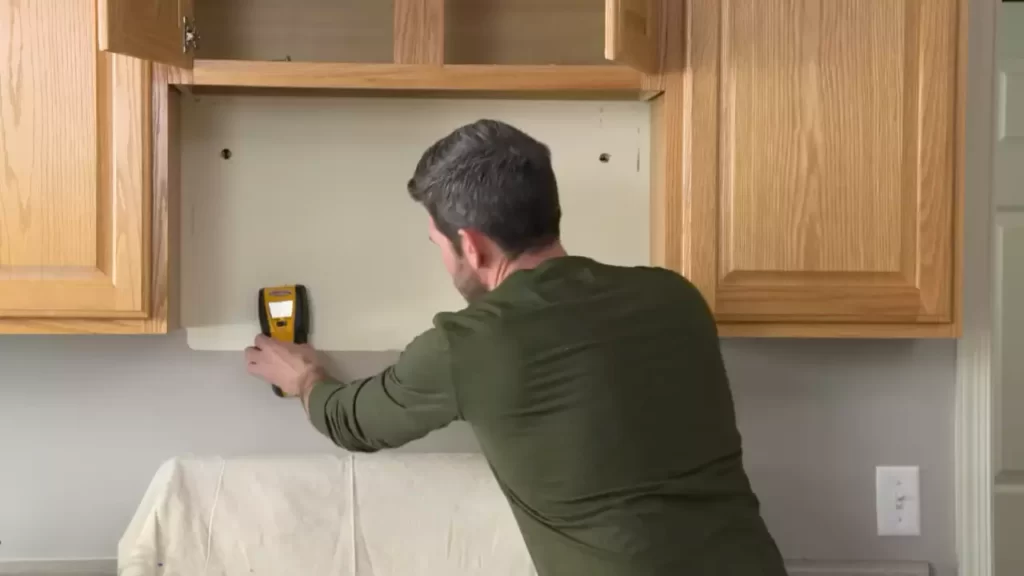
Ensuring proper electrical outlets and ventilation
Proper electrical outlets and ventilation are essential for the safe and efficient operation of an under cabinet microwave. Here are some important considerations:
- Electrical outlets: Make sure there is a nearby electrical outlet with the appropriate voltage for your microwave. If there isn’t one, you may need to hire an electrician to install a new outlet.
- Ventilation: Microwaves generate heat during operation, so it’s important to have proper ventilation. Ensure that there is enough space around the microwave for air to circulate and dissipate heat. If necessary, consider installing a vent hood or using a microwave with built-in ventilation.
Gathering tools and materials needed for the installation
To ensure a smooth installation process, it’s important to gather all the necessary tools and materials beforehand. Here’s a list of items you may need:
| Tools | Materials |
|---|---|
| Screwdriver set | Under cabinet mounting kit |
| Tape measure | Electrical supplies (if needed) |
| Pencil or marker | Mounting brackets |
| Level | Power drill |
| Stud finder | Hardware (nuts, bolts, screws) |
| Drywall anchors | Exhaust vent (if required) |
Having these tools and materials ready will save you time and hassle during the installation process. Make sure you have everything on hand before you begin.
By following these steps and ensuring you have the proper tools and materials, you will be well-prepared to install your under cabinet microwave with ease. In the next section, we will cover the actual installation process in detail.
Removing The Existing Microwave (If Applicable)
Unplugging and Disconnecting the Old Microwave
Before you can begin the process of installing your new under cabinet microwave, you’ll need to remove the existing one, if applicable. The first step in this process is to unplug and disconnect the old microwave. This ensures your safety and prevents any electrical mishaps during the removal.
To do this, locate the power cord of the microwave and unplug it from the electrical outlet. Inspect the cord for any signs of damage, such as fraying or exposed wires. If you notice any issues, consider replacing the cord before proceeding with the removal.
Next, you’ll need to disconnect the microwave from its power source. This may involve turning off the circuit breaker that supplies power to the microwave. Consult your electrical panel to identify the correct circuit breaker and switch it off.
Removing Mounting Brackets and Screws
Once the old microwave is safely disconnected from the power source, it’s time to remove the mounting brackets and screws that are securing it in place. These brackets are typically located at the top and bottom of the microwave.
To access the mounting brackets, carefully remove the microwave’s front grille if it has one. Check the manufacturer’s instructions for specific details on how to remove the grille for your particular model.
Once the grille is removed, you’ll be able to see the mounting brackets. Use a screwdriver or wrench to loosen and remove the screws that are holding the brackets in place. Be sure to keep track of the screws, as you’ll need them later when installing your new microwave.
After removing the screws, gently lift the old microwave up and away from its mounting brackets. It’s important to use caution during this step, as the microwave can be heavy and you don’t want it to accidentally fall.
Before proceeding with the installation of your new under cabinet microwave, take a moment to ensure the area is clean and free from any debris or dust left behind from the removal process.
Now that you’ve successfully removed the existing microwave, you’re one step closer to installing your new under cabinet microwave. Stay tuned for the next section of this blog post, where we’ll guide you through the process of properly installing your new microwave.
Installing The Mounting Plate And Template For The New Microwave
One of the crucial steps in installing an under cabinet microwave is properly mounting the mounting plate and using the template to mark drill holes. This ensures that the microwave is securely attached to the underside of the cabinet, allowing for safe and efficient operation. In this section, we will guide you through the process of positioning the mounting plate correctly, using the template to mark drill holes, and drilling pilot holes for the mounting plate.
Positioning the Mounting Plate Correctly
To begin with, you need to accurately position the mounting plate to ensure the microwave fits snugly beneath the cabinet. Follow these steps:
- Clean the underside of the cabinet surface to remove any dirt or debris.
- Hold the mounting plate against the cabinet, making sure it is centered and level. You can use a level tool to achieve a balanced position.
- Mark the mounting holes on the underside of the cabinet using a pencil or marker. These marks will serve as reference points when drilling the pilot holes.
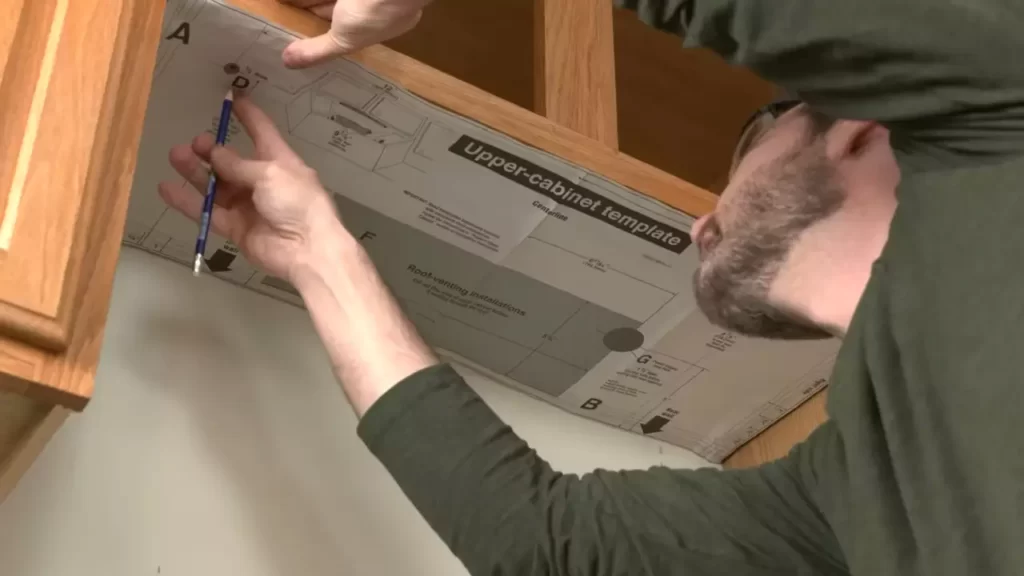
Using the Template to Mark Drill Holes
Once the mounting plate is positioned correctly, you can move on to using the template provided with your new microwave to mark the drill holes. Follow these instructions:
- Retrieve the template from the microwave’s packaging.
- Align the template with the mounting plate, ensuring that it is centered and level.
- Secure the template in place using tape or adhesive, making sure it doesn’t shift during the marking process.
- Using a pencil or marker, mark the drill holes indicated on the template onto the cabinet surface. These marks will guide you in drilling the pilot holes accurately.
Drilling Pilot Holes for the Mounting Plate
Now that you have marked the drill holes, you can proceed to drill pilot holes for the mounting plate. Here’s how:
- Select an appropriate drill bit size for the pilot holes. Refer to the manufacturer’s instructions for the recommended size.
- Securely attach the drill bit to your power drill.
- Position the drill bit at one of the marked drill hole points and slowly drill into the cabinet surface.
- Repeat this process for each marked drill hole.
By drilling pilot holes, you are preparing the cabinet surface for the mounting screws, ensuring a secure and stable installation of the under cabinet microwave.
With the mounting plate securely positioned and the pilot holes drilled, you are now ready to move on to the next step of installing your under cabinet microwave. Stay tuned for our next section on attaching the microwave to the mounting plate and completing the installation process!

Mounting The Microwave
When it comes to installing an under cabinet microwave, one of the most important steps is mounting it securely. This ensures the microwave is stable and safe to use in your kitchen. In this section, we will guide you through the process of attaching the mounting plate, lifting the microwave onto the plate, and fastening it securely using screws.
Attaching the mounting plate securely to the cabinet or wall
To mount the microwave, start by attaching the mounting plate securely to either the cabinet or the wall. The mounting plate is usually included with the microwave and may come in different sizes and designs. Follow the manufacturer’s instructions to determine the best placement and installation method for your specific model.
Here are the general steps to attach the mounting plate:
- Measure and mark the desired location for the mounting plate.
- Use a level to ensure the plate is perfectly horizontal.
- Securely attach the plate using screws or other provided hardware. Refer to the manufacturer’s instructions for the recommended screw size and type.
- Double-check the stability of the mounting plate to ensure it can support the weight of the microwave.
Lifting the microwave onto the mounting plate
Once the mounting plate is securely attached, it’s time to lift the microwave onto the plate. This step may require assistance from another person, especially if the microwave is heavy.
Follow these steps to lift the microwave onto the mounting plate:
- Ensure the microwave is disconnected from the power source to avoid any electrical hazards.
- Carefully lift the microwave, positioning it in front of the mounting plate.
- Align the holes or slots on the back of the microwave with the corresponding tabs or brackets on the mounting plate.
- Slowly and evenly slide the microwave onto the mounting plate, ensuring it is properly aligned.
Fastening the microwave to the mounting plate using screws
With the microwave in place on the mounting plate, the final step is to fasten it securely using screws. This ensures the microwave stays in position and doesn’t move or fall while in use.
Here’s how to fasten the microwave to the mounting plate using screws:
- Check the manufacturer’s instructions for the recommended screw size and type.
- Insert the screws through the holes or slots in the microwave and into the tabs or brackets on the mounting plate.
- Tighten the screws using a screwdriver or drill, but be careful not to overtighten and damage the microwave or mounting plate.
- Double-check the stability and alignment of the microwave to ensure it is securely attached to the mounting plate.
By following these steps, you can successfully mount your under cabinet microwave and enjoy the convenience it brings to your kitchen. Remember to refer to the manufacturer’s instructions for any specific requirements or guidelines unique to your microwave model.
Connecting Electrical And Ventilation Components
Once you have successfully mounted your under cabinet microwave, the next step is to connect the electrical and ventilation components. This section will guide you through the process to ensure proper electrical connection and efficient ventilation.
Ensuring proper electrical connection
Before you begin the electrical connection, make sure to turn off the power at the circuit breaker to ensure your safety. Follow these steps to ensure the proper electrical connection:
- First, locate the power source. In most cases, you will find an existing electrical outlet within the cabinet or nearby.
- Check the voltage requirement of your under cabinet microwave and make sure the power source meets the specifications.
- Carefully plug in the microwave’s power cord into the electrical outlet.
- Secure the cord to the back of the cabinet using cable clips or adhesive hooks to prevent any accidental tugging or pulling.
- Once everything is properly connected, restore the power by turning on the circuit breaker.
Remember, safety should always be the top priority. If you are unsure about any electrical connections, it is recommended to consult a licensed electrician.
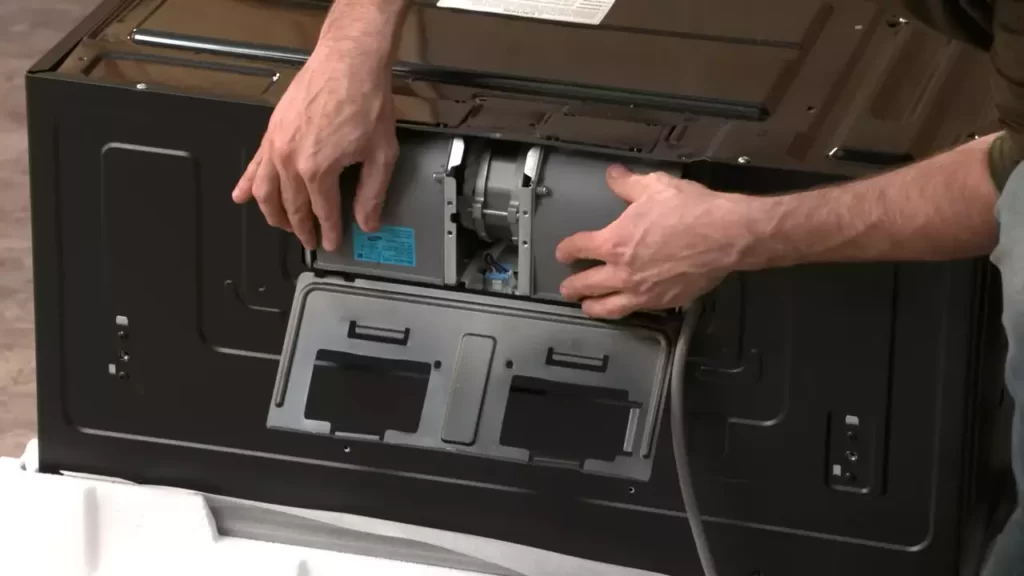
Connecting venting system for proper ventilation
Proper ventilation is crucial for the efficient operation of your under cabinet microwave. Follow these steps to connect the venting system:
- First, determine whether your microwave requires external ventilation or recirculating air through a charcoal filter.
- If external ventilation is needed, locate the vent opening at the back of the microwave and align it with the duct opening in the cabinet or wall.
- Securely attach the venting duct to both the microwave and the duct opening using appropriate clamps or screws.
- If your microwave requires recirculation, locate the charcoal filter and install it according to the manufacturer’s instructions.
- Once the venting system is properly connected, test it by running the microwave and checking for any air leaks or obstructions.
- Make sure to clean or replace the charcoal filter regularly for optimal performance.
By following these steps, you can ensure that your under cabinet microwave is properly connected electrically and has an efficient ventilation system in place. Enjoy the convenience of having a microwave tucked neatly under your cabinets while maintaining a safe and functional kitchen environment.
Testing And Adjusting The Microwave
Testing and Adjusting the Microwave
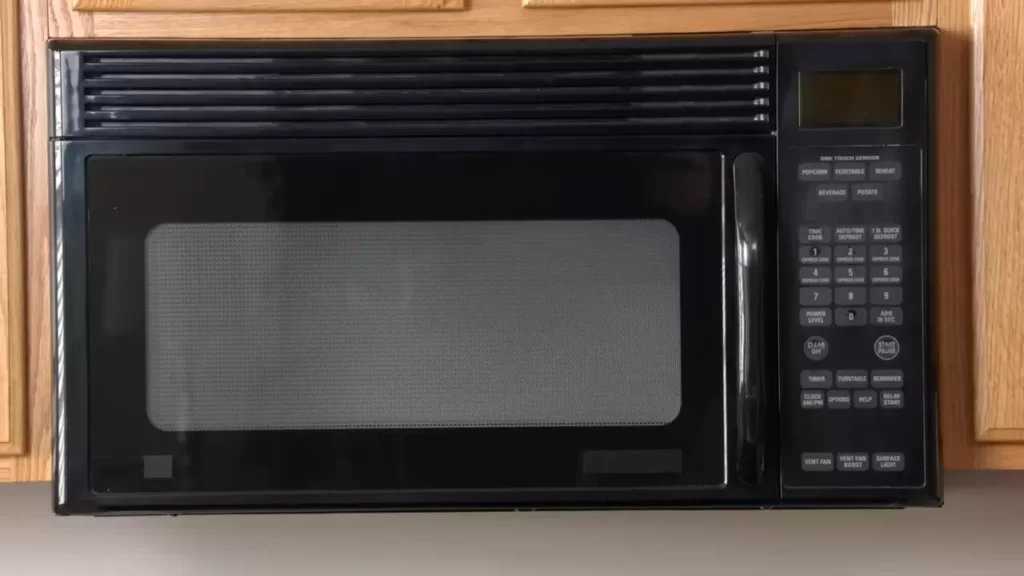
After successfully installing the under cabinet microwave, the next step is to test and adjust it to ensure it is functioning properly. This step is crucial as it allows you to verify if the microwave powers on correctly, check its position, and make any necessary adjustments.
Plugging in the microwave and testing if it powers on
Before proceeding, make sure the under cabinet microwave is properly plugged into the electrical socket. Double-check the power cord and ensure it is securely connected. Once confirmed, it’s time to test if the microwave powers on.
To test if the microwave is working, simply press the power button located on the control panel. If the display screen lights up and you hear the familiar hum of the microwave, congratulations! You’ve successfully powered it on.
If, however, the microwave doesn’t power on, there may be a couple of possible causes. First, cross-check the power source to ensure it is supplying electricity. You can plug another device into the same socket to verify if electricity is flowing. If electricity is available, there may be an issue with the microwave’s power cord or internal components. In such cases, it is advisable to consult a professional technician for further assistance.
Checking the microwave’s position and adjusting if needed
Once you’ve confirmed that the microwave powers on, it’s important to check its position to ensure it is properly aligned. An incorrectly positioned microwave can affect its functionality and even pose safety risks. Here’s how to check and adjust the microwave’s position:
- First, visually inspect the microwave’s alignment. Ensure that it is centered and evenly spaced within the allotted space beneath the cabinet.
- If you notice any misalignments, loosen the screws or brackets holding the microwave in place. Carefully shift the microwave to the desired position and tighten the screws or brackets once again.
- Make sure the microwave is level. An uneven microwave can lead to cooking issues or even cause the appliance to become unstable. Use a level tool to check if the microwave is sitting straight. If it isn’t, adjust the position accordingly.
- Check that there is sufficient clearance between the microwave and other objects, such as the cabinet walls or adjacent appliances. This is crucial for proper airflow and ventilation.
By following these steps, you can test and adjust the under cabinet microwave, ensuring it is functioning optimally and positioned correctly. After completing these tasks, feel free to enjoy your newly installed microwave and all the conveniences it brings to your kitchen!
Cleaning Up And Finalizing The Installation
Removing any packaging and protective film
Once you have successfully installed your under cabinet microwave, it’s time to clean up and finalize the installation. One of the first steps in this process is to remove any packaging and protective film from the microwave. This ensures that the microwave is free from any potential hazards and ready for use. Carefully inspect the microwave for any stickers, plastic covers, or tape that may need to be peeled off or cut away. This will prevent any unwanted debris from hindering the performance of your microwave.
Double-checking the stability and security of the microwave
After you have removed all the packaging and protective film, it’s essential to double-check the stability and security of the microwave. This ensures that it is securely in place and won’t pose any safety risks. Give the microwave a gentle shake to check for any looseness or instability. If you notice any wobbling, make sure to tighten the mounting screws or brackets accordingly. It’s important to ensure that the microwave is securely fixed under the cabinet to avoid any accidents or damage.
Cleaning the exterior surfaces of the microwave
To complete the installation process, it’s crucial to clean the exterior surfaces of the microwave thoroughly. The exterior of the microwave can accumulate fingerprints, grease, and dust, affecting its visual appeal and hygiene. Begin by wiping down the exterior surfaces with a clean, damp cloth. For stubborn stains or grime, you can use a mild detergent or a non-abrasive cleaner. Be sure to avoid using abrasive sponges or harsh chemicals that may damage the microwave’s finish. Pay attention to any crevices, buttons, or knobs, ensuring they are thoroughly cleaned and free from any dirt or debris.
By following these final steps of removing packaging, double-checking stability, and cleaning the exterior surfaces, you can ensure that your under cabinet microwave installation is complete and ready to be used. Take the time to tidy up and finalize the installation properly, so you can enjoy the convenience of your new microwave without any issues.
Tips And Troubleshooting
Installing an under cabinet microwave can be a convenient and space-saving solution in your kitchen. While the process may seem daunting at first, following a few tips and troubleshooting common issues can ensure a smooth installation process. In this section, we will cover some essential tips to make your installation process easier and provide troubleshooting solutions for common problems that may arise.
Tips for a smooth installation process
When it comes to installing an under cabinet microwave, planning and preparation are key. Follow these helpful tips to ensure a smooth installation process:
- Measure twice, cut once: Before starting the installation, make sure to measure the available space accurately. Take into consideration any obstructions or vents that may hinder the installation process. This will help avoid unnecessary modifications or setbacks.
- Double-check weight capacity: Under cabinet spaces have weight limits. Ensure that the chosen microwave falls within the weight capacity specified for your particular cabinet. Exceeding this limit can cause structural damage and compromise the integrity of the installation.
- Use template for accurate placement: Most under cabinet microwaves come with a template that helps you determine the right location for installation. Take the time to carefully align and tape the template in place. This will provide an accurate guide for drilling and mounting.
- Secure mounting brackets properly: Pay close attention to the mounting brackets included with your under cabinet microwave. Ensure they are securely attached to the cabinet to provide a stable foundation for the appliance. Loose brackets can lead to excessive vibrations and potential safety hazards.
- Follow manufacturer’s instructions: Each microwave brand and model may have specific installation requirements. It is crucial to read the manufacturer’s instructions carefully and follow them step-by-step. This will help you avoid mistakes and ensure a successful installation.
Common issues and troubleshooting solutions
While installing an under cabinet microwave, you may encounter a few common issues. Here are some troubleshooting solutions to overcome these problems:
| Issue | Solution |
|---|---|
| Microwave not fitting properly into the cabinet space | Double-check measurements and ensure the cabinet opening aligns with the microwave’s dimensions. If necessary, make adjustments and modifications to the cabinet to accommodate the appliance. |
| Microwave door hitting the cabinet or obstructing surrounding items | Reposition the microwave or adjust the hinge to ensure proper clearance. If the microwave door interferes with other objects, consider rearranging the items or using alternative storage options to create adequate space. |
| Microwave displaying error codes or not functioning properly | Refer to the manufacturer’s manual to identify error codes and troubleshoot accordingly. If the problem persists, contact the manufacturer or seek professional assistance for repairs. |
| Inadequate ventilation causing overheating | Ensure that the microwave has proper ventilation as specified by the manufacturer. Check for any obstructions or blockages that may impede airflow. Consider installing additional ventilation solutions, such as vent kits or exhaust fans, if necessary. |
By following these tips and troubleshooting solutions, you can ensure a successful and hassle-free installation of your under cabinet microwave. Remember to take your time, read the instructions thoroughly, and address any issues promptly. Soon, you’ll be enjoying the convenience and efficiency of your newly installed appliance in your kitchen.
Resources And Recommendations
When it comes to installing an under cabinet microwave, having access to the right resources and recommendations can make all the difference. Whether you prefer visual guidance or are in search of the best brands and models on the market, this section has got you covered. Below, you will find a comprehensive list of online tutorials and videos to help you install your under cabinet microwave with ease. Additionally, we have curated a selection of highly recommended brands and models to guide you in your search for the perfect microwave for your kitchen.
Online tutorials and videos for visual guidance
Visual demonstration can be incredibly helpful when it comes to complicated tasks like installing an under cabinet microwave. Thankfully, there is a vast array of online tutorials and videos available to guide you through the process. Here are some top picks:
- Under Cabinet Microwave Installation Made Easy – A step-by-step tutorial video that covers the entire installation process, from preparation to mounting the microwave.
- Troubleshooting Under Cabinet Microwave Installation – In this video, you’ll learn how to tackle common issues that may arise during the installation process.
- Ultimate Under Cabinet Microwave Installation Guide – This comprehensive blog post provides detailed instructions, accompanied by clear images, to make installation a breeze.
Recommended brands and models of under cabinet microwaves
The market is flooded with a wide range of under cabinet microwaves, making it challenging to choose the right one. To simplify your decision-making process, here are some highly recommended brands and models:
| Brand | Model | Features |
|---|---|---|
| Breville | Quick Touch Crisp | Smart cooking functions Crisping and grilling capabilities Easy-to-clean interior |
| Panasonic | Inverter Technology Microwave | Evenly cooks and reheats food Large capacity Sleek stainless steel design |
| GE | Profile Series Microwave | Built-in convection oven Sensor cooking technology Intuitive controls |
These brands and models have garnered positive reviews for their performance, durability, and user-friendly features. However, it’s essential to consider your specific needs and kitchen requirements when selecting an under cabinet microwave.
With these valuable resources and recommendations at your disposal, installing an under cabinet microwave will be a seamless and enjoyable process. Follow the visual tutorials and videos for step-by-step guidance, and explore the recommended brands and models to find the perfect microwave for your kitchen.
Frequently Asked Questions On How To Install Under Cabinet Microwave Video
Can You Install A Microwave Under A Cabinet?
Yes, you can install a microwave under a cabinet. It is a popular option for saving counter space and achieving a streamlined kitchen look. However, be sure to follow the manufacturer’s guidelines for proper installation and ensure there is enough clearance for ventilation.
How Do You Install An Undermount Microwave?
To install an undermount microwave, follow these steps:
1. Find a suitable location for the microwave.
2. Measure the space accurately and check the weight limit for the cabinet.
3. Secure the mounting plate to the cabinet bottom using screws.
4. Place the microwave on the mounting plate and fasten it securely.
5. Test the microwave to ensure it’s working properly.
Do You Need To Vent Under Cabinet Microwave?
Yes, under cabinet microwaves need to be vented. Venting is necessary to release excess heat and steam generated during cooking, ensuring the microwave functions properly and prevents damage to surrounding cabinets. Proper ventilation also helps maintain a healthy indoor air quality by removing odors and moisture.
What Type Of Microwave Can Be Mounted Under A Cabinet?
The type of microwave that can be mounted under a cabinet is called an under cabinet microwave.
Conclusion
Installing an under cabinet microwave can greatly enhance your kitchen space. With the steps outlined in this video tutorial, you can easily add convenience and functionality to your cooking area. By following the instructions and using the right tools, you’ll be able to enjoy the benefits of a seamlessly integrated microwave in no time.
Whether you’re a beginner or a DIY enthusiast, this guide provides the necessary guidance to complete the installation successfully. Upgrade your kitchen with an under cabinet microwave today and streamline your culinary experience.