To install Suntouch Heated Floor, begin by planning the layout and ensuring you have the necessary tools and supplies. Then, install the heating mat and connect it to a thermostat.
Finally, cover the mat with thinset mortar and tile.
Understanding The Benefits Of Suntouch Heated Floors
Suntouch heated floors are a fantastic addition to any home, offering a range of benefits that enhance both comfort and energy efficiency. By installing Suntouch heated floors, you can transform chilly, hard flooring surfaces into warm, inviting spaces you’ll love to walk on. In addition to providing a cozy atmosphere, these floors are also highly energy efficient, helping you to save on heating costs in the long run.
Enhanced comfort and warmth for your home
Imagine stepping onto a luxuriously warm floor on a cold winter morning. With Suntouch heated floors, you can experience this comfort every day. Whether you have tile, stone, or laminate flooring, the electric heating system is designed to evenly distribute heat throughout the entire surface, eliminating cold spots. This means you can enjoy a warm and cozy home without needing to wear heavy socks or slippers.
The even distribution of heat is made possible by a series of electric floor heating mats installed beneath the flooring material. These mats consist of a heating cable that is laid out in a serpentine pattern, ensuring consistent warmth across the entire floor. This innovative design provides a uniform heat that radiates upward, filling the room with cozy comfort.
Energy efficiency and cost savings
In addition to enhanced comfort, Suntouch heated floors also offer significant energy efficiency benefits. Traditional heating systems often heat the air in a room, leading to heat loss and inefficiency. However, Suntouch heated floors directly heat the flooring material, resulting in minimized heat loss and reduced energy consumption.
By opting for Suntouch heated floors, you can experience noticeable cost savings on your energy bills. The system is designed to be thermostatically controlled, allowing you to set the desired temperature for each room. This precise temperature control ensures that energy is only used to heat the floor when necessary, providing efficient warmth without wasting energy.
Additionally, Suntouch heated floors can be easily integrated with your existing home heating system. You have the flexibility to zone the heating, meaning you can choose to heat specific areas of your home while leaving others untouched. This zoning capability further enhances energy efficiency by only heating the rooms that are being used, saving you even more on energy costs.
Investing in Suntouch heated floors is not only a practical choice but also an environmentally conscious one. By reducing energy consumption and minimizing heat loss, you are reducing your carbon footprint and contributing to a greener, more sustainable future.
In conclusion, Suntouch heated floors offer a range of benefits that enhance both comfort and energy efficiency in your home. Say goodbye to cold, hard flooring surfaces and hello to cozy warmth throughout the winter months. With the added bonus of energy savings and environmental friendliness, Suntouch heated floors are a smart investment for any homeowner. Experience the ultimate in comfort and efficiency with Suntouch heated floors – your feet will thank you.
Choosing The Right Suntouch Heated Floor System
Different options available based on your needs
When it comes to installing a Suntouch heated floor system, it’s crucial to choose the right one that suits your specific needs. With a variety of different options available, selecting the perfect system for your home can seem overwhelming. To help you make an informed decision, let’s take a look at the different options offered by Suntouch.
Factors to consider when selecting the system
When selecting a Suntouch heated floor system, there are several important factors to consider. These factors will ensure that you choose the system that not only meets your requirements but also provides efficient and reliable performance. Keep the following points in mind:
- Size and layout of the area: Consider the square footage and layout of the space where the heating system will be installed. This will help determine the heating capacity and the number of heating mats or cables required.
- Power options: Suntouch offers both electric and hydronic heated floor systems. Electric systems are suitable for most residential applications, while hydronic systems are more commonly used for larger spaces or when the house is already equipped with a hot water heating system.
- Type of flooring: Different flooring materials have specific requirements for heat conductivity. Ensure that the Suntouch system you choose is compatible with the type of flooring you have, whether it’s tile, laminate, or hardwood.
- Thermostat compatibility: Suntouch provides different thermostat options, including manual, programmable, and smart thermostats. Determine which thermostat suits your lifestyle and preferences to maximize the comfort and energy efficiency of your heated floor system.
- Budget: Consider your budget when selecting a Suntouch system. While investing in a heated floor system can bring long-term benefits, it’s important to choose a system that fits within your financial means.
By carefully considering these factors, you can ensure that you choose the ideal Suntouch heated floor system for your specific needs. Whether you’re looking to add warmth to your bathroom, kitchen, or entire home, Suntouch offers a range of options to meet your requirements.
Gathering The Necessary Tools And Materials
Before you begin the installation process for your Suntouch heated floor system, it’s crucial to gather all the necessary tools and materials. Having everything you need on hand will ensure a smooth and efficient installation, saving you time and frustration. In this section, we will provide you with a comprehensive list of tools required for the installation, as well as the materials needed to complete the project.
List of tools required for installation
When it comes to installing your Suntouch heated floor, it’s essential to have the right tools to get the job done correctly. Here is a list of tools you will need:
| 1. | Tape measure |
| 2. | Utility knife |
| 3. | Trowel or putty knife |
| 4. | Notched trowel |
| 5. | Electric circuit tester |
| 6. | Wire strippers |
| 7. | Multimeter |
| 8. | Thinset mortar mixer |
| 9. | Notched trowel |
| 10. | Grout float |
| 11. | Knee pads |
| 12. | Level |
Materials needed for the project
In addition to the tools listed above, you will also need certain materials to complete your Suntouch heated floor installation. Here is a list of materials you should have:
- Suntouch heated floor mat
- Thermostat
- Electrical wire
- Thinset mortar
- Grout
- Backer board
- Tile adhesive
- Tile spacers
- Grout sealer
Make sure you have all these materials in the right quantities before you start with the installation process. Adequate preparation will ensure a seamless installation and a perfect end result.
Measuring And Planning The Floor Layout
Before you begin the installation of your Suntouch Heated Floor, it is crucial to measure and plan the layout of your space to ensure proper heat distribution and a seamless installation process. In this section, we will guide you through the steps of accurately measuring the room dimensions and determining the optimal layout for your heated floor system.
Measuring the room dimensions accurately
Accurate measurements are essential for a successful installation. To measure the dimensions of your room, follow these steps:
- Start by measuring the length and width of each wall using a tape measure. Make sure to measure from wall to wall, excluding any baseboard or molding.
- Record these measurements and calculate the total square footage of the room by multiplying the length and width measurements.
- Take note of any obstacles in the room, such as built-in cabinets or fixtures, and measure their dimensions as well.
- To ensure accuracy, double-check all measurements before proceeding with the installation.
Determining the layout for optimal heat distribution
Once you have measured the dimensions of your room, it’s time to determine the layout for optimal heat distribution. Follow these steps:
- Consider the primary use and traffic flow of the room. Identify high-traffic areas where you would like to have more warmth.
- Refer to the manufacturer’s instructions and guidelines provided with your Suntouch Heated Floor system to determine the recommended spacing for the heating elements or mats.
- Using your room measurements, create a scaled drawing or digital layout of the room. Include any obstacles and areas where you would like the heat to be concentrated.
- Based on your scaled drawing, plan the placement of the heating elements or mats, ensuring they cover the entire floor surface while adhering to the recommended spacing.
- Consider using a table or floor planner tool to help visualize the layout and ensure even heat distribution throughout the room.
By accurately measuring the room dimensions and carefully planning the layout, you will ensure optimal heat distribution and a successful installation of your Suntouch Heated Floor system. Following these steps will help you create a warm and cozy space to enjoy all year round.
Preparing The Subfloor
Before installing your Suntouch Heated Floor, it is crucial to properly prepare the subfloor. This step will ensure a stable and durable foundation for your heated flooring system. In this section, we will discuss how to evaluate the condition of the subfloor and how to repair or level it if necessary.
Evaluating the condition of the subfloor
Before starting any renovation project, it’s essential to assess the condition of the existing subfloor. Look for signs of damage, such as cracks, warping, or moisture issues. These can affect the performance and longevity of the heated floor system. It’s important to note that your subfloor needs to be structurally sound and smooth for a successful installation.
Repairing or leveling the subfloor if necessary
If you notice any issues with your subfloor, it’s crucial to address them before proceeding with the installation. Here are some steps you can take to repair or level your subfloor:
- Repairing cracks: If you find cracks in the subfloor, use a suitable filler to fill them. Make sure to follow the manufacturer’s instructions for the filler and allow it to dry completely before moving on to the next step.
- Fixing warping: If your subfloor has areas that are warped or uneven, you may need to use a floor leveling compound. Prepare the compound according to the manufacturer’s instructions and spread it over the affected areas using a trowel. Smooth out the surface, ensuring it is level with the surrounding subfloor. Allow the compound to dry completely before continuing.
- Addressing moisture issues: Moisture can cause significant damage to your heated floor system, so it’s important to address any moisture issues in the subfloor. Use a moisture barrier or sealer to prevent moisture from seeping into the flooring. Again, follow the manufacturer’s instructions for the specific product you are using.
By taking the time to evaluate and repair the subfloor, you are ensuring the long-term success of your Suntouch Heated Floor installation. A properly prepared subfloor will provide the necessary stability and levelness required for a smooth and efficient heated flooring system.
Installing The Insulation
Understanding the Importance of Insulation
Before you start the installation process for your Suntouch heated floors, it’s crucial to understand the importance of insulation. Insulation plays a key role in maintaining the efficiency and effectiveness of your heated floors.
Insulation helps to prevent heat loss, ensuring that the warmth generated by your Suntouch system is directed towards the floor surface and not lost to the subfloor. This not only maximizes the comfort level of your heated floors but also helps to minimize energy consumption.
Steps to Install Insulation for Suntouch Heated Floors
Now that you understand the significance of insulation, let’s dive into the steps involved in installing insulation for your Suntouch heated floors:
- Measure and Cut Insulation: Start by measuring the dimensions of your room to determine the amount of insulation required. Ensure that you leave a slight overlap at the seams to create a continuous thermal barrier. Use a utility knife or insulation cutter to cut the insulation to the appropriate size.
- Prepare the Subfloor: Before installing the insulation, make sure that the subfloor is clean, dry, and free of any debris. Any imperfections or irregularities in the subfloor should be addressed to ensure a smooth installation.
- Lay Out the Insulation: Begin laying out the insulation material parallel to the longest wall in the room. If necessary, use tape or adhesive to secure the insulation in place and prevent it from shifting during the installation process.
- Fit Around Obstacles: As you continue laying out the insulation, make sure to carefully fit it around any obstacles such as pipes, vents, or electrical boxes. Take your time to ensure a snug fit, as this will help to maintain the integrity of the thermal barrier.
- Seal Seams and Edges: It’s important to seal the seams and edges of the insulation to further enhance its effectiveness. You can use foil tape or a similar sealing material to create a tight seal. This will help to prevent air leakage, thus optimizing the efficiency of your heated floors.
- Continue Installation: Once you have completed the insulation installation, you can proceed with the next steps of installing your Suntouch heated floors. Follow the manufacturer’s instructions carefully and be sure to consult professional assistance if needed.
By following these steps, you will ensure that your Suntouch heated floors are installed over a quality insulation layer, maximizing their performance and energy efficiency. Remember, proper insulation is key to enjoying the full benefits of your heated floors.
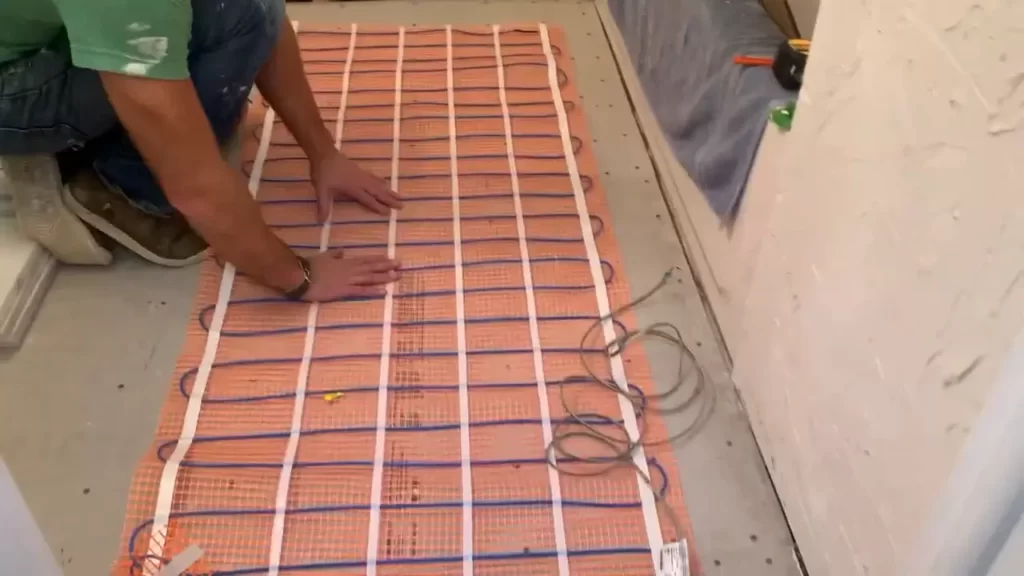
Laying Out The Heating Wire
Installing a Suntouch heated floor not only adds comfort to your space but also enhances its overall appeal. One of the crucial steps in this process is laying out the heating wire. Correctly positioning and securing the wire ensures even heating throughout the floor. In this section, we will discuss the best starting point for the wire and methods to evenly space and secure it.
Determining the best starting point for the wire
Before laying out the heating wire, it is important to determine the best starting point for optimal performance. Here are a few key factors to consider:
- Room layout: Take into account any obstacles or architectural features in the room that may affect the wire’s path.
- Doorways: Start the wire in a location that allows for seamless continuity under doorways.
- Furniture placement: Plan the wire layout in a way that ensures it remains beneath furniture, providing consistent heat across the entire floor surface.
- Thermostat location: Consider the location of the thermostat, as it affects the wire’s starting point. Typically, it is placed near the entrance of the room.
By carefully considering these factors, you can determine the best starting point for the heating wire, resulting in efficient and effective heat distribution.
Methods for evenly spacing and securing the wire
Once you have determined the starting point, the next step is to evenly space and secure the heating wire. This ensures uniform heating across the entire floor. Here are some methods to achieve this:
- Use spacing strips: Suntouch provides spacing strips that help maintain consistent wire spacing. These strips are placed along the length of the wire, keeping it in position and preventing it from moving during the installation process.
- Secure with tape: Use high-quality, double-sided tape to fasten the wire to the subfloor. This helps keep it in place and prevents any shifting or movement.
- Follow the manufacturer’s guidelines: Refer to the installation manual provided by Suntouch for specific instructions on wire spacing and securing methods. Following these guidelines ensures proper installation and optimal performance.
By utilizing spacing strips, tape, and following the manufacturer’s guidelines, you can ensure the heating wire is evenly spaced and securely in place. This results in a well-functioning, evenly heated floor.
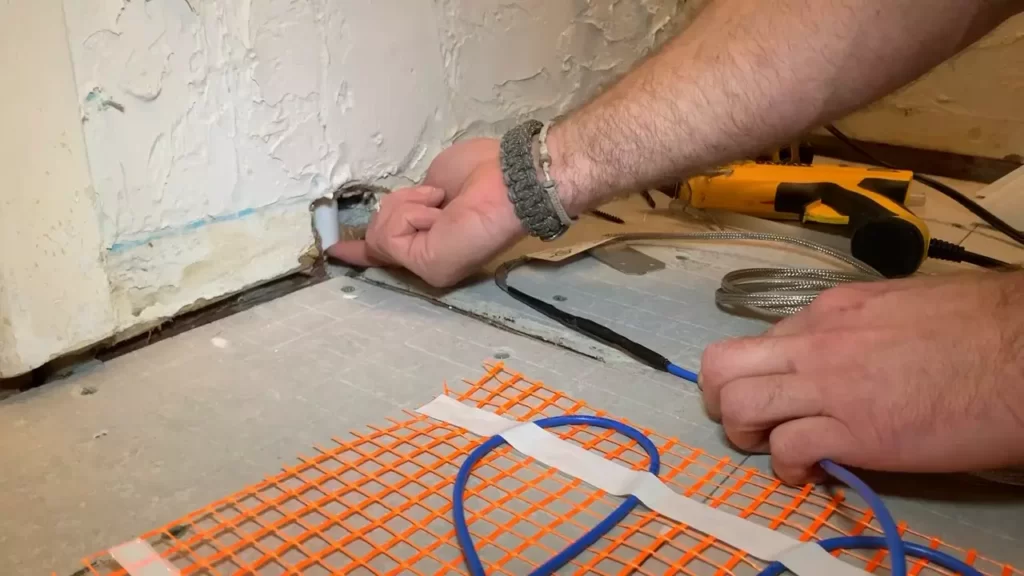
Connecting The Heating Wire To The Thermostat
Wiring the Heating Wire to the Thermostat
Once you have laid the Suntouch heated floor mat and completed the necessary electrical connections, the next step is to connect the heating wire to the thermostat. This is an important part of the installation process as it allows you to control and regulate the temperature of your heated floors.
To ensure a successful and hassle-free installation, follow these simple steps:
- First, locate the thermostat wiring box. This is typically found near the floor or on a nearby wall. It should be clearly labeled for easy identification.
- Remove the cover of the wiring box by unscrewing the screws. Set the cover aside in a safe place.
- Inside the wiring box, you will find several labeled terminals. Each terminal corresponds to a specific wire.
- Take the heating wire and strip off about 1/2 inch of insulation from each end using a wire stripper tool. This will expose the copper conductor.
- Identify the wires coming from the heating wire. There should be two: a black wire and a white wire.
- Connect the black wire to the terminal labeled “H” or “Heating”. Insert the bare copper conductor into the hole or wrap it around the screw, depending on the type of terminal connection.
- Connect the white wire to the terminal labeled “N” or “Neutral”. Again, insert the bare copper conductor into the hole or wrap it around the screw securely.
- Tighten the screws on each terminal to ensure a solid and secure connection.
- Replace the cover of the wiring box and secure it with the screws.
With the heating wire successfully connected to the thermostat, you are one step closer to enjoying cozy, warm floors. The next step is to program the thermostat for optimal usage.
Programming the Thermostat for Optimal Usage
Properly programming your Suntouch heated floor thermostat is essential for maintaining comfort and energy-efficiency. Follow these instructions to ensure the best performance from your heated floors:
- Refer to the manufacturer’s instructions to familiarize yourself with the thermostat’s programming features and capabilities.
- Set the desired temperature for each time period. Consider your daily routine and adjust the temperature accordingly. For example, you may want the floors to be warmer in the morning and evening when you are most likely to be using the space.
- Take advantage of the thermostat’s scheduling capabilities. Program it to automatically adjust the temperature throughout the day to maximize comfort and energy savings.
- Consider using setbacks or temporary temperature adjustments for times when the space is not in use, such as during working hours or when you are away on vacation.
- Regularly monitor and adjust the settings as needed. This will ensure that your floors are always at the perfect temperature for your comfort.
By properly wiring the heating wire to the thermostat and programming it for optimal usage, you can make the most of your Suntouch heated floors. Enjoy the luxury of warm floors in your home all year round!
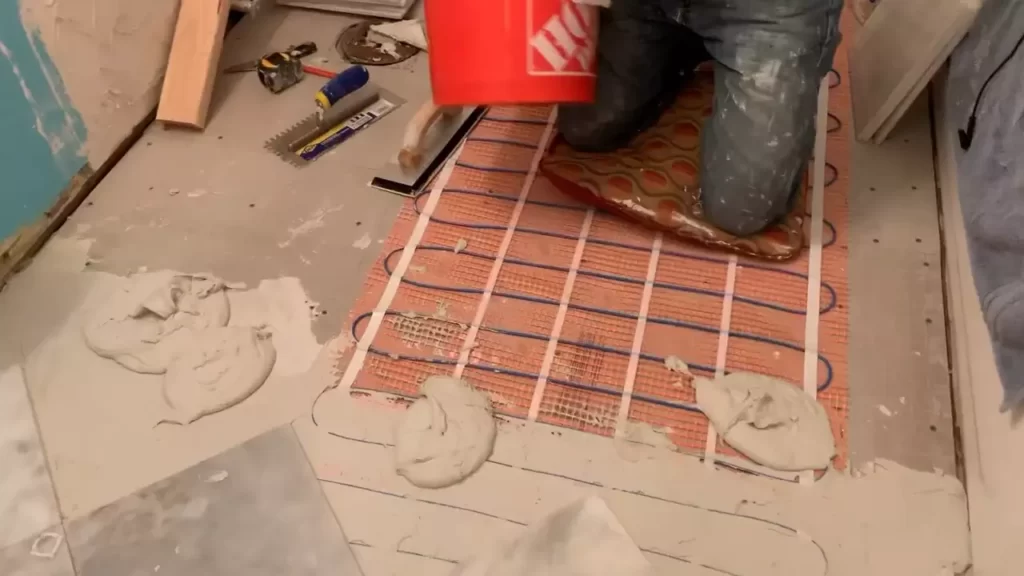
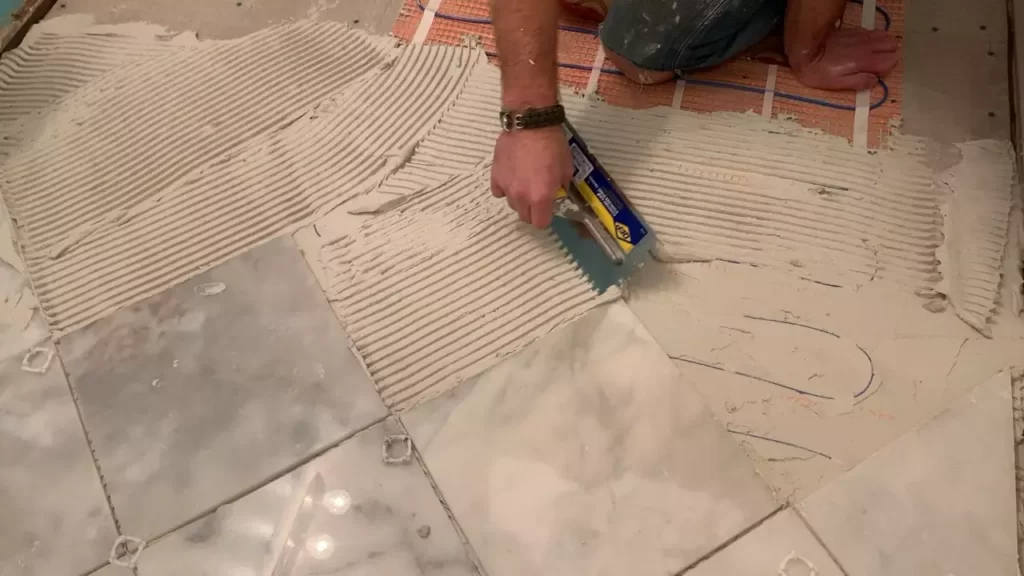
Applying Thinset Mortar And Installing The Flooring
Once you have finished laying out and securing the electric heating wire of your Suntouch heated floor, it’s time to move on to the next crucial steps of the installation process: applying thinset mortar and installing the flooring material. These steps are essential to ensure a durable and properly functioning heated floor system. Let’s dive into the details of each step to help you successfully complete your installation.
Mixing and applying thinset mortar
To start, you’ll need to mix the thinset mortar according to the manufacturer’s instructions. Thinset mortar acts as an adhesive that bonds the heating wire and the flooring material to the subfloor. It is crucial to follow the proper mixing ratio and consistency to achieve a strong and reliable bond.
Table 1 below shows a general guideline for mixing thinset mortar:
| Materials | Amount |
|---|---|
| Thinset Mortar | 1 part |
| Water | 4-5 parts |
Once the thinset mortar is properly mixed, use a notched trowel to apply it evenly over the electric heating wire. Make sure to spread the mortar in a consistent direction to avoid any lumps or uneven coverage. It’s important to work in small sections to prevent the mortar from drying out before you start installing the flooring material.
Installing the flooring material over the heating wire
After applying the thinset mortar, it’s time to lay the flooring material over the electric heating wire. You can choose from a variety of compatible flooring options, including tile, stone, or engineered wood. Make sure to select a flooring material that is suitable for use with a heated floor system.
Before installation, ensure that the subfloor is clean, level, and free from any debris. This will help create a smooth and stable surface for the flooring material. Begin by placing the first piece of flooring material against a wall or starting point, making sure to leave a small gap for any necessary expansion. Then, firmly press down on the flooring material to ensure it adheres to the thinset mortar.
Continue installing the flooring material, working your way across the entire heated floor area. Pay attention to the alignment and spacing between each piece to achieve an even and visually pleasing result. You may need to make some cuts to properly fit the flooring material around obstacles or edges.
Once all the flooring material is installed, allow it to set and cure according to the manufacturer’s instructions. This will ensure that the thinset mortar fully bonds with both the heating wire and the flooring material, creating a secure and long-lasting heated floor system.
Remember, proper installation of the thinset mortar and flooring material is crucial to the performance and longevity of your Suntouch heated floor. Following these steps will help you achieve a beautiful and functional heated floor system that adds warmth and comfort to your space.
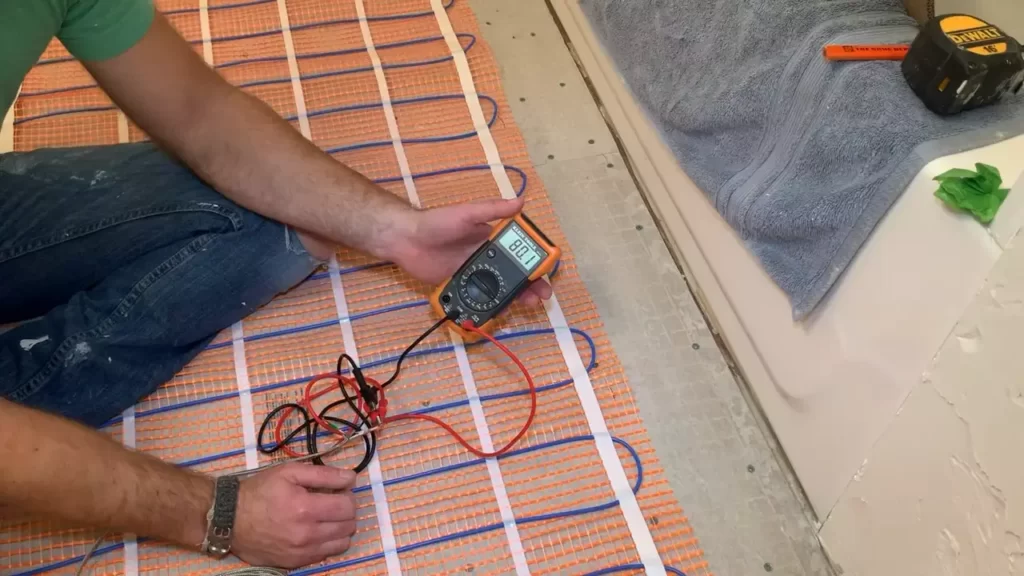
Testing The Suntouch Heated Floor System
Once you have successfully installed your Suntouch Heated Floor system, it is crucial to test its functionality to ensure optimal performance. Testing the system will help you identify any potential issues or malfunctions that need to be addressed before enjoying your cozy and warm floors. In this section, we will guide you through the steps to ensure the proper functioning of the system and troubleshoot common issues that may arise.
Steps to ensure proper functioning of the system
To ensure your Suntouch Heated Floor system is operating correctly, follow these steps:
- Turn on the power: Before testing, make sure the electrical power to your floor heating system is turned on. Check that the circuit breaker for the system is not tripped.
- Verify the thermostat settings: Double-check that the thermostat is set to the desired temperature and mode.
- Monitor the temperature: Allow the system to run for a while and monitor the temperature of the floor surface. Ensure that the floor is heating up evenly without any cold spots.
- Use an infrared thermometer: To get accurate temperature readings, use an infrared thermometer to measure the floor surface temperature at various points. This will help you identify any inconsistencies in heating.
- Check for abnormal noises or odors: While the system is running, listen for any unusual noises or detect any strange odors. If you notice anything out of the ordinary, it may indicate a potential issue.
To conclude, it is essential to go through these steps to ensure the proper functioning and performance of your Suntouch Heated Floor system. By following these guidelines, you can confidently enjoy the warmth and comfort provided by your heated floors.
Troubleshooting common issues and potential solutions
If you encounter any issues with your Suntouch Heated Floor system during testing, here are some common problems and potential solutions:
| Issue | Solution |
|---|---|
| The floor is not heating up at all | 1. Check the power supply and ensure the circuit breaker is not tripped. 2. Verify that the thermostat is set correctly and functioning properly. 3. Inspect the wiring connections and ensure they are secure. 4. Consult a professional electrician if necessary. |
| Uneven heating or cold spots on the floor | 1. Check for any obstructions on the floor surface, such as furniture or rugs blocking the heat. 2. Inspect the floor for any damages or cracks that may affect heat distribution. 3. Make sure the floor covering or tile installation is not impeding the heat transfer. 4. Check the zoned areas and ensure they are set up correctly. |
| Abnormal noises or odors | 1. Check for loose or malfunctioning heating elements or wiring. 2. Inspect for any foreign objects that may have come in contact with the heating system. 3. Turn off the system and consult a professional if the issue persists. |
By troubleshooting these common issues and implementing the provided solutions, you can resolve any problems with your Suntouch Heated Floor system and enjoy its optimal performance. If you encounter more complex issues, it is recommended to contact the manufacturer’s customer support or seek assistance from a professional installer.
Finalizing The Installation
Now that you have successfully completed the initial steps of installing your Suntouch heated floor, it’s time to finalize the installation and get ready to enjoy the cozy comfort of heated floors in your home. This last stage involves completing any necessary finishing touches and cleaning up the installation area to ensure a seamless and professional-looking result.
Completing any necessary finishing touches
Before you can declare your Suntouch heated floor installation complete, there are a few finishing touches that need your attention. These tasks may seem small, but they play a crucial role in ensuring the longevity and functionality of your heated floors.
- Trimming excess heating element: Carefully inspect the installed heating element to ensure there are no loose or protruding sections. If you notice any, use wire cutters to trim away the excess, ensuring a seamless fit.
- Securing the thermostat sensor: Double-check that the thermostat sensor is properly installed and secured according to the manufacturer’s instructions. This ensures accurate temperature readings and efficient heating control.
- Covering the heating system: If your installation includes a mortar bed or self-leveling compound, make sure to cover the entire heating system to protect it from any potential damage during subsequent flooring installations.
Once you have completed these finishing touches, you can move on to the final step: cleaning up the installation area.
Cleaning up the installation area
A clean and tidy installation area not only enhances the visual appeal of your Suntouch heated floor but also ensures optimal performance. Follow these steps to clean up the installation area and prepare your floor for its next phase:
- Remove any debris: Use a brush or a vacuum cleaner to remove any loose debris, dust, or dirt from the floor surface. This step ensures a clean base for the subsequent flooring installation.
- Check for leftover adhesive: Inspect the installation area for any adhesive residue or excess glue. This can be gently removed using a suitable adhesive remover or scraping tool, being cautious not to damage the heating elements.
- Smooth out any imperfections: Feel the floor surface for any bumps, unevenness, or imperfections. If you notice any, use a leveling compound or sandpaper to smoothen them out, providing a flat and even surface for your new floor.
- Wipe down the floor: Finally, use a damp cloth or mop to wipe down the floor, removing any remaining dust or residue. Ensure the floor is completely dry before proceeding with the next steps.
By completing these cleaning steps, you are ready to move forward with installing your desired flooring material over your Suntouch heated floor system.
Finalizing the installation of your Suntouch heated floor is an important stage that sets the foundation for a successful and efficient heating system. By completing the necessary finishing touches and cleaning up the installation area, you can ensure a flawless and long-lasting result. Now that everything is in order, it’s time to move on to the next exciting step of transforming your home with the luxurious warmth of heated floors.
Regular Maintenance For Suntouch Heated Floors
Proper maintenance is essential to ensure the longevity and efficient performance of your Suntouch heated floors. Regular care and upkeep will prevent damage, extend the life of your flooring system, and provide a comfortable and cozy living space. In this article, we will explore the recommended cleaning methods and how to inspect and repair any damages that may occur.
Recommended Cleaning Methods
When it comes to cleaning your Suntouch heated floors, it is important to follow the manufacturer’s guidelines to avoid any potential damage. Here are the recommended cleaning methods:
- Regular sweeping: Start by removing any loose debris or dirt from the floor surface using a soft-bristle broom or a vacuum cleaner with a brush attachment. This will prevent scratches and keep your floors looking pristine.
- Gentle mopping: For a deeper clean, you can use a mild floor cleaner mixed with warm water. Avoid using harsh chemicals or abrasive cleaning agents, as they may cause discoloration or damage to the floor. Gently mop the surface in a back-and-forth motion, being careful not to oversaturate the floor.
- Spot cleaning: For spills or stains, it is important to act quickly. Use a damp cloth or sponge to blot the affected area, avoiding any rubbing or scrubbing motion. If necessary, you can use a mild detergent mixed with water for tougher stains. Once cleaned, make sure to dry the area thoroughly to prevent any moisture from seeping into the floor.
Inspecting and Repairing any Damages
To maintain the integrity of your Suntouch heated floors, regular inspection and timely repairs are crucial. Here are some steps to follow:
- Check for any visible damages: Take a close look at the floor surface for any cracks, chips, or scratches. These can be repaired to prevent further damage.
- Inspect the heating elements: Ensure that the heating elements are intact and functioning properly. Any signs of damage or malfunction should be addressed immediately by a qualified professional.
- Monitor thermostat performance: Keep an eye on your thermostat to ensure it is accurately controlling the temperature of your floors. If you notice any irregularities or fluctuations, seek professional assistance.
- Address any repairs promptly: If you come across any damages or issues, it is important to contact a certified technician. Attempting to fix the problem yourself may void your warranty or cause further damage to the flooring system.
By following these regular maintenance practices, you can enjoy the comfort and efficiency of your Suntouch heated floors for years to come. Remember to always refer to the manufacturer’s guidelines and seek professional help for any major repairs or issues.
Optimizing Energy Efficiency And Comfort
Installing a Suntouch Heated Floor is a wise investment that not only provides warmth and comfort during chilly winters, but also offers a great opportunity to optimize energy efficiency. With a few simple tips and adjustments to the thermostat settings, you can ensure that you are getting the most out of your heated floor system, both in terms of energy savings and desired comfort levels.
Tips for Efficient Usage of the System
Efficient usage of your Suntouch Heated Floor system starts with understanding how to optimize its performance. By following these tips, you can make sure that your system operates at its best:
- Install proper insulation: Before installing your heated floor system, it is essential to ensure that the subfloor is well-insulated. Proper insulation will help prevent heat loss, allowing your system to work more efficiently.
- Use a programmable thermostat: Investing in a programmable thermostat allows you to set specific times and temperatures according to your daily schedule. This means that you can enjoy warm floors when you need them, and save energy by lowering the temperature when the floors are not in use.
- Maintain the right temperature: While it can be tempting to crank up the heat, keeping the temperature within a comfortable range is essential for both energy efficiency and comfort. Aim for a temperature between 68°F and 72°F to strike the perfect balance.
- Avoid blocking the heat: To ensure efficient heat distribution, avoid placing bulky furniture or mats directly over the heated floor. This will allow the warmth to spread evenly across the room, optimizing the system’s performance.
- Regular maintenance: Like any other system, your Suntouch Heated Floor requires regular maintenance to operate efficiently. Make sure to clean the floor regularly and inspect for any issues such as loose wires or damaged components.
Adjusting Thermostat Settings for Desired Comfort Levels
Your Suntouch Heated Floor system comes with a user-friendly thermostat that allows you to fine-tune the temperature settings according to your preferred comfort levels. Here’s how you can adjust the thermostat:
- Select the desired mode: Most Suntouch thermostats offer multiple operating modes such as manual, automatic, or vacation mode. Choose the mode that best suits your needs.
- Set the desired temperature: Using the thermostat controls, adjust the temperature to your preference. Remember that higher temperatures will result in faster heating, while lower temperatures will conserve energy.
- Program temperature schedules: If you have a programmable thermostat, take advantage of its features by setting different temperatures for various times of the day. For example, you can set a higher temperature during the morning and evening, and lower temperatures during the night or when you’re away from home.
- Monitor and adjust: Keep an eye on your system’s performance and make adjustments as needed. If you find that the floors are too warm or not warm enough, you can easily modify the thermostat settings to achieve the desired comfort levels.
By following these tips and making adjustments to the thermostat settings, you can optimize the energy efficiency and comfort provided by your Suntouch Heated Floor system. Enjoy the cozy warmth of your heated floors while minimizing energy consumption and maximizing comfort.
Frequently Asked Questions On How To Install Suntouch Heated Floor
Can You Install Heated Floors Yourself?
Yes, you can install heated floors yourself. It requires careful planning, knowledge of electrical systems, and adherence to safety guidelines. Ensure to follow manufacturer instructions and local building codes.
What Do You Put Under A Heated Floor?
Under a heated floor, you typically place a layer of insulation followed by a heat-conductive material like tile, stone, or engineered wood. This ensures efficient heat distribution and thermal insulation, creating a comfortable and warm space.
How Do You Install Underfloor Heating On An Existing Floor?
To install underfloor heating on an existing floor, follow these steps:
1. Prepare the existing floor surface by removing any protrusions or debris.
2. Lay down insulation boards to improve heat distribution.
3. Install the underfloor heating system, following the manufacturer’s instructions.
4. Connect the heating system to the power source.
5. Finally, cover the heating system with a suitable floor finish, such as tiles or laminate.
How Do You Install An Electric Heated Floor Under Tile?
To install an electric heated floor under tile, start by preparing the subfloor and laying a suitable insulation layer. Then, place the heating mats or cables evenly and secure them with adhesive. Connect the heating system to a thermostat and test it before installing the tile on top.
Conclusion
Installing Suntouch Heated Floor is a straightforward process that can add comfort and luxury to your home. By following the step-by-step guide provided in this blog post, you can easily install a heated floor system without any professional help. From preparing the subfloor to connecting the thermostat, everything is covered in detail.
With Suntouch Heated Floor, you can enjoy a warm and cozy environment throughout the year, making your home even more inviting. So, why wait? Start installing your heated floor and experience the ultimate comfort today.