To install a stove top, first make sure the area is clean and flat. Then, carefully place the stove top onto the designated spot, ensuring that it aligns properly with the cut-out.
Safety Precautions
Installing a stove top is an essential task that requires attention to detail and adherence to important safety measures. Whether you’re a seasoned DIY enthusiast or a novice, understanding and following these safety precautions is crucial to ensure a successful and safe stove top installation.
Essential safety measures to follow during installation
When it comes to installing a stove top, safety should always be your top priority. Here are some essential safety measures to keep in mind during the installation process:
- Before starting the installation, make sure to turn off the power supply to the existing cooktop or range. This can be done by switching off the circuit breaker or unplugging it from the outlet.
- Protect yourself by wearing gloves and safety glasses throughout the installation process to prevent any injuries.
- Ensure the work area is well-lit and free from any clutter or obstacles that could pose a safety hazard.
- Read and follow the manufacturer’s instructions carefully, as they provide specific guidelines for safely installing the stove top.
- Use proper tools and equipment that are suitable for the installation, ensuring they are in good condition and functioning correctly.
- If you’re unsure about any step of the installation process, consult a professional electrician or stove top installer to ensure everything is done correctly and safely.
Tips for handling electrical connections safely
Electrical connections play a crucial role in the installation of a stove top. It’s important to handle them with care and follow these tips for optimal safety:
- Always disconnect the power supply to the stove top before working on any electrical connections.
- Securely tighten all electrical connections to ensure they are properly fastened and won’t come loose over time.
- If you’re unsure about any electrical connections, consult a certified electrician who can assist you in ensuring proper wiring and safety.
- Regularly inspect the power cord for any signs of wear and tear, such as frayed wires or exposed insulation. If any issues are detected, replace the cord immediately.
- Once the electrical connections are complete, carefully tuck the wires away, ensuring they are not exposed or dangling, as this can pose a safety risk.
Common safety hazards to avoid while installing a stove top
During the installation process, it’s crucial to be aware of common safety hazards that can arise. By avoiding these hazards, you can ensure a smooth and secure installation:
- Avoid placing flammable materials near the stove top installation area, as they pose a fire hazard.
- Never attempt to modify or alter the stove top in any way that deviates from the manufacturer’s instructions, as this can lead to electrical or structural issues.
- Keep children and pets away from the installation area to prevent accidents and injuries.
- Ensure proper ventilation is in place to avoid the buildup of harmful gases, such as carbon monoxide.
- If you’re replacing an existing cooktop or range, safely dispose of the old appliance according to local regulations and guidelines.
By following these safety precautions, you can install your stove top with confidence, knowing that you’ve taken the necessary steps to ensure a safe and secure installation. Remember, safety always comes first!
Gathering Tools And Materials
Before you dive into the stove top installation process, it is crucial to gather all the necessary tools and materials. Having everything you need right at your fingertips will not only save you time but also ensure a smooth installation process. In this section, we will discuss the list of necessary tools for installation and the required materials you’ll need.
List of necessary tools for installation
Installing a stove top requires specific tools to ensure a job well done. Here are the tools you’ll need:
- Screwdriver: A screwdriver (either Phillips or flathead) is essential for loosening and tightening screws during the installation process.
- Adjustable wrench: An adjustable wrench is used to tighten or loosen nuts and bolts, ensuring a secure fit.
- Tape measure: Accurate measurements are vital when installing a stove top. A tape measure will help you determine the right dimensions and ensure a proper fit.
- Drill: A drill comes in handy if you need to make holes for mounting brackets or screws.
- Hole saw: If your stove top requires a larger hole for ventilation or electrical connections, a hole saw will do the job efficiently.
- Wire stripper: This tool is necessary if you need to strip the insulation off wires for electrical connections.
- Level: A level ensures that your stove top is installed perfectly straight, reducing the risk of any future issues.
- Pliers: Pliers are useful for gripping and maneuvering small parts during installation, providing a better grip and control.
Required materials for a smooth installation process
Alongside the tools, certain materials are necessary for a successful stove top installation. Here are the materials you’ll need:
- Stove top: Make sure you have purchased the appropriate stove top that fits your kitchen requirements and preferences.
- Mounting brackets: These brackets are essential for securely attaching the stove top to the countertop.
- Screws and bolts: Depending on the specific instructions provided with your stove top, you may require screws and bolts for mounting and securing the stove top.
- Electrical wire and connectors: If your stove top requires an electrical connection, ensure you have the appropriate wires and connectors.
- Gas line and fittings: For gas stove tops, you will need a gas line and fittings for proper gas supply and connection.
Where to find and purchase the required items
Now that you know the tools and materials needed for stove top installation, the next step is acquiring them. Here are a few options to consider when it comes to finding and purchasing the required items:
- Hardware stores: Local hardware stores usually carry a wide variety of tools and materials for stove top installation. Visit the nearest store in your area to check if they have what you need.
- Specialty appliance stores: Some stores specialize in appliances and kitchen fixtures. They often offer a comprehensive selection of stove tops and the necessary installation materials.
- Online retailers: If you prefer the convenience of online shopping, several reputable online retailers provide tools and materials specifically for stove top installation. Browse their websites to find the items you need.
By gathering all the essential tools and materials and knowing where to find them, you’ll be well-prepared to tackle the stove top installation process with confidence.
Removing The Old Stove Top
Before you can install a new stove top, you must first remove the old one. This may seem like a daunting task, but with the right steps and techniques, it can be done safely and efficiently. In this section, we will guide you through the process of disconnecting electrical connections, safely removing the old stove top, and properly disposing of it.
Steps to Disconnect Electrical Connections
To begin the removal process, you’ll need to disconnect the electrical connections of your old stove top. Follow these steps to ensure a safe disconnection:
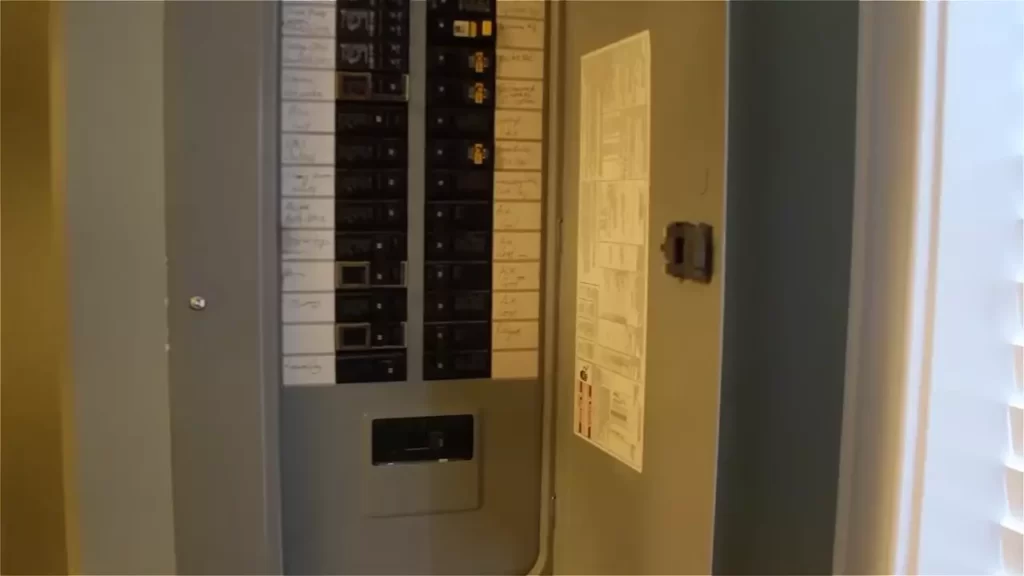
- Start by turning off the power supply to the stove top. Locate the circuit breaker or fuse box and flip the corresponding switch to shut off the power.
- Next, remove the screws or bolts that hold the control panel in place. Carefully lift the panel and locate the wire connections.
- Using a pair of pliers, gently disconnect the wires by loosening the wire nuts. Take note of which wire corresponds to each connection, as this will be important when installing the new stove top.
- Once all the wires are disconnected, secure them by using electrical tape to prevent them from accidentally touching each other or other components.
Techniques for Safely Removing the Old Stove Top
Now that the electrical connections are safely disconnected, it’s time to remove the old stove top from its position. Follow these techniques for a smooth and safe removal:
- Before proceeding, ensure the stove top is completely cooled down to avoid any burns.
- Start by removing any knobs or control panels that may be attached to the stove top.
- Next, locate the mounting clips or brackets that hold the stove top in place. Depending on the model, these may be located at the front or back of the stove top.
- Using a screwdriver or wrench, carefully loosen and remove the mounting clips or brackets.
- With the clips or brackets removed, gently lift the stove top from its position. It may be helpful to have an extra pair of hands to assist you in this step.
Proper Disposal Methods for the Old Stove Top
Once you have successfully removed the old stove top, it’s important to properly dispose of it to minimize environmental impact. Follow these steps for proper disposal:
- Check with your local recycling center to see if they accept old stove tops. If they do, they may have specific guidelines for preparation and drop-off.
- If recycling is not an option, you may need to schedule a bulk trash pickup or contact a waste disposal service to arrange for proper disposal.
- Before disposing of the stove top, ensure all gas or electrical connections have been properly capped and sealed to prevent any potential hazards.
By following these steps and techniques, you can safely remove your old stove top and make way for a new one. Remember to always prioritize safety and follow any manufacturer instructions specific to your stove top model.
Preparing The Installation Area
Before installing a stove top, it is important to properly prepare the installation area to ensure a secure and well-fitted appliance. This involves measuring the countertop space, ensuring the area is clean and ready, and making any necessary adjustments or modifications to the countertop. Following these steps will help ensure a successful stove top installation.
Measuring the countertop space for proper fit
In order to install a stove top, it is crucial to measure the countertop space accurately. This will ensure a proper fit and prevent any future complications. To measure the space, follow these steps:
- Clear the countertop area of any objects or debris.
- Using a tape measure, measure the width and depth of the space where the stove top will be installed.
- Take note of these measurements and double-check for accuracy.
By measuring the countertop space, you will have the necessary dimensions needed to choose the right stove top and ensure a seamless installation.
Ensuring the installation area is clean and ready
Prior to installing the stove top, it is crucial to clean and prepare the installation area. This will help create a clean and safe surface for the appliance. Follow these steps to clean and prepare the installation area:
- Remove any items from the countertop, such as small appliances, cooking utensils, or cutting boards.
- Gently clean the countertop with a mild soap solution and a soft cloth, removing any dirt or grease.
- Ensure that the installation area is dry and free of any moisture.
By cleaning and preparing the installation area, you will ensure a clean and stable surface for the stove top, enhancing its longevity and performance.
Making any necessary adjustments or modifications to the countertop
In some cases, the countertop may require adjustments or modifications to accommodate the stove top. This step is essential to ensure a proper fit and prevent any damage to the appliance or countertop. Here are some considerations:
- Verify if the countertop can support the weight of the stove top.
- If needed, use a jigsaw or router to cut the countertop according to the stove top’s dimensions.
- Smooth any rough edges with sandpaper, ensuring a clean finish.
- Double-check the measurements to ensure the adjustments are accurate.
By making the necessary adjustments or modifications, you will create an ideal fit for the stove top and minimize the risk of any issues during or after installation.
By following these steps and properly preparing the installation area, you can ensure a successful stove top installation. Next, we will cover the installation process itself.
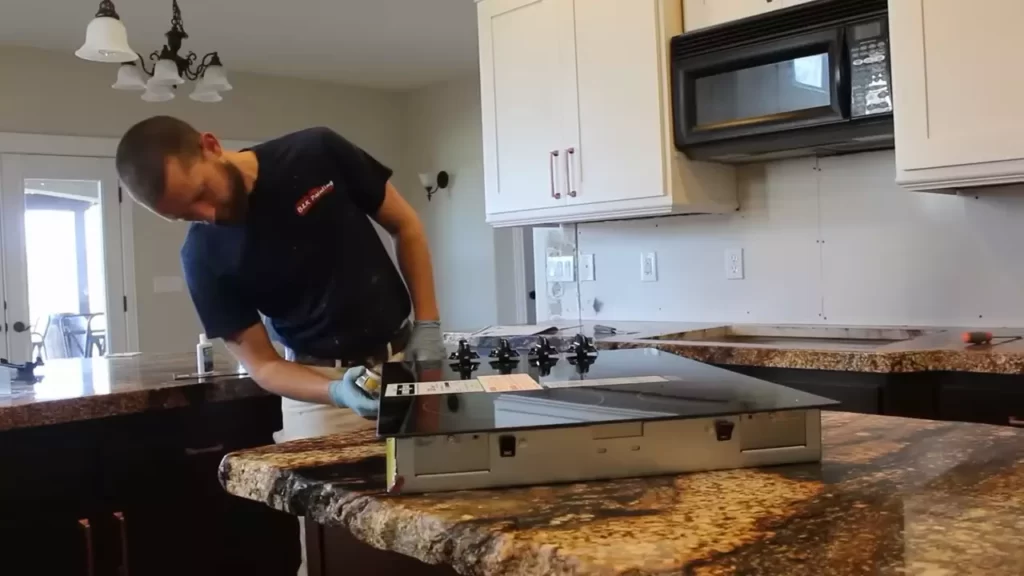
Installing The New Stove Top
If you’re looking to upgrade your kitchen appliances, installing a new stove top can make a significant difference in both function and style. Whether you’re replacing an old stove top or installing one for the first time, this step-by-step guide will help you complete the installation process smoothly.
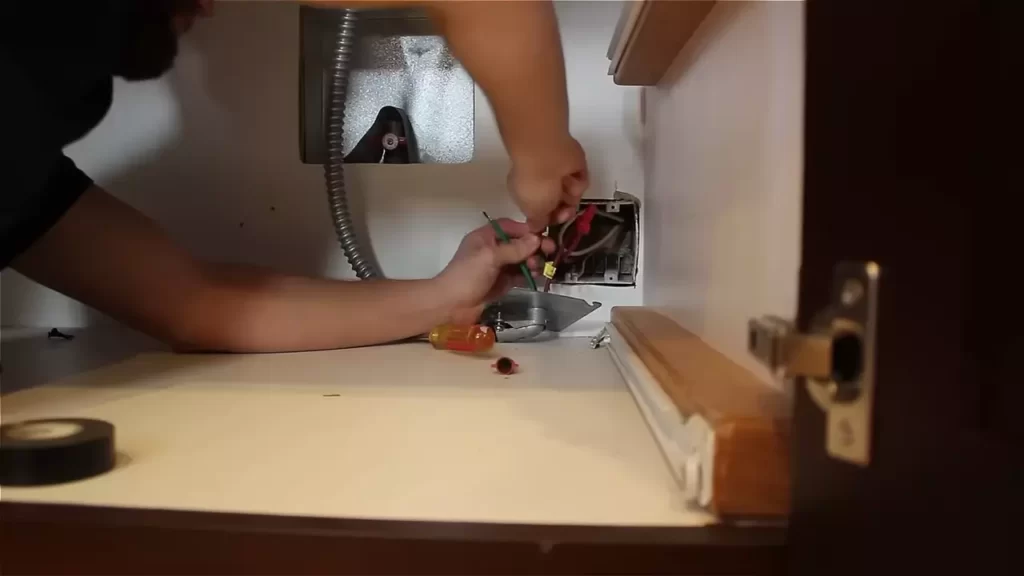
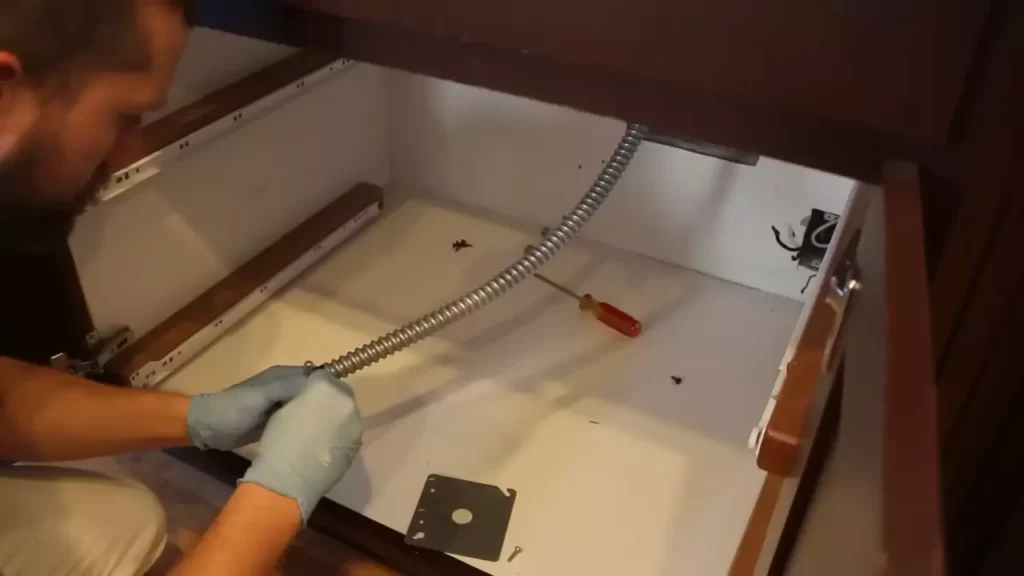
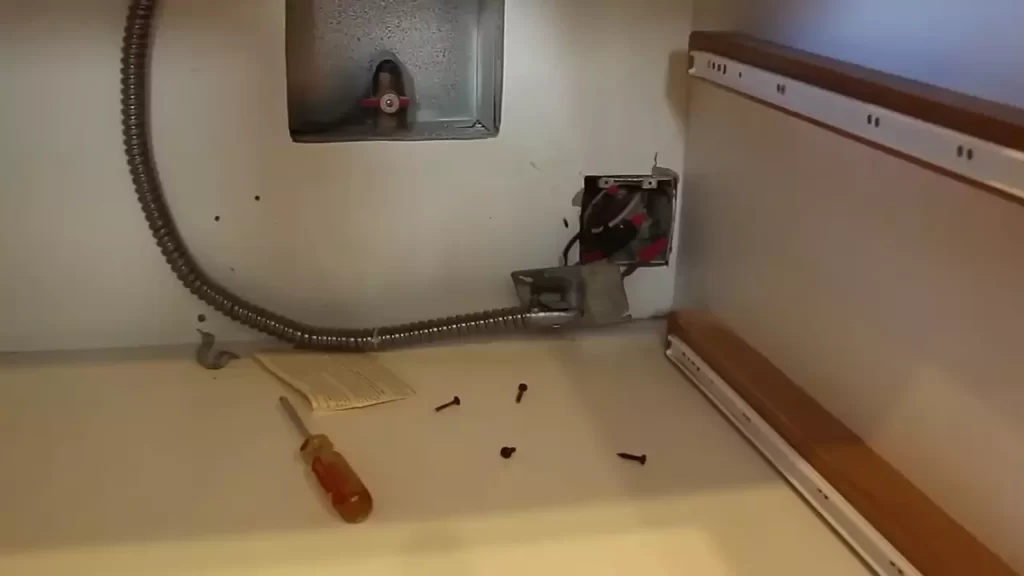
Connecting the Electrical Wiring Securely
Before you begin connecting the electrical wiring, it is crucial to turn off the power supply to avoid any electrical accidents. Follow these steps to connect the wiring securely:
- Locate the electrical junction box behind the stove top area.
- Open the junction box cover and carefully examine the available wires.
- Identify the corresponding wires on both the stove top and the electrical junction box.
- Connect the wires using wire nuts, ensuring a tight and secure connection.
- After connecting the wires, carefully tuck them into the junction box and replace the cover.
Aligning the Stove Top with the Installation Area
Proper alignment is crucial to ensure that the stove top fits seamlessly into the installation area. Follow these steps for a precise alignment:
- Insert the stove top into the designated opening in the countertop.
- Check that the stove top is centered and level by using a bubble level.
- If adjustments are needed, carefully lift the stove top and make the necessary changes.
Attaching the Stove Top to the Countertop with Appropriate Screws or Brackets
To secure the stove top firmly in place, you’ll need to attach it to the countertop using either screws or brackets. Follow these steps for a secure attachment:
- Locate the screw holes or brackets on the underside of the stove top.
- Position the stove top in the exact desired location on the countertop.
- If using screws, insert them through the screw holes and tighten them with a screwdriver.
- If using brackets, align them with the corresponding holes and secure them with screws.
Ensure that the stove top is firmly attached and does not wobble. This will prevent any accidents during use and ensure the longevity of the installation.
By following these steps, you can effortlessly install your new stove top and elevate the look and functionality of your kitchen. Remember to always prioritize safety and precision in each phase of the installation process. Enjoy your new stove top and happy cooking!
Testing And Troubleshooting
After successfully installing your new stove top, it’s crucial to run some tests and troubleshoot any potential issues that may arise. This ensures that your stove top is installed correctly and functions properly, allowing you to enjoy cooking without any hiccups. In this section, we’ll guide you through the process of verifying the stove top, troubleshooting common installation issues, and addressing any potential complications or errors that may come up along the way.
Verifying the stove top is functioning properly
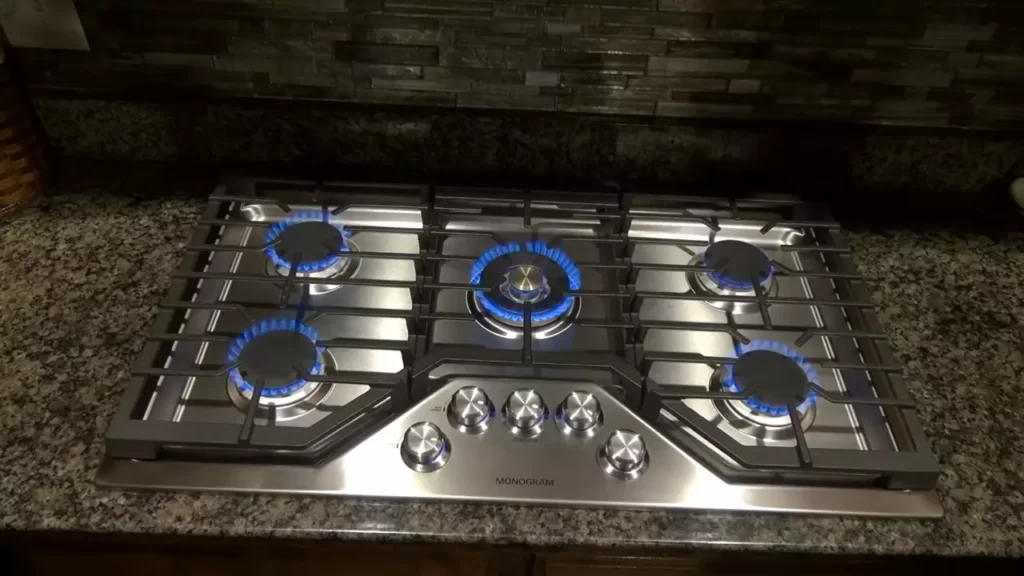
Before you start using your newly installed stove top, it’s important to verify that it is functioning as intended. Here are a few steps you can follow to ensure everything is in working order:
- Turn on each burner individually and observe the flame. The flame should be consistent, steady, and blue in color. If you notice any irregularities, such as a yellow or orange flame, it may indicate a problem with the gas supply or burner.
- Test the ignition system by turning the control knobs to the “Ignite” position. Each burner should ignite quickly and without any hesitation. If you experience difficulties in igniting the burners, it could be a sign of a faulty igniter or a problem with the gas supply.
- Check the temperature control by setting each burner to different heat levels. Observe if the burners respond accordingly and adjust the flame as desired. If you notice any inconsistencies in temperature control, it might be necessary to recalibrate the stove top or seek professional assistance.
Troubleshooting common installation issues
Even with careful installation, there are some common issues that may arise. Here are a few troubleshooting tips for addressing such issues:
- If the burners fail to ignite, check the gas supply and ensure the gas valve is fully open. Additionally, verify that the igniters and wires are properly connected and free from any obstructions or damage.
- In case of uneven heat distribution, make sure that the burners and grates are properly aligned and positioned. Clean any debris or food particles that may be blocking the openings of the burners.
- If the flame is consistently yellow or orange, it could indicate a lack of oxygen supply. Check the ventilation system and ensure that the area around the stove top is well-ventilated.
Addressing any potential complications or errors
Despite careful installation and troubleshooting, complications or errors may still occur. Here are a few potential complications and how to address them:
| Complication/Error | Solution |
|---|---|
| Burners not lighting up at all | Check the power supply and make sure the stove top is properly connected to a functioning electrical outlet or gas line. |
| Gas leakage | If you suspect a gas leak, turn off the gas supply immediately, open windows for ventilation, and contact a professional technician to locate and fix the leakage. |
| Electrical issues | If the stove top is electric, ensure that it is receiving adequate power by checking the circuit breaker or fuse box. |
By following these steps to verify, troubleshoot, and address any complications or errors, you can ensure a successful installation and enjoy the full functionality of your stove top. Remember, if you encounter any persistent issues or are unsure about any aspect of the installation or troubleshooting, it is always recommended to seek professional assistance.
Additional Considerations
When it comes to installing a stove top, there are a few additional considerations that you should keep in mind. Taking care of your stove top involves more than just the installation process itself. In this section, we will discuss some essential tips for cleaning and maintaining the stove top, energy-saving measures for optimal efficiency, and safety precautions to follow while using the stove top.
Tips for cleaning and maintaining the stove top
Keeping your stove top clean is important not only for aesthetic purposes but also for ensuring its functionality and longevity. Here are some tips for cleaning and maintaining your stove top:
1. Regular cleaning: Regularly clean your stove top after each use to prevent the buildup of grease and food particles. Use a soft cloth or sponge and a mild detergent to wipe away spills and stains.
2. Avoid abrasive cleaners: Avoid using abrasive cleaners and scouring pads, as they can scratch and damage the surface of your stove top. Instead, opt for gentle cleaners specifically formulated for stove tops.
3. Remove burner grates and knobs: Occasionally, remove the burner grates and knobs from your stove top and clean them separately. Soak them in warm soapy water, scrub gently, and rinse thoroughly before putting them back in place.
Energy-saving measures for optimal efficiency
To maximize the energy efficiency of your stove top and reduce your carbon footprint, consider the following measures:
1. Choose the right cookware: Using the right size of cookware can significantly affect the energy efficiency of your stove top. Match the size of the burner to the size of the pot or pan to ensure that heat is evenly distributed, minimizing energy waste.
2. Use lids while cooking: Covering pots and pans with proper lids helps retain heat, allowing your food to cook faster while saving energy. This simple practice can make a noticeable difference in your energy consumption.
3. Keep burner surfaces clean: A clean stove top ensures effective heat transfer and prevents energy loss. Regularly remove any debris or spills from the burner surfaces to ensure optimal efficiency.
Safety precautions to follow while using the stove top
While a stove top provides a convenient way to prepare meals, it is important to prioritize safety. Follow these safety precautions to avoid accidents and ensure a safe cooking environment:
1. Never leave the stove unattended: Always stay in the kitchen while using the stove top and keep an eye on your cooking. Unattended cooking can lead to accidents such as fires or boiling over.
2. Keep flammable materials away: Prevent any flammable materials, such as kitchen towels or oven mitts, from coming into contact with the stove top. Maintain a clear and clutter-free cooking area.
3. Use appropriate heat levels: Adjust the heat levels on your stove top according to your cooking needs. Excessive heat can cause burns and fires, while insufficient heat may result in undercooked food.
By following these additional considerations, you can ensure a clean, efficient, and safe stove top experience. Regular cleaning and maintenance, energy-saving practices, and adherence to safety precautions will help you enjoy your stove top while minimizing risks and maximizing its lifespan.
Hiring A Professional Installer
Installing a stove top can be a DIY project for individuals with technical expertise and experience working with electrical or gas connections. However, it’s important to remember that stove top installation involves dealing with complex electrical or gas connections, which can be potentially dangerous if not handled properly. Hiring a professional installer ensures that the installation is done safely and efficiently, giving you peace of mind and reducing the risk of accidents or damage to your home.
When to Consider Hiring a Professional for Installation
While some people may feel confident enough to tackle stove top installation on their own, there are certain situations where hiring a professional is highly recommended. Here are a few scenarios when it’s wise to consider professional help:
- If you have little or no experience with electrical or gas connections
- If your home has specific wiring or gas line requirements that require expert knowledge
- If you are unsure about the safety regulations and codes that must be followed
- If you want to ensure the warranty on the stove top is not voided
Choosing a Reliable and Experienced Installer
When it comes to finding a professional installer for your stove top, it’s important to choose someone who is reliable and experienced. Here are a few factors to keep in mind:
- Look for installers who are licensed and insured, as this ensures they have met the necessary legal requirements and will be accountable for their work
- Ask for references or check online reviews to gauge the installer’s reputation and previous customers’ satisfaction
- Consider the installer’s experience and expertise in stove top installations, specifically whether they have experience with the brand and model of the stove top you have purchased
- Make sure the installer provides a clear and detailed estimate, including any additional charges for materials or unforeseen complications that may arise during the installation
Factors to Consider When Budgeting for Professional Installation
Professional installation of a stove top comes with a cost, and it’s important to budget accordingly. Here are a few factors to consider while planning your budget:
- The complexity of the installation, including any additional electrical or gas line work that may be required
- The location and accessibility of the installation site, as this may affect the time and effort required by the installer
- Any potential modifications or upgrades that may be needed in your kitchen, such as adding new electrical outlets or gas lines
- Consider obtaining multiple quotes from different installers to compare prices and ensure you are getting a fair deal
- Remember to factor in post-installation services, such as warranty coverage or follow-up maintenance, as these may vary between installers
Frequently Asked Questions On How To Install Stove Top
Can You Install A Stove Top Yourself?
Yes, you can install a stove top yourself. However, it is important to follow the manufacturer’s instructions carefully to ensure safety and proper installation. If you are unsure or uncomfortable with the process, it is recommended to hire a professional for assistance.
Can I Install Gas Cooktop Myself?
No, it is not recommended to install a gas cooktop yourself. It requires specialized knowledge and skills to ensure proper installation and safety. Hiring a professional is the best option to ensure a proper and secure installation.
How Do You Install A Stove Top On A Countertop?
To install a stove top on a countertop, start by measuring and marking the area where the stove top will be placed. Next, cut a hole in the countertop following the measurements. Then, carefully lower the stove top into the hole, making sure it sits evenly.
Finally, secure the stove top in place by tightening the screws or locking mechanism.
How Much Does It Cost To Install A Stove Top?
The cost of installing a stove top varies depending on factors such as the type of stove and any additional work required. However, on average, the installation cost can range from $150 to $500.
Conclusion
Installing a stove top is a straightforward process that can greatly enhance your cooking experience. By following these step-by-step instructions, you can easily install your stove top without any hassle. Remember to gather all the necessary tools beforehand and consult the manufacturer’s manual for specific instructions.
With a little patience and attention to detail, you’ll have your stove top up and running in no time. So, go ahead and get started on your kitchen upgrade today!