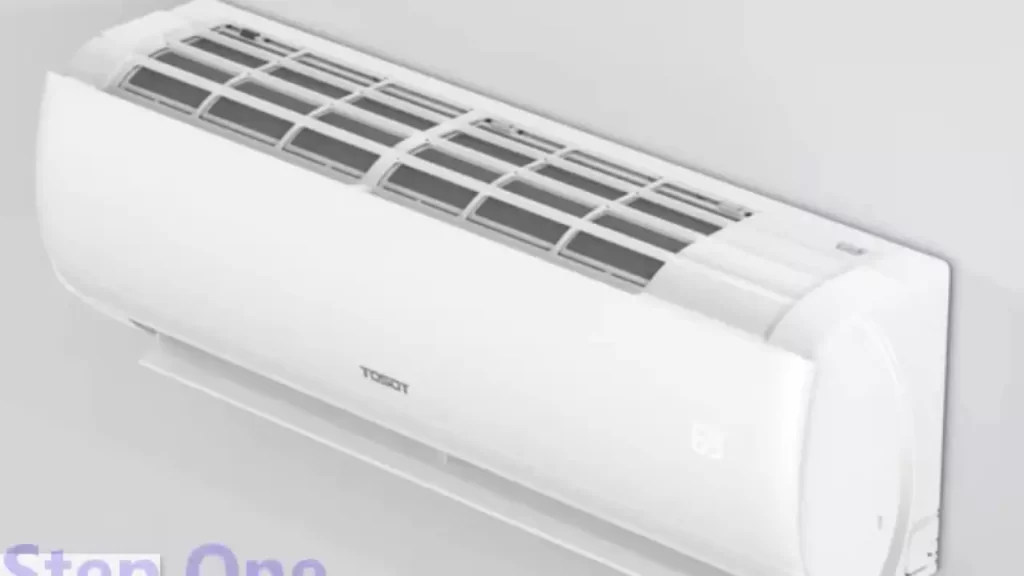
To install a split system, have a professional HVAC technician mount the indoor unit on a wall or ceiling and place the outdoor unit on a flat, stable surface outside the building. A split system is a type of heating and cooling system that consists of two main components: an indoor unit and an outdoor unit.
The indoor unit contains the evaporator coil, while the outdoor unit houses the compressor and condenser coil. These units are connected by refrigerant lines, electrical cables, and a drainage pipe. Once installed, the split system can provide efficient and effective cooling and heating for your space.
It is important to have a professional install the split system to ensure proper functioning and to avoid any potential issues.
Understanding The Basics Of A Split System
When it comes to home cooling, a split system is a popular and effective option. With its ability to provide efficient temperature control in specific areas, it’s no wonder why many homeowners opt for this type of system. In this article, we will delve into the basics of a split system, exploring what it is, its components, and the benefits it offers.
What is a split system?
A split system, also known as a ductless air conditioning system, consists of two main components: an outdoor unit and one or more indoor units. Unlike a traditional central air conditioning system that uses ducts to distribute air, a split system allows for localized cooling by directly delivering cooled air to specific areas of the home.
Components of a split system
A split system typically comprises two main components:
- The outdoor unit: This unit houses the compressor, condenser, and other essential components. It is installed outside the home, usually on a concrete slab or mounted on a wall. The outdoor unit is responsible for releasing heat extracted from indoor air into the environment.
- The indoor unit: Indoor units are installed in the areas that require cooling. These units include the evaporator coil, blower, and air filter. They are connected to the outdoor unit via refrigerant lines, electrical wiring, and a condensate drain line.
Furthermore, the indoor units are available in various types, including wall-mounted, floor-mounted, ceiling-mounted, and cassette units. This versatility allows homeowners to choose the most suitable option for their specific needs and aesthetic preferences.
Benefits of using a split system
There are several advantages to using a split system for cooling your home:
- Energy efficiency: Split systems are known for their energy efficiency, allowing you to save on your utility bills while keeping your home comfortable.
- Zoned cooling: By installing multiple indoor units, you can create different temperature zones within your home, providing customized comfort for each area.
- No ductwork required: Since split systems do not rely on ductwork, they eliminate the energy loss commonly associated with duct leaks and provide cleaner indoor air quality.
- Easy installation: The installation process for a split system is relatively simple, depending on the configuration and accessibility of your home. It requires minimal disruption to your living space.
- Quiet operation: Split systems tend to operate quietly, ensuring a peaceful living environment.
In conclusion, a split system is a versatile and efficient cooling solution that offers numerous benefits. With its localized cooling capabilities, it provides customizable comfort, energy savings, and improved indoor air quality. Consider installing a split system to enjoy all these advantages and maintain a comfortable living space throughout the year.
Choosing The Right Split System For Your Needs
When it comes to installing a split system in your home, choosing the right one is crucial to ensure maximum comfort and energy efficiency. With numerous options available in the market, it can be overwhelming to make a decision. However, by assessing your cooling and heating requirements, determining the appropriate size and capacity, evaluating energy efficiency ratings, and considering additional features and options, you can find the perfect split system for your needs.
Assessing your cooling and heating requirements
Before you start looking at different split systems, it’s essential to assess your cooling and heating requirements. Determine the size of the space you want to cool or heat and take note of any specific needs or preferences. For example, if you live in a region with extreme temperatures, you may require a split system with higher heating or cooling capacity. Assessing your requirements will help you narrow down your options and find a split system that meets your specific needs.
Determining the appropriate size and capacity
Once you have assessed your cooling and heating requirements, it’s time to determine the appropriate size and capacity of the split system. A split system that is too small for your space will struggle to cool or heat effectively, while a system that is too large may result in energy wastage and inefficient operation. To find the right size and capacity, consider factors such as the room’s dimensions, insulation, and any additional heat sources. Consulting a professional can also provide valuable guidance in determining the appropriate size and capacity for your split system.
Evaluating energy efficiency ratings
Energy efficiency is an important consideration when choosing a split system. Not only does an energy-efficient system help reduce your utility bills, but it also has a positive impact on the environment. Look for energy efficiency ratings such as the Seasonal Energy Efficiency Ratio (SEER) and Energy Efficiency Ratio (EER). Higher ratings indicate greater energy efficiency. Additionally, consider features such as programmable thermostats and energy-saving modes, which can further enhance the system’s energy efficiency.
Considering additional features and options
In addition to cooling and heating, split systems often come with a range of additional features and options. Consider features such as air purification, humidity control, and multi-zone capabilities. For example, if you have multiple rooms or zones that require independent temperature control, a multi-zone split system may be the ideal choice. Think about your specific needs and preferences to determine which additional features and options are important to you.
By following these guidelines, you can confidently choose the right split system for your needs. Remember to consult with professionals, compare different models, and consider factors such as cooling and heating requirements, size and capacity, energy efficiency ratings, and additional features. With the right split system in place, you can enjoy the perfect balance of comfort, energy efficiency, and convenience in your home.
Preparing For Split System Installation
Before installing a split system, it’s important to prepare the installation area properly. This ensures a smooth and hassle-free installation process, minimizing any potential risks or complications. In this section, we will discuss the necessary steps to take when preparing for split system installation.
Gathering the necessary tools and equipment
One of the first steps in preparing for split system installation is gathering all the necessary tools and equipment. This will save you time and effort during the installation process. Here is a list of tools and equipment you will need:
| Tools | Equipment |
|---|---|
| Power drill | Split system unit |
| Screwdriver set | Mounting brackets |
| Level | Insulated copper tubing |
| Tape measure | Electrical cables and wires |
Clearing the installation area
Before starting the installation process, it’s important to clear the installation area. This ensures that there are no obstructions or obstacles that could hinder the installation. Here are some steps to clear the installation area:
- Remove any furniture or objects that may be in the way of the installation.
- Clean the area to remove any dust or debris.
- Ensure that there is sufficient space for the split system unit and the necessary clearance for airflow.
Checking electrical and wiring requirements
Another crucial step in preparing for split system installation is checking the electrical and wiring requirements. This ensures that the electrical system can handle the power requirements of the split system unit. Here are some things to consider:
- Check the voltage and amperage requirements of the split system unit.
- Ensure that the electrical circuit can handle the power load of the split system unit.
- Verify the availability of the necessary electrical connections and outlets.
- Inspect the existing wiring for any damages or defects.
Safety precautions to follow
Finally, it’s crucial to follow safety precautions during the split system installation. This helps protect yourself and others from potential hazards. Here are some safety precautions to keep in mind:
- Ensure that the power is turned off before starting any electrical work.
- Wear appropriate personal protective equipment, such as gloves and safety glasses.
- Follow the manufacturer’s instructions and guidelines during the installation process.
- If you’re unsure about any step or process, consult a qualified professional for assistance.
By following these steps and adhering to safety precautions, you can ensure a successful and safe split system installation.
Installing The Indoor Unit
MOUNTING THE INDOOR UNIT ON THE WALL
Installing the indoor unit is a crucial step in setting up your split system. Proper installation ensures efficient cooling and heating throughout your space. Here’s a step-by-step guide on how to mount the indoor unit on the wall.
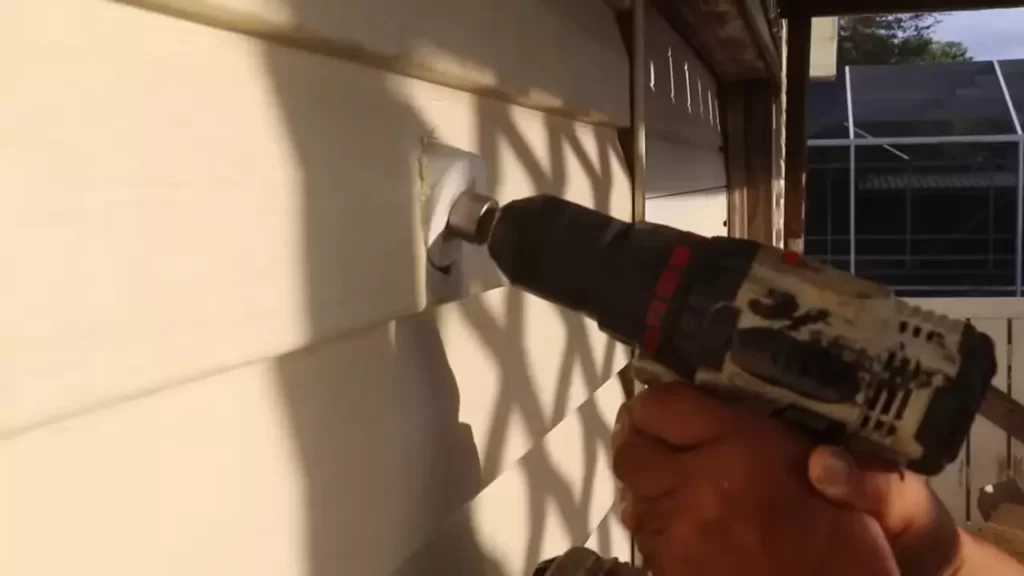
- Choose the right location: Select a wall that can support the weight of the indoor unit and provide proper airflow. It should be free from obstructions such as furniture or curtains.
- Mark the position: Use a level and pencil to mark the desired position on the wall where you want to mount the indoor unit. Make sure it’s at an appropriate height for easy access and maintenance.
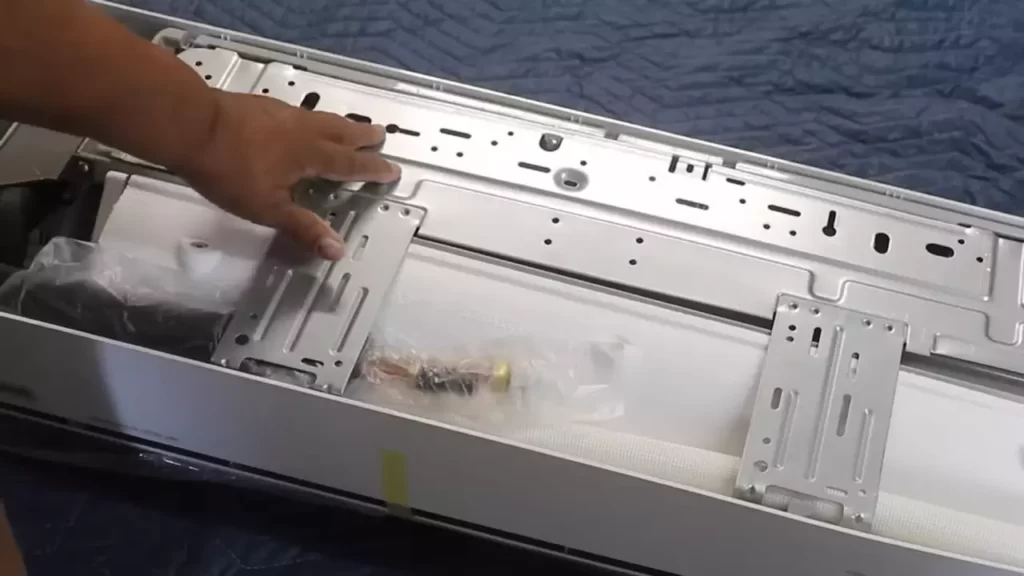
- Drill holes: Use a drill and appropriate size drill bit to create holes at the marked positions. These holes will be used to attach the mounting plate.
- Attach the mounting plate: Securely screw the mounting plate onto the wall using the pre-drilled holes. Ensure it is leveled and sturdy.
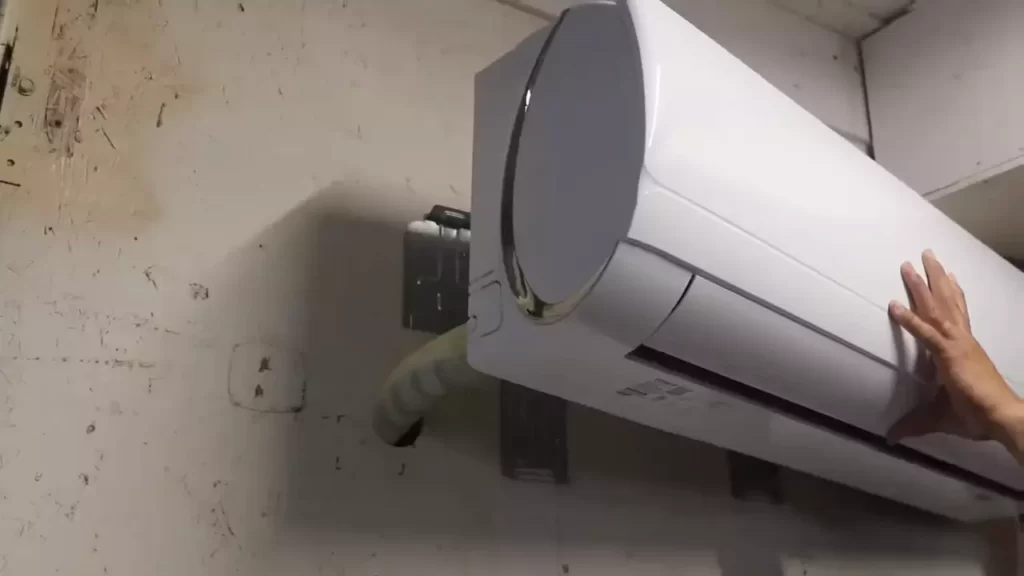
- Hang the unit: Lift the indoor unit and carefully hang it on the mounting plate. Ensure it is securely attached and in the correct position.
CONNECTING THE REFRIGERANT LINES
Once you have mounted the indoor unit, the next step is to connect the refrigerant lines. These lines carry the refrigerant between the indoor and outdoor units, allowing for proper cooling or heating. Follow these steps to ensure a proper connection:
- Locate the service valve: Find the service valve on the back of the indoor unit. It is usually labeled and color-coded for easy identification.
- Remove valve caps: Remove the valve caps from both the liquid and suction pipes. Keep them in a safe place to prevent misplacement.
- Connect the pipes: Connect the liquid and suction pipes to their respective service valves. Make sure to tighten the flare nuts properly using a wrench.
- Check for leaks: Apply a soapy water solution on the connections to check for any leaks. Bubbles will indicate leaks, which need to be resolved before proceeding.
CONNECTING THE DRAIN LINE
Proper drainage is essential to prevent water damage and maintain the indoor unit’s performance. Here’s how to connect the drain line:
- Locate the drain connection: Find the drain hole on the back or bottom of the indoor unit. It is usually marked as a drain or condensate outlet.
- Attach the drain pipe: Connect the drain pipe to the unit’s drain connection. It is recommended to use a flexible drain pipe to make installation easier.
- Ensure proper slope: Ensure that the drain pipe slopes downward at a slight angle to facilitate proper water flow. This prevents water from pooling or backing up.
- Secure the drain pipe: Use tape or clamps to secure the drain pipe in place and prevent any movement or disconnection.
WIRING THE INDOOR UNIT
Wiring the indoor unit is an essential step to ensure proper functionality. Pay attention to the wiring connections and follow these steps:
- Turn off the power: Before starting any electrical work, turn off the power to the indoor unit at the circuit breaker.
- Remove the panel: Remove the panel covering the electrical connections on the indoor unit. It is usually secured with screws or clips.
- Locate the terminal block: Find the terminal block inside the unit where the wires will be connected.
- Connect the wires: Connect the corresponding wires from the power supply to their respective terminals. Refer to the manufacturer’s instructions or wiring diagram for accurate connections.
- Secure the connections: Ensure all connections are secure and properly tightened. Use electrical tape or wire connectors to provide additional protection.
- Replace the panel: Put back the panel covering the electrical connections and secure it in place.
Congratulations! You have successfully installed the indoor unit of your split system. Now, you can move on to installing the outdoor unit for a complete and functional HVAC system.
Installing The Outdoor Unit
Once you have successfully selected an appropriate location for your split system outdoor unit, it’s time to move onto the installation process. In this section, we will guide you through the necessary steps, including installing the outdoor unit on a concrete pad or brackets, connecting the refrigerant lines, and connecting the electrical wiring to ensure a smooth and efficient operation of your split system.
Selecting an Appropriate Location for the Outdoor Unit
Choosing the right location to install your split system outdoor unit is crucial for optimal performance. Here are a few factors to consider:
- Place the unit on a level surface that can support its weight and vibration.
- Ensure the outdoor unit is located away from direct sunlight, heat sources, and any obstacles that could restrict airflow.
- Avoid installing the unit near plants, as leaves and debris can obstruct the airflow and hinder the system’s efficiency.
Installing the Outdoor Unit on a Concrete Pad or Brackets
Securing the outdoor unit on a stable surface is essential. Follow these steps to install it properly:
- Prepare a concrete pad or use brackets specifically designed for split system units.
- Place the pad or brackets in the selected location, ensuring they are level and securely fixed.
- Position the outdoor unit on the pad or brackets, aligning it with the mounting holes provided.
- Use the appropriate screws or bolts to secure the unit to the pad or brackets, ensuring it is stable and doesn’t wobble.
Connecting the Refrigerant Lines to the Outdoor Unit
Properly connecting the refrigerant lines is crucial for the efficient operation of your split system. Follow these steps:
- Identify the refrigerant lines coming from the indoor unit and the corresponding connections on the outdoor unit.
- Attach the appropriate tubing to the corresponding connections and secure them tightly.
- Ensure that the refrigerant lines are properly insulated to prevent any heat transfer.
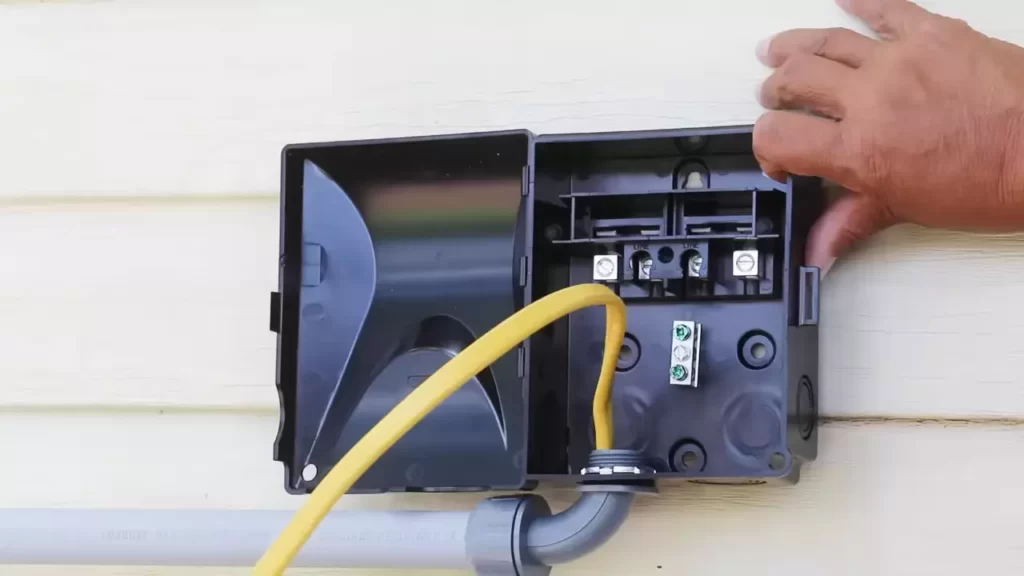
Connecting the Electrical Wiring to the Outdoor Unit
Connecting the electrical wiring correctly is essential to ensure the safe and efficient operation of your split system. Here’s how to do it:
- Consult the manufacturer’s instructions to identify the specific electrical requirements for your split system.
- Mount an appropriate electrical box near the outdoor unit, following the necessary electrical codes and regulations.
- Connect the electrical wires from the outdoor unit to the electrical box, following the color-coded instructions.
- Ensure all connections are secured tightly and protected with appropriate electrical conduit or tape.
- After completing the electrical connections, test the system to ensure it is working properly.
By following these steps, you can safely and efficiently install the outdoor unit of your split system, setting the foundation for a comfortable indoor environment.
Connecting The Indoor And Outdoor Units
The installation of a split system air conditioner involves connecting the indoor and outdoor units. This crucial step ensures that the two units work together to provide efficient cooling or heating for your space. To successfully connect the units, it is important to follow a systematic approach that includes running the refrigerant lines, ensuring proper insulation and securing, connecting the condensation drain line, and testing the refrigerant lines for leaks. Let’s dive into each of these steps in detail.
Running the refrigerant lines between the indoor and outdoor units
The first step in connecting the indoor and outdoor units of a split system is running the refrigerant lines. These lines are responsible for carrying the refrigerant, which is the substance that absorbs and releases heat, between the two units. To run the refrigerant lines, you will need to:
- Locate a suitable pathway for the lines, ensuring that there are no obstacles or obstructions in the way.
- Carefully measure and cut the refrigerant lines to the appropriate lengths.
- Securely attach the lines to the designated areas on both the indoor and outdoor units, following the manufacturer’s instructions.
- Use clamps or brackets to keep the lines in place and prevent any movement or damage.
Running the refrigerant lines requires precision and attention to detail to ensure that the units are properly connected for optimal performance.
Ensuring proper insulation and securing the lines
Once the refrigerant lines are in place, it is essential to ensure proper insulation and secure them to prevent any energy loss or damage. Proper insulation helps maintain the desired temperature and prevents condensation or potential leaks. Here are the steps to follow:
- Wrap the refrigerant lines with insulation material specifically designed for HVAC systems.
- Secure the insulation with adhesive tape or zip ties at regular intervals.
- Pay close attention to fittings, bends, and joints, ensuring they are well-insulated to minimize heat transfer.
- Check for any gaps or openings in the insulation and seal them to maintain efficiency.
By properly insulating and securing the refrigerant lines, you can reduce energy consumption and enhance the overall performance of your split system.
Connecting the condensation drain line
In addition to the refrigerant lines, it is crucial to connect the condensation drain line to ensure proper drainage of excess moisture. Here’s how to do it:
- Identify the condensation drain on the indoor unit and the designated drainage point.
- Measure and cut the condensation drain line to the appropriate length.
- Connect one end of the drain line to the drain outlet of the indoor unit.
- Ensure that the other end of the drain line is securely connected to the drainage point, sloping downward for proper water flow.
- Consider using a condensation pump if your drainage point is located at a higher level.
Connecting the condensation drain line is crucial as it prevents the accumulation of water and potential damage to your split system.
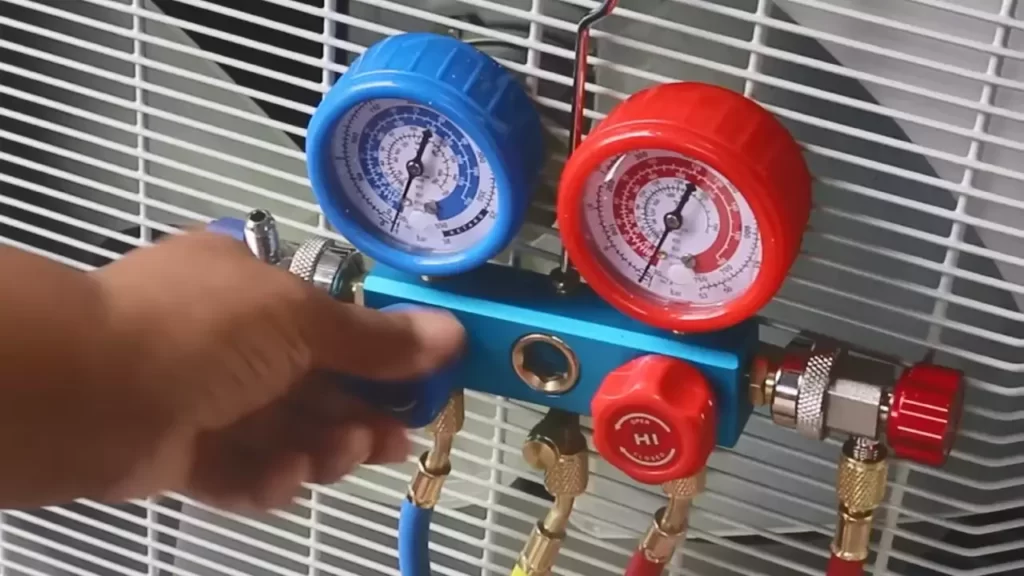
Testing the refrigerant lines for leaks
Once all the connections are made, it is imperative to test the refrigerant lines for leaks. This helps ensure that the system operates efficiently and does not lose any refrigerant. Follow these steps:
- Use a refrigerant leak detector or a soapy water solution to check for any leaks along the refrigerant lines.
- Inspect each connection point, fittings, and joints for any signs of leakage.
- If any leaks are detected, tighten the connections or seek professional assistance to fix the issue.
- Recheck the refrigerant lines after fixing any leaks to ensure they are properly sealed.
Testing the refrigerant lines for leaks is a critical step to ensure the proper functioning and longevity of your split system. By detecting and resolving any leaks early on, you can avoid costly repairs and maintain optimal performance.
Electrical Connections And Testing
When it comes to installing a split system, ensuring proper electrical connections and testing is essential for optimal performance. In this section, we will cover everything you need to know about wiring the electrical connections, connecting the control wires, testing the connection and voltage, and checking the functionality of the system.
Wiring the electrical connections
Before you begin wiring the electrical connections of your split system, it’s crucial to ensure your safety by turning off the power to the HVAC unit. Once the power is off, you can proceed with the following steps:
- Locate the electrical panel and open it to access the wiring area.
- Identify the specific wires for the split system, including the power supply wires, ground wires, and neutral wires.
- Using wire strippers, carefully strip the ends of the wires to expose the copper strands.
- Connect the power supply wires to the corresponding terminals on the split system, ensuring a secure connection.
- Secure the ground wires by connecting them to the designated grounding points on the HVAC unit.
- Finally, connect the neutral wires to their respective terminals, making sure they are tightly fastened.
Connecting the control wires
After you have completed the electrical connections, it’s time to connect the control wires to the appropriate terminals. These wires are responsible for transmitting signals between the thermostat and the HVAC unit. Follow these steps:
- Locate the control wire terminals on both the split system and the thermostat.
- Carefully strip the ends of the control wires using wire strippers.
- Match the corresponding control wires from the split system and the thermostat, ensuring the colors and labels align.
- Securely connect each control wire to its designated terminal, making sure the connections are tight.
Testing the connection and voltage
Once all the electrical and control wires are properly connected, it’s time to test the connection and voltage to ensure everything is working correctly. Follow these steps to perform a thorough test:
- Safely restore power to the HVAC unit by turning on the electrical panel.
- Use a multimeter to measure the voltage between the power supply wires.
- Ensure the voltage reading matches the required specifications mentioned in the manufacturer’s instructions.
- If the voltage is within the expected range, proceed to the next step.
- If the voltage is not within the specified range, double-check all the electrical connections and consult a professional if needed.
Checking the functionality of the system
Once you have confirmed the proper connection and voltage, it’s time to check the functionality of your split system. Follow these steps:
- Turn on the HVAC unit and set the desired temperature on the thermostat.
- Listen for any unusual noises coming from the split system.
- Check if the air conditioning or heating is functioning correctly.
- Observe the air quality and ensure adequate airflow from the vents.
- If you notice any issues, refer to the troubleshooting section of the manufacturer’s instructions or seek professional assistance.
Final Steps And Maintenance
Once the split system is properly installed, there are a few important final steps and ongoing maintenance tasks to ensure its optimal operation. By following these guidelines, you can increase the efficiency and longevity of your split system, keeping your indoor environment comfortable all year round.
Installing the air filters
One crucial step in maintaining your split system is installing and regularly cleaning or replacing the air filters. These filters are responsible for trapping dust, pollen, and other airborne particles, keeping the indoor air quality high. To install the air filters:
- Locate the air filter slots on the indoor unit.
- Remove the old filter and dispose of it properly.
- Insert a new filter into the slot, following the manufacturer’s instructions.
- Make sure the filter is tightly secured and properly aligned.
To ensure optimal performance, it is recommended to clean or replace the air filters every month or as specified by the manufacturer. This will prevent dust buildup and maintain efficient airflow throughout your split system.
Setting the thermostat and programming desired temperature settings
An essential aspect of operating a split system is setting the thermostat and programming the desired temperature settings. These steps will help you create a comfortable indoor environment while maximizing energy savings:
- Determine the desired temperature for your space.
- Access the thermostat control panel.
- Using the provided buttons or touchscreen, adjust the temperature setting to your desired level.
- Set the fan speed according to your preference.
- Utilize programmable features to create temperature schedules based on your daily routines.
By programming temperature settings according to your needs, you can avoid unnecessary energy consumption and ensure a pleasant environment when you return home or wake up in the morning.
Conducting a thorough system test
Before the installation process is complete, it is essential to conduct a thorough system test to verify the proper functioning of your split system. Here’s how you can do it:
- Turn on the power supply to the split system.
- Ensure the indoor and outdoor units are operational.
- Listen for any unusual noises or vibrations that might indicate a problem.
- Check if the air is flowing through the vents in the desired direction.
- Monitor the temperature to make sure it matches the setting on the thermostat.
If you encounter any issues during the system test, it is recommended to contact a professional technician for assistance. Resolving potential problems at an early stage can save you from costly repairs later.
Performing regular maintenance and cleaning
To maintain the optimum performance of your split system and extend its lifespan, regular maintenance and cleaning are essential. Here are some maintenance tasks you should perform:
| Maintenance Task | Frequency |
|---|---|
| Clean the outdoor unit | At least once a month |
| Inspect refrigerant lines for leaks | Every 3-6 months |
| Clear debris from outdoor unit | Regularly |
| Check and clean the condensate drain line | Every 3 months |
Regularly performing these maintenance tasks will help keep your split system in top condition and prevent any preventable issues from arising. It is also advisable to schedule an annual professional inspection and maintenance service to ensure optimal performance.
By following these final steps and regularly maintaining your split system, you can enjoy consistent comfort and energy efficiency throughout the year. Take the time to perform these tasks, and your split system will reward you with reliable performance and cost savings in the long run.
Troubleshooting Common Issues
When it comes to split system installation, it’s important to know how to troubleshoot common issues that may arise. In this section, we will discuss some common problems you may encounter with your split system and provide solutions to resolve them.
Insufficient cooling or heating
If you find that your split system is not providing adequate cooling or heating, there could be several reasons for this. Here are a few troubleshooting steps you can take:
- Check the thermostat settings: Ensure that the thermostat is set to the desired temperature and the mode (cooling or heating) is selected appropriately.
- Clean or replace the air filter: A dirty or clogged air filter can restrict airflow, affecting the cooling or heating efficiency. Clean or replace the filter according to the manufacturer’s instructions.
- Inspect the outdoor unit: Check if the outdoor unit is obstructed by debris, such as leaves or branches. Clear any obstructions that may restrict airflow.
- Examine the indoor unit: Inspect the indoor unit to see if it is clean and free from dust or debris. Clean it if necessary.
- Check for refrigerant leaks: Insufficient cooling or heating could be a result of a refrigerant leak. If you suspect a leak, it is best to contact a professional technician for assistance.
Strange noises or odors
If your split system is making strange noises or emitting unusual odors, it could be an indication of a problem. Here’s what you can do:
- Identify the source of the noise or odor: Determine if the noise is coming from the indoor or outdoor unit. Similarly, pinpoint the area from where the odor is originating.
- Check for loose or damaged parts: Inspect the unit for any loose or damaged components. Secure or replace them as needed.
- Clean the air vents and ducts: Sometimes, the accumulation of dirt or debris in the air vents or ducts can cause strange noises or odors. Clean them thoroughly to eliminate any potential sources of the problem.
- Contact a professional technician: If the issue persists or if you are unsure about the cause, it is advisable to seek professional assistance. A qualified technician can diagnose and resolve the issue effectively.
Leaking refrigerant
Leaking refrigerant can significantly impact the performance of your split system. Here’s what you should do if you notice a refrigerant leak:
- Look for signs of leakage: Check for any visible signs of refrigerant leakage, such as oil spots or refrigerant stains.
- Call a professional technician: Refrigerant leaks should be addressed by a professional technician. Contact a qualified HVAC technician to inspect the system, repair the leak, and recharge the refrigerant as necessary.
Unresponsive controls
If the controls of your split system become unresponsive, you may not be able to adjust the settings or operate the system efficiently. Follow these steps to troubleshoot the issue:
- Check the power supply: Ensure that the system is receiving power and that the circuit breaker or fuse is not tripped.
- Replace the batteries: If you have a remote control for your split system, it may require new batteries. Replace them and see if the controls respond.
- Reset the unit: Sometimes, performing a system reset can resolve control issues. Refer to the manufacturer’s instructions on how to reset your specific split system model.
- Contact customer support: If none of the above steps solve the problem, contact the customer support of the split system manufacturer for further assistance.
By following these troubleshooting tips, you can diagnose and resolve common issues that may arise with your split system installation. However, if the problems persist or if you are unsure about handling them yourself, it is always recommended to reach out to a professional service provider for assistance.
Frequently Asked Questions On How To Install Split System
Can I Install A Split AC myself?
Installing a split AC yourself is not recommended. It requires expertise and technical knowledge. Improper installation can lead to inefficiency, malfunction, and even safety hazards. It’s best to hire a professional for a safe and hassle-free installation.
Is A Split System Easy To Install?
Yes, a split system is easy to install. It requires minimal hassle, making installation a straightforward process. The simplicity of the design allows for a quick and efficient setup, saving you time and effort.
Are Split Units Hard To Install?
Split units are not hard to install. They can be easily installed with basic tools and instructions. The installation process generally involves mounting the indoor and outdoor units, connecting the refrigerant and electrical lines, and ensuring proper insulation. Professional installation is recommended for optimal performance.
How To Install A Split System Hvac?
To install a split system HVAC, follow these steps:
1. Choose an appropriate location for the outdoor unit and ensure proper clearance. 2. Install the indoor unit on a sturdy wall, keeping it away from direct sunlight and heat sources.
3. Connect the refrigerant lines, electrical wiring, and drain pipe between the indoor and outdoor units.
4. Securely mount both units and ensure proper insulation around the pipes.
5. Test the system to ensure it’s working efficiently before enjoying its cooling or heating benefits.
Conclusion
To sum up, installing a split system can greatly enhance your home’s comfort and energy efficiency. By following the step-by-step guide outlined in this blog post, you can successfully install it yourself without the need for professional assistance. Remember to carefully consider the placement of the indoor and outdoor units, as well as to properly connect the refrigerant lines and electrical components.
With a little patience and attention to detail, you’ll have a fully functioning split system in no time. Enjoy the benefits of a cool and comfortable home!