To install a small electric water heater, follow these steps: Turn off the power supply, shut off the water, drain the existing water heater, remove the old unit, connect the new water heater, fill the tank with water, and turn on the power supply. Installing a small electric water heater is a quick and easy process that can be completed in just a few simple steps.
By following these instructions, you can have hot water flowing in no time.
Choosing The Right Small Electric Water Heater
Factors to consider when selecting a small electric water heater
Choosing the right small electric water heater is crucial for ensuring a reliable and efficient supply of hot water in your home. With so many options available in the market, it can be overwhelming to make the right choice. However, by considering a few key factors, you can make an informed decision that meets your specific needs.
- Size: One of the first things to consider when selecting a small electric water heater is its size. You need to determine the amount of hot water your household requires. Calculate the number of users and the typical usage patterns to determine the appropriate tank size. It’s essential to find a unit that provides enough hot water without wasting energy on heating excess water.
- Energy Efficiency: Energy efficiency is an important consideration to reduce your electricity bills. Look for small electric water heaters that have high energy efficiency ratings. These units are designed to minimize heat loss and maximize the utilization of electrical energy, making them more cost-effective in the long run.
- Installation Requirements: Different small electric water heaters may have different installation requirements. Consider the space available in your home and choose a unit that fits seamlessly into your desired location. Also, keep in mind any necessary electrical and plumbing connections that may be required for the installation.
- Temperature Range: Check the temperature range of the small electric water heater you are considering. Ensure that it can provide hot water at the desired temperature for your needs. Some units may have adjustable settings, allowing you to customize the temperature based on your preferences.
- Safety Features: Safety should always be a top priority, especially when dealing with electrical appliances. Look for small electric water heaters that come with safety features such as temperature and pressure relief valves. These features protect against overheating, excessive pressure, and other potential hazards.
By considering these factors, you can find the most suitable small electric water heater for your home. Remember to prioritize your specific hot water needs, energy efficiency, and safety when making your decision. An appropriately sized and efficient water heater will ensure a consistent supply of hot water while keeping your energy costs under control.
Gathering The Necessary Tools And Materials
Before you begin the installation process of a small electric water heater, it is essential to gather all the necessary tools and materials. By having everything prepared beforehand, you can save time and avoid interruptions during the installation. Here is a list of the tools and materials you will require:
List of tools and materials needed for the installation process:
| Tools | Materials |
|---|---|
|
|
Gathering these tools and materials ahead of time will ensure a smoother installation process. Make sure to have all the necessary tools in proper working condition, and quality materials that meet the recommended standards.
Once you have everything ready, you will be able to proceed with confidence, knowing that you have all the essential tools and materials required for the installation of your small electric water heater.
Preparing For Installation
Before installing a small electric water heater, it is crucial to properly prepare the space and ensure compatibility with the electrical circuit. This section will guide you through the necessary steps to get ready for the installation.
Measuring space requirements for the water heater
One of the important initial steps in installing a small electric water heater is to measure the available space. Before purchasing the water heater, make sure to measure the designated area to ensure it fits properly. Here’s how you can do it:
- Clear the space: Remove any items or clutter from the area where you plan to install the water heater. This will provide you with a clear and accurate measurement.
- Measure the dimensions: Use a tape measure to determine the height, width, and depth of the space. Write down these measurements to have them handy while selecting a water heater.
Keep in mind that the space requirements may differ depending on the specific model of the water heater you choose. By accurately measuring the available space, you can select a water heater that fits perfectly, without any installation issues or constraints.
Checking electrical circuit compatibility
Ensuring that the electrical circuit is compatible with the small electric water heater is essential for a successful installation. Here are the steps to follow:
- Check the circuit capacity: Refer to the water heater’s specifications and verify the required electrical circuit capacity. This information can usually be found in the product manual or on the manufacturer’s website.
- Inspect the circuit breaker: Locate the circuit breaker that supplies power to the area where the water heater will be installed. Verify that the circuit breaker has the necessary amperage rating to handle the water heater’s electrical load.
- Assess wiring conditions: Examine the condition of the existing wiring. Look for any signs of damage or wear that may pose a safety hazard. It is recommended to consult a licensed electrician if you are unsure about the wiring or if any repairs or upgrades are necessary.
By performing these checks, you can ensure that the electrical circuit is compatible with the small electric water heater. This will help prevent potential electrical issues and ensure safe and efficient operation of the water heater.
Turning Off The Power And Water Supply
Steps to Safely Shut Off the Power and Water
Before installing a small electric water heater, it is crucial to turn off both the power and water supply. This step ensures your safety and prevents any potential electrical shocks or leaks.
Turning Off the Power
- Locate the nearest circuit breaker box or electrical panel in your home.
- Open the panel door to reveal the circuit breakers or fuses.
- Look for the breaker or fuse labeled for the water heater. If there is no specific label, check the manufacturer’s instructions or consult an electrician.
- Switch off the breaker by pushing it to the “off” position or remove the fuse.
- Use a voltage tester to verify that the power to the water heater has been successfully turned off. This test is crucial before proceeding with the installation.
Shutting Off the Water Supply
To prevent any water leaks during the installation process, you need to shut off the water supply to the existing water heater.
- Locate the main water shut-off valve in your home. This valve is usually found near the water meter or where the water supply enters your property.
- Turn the valve clockwise to shut off the water supply. If you have a gate valve, turn the handle a few times until it is fully closed.
- Open all hot water faucets in your home to relieve any residual pressure in the water lines.
- Allow the water to drain completely from the existing water heater.
By following these steps, you can safely shut off the power and water supply before installing a small electric water heater. Remember to always prioritize your safety and consult a professional if you are unsure about any step in the process. Once these precautions are taken, you can proceed with confidence to install your new water heater.
Installing The Small Electric Water Heater
Step-by-step Guide for Installing a Small Electric Water Heater
Welcome to our step-by-step guide for installing a small electric water heater! Whether you’re replacing an old unit or installing a new one, this guide will walk you through the process, ensuring a hassle-free installation.
1. Gather the necessary tools and materials
Before you start the installation process, it’s important to gather all the tools and materials you’ll need. Here’s a handy checklist:
- A small electric water heater (check the specifications to ensure it fits your needs)
- Adjustable wrench
- Teflon tape
- Wire cutters and strippers
- Electrical conduit
- Screwdrivers
- Plumber’s tape
- Bucket or basin
- Level
2. Choose the right location for your water heater
Next, you’ll need to choose a suitable location for your small electric water heater. Keep in mind that it should be easily accessible for maintenance and repairs. Additionally, ensure that the location has proper ventilation to avoid overheating. The water heater should be placed on a level surface away from flammable materials.
3. Prepare the area and make necessary connections
- Turn off the electricity supply to the water heater at the main circuit breaker.
- Disconnect the old water heater, if applicable, by shutting off the water supply valve and draining the tank through the drain valve.
- Using plumber’s tape, wrap the threads of the water supply connections.
- Connect the hot and cold water supply pipes to the corresponding connections on the water heater using an adjustable wrench.
- Make sure all connections are tight and secure.
- If required, install an expansion tank to prevent pressure buildup in the water heater.
4. Connect the electrical wiring
Follow these steps to connect the electrical wiring:
- Consult the manufacturer’s instructions for specific wiring requirements.
- Make sure the power supply is turned off at the circuit breaker.
- Remove the wiring compartment cover on the water heater.
- Strip about 1/2 inch of insulation from the ends of the wires.
- Connect the wires according to the manufacturer’s instructions, typically matching color-coded wires together.
- Secure the connections with wire nuts and tighten them firmly.
- Replace the wiring compartment cover.
5. Fill and test the water heater
Finally, you’ll need to fill and test the water heater before using it:
- Open a hot water faucet nearby to release any trapped air in the system.
- Open the water supply valve to the water heater.
- Allow the tank to fill until water flows smoothly from the faucet.
- Close the faucet and check for any leaks around the connections.
- If there are no leaks, turn on the electricity supply to the water heater.
Congratulations! You’ve successfully installed your small electric water heater. Remember to regularly check for any signs of leaks or malfunctions and perform routine maintenance as recommended by the manufacturer.
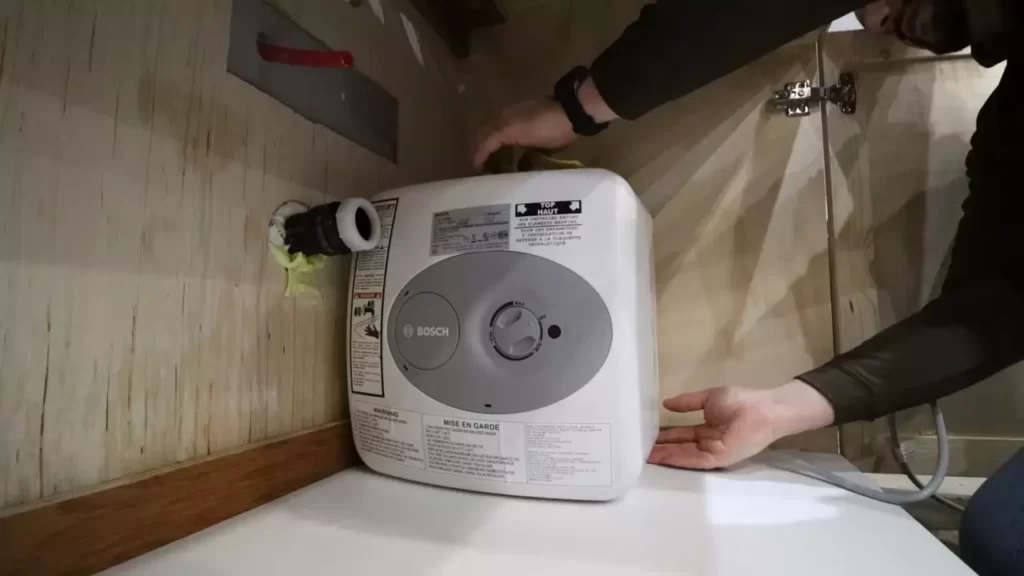
Mounting The Water Heater
Instructions for securely mounting the water heater
Mounting the water heater properly is essential for its safe and efficient operation. This step-by-step guide will walk you through the process of securely installing your small electric water heater.
1. Choose an appropriate location
Before mounting the water heater, determine the best location for installation. Ensure the area is well-ventilated and easily accessible for maintenance. It should also be close to the electrical and water supply lines. Avoid areas that are prone to high humidity or extreme temperatures.
2. Provide proper support
To ensure stability, it is crucial to provide adequate support for the water heater. Confirm the wall or surface where you plan to mount the heater is strong enough to bear its weight. Use a stud finder to locate the wall studs or use appropriate anchors if mounting on a different surface.
3. Positioning the mounts
Once you have determined the location and secured the support, position the mounting brackets or straps. These should be included with your water heater and can be installed at the top and bottom of the unit. Ensure they are level and firmly attached to the wall or surface.
4. Attaching the water heater
Carefully lift the small electric water heater and align it with the mounting brackets or straps. Double-check that the unit is level before proceeding. Securely attach the water heater to the brackets using the provided fasteners, ensuring they are tightened sufficiently to hold the unit in place.
5. Connecting electrical and plumbing
Once the water heater is securely mounted, it’s time to connect the electrical and plumbing components. Follow the manufacturer’s instructions for properly installing the electrical supply and the water inlet and outlet connections. Use appropriate fittings and connectors to ensure a leak-free installation.
6. Testing and final adjustments
Before considering the installation complete, it is essential to test the water heater and make any final adjustments. Check for any leaks in the plumbing connections and verify that the electrical supply is working correctly. Adjust the temperature settings as per your preference and allow the water heater to fill and heat a tank of water to ensure everything is functioning properly.
Conclusion
By following these instructions for securely mounting your small electric water heater, you can ensure safe and efficient operation. Taking the time to properly position and secure the unit will provide peace of mind and reliable hot water for your daily needs. Remember to consult the manufacturer’s guidelines and local building codes for specific requirements to guarantee a successful installation.
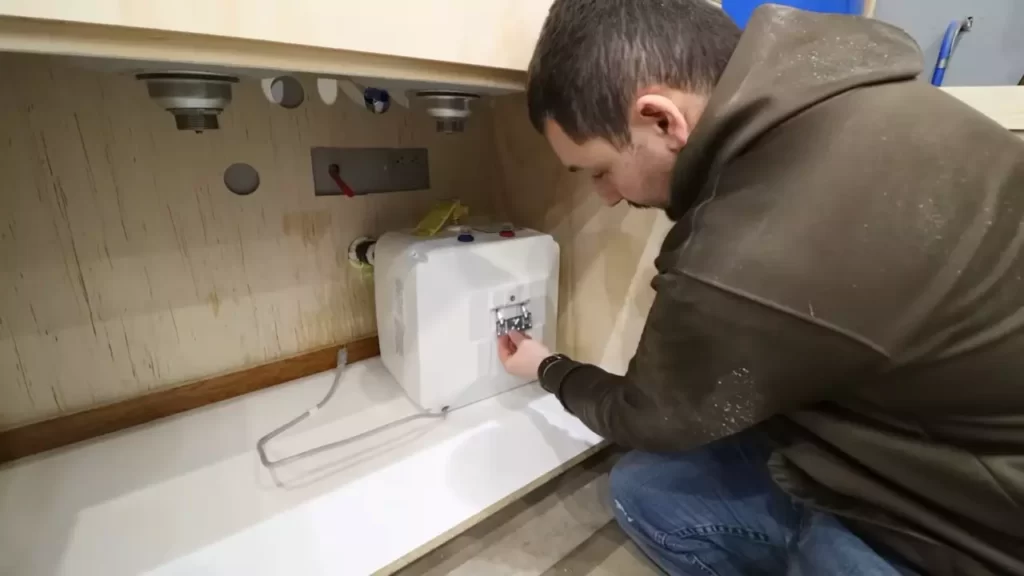
Connecting The Electrical Wiring
Properly connecting the electrical wires to your small electric water heater is an essential step in the installation process. Without the correct wiring connection, your water heater won’t function properly and could pose a safety hazard. This guide will take you through the necessary steps to ensure that your electrical wiring is connected safely and effectively.
Step 1: Gather the Materials
Before you start connecting the electrical wiring, gather all the necessary materials. You will need:
- Wire stripper
- Electrical tape
- Wire nuts
- Screwdriver
- Wire connectors
Step 2: Turn off the Power
Before handling any electrical wiring, it is crucial to turn off the power to prevent accidents or electrical shocks. Locate the breaker box and turn off the circuit breaker that supplies power to the water heater.
Step 3: Remove the Wiring Compartment Cover
Locate the wiring compartment cover on your small electric water heater. Use a screwdriver to remove the screws securing the cover in place. Once the cover is removed, you will have access to the wiring connections.
Step 4: Identify the Wiring
Identify the different wires within the wiring compartment. There are typically three wires: a black wire (hot), a white wire (neutral), and a green or bare copper wire (ground).
Step 5: Make the Connections
Using your wire stripper, strip about 1/2 inch of insulation from the end of each wire. Start by connecting the black wire from the water heater to the black wire from the power supply. Twist the exposed ends of the wires together and secure them with a wire connector. Repeat this process for the white and green/bare copper wires.
Step 6: Insulate the Connections
After making the connections, it’s essential to insulate them properly to prevent any electrical hazards. Wrap each wire connection with electrical tape, ensuring that no exposed wires are visible.
Step 7: Replace the Wiring Compartment Cover
Once all the connections are properly made and insulated, replace the wiring compartment cover by securing it with the screws you removed earlier. Ensure that the cover is securely in place to protect the wiring.
Step 8: Turn on the Power
Finally, head back to the breaker box and turn on the circuit breaker that supplies power to your water heater. This will restore power to the unit, allowing it to function correctly.
Remember, if you’re unsure about any step in the process, it’s always best to seek professional assistance to ensure that your small electric water heater is installed safely and effectively.
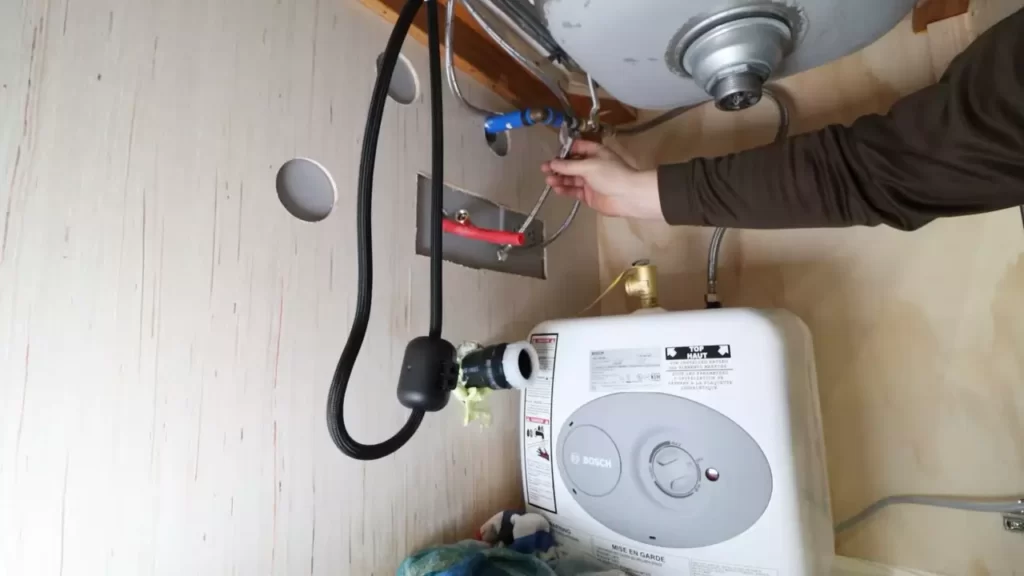
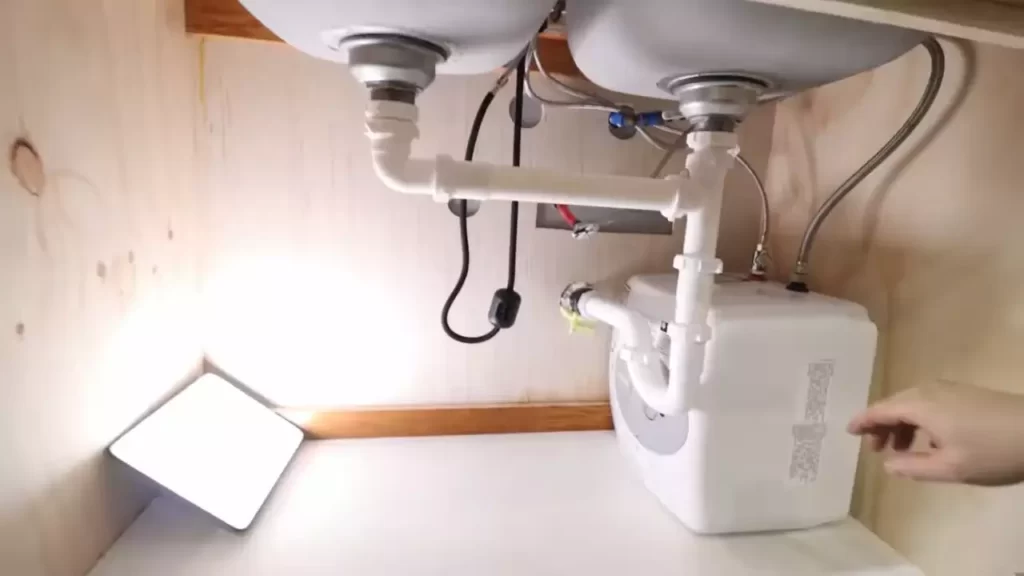
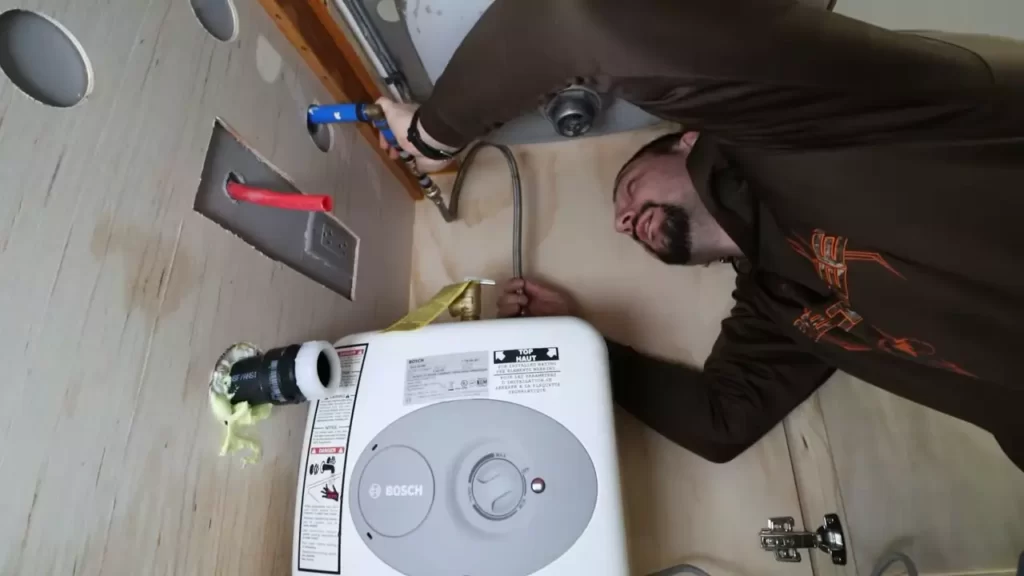
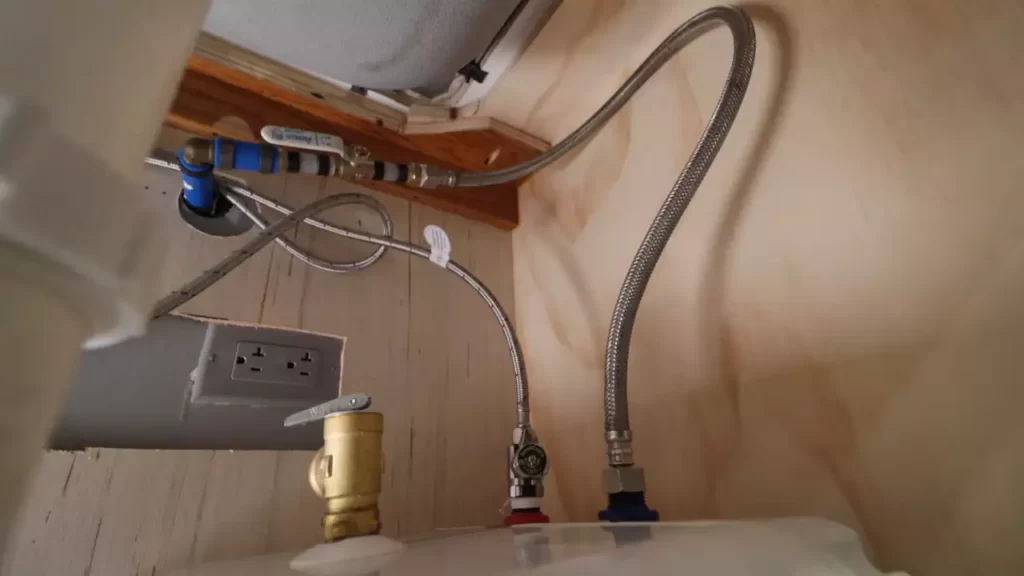
Plumbing Connections
Connecting the Water Supply and Discharge Pipes
Once you have positioned your small electric water heater in its designated spot, the next step towards its successful installation is connecting the water supply and discharge pipes. This crucial part of the installation process ensures that water flows smoothly and wastes are properly expelled.
Before you start connecting the pipes, it’s important to gather the necessary tools and materials. You will need:
- Adjustable wrench
- Teflon tape
- Pipe cutter or hacksaw
- Tubing cutter (for copper pipes)
- Metal file (if needed)
- Flexible supply lines (if required)
1. Water Supply Connection
Begin with the water supply connection. This involves connecting the cold water pipe to the inlet valve of the water heater. Follow these steps:
- First, ensure that the main water supply is turned off.
- Measure and cut the cold water pipe to the appropriate length, leaving enough space for fittings.
- If using copper pipes, use a tubing cutter to make a clean, straight cut. For other types of pipes, a pipe cutter or hacksaw will do the job.
- Smooth any rough edges with a metal file to ensure a proper fit.
- Select the appropriate fittings based on the size and type of pipes being connected.
- Wrap Teflon tape around the threaded ends of the fittings to create a tight seal.
- Screw the fittings onto the water heater’s inlet valve, making sure they are securely tightened with an adjustable wrench.
- Connect the cold water pipe to the fittings, ensuring it is properly aligned and tightened.
2. Discharge Pipe Connection
The next step is to connect the discharge pipe, which allows the release of hot water and pressure relief. Here’s how:
- Locate the T&P (temperature and pressure relief) valve on the water heater.
- Measure and cut a section of discharge pipe that will reach a suitable location for water to safely drain. Keep in mind local plumbing codes and regulations.
- Attach any necessary fittings to the T&P valve.
- Apply Teflon tape to the threaded ends of the fittings.
- Screw the fittings onto the T&P valve, ensuring they are tightened securely.
- Connect the discharge pipe to the fittings, making sure it is properly aligned and tightened.
- Ensure that the discharge pipe is sloping downward to allow for effective drainage.
Remember to carefully inspect all connections for leaks before turning on the water supply. Tighten any fittings if necessary. Once the connections are secure and water is flowing smoothly, you can move on to the next step of the installation process.
By following these steps and properly connecting the water supply and discharge pipes, you can ensure that your small electric water heater functions efficiently and provides you with the hot water you need.
Testing And Troubleshooting
Testing and troubleshooting are important steps in the installation process of a small electric water heater. By thoroughly testing the unit and troubleshooting common issues, you can ensure that your water heater is functioning properly and delivering hot water efficiently.
Steps to Test the Water Heater
Testing your small electric water heater involves a few simple steps to ensure its functionality. Follow these steps to thoroughly test your water heater:
- Check the power supply: Ensure that the power supply to the water heater is turned on. Check if the breaker switch or the fuse for the water heater is not tripped or blown.
- Inspect the connections: Make sure all electrical connections are secure and free from any loose or damaged wires.
- Verify thermostat settings: Set the thermostat temperature to a desirable level and wait for a few minutes to see if the water heats up accordingly.
- Test the heating elements: Use a multimeter to check the heating elements’ resistance. If the resistance reading is higher or infinite, it indicates a faulty heating element that needs replacement.
- Check the pressure relief valve: Lift the pressure relief valve slightly to release any excess pressure. If water flows out, it means the valve is functioning correctly.
Troubleshooting Common Issues
Even with proper installation, small electric water heaters can encounter common issues. By troubleshooting these problems, you can identify and address them promptly:
| Issue | Possible Cause | Troubleshooting Steps |
|---|---|---|
| No hot water | Faulty heating elements, incorrect thermostat settings, or insufficient power supply. |
|
| Inconsistent water temperature | Broken thermostat, sediment buildup, or faulty heating elements. |
|
| Leaking water | Loose connections, damaged pipes, or a faulty pressure relief valve. |
|
Testing and troubleshooting your small electric water heater can prevent unexpected issues and ensure that you have a reliable source of hot water in your home. By carefully following the testing steps and addressing common problems, you can enjoy a consistent and efficient supply of hot water for your daily needs.
Filling And Testing The Tank
Instructions for filling the tank and checking for leaks
Once you have successfully installed your small electric water heater, the next step is to fill and test the tank to ensure everything is in working order. Follow these instructions to properly fill the tank and check for any leaks:
- Begin by closing the water supply valve and turning on the power to the water heater.
- Attach a hose to the drain valve located at the bottom of the tank and place the other end of the hose in a suitable drainage area. Open the drain valve to allow any air or debris to be flushed out of the tank.
- Once the water starts flowing steadily out of the drain valve, close the valve.
- Take note of any signs of leaks around the drain valve or any other connections.
- Next, locate the cold-water supply valve at the top of the tank. This valve should be labeled or indicated with an arrow pointing in the direction of the tank.
- Slowly open the cold-water supply valve to allow water to fill the tank. Keep an eye on the pressure relief valve to make sure it does not release any water during the filling process.
- While the tank is filling, carefully inspect all the connections and joints for any signs of leaks. Look for dripping water or damp areas around the fittings.
- If you notice any leaks, immediately shut off the water supply and tighten the connections. If the leaks persist, you may need to consult a professional plumber for assistance.
- Continue filling the tank until the water reaches the desired level, which is usually indicated on the tank itself.
- Once the tank is filled, check again for any leaks around the connections and joints.
Congratulations! You have successfully filled and tested your small electric water heater. Ensure that there are no leaks present before fully closing the access panels and using the heater. Regularly monitor the tank for any leaks or issues to maintain the efficiency and functionality of your water heater.
Addressing Common Problems
Installing a small electric water heater involves specific steps and considerations to ensure a successful setup. However, like any installation process, there may be certain issues that could arise during the installation. To assist you in troubleshooting these problems, we have compiled a list of helpful tips that will help you address common issues that may occur during the installation of your small electric water heater.
Troubleshooting tips for issues that may arise during installation
1. Electrical Connection Problems:
One of the most common issues that people encounter during the installation of a small electric water heater is related to electrical connections. If you’re experiencing problems with the electrical connections, follow these troubleshooting steps:
- Verify that the power supply to the water heater is switched off before beginning any work.
- Double-check the wiring connections to ensure they are securely fastened.
- Inspect the circuit breaker to see if it has tripped; if so, reset it and monitor the situation.
- If the issue persists, consult a licensed electrician to assess the electrical system and identify any underlying problems.
2. Water Leakage:
Water leakage is another issue that may arise during the installation of a small electric water heater. If you notice any signs of water leakage, here’s what you can do to troubleshoot and resolve the problem:
- Inspect all the connections and fittings to ensure they are properly tightened.
- Check the temperature and pressure relief valve for any leaks or signs of damage. If necessary, replace the faulty valve.
- Examine the water heater tank for cracks or corrosion. If any damage is detected, it’s best to replace the tank entirely.
- If the issue persists, it’s recommended to reach out to a professional plumber for assistance to prevent any further water damage or safety hazards.
3. Inadequate Hot Water:
Inadequate hot water production can occasionally occur after the installation of a small electric water heater. To troubleshoot this issue, consider the following steps:
- Verify that the water heater’s thermostat is set to the desired temperature. Adjust if necessary.
- Ensure that the water heater tank is completely filled and that there are no air pockets within the tank.
- If the issue persists, check the water supply pressure to ensure it meets the manufacturer’s recommended specifications.
- If required, clean the heating elements within the water heater as mineral buildup can reduce their efficiency.
- Contact a professional plumber if the problem continues, as there may be underlying issues affecting the water heater’s performance.
By following these troubleshooting tips, you can effectively address common problems that may arise during the installation of a small electric water heater. Remember, if you encounter any issues that you are uncomfortable or uncertain about handling yourself, it’s always best to seek professional assistance to ensure a safe and efficient installation.
Maintenance And Safety Tips
In order to ensure optimal performance and safety of your small electric water heater, it is essential to implement regular maintenance practices. Proper maintenance not only prolongs the lifespan of your water heater but also reduces the likelihood of potential malfunctions or safety hazards.
Tips for maintaining the small electric water heater for optimal performance and safety
Flush the water heater regularly
Regularly flushing your small electric water heater helps to remove sediment and mineral buildup, which can inhibit efficiency and lead to potential damage. Follow these steps to flush your water heater:
- Turn off the power to the water heater.
- Close the cold water supply valve.
- Attach a hose to the drain valve and place the other end in a suitable drainage area.
- Open the drain valve and allow the water to flow out until it runs clear.
- Once completed, close the drain valve and remove the hose.
- Open the cold water supply valve to refill the tank.
- Turn on the power to the water heater.
- Ensure there are no leaks and check for proper functionality.
Inspect the temperature and pressure relief valve
The temperature and pressure relief valve is a crucial safety component of your water heater. It prevents excessive pressure or temperature buildup, which can potentially lead to an explosion. To inspect the valve:
- Turn off the power to the water heater.
- Place a bucket beneath the valve to catch any water that may be released.
- Push the valve’s release lever to check if it opens and closes freely.
- If the valve does not release water or is stuck, it may need to be replaced. Consult a professional for assistance.
Check for leaks
Regularly inspecting your small electric water heater for leaks is crucial to prevent water damage and potential electrical hazards. Follow these steps to check for leaks:
- Visually inspect the water heater, looking for any signs of water around the tank, connections, or valves.
- If you notice any leaks, turn off the power to the water heater and close the water supply valve.
- Fix or replace any faulty connections or valves as needed.
- Once repaired, turn on the power and water supply to the water heater and check for any additional leaks.
Ensure proper ventilation
Proper ventilation is essential to prevent the buildup of harmful gases, such as carbon monoxide, which can be produced by your small electric water heater. Ensure the following:
- There is sufficient clearance around the water heater to allow for proper airflow.
- No obstructions, such as debris or other items, are blocking the vents.
- Regularly clean any dust or debris from the vents to ensure efficient ventilation.
Get professional inspection and maintenance
While regular maintenance is effective in preventing many issues, it is recommended to have your small electric water heater professionally inspected and serviced annually. A certified technician can identify potential problems and ensure your water heater is functioning at its best.
By implementing these maintenance tips, you can ensure optimal performance and safety of your small electric water heater, protecting your investment and providing hot water when you need it most.
Regular Maintenance
Guidelines for routine maintenance tasks
Regular maintenance is essential to keep your small electric water heater running efficiently and to extend its lifespan. By following a few simple tasks, you can ensure that your heater continues to provide you with hot water when you need it. Here are some guidelines for routine maintenance tasks that you should perform:
Checking the pressure relief valve
The pressure relief valve is an important safety feature of your small electric water heater. It helps relieve excess pressure that can build up inside the tank. To check the pressure relief valve:
- Turn off the power supply to the water heater.
- Locate the pressure relief valve on top of the tank.
- Place a bucket or container under the valve to catch any water that may be released.
- Flip the valve’s lever to open it and allow some water to flow out.
- Close the valve once the water stops flowing.
If no water comes out or it continues to drip after closing the valve, it may indicate a malfunction. In such cases, it’s recommended to get professional assistance.
Flushing the tank
Over time, sediment can build up inside the tank, affecting the efficiency of your small electric water heater. Flushing the tank helps remove this sediment and keeps the heater functioning optimally. To flush the tank:
- Turn off the power supply to the water heater.
- Connect a garden hose to the drain valve located at the bottom of the tank.
- Place the other end of the hose in a suitable drainage area or a bucket.
- Open the drain valve and allow the water to flow out until it runs clear.
- Close the drain valve and remove the hose.
Flushing the tank once or twice a year can help prevent sediment buildup and maintain the efficiency of your water heater.
Inspecting electrical connections
Regularly inspecting the electrical connections of your small electric water heater is important for safety and optimal performance. Follow these steps to inspect the electrical connections:
- Ensure the power supply to the water heater is turned off.
- Check all electrical connections, including the wiring, junction box, and terminal screws.
- Tighten any loose connections and ensure there are no signs of damage or corrosion.
- If you notice any issues or are unsure, it is recommended to consult a professional electrician.
By regularly performing these routine maintenance tasks, you can keep your small electric water heater in good condition and enjoy reliable hot water for years to come.
Safety Precautions
Installing a small electric water heater in your home can provide you with hot water whenever you need it, but it’s important to prioritize safety during the installation process. By following a few essential safety precautions, you can ensure that the installation is done correctly and avoid any potential accidents or mishaps. In this section, we will outline the important safety measures you should follow when using and maintaining the water heater.
Important safety measures to follow when using and maintaining the water heater:
When it comes to using and maintaining your small electric water heater, safety should be your top priority. By adhering to the following safety measures, you can ensure a safe and hassle-free experience:
- Read the instructions: Before you begin the installation process, thoroughly read and understand the manufacturer’s instructions. This will give you a clear understanding of the precautions specific to your water heater model.
- Professional installation: While it may be tempting to install the water heater yourself, it’s always best to hire a professional electrician or plumber for the job. They have the necessary knowledge and experience to ensure the installation is done correctly and safely.
- Proper electrical connections: Ensure that the water heater is properly connected to the electrical supply. Avoid using extension cords or making any unauthorized modifications to the electrical system.
- Grounding: Proper grounding is crucial for electrical safety. Make sure the water heater is properly grounded according to the manufacturer’s instructions.
- Temperature and pressure relief valve: Install a temperature and pressure relief valve on the water heater to prevent excessive pressure buildup. Regularly test the valve to ensure it is functioning correctly.
- Allow for proper ventilation: Adequate ventilation is necessary to prevent the buildup of combustion gases. Ensure that the water heater is installed in a well-ventilated area and keep the venting system free from obstructions.
- Regular inspections and maintenance: Periodically inspect the water heater for any signs of damage or malfunction. Follow the manufacturer’s recommendations for routine maintenance to keep the water heater in optimal condition.
- Turn off power when not in use: When the water heater is not in use, such as when you are away from home for an extended period, it is important to turn off the power supply. This can help prevent accidents and save energy.
By following these important safety measures, you can enjoy the benefits of a small electric water heater without any unnecessary risks. Remember, safety should always come first when it comes to any household installation or maintenance tasks.
Frequently Asked Questions On How To Install Small Electric Water Heater
Can You Install An Electric Water Heater By Yourself?
Yes, you can install an electric water heater by yourself. However, it’s important to have proper knowledge, skills, and understanding of electrical systems to ensure safety and proper installation. It’s recommended to consult a professional or follow the manufacturer’s instructions for correct installation.
How To Install Small Tankless Electric Water Heater?
To install a small tankless electric water heater, follow these steps:
1. Shut off the water and electricity supply.
2. Measure the area to ensure proper fit.
3. Mount the unit on a sturdy wall, ensuring it’s level.
4. Connect the cold and hot water lines, using appropriate fittings.
5. Connect the electrical wiring and restore power. Test the unit for proper heating and functioning.
Does A Small Water Heater Need Its Own Circuit?
Yes, a small water heater typically requires its own dedicated circuit to ensure proper and safe operation.
Does An Electric Water Heater Need To Be On A Stand?
No, it is not necessary for an electric water heater to be on a stand.
Conclusion
To conclude, installing a small electric water heater doesn’t have to be a daunting task. With the right tools and step-by-step instructions, you can easily enjoy the convenience of hot water in your home. Remember to carefully follow safety guidelines, choose the appropriate size for your needs, and properly maintain your water heater for long-lasting efficiency.
So go ahead and take the plunge, and enjoy the comfort of warm water whenever you need it!