To install a range hood without a cabinet, you need to use wall brackets to secure the hood to the wall. Then, connect the hood to the electrical and ventilation systems.
However, it is important to consult the manufacturer’s instructions for specific installation guidelines. Additionally, ensure that there is enough clearance between the range hood and the cooktop for proper ventilation and safety. It is also essential to consider the height of the range hood for maximum efficiency.
By following these steps and guidelines, you can successfully install a range hood without a cabinet and improve the air quality in your kitchen.
Improved Air Quality
Installing a range hood without a cabinet is a smart way to improve the air quality in your kitchen. With its powerful ventilation system, a range hood effectively removes smoke, odors, and pollutants that are released during cooking. This not only keeps your kitchen smelling fresh, but also creates a healthier environment for you and your family.
Removes Smoke, Odors, and Pollutants
A range hood is designed to eliminate smoke, odors, and pollutants that are produced when you cook. Whether you are frying crispy bacon or sautéing onions, the range hood sucks up the airborne particles and gases, preventing them from spreading throughout your kitchen and adjacent rooms. The built-in filtration system captures grease, smoke, and other impurities, preventing them from recirculating back into the air.
By removing smoke, odors, and pollutants, a range hood not only keeps your kitchen fresh and odor-free, but it also improves the overall indoor air quality. This means that you can cook without worrying about your kitchen smelling like yesterday’s dinner or having to deal with lingering cooking fumes.
Reduces the Risk of Respiratory Issues
Poor indoor air quality can have detrimental effects on your respiratory health. When you cook without proper ventilation, smoke and other airborne contaminants can accumulate, leading to increased respiratory issues such as coughing, wheezing, and even asthma attacks. By installing a range hood without a cabinet, you can significantly reduce the risk of these respiratory issues.
The powerful exhaust system of a range hood effectively pulls the smoke, fumes, and other pollutants out of your kitchen, preventing them from being inhaled. This is especially important if you have family members with allergies or pre-existing respiratory conditions. By improving the air quality in your kitchen, you can create a safer and healthier cooking environment for everyone.
Furthermore, a range hood without a cabinet can also help to remove excess moisture and prevent the growth of mold and mildew. This is particularly beneficial in kitchens that lack proper ventilation, as excess moisture can lead to moisture damage and a breeding ground for bacteria.
Enhanced Safety
Protects cabinets from heat damage
Installing a range hood without a cabinet not only enhances the airflow in your kitchen but also provides enhanced safety measures. One of the major advantages of installing a range hood without a cabinet is that it protects your cabinets from heat damage.
A range hood is designed to effectively expel the hot air, steam, and odors generated during the cooking process. When you install a range hood without a cabinet, you eliminate the risk of heat accumulation within the enclosed space. This prevents your cabinets from getting overheated, which could potentially cause discoloration, warping, or even cracking of the cabinet material.
By providing a direct pathway for the heat to escape, installing a range hood without a cabinet ensures the proper ventilation of your kitchen, keeping your cabinets safe from any heat-related damage.
Decreases the likelihood of fire accidents
Another crucial aspect of enhanced safety when installing a range hood without a cabinet is the decreased likelihood of fire accidents.
During the cooking process, oil, grease, and food particles can get dispersed in the air and settle on surfaces around your stove, including cabinet surfaces. These flammable substances can be potential fire hazards if they come into contact with high heat or open flames.
By having a range hood without a cabinet, you provide an extra layer of protection against fire accidents. The range hood effectively captures and removes airborne grease particles, preventing them from settling on the cabinets and reducing the risk of fire.
Furthermore, the proper ventilation provided by the range hood eliminates the chances of heat build-up, reducing the risk of fire in the kitchen. With a range hood without a cabinet, you can have peace of mind knowing that you have taken precautionary measures to safeguard your kitchen from potentially hazardous incidents.
Increased Kitchen Space
Provides additional storage options
Installing a range hood without a cabinet not only creates more kitchen space but also provides additional storage options. A traditional range hood typically requires a cabinet above it to house the venting system and other components. Without the need for a cabinet, you can explore alternative storage solutions that better suit your needs.
One option is to install open shelves or floating shelves above the range hood. This allows you to store frequently used kitchen items within easy reach while still maintaining an open and spacious kitchen atmosphere. Consider organizing your cookbooks, spice jars, or decorative pieces on these shelves to add a touch of personality to your kitchen.
If you prefer a more streamlined look, you can opt for sleek wall-mounted cabinets to complement your range hood. These cabinets can be fitted with adjustable shelves or racks, providing ample storage space for your kitchen essentials. With a range hood without a cabinet, you have the freedom to choose the storage solution that best suits your style and organizational needs.
Creates a more spacious countertop area
A range hood without a cabinet not only increases your kitchen space but also creates a more spacious countertop area. Typically, a cabinet above a range hood can make your kitchen feel cramped and limit your countertop workspace. By removing the cabinet, you can enjoy a larger and more functional countertop area.
This increased countertop space provides you with numerous advantages. You’ll have more room for meal preparation, allowing you to work with ease while cooking up delicious dishes. It also gives you the opportunity to incorporate additional appliances or accessories, such as a coffee maker or a wine rack, without sacrificing the functionality of your kitchen.
With a range hood without a cabinet, your kitchen countertop becomes a versatile space where you can showcase decorative accents or set up a mini bar for entertaining guests. The absence of a cabinet above the range hood creates an open and airy atmosphere, making your kitchen feel more inviting and spacious.
Assessing The Available Space
Before you begin the installation process of a range hood without a cabinet, it is crucial to assess the available space in your kitchen. This will help you determine the correct dimensions of the range hood and find a suitable location for installation. By following these steps, you can ensure a seamless installation process and achieve optimal functionality of your range hood.
Measuring the dimensions of the range hood
The first step in assessing the available space is to measure the dimensions of the range hood. To do this, you will need a measuring tape or a ruler. Begin by measuring the width of the range hood, starting from one end to the other. Next, measure the depth of the range hood by determining the distance from the front of the hood to the back. Finally, measure the height of the hood by measuring from the bottom to the top. These measurements will help you determine the appropriate size of the range hood that will fit perfectly in your kitchen.
Determining the suitable location for installation
Once you have the dimensions for your range hood, the next step is to find a suitable location for installation. Take into consideration the distance from the cooktop or stove, as the range hood should be positioned directly above it for maximum efficiency. Additionally, ensure that the range hood is installed at a suitable height, allowing for proper clearance. The ideal height is usually between 24 to 30 inches above the cooktop. By selecting the right location for installation, you can enhance the overall performance of your range hood and improve the ventilation in your kitchen.
Types Of Range Hood Mounting
When it comes to installing a range hood without a cabinet, there are several types of mounting options to consider. Each type has its own advantages and can be suitable for different kitchen layouts. In this blog post, we will explore the three main types of range hood mounting, which are Under Cabinet, Wall-Mounted, and Ceiling-Mounted.
Under Cabinet
The under cabinet range hood mounting is a popular choice for many kitchens. As the name suggests, this type of range hood is installed underneath a cabinet, providing efficient ventilation while saving space. It requires a kitchen layout with existing cabinets located above the cooking area, making it an ideal option for those with limited space.
When installing an under cabinet range hood, it is important to ensure that there is enough space between the bottom of the hood and the cooking surface. This space allows for proper ventilation and prevents any obstruction while cooking. Additionally, it is crucial to follow the manufacturer’s instructions during the installation process to ensure proper functionality and safety.
Wall-Mounted
If you’re looking for a sleek and modern look in your kitchen, a wall-mounted range hood may be the perfect choice. This type of range hood is installed directly on the wall, typically above the cooking area and below any cabinetry. It provides excellent ventilation and adds a stylish focal point to your kitchen.
When installing a wall-mounted range hood, it is important to consider the height at which it is mounted. The hood should be positioned at a height that allows for effective capture of cooking fumes and odors. Additionally, make sure to follow the manufacturer’s instructions for proper installation and consider hiring a professional if you are unsure about the process.
Ceiling-Mounted
If you have a kitchen layout that doesn’t have any cabinets or walls above the cooking area, a ceiling-mounted range hood can be a great solution. This type of range hood is installed directly on the ceiling, providing efficient ventilation without obstructing any sight lines. It creates a seamless and open look in your kitchen.
Installing a ceiling-mounted range hood requires careful consideration of the structural integrity of your ceiling. It is important to consult a professional to ensure that your ceiling can support the weight of the range hood. Additionally, proper installation following the manufacturer’s instructions is crucial for optimal performance.
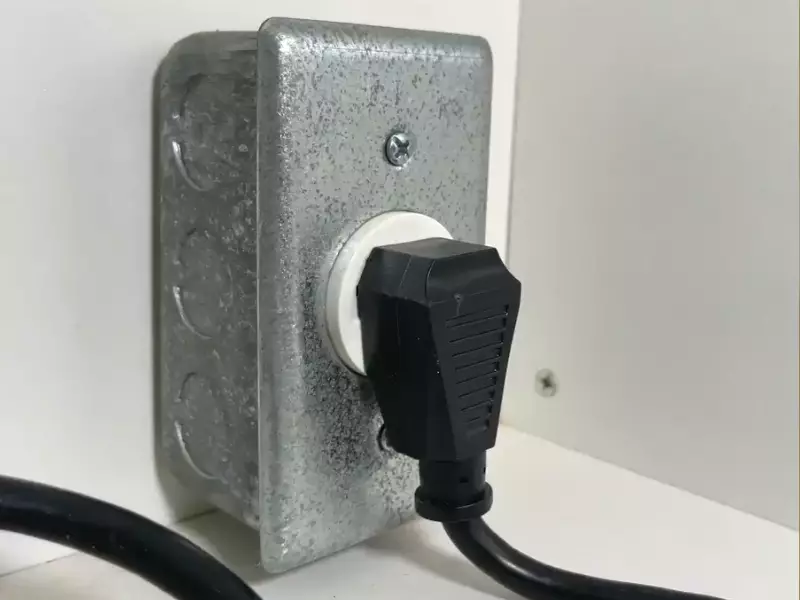
Identify Power Source
Locating an electrical outlet or hardwiring
Identifying the power source is the first step towards installing a range hood without a cabinet. Depending on the layout of your kitchen, you may need to find an electrical outlet or consider hardwiring the range hood.
If you already have an electrical outlet near the desired location for your range hood, you’re in luck! Simply ensure that the outlet is safely grounded and can handle the power requirements of the range hood. Pay attention to the voltage and amperage specifications provided by the manufacturer. Matching the power requirements of the range hood to the electrical outlet is crucial for a safe and effective installation.
However, if an existing outlet is not available or conveniently located, hardwiring may be necessary. Hardwiring requires a direct connection from the range hood to the electrical system of your home. This eliminates the need for an outlet and provides a cleaner installation look. To hardwire your range hood, consult a professional electrician to ensure the wiring is done correctly and up to code.
Ensuring proper voltage for the range hood
Once you have identified the power source and determined whether to use an electrical outlet or hardwire the range hood, it is crucial to ensure that the proper voltage is supplied. The voltage requirements can be found in the product specifications provided by the manufacturer.
To ensure the range hood operates safely and efficiently, it is important to match its voltage requirements with the electrical supply in your home. In most cases, range hoods require either 120 volts or 240 volts. Check the voltage of your electrical supply and make sure it matches the required voltage for your range hood.
Using the wrong voltage can not only damage the range hood but also pose a safety hazard. If you are unsure about the voltage or how to check it, consult an electrician who can guide you through the process.
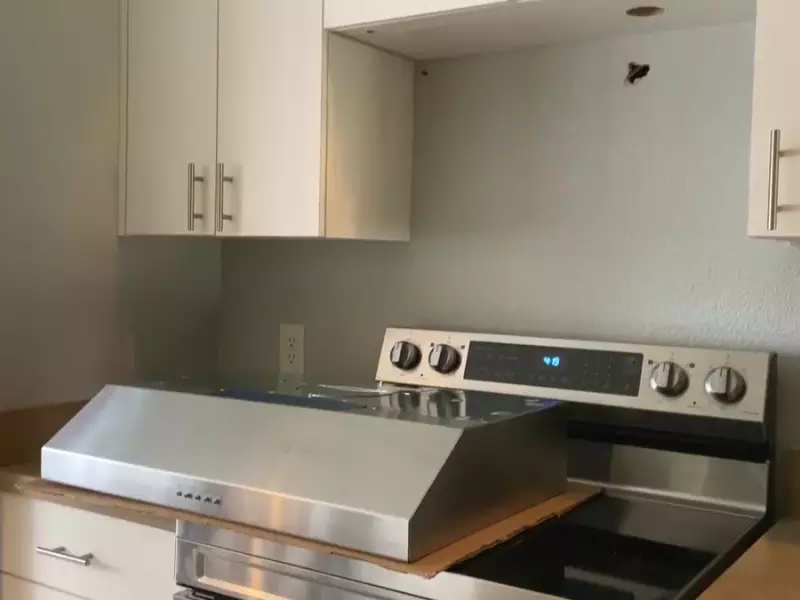
Preparing The Area
Before installing a range hood without a cabinet, it is important to prepare the area properly. This involves removing any cabinets or obstacles that may be in the way and cleaning the installation site thoroughly. Take the following steps to ensure a smooth and successful installation:
Removing cabinets or other obstacles
The first step in preparing the area is to remove any cabinets or other obstacles that may interfere with the installation of the range hood. This may involve unscrewing or detaching the cabinets from the wall, or clearing out any clutter that may be in the way. Be sure to follow proper safety procedures and use suitable tools when removing cabinets or obstacles.
Cleaning the installation site
Once the cabinets or obstacles have been removed, it is important to clean the installation site thoroughly. This will ensure that the range hood is installed on a clean and stable surface, which will not only enhance its functionality but also prolong its lifespan. Use a suitable cleaner and a damp cloth or sponge to remove any dirt, grease, or debris from the area. Pay special attention to the wall surface where the range hood will be mounted, as any residue left behind can affect the adhesion of the hood.
If the installation site is a tiled wall, check for any loose or cracked tiles and repair them before proceeding with the installation. This will ensure that the range hood will be installed on a solid and secure surface.
Another important aspect of cleaning the installation site is to ensure that the area is free from any electrical hazards. This involves checking the wiring and outlets in the vicinity and addressing any issues that may pose a risk. If you are not familiar with electrical work, it is recommended to hire a professional electrician to ensure the safety of the installation.
Once the area has been cleared and cleaned, you are now ready to install your range hood without a cabinet. Follow the manufacturer’s instructions carefully and take all necessary precautions to ensure a successful installation.
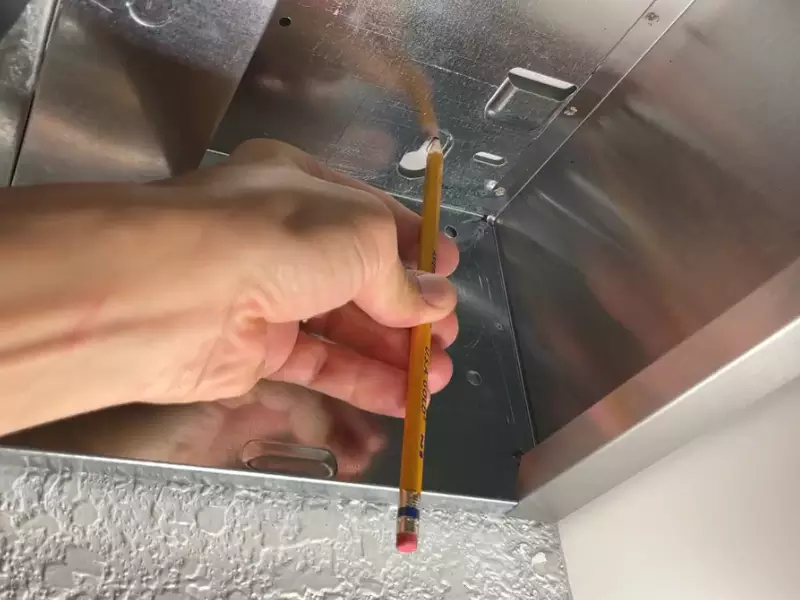
Mounting The Range Hood
Mounting the range hood is a crucial step in the installation process, as it ensures that the hood is securely attached to the designated spot. It involves two main steps: attaching the mounting brackets or hardware and then securing the range hood in place.
Attaching mounting brackets or hardware
Before you can mount the range hood, you need to ensure that you have the necessary mounting brackets or hardware. These are typically included with the range hood, but if not, you can purchase them separately from a hardware store.
To attach the mounting brackets or hardware, follow these steps:
- Step 1: Begin by identifying the mounting points on the back of the range hood. These are usually pre-drilled holes or slots.
- Step 2: Position the brackets or hardware over the mounting points, ensuring that they align properly.
- Step 3: Use a screwdriver or drill to secure the brackets or hardware in place. Make sure to use the appropriate screws or bolts provided with the range hood.
- Step 4: Double-check that the brackets are firmly attached by gently pulling on them.
Securing the range hood to the designated spot
Once you have successfully attached the mounting brackets or hardware, it’s time to secure the range hood to the designated spot. Follow the steps below:
- Step 1: Place the range hood in the desired location, aligning it with the pre-determined holes or slots on the wall.
- Step 2: Check that the range hood is level using a level tool. Adjust if necessary.
- Step 3: With the help of an assistant, hold the range hood in position while you secure it.
- Step 4: Insert the screws or bolts through the mounting brackets or hardware into the pre-drilled holes or slots on the wall.
- Step 5: Use a screwdriver or drill to tighten the screws or bolts, ensuring that the range hood is securely fastened.
- Step 6: Give the range hood a gentle tug to verify its stability.
Now that you have successfully mounted the range hood, you can move on to the next steps in the installation process.
Connecting Ventilation
Proper ventilation is crucial for a range hood to function efficiently. When installing a range hood without a cabinet, you have two options for connecting the ventilation: installing ductwork or using a ductless conversion kit. Let’s take a closer look at each option to ensure you make the right choice for your kitchen.
Installing Ductwork or Ductless Conversion Kit
If your kitchen has existing ductwork, installing a range hood without a cabinet becomes easier. Simply connect the ductwork to the range hood’s vent for optimal airflow and ventilation. However, not all kitchens come equipped with ductwork, which is when a ductless conversion kit becomes essential.
A ductless conversion kit allows you to install a range hood without the need for ductwork. Instead, it uses filters to capture and recirculate the air back into the kitchen. These filters help remove smoke, grease, and odors while ensuring the air remains fresh and clean. It’s important to note that ductless range hoods may not be as effective at removing heat and steam compared to ducted ones.
Ensuring Proper Airflow and Ventilation
Whether you opt for ductwork installation or a ductless conversion kit, ensuring proper airflow and ventilation is essential. A range hood needs to be properly positioned over the cooking surface to effectively capture the pollutants. It’s recommended to install the range hood around 20-24 inches above a gas stove or 24-30 inches above an electric stove for optimal performance.
Additionally, consider the size and power of the range hood. You want it to match the size of your kitchen and the cooking surface. An improperly sized range hood may not efficiently remove smoke and odors, impacting the overall air quality in your kitchen.
Regular maintenance is also crucial for adequate ventilation. Clean the filters regularly to prevent grease buildup and ensure proper airflow. Depending on your cooking habits, it’s recommended to clean or replace the filters every 6-12 months.
By connecting ventilation properly and ensuring adequate airflow, you can enjoy a well-ventilated kitchen with your range hood, even without a cabinet. Whether you choose ductwork installation or a ductless conversion kit, make sure to follow the manufacturer’s instructions for a seamless installation process.
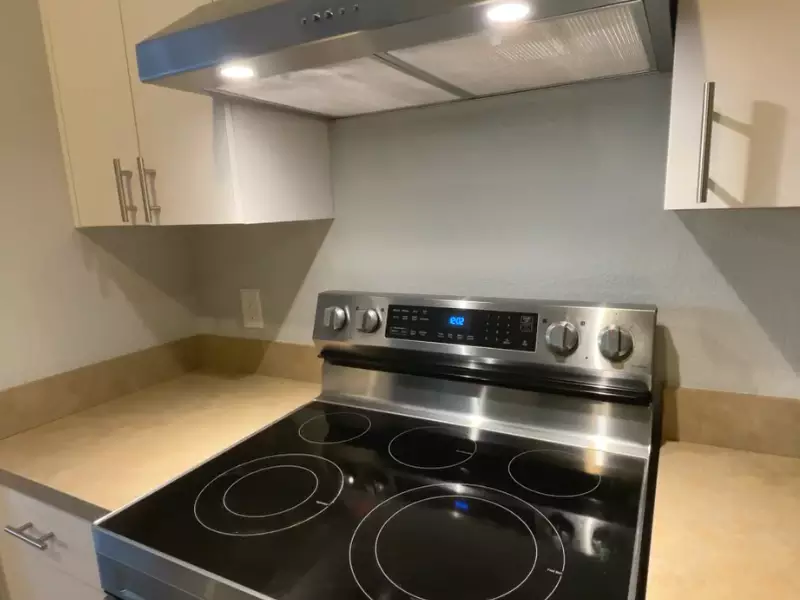
Testing And Finishing Touches
Once you have successfully installed the range hood without a cabinet, it is time to proceed with the testing and finishing touches to ensure the installation is complete and functioning properly. This step is crucial as it guarantees the safety and effectiveness of the range hood in your kitchen.
Checking electrical connections
Before proceeding with any electrical connections, ensure that the power source is turned off by switching off the circuit breaker connected to the range hood. This precautionary measure eliminates the risk of electric shock or accidental damage.
Next, carefully examine the electrical connections of the range hood. Ensure that all wires are securely connected and properly insulated to prevent any potential hazards. Examine the wiring diagram provided in the user manual to ensure the correct connections have been made according to the manufacturer’s instructions.
Confirming the range hood functionality
Once you have completed the electrical connections, it is time to test the functionality of the range hood. Switch on the power source, and check the different functions of the range hood, such as the fan speed settings and lighting options. Test the range hood’s ability to effectively remove smoke, steam, and cooking odors by turning on the cooktop and observing the hood’s performance.
Additionally, pay attention to any unusual noises or vibrations that may indicate a problem with the installation or the range hood itself. If you notice any issues, refer back to the user manual or consult with a professional to address and resolve the problem promptly.
Styling and cleaning the installed range hood
Now that you have successfully installed and tested the range hood, it is time to focus on the aesthetic aspect of your kitchen. Clean the exterior surface of the range hood using a mild detergent and a soft cloth, ensuring it remains free from grease and grime accumulation.
You can also consider styling the range hood to complement your kitchen decor. Whether it is a modern stainless-steel finish or a sleek glass design, ensure that the range hood seamlessly integrates into the overall aesthetic of your kitchen.
Frequently Asked Questions Of How To Install Range Hood Without Cabinet
Can You Just Plug A Range Hood?
Yes, you can simply plug in a range hood.
How Do You Install A Range Hood Without Ducts?
Install a range hood without ducts by opting for a ductless model. These hoods circulate the air through a filter and release it back into the kitchen. Just mount the hood, connect it to a power source, and replace the filter regularly for efficient ventilation.
Do Range Hoods Have To Vent Outside?
Yes, range hoods generally need to vent outside in order to effectively remove smoke, odors, and airborne particles from your kitchen. Venting outside ensures proper ventilation and prevents the recirculation of pollutants.
Can You Put A Range Hood Anywhere?
Yes, range hoods can be installed in different locations in your kitchen. However, it is important to consider proper ventilation and an accessible power source for optimal functionality.
Conclusion
Installing a range hood without a cabinet might seem like a daunting task, but with the right tools and instructions, it can be easily accomplished. By following the steps outlined in this blog post, you can ensure proper ventilation and a cleaner, more efficient kitchen space.
Remember to gather the necessary materials and double-check measurements before starting the installation process. With a little patience and attention to detail, you’ll have a functional and stylish range hood in no time. Increase the functionality and aesthetic appeal of your kitchen with this simple DIY project.