To install a propane tank to a grill, first ensure the grill is turned off. Then, connect the propane tank to the grill using a regulator and hose assembly, ensuring the connections are secure.
Choosing The Right Propane Tank
Factors to consider when selecting a propane tank
When it comes to grilling, choosing the right propane tank is crucial for both safety and convenience. There are a few key factors you should consider when selecting a propane tank for your grill.
- Size and capacity: One important factor to consider is the size and capacity of the propane tank. Propane tanks come in various sizes, typically measured in pounds of LP Gas capacity. The most common sizes for grilling are 20-pound, 30-pound, and 40-pound tanks. The right size for you will depend on the frequency and duration of your grilling sessions.
- Safety features: Another factor to keep in mind is the safety features of the propane tank. This is particularly important as it ensures safe usage and avoids any potential accidents. Look for tanks that have integrated safety valves, leak detection devices, and protective caps. These features play a vital role in providing peace of mind while you enjoy your grilling experience.
- Durability and construction: It’s essential to select a propane tank that is durable and built to last. Opt for tanks made of sturdy materials such as steel or aluminum. Additionally, check for protective coatings that guard against rust and corrosion. A durable tank will not only ensure your safety but also provide long-term value.
- Regulator compatibility: When choosing a propane tank, make sure it is compatible with your grill’s regulator. Different grills may have different types of regulators, so it’s important to check if they are compatible. This ensures a proper and efficient flow of propane to your grill.
Different sizes and capacities of propane tanks
Propane tanks come in various sizes and capacities to accommodate different grilling needs. Here’s an overview of the most common sizes:
| Size | Capacity (in pounds) |
|---|---|
| 20-pound tank | 20 |
| 30-pound tank | 30 |
| 40-pound tank | 40 |
These sizes are suitable for most grilling needs and provide a good balance between capacity and portability. The 20-pound tank is the most common choice for backyard grilling, while the larger tanks are ideal for extended grilling sessions or commercial use.
Safety features to look for in a propane tank
Ensuring the safety of your grilling experience is paramount, and selecting a propane tank with the right safety features is essential. Here are some safety features to look for:
- Leak detection device: A propane tank equipped with a leak detection device will alert you if there is a leak, ensuring prompt action can be taken to prevent any accidents.
- Safety valve: An integrated safety valve is designed to release excess pressure and prevent the tank from rupturing. It acts as a crucial safeguard against potential hazards.
- Protective cap: A protective cap serves as a barrier, preventing debris, dirt, or insects from entering the valve and causing blockages, which could affect the safe operation of the tank.
By choosing a propane tank with these safety features, you can enjoy your grilling sessions with peace of mind, knowing that you have taken the necessary precautions to ensure safety.
Assembling The Grill And Preparing For Installation
Before you can start grilling up delicious meals, it’s essential to assemble the grill and prepare it for installation. This process involves setting up the grill in a safe and suitable location, checking the components to ensure they are in working condition, and gathering the necessary tools for installation. By following these steps, you can ensure a smooth installation process and enjoy hassle-free grilling sessions.
Setting up the grill in a safe and suitable location
When setting up your grill, it’s crucial to choose a safe and suitable location. This ensures the safety of both you and your surroundings. Follow these steps to set up your grill:
- Choose an outdoor area that is well-ventilated to avoid the buildup of propane gas.
- Ensure the area is level and stable, as an uneven surface may cause the grill to tip over.
- Keep the grill away from combustible materials such as foliage, wooden structures, or flammable liquids.
- Maintain a safe distance of at least 10 feet from your house or any other structures.
- Place the grill on a non-flammable surface such as concrete or gravel.
Checking the components and ensuring they are in working condition
Prior to installation, it’s essential to check all the components of your grill to ensure they are in proper working condition. This will help prevent any issues during installation or while using the grill. Follow these steps to check the components:
- Inspect the propane tank for any signs of damage, rust, or leaks. If you find any issues, replace the tank before proceeding.
- Check the propane hose and regulator for any cuts, cracks, or other damages. Replace them if necessary.
- Inspect the grill burners, igniter, and control knobs to ensure they are clean and functioning correctly.
- Make sure the grill grates and cooking surfaces are clean and free from any debris.
- Verify that the grill’s lid and handle are secure and in good condition.
Gathering the necessary tools for installation
To ensure a smooth installation process, it’s crucial to gather all the necessary tools beforehand. This will save you time and effort during the installation. Here are the tools you’ll typically need:
| Tools | Essentials | Optional but handy |
|---|---|---|
| Adjustable wrench | ✔ | |
| Phillips-head screwdriver | ✔ | |
| Wire brush or grill brush | ✔ | |
| Propane leak detector solution | ✔ | |
| Socket set | ✔ | |
| Grill cover | ✔ |
With these essentials and optional tools, you’ll be fully equipped to install your propane tank to your grill.
By setting up your grill in a safe location, checking the components, and gathering the necessary tools, you’re now ready to move on to the next step – connecting the propane tank to your grill. Stay tuned for the next section of this guide!
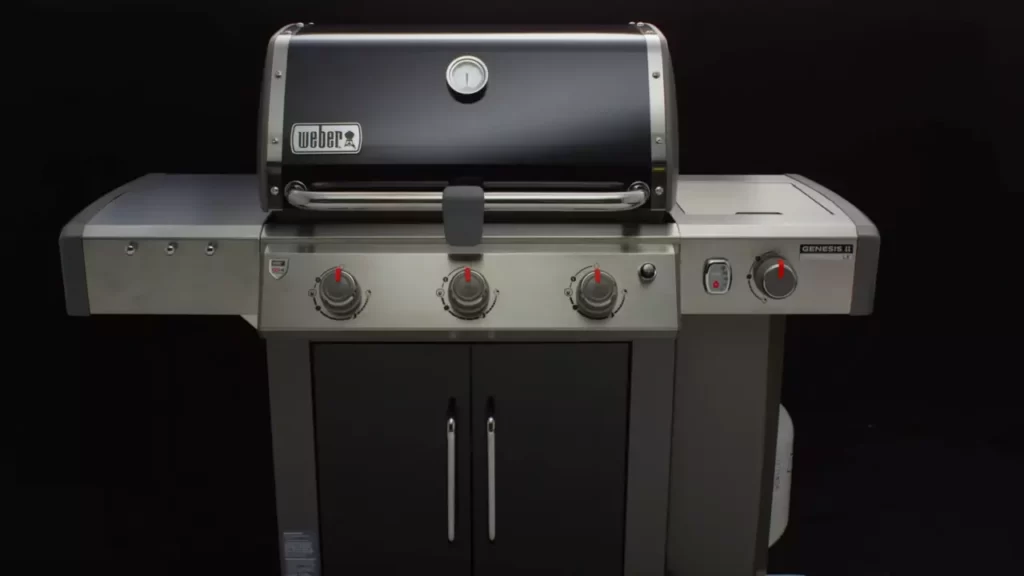
Step-By-Step Guide To Installing The Propane Tank
If you’re a grilling enthusiast, you know that having a reliable propane tank is essential for that perfect outdoor cooking experience. But how exactly do you install a propane tank to your grill? In this step-by-step guide, we’ll walk you through the process, from positioning the tank to checking for leaks and ensuring a secure connection. Let’s get started!
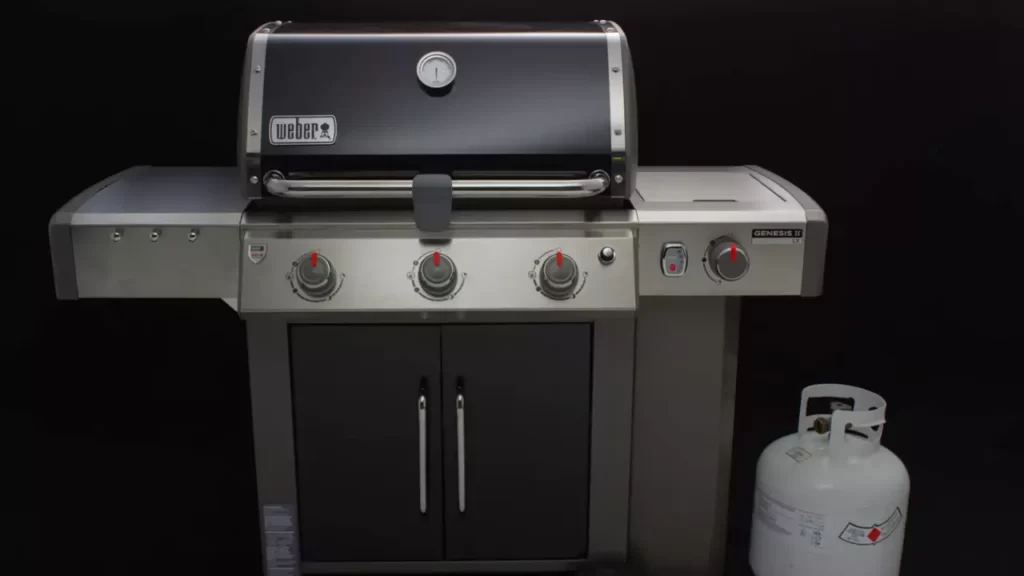
Positioning the Propane Tank and Connecting It to the Grill
- Start by selecting a suitable location for your propane tank. Place it in a well-ventilated area, preferably outdoors, away from any flammable materials.
- Carefully remove the plastic cap from the propane tank valve and set it aside.
- With the help of an adjustable wrench, attach the regulator hose to the valve on the propane tank. Make sure to tighten the connection firmly but avoid over-tightening to prevent any damage.
- Once the hose is securely attached, locate the regulator end and connect it to the inlet on the grill. Again, use the adjustable wrench to tighten this connection.
- Ensure that the gas flow control valve on the grill is in the “off” position before proceeding.
Checking for Leaks and Ensuring a Secure Connection
Once the propane tank is properly connected to your grill, it’s important to check for any potential gas leaks and ensure a secure connection. Follow these steps:
- Apply a solution of soapy water to the connections between the propane tank and the grill.
- Turn on the propane tank valve to allow gas flow.
- Observe the soapy water solution for any bubbles. If you see bubbles forming at any connection point, it indicates a gas leak. In this case, quickly turn off the propane tank valve and tighten the connection before retesting.
- Inspect the connections visually to ensure they are secure and free from any damage.
Testing the Grill to Ensure Proper Propane Flow
Now that the propane tank is properly connected and there are no gas leaks, it’s time to test the grill for proper propane flow. Follow these final steps:
- Slowly turn on the gas flow control valve on the grill.
- Listen for any hissing sounds or irregularities. If you notice anything unusual, turn off the gas flow control valve immediately and check for any leaks or connection issues.
- Ignite the grill following the manufacturer’s instructions and allow it to heat up for a few minutes.
- Check that the flame is strong and consistent. If it appears weak or uneven, you may need to troubleshoot for any potential issues.
Congratulations! You have successfully installed the propane tank on your grill. Now you can enjoy your outdoor cooking adventures with confidence!
Positioning The Propane Tank
Choosing a stable and well-ventilated location for the tank
Positioning the propane tank correctly is crucial for ensuring safe and efficient grilling sessions. When choosing a location for your propane tank, there are a few key factors to consider. First and foremost, the area should be stable and level to prevent any accidental tipping or rolling of the tank. This not only enhances safety but also helps to minimize any potential damage to the tank itself.
A well-ventilated location is equally important. Propane tanks contain highly flammable gas, and proper air circulation is necessary to prevent the accumulation of potentially dangerous fumes. Ideally, the tank should be placed in an outdoor area with ample natural ventilation. This could include an open patio, deck, or yard where air can freely circulate around the tank. Also, keep in mind that storing the tank in a confined space, such as a garage or shed, is not recommended due to potential gas buildup.
Ensuring the tank is placed a safe distance from flammable materials
When positioning your propane tank, it’s crucial to maintain a safe distance from flammable materials. This includes anything that could easily catch fire, such as leaves, branches, or dry grass. The recommended distance between the tank and any flammable objects is at least 10 feet, although it’s always better to err on the side of caution and leave a larger buffer zone if possible.
Additionally, take note of any potential ignition sources nearby, such as open flames, cigarettes, or electrical equipment. Keeping the tank away from such hazards significantly reduces the risk of fire accidents and ensures a safer grilling experience for everyone.
Using a tank cart or stand for better mobility
While safely positioning your propane tank is essential, it’s also important to consider practicality and ease of use. To enhance mobility and convenience, consider using a tank cart or stand.
A tank cart provides a stable platform for the propane tank, allowing you to move it around easily without straining your back or risking damage to the tank. With sturdy wheels and a secure locking mechanism, a tank cart ensures that the tank stays in place while you move it from one location to another.
Alternatively, a tank stand can provide stability and elevation, keeping the tank off the ground and making it more accessible for connecting to your grill. These stands usually come with additional features such as hooks for hanging grilling tools, making them a practical storage solution as well.
By incorporating a tank cart or stand into your grilling setup, you not only improve the maneuverability of your propane tank, but also add a touch of convenience and organization to your outdoor cooking area.
Connecting The Tank To The Grill
Once you have a propane tank ready to fuel your grill, the next step is connecting it securely. This process involves removing the protective cap from the tank valve, matching the regulator to the tank valve, and attaching it securely. Let’s go through each step in detail to ensure a safe and successful connection.
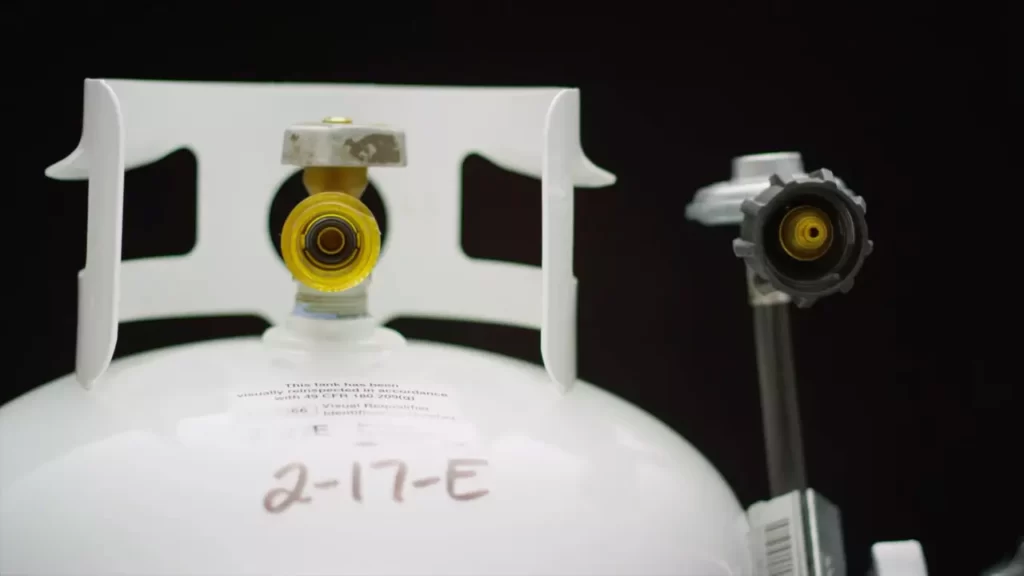
Removing the protective cap from the tank valve
The first thing you need to do is remove the protective cap from the tank valve. This cap is designed to keep dust and debris out of the valve and should be removed before connecting the tank to the grill. To do this, follow these steps:
- Make sure the grill is turned off and any knobs or valves connecting to the tank are in the off position.
- Locate the protective cap on the tank valve. It is usually a round cap that is hand-tightened.
- Using your hand, turn the cap counterclockwise until it comes off. Set it aside in a safe place.

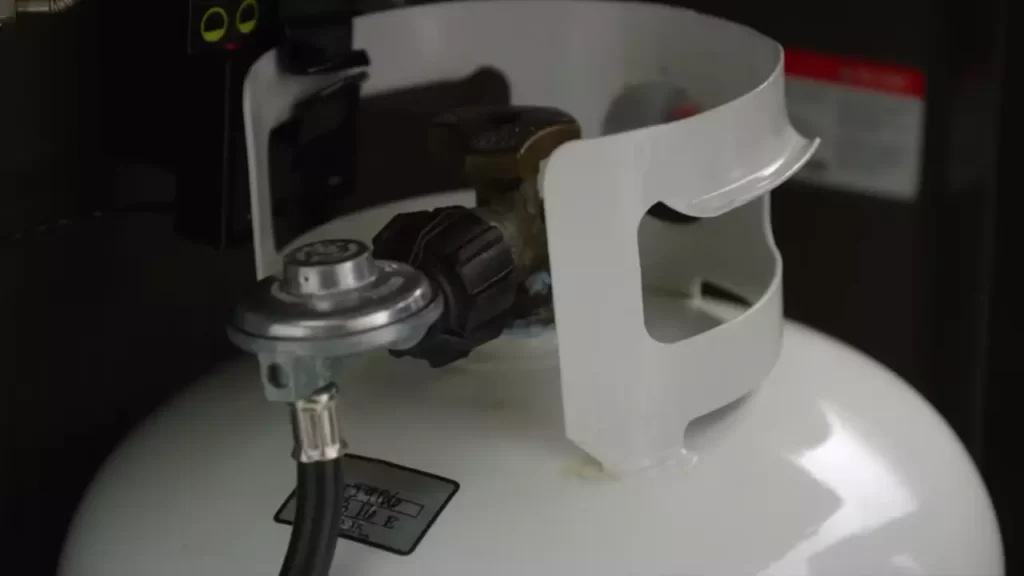
Matching the regulator to the tank valve and attaching it securely
Once the protective cap is removed, it’s time to match the regulator to the tank valve and attach it securely. The regulator is a crucial component that controls the flow of propane from the tank to the grill and ensures a safe operation. Follow these steps to connect the regulator:
- Inspect the tank valve to ensure it is clean and free of debris. If necessary, use a clean cloth or paper towel to wipe away any dirt.
- Align the regulator with the tank valve, making sure the threads match.
- With one hand holding the regulator, use your other hand to turn the regulator clockwise until it is hand-tightened. Make sure it is securely attached.
Tightening the connections using a wrench or adjustable pliers
Lastly, use a wrench or adjustable pliers to tighten the connections between the tank valve and the regulator. This step ensures a leak-free connection and further enhances safety. Here’s what you need to do:
- Grab a wrench or adjustable pliers that fit the size of the regulator’s connection.
- Hold the regulator steady with one hand while using the wrench or pliers to tighten the connection clockwise.
- Make sure the connection is snug but avoid overtightening, as it may damage the threads or cause leaks. Use your judgment and stop tightening when the connection feels secure.
With the tank securely connected to the grill, you’re one step closer to firing up that grill and enjoying delicious meals outdoors. Remember to always follow safety precautions and consult the manufacturer’s instructions for your specific grill model. Happy grilling!
Checking For Leaks
One of the most important steps when installing a propane tank to a grill is checking for leaks. It’s crucial to ensure that there are no gas leaks, as they can be a serious safety hazard. By following a few simple steps, you can easily check for any potential leaks and address them promptly.
Applying a leak detection solution or soapy water to the connections
The first step in checking for leaks is applying a leak detection solution or soapy water to the connections. This solution is easily available at hardware stores or can be made at home by mixing dish soap with water. By applying this solution to the connections, you create a visible indicator that helps identify any escaping gas.
Inspecting for any bubbles or signs of escaping gas
Once the leak detection solution or soapy water is applied, inspect the connections carefully for any bubbles or signs of escaping gas. Gently brush the solution onto the fittings, hoses, and valves to ensure complete coverage. Keep an eye out for any bubbling or foaming, as this indicates a leak.
If you notice any bubble formation or signs of escaping gas, it’s important to address the issue immediately. Gas leaks can lead to accidents such as fires or explosions, so taking quick action is crucial for everyone’s safety.
Tightening any loose connections to eliminate leaks
In case you find any loose connections or areas with leaks, it’s crucial to tighten them immediately to eliminate the leaks. Using a wrench or pliers, carefully tighten the fittings, valves, and hoses as needed. Be cautious not to overtighten, as this can also cause damage.
After tightening all the connections, it’s recommended to repeat the inspection process to ensure there are no more leaks. Always remember that a thorough check and proper tightening can prevent potential accidents and ensure a safe grilling experience.
Testing The Grill
Once you have successfully connected the propane tank to your grill, it is important to ensure that everything is working properly before you start grilling. Testing the grill involves a few simple steps that will give you peace of mind and ensure a smooth grilling experience.
Turning the propane tank valve on slowly and fully
To test your grill, the first step is to turn the propane tank valve on slowly and fully. This allows propane to flow into the grill’s burners and ensures a steady fuel supply. Make sure to do this carefully to avoid any sudden bursts of propane or potential hazards. Slowly turning the valve counterclockwise until it is fully open is essential for a safe and efficient grilling session.
Igniting the grill burners and ensuring a consistent flame
Once the propane tank valve is fully open, ignite the grill burners. This can typically be done by turning the burner knobs to the “ignition” or “light” position. Once the flames are lit, visually inspect each burner and ensure that the flames are consistent and evenly distributed across the grill. A consistent flame is important for even cooking and will help you achieve those perfectly grilled meals.
Adjusting the flame and temperature controls as desired
After igniting the grill burners, it’s time to adjust the flame and temperature controls as desired. Depending on the type of grill you have, temperature controls may vary, but they typically consist of knobs or dials that allow you to increase or decrease the heat level. Experiment with the controls to find the perfect flame and temperature that suits your cooking needs. Remember to make adjustments gradually and carefully to avoid sudden temperature changes that could affect your cooking.
Whether you’re grilling for a small gathering or a big barbecue, properly testing the grill is crucial for a successful cooking experience. These simple steps provide the assurance you need to start grilling with confidence. Now that you are familiar with how to test your grill, it’s time to fire it up and enjoy those delicious grilled meals!
Maintaining And Storing The Propane Tank
Regularly inspecting the tank for signs of damage or corrosion
Regular inspection of your propane tank is crucial to ensure its safe and efficient operation. Before each use, take a moment to visually examine the tank for any signs of damage or corrosion. This can be done by carefully looking over the entire surface of the tank, paying close attention to areas such as the valve, regulator, and connection points. Look for any rust spots, dents, or other visible signs of wear and tear. If you notice any damage, it is important to address it promptly to prevent any potential hazards. You should also ensure that the tank’s safety features, such as the pressure relief valve, are in good working condition.
Cleaning the tank and grill to prevent buildup and rust
To maintain the longevity of your propane tank and grill, regular cleaning is crucial. Over time, grease, food residues, and other debris can accumulate both inside and outside of the grill and tank. This can lead to buildup and rust, which can affect the performance and safety of your equipment.
To clean the tank, start by disconnecting it from the grill and removing the regulator. Use a damp cloth or sponge to wipe down the exterior of the tank, paying close attention to any areas with visible buildup. Avoid using harsh chemicals or abrasive materials that can damage the tank’s surface. For the grill, start by preheating it for several minutes to loosen any food residues. Then, use a grill brush or scraper to remove any stuck-on debris. After cleaning, rinse both the tank and grill with water and allow them to fully dry before reconnecting and using.
Safely storing the propane tank during periods of non-use
When it comes to storing your propane tank during periods of non-use, it is essential to prioritize safety. Ensure that the tank is stored in a well-ventilated area away from open flames, heat sources, and direct sunlight. Propane tanks should never be stored indoors as they can pose a serious fire hazard. Additionally, make sure the tank is kept upright and in a secure position to prevent it from tipping over. Covering the tank with a protective tarp or cap can also help to prevent dust and debris from accumulating. If you plan to store the tank for an extended period, it is recommended to close the valve tightly and disconnect the tank from the grill. This will help to prevent any potential gas leaks and ensure the tank stays in good condition.
Frequently Asked Questions For How To Install Propane Tank To Grill
How Do You Secure A Propane Tank To A Charbroil Grill?
Secure a propane tank to a Charbroil grill by placing it on the designated holder, aligning the tank valve with the grill’s connection point, and tightening the nut until snug. Remember to check for leaks by applying soapy water to the valves and connections.
Enjoy safe grilling!
How Do You Change A Propane Tank On A Gas Grill?
To change a propane tank on a gas grill, follow these steps:
1. Turn off the gas supply valve.
2. Disconnect the old tank from the grill.
3. Remove any attachments or fittings from the old tank.
4. Connect the new tank to the grill.
5. Open the gas supply valve slowly and check for leaks.
How Do You Hook Up A 16 Oz Propane Tank?
To hook up a 16 oz propane tank, first check for any leaks. Then, align the valve opening on the tank with the connector on your device. Apply firm pressure and twist it clockwise to secure it. Finally, check for any further leaks using soapy water.
How Do You Hook Up A Propane Tank To A Weber Spirit Grill?
To connect a propane tank to a Weber Spirit grill, follow these steps:
1. Ensure control knobs are in ‘off’ position.
2. Remove the old tank.
3. Place new tank into the cabinet.
4. Attach the regulator hose to the tank’s valve.
5. Tighten hose with a wrench.
Conclusion
Installing a propane tank to your grill is a simple process that can enhance your outdoor cooking experience. By following these step-by-step instructions, you can safely connect and secure the tank to ensure a steady flow of fuel. Remember to always prioritize safety and consult the manufacturer’s guidelines for your specific grill model.
Happy grilling!