To install pellet stove piping, first, ensure the stove is located near an exterior wall. Then, connect the stove to the chimney using the appropriate venting pipe, making sure it is level and properly sealed.+ If you’re considering installing a pellet stove in your home, it’s essential to understand the process of installing the pellet stove piping.
Proper installation is crucial for efficient heating and the safety of your home. In this guide, we will provide step-by-step instructions on how to install pellet stove piping to ensure a successful installation. By following these guidelines, you will be able to properly connect the stove to the chimney, ensuring proper ventilation and creating a warm and cozy environment in your home.
So let’s dive right in and learn how to install pellet stove piping.
Understanding The Basics Of Pellet Stove Piping
When it comes to installing a pellet stove, understanding the basics of pellet stove piping is crucial. Proper installation and maintenance of the pellet stove piping is essential for the safe and efficient operation of your pellet stove. In this section, we will delve into the various aspects of pellet stove piping, including the importance of proper installation, the components involved, and the different types of pellet stove piping materials.
Importance of Proper Pellet Stove Piping
Proper pellet stove piping is of utmost importance for several reasons. Firstly, it ensures the safe operation of your pellet stove by effectively venting the exhaust gases out of your home. Improper venting can lead to the accumulation of dangerous carbon monoxide gas, which can have severe health implications for you and your family. Additionally, incorrect installation can result in a decreased efficiency of your pellet stove, leading to higher energy consumption and increased heating costs. Therefore, it is vital to prioritize the correct installation and maintenance of pellet stove piping to ensure the safety and efficiency of your pellet stove.
Components of Pellet Stove Piping
To understand the basics of pellet stove piping, it is essential to familiarize yourself with its components. The main components of pellet stove piping include:
- Vent Pipe: The vent pipe is responsible for carrying the exhaust gases from the pellet stove to the outside of your home. It should be made of durable materials, such as stainless steel, to withstand the high temperatures emitted by the pellet stove.
- Elbows: Elbows allow for the smooth maneuvering of the vent pipe around obstacles, such as walls or ceilings. They come in various angles, typically 45 or 90 degrees, and should be installed according to the manufacturer’s instructions to maintain proper airflow.
- Termination Cap: The termination cap is the final component of the pellet stove piping system. It is installed on the exterior of your home and serves as a barrier against weather elements, preventing rain or snow from entering the vent pipe.
Different Types of Pellet Stove Piping Materials
When it comes to choosing the right material for your pellet stove piping, several options are available. Each material has its own unique advantages and considerations. Some of the commonly used materials for pellet stove piping include:
- Stainless Steel: Stainless steel is the most popular choice due to its durability and resistance to high temperatures. It is highly recommended for pellet stove piping systems, ensuring longevity and efficient operation.
- Galvanized Steel: Galvanized steel is another option for pellet stove piping. It is less expensive than stainless steel but tends to corrode more quickly. Regular maintenance and inspection are necessary to prevent corrosion buildup.
- Aluminum: Aluminum is lightweight and easy to work with, making it an attractive option for pellet stove piping. However, it is not as durable or heat-resistant as stainless steel, requiring frequent inspection and replacement.
Measuring And Sizing Pellet Stove Piping
When installing a pellet stove, one of the crucial aspects to consider is the piping. Proper measuring and sizing of pellet stove piping is essential to ensure efficient operation and safe venting of gases. In this section, we will discuss the steps to determine the correct size and length of piping, as well as calculate the number of elbows, tees, and other fittings required for the installation. We will also touch upon the considerations for venting through walls, ceilings, or roofs, to help you plan your pellet stove installation effectively.
Determining the Correct Size and Length of Piping
Before starting the installation process, it is vital to determine the correct size and length of the piping required for your pellet stove. This will largely depend on the stove’s BTU rating, the distance of the vent from the stove to the exterior, and any other specific requirements outlined in the manufacturer’s instructions. Here are the steps to help you calculate the appropriate size and length:
- Check the manufacturer’s guidelines: Start by referring to the manufacturer’s guidelines or product manual. These documents typically provide specific instructions on the recommended pipe size and length for your particular pellet stove model.
- Calculate the BTU rating: Determine the BTU rating of your pellet stove. This information can usually be found on the stove’s label or in the product specifications. The BTU rating will help determine the pipe size required to handle the stove’s exhaust gases effectively.
- Consult the pipe sizing chart: Once you have the BTU rating, refer to a pipe sizing chart provided by your stove’s manufacturer or a reputable online resource. This chart will correlate the BTU rating with the appropriate pipe diameter.
- Measure the distance: Measure the total distance from the stove’s vent outlet to the exterior of your home. This will include both the vertical and horizontal sections of the piping. It is important to factor in these measurements to ensure proper venting.
- Consider the number of elbows: If you have any bends or elbows in your piping system, they can restrict airflow and affect the performance of your pellet stove. Determine the number of elbows required and plan your piping accordingly.
- Account for vertical rise: If your pellet stove requires vertical venting, make sure to account for the vertical rise in your measurements. Vertical venting plays a crucial role in the proper functioning of the stove and the prevention of backdrafts.
Calculating the Number of Elbows, Tees, and Other Fittings Required
Another aspect to consider when sizing pellet stove piping is the number of fittings required for the installation. Fittings, such as elbows and tees, are necessary to navigate around obstacles or to change directions in the piping system. Here are some steps to help you calculate the number of fittings needed:
- Analyze your installation layout: Take a close look at your installation layout and identify any areas where you may need fittings. Consider obstacles like walls, floors, and ceilings that the venting needs to pass through.
- Determine the required fittings: Based on your installation layout, determine the type and quantity of fittings needed. Keep in mind that each fitting introduces some resistance to the airflow, so it’s important not to overuse them.
- Refer to manufacturer guidelines: Consult the manufacturer’s guidelines for your pellet stove model to ensure compliance with their recommended fittings. The manufacturer may have specific instructions regarding the allowable number of fittings.
Considerations for Venting Through Walls, Ceilings, or Roofs
Venting pellet stoves through walls, ceilings, or roofs requires additional considerations to maintain proper airflow and avoid potential safety hazards. Here are some key points to keep in mind:
- Vertical or horizontal venting: Decide whether your pellet stove requires vertical or horizontal venting. This will depend on the stove’s specific venting requirements outlined in the manufacturer’s instructions.
- Maintain clearances: Ensure you maintain the clearance distances specified by the manufacturer when passing the vent through combustible materials such as walls or ceilings. This will help prevent fire hazards.
- Use appropriate wall thimbles or ceiling supports: When venting through walls or ceilings, consider using wall thimbles or ceiling supports to maintain proper clearances and provide a safe penetration point.
- Weatherproofing: Properly seal and weatherproof the venting system where it penetrates through walls, roofs, or any external surfaces to prevent any moisture infiltration.
By accurately measuring and sizing your pellet stove piping, as well as determining the required fittings and considering the venting specifications, you can ensure a safe and efficient installation. Following these guidelines will help you reap the benefits of your pellet stove while minimizing any potential issues.
Selecting And Gathering Necessary Tools And Materials
When it comes to installing a pellet stove piping system, selecting and gathering the necessary tools and materials is an essential first step. Having the right tools and materials ensures a successful and safe installation process. In this section, we will discuss the essential tools, required materials, and safety equipment needed for the installation.
Essential Tools for Installing Pellet Stove Piping
Before you begin the installation process, it’s important to gather the necessary tools. The following is a list of essential tools that you will need:
- A ladder:
- A tape measure:
- A level:
- A drill:
- A screwdriver:
A sturdy and stable ladder is required to access the area where you will be installing the pellet stove piping. Make sure to choose a ladder that is suitable for the height of your installation location.
Accurate measurements are crucial when installing pellet stove piping. A tape measure will help you measure the distance between the stove and the vent, as well as the length of the piping needed for the installation.
Ensuring that the pellet stove piping is installed level is important for proper airflow. A level will help you determine if the piping is straight and level during the installation process.
A drill with a variable speed setting is necessary for drilling holes in the walls or ceilings to accommodate the piping. Make sure to have the appropriate drill bits for the material you will be drilling into.
A screwdriver will be used to secure the sections of the pellet stove piping together. Look for a screwdriver that is compatible with the screws or clamps provided with the piping.
Required Materials for a Successful Installation
In addition to the tools mentioned above, there are several materials that you will need for a successful pellet stove piping installation. These materials include:
- Pellet stove piping:
- Chimney pipe adapter:
- Wall thimble or ceiling support box:
- Screws or clamps:
- Flashing and caulking:
Purchase the appropriate type and size of pellet stove piping for your specific stove and installation requirements. It’s important to select high-quality piping that is approved for use with pellet stoves.
If your pellet stove requires a chimney pipe adapter to connect the stove to the piping, make sure to have the correct adapter on hand.
A wall thimble or ceiling support box will provide proper support and protection for the piping as it passes through the walls or ceilings. Choose a thimble or support box that is suitable for the thickness of your walls or ceilings.
Depending on the type of pellet stove piping you have, you may need screws or clamps to secure the sections together. Check the manufacturer’s instructions to determine what type of fasteners are required.
To ensure a watertight seal around the area where the piping exits your home, you will need flashing and caulk. Choose a high-quality flashing material and an appropriate caulk that is compatible with your specific installation requirements.
Safety Equipment Needed for the Installation Process
Safety should be a top priority when installing pellet stove piping. Make sure to have the following safety equipment on hand:
- Gloves:
- Safety glasses:
- Dust mask:
- Fire extinguisher:
Wearing gloves will protect your hands from sharp edges and potential injury during the installation process.
Protecting your eyes is crucial when working with tools and materials. Wearing safety glasses will shield your eyes from any flying debris or particles.
Installing pellet stove piping may generate dust or debris. Wearing a dust mask will help filter the air you breathe and minimize your exposure to these particles.
It’s always a good idea to have a fire extinguisher nearby in case of emergency. Make sure the fire extinguisher is easily accessible and in proper working condition.
By gathering the essential tools, required materials, and necessary safety equipment, you will be well-prepared to install pellet stove piping successfully. Remember to follow the manufacturer’s instructions and prioritize safety throughout the installation process.
Clearing The Installation Area And Preparing The Pellet Stove
Properly installing a pellet stove requires careful planning and preparation. Before diving into the installation process, it is crucial to ensure a safe and proper installation space, properly position the pellet stove for optimal performance, and clean and inspect the stove to ensure its efficiency. By following these steps, you can ensure a successful installation that will provide you with warmth and comfort during those cold winter months.
Ensuring a Safe and Proper Installation Space
When it comes to installing a pellet stove, safety is of utmost importance. Before starting the installation process, it is essential to clear the area where the stove will be placed. Remove any combustible materials, such as furniture, curtains, or rugs, from the installation space. These objects can potentially catch fire or obstruct the proper venting of the stove. Additionally, ensure that there is a clear and unobstructed path for the vent pipe to pass through the walls or ceiling.
Furthermore, it is crucial to adhere to local building codes and regulations when determining the installation space. These regulations typically include clearance distances from walls, floors, and ceilings to ensure safe operation and prevent potential fire hazards. Be sure to check your local building codes or consult with a professional if you are uncertain about the specific requirements for your area.
Properly Positioning the Pellet Stove for Optimal Performance
Positioning the pellet stove correctly is essential to ensure its optimal performance and efficiency. First, determine the ideal location where the stove will be placed. Consider factors such as the layout of the room, proximity to the exterior wall for venting, and accessibility for maintenance and cleaning.
When positioning the pellet stove, be mindful of maintaining proper clearances from combustible materials, as specified by the manufacturer’s instructions or local building codes. These clearances are crucial to prevent overheating and fire hazards.
Moreover, it is recommended to position the stove on a non-combustible surface, such as a fire-resistant hearth pad or a metal stand specifically designed for pellet stoves. This ensures that any residual heat from the stove will not pose a risk to your home’s flooring or other surrounding materials.
Cleaning and Inspecting the Pellet Stove Before Installation
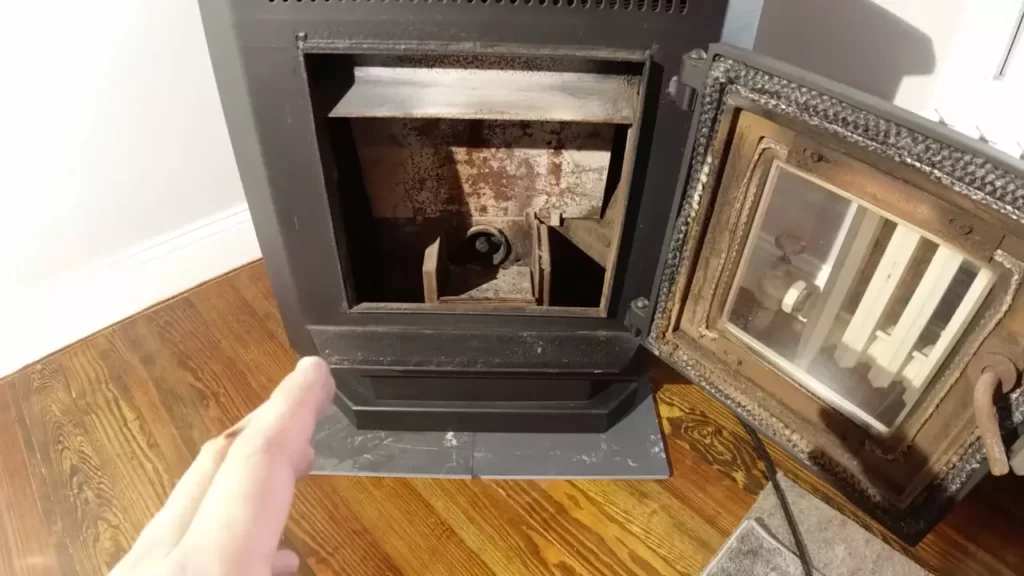
Prior to installing the pellet stove, it is important to give it a thorough cleaning and inspection. Remove any debris, dust, or ash from the stove’s interior, including the burn pot, exhaust vent, and heat exchanger. A clean stove will not only improve its performance but also prevent potential blockages and malfunctions.
Inspect all components of the pellet stove, including the hopper, auger, and combustion blower, for any signs of damage or wear. Replace any worn-out or malfunctioning parts to ensure that the stove operates efficiently and safely. It is also a good idea to check the gaskets and seals for any leaks and replace them if necessary.
By performing a thorough cleaning and inspection before installation, you can address any issues or concerns and ensure that your pellet stove will function optimally from the moment it is installed.
Assembling And Installing Vertical Venting System
When it comes to installing a pellet stove, one of the most important steps is properly assembling and installing the vertical venting system. The venting system ensures that the combustion byproducts, such as smoke and gases, are safely expelled from your home.
Guidelines for Vertical Venting Installation
To ensure the safe and efficient operation of your pellet stove, it’s essential to follow these guidelines for vertical venting installation:
- Always refer to the manufacturer’s instructions. Each pellet stove may have specific requirements for venting, so it’s crucial to carefully read and understand the provided instructions.
- Choose the right type of vent pipe. Generally, pellet stoves require a specific type of vent pipe, such as stainless steel or double-wall pipe. It’s important to select the correct type and size of pipe that meets the manufacturer’s specifications.
- Plan the venting route. Before starting the installation, plan the route for the vent pipe. Consider factors such as clearances, the proximity of combustible materials, and any obstacles that may obstruct the proper installation of the vent pipe.
- Ensure proper clearances. The vent pipe should have adequate clearance from combustible materials, such as walls and ceilings. Check the manufacturer’s instructions for the recommended clearances, and make sure to adhere to them.
- Use the appropriate fittings. Depending on the layout of your venting system, you may need to use various fittings, such as elbows, tees, and adapters. Ensure that you use the correct fittings and connect them securely to the vent pipe.
- Seal the joints properly. To prevent any leakage of exhaust gases, it’s essential to seal the joints of the vent pipe properly. Use high-temperature sealant or metal tape to create a tight seal at each joint.
- Inspect the venting system. Once the installation is complete, carefully inspect the entire venting system to ensure that it is free from any blockages or damage. Regular inspections and maintenance are crucial to ensure the safe operation of your pellet stove.
Connecting the exhaust pipe to the pellet stove
Now that you’ve understood the guidelines for vertical venting installation, the next step is connecting the exhaust pipe to the pellet stove. This connection is essential for effectively directing the combustion byproducts out of your home.
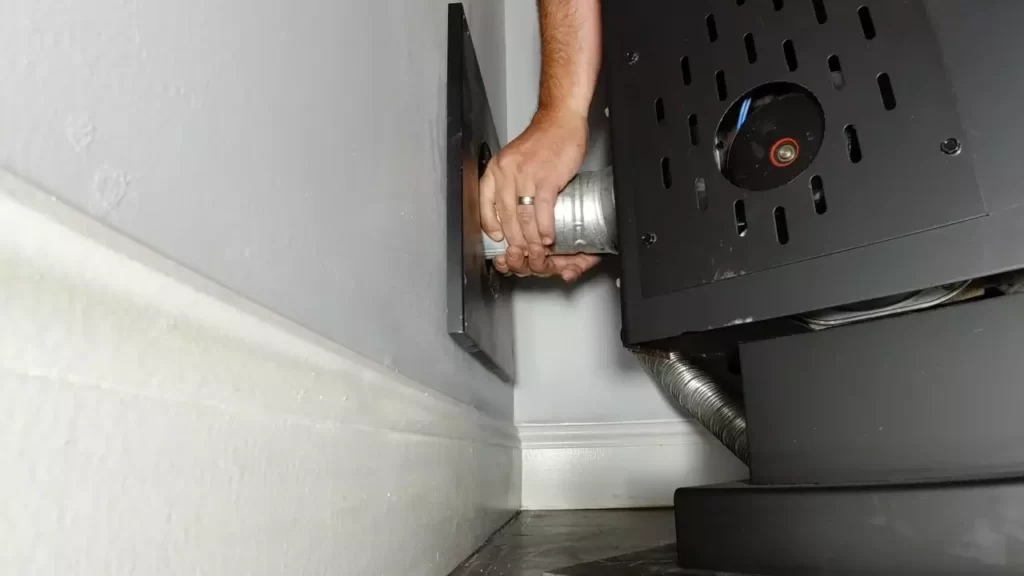
The exhaust pipe is typically connected to the back of the pellet stove using a flue collar or an adapter provided by the manufacturer. Follow these steps to connect the exhaust pipe:
- Select the appropriate-sized pipe. Ensure that the diameter of the exhaust pipe matches the flue collar or adapter on the pellet stove. Using the wrong size can result in improper ventilation and decreased efficiency.
- Slide the exhaust pipe onto the flue collar or adapter. Align the pipe with the collar or adapter, and firmly slide it in place. Make sure the connection is secure and tight.
- Secure the connection. Depending on the pellet stove model, you may need to use clamps or screws to secure the connection between the exhaust pipe and the flue collar or adapter. Follow the manufacturer’s instructions to properly secure the connection.
- Inspect the connection. Once the connection is made, inspect it to ensure that it is secure and tight. A loose connection can lead to the leakage of exhaust gases, which can pose a safety hazard.
Positioning and securing vertical sections of vent pipe
After connecting the exhaust pipe, the next step is positioning and securing the vertical sections of the vent pipe. This ensures that the exhaust gases are effectively vented out of your home without any obstructions. Follow these steps to position and secure the vertical sections of the vent pipe:
- Measure and cut the vent pipe sections. Determine the appropriate length of each section of vent pipe based on your specific installation. Measure carefully and use a suitable tool to cut the pipe to the required length.
- Attach the sections of vent pipe. Connect the sections of vent pipe together by inserting one end into the other. Ensure that each connection is secure and properly aligned.
- Secure the vent pipe to the wall or ceiling. Use appropriate brackets or supports to secure the vent pipe to the wall or ceiling. Follow the manufacturer’s instructions to determine the recommended spacing between supports.
- Ensure proper clearances. Maintain the required clearances between the vent pipe and any combustible materials, such as walls or insulation. Refer to the manufacturer’s instructions for the specific clearances.
- Inspect the vent pipe installation. Once the installation is complete, carefully inspect the entire vent pipe system to ensure that it is positioned correctly, securely connected, and free from any obstructions.
By following these steps for assembling and installing the vertical venting system, you can ensure the safe and efficient operation of your pellet stove. Remember to refer to the manufacturer’s instructions throughout the installation process, and regularly inspect and maintain your venting system to keep it in optimal condition.
Installing Horizontal Venting System
The horizontal venting system for a pellet stove is an important aspect of the installation process. Proper venting ensures that harmful gases are safely expelled from your home, while also maintaining optimal performance and efficiency of your pellet stove. In this section, we will discuss the guidelines for horizontal venting installation, connecting the exhaust pipe to the pellet stove, and positioning and securing horizontal sections of vent pipe.
Guidelines for horizontal venting installation
Before starting the installation process, it is crucial to familiarize yourself with the guidelines for horizontal venting. These guidelines will ensure that the venting system works effectively and safely. Here are some key points to keep in mind:
- Choose the appropriate location for the vent termination point, ensuring it is away from windows, doors, and other openings.
- Follow local building codes and regulations regarding venting installation, clearance requirements, and materials used.
- Use only approved venting components that are compatible with the pellet stove model you are installing.
- Inspect and clean the horizontal venting system regularly to remove any debris or blockages that could affect performance.
Connecting the exhaust pipe to the pellet stove
Once you have familiarized yourself with the guidelines, it is time to connect the exhaust pipe to the pellet stove. Follow the steps below:
- Locate the exhaust outlet on the back of the pellet stove.
- Measure the distance between the exhaust outlet and the desired location for the horizontal venting system.
- Choose the appropriate flue pipe size and length that will connect the exhaust outlet to the horizontal venting system.
- Attach one end of the flue pipe to the exhaust outlet, ensuring a secure connection using the provided clamps or adapters.
Make sure to tighten the clamps or adapters properly to prevent any leaks or disconnections. Once the exhaust pipe is securely connected to the pellet stove, you can proceed with positioning and securing the horizontal sections of vent pipe.
Positioning and securing horizontal sections of vent pipe
Proper positioning and securing of the horizontal sections of vent pipe are vital for the overall performance and safety of your pellet stove. Here are the steps to follow:
- Determine the layout and route of the vent pipe, ensuring it is straight with minimal bends for optimal airflow.
- Secure the horizontal sections of vent pipe using the appropriate hardware, such as brackets or hangers, to prevent sagging or movement over time.
- Ensure that each joint between sections is properly connected and sealed using high-temperature silicone or approved metal foil tape.
- Check for any potential obstructions or clearance issues, making necessary adjustments as required.
By adhering to these guidelines and following the correct installation steps, you can ensure a properly installed horizontal venting system for your pellet stove. This will not only provide efficient heating but also promote a safe and comfortable environment in your home.
Attaching Pellet Stove Pipe To The Exterior
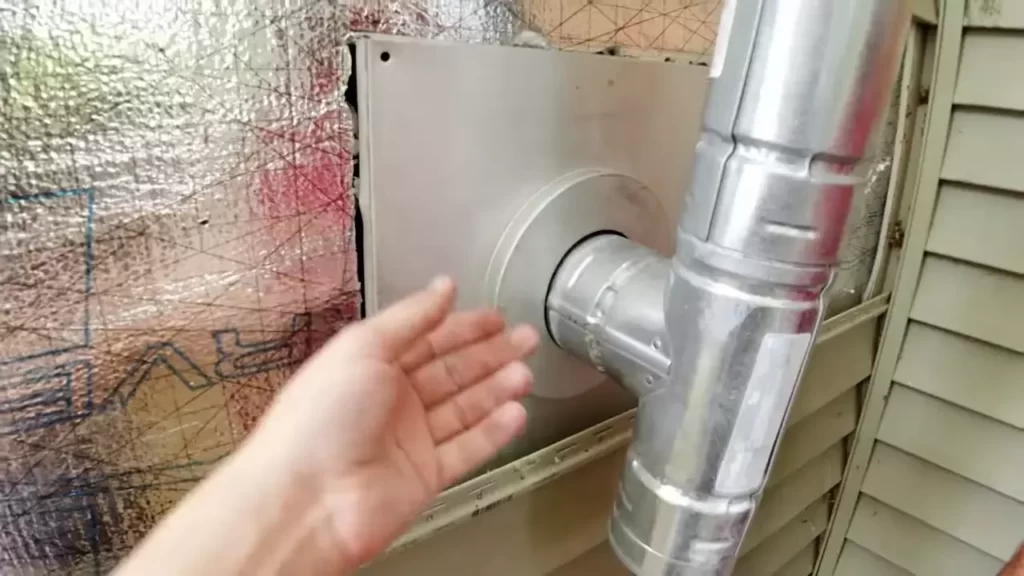
When it comes to installing pellet stove piping, attaching the pipe to the exterior is a critical step in ensuring a secure and efficient installation. This involves two key components: installing wall thimbles and exterior termination caps, as well as properly sealing vent pipe connections. Follow these steps to effectively attach pellet stove pipe to the exterior in a secure and weatherproof manner.
Installing Wall Thimbles and Exterior Termination Caps
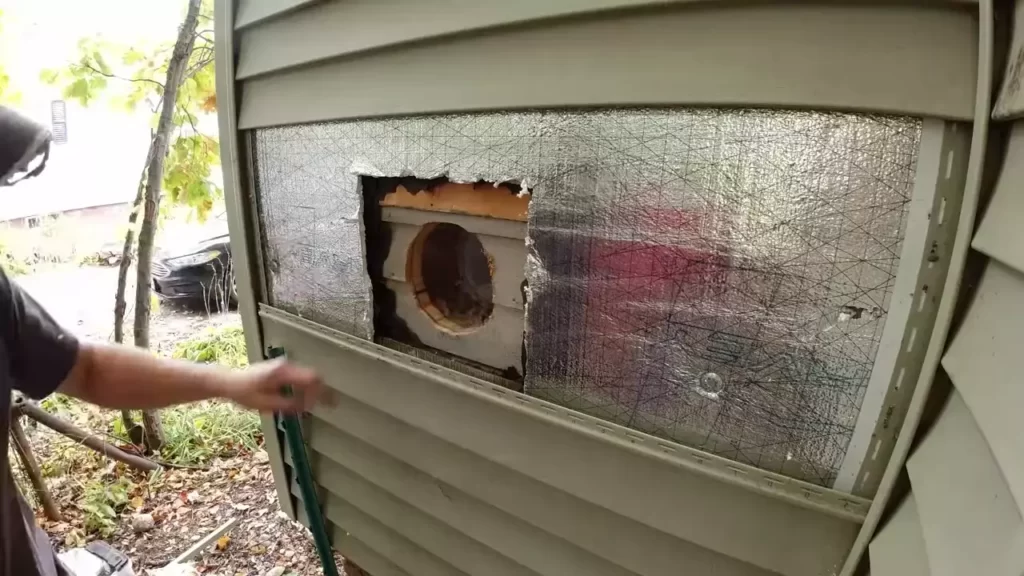
To begin, install a wall thimble to create a passage for the vent pipe to pass through the wall. A wall thimble provides a fire-safe and insulated opening, preventing heat transfer and minimizing any potential hazards. Ensure the wall thimble is properly aligned with the vent pipe’s trajectory and use appropriate mounting hardware to secure it in place.
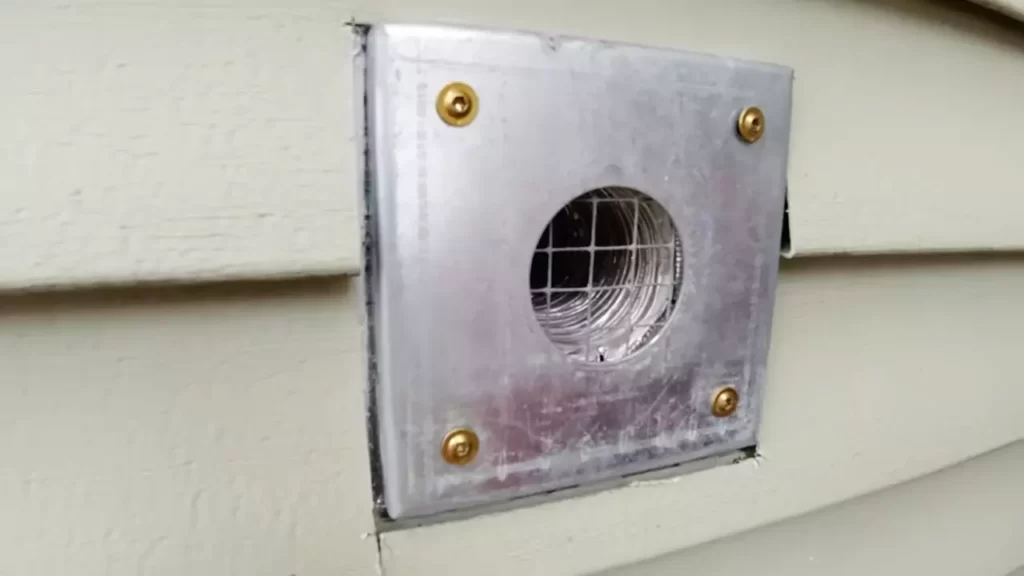
Next, attach an exterior termination cap to the exterior wall. This cap serves two important purposes: it protects the vent pipe and termination point from the elements, and it prevents critters or debris from entering the pipe. Install the termination cap securely and make sure it is properly sealed to the exterior wall to prevent any leaks or drafts.
Properly Sealing Vent Pipe Connections
Once the wall thimble and termination cap are in place, it’s crucial to properly seal the vent pipe connections. Effective sealing not only ensures optimum draft and efficiency but also prevents any potential carbon monoxide leaks. Here’s how to do it:
- Apply a high-temperature sealant, such as silicone or furnace cement, to the inside of the wall thimble.
- Insert the vent pipe into the wall thimble, ensuring a snug fit.
- Connect the sections of the vent pipe securely, using pipe clamps or screws to hold them in place.
- Apply the high-temperature sealant around the secured connections to eliminate any gaps or leaks.
By properly sealing the vent pipe connections, you can prevent any potential air or gas leakage and ensure the safe operation of your pellet stove.
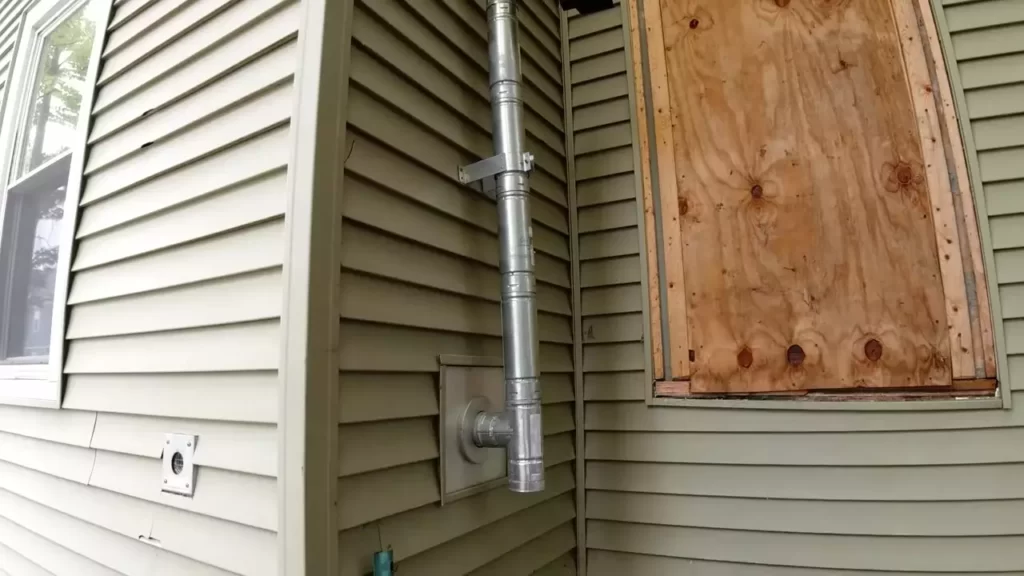
Ensuring a Secure and Weatherproof Exterior Installation
Lastly, it’s important to ensure a secure and weatherproof exterior installation for your pellet stove piping. Here are a few tips to help you achieve this:
- Inspect the installed pipe sections, thimble, and termination cap for any gaps or loose fittings. Tighten any loose screws or clamps and apply additional high-temperature sealant as needed.
- Check the exterior termination cap regularly to ensure it’s free from debris or obstructions. Keep it clean to maintain proper airflow and prevent any potential issues.
- Consider using a rain cap or wind deflector to further protect the exterior termination cap from adverse weather conditions, such as heavy rain or strong winds.
By taking these measures, you can create a secure and weatherproof exterior installation for your pellet stove piping, ensuring optimal performance and safety.
Conducting A Thorough Venting System Inspection
Before installing pellet stove piping, it is crucial to conduct a thorough inspection of the venting system to ensure its proper functioning. This inspection helps identify any potential leaks, damaged components, or performance issues that could affect the efficiency and safety of the pellet stove. By paying attention to the following aspects, you can address any concerns and resolve them before proceeding with the installation.
Checking for leaks or damaged venting components
One of the essential steps in the inspection process is to check for any leaks or damage in the venting system components. This includes the pipes, elbows, joints, and connectors. Even a small leak can lead to a loss of efficiency and, in worst cases, pose a safety hazard. By carefully examining each component, you can identify any cracks, gaps, or signs of wear and tear that require immediate attention. This inspection ensures that the venting system is in good condition and ready for installation.
Testing the performance of the venting system
Another critical aspect of the venting system inspection is testing its performance. This involves checking if the system is appropriately sized and able to handle the pellet stove’s exhaust gases. An undersized or improperly functioning venting system can lead to poor drafting, backdrafting, or excessive buildup of soot and creosote. By conducting a thorough performance test, you can ascertain whether the venting system can effectively and safely handle the pellet stove’s output.
Identifying and resolving any issues or concerns
If during the inspection, you come across any issues or concerns with the venting system, it is vital to address them promptly. Ignoring or overlooking these problems can compromise the pellet stove’s performance and, more importantly, pose a potential fire hazard. Whether it’s adjusting the pipe lengths, fixing leaky joints, or replacing damaged components, ensuring they are resolved before installation guarantees the safe operation of the pellet stove. It is always better to be proactive in identifying and resolving any issues to prevent any complications later.
By conducting a thorough venting system inspection, including checking for leaks or damaged components, testing the system’s performance, and resolving any issues or concerns, you can ensure an efficient and safe installation of pellet stove piping.
Understanding Pellet Stove Safety Guidelines
When it comes to installing a pellet stove and ensuring its safe operation, understanding and following the proper safety guidelines is crucial. Not only does it protect you and your loved ones from potential hazards, but it also helps maintain the longevity and efficiency of your pellet stove. In this section, we will discuss important safety precautions during installation, regular maintenance practices, and the proper venting of carbon monoxide and other gases.
Important Safety Precautions During Installation
Before installing the pellet stove piping, it is essential to observe certain safety precautions to minimize risks. Here are some important steps to consider:
- Ensure the installation complies with all local building codes and regulations.
- Inspect the area where the pellet stove will be installed and ensure it is clear of any combustible materials.
- Choose the appropriate type and size of pellet stove piping recommended by the manufacturer.
- Wear protective gear, such as gloves and goggles, during the installation process.
- Securely fasten the piping to prevent any leaks or disconnections.
- Never install the piping near flammable objects, electrical outlets, or other heat-sensitive materials.
Regular Maintenance Practices to Ensure Safe Operation
Regular maintenance is essential to ensure the safe and efficient operation of your pellet stove. By following these simple practices, you can minimize the risk of malfunctions or accidents:
- Clean the pellet stove and piping regularly to remove any accumulated ash or debris that could obstruct the airflow.
- Inspect the piping for any signs of wear, cracks, or corrosion. Replace any damaged sections immediately to prevent leaks.
- Check the connections between the stove and the piping regularly to ensure they are secure.
- Keep the area around the stove clean and free of clutter to prevent the risk of fire.
- Refer to the manufacturer’s instructions for proper maintenance procedures, including lubrication and filter replacement.
Properly Venting Carbon Monoxide and Other Gases
One of the most critical aspects of pellet stove installation is ensuring the proper venting of carbon monoxide and other gases. Carbon monoxide is a potentially deadly gas that can be produced during the combustion process. To prevent the buildup of carbon monoxide in your home, follow these guidelines:
- Install a venting system that meets the specifications outlined by the manufacturer.
- Ensure the venting system is properly sealed to prevent any leaks.
- Regularly inspect the venting system for obstructions and remove any debris that may accumulate.
- Install carbon monoxide detectors in the area surrounding the pellet stove and throughout your home.
- Test the carbon monoxide detectors regularly to ensure they are functioning properly.
- Seek professional help if you suspect a carbon monoxide leak or if the detector alarms are triggered.
By understanding and adhering to these pellet stove safety guidelines, you can enjoy the warmth and comfort of your pellet stove while ensuring the safety of your home and loved ones.
Frequently Asked Questions For How To Install Pellet Stove Piping
Can I Run A Pellet Stove Pipe Straight Out The Wall?
Yes, you can run a pellet stove pipe straight out the wall. However, it is important to follow safety guidelines and regulations to ensure proper installation and prevent any potential hazards. Consider consulting a professional to ensure the installation meets all necessary requirements.
What Are The Requirements For A Pellet Stove Exhaust Pipe?
Pellet stove exhaust pipes must meet specific requirements. They should be made of durable materials, such as stainless steel, and have a minimum diameter of 3 inches. The pipe should be sealed tightly to prevent leaks and must be vented outside to ensure proper ventilation.
It should also be installed at a safe distance from combustible materials.
Do Pellet Stoves Require Double Wall Pipe?
Yes, pellet stoves require a double wall pipe. The double wall pipe provides proper ventilation and helps to prevent heat transfer to combustible materials. It is necessary for the safety and efficient operation of the pellet stove.
Can I Install A Pellet Stove Myself?
Yes, you can install a pellet stove yourself. Just follow safety guidelines and local building codes. It’s best to consult the manufacturer’s instructions for specific installation steps. Consider professional help if you lack experience or encounter any uncertainties. Enjoy the warmth and efficiency of your pellet stove!
Conclusion
Installing pellet stove piping can be a straightforward DIY project with the right knowledge and tools. By following the step-by-step guide provided in this blog post, you can ensure that your pellet stove piping is installed correctly and efficiently. Proper installation of the piping is crucial for efficient heating and safety.
Remember to consult the manufacturer’s instructions and local building codes for specific requirements. With the right techniques, you can enjoy a warm and comfortable home with your pellet stove.