To install a mini split on an interior wall, you need to choose a suitable location and position the mounting bracket. Once the bracket is installed, connect the refrigerant lines and electrical wiring, then secure the unit onto the bracket and test its functionality.
When installing a mini split on an interior wall, it is essential to follow a few simple and straightforward steps. By carefully selecting the location, positioning the mounting bracket, and connecting the necessary lines and wiring, you can ensure a successful installation.
This article will guide you through the process, helping you set up your mini split efficiently and effectively.
What Is A Mini Split And Why Install It On An Interior Wall?
A mini split, also known as a ductless air conditioning system, is a popular choice for cooling and heating individual rooms or zones in a home. Unlike traditional HVAC systems, mini splits do not require ductwork, making them a flexible and cost-effective solution for both residential and commercial spaces.
Installing a mini split on an interior wall offers several advantages. Firstly, it provides efficient temperature control within the specific room or zone, allowing you to customize the comfort level according to your preferences. Secondly, locating the mini split on an interior wall helps to maintain the aesthetics of your space as the system remains discreetly hidden from view.
Benefits of installing a mini split on an interior wall
- Efficient temperature control within the specific room or zone
- Customizable comfort level according to preferences
- Discreetly hidden system, maintaining the aesthetics of the space
- No need for extensive ductwork
- Increased energy efficiency compared to traditional HVAC systems
- Quiet operation, minimizing noise disruptions
Factors to consider before choosing an interior wall location
When deciding on the placement of your mini split system on an interior wall, it’s important to take certain factors into consideration:
- Proximity to the outdoor unit: Ensure that the chosen interior wall allows for a direct line of sight and easy access to the outdoor unit, as this is where the condenser is typically located. Keep in mind that the maximum allowable distance may vary based on the specific system.
- Structural support: Verify that the interior wall can accommodate the weight of the unit and any additional components. Consult with a professional to determine if any modifications or reinforcements are necessary.
- Electrical requirements: Confirm that the chosen wall location is within reach of an electrical outlet to power the mini split system. It is essential to consult an electrician to ensure that the existing electrical infrastructure can handle the load.
- Aesthetics and functionality: Consider how the mini split placement will fit within the overall aesthetics of the room and its functionality. Take into account factors such as furniture placement and potential obstructions that may affect airflow.
- Installation clearance: Check if the interior wall has enough space to accommodate the necessary installation clearances specified by the manufacturer. This ensures proper airflow and maintenance access.
By carefully considering these factors, you can select the ideal interior wall location for your mini split system, ensuring optimal performance and comfort in the designated room or zone.
Measuring The Interior Wall For Optimal Placement
Determining the most suitable wall for installation
Before you jump into the installation process of a mini split on your interior wall, it is essential to determine the most suitable wall for optimal placement. Not every wall in your space may be suitable for installing a mini split, so it is crucial to evaluate the options and choose the one that will work best for your needs.
Factors to consider when measuring the wall dimensions
Measuring the wall dimensions accurately is a vital step to ensure proper installation of your mini split. Here are a few factors you should consider when measuring:
- Available space: Measure the width and height of the wall to ensure there is enough space for the mini split unit.
- Clearance requirements: Check the manufacturer’s specifications for the recommended clearance requirements for the mini split unit. These requirements typically include clearance from the ceiling, floor, and adjacent walls.
- Obstacles: Take note of any obstacles on the wall, such as electrical outlets, switches, or pipes. These obstacles may require adjustments in the placement of the mini split unit.
- Structural support: Ensure that the chosen wall can provide adequate structural support to bear the weight of the mini split unit. Consider consulting a professional if you have any doubts about the wall’s structural integrity.
By considering these factors while measuring the wall dimensions, you can ensure that your mini split installation goes smoothly and efficiently. It is always better to double-check the measurements before proceeding with the installation process to avoid any unnecessary complications.
Assessing Structural Support For The Mini Split Unit
Checking the load-bearing capacity of the wall
Before installing a mini split unit on an interior wall, it is crucial to assess the structural support provided by the wall. This step ensures the stability and safety of the unit, preventing any potential issues in the future. To determine the load-bearing capacity of the wall, follow these steps:
- Identify the wall where you intend to install the mini split unit.
- Locate the studs within the wall. These are vertical wooden or metal frames supporting the wall structure.
- Use a stud finder tool to locate the studs accurately. This tool emits a beep or a light when it detects a stud.
- With a tape measure, measure the distance between each stud. Typically, studs are spaced approximately 16 inches apart, but this may vary.
- Calculate the weight of the mini split unit. You can find this information in the product specifications or manual.
- Multiply the weight of the unit by its dimensions to get the total weight to be supported by the wall.
- Add a safety margin to the total weight to ensure the wall can withstand the load. It is recommended to add at least 20-30% extra weight.
- Compare the total weight, including the safety margin, with the load-bearing capacity of the wall. The load-bearing capacity can typically be found in building code regulations or consult a structural engineer if unsure.
If the wall’s load-bearing capacity exceeds the total weight of the mini split unit, you can proceed with confidence.
Evaluating the wall material for stability
Assessing the stability of the wall material is equally important to ensure a secure installation of the mini split unit. Consider the following factors when evaluating the wall material:
- Inspect the wall for signs of damage, such as cracks or water leaks. These issues can compromise the wall’s stability and should be addressed before installation.
- Check if the wall material is suitable for mounting a mini split unit. Some materials, like drywall or concrete, provide a solid surface for installation, while other materials may require additional reinforcement.
- Consider the thickness of the wall material. Thicker walls tend to be more stable and better able to support the unit’s weight.
- If in doubt, consult a professional to evaluate the wall material’s stability and suitability for the mini split unit installation.
By thoroughly assessing the structural support and stability of the interior wall, you can ensure a successful and safe installation of your mini split unit.
Selecting The Right Tools And Equipment
Installing a mini split on an interior wall may seem like a daunting task, but with the right tools and equipment, it can be a straightforward process. Before you begin, it’s essential to gather all the necessary tools and equipment to ensure a successful installation. In this section, we’ll explore the essential tools and additional equipment you’ll need to complete the installation seamlessly.
Essential Tools for Mini Split Installation on an Interior Wall
When it comes to installing a mini split on an interior wall, having the right tools is crucial. Here are the essential tools you should have at your disposal:
- A stud finder: This tool will help you locate the studs in the wall where you plan to install your mini split. It ensures that the unit is securely mounted.
- A level: Having a level is vital to ensure that your mini split is mounted straight and level on the wall.
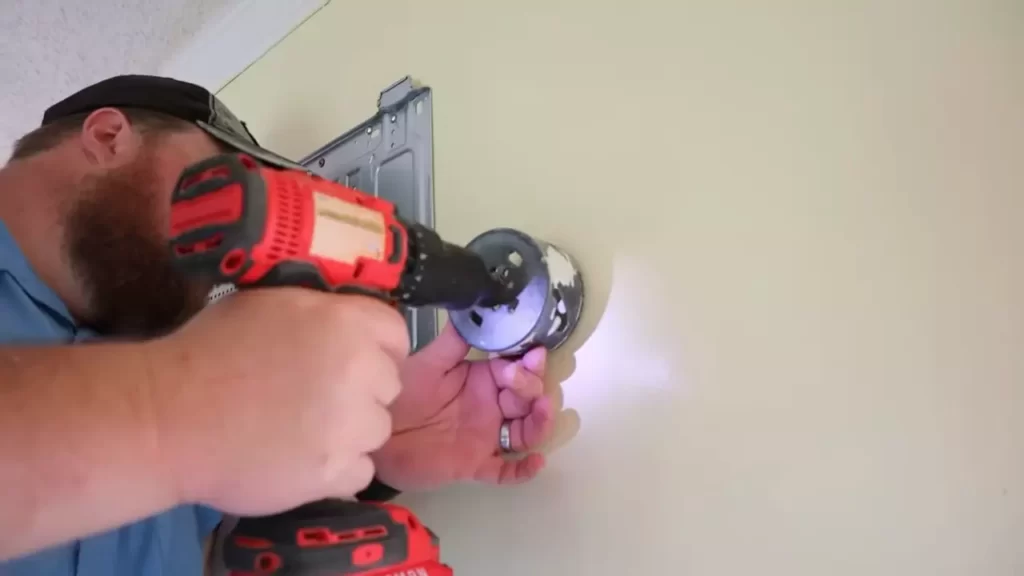
- A drill: You’ll need a drill to create holes in the wall for mounting brackets and running the necessary wiring.
- A screwdriver: A screwdriver is necessary for tightening screws during the installation process.
- Electrical tape: This tape is used to secure and protect the electrical connections.
- Wire cutters/strippers: These tools will be required to strip and cut wires during the installation.
Additional Equipment Needed for a Successful Installation
In addition to the essential tools mentioned above, there are a few additional pieces of equipment that you’ll need to complete the installation successfully:
- Mounting brackets: These brackets are used to securely attach the mini split unit to the wall. Follow the manufacturer’s instructions to determine the type and size of brackets needed for your specific unit.
- PVC conduit: This conduit is used to protect and hide the wiring that connects the mini split to the electrical source. It creates a clean and professional look once installed.
- Electrical wire: Depending on the distance between the indoor and outdoor units, you may need to purchase additional electrical wire to connect them.
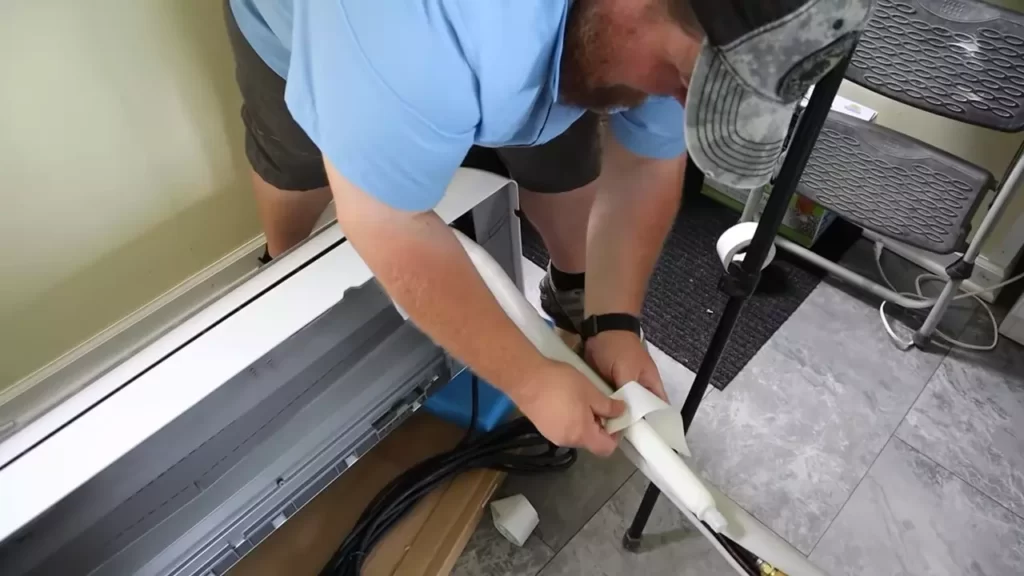
- Insulation tape or foam: Insulating the refrigerant lines is essential to prevent condensation and maintain optimum performance. Insulation tape or foam can be used for this purpose.
- Anchor bolts: If your interior wall is made of concrete or brick, you’ll need anchor bolts to securely fasten the mounting brackets.
- Caulking gun and silicone sealant: To ensure an airtight seal around the unit, use a caulking gun and silicone sealant to fill any gaps between the wall and the unit.
By having all the necessary tools and equipment at hand, you’ll be well-prepared to tackle the installation of a mini split on an interior wall. With proper planning and attention to detail, you’ll soon be enjoying the benefits of a comfortably cooled or heated space.
Preparing The Interior Wall
Before installing a mini split air conditioner on an interior wall, it is essential to prepare the wall properly. This will ensure the installation goes smoothly and that the unit works efficiently. Two key steps in this process include clearing the area and ensuring proper ventilation, as well as removing any obstructions and potential obstacles.
Clearing the Area and Ensuring Proper Ventilation
First and foremost, clear the area where you plan to install the mini split air conditioner. This means removing any furniture, decor, or other items that might obstruct the installation process. By creating an open space, you provide easy access to the wall and make it easier to install the unit. Plus, it helps to prevent any accidental damage to your belongings during the installation.
Proper ventilation is crucial for the performance and longevity of the mini split air conditioner. Ensure that the wall you choose to install the unit on allows for adequate airflow. A well-ventilated area helps the air conditioner to work efficiently and effectively, providing you with optimal cooling or heating results. To enhance ventilation, place the unit away from curtains, furniture, or any other objects that might block the airflow.
Removing Obstructions and Potential Obstacles
Next, take a closer look at the wall and remove any obstructions or potential obstacles that might interfere with the installation. This includes electrical outlets, light switches, or any other fixtures that could be in the way. Clearing these obstructions ensures a smooth installation process and prevents any damage to the mini split air conditioner or the wall itself.
To remove electrical outlets or light switches from the wall temporarily, carefully unscrew the faceplate and gently pull it out. This step allows you to work on a flat, obstruction-free surface. However, if you are not comfortable doing this or unsure about handling electrical fixtures, it is advisable to seek professional help. Remember, safety should always be a priority during any installation process.
By preparing the interior wall properly, you are setting the foundation for a successful mini split air conditioner installation. Clearing the area and ensuring proper ventilation, as well as removing obstructions and potential obstacles, will help you avoid any inconveniences or issues down the line. With these steps taken care of, you can move on to the next phase of installation with confidence.
Mounting The Indoor Unit On The Interior Wall
Mounting the indoor unit on the interior wall
Properly mounting the indoor unit of a mini split air conditioner system on the interior wall is essential for optimal performance and aesthetics. This step-by-step guide will walk you through the process, from ensuring the proper positioning and alignment of the unit to securing it to the wall for stability.
Proper positioning and alignment of the unit
To begin with, it’s crucial to choose the appropriate location for mounting the indoor unit. Identify a spot on the interior wall that meets the following criteria:
- Accessible for maintenance and cleaning purposes.
- Provides proper air circulation throughout the room.
- Avoids direct exposure to sunlight or any other sources of heat.
- Keeps the unit away from any potential obstructions, such as furniture or curtains.
Once you’ve determined the ideal location, use a level to ensure that the unit will be mounted straight and aligned properly. This step is crucial to achieve optimal functionality and prevent any unnecessary strain on the system.
Securing the unit to the wall for stability
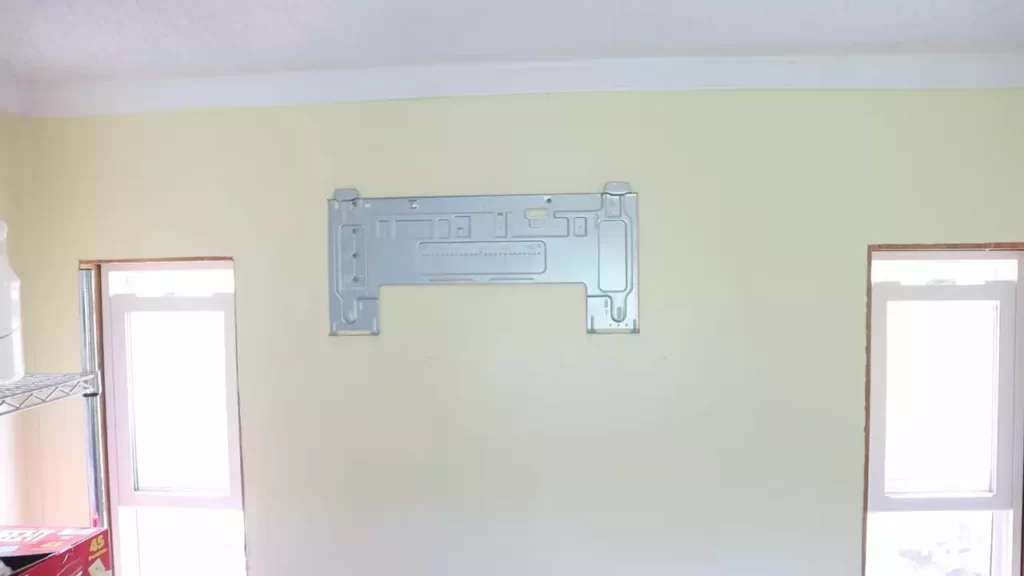
After you have determined the right position and alignment for the indoor unit, it’s time to secure it to the interior wall. Follow these steps:
- Using a pencil, mark the positions of the screws or brackets according to the mounting holes on the back of the unit. Refer to the manufacturer’s instructions for the precise measurements.
- Drill pilot holes at the marked positions. Ensure that the drill bit matches the size of the screws or brackets provided with the unit.
- Attach the screws or brackets to the wall, making sure they are aligned with the pilot holes. Tighten them securely to provide stability for the unit.
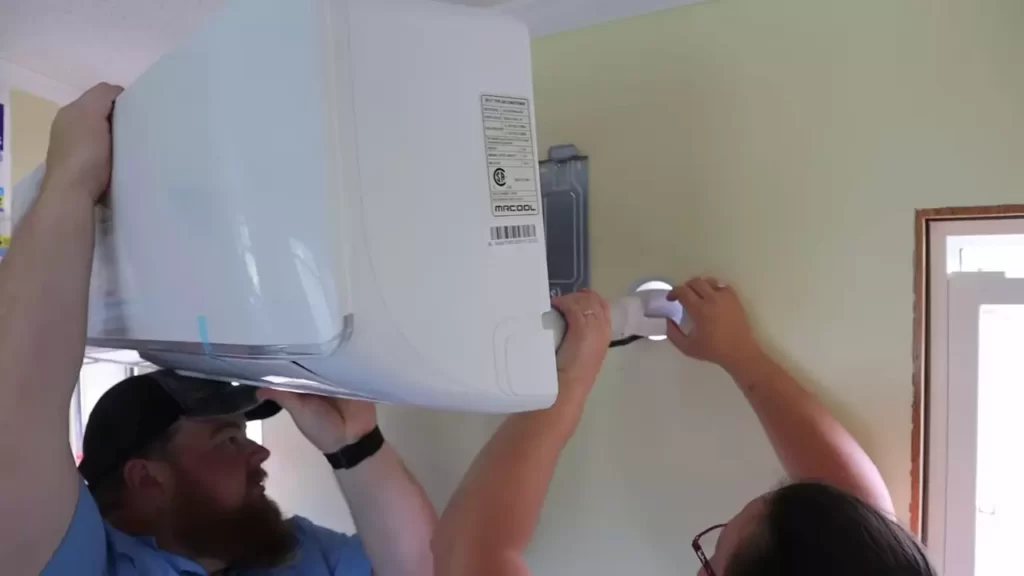
- Carefully lift the indoor unit and hang it onto the screws or brackets. Ensure it is properly seated and aligned with the mounting holes.
- Double-check the stability of the unit by gently shaking it. If there is any wobbling or instability, adjust the screws or brackets accordingly until the unit is firmly secured.
Remember to handle the indoor unit with care during the installation process to avoid any damage. Once the unit is securely mounted, connect it to the corresponding outdoor unit according to the manufacturer’s instructions, and you’re ready to enjoy the comfort of your newly installed mini split air conditioner system.
Connecting The Refrigerant Lines And Electrical Wiring
Connecting the refrigerant lines and electrical wiring is a crucial step in the installation of a mini-split system on an interior wall. It ensures the proper functionality and efficiency of the system. Understanding the refrigerant line connections and ensuring the correct wiring connections are essential for maximum efficiency. Follow this guide to ensure a successful installation.
Understanding the refrigerant line connections
Before connecting the refrigerant lines, it is vital to have a clear understanding of how they work. The refrigerant lines are responsible for carrying the refrigerant between the indoor and outdoor units of the mini-split system. These lines consist of two pipes – the liquid line and the suction line. The liquid line carries the refrigerant from the outdoor unit to the indoor unit, while the suction line carries the refrigerant back to the outdoor unit.
To connect the refrigerant lines, you will need the appropriate tools and fittings. Make sure to check the manufacturer’s instructions for specific requirements. Typically, the connections will involve flaring or brazing the pipes to create a sealed connection. Ensure that the connections are tight and free from leaks.
Ensuring the correct wiring connections for maximum efficiency
Proper wiring connections are essential for the efficient operation of your mini-split system. Follow these steps to ensure the correct wiring connections:
- Start by turning off the power to the electrical circuit that will supply the mini-split system. This is crucial for your safety during the installation process.
- Carefully remove the cover of the indoor unit to access the wiring terminals. The terminals may be labeled based on their functions, such as L1, L2, N, GND, etc.
- Refer to the wiring diagram provided by the manufacturer. This diagram will guide you on how to connect the wires from the indoor unit to the electrical supply and the outdoor unit.
- Connect the wires according to the diagram, ensuring that the connections are secure and free from any loose ends. Use appropriate wire connectors or terminal blocks to make the connections.
- Once all the wiring connections are made, double-check to ensure that there are no loose or exposed wires.
Remember, if you are unsure or uncomfortable with any aspect of the wiring process, it is always advisable to seek assistance from a qualified electrician. Safety should be your top priority during the installation.
By properly connecting the refrigerant lines and electrical wiring, you are setting the stage for your mini-split system to function efficiently and provide you with the desired indoor comfort. Take your time, follow the instructions carefully, and enjoy the benefits of a well-installed mini-split system.
Testing And Troubleshooting The Installation
After successfully installing the mini split on the interior wall, it’s essential to perform thorough testing and troubleshooting. This step ensures that the unit functions optimally and eliminates any potential problems that may arise. Let’s take a closer look at the two crucial aspects of testing and troubleshooting: checking for leaks in the refrigerant lines and verifying the electrical connections and power supply.
Checking for Leaks in the Refrigerant Lines
One of the common issues that may occur during the installation process is refrigerant leaks. These leaks can significantly affect the performance of the mini split and potentially cause damage. Therefore, it’s vital to carefully inspect the refrigerant lines and ensure that there are no leaks present.
To check for leaks, you can use a refrigerant leak detector tool or a mix of soap and water. Start by inspecting the fittings, joints, and connections along the refrigerant lines. Apply the soap and water mixture to these areas and observe. If you notice any bubbles forming, it indicates a leak. In such cases, tighten the connections or replace any damaged components immediately.
Verifying the Electrical Connections and Power Supply
Another crucial aspect of testing and troubleshooting is verifying the electrical connections and power supply. A faulty electrical connection can lead to the mini split not operating correctly or even pose a safety risk.
Begin by ensuring that the power supply to the unit is turned off. Use a multimeter to measure the voltage at the electrical connections. Make sure that the readings match the manufacturer’s specifications. Additionally, inspect the electrical wiring for any signs of damage or loose connections. Tighten any loose wires and replace any damaged ones.
Once you have completed the inspections and repairs, it’s time to test the system. Turn on the power supply and check if the mini split starts operating as expected. Listen for any unusual sounds or vibrations, as they may indicate further issues. Monitor the unit for a while to ensure that it maintains the desired temperature and functions properly.
Keep in mind that if you encounter any persistent issues even after troubleshooting, it’s advisable to consult a professional HVAC technician. They have the expertise and tools to diagnose the problem accurately and provide the necessary solutions.
Sealing And Insulating The Wall Opening
Preventing Air Leakage
One of the most critical steps in installing a mini split on an interior wall is sealing and insulating the wall opening. This ensures that there are no gaps or cracks where air can leak in or out, reducing energy efficiency and compromising the performance of your mini split system.
To prevent air leakage, start by applying a high-quality sealant around the edges of the wall opening. This will help create an airtight seal between the interior and exterior of your home. Pay special attention to any gaps or seams where the wall meets the frame, as these are common areas for air infiltration.
Next, use insulation materials to fill the space between the wall and the mini split unit. This insulation not only helps prevent air leakage but also improves energy efficiency by reducing heat transfer between the interior and exterior of your home.
Optimizing Energy Efficiency
In addition to preventing air leakage, there are other steps you can take to optimize the energy efficiency of your mini split system.
First, consider using insulation tape or sealant to cover any exposed piping or electrical lines. This will help minimize heat transfer and ensure that your mini split operates at its maximum efficiency.
Second, make sure that the wall opening is properly insulated. This can be achieved by installing insulation panels or batt insulation in the gap between the wall and the mini split unit. This additional layer of insulation will further reduce heat transfer and improve overall energy efficiency.
Maintaining And Servicing The Mini Split Unit
Regular cleaning and maintenance of your mini split unit is essential to ensure optimal performance and longevity. By following some simple techniques, you can keep your unit running smoothly and avoid costly repairs. If you do encounter any issues, it’s important to know when to seek professional help for servicing and repairs. Let’s explore these topics in more detail.
Regular Cleaning and Maintenance Techniques
To keep your mini split unit in good condition, regular cleaning and maintenance should be part of your routine. Here are some techniques to help you maintain your unit:
- Clean the filters: The filters of your mini split unit can accumulate dust and debris over time, reducing its efficiency. Regularly cleaning or replacing these filters is crucial for maintaining proper airflow and improving indoor air quality.
- Inspect and clean the coils: The indoor and outdoor coils can collect dirt and grime, hindering heat exchange and reducing efficiency. Gently brush off any debris and use a soft cloth dampened with a mild detergent to clean the coils. Avoid using harsh chemicals that could damage the unit.
- Clean the condensate drain line: The condensate drain line can become clogged with algae, mold, or debris, leading to water leakage and potential damage. Regularly flushing the drain line with a mixture of water and bleach can help prevent clogs and ensure proper drainage.
- Check electrical connections: Inspect the electrical connections to ensure they are tight and free from corrosion. Loose connections can cause performance issues and even electrical hazards.
When to Seek Professional Help for Servicing and Repairs
While regular maintenance can prevent many issues, there are times when professional help is necessary. Here are some signs that indicate you should seek professional assistance:
- Strange noises: If your mini split unit is making unusual noises such as grinding, squealing, or clunking, it’s best to have a professional assess the situation. These noises could indicate a mechanical problem that requires expert attention.
- Insufficient cooling or heating: If your mini split unit is no longer providing the level of cooling or heating you expect, it could be a sign of a malfunction. A professional can diagnose the issue and make the necessary repairs.
- Leakage or water pooling: If you notice water leakage or pooling around your mini split unit, it could indicate a refrigerant leak or a problem with the condensate drainage system. Professional assistance is necessary to address these issues.
- Electrical problems: If you experience electrical issues with your mini split unit, such as frequent tripping of the circuit breaker or power surges, it’s important to have an electrician or HVAC technician check the wiring and electrical components.
Remember, proper maintenance and timely repairs are vital for the optimal performance and longevity of your mini split unit. By following these regular cleaning techniques and knowing when to seek professional help, you can ensure a comfortable and efficient cooling or heating experience.
Troubleshooting Common Installation Issues
Installing a mini split on an interior wall can provide efficient heating and cooling for any room in your home. However, there are common challenges that may arise during the installation process. In this section, we will discuss how to identify and resolve these issues to ensure a successful installation.
Identifying and resolving common installation challenges
Installing a mini split on an interior wall requires careful attention to detail. Here are some common challenges you may encounter:
| Challenge | Solution |
|---|---|
| The wall is not strong enough to support the unit | Ensure that the wall is capable of supporting the weight of the mini split unit. If needed, consult a professional to reinforce the wall or consider an alternative installation location. |
| Electrical wiring is not compatible or insufficient | Check the electrical requirements of the mini split unit and ensure that your existing wiring meets those specifications. If necessary, hire an electrician to upgrade the wiring. |
| Inadequate space for the unit | Measure the available space on the wall and compare it to the dimensions of the mini split unit. If there is not enough space, consider an alternative location or a different type of cooling system. |
| Improper placement of the outdoor unit | Ensure that the outdoor unit is placed in a suitable location that allows for proper airflow and minimizes noise. Avoid placing it near obstacles or in direct sunlight. |
By addressing these common challenges, you can overcome potential obstacles and complete the installation successfully.
Revisiting the installation process for potential errors
Even if you have followed the installation instructions carefully, errors can still occur. It is important to revisit the installation process to identify and correct any mistakes. Here are some potential errors to look out for:
- Leakage of refrigerant: Ensure that all connections are tight and properly sealed to prevent refrigerant leakage.
- Misalignment of the indoor and outdoor units: Double-check the alignment of the units to ensure they are properly connected.
- Inadequate insulation: Inspect the insulation around the refrigerant lines and ensure that it is properly installed to prevent temperature loss.
- Electrical wiring issues: Test the electrical connections to ensure they are secure and properly connected.
By revisiting the installation process and addressing any potential errors, you can troubleshoot and resolve issues that may arise. This will ensure optimal performance and longevity of your mini split unit.
Frequently Asked Questions On How To Install Mini Split On Interior Wall
Can I Mount A Mini Split On An Interior Wall?
Yes, you can mount a mini split on an interior wall if certain factors are considered. Ensure the wall is structurally strong enough to support the unit’s weight. Also, the chosen location should provide proper airflow and be easily accessible for maintenance purposes.
Keep in mind that professional installation is recommended to ensure optimal performance.
Can A Split System Be Installed On An Internal Wall?
Yes, a split system can be installed on an internal wall.
Where Should You Not Install A Mini Split?
Avoid installing a mini-split in the following locations: high-moisture areas like bathrooms, near sources of heat/cold, dusty areas or spaces with poor ventilation, rooms with low ceilings, and places with limited access for maintenance.
Does A Mini Split Need To Be Centered On The Wall?
No, a mini split does not need to be centered on the wall. It can be installed anywhere along the wall, as long as there is proper airflow and access to electrical connections.
Conclusion
Installing a mini split on an interior wall is a convenient and efficient way to regulate temperature in your home. By following the step-by-step guide outlined in this blog post, you can successfully install the mini split system without any hassle.
Remember to carefully choose the location, prepare the wall, and hire a professional if needed. With the right tools and knowledge, you can enjoy the benefits of a mini split system for years to come.