Installing metal ductwork involves measuring and cutting the ducts, connecting them with screws and tape, and securing them in place using hangers and supports. The process requires precision and attention to detail for proper installation.
Metal ductwork is commonly used in HVAC systems to distribute heated or cooled air throughout a building. It provides efficient airflow and is known for its durability and longevity. If you’re considering installing metal ductwork, it’s important to follow the correct steps to ensure optimal performance.
We will guide you through the process of installing metal ductwork. From measuring and cutting the ducts to connecting them and securing them in place, we will cover all the necessary steps. So, let’s get started and make sure your metal ductwork installation is a success.
Why Metal Ductwork Is The Best Choice?
When it comes to installing ductwork in your home or commercial building, metal ductwork is the best choice for a number of reasons. Metal ductwork offers several benefits, including superior durability, cost-effectiveness, and efficient airflow. In this blog post, we will explore the reasons why metal ductwork is the preferred option for your HVAC system.
Benefits of Metal Ductwork
Metal ductwork provides a range of benefits that make it an ideal choice for residential and commercial HVAC systems. Some of the key advantages of metal ductwork include:
- Durability: Metal ductwork is highly durable, ensuring it can withstand various environmental conditions and the test of time. Unlike other types of ductwork, such as fiberglass or plastic, metal ductwork is less prone to damage and degradation. This longevity makes metal ductwork a cost-effective option in the long run as it reduces the need for frequent repairs or replacements.
- Efficient airflow: Metal ductwork allows for efficient airflow, ensuring that heated or cooled air can travel throughout your home or building effectively. The smooth walls and tight seals of metal ductwork minimize air leaks, preventing energy loss and reducing your energy bills. By delivering air to the desired areas efficiently, metal ductwork helps maintain a comfortable indoor environment.
- Fire resistance: Metal ductwork is fire resistant, providing an added safety feature to your HVAC system. In the event of a fire, metal ductwork helps prevent the spread of flames, protecting the structure of your home or building and potentially saving lives. In comparison, other ductwork materials may pose a higher fire risk, making metal ductwork the safer choice.
- Ease of maintenance: Metal ductwork is relatively easy to clean and maintain, ensuring optimal airflow performance. Regular cleaning and maintenance of metal ductwork can help prevent the buildup of dust, allergens, and contaminants, promoting healthier indoor air quality. Additionally, metal ductwork is resistant to mold and mildew growth, reducing the risk of air quality issues.
Durability of Metal Ductwork
Metal ductwork is renowned for its exceptional durability, making it highly resistant to wear and tear. Unlike other materials that can be easily damaged or degraded over time, metal ductwork is built to last.
The durability of metal ductwork can be attributed to its strong construction and ability to withstand various environmental conditions. Metal ductwork can handle high pressure, temperature fluctuations, and exposure to moisture without losing its structural integrity.
Whether you live in a region with extreme weather conditions or you want ductwork that will stand the test of time, metal ductwork is the ideal choice.
Cost-effectiveness of Metal Ductwork
Investing in metal ductwork can lead to long-term cost savings for homeowners and businesses alike. While the initial cost of installing metal ductwork may be higher compared to other materials, its durability and low maintenance requirements make it a cost-effective choice in the long run.
With metal ductwork, you can avoid the expenses associated with frequent repairs and replacements that may be required with other types of ductwork materials. Metal ductwork’s ability to withstand the test of time means you can enjoy the benefits of a reliable and efficient HVAC system without the need for constant repairs.
Planning For Metal Ductwork Installation
Before embarking on the installation of metal ductwork, proper planning is essential to ensure optimal ventilation in your space. This involves assessing your ventilation needs, measuring the space for ductwork, and choosing the right type of metal ductwork. By meticulously planning these aspects, you can ensure a smooth and efficient installation process.
Assessing the ventilation needs
When assessing your ventilation needs, consider factors such as the size of the space, the number of occupants, and the purpose of the area. Adequate ventilation is crucial for maintaining indoor air quality and preventing the accumulation of pollutants. Proper assessment allows you to determine the required airflow and ductwork capacity, ensuring efficient ventilation throughout your space.
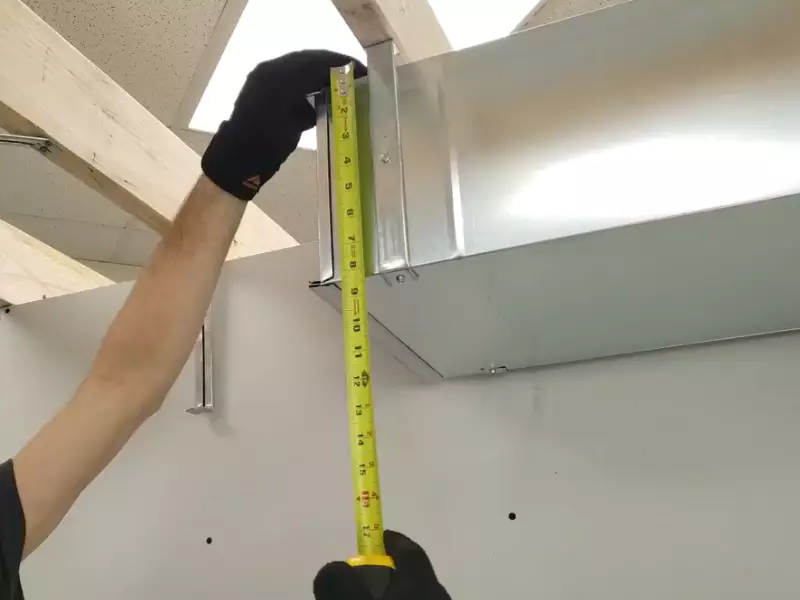
Measuring the space for ductwork
Accurate measurements are crucial when installing metal ductwork. Before beginning the installation, measure the length, width, and height of the space to determine the size of the ducts required. Take into account any obstructions such as walls, beams, or equipment that may affect the placement of the ducts. This enables you to plan the layout and design of your ductwork system for maximum efficiency and functionality.
Choosing the right type of metal ductwork
There are different types of metal ductwork available, each with its unique advantages and applications. Consider factors such as durability, insulation properties, cost-effectiveness, and compatibility with your HVAC system. Popular choices include galvanized steel, aluminum, and stainless steel ducts. Consult with professionals or refer to building codes to determine the most suitable type of ductwork for your specific needs.
By properly assessing your ventilation needs, measuring the space for ductwork, and selecting the appropriate type of metal ductwork, you can ensure a successful installation process. Following these steps will not only promote efficient airflow but also contribute to the overall performance and energy efficiency of your HVAC system.
Step-By-Step Guide To Installing Metal Ductwork
“`
Welcome to our step-by-step guide to installing metal ductwork! Whether you’re building a new home or renovating an existing one, installing metal ductwork is an essential task that ensures proper air ventilation throughout your space. In this guide, we’ll walk you through each stage of the installation process, from preparing the work area to sealing the joints and connections. So, let’s get started!
Preparing the Work Area
The first step in installing metal ductwork is to prepare the work area. Clear out any obstructions, such as furniture or debris, to create a clean and safe environment to work in. Make sure to have adequate lighting and ventilation, as the installation process may require you to work in tight spaces.
Gathering the Necessary Tools and Materials
Before you begin, gather all the necessary tools and materials to complete the installation. Here’s a list of what you’ll need:
| Tools | Materials |
|---|---|
|
|
Cutting and Shaping the Metal Ductwork Pieces
Once you have all your tools and materials ready, it’s time to cut and shape the metal ductwork pieces to fit your space. Measure the dimensions of the area where the ductwork will be installed, and use your sheet metal snips to cut the ductwork accordingly. Ensure that each piece fits snugly and securely.
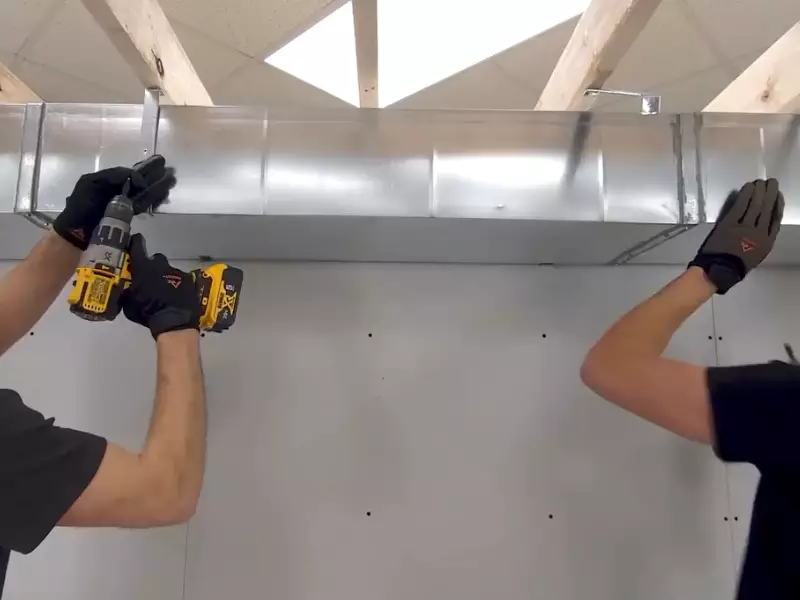
Connecting the Ductwork Sections
With the individual pieces cut and shaped, it’s time to connect them together. Use connectors, screws, and a power drill to secure the ductwork sections. Make sure the connections are tight and properly aligned to prevent air leaks.
Insulating the Ductwork
Insulating the ductwork is crucial to maintain proper temperature control and prevent energy loss. Wrap insulation around the ductwork, ensuring that it covers all exposed areas. Secure the insulation with duct tape to keep it in place.
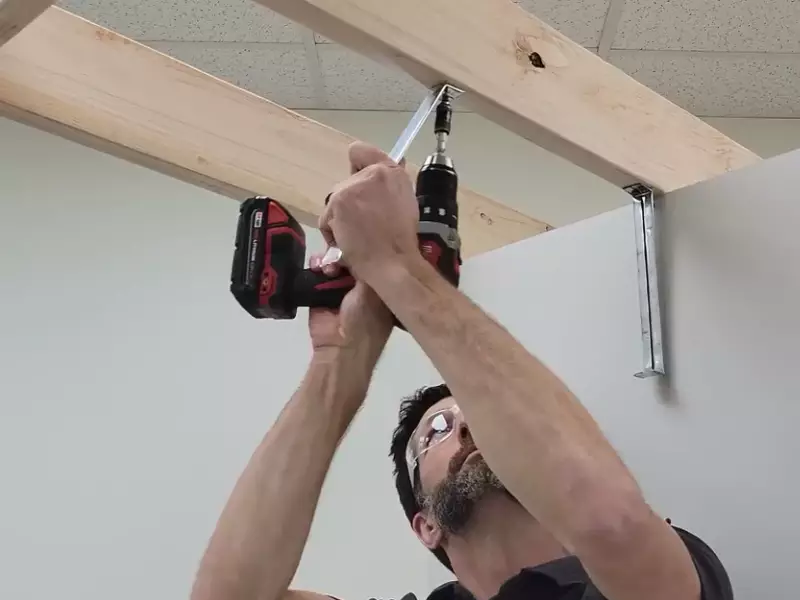
Securing the Ductwork in Place
Now that the ductwork is connected and insulated, secure it in place using screws and brackets. This will ensure that the ductwork remains stable and doesn’t move or shift over time.
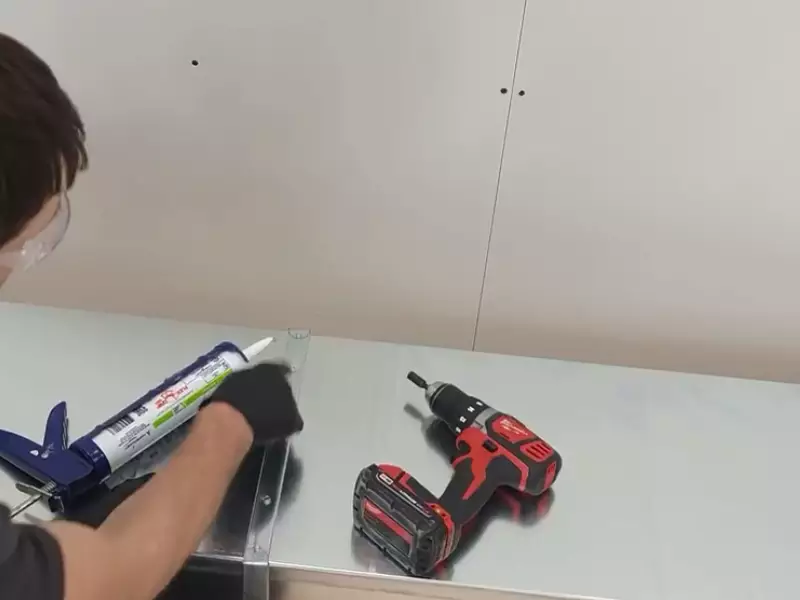
Sealing the Joints and Connections
The final step in installing metal ductwork is to seal the joints and connections. This will prevent air leaks and ensure efficient airflow. Apply duct sealant or mastic to all joints and connections, and use duct tape to provide an additional layer of sealing.
And that’s it! By following this step-by-step guide, you’ll be able to install metal ductwork like a pro. Remember to take your time and double-check each step to ensure a proper installation. If you have any questions or need further assistance, feel free to reach out to our team. Happy ductwork installation!
Troubleshooting Common Issues With Metal Ductwork Installation
Identifying and fixing air leaks
One of the most common issues that arise during metal ductwork installation is air leaks. These leaks can significantly impact the efficiency of your HVAC system and lead to higher energy costs. To identify air leaks, you can perform a simple visual inspection of the ductwork, looking for any loose connections or gaps. It’s important to fix these leaks promptly to ensure proper airflow and prevent air loss. Here are a few steps you can follow to fix air leaks:
- Step 1: Seal small gaps and cracks: Using aluminum foil tape or mastic sealant, seal off any small gaps or cracks in the ductwork. Make sure to clean the area thoroughly before applying the sealant for better adhesion.
- Step 2: Tighten loose connections: Check all the connections between duct sections and ensure they are tightly secured. Use metal screws or clamps to tighten any loose connections and prevent air leakage.
- Step 3: Insulate ductwork: Consider insulating your ductwork to prevent air leaks and improve energy efficiency. Insulation can also help reduce condensation issues, which we will discuss next.
Dealing with condensation problems
Condensation problems can occur when the temperature of the ductwork is lower than the dew point of the surrounding air. This can lead to moisture buildup and eventually result in mold growth and structural damage. To address condensation issues, follow these steps:
- Step 1: Insulate ductwork: Insulation plays a crucial role in preventing condensation. By insulating the ductwork, you can create a barrier that maintains the temperature of the air inside the ducts, reducing the chances of condensation.
- Step 2: Install vapor barriers: Vapor barriers can be installed on the exterior of the ductwork to further prevent moisture penetration. These barriers act as a protective layer and help keep the ducts dry.
- Step 3: Properly seal duct joints: Ensure that all duct joints are tightly sealed to minimize air leakage. This can prevent warm, humid air from entering the ductwork and causing condensation.
Addressing noise issues
Metal ductwork installation can sometimes lead to noise issues, resulting from vibrations and airflow turbulence. These noises can be annoying and disruptive. Here are a few steps to address noise issues:
- Step 1: Use noise-reducing materials: Consider using acoustical lining or insulation specifically designed to reduce noise in your ductwork. These materials absorb sound waves and help minimize noise transmission.
- Step 2: Install vibration isolators: Vibration isolators can be installed at the connection points of the ductwork to absorb vibrations and reduce noise. These isolators provide a buffer that minimizes the transmission of vibrations to the surrounding areas.
- Step 3: Perform airflow adjustments: Sometimes, noise issues can be caused by improper airflow. Ensure that the ducts are sized correctly and that the airflow is balanced throughout the system. You may need to adjust dampers or make modifications to improve the airflow and reduce noise.
Ensuring proper airflow
Proper airflow is crucial for the efficient operation of your HVAC system. Without adequate airflow, your system may struggle to heat or cool your space effectively. Here are a few steps to ensure proper airflow:
- Step 1: Check duct size: Make sure that the ducts are sized correctly for the airflow requirements of your HVAC system. Undersized or oversized ducts can lead to airflow restrictions or inefficiencies.
- Step 2: Remove obstructions: Inspect the ductwork for any obstructions such as debris, dust, or debris. Clear any blockages to allow for unrestricted airflow.
- Step 3: Balance the airflow: Ensure that the airflow is balanced throughout your space by adjusting dampers or registers. This will ensure that each area receives the necessary amount of conditioned air.
Dealing with irregularities in the space
During metal ductwork installation, you may encounter irregularities in the space that can pose challenges. These irregularities can include tight corners, low ceilings, or obstacles blocking the installation path. Here are a few steps to deal with such irregularities:
- Step 1: Plan the duct route: Before installation, carefully assess the space and plan the duct route. Identify any obstacles or irregularities and find alternative paths if necessary.
- Step 2: Use flexible ducts: Flexible ducts can be a useful solution for navigating tight corners or areas with limited space. They can be bent and maneuvered to fit irregular spaces without compromising airflow.
- Step 3: Seek professional help: If you’re facing significant challenges due to irregularities in the space, consider consulting with a professional HVAC contractor. They have the expertise to tackle complex installations and find the best solutions for your specific situation.

Maintaining And Repairing Metal Ductwork
Metal ductwork is an essential component of any HVAC system, ensuring the effective distribution of hot or cold air throughout a building. To keep your system working at its best, regular maintenance and timely repairs are crucial. In this section, we will discuss how to properly clean and inspect your metal ductwork, as well as how to repair any damaged sections. Additionally, we will explore upgrading and improving your ductwork system to optimize its performance.
Regular cleaning and inspection
Regular cleaning and inspection of your metal ductwork is vital to maintain the efficiency and air quality of your HVAC system. Over time, dust, dirt, and other particles can accumulate in the ducts, obstructing airflow and potentially causing health issues. To keep your ductwork in top shape, follow these steps:
- Remove supply and return registers: Start by carefully removing the supply and return registers in each room. These are typically held in place with screws or clips.
- Use a vacuum and brush: With the registers removed, use a vacuum cleaner with a brush attachment to clean the interior surfaces of the ductwork. Pay extra attention to corners, bends, and junctions where debris can accumulate.
- Inspect for damage: While cleaning, inspect the ductwork for any signs of damage such as holes, leaks, or loose connections. If you notice any issues, address them promptly to prevent further damage and inefficiencies.
- Replace filters: Don’t forget to replace the filters in your HVAC system regularly. Clean filters allow for better airflow and help to keep the ductwork cleaner for longer.
- Reinstall registers: Once the cleaning and inspection are complete, reinstall the supply and return registers in each room, ensuring a secure fit.
Repairing damaged sections
If you discover any damaged sections during your inspection, it’s essential to address them promptly to ensure the proper functioning of your metal ductwork. Here’s how you can repair damaged sections:
- Identify the damaged area: Inspect your ductwork thoroughly to locate the specific area that requires repair.
- Clean the damaged area: Before making any repairs, clean the damaged area to remove dirt, dust, and debris. This will help ensure a secure and long-lasting repair.
- Apply duct tape or mastic sealant: For small holes or gaps, you can use duct tape as a temporary fix. However, for more significant repairs, consider using mastic sealant, which provides a more permanent solution.
- Secure loose connections: If you notice any loose connections, tighten them using metal clamps or screws to prevent air leakage.
- Consider professional assistance: For complex repairs or extensive damage, it’s best to seek professional help from an HVAC technician or ductwork specialist.
Upgrading and improving the ductwork system
If you want to optimize the performance of your HVAC system, upgrading and improving the ductwork system is worth considering. Here are a few ways to enhance your metal ductwork:
- Seal duct joints: Properly sealing the joints of your ductwork can prevent air leaks and improve energy efficiency. Use mastic sealant or metal-backed tape for a more durable seal.
- Insulate exposed ductwork: Insulating exposed ductwork minimizes heat loss or gain, resulting in more efficient temperature control and reduced energy consumption.
- Consider zoning: Zoning allows you to control the airflow and temperature in different areas of your building independently. This can lead to increased comfort and energy savings.
- Upgrade to larger ducts: If you notice airflow issues in specific rooms, consider upgrading to larger ducts to improve airflow and balance temperature distribution.
- Consult professionals: When planning significant upgrades or improvements, it’s best to consult with HVAC professionals who can provide expert advice tailored to your specific needs.
Maintaining and repairing your metal ductwork ensures the longevity and optimal performance of your HVAC system. By following these guidelines for regular cleaning and inspection, timely repairs, and strategic upgrades, you can enjoy improved air quality, energy efficiency, and overall comfort in your home or commercial space.
Frequently Asked Questions Of How To Install Metal Ductwork
How Do You Put Metal Ductwork Together?
To assemble metal ductwork, follow these steps:
1. Measure and mark the desired length on each duct piece.
2. Use metal shears to cut along the marked lines.
3. Apply duct sealant to the edges and connect the pieces using sheet metal screws.
4. Securely attach the ductwork to the designated areas.
5. Ensure proper insulation and sealing to maximize efficiency.
Does Sheet Metal Ductwork Need To Be Insulated?
Yes, sheet metal ductwork should be insulated. Insulation helps in preventing condensation on the ducts, reducing energy loss, and controlling indoor temperature. It also minimizes noise and improves overall efficiency. Insulating your ductwork is necessary for optimal performance and cost savings.
Can I Replace the Ductwork Myself?
No, replacing ductwork should be handled by a professional to ensure proper installation and safety. Hiring an experienced HVAC technician is recommended for this task.
What Is The Best Way To Connect Ductwork?
The best way to connect ductwork is by using metal sleeves or connectors along with screws or clamps. Make sure the connections are tight and properly sealed to prevent air leakage. Additionally, insulate the connections to improve energy efficiency.
Conclusion
Installing metal ductwork can be a challenging task, but with the right knowledge and tools, it can be accomplished seamlessly. By following the steps outlined in this blog post, you can ensure a successful installation that will improve the efficiency and effectiveness of your HVAC system.
Remember to carefully measure and plan before starting, use proper safety precautions, and seek professional help if needed. With attention to detail and patience, you can have a properly installed metal ductwork system that will last for years to come.