To install infloor heating, first, ensure the subfloor is clean and dry. Then, lay down the heating system and connect it to the thermostat.
Welcome to our guide on how to install infloor heating. Infloor heating is a popular and efficient way to warm your home, providing an even distribution of heat throughout the space. We will walk you through the step-by-step process of installing infloor heating so that you can enjoy a cozy and comfortable living environment.
Whether you are renovating your current home or building a new one, installing infloor heating can be a great investment. So, let’s get started and make your home warm and inviting with infloor heating.
Planning Your Infloor Heating Installation
Before installing infloor heating in your space, careful planning is essential to ensure a successful and efficient installation. By taking the time to plan and consider various factors, you can make informed decisions that will optimize the performance of your infloor heating system.
Choosing the Right Type of Infloor Heating
There are different types of infloor heating systems available, each with its own benefits and considerations. The two main options are electric infloor heating and hydronic infloor heating. Electric infloor heating uses electric cables or mats to produce heat, whereas hydronic infloor heating uses hot water running through pipes.
When choosing the right type of infloor heating system, you should consider factors such as the size of the space, the amount of heat required, and your budget. Electric infloor heating is often a more affordable option for smaller areas, while hydronic infloor heating is ideal for larger spaces and can be more cost-effective in the long run.
Determining the Suitable Area for Installation
Once you have chosen the type of infloor heating that best suits your needs, the next step is to determine the suitable area for installation. Infloor heating can be installed in various rooms, including bathrooms, kitchens, living rooms, and entryways.
It is important to consider the layout and function of each room. Areas where people spend the most time, such as living rooms or bedrooms, may require more extensive infloor heating coverage. On the other hand, rooms with less foot traffic, like hallways or storage areas, may not need full coverage. Properly identifying the suitable areas will help you allocate your resources efficiently.
Calculating the Heating Load Requirements
Calculating the heating load requirements is a crucial step in planning your infloor heating installation. The heating load refers to the amount of heat needed to maintain a comfortable temperature in a specific space. By determining the heating load requirements, you can select the appropriate heating system and avoid any issues with under or over-heating.
To calculate the heating load requirements, factors such as the room size, insulation, and local climate should be taken into account. This can be done by consulting an HVAC professional or using online calculators that consider various parameters to provide accurate results.
Analyzing Compatibility with Existing Flooring
Before installing infloor heating, it’s important to assess the compatibility with your existing flooring. Most types of flooring, including tile, laminate, and hardwood, are compatible with infloor heating. However, some flooring materials, such as thick carpet or vinyl, may not be suitable.
Consulting with a flooring specialist is recommended to verify the compatibility of your chosen flooring materials. They can guide you in selecting the appropriate flooring that works well with infloor heating. It’s crucial to ensure that the combined system will provide efficient heat transfer while preserving the integrity of your flooring.
Procuring the Necessary Materials and Tools
Once you have completed your planning phase, it’s time to procure the necessary materials and tools for your infloor heating installation. To ensure a smooth process, ensure that you have all the required items in advance. This will save you time and prevent delays during the installation.
Make a list of the materials you need based on the type of infloor heating you have chosen. This may include electric cables or mats, insulation boards, adhesive tapes, thermostats, control panels, and other related items. Additionally, gather the tools required for the installation, such as wire strippers, cutting tools, and a multimeter.
By being well-prepared with the necessary materials and tools, you can proceed with the installation process confidently, knowing that you have everything you need at your disposal.
Preparing The Subfloor For Infloor Heating Installation
Before you can begin installing infloor heating, it is crucial to properly prepare the subfloor. This essential step ensures that the heating system functions efficiently and provides optimal warmth and comfort. In this section, we will guide you through the necessary steps to prepare your subfloor for infloor heating installation.
Clearing the Area and Removing Obstacles
Clearing the area where the infloor heating system will be installed is the first step in preparing your subfloor. Remove any furniture, rugs, or objects that might obstruct the installation process. Ensure that the work area is completely clear, allowing for easy access during the installation.
Inspecting and Repairing the Subfloor
Inspecting and repairing the subfloor is an important step to ensure a stable and level surface for infloor heating installation. Thoroughly examine the subfloor for any signs of damage, such as cracks, rot, or uneven sections. Patch up any holes or cracks using a high-quality patching compound. Repairing the subfloor will prevent the heating system from being compromised by an unsound foundation.
Ensuring Proper Insulation
Proper insulation is essential for infloor heating efficiency. Insulation helps to prevent heat loss, ensuring that the warmth produced by the heating system is directed upwards into your living space. Inspect the existing insulation and replace or add insulation as needed. Pay particular attention to areas that are prone to heat loss, such as exterior walls or areas above unheated spaces.
Installing a Vapor Barrier
A vapor barrier is an essential component of a well-prepared subfloor for infloor heating installation. It acts as a moisture barrier, preventing any moisture from seeping into the heating system. Lay a high-quality vapor barrier on top of the insulation layer, ensuring that it covers the entire subfloor surface. This barrier will protect the infloor heating system and prolong its lifespan.
Leveling the Subfloor
Before installing infloor heating, it is crucial to ensure that the subfloor is level and even. An uneven subfloor can lead to hot spots or cold spots, hindering the heat distribution. Use a self-leveling compound to level any uneven sections of the subfloor. Spread the compound evenly across the surface, following the manufacturer’s instructions. Allow the compound to dry and cure completely before proceeding with infloor heating installation.
By following these steps and properly preparing your subfloor, you are setting the foundation for a successful infloor heating installation. A well-prepared subfloor ensures efficient heat distribution and maximizes the performance of your infloor heating system.
Installing Infloor Heating System
Installing an infloor heating system is a great way to add comfort and luxury to your home. This advanced system efficiently warms up your floors, providing a cozy environment in the chilly months. If you’re ready to experience the benefits of infloor heating, here’s a step-by-step guide on how to install it.

Marking Out the Heating Zones
The first step in installing an infloor heating system is to mark out the heating zones. This is crucial to ensure even heating distribution throughout your space. Begin by dividing the area you wish to heat into separate zones. Zones can be determined based on the size of the room or the layout of your heating cable or mats. Use a tape measure, a marker, and a level to mark the boundaries of each zone.
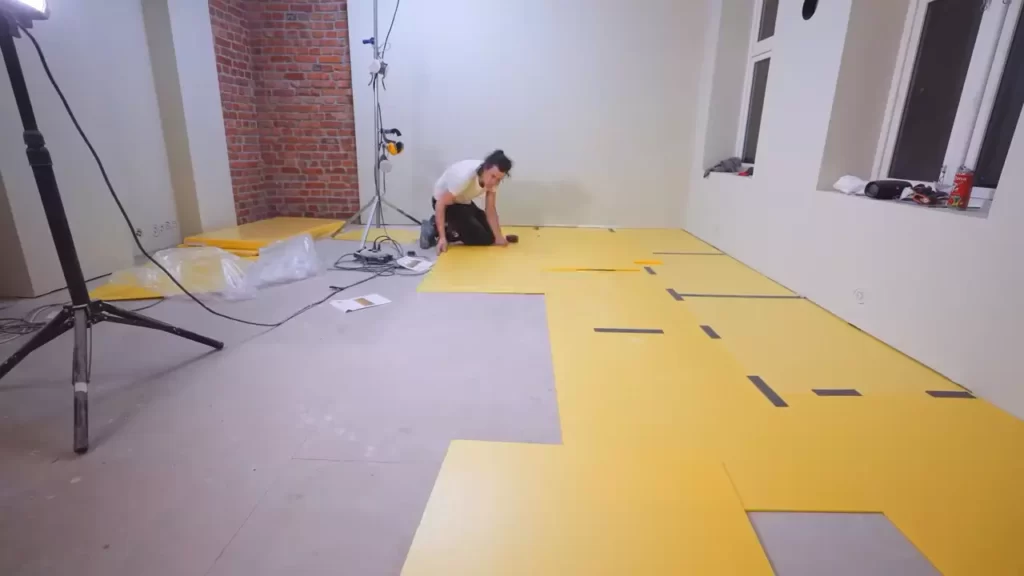
Laying Out the Heating Cable or Mats
Once you have marked out the heating zones, it’s time to lay out the heating cable or mats. Start by preparing the subfloor, ensuring it is clean and free from any debris. Then, lay out the heating cable or mats according to the manufacturer’s instructions. Make sure to evenly distribute the cable or mats within each heating zone, taking care not to overlap or cross the cables. This will ensure consistent heating throughout the floor.
Securing the Cable or Mats in Place
After laying out the heating cable or mats, it’s important to secure them in place. Use a combination of adhesive or clips provided by the manufacturer to hold the cable or mats securely on the subfloor. This will prevent any movement or shifting during the installation process and ensure long-term reliability.
Connecting the Heating System to Power
Now that the heating cable or mats are securely in place, it’s time to connect the heating system to power. Consult the manufacturer’s instructions for the specific wiring requirements of your infloor heating system. Make sure to follow all electrical codes and safety precautions during this step to ensure a safe and effective installation. If you are not confident in your electrical abilities, it’s always best to hire a licensed electrician to handle this part of the installation.
Testing the Heating System for Proper Functionality
After completing the installation and connecting the heating system to power, it’s essential to test the system for proper functionality. Follow the manufacturer’s instructions on how to test the heating system and ensure that it is heating up as expected. This step is crucial to confirm that all components are working correctly and that there are no issues with the installation.
Installing an infloor heating system can be a rewarding project that adds both comfort and value to your home. By carefully following these steps, you can enjoy the benefits of a warm and cozy environment all year round.
Finishing Edges And Covering The Infloor Heating
Installing Appropriate Insulation Edging
Before you can cover the infloor heating, it’s crucial to install insulation edging that will help optimize the system’s efficiency and prevent heat loss. Insulation edging acts as a boundary between the heated floor and adjacent walls or fixtures, ensuring that the heat is directed upwards rather than escaping sideways. Here’s a step-by-step guide:
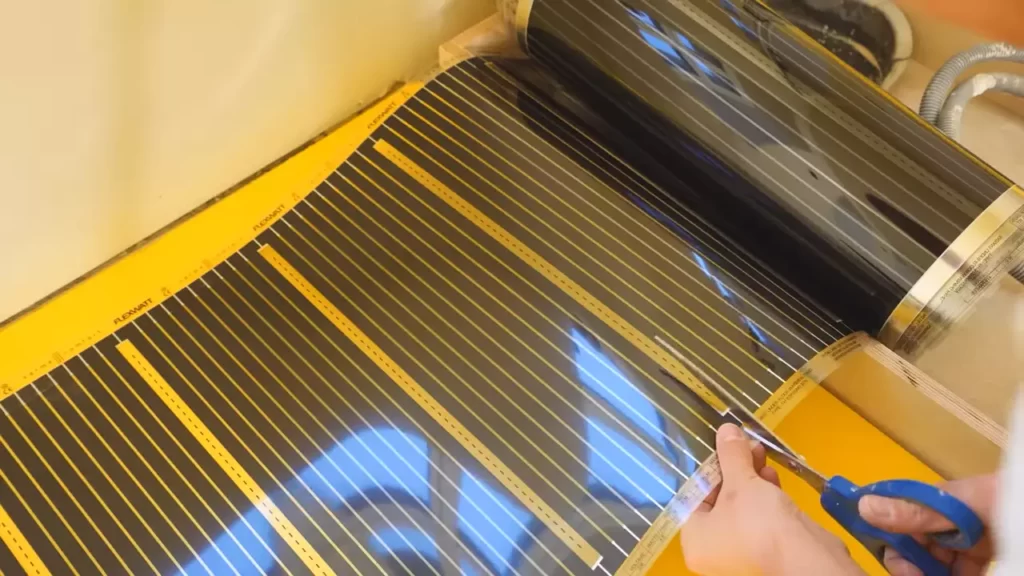
- Start by measuring the perimeter of the room where you’ll be installing the infloor heating. Take these measurements into account when purchasing insulation edging.
- Cut the insulation edging to the required lengths using a sharp utility knife or scissors. Make sure the pieces fit snugly against the walls or other structures.
- Secure the insulation edging using adhesive or mechanical fasteners as recommended by the manufacturer. Ensure that it is firmly attached to the subfloor, providing a tight seal.
Covering the Heating System with a Self-leveling Compound
After installing the insulation edging, the next step is to cover the infloor heating system with a self-leveling compound. This compound not only fills in any gaps or irregularities on the subfloor but also creates a smooth and level surface for the final flooring to go over. Follow these instructions:
- Prepare the self-leveling compound according to the manufacturer’s instructions. This typically involves mixing it with water in the correct proportions. Use a drill with a mixing paddle to achieve a smooth consistency.
- Pour the self-leveling compound onto the subfloor, starting from one corner of the room and working your way towards the opposite side. Use a trowel or a long-handled squeegee to spread and evenly distribute the compound.
- Ensure that the self-leveling compound reaches the desired thickness, typically specified by the manufacturer. Use a leveling tool, such as a straightedge or level, to check the evenness of the compound’s surface. Make any necessary adjustments to achieve a smooth, level finish.
- Allow the self-leveling compound to dry and cure completely before proceeding to the next step. The drying time can vary depending on factors such as room temperature and humidity, so refer to the manufacturer’s recommendations for accurate guidelines.
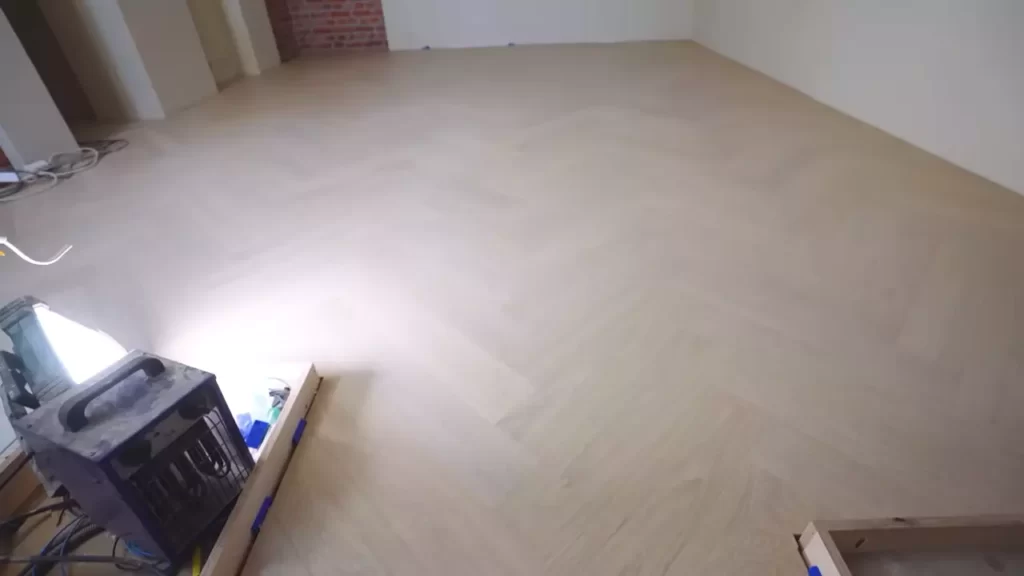
Installing Flooring Over the Infloor Heating
With the insulation edging in place and the heating system covered by a self-leveling compound, it’s now time to install the final flooring material. Follow these guidelines for a successful installation:
- Check the flooring manufacturer’s recommendations to ensure that it is compatible with infloor heating systems.
- Ensure that the flooring material has been acclimated to the room’s conditions, as per the manufacturer’s instructions.
- Begin installing the flooring from one corner of the room, following the manufacturer’s specific installation guidelines for your chosen material. Be mindful not to damage any of the infloor heating elements during the installation process.
- Continue laying the flooring across the room, ensuring a tight fit and maintaining the desired pattern or alignment.
- Once the flooring is fully installed, allow it to settle and adjust to the room’s temperature and humidity. This period is crucial for preventing any potential damage or issues.
Testing And Commissioning The Infloor Heating
Once you have successfully installed the infloor heating system in your home, the next crucial step is to conduct thorough testing and commissioning to ensure its efficient functionality. This essential process involves various steps including conducting an insulation resistance test, checking the heating system controls, ensuring proper heat distribution, and balancing the heating zones.
Conducting Insulation Resistance Test
An insulation resistance test is conducted to ensure the electrical safety of the infloor heating system. This test helps identify any leakage or faults in the wiring or connections. By measuring the insulation resistance, you can verify if the system meets the required standards, ensuring it operates safely and efficiently. It is recommended to hire a professional electrician to perform this test using specialized equipment for accurate results.
Checking Heating System Controls
Proper functioning of the heating system controls is crucial for maintaining a comfortable and energy-efficient environment. During the testing and commissioning process, it is essential to check all the controls, including thermostats, timers, and programming settings. Make sure each control is calibrated correctly and accurately reflects the desired temperature changes. Testing the controls ensures you can easily adjust the heating settings and avoid any potential malfunctions or inconsistencies.
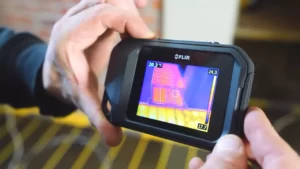
Ensuring Proper Heat Distribution
An evenly distributed heat flow throughout the space is essential for optimal comfort and efficiency. To ensure proper heat distribution, carefully inspect the infloor heating system for any potential blockages, air bubbles, or imbalances. Check valves, manifold balancing, and flow meters to ensure proper operation. If necessary, make adjustments to enhance heat distribution, such as adjusting flow rates or using flow control valves. Proper heat distribution guarantees a comfortable environment throughout your home and maximizes the efficiency of your heating system.
Balancing the Heating Zones
For larger areas with multiple heating zones, it is necessary to balance the heat distribution between these zones. Balancing involves adjusting the flow rates and temperature of each zone individually to ensure equal heat output. This step is crucial to avoid any cold spots or overheating in specific areas. Utilizing zone valves, motorized valves, or other control mechanisms, all heating zones should be balanced to provide consistent and comfortable warmth across the entire space. Balancing the heating zones optimizes energy efficiency and contributes to the overall performance of the infloor heating system.
By conducting insulation resistance tests, checking the heating system controls, ensuring proper heat distribution, and balancing the heating zones, you can ensure the smooth and efficient operation of your infloor heating system. Thorough testing and commissioning not only ensure your system meets the necessary safety standards but also enhance its performance, providing you with reliable warmth and comfort throughout your home.
Maintaining Infloor Heating System
Maintaining an infloor heating system is crucial to ensure its efficient operation and longevity. Regular cleaning and maintenance, troubleshooting common issues, replacing faulty components, and seeking professional assistance when necessary are essential aspects of maintaining a flawless functioning heating system.
Regular Cleaning and Maintenance
Regular cleaning and maintenance are essential to keep your infloor heating system in optimal condition. Here are some important steps to follow:
- Inspect the heating system regularly to check for any visible signs of damage or blockages.
- Clean the floor surface regularly to remove any dirt, debris, or dust that may obstruct heat transfer.
- Take care to avoid using harsh chemicals or abrasive tools that could damage the floor or heating system.
- Inspect and clean the control panel to ensure it is free from dust or any other contaminants that could affect its functionality.
Troubleshooting Common Issues
Despite regular maintenance, some common issues may still arise with your infloor heating system. Here are a few troubleshooting tips to help you address them:
- If the system is not heating up sufficiently, check the thermostat settings and adjust them if necessary.
- If there is no heat at all, check the circuit breaker to ensure it hasn’t tripped.
- Inspect the floor sensor to ensure it is properly installed and hasn’t been damaged.
- If there are cold spots or uneven heating, it could indicate a problem with the tubing or blockages in the system. Consider seeking professional assistance to address these issues.
Replacing Faulty Components
If you encounter a faulty component in your infloor heating system, it’s important to replace it promptly. Here are some key points to keep in mind:
- Identify the faulty component, whether it’s a sensor, thermostat, pump, or tubing.
- Turn off the power supply to the system before replacing the component to ensure safety.
- Refer to the manufacturer’s instructions or seek professional help if you are unsure about the replacement process.
- Test the system after replacing the faulty component to ensure it is functioning properly.
Seeking Professional Assistance When Necessary
While regular maintenance and troubleshooting techniques can help you address minor issues, seeking professional assistance is sometimes necessary to ensure the best results. Here are the instances when it is advisable to seek professional help:
- If you are unable to identify or address the issue on your own.
- For complicated repairs or replacements that require specialized knowledge or tools.
- When the warranty terms state that professional assistance is required to maintain the warranty coverage.
- If the issue persists despite your efforts to troubleshoot and replace components.
Remember, maintaining your infloor heating system is essential for its efficiency and longevity. Regular cleaning and maintenance, along with troubleshooting and timely component replacements, will ensure optimal performance and comfort in your home.
Frequently Asked Questions Of How To Install Infloor Heating
Can I Install Radiant Floor Heating Myself?
Yes, it is possible to install radiant floor heating yourself. However, it requires careful planning, proper tools, and a good understanding of the process. Make sure to research and follow instructions accurately to ensure a successful installation. Consider consulting a professional if you are unsure about any steps or if you want to avoid potential mistakes.
Can I Install My Own Underfloor Heating?
Yes, you can install your own underfloor heating following these guidelines:
- Plan and measure the area accurately.
- Choose the right type of underfloor heating system.
- Gather all the necessary tools and materials.
- Follow the manufacturer’s instructions for installation.
- Connect the system to a thermostat and test it before use.
How Do You Install Radiant Heat On An Existing Floor?
To install radiant heat on an existing floor:
- Assess your existing flooring and make sure it can accommodate the system.
- Install insulation panels over the floor for efficient heat distribution.
- Lay out the radiant heating system, connecting the pipes or electrical cables.
- Cover the system with a layer of thinset or self-leveling concrete.
- Finish with your desired flooring material.
Is It Easy To Install In Floor Heating?
Installing in-floor heating is relatively easy. With proper planning and the right tools, you can install it yourself or hire a professional. Prepare the floor, lay the heating mats, connect them to a thermostat, and cover it with flooring material.
Enjoy the warmth and comfort in your space.
Conclusion
Installing infloor heating not only adds comfort and warmth to your home but also offers energy-efficient and cost-effective heating solutions. By following the steps outlined in this blog post, you can confidently embark on this DIY project. Remember to prioritize safety, consult professional advice when needed, and enjoy the benefits of a cozy and efficient home.
Start your journey towards a more comfortable living space today!