To install a hydronic baseboard heater, first, disconnect the power supply. Then, mount the heater to the wall according to the manufacturer’s instructions.
Here are the step-by-step instructions to follow. When it comes to heating your home, a hydronic baseboard heater can be a great option. Not only does it provide comfortable and efficient heating, but it can also enhance the aesthetics of any room.
Installing a hydronic baseboard heater is a straightforward process that can be done by following a few simple steps. We will guide you through the installation process to help you achieve a warm and cozy home. So, let’s get started and learn how to install a hydronic baseboard heater in your home.
Understanding Hydronic Baseboard Heaters: An Overview
Welcome to our comprehensive guide on how to install a hydronic baseboard heater. In this first section, we will delve into the basics of hydronic baseboard heaters, helping you gain a clear understanding of what they are, how they work, and the benefits they offer. Whether you are a homeowner looking to upgrade your heating system or a DIY enthusiast eager to learn a new skill, this overview will provide you with the necessary knowledge to get started.
What is a hydronic baseboard heater?
A hydronic baseboard heater, also known as a hot water baseboard heater, is a type of heating system that uses heated water to provide warmth to a space. Unlike traditional forced-air heating systems, which rely on warmed air to distribute heat, hydronic baseboard heaters utilize a network of copper pipes and aluminum fins to transfer heat directly into the room.
These heaters are typically installed along the baseboard of a wall, hence their name, and are often found in residential settings. The combination of radiant and convection heat provided by hydronic baseboard heaters makes them an efficient and comfortable option for maintaining a cozy indoor climate.
How does a hydronic baseboard heater work?
Understanding how a hydronic baseboard heater operates is key to successfully installing one. The heating process begins when heated water is pumped from a boiler through the copper pipes located within the baseboard heater. As the water travels through the pipes, it heats up the aluminum fins, which then radiate the heat into the room.
This radiant heat warms objects and people in the vicinity, creating a comfortable and cozy environment. Additionally, as the warm air rises, convection currents are created, further distributing the heat throughout the space. This combination of radiant and convection heat results in a consistent and even temperature.
Benefits of installing a hydronic baseboard heater
There are numerous benefits to installing a hydronic baseboard heater in your home. Let’s take a look at some of the advantages:
- Efficiency: Hydronic baseboard heaters are energy efficient, as they rely on heated water rather than blowing air. This means they don’t experience the same energy losses associated with ductwork, making them a cost-effective heating option.
- Comfort: The combination of radiant and convection heat provided by hydronic baseboard heaters results in a gentle and consistent warmth. This eliminates the unpleasant drafts often associated with forced-air systems.
- Quiet operation: Unlike noisy fans or blowers used in other heating systems, hydronic baseboard heaters operate quietly, ensuring a peaceful and serene indoor environment.
- Zoned heating: Hydronic baseboard heaters can be easily zoned, allowing you to control the temperature independently in different areas of your home. This allows for personalized comfort and energy savings.
- Durability: With their sturdy construction and minimal moving parts, hydronic baseboard heaters are known for their longevity. They require little maintenance and have a lifespan that often exceeds that of other heating systems.
- Compatibility with renewable energy sources: Hydronic baseboard heaters can be easily integrated with renewable energy sources such as solar or geothermal systems, reducing your reliance on fossil fuels.
Now that you have a solid understanding of the basics of hydronic baseboard heaters, it’s time to move on to the installation process. In the following sections, we will guide you step-by-step through each stage, ensuring you have the knowledge and confidence to complete the installation successfully.
Preparing For Installation: Tools And Materials Needed
Before you begin the installation process of a hydronic baseboard heater, it’s important to gather all the necessary tools and materials. This will ensure that you have everything you need on hand, which will save you time and make the installation process smoother. In this section, we will provide you with a list of the tools required for the installation, as well as guide you through gathering the necessary materials.
List of Tools Required for the Installation
- Measuring Tape: You’ll need a measuring tape to measure the length of the baseboard heater and determine the placement.
- Screwdriver: A screwdriver will be needed to secure the brackets and fasten the heater to the wall.
- Drill: A drill will be necessary to create holes in the wall for mounting the brackets.
- Level: Use a level to ensure that the baseboard heater is installed straight and level.
- Pliers: Pliers may be needed to secure electrical connections or adjust the installation.
- Wire Strippers: Wire strippers will be necessary to strip the insulation from the electrical wires.
- Safety Equipment: It’s important to have safety equipment such as gloves and safety glasses to protect yourself during the installation.
Gathering the Necessary Materials for the Project
Once you have the tools ready, it’s time to gather the materials needed for the installation. Here is a list of the essential materials:
- Hydronic Baseboard Heater: This is the main component of the installation. Ensure that you have chosen the appropriate size and model for your specific needs.
- Mounting Brackets: The brackets will be used to secure the baseboard heater to the wall. Make sure you have the correct number of brackets for the length of the heater.
- Screws and Anchors: You’ll need screws and anchors to secure the mounting brackets to the wall. Choose the appropriate size and type for your wall material.
- Thermostat: A thermostat is necessary to regulate the temperature of the baseboard heater. Ensure that it is compatible with the hydronic system.
- Electrical Wiring: Depending on the specific requirements of your system, you may need electrical wiring to connect the baseboard heater to the power source.
- Cover Plates: Cover plates are used to conceal the electrical connections and add a finished look to the installation.
- Insulation: Insulating the wall behind the baseboard heater can improve energy efficiency. Consider using insulation materials during the installation.
By having the necessary tools and materials ready, you can ensure a successful and efficient installation of your hydronic baseboard heater. The next step is to start the installation process. Stay tuned for the next section where we will guide you through the step-by-step process of installing the heater.
Step 1: Planning And Measuring
Before installing a hydronic baseboard heater, it is important to properly plan and measure the area where the heater will be installed. This initial step ensures that the heater will fit perfectly and provide efficient heating for your space. In this section, we will discuss three key factors to consider during the planning and measuring process.
Assessing the area for installation
Start by assessing the area where you plan to install the hydronic baseboard heater. Take note of the size and conditions of the room, as well as any obstructions such as furniture or windows. Ensure there is enough space available on the wall where the heater will be mounted, and that there are no objects that could obstruct the heat flow.
Determining the heating requirements
Next, it is important to determine the heating requirements for the room. Consider factors such as the room size, insulation, and desired temperature. You can use online calculators or consult a heating professional to help you accurately calculate the required heating capacity for your space. This step is crucial to ensure that the hydronic baseboard heater you choose is capable of effectively heating the room.
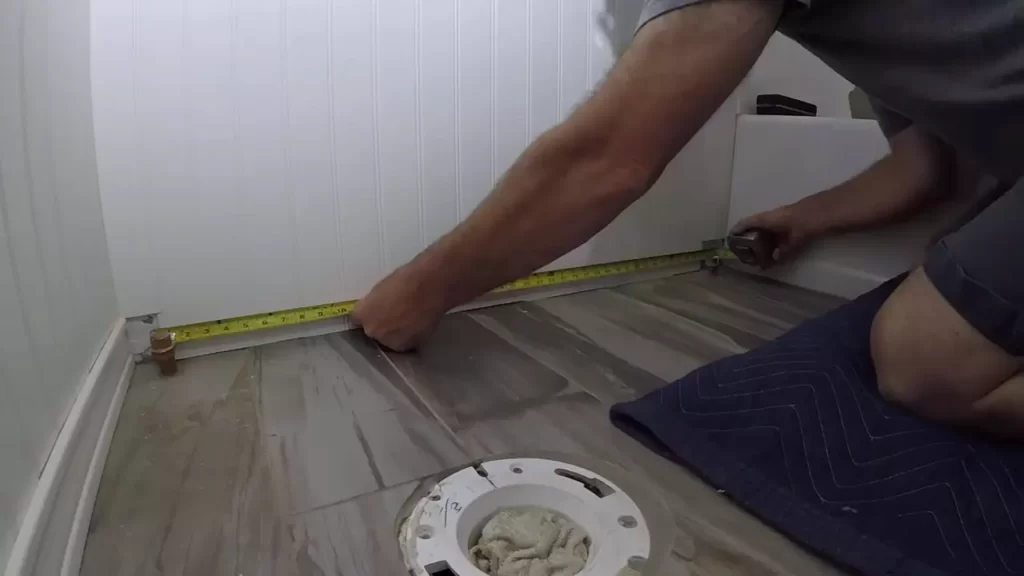
Measuring the dimensions of the baseboard heater
Once you have assessed the area and determined the heating requirements, it is time to measure the dimensions of the baseboard heater itself. Measure the length of the wall where the heater will be installed, as well as the height of the wall. These measurements will help you choose a baseboard heater that fits perfectly and provides uniform heat distribution.
To measure the dimensions accurately, follow these steps:
- Measure the length of the wall where the heater will be installed using a tape measure.
- Measure the height of the wall from the floor to the desired height for the heater placement.
Once you have these measurements, you can compare them to the dimensions provided by the manufacturer to ensure a proper fit. It’s always a good idea to double-check these measurements before making a purchase to avoid any installation issues later on.
By following these steps and properly planning and measuring your space, you can ensure a successful installation of your hydronic baseboard heater. The next step, Step 2, will cover the installation process in detail.
Step 2: Choosing The Right Location
Once you have decided to install a hydronic baseboard heater, the next step is to choose the right location for its installation. Selecting the proper location is crucial as it can affect the efficiency and effectiveness of the heater. In this step, we will discuss the factors to consider when selecting the installation location and the safety precautions and clearance requirements to ensure optimal performance.
Factors to consider when selecting the installation location
When it comes to selecting the installation location for your hydronic baseboard heater, there are several factors you need to take into account. These factors will help you determine the most suitable location that meets your heating requirements. Consider the following:
- The size and layout of the room: Take the size and layout of the room into consideration to ensure that the heat is distributed evenly. Larger rooms may require multiple heaters or additional placement considerations.
- Ventilation: Ensure that the location chosen allows for proper ventilation to prevent overheating. Good airflow is essential for the heater to work efficiently.
- Accessibility: Choose a location where the heater is easily accessible for maintenance and repairs.
- Interior design: The heater should be placed in a location that complements the interior design of the room.
Considering safety precautions and clearance requirements
Installing a hydronic baseboard heater requires careful adherence to safety precautions and clearance requirements. These precautions are essential to prevent any potential hazards and ensure both the safety of the occupants and the longevity of the heater. Keep the following points in mind:
- Clearance from combustible materials: Ensure that the heater is installed at a safe distance from any combustible materials, such as curtains, furniture, or carpets. This will prevent the risk of fire.
- Electrical clearance: Allow for adequate clearance from electrical outlets and switches to prevent any interference or potential hazards.
- Floor clearance: Make sure there is enough clearance between the baseboard heater and the floor. This will prevent any potential damage to the flooring due to excessive heat.
- Wall clearance: Provide sufficient clearance between the baseboard heater and the walls to ensure proper airflow and heat distribution.
- Child and pet safety: Consider the placement of the heater to ensure it is out of reach of children and pets to prevent any accidents.
By carefully considering these factors and adhering to the safety precautions and clearance requirements, you can ensure a successful installation of your hydronic baseboard heater. Once you have chosen the right location, you will be ready to proceed to the next step in the installation process.
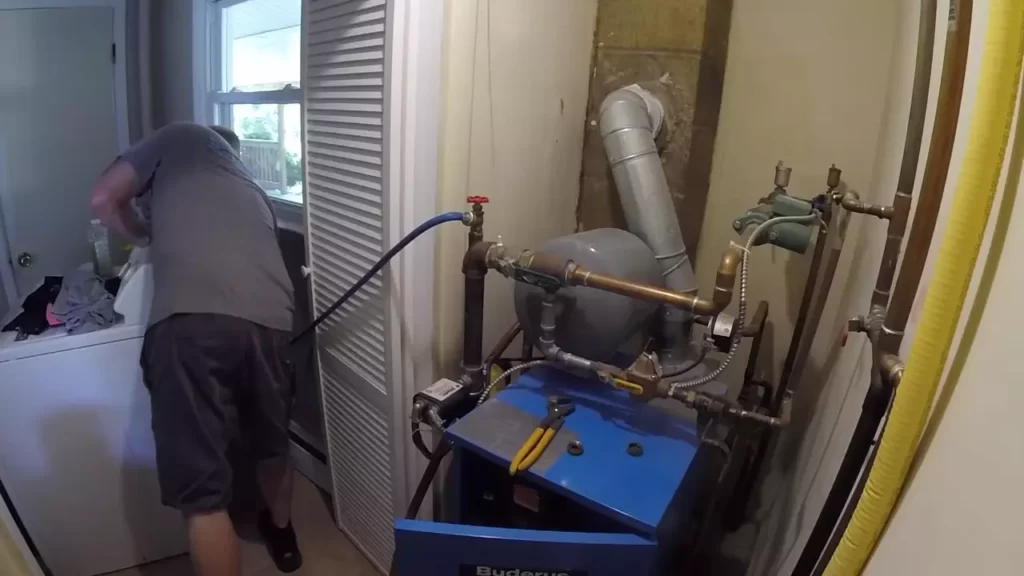
Step 3: Installing The Baseboard Heater
Now that you have prepared the installation area and mounted the baseboard heater securely, it’s time to connect the heater to the existing hydronic system. This crucial step will ensure that your heater functions properly and efficiently. Follow the instructions below to complete the installation process.
Preparing the installation area
Before connecting the baseboard heater to the hydronic system, it’s important to properly prepare the installation area. This ensures a smooth and hassle-free installation process. Here’s what you need to do:
- Clean the area where the heater will be installed. Remove any dust, debris, or obstructions that may hinder the installation process. A clean and clear area provides a stable and secure base for the heater.
- Ensure that the area is dry and free from any water leaks or moisture. This is especially important as hydronic systems rely on water for heat transfer. Any leaks or moisture can lead to damage and inefficient operation.
- If needed, mark the wall where the heater will be mounted. This will help you accurately position the heater during the installation process.
Mounting the baseboard heater securely
Once the installation area is prepared, it’s time to mount the baseboard heater securely. This step is vital to ensure the stability and proper functioning of the heater. Follow these steps for a secure installation:
- Position the heater against the wall, ensuring that it aligns with the marked area (if applicable). Use a level to check for straightness and adjust if necessary.
- Using a pencil, mark the screw hole locations on the wall. These markings will serve as a guide when attaching the heater to the wall.
- Drill pilot holes at the marked locations. Make sure to use a drill bit of appropriate size for the screws that came with the heater.
- Attach the mounting brackets to the wall using the screws. Make sure the brackets are securely fastened to provide sturdy support for the heater.
- Place the baseboard heater onto the mounting brackets. Ensure that it is level and securely positioned.
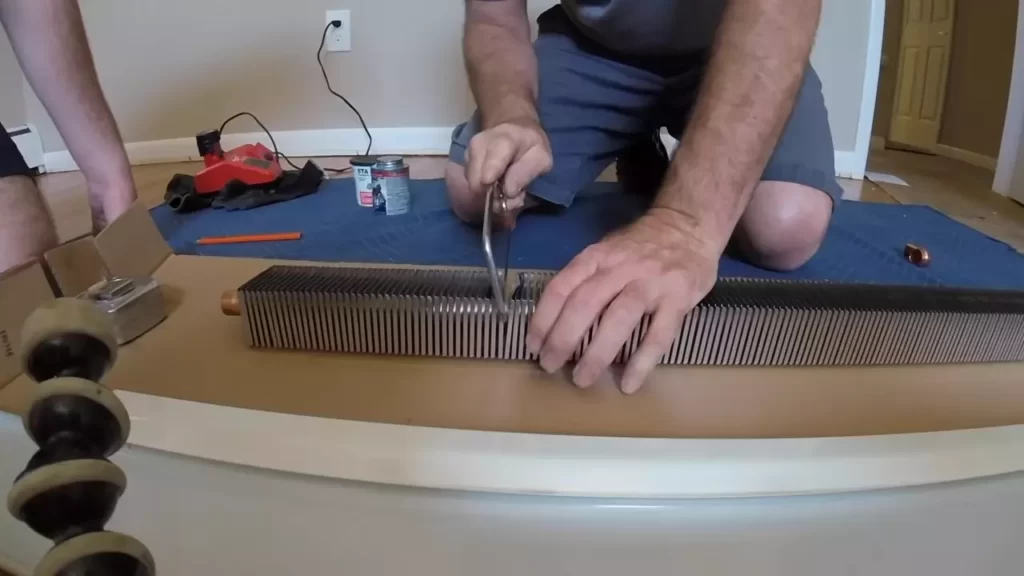
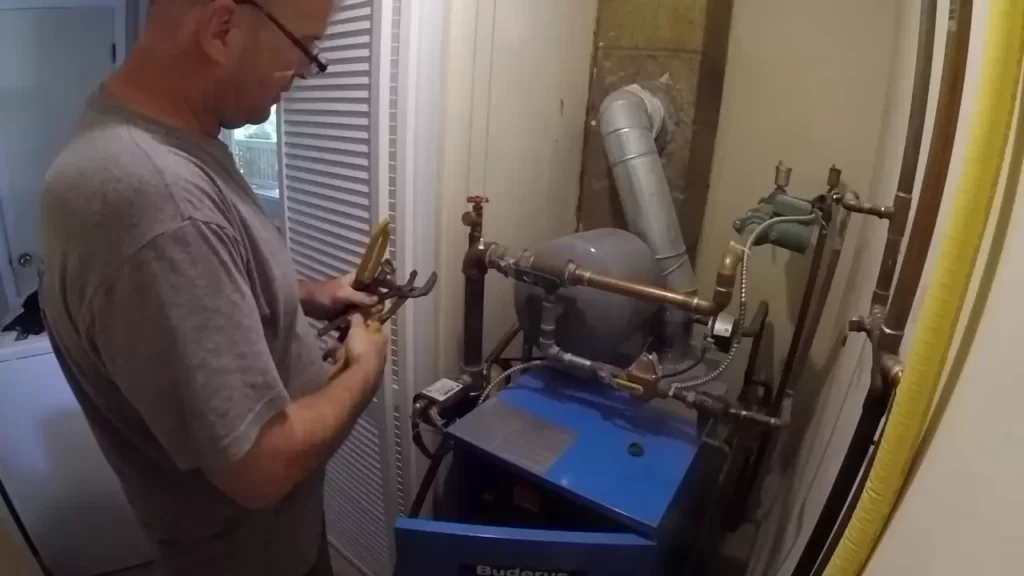
Connecting the heater to the existing hydronic system
Once the baseboard heater is securely mounted, it’s time to connect it to the existing hydronic system. This step will ensure that the heater receives the necessary hot water flow for efficient heating. Follow these steps to connect the heater:
- Locate the inlet and outlet ports on the baseboard heater. These ports allow hot water to enter and exit the heater.
- Using a wrench, carefully connect the inlet and outlet pipes of the heater to the corresponding pipes of the hydronic system. Make sure the connections are tight to prevent leaks.
- If necessary, bleed the air from the system to ensure proper circulation of hot water. This can be done by opening the bleed valve on the heater or following the instructions provided by the manufacturer.
- Once the connections are secure and any air is bled from the system, turn on the hydronic system and test the heater for proper operation. Ensure that hot water flows through the heater and that it is heating effectively.
By following these steps, you can successfully install a hydronic baseboard heater and enjoy efficient and comfortable heating in your space.
Step 4: Wiring And Controls
Running electrical wiring to the baseboard heater
Once you have mounted your hydronic baseboard heater securely to the wall and connected the supply and return pipes, it’s time to move on to the electrical wiring. This step is crucial for ensuring that your heater functions properly and safely. Follow these guidelines to run the electrical wiring to your baseboard heater:
- Begin by turning off the power supply to the circuit you’ll be working on. This can be done by switching off the breaker at the main electrical panel.
- Locate the nearest electrical outlet or junction box to your baseboard heater. Depending on the distance, you may need to use wire conduits to protect and conceal the wiring.
- Measure and cut the appropriate length of electrical wire, making sure to leave some extra for connections.
- Strip the insulation off the ends of the wire to expose the copper conductors.
- Connect one end of the wire to the power supply or junction box, following the manufacturer’s instructions and local electrical codes. Secure the connection using wire nuts or terminal blocks.
- Route the wire along the wall or through conduits, ensuring it is kept away from any sharp edges or heat sources.
- Attach the other end of the wire to the baseboard heater, making sure to match the corresponding colored wires. Again, use wire nuts or terminal blocks to secure the connection.
- Double-check all the connections to ensure they are tight and properly insulated.
By following these steps, you will have successfully run the electrical wiring to your hydronic baseboard heater. Now, it’s time to proceed to the next stage of connecting the heater to the thermostat and control system.
Connecting the heater to the thermostat and control system
Now that you have the electrical wiring in place, it’s time to connect your hydronic baseboard heater to a thermostat and control system. This will allow you to regulate the temperature and ensure optimal comfort in your space. Follow these steps to make the necessary connections:
- Begin by choosing a suitable location for your thermostat. This should be a central and easily accessible spot in the room.
- Ensure that the power to the circuit is still switched off before making any connections.
- Run a separate wire from the baseboard heater to the thermostat location. This wire should match the specifications provided by the manufacturer.
- Strip the insulation off the ends of the wire to expose the copper conductors.
- Connect one end of the wire to the baseboard heater, following the manufacturer’s instructions. Secure the connection using wire nuts or terminal blocks.
- Attach the other end of the wire to the thermostat, once again following the manufacturer’s instructions for proper connections.
- Double-check all the connections to ensure they are secure and properly insulated.
Once you have successfully connected the heater to the thermostat and control system, you’re ready to move onto the final step of testing the wiring and controls.
Testing the wiring and controls
Before you can enjoy the warmth and comfort of your hydronic baseboard heater, it’s essential to test the wiring and controls to ensure everything is functioning as it should be. Follow these steps to conduct the necessary tests:
- Switch on the power supply to the circuit at the main electrical panel.
- Set the thermostat to the lowest temperature setting and wait for the baseboard heater to start heating up.
- Observe the heater and confirm that it is heating evenly along its length.
- Gradually increase the thermostat temperature and monitor the performance of the heater.
- Check that the thermostat is accurately displaying and maintaining the desired temperature.
- Inspect the wiring connections and controls for any signs of overheating, loose wiring, or other abnormalities.
- If any issues are discovered during the testing process, it is crucial to address them promptly to ensure the safe and efficient operation of your hydronic baseboard heater.
By following these testing procedures, you can ensure that your wiring and controls are functioning properly, giving you peace of mind as you enjoy the warmth and comfort provided by your hydronic baseboard heater.
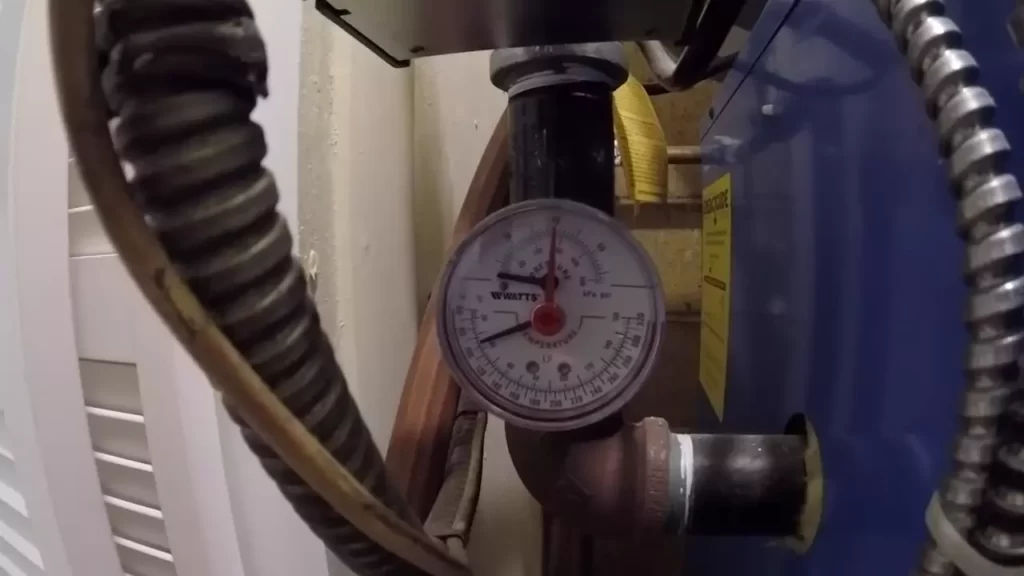
Step 5: Bleeding And Balancing The System
Once you have successfully installed the hydronic baseboard heater in your home, it’s important to complete the final step of bleeding and balancing the system. This step ensures optimal performance and even heat distribution throughout your space. In this section, we will guide you through the process of bleeding the air from the hydronic system and balancing the water flow.
How to Bleed Air from the Hydronic System
To ensure the efficient operation of your hydronic baseboard heater, it’s crucial to eliminate any trapped air from the system. Bleeding the air will prevent potential heating issues and ensure consistent warmth in your home. Follow these simple steps to bleed air from the hydronic system:
- Start by locating the air bleeder valve, which is typically found at the highest point of the system. It may be located on the boiler, the expansion tank, or the baseboard unit itself.
- Put on a pair of gloves to protect your hands and have a towel or container ready to catch any water that may come out during the bleeding process.
- Using a screwdriver or a wrench, carefully open the air bleeder valve by turning it counterclockwise. This will release the trapped air from the system.
- You should hear a hissing sound as the air is released. Once the hissing stops and water starts coming out of the valve, close the valve by turning it clockwise to prevent water from leaking out.
- Repeat this process for any other air bleeder valves in your system, working from the highest point to the lowest.
Balancing the Water Flow to Ensure Even Heat Distribution
Properly balancing the water flow in your hydronic system is essential in achieving even heat distribution throughout your home. This step is necessary to prevent certain areas from becoming too hot or too cold. Follow these steps to balance the water flow:
- Begin by identifying the balancing valves on each baseboard unit. These valves are typically located on the supply and return lines.
- Open the balancing valve on each baseboard unit slightly to allow water flow.
- Use a thermometer to measure the temperature at each baseboard unit.
- If you notice significant temperature variations, adjust the balancing valves accordingly by opening or closing them to regulate the water flow.
- Repeat this process for each baseboard unit until you achieve the desired temperature consistency throughout your home.
Once you have successfully bled the air from your hydronic system and balanced the water flow, you can rest assured that your baseboard heater will operate efficiently, providing comfortable and consistent warmth throughout your space. Take the time to properly complete this final step to ensure the optimal performance of your heating system.
Step 6: Insulation And Finishing Touches
Insulating the Pipes and Baseboard Heater
Insulating the pipes and baseboard heater is an essential step in the installation process to ensure maximum efficiency and energy savings. By properly insulating these components, you can reduce heat loss and improve the overall performance of your hydronic baseboard heating system.
Begin by insulating the pipes that connect to the baseboard heater. You can use foam pipe insulation to wrap around the pipes, which helps to prevent heat loss and improves the distribution of heat. Start by measuring the length of the pipes and cutting the insulation to fit. Then, simply slip the insulation over the pipes and secure it in place with adhesive or tape.
Next, it’s time to insulate the baseboard heater itself. Start by measuring the length of the heater and cut a piece of foam board insulation to fit. Make sure to leave enough space for the air to circulate around the heater. Attach the insulation to the backside of the heater using adhesive or tape, making sure it is securely in place.
Insulating the pipes and baseboard heater not only helps to improve energy efficiency but also reduces noise and prevents condensation. By taking the time to properly insulate these components, you can enjoy a more comfortable and cost-effective heating system.
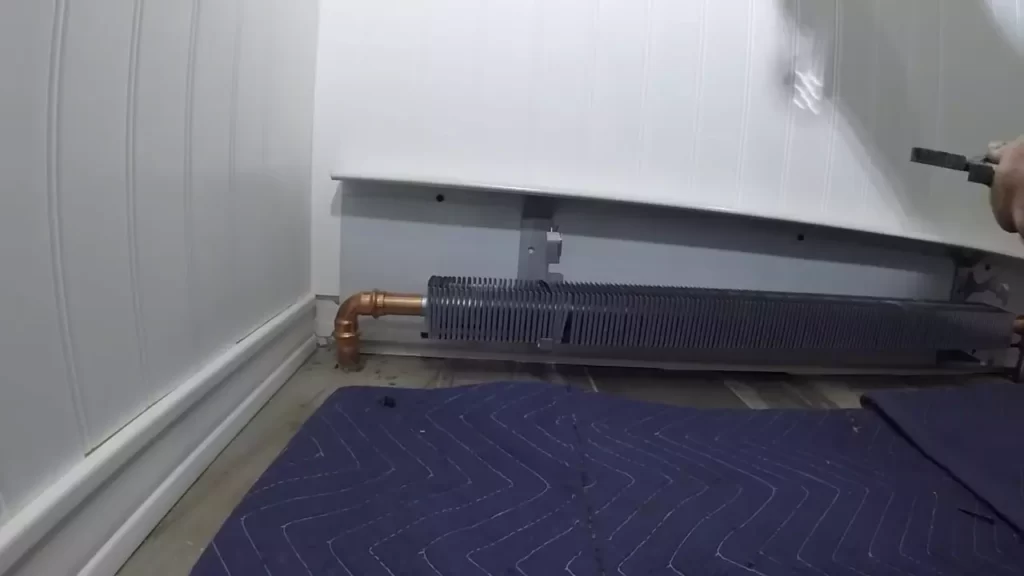
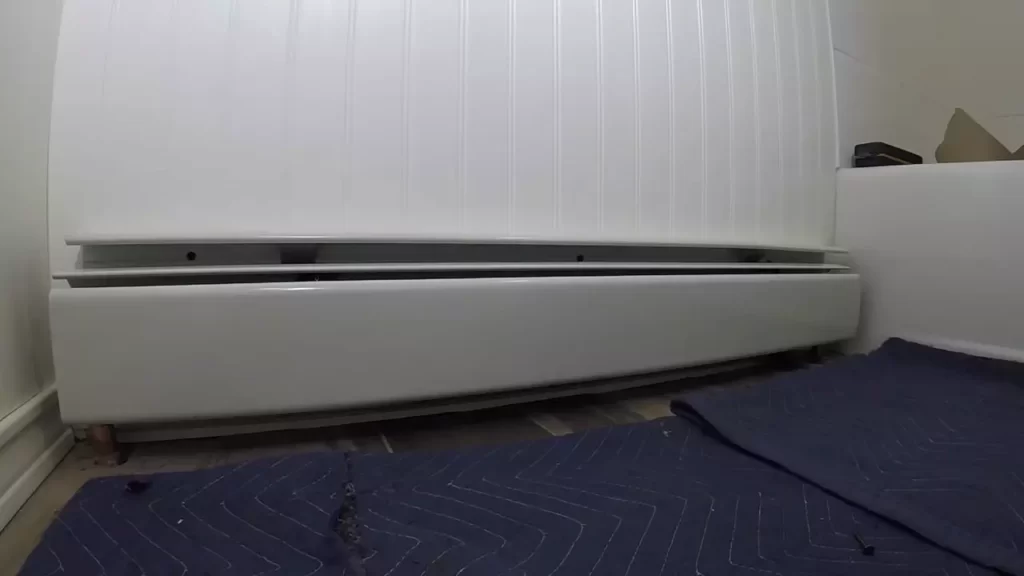
Concealing any Exposed Components for a Finished Look
Once the insulation is in place, it’s time to focus on concealing any exposed components for a polished and finished appearance. This step not only enhances the aesthetic appeal of your hydronic baseboard heater but also helps to protect the system and prevent any damage.
Start by carefully examining the area around the baseboard heater to identify any exposed pipes or wires. These components can be unsightly and disrupt the overall look of the room. To conceal them, you have a few options.
You can use decorative covers specifically designed for baseboard heaters. These covers come in a variety of styles and colors, allowing you to choose one that complements your existing decor. Simply slip the cover over the baseboard heater, ensuring a snug and secure fit.
If you prefer a more DIY approach, you can also consider using molding or trim to hide the exposed components. Measure and cut the molding or trim to fit around the baseboard heater, ensuring a seamless and polished look. Attach the molding or trim to the wall using adhesive or screws, making sure it is securely in place.
By concealing any exposed components, you can give your hydronic baseboard heater a professional and finished appearance. This not only enhances the overall look of the room but also adds a touch of style to your heating system.
Troubleshooting Common Issues
During the installation of a hydronic baseboard heater, it is common to encounter various issues that may hinder its proper functioning. Identifying and troubleshooting potential problems during installation is crucial to ensure the efficient operation of your heating system. In this section, we will discuss some common issues that you may come across and provide tips on how to resolve them.
Identifying and troubleshooting potential problems during installation
Proper installation is key to the smooth operation of your hydronic baseboard heater. However, sometimes issues may arise during the installation process. Here are some potential problems you might encounter, along with troubleshooting tips:
- Insufficient heat output: If your baseboard heater is not providing adequate heat, check the water flow rate by inspecting the valves and pipes. Ensure they are fully open and not obstructed by debris. Additionally, make sure the thermostat is set to the desired temperature and that the heating zone is not air-locked.
- Noisy operation: If you notice unusual noises coming from your baseboard heater, it could be due to air trapped in the system. Bleeding the air out by opening the bleed valve or vent located at the highest point of the unit may help resolve this issue.
- Uneven heating: In some cases, you may notice that the heat distribution is uneven, with certain areas being warmer or colder than others. This could be caused by air bubbles in the system. Bleeding the air out and ensuring proper water circulation can help address this problem.
Tips for maintaining and extending the lifespan of your hydronic baseboard heater
Proper maintenance is essential for maximizing the lifespan of your hydronic baseboard heater. Here are some tips to help you maintain and extend the life of your heating system:
- Regular cleaning: Keep the heating elements and fins clean by gently vacuuming or dusting them. Accumulated dirt and dust can hinder the heat transfer process and reduce efficiency.
- Inspect for leaks: Periodically check for any leaks in the system. Pay close attention to connectors, valves, and pipes. If you find any leaks, promptly repair or replace the affected components to prevent further damage.
- Monitor water pressure: Make sure to monitor the water pressure regularly. Low water pressure can indicate a problem with the circulation pump, while high pressure can cause strain on the system. Consult the manufacturer’s guidelines for the recommended water pressure range.
- Annual maintenance check: Consider scheduling an annual maintenance check by a professional technician. They can inspect the entire system, including valves, pipes, and electrical connections, to ensure everything is functioning properly.
Following these maintenance tips can help you keep your hydronic baseboard heater running efficiently and extend its lifespan, ensuring consistent warmth in your home.
Frequently Asked Questions Of How To Install Hydronic Baseboard Heater
Do All Hydronic Baseboard Heaters Need Plumbing?
No, not all hydronic baseboard heaters require plumbing. Some models can be plugged into a standard electrical outlet for power.
Are Hydronic Baseboard Heaters Worth It?
Hydronic baseboard heaters are worth it as they provide efficient and comfortable heating. They use hot water to create a steady warmth that is evenly distributed throughout the room. This type of heating system is energy efficient and can save on heating costs.
Do Hydronic Baseboard Heaters Need A Boiler?
Yes, hydronic baseboard heaters require a boiler. The boiler heats water which then circulates through the hydronic system, transferring heat to the baseboard heaters for efficient heating.
Can I Install My Own Baseboard Heaters?
Yes, you can install your own baseboard heaters. Just remember to follow safety guidelines, ensure proper electrical connections, and use the right tools. If you’re not familiar with electrical work, it’s best to hire a professional.
Conclusion
To conclude, installing a hydronic baseboard heater may seem like a complex task, but with the right tools and knowledge, it is easily achievable. By following the step-by-step guide mentioned in this post, you can ensure a safe and effective installation.
Remember to prioritize safety, efficiency, and proper maintenance to enjoy the benefits of a warm and comfortable home. So, don’t hesitate to start your hydronic baseboard heater installation project and make your living space cozy all year round.