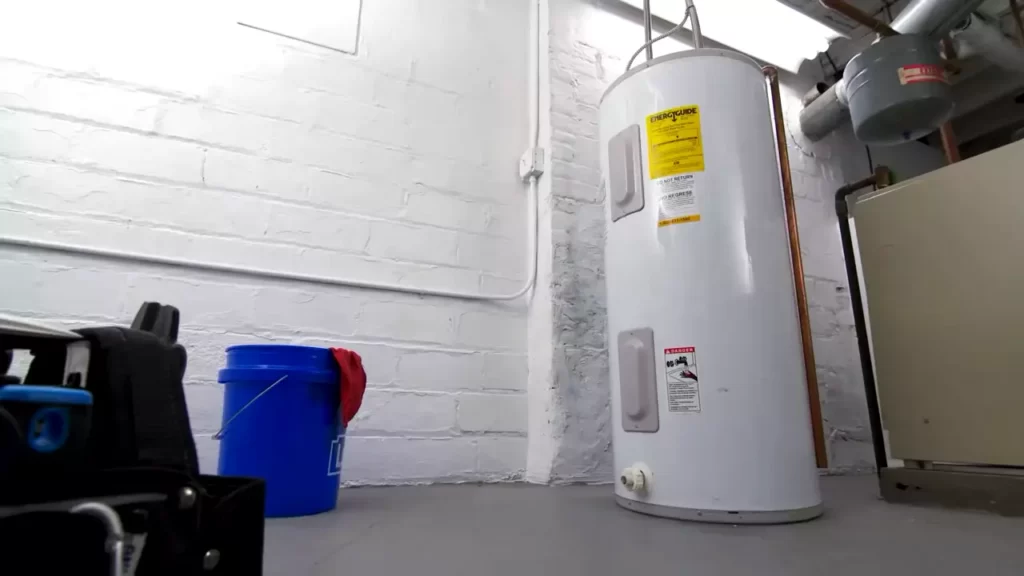
To install a hot water heater electric, shut off the power supply, drain the old water heater, disconnect the electrical connections, connect the new heater, and fill it with water. Installing a hot water heater electric involves a simple step-by-step process.
It begins by shutting off the power supply and draining the old water heater. Next, disconnect the electrical connections and connect the new electric heater. Finally, fill the new heater with water. By following these steps, you can easily install a hot water heater electric and ensure a steady supply of hot water in your home.
It is important to handle the installation process carefully to avoid any accidents or damage.
Factors To Consider When Selecting An Electric Hot Water Heater
When it comes to installing an electric hot water heater, selecting the right one for your needs is crucial. With a wide range of options available, it’s important to consider several factors to ensure you make the right choice. Whether you’re replacing an old unit or installing a new one, the following factors should be taken into account:
Energy Efficiency
One of the key factors to consider when selecting an electric hot water heater is its energy efficiency. This not only affects your monthly utility bills but also determines the environmental impact of your appliance. Look for a water heater that has a high energy efficiency rating, such as an Energy Star-certified model. These units are designed to consume less electricity while still providing ample hot water for your needs. Investing in an energy-efficient water heater can save you money in the long run and reduce your carbon footprint.
Tank or Tankless
Another consideration is whether to choose a water heater with a tank or go for a tankless option. Traditional tank-style water heaters store and heat a specific amount of water in a tank, which is ready to use whenever needed. On the other hand, tankless water heaters heat water on demand, providing hot water instantly without the need for a storage tank. Deciding between the two options depends on your household’s hot water usage and space limitations. Tankless heaters are more compact, but they may have a limitation on the number of hot water outlets that can be used simultaneously.
Capacity and Size
The capacity and size of the water heater are also important aspects to consider. The capacity refers to the amount of hot water the heater can provide at a given time. It’s essential to select a water heater with sufficient capacity to meet your household’s hot water demands. Consider factors such as the number of family members, daily water usage, and peak hot water usage times. Additionally, ensure that the physical dimensions of the water heater align with the available space in your home. Measure the installation area to determine if a particular model will fit comfortably without any space constraints.
Installation Requirements
Lastly, it’s crucial to be aware of the installation requirements before selecting an electric hot water heater. Different models may have specific installation guidelines, such as electrical voltage, exhaust ventilation, and water pipe connections. Ensure that your home meets these requirements or if modifications are needed, consult a professional plumber or electrician for assistance. Adhering to the installation guidelines will not only ensure optimal performance of the water heater but also maintain its warranty validity.
Determining The Right Size For Your Electric Hot Water Heater
Installing a hot water heater electric in your home is a practical and efficient solution for ensuring a continuous supply of hot water. However, it is crucial to determine the right size of the water heater to meet your household’s hot water demands. Estimating your water usage, calculating gallons per minute (GPM), and referring to a sizing chart can all help you find the perfect fit. In this section, we will explore each step in detail.
Estimating Water Usage
Before you can determine the size of your electric hot water heater, it’s essential to estimate your household’s daily water usage. Different activities such as showering, dishwashing, and laundry require varying amounts of hot water. By considering the number of people in your household and their daily routines, you can make a more accurate estimation.
Calculating Gallons per Minute (GPM)
To calculate the gallons per minute (GPM) of hot water needed for your home, you’ll need to determine the flow rate of each fixture or appliance that uses hot water. This information can usually be found in their specifications or by using a flow meter. Keep in mind that simultaneous usage might occur, so it’s important to take that into account when adding up the GPM values.
Sizing Chart for Different Household Sizes
To simplify the process, you can refer to a sizing chart that provides guidelines for choosing the right electric hot water heater based on the number of people in your household. These charts typically list the recommended water heater size in terms of gallons. By matching your estimated GPM to the appropriate household size, you can confidently select a water heater that will meet your hot water needs.
| Household Size | Recommended Water Heater Size (Gallons) |
|---|---|
| 1-2 people | 30-40 |
| 3-4 people | 40-50 |
| 5-6 people | 50-80 |
| 7 or more people | 80 or more |
Remember, these sizing recommendations are general guidelines. Your specific hot water needs may vary based on factors like climate, usage patterns, and personal preferences. Consulting with a professional or plumber can provide further insight and ensure accurate sizing.
By following these steps and considering your household’s hot water usage, you can determine the right size for your electric hot water heater. Making an informed decision will not only optimize your hot water supply but also help you save energy and money in the long run.
Gathering The Necessary Tools And Materials
Before you begin the process of installing an electric hot water heater, it’s essential to gather all the necessary tools and materials. Having everything prepared beforehand will make the installation process smoother and more efficient. Here are the key tools and materials you will need:
1. Pipe Wrench
A pipe wrench is a critical tool for any plumbing job, including the installation of a hot water heater. This wrench has adjustable teeth that can grip onto pipes securely, making it easier to tighten or loosen fittings. Make sure to have a pipe wrench of the appropriate size and quality for this task.
2. Adjustable Wrench
Another essential tool for this installation is an adjustable wrench. It allows you to tighten and loosen bolts and nuts of various sizes with ease. Having a reliable adjustable wrench on hand will provide you with the necessary gripping power to secure different components of the hot water heater.
3. Teflon Tape
To ensure leak-free connections of the pipes and fittings, you’ll need some Teflon tape. This thin white tape is made of polytetrafluoroethylene (PTFE) and acts as a lubricant when you wrap it around threaded connections. It helps create a watertight seal, preventing any water from leaking out.
4. Electrical Tape
Since you’re dealing with an electric hot water heater, electrical tape is crucial for protecting and insulating any exposed electrical connections. It is used to wrap around wires or connections to prevent any exposed wires from creating a short circuit or causing any electrical hazards.
5. Safety Gloves and Goggles
Safety should always be a top priority when working on any project, including hot water heater installation. You must protect your hands and eyes from potential injuries and harmful materials. Safety gloves will shield your hands from sharp edges and surfaces, while safety goggles will protect your eyes from any debris or chemicals.
6. Copper Pipes or Flexible Water Lines
Depending on your specific installation requirements, you may need either copper pipes or flexible water lines to connect the hot water heater to the water supply. Copper pipes are more traditional and durable, while flexible water lines offer more versatility and easier installation. Choose the option that suits your needs and preferences.
By gathering these essential tools and materials before starting the installation process, you’ll be well-prepared and equipped to complete the job efficiently. Once you have everything assembled, it’s time to move on to the next steps of installing your electric hot water heater.
Turning Off The Power And Water Supply
When it comes to installing a hot water heater electric, one of the crucial steps is turning off the power and water supply. This ensures your safety and protects the equipment from any potential damage. In this section, we’ll go over the steps necessary to safely shut off the power and water supply to your hot water heater.
Locating the Main Electrical Panel
The first step is to locate the main electrical panel in your home. This panel contains the circuit breakers that control the power supply to different areas of your house. The main electrical panel is usually found in a basement, utility room, or garage. Once you have located the panel, follow these steps to proceed:
- Open the main electrical panel door.
- Look for the circuit breaker labeled “Water Heater” or something similar. Refer to the label guide if needed.
- If there is no specific label, look for a double-pole breaker. This type of breaker controls 240 volts and is commonly used for electric water heaters.
Shutting off the Circuit Breaker
Once you have located the correct circuit breaker for your hot water heater, it’s time to shut off the power. Follow these steps:
- Ensure you have a flashlight or another source of light for better visibility.
- Find the circuit breaker handle for the water heater.
- Turn the handle to the “Off” position. You should feel a slight resistance.
- Confirm the power is off by checking if any lights or indicators on the hot water heater are no longer lit.
Closing the Main Water Valve
In addition to turning off the power, it’s essential to shut off the water supply to the hot water heater. Here’s how you can do it:
| Action | Instructions |
|---|---|
| 1 | Locate the main water valve in your home. It is typically found near the water meter or in the basement. |
| 2 | Turn the valve handle clockwise to close it. This will stop the water flow to the hot water heater. |
| 3 | Check if any faucets or fixtures are running to ensure the water supply is completely shut off. |
By following these steps, you have successfully turned off both the electrical power and water supply to your hot water heater. This ensures a safe and controlled environment for the installation process. In the next section, we will discuss how to prepare for the actual installation of the hot water heater electric.
Clearing The Installation Space
Before you begin the installation process of a new electric hot water heater, it is essential to clear the installation space properly. This ensures that the installation goes smoothly and efficiently.
Removing the Old Water Heater
The first step in clearing the installation space is removing the old water heater. This is crucial to make room for the new unit. Follow these steps to remove the old water heater:
- Turn off the power supply and shut off the water by closing the water supply valve.
- Drain the old water heater by connecting a garden hose to the drain valve and directing the water to a suitable drain or outdoors.
- Disconnect the electrical wiring by carefully following the manufacturer’s instructions. It is important to note that electrical connections can be dangerous, so if you’re unsure, it’s best to consult a professional.
- Disconnect the water supply pipes by turning the fittings counterclockwise using adjustable pliers.
- Once all connections are removed, carefully lift and remove the old water heater from the installation space.
Cleaning the Area
After removing the old water heater, it is important to clean the area before installing the new one. Here’s how to ensure a clean installation space:
- Remove any debris or dust from the installation area using a broom or vacuum cleaner. It is crucial to have a clean surface to ensure a secure installation.
- Check for any signs of water damage or leaks. If you notice any, it is essential to address the issue before installing the new water heater. Consult a professional if needed.
- Inspect the surrounding walls and floor for any signs of mold or mildew. If present, it is crucial to clean and treat the area properly before proceeding with the installation.
By following these steps to clear the installation space, you can ensure a smooth and hassle-free process when installing your new electric hot water heater. A clean and well-prepared area will contribute to the overall efficiency and longevity of the new unit.
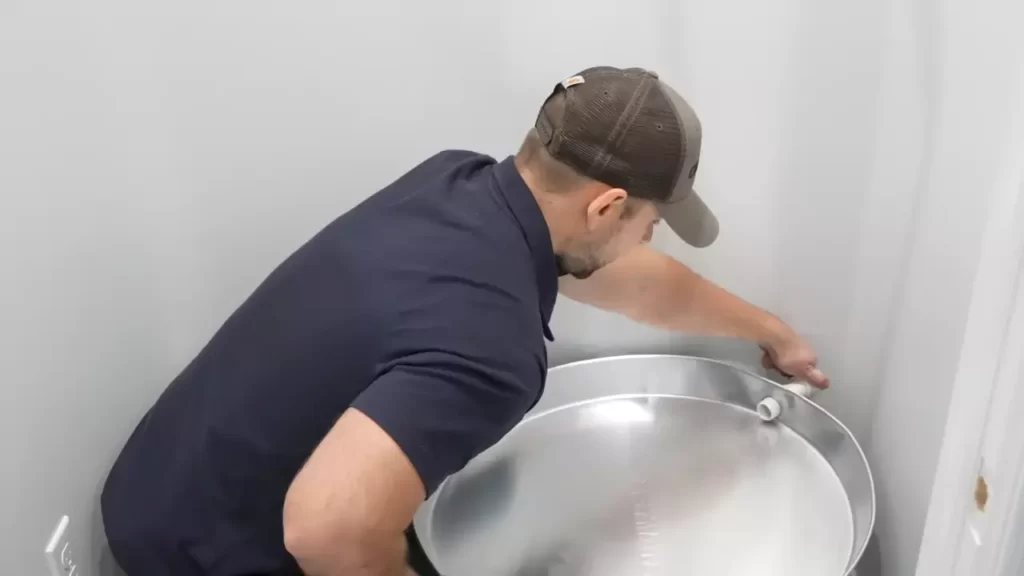
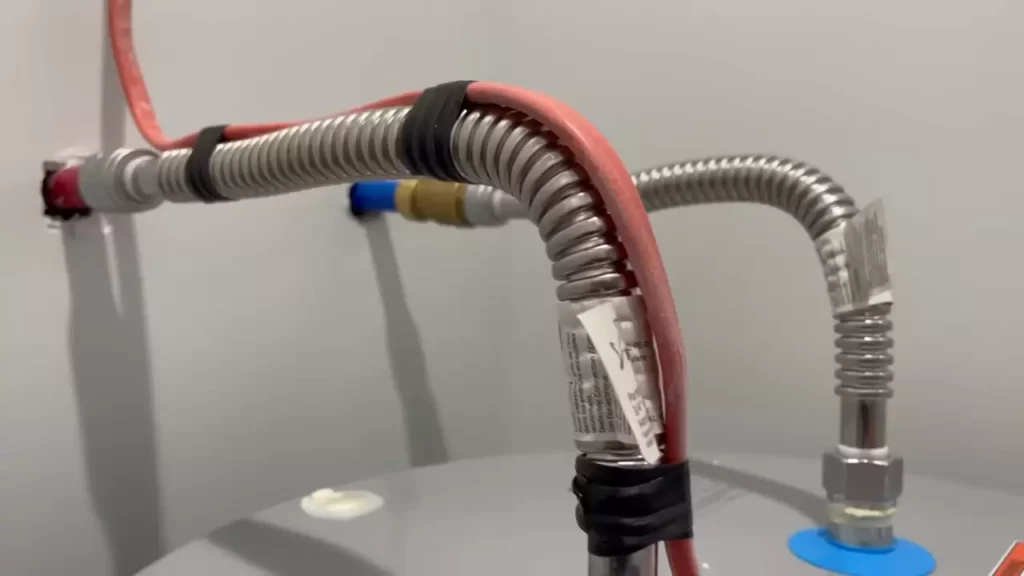
Connecting The Water Lines
Now that you have successfully installed your electric hot water heater, it’s time to connect the water lines. This step is crucial in ensuring your heater functions at its best and provides a steady supply of hot water. In this section, we will guide you through the process of installing a pressure relief valve, attaching the cold and hot water lines, and using Teflon tape for leak-free connections.
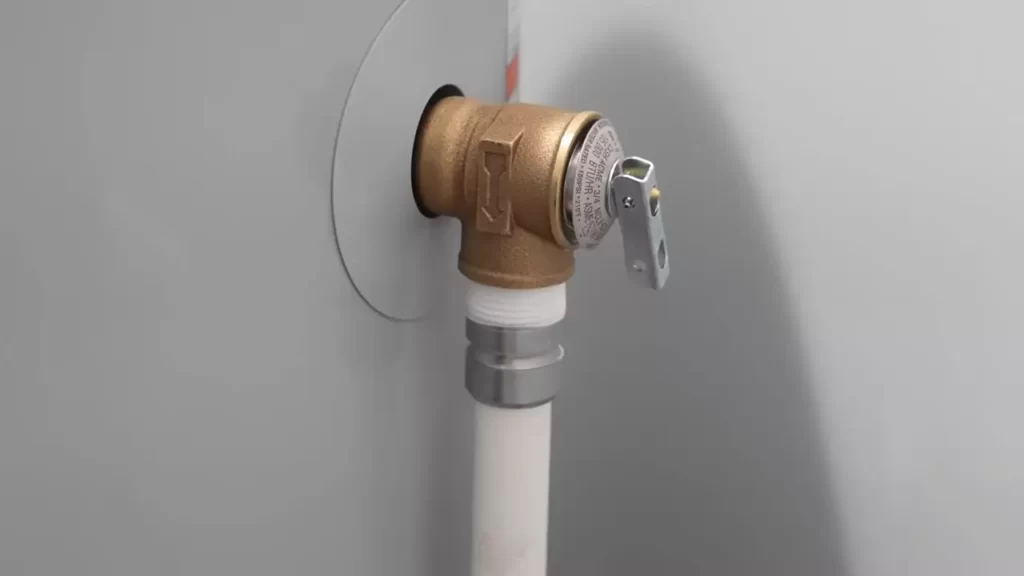
Installing a Pressure Relief Valve
The pressure relief valve is an essential safety feature that prevents excessive pressure buildup inside the water heater. To install it, follow these steps:
- First, ensure that the power to the water heater is turned off. Safety should always be your top priority.
- Locate the pressure relief valve opening on the top or side of the tank and remove the threaded plug.
- Clean the threads and apply Teflon tape to the new pressure relief valve’s threads. This will create a secure seal.
- Tightly screw the pressure relief valve into place using a wrench or pliers, ensuring it is firmly attached but not overly tightened.
- Once the valve is secured, connect the overflow pipe to the valve’s discharge outlet. This pipe should direct any excess water away from the heater and to a safe location, such as a drain.
Attaching the Cold and Hot Water Lines
Now that the pressure relief valve is installed, you can move on to connecting the cold and hot water lines. Follow these steps:
- Locate the cold water inlet and hot water outlet connections on the top of the water heater tank.
- Attach a flexible hose or pipe to the cold water inlet, ensuring it is securely fastened. You may need to use a wrench or pliers to tighten the connection.
- Connect the other end of the hose or pipe to the cold water supply line. Ensure the connection is watertight to prevent leaks.
- Repeat the above steps for the hot water outlet, connecting it to the appropriate supply line.
Using Teflon Tape for Leak-Free Connections
Properly sealing the water line connections is vital in preventing leaks. To achieve leak-free connections, follow these tips for using Teflon tape:
- Start by cleaning the male threads of the water heater connections and the female threads of the hoses or pipes.
- Take a length of Teflon tape and wrap it clockwise around the male threads. Make sure to overlap the tape and cover the entire threaded area.
- Keep the tape tight as you wrap, but avoid over-tightening, as this could cause the tape to break or the threads to strip.
- Once the Teflon tape is applied, carefully screw the connections together, ensuring a snug fit. Use a wrench or pliers to tighten, but be cautious not to overtighten and damage the threads.
- Check for any signs of leaks around the connections. If you notice any leaks, tighten the connections further or replace the Teflon tape.
By following these steps and using Teflon tape for leak-free connections, you can confidently connect the water lines of your electric hot water heater. This will help ensure its proper functioning and a steady supply of hot water for your everyday needs.
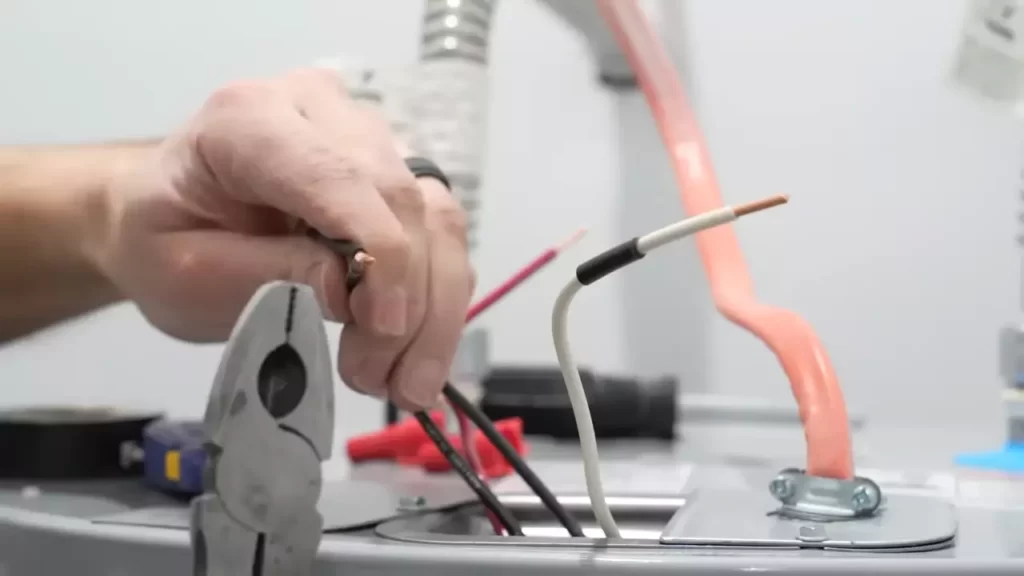
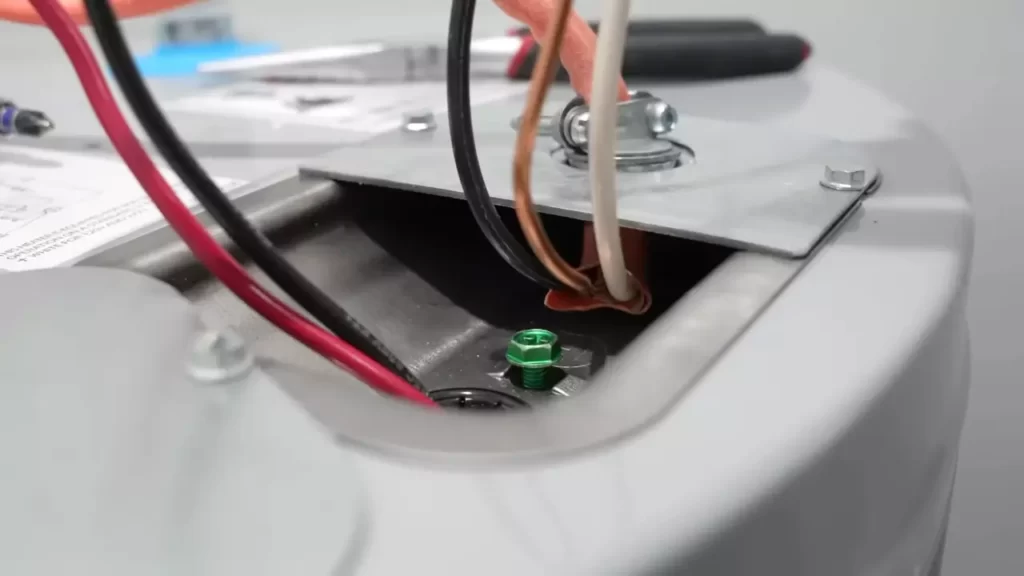
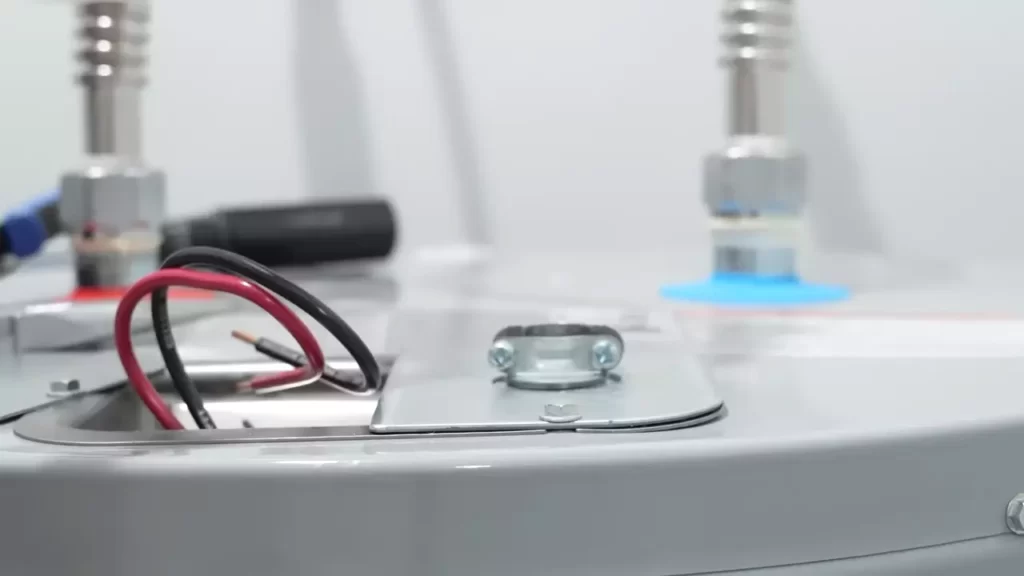
Connecting The Electrical Components
When it comes to installing an electric hot water heater, connecting the electrical components is a crucial step. It involves properly connecting the electric wires, grounding the hot water heater, and testing the electrical connections. In this article, we will guide you through each of these steps to ensure a safe and efficient installation.
Connecting the Electric Wires
The first step in connecting the electrical components of an electric hot water heater is to properly connect the electric wires. Here’s a step-by-step guide to help you:
- Locate the wiring compartment on the top of the water heater. It is typically a metal box with a removable cover.
- Open the wiring compartment cover using a screwdriver.
- Inside the wiring compartment, you will find three sets of wires – two hot wires (black and red) and one ground wire (green or bare copper).
- Insert the black and red wires into their corresponding terminals. The terminals are usually labeled “L1” and “L2”.
- Tighten the terminal screws securely with a screwdriver to ensure proper connection.
- Connect the ground wire to the ground terminal. The ground terminal is usually marked with a green screw or a grounding symbol.
- Tighten the ground terminal screw securely to establish a solid grounding connection.
- After connecting the wires, carefully tuck them into the wiring compartment and close the cover.
- Ensure that the wires are not pinched or damaged during the process.
Remember, it is essential to follow the manufacturer’s instructions and consult a professional if you are unsure about any step.
Properly Grounding the Electric Hot Water Heater
A crucial aspect of connecting an electric hot water heater is properly grounding it. Grounding helps protect against electrical shock and ensures the safe operation of the appliance.
To properly ground your electric hot water heater, follow these important steps:
- Identify the grounding terminal in the wiring compartment, usually marked with a green screw or the grounding symbol.
- Connect the ground wire (usually green or bare copper) to the grounding terminal.
- Ensure that the ground wire is securely fastened and tightly connected to the grounding terminal.
- Inspect the connection to make sure there are no loose or exposed wires.
- Confirm that the grounding wire is properly grounded to the electrical system of your home.
An improper ground can lead to safety hazards, so it is essential to take the necessary precautions and ensure a proper grounding connection.
Testing the Electrical Connections
After connecting the electric wires and grounding the electric hot water heater, it is crucial to test the electrical connections to ensure everything is functioning correctly. Here’s how you can do it:
- Turn off the power to the water heater at the main electrical panel.
- Use a multimeter to check for continuity between the hot and ground terminals and between the two hot terminals.
- If you detect any continuity, there might be a wiring issue, and you should consult a professional.
- If there is no continuity, turn on the power to the water heater and test for voltage between the hot and ground terminals. It should read the same voltage as the power supply.
- If you receive the correct voltage reading, your electrical connections are properly installed.
- If there are any discrepancies, turn off the power to the water heater and double-check your wiring connections.
Testing the electrical connections is a critical step to ensure the safe and efficient operation of your electric hot water heater. If you encounter any issues or are unsure about the testing process, it is advisable to seek professional assistance.
Filling And Testing The Water Heater
The final step in installing an electric hot water heater is filling and testing the unit. This crucial process ensures that the heater is correctly functioning and ready to provide you with a constant supply of hot water when you need it. In this section, we will guide you through three essential steps: filling the tank with water, checking for leaks, and finally, turning on the power and verifying the functionality of the water heater.
Filling the Tank with Water
Now that your water heater is in place and connected to the water supply, it’s time to fill the tank with water. To do this, follow these simple steps:
- Close the cold water shut-off valve, which is usually located on the water pipe leading into the tank. This prevents any flow of water while you fill the tank.
- Open the hot water faucet in a nearby sink or tub to allow air to escape from the tank and help with the filling process.
- Locate the drain valve near the bottom of the tank and connect a garden hose to it. Position the other end of the hose in a suitable drain or outside where the water can safely flow away.
- Open the drain valve slowly, allowing water to flow into the tank while monitoring the pressure relief valve. This valve should be open until a steady stream of water flows from it, indicating that the tank is full and properly filled.
- Once the tank is full, close the drain valve and remove the hose.
Checking for Leaks
After filling the tank with water, it’s crucial to check for any leaks to ensure the water heater is installed correctly. Follow these steps to perform a leak check:
- Inspect all the connections, including the inlet and outlet pipes, temperature and pressure relief valve, and drain valve. Look for any signs of water leakage, such as dripping or pooling.
- If you notice any leaks, tighten the connections as necessary. Remember to use caution and not over-tighten, as this can damage the pipes or fittings.
- Leaks in the tank itself are rare but can happen. If you discover any cracks or holes, contact a professional plumber for further assistance.
Turning on the Power and Verifying Functionality
Once you have filled the tank and checked for leaks, you are ready to turn on the power and verify the functionality of the water heater. Follow these steps:
- Ensure the thermostat temperature is set to the desired level.
- Open the cold water shut-off valve fully to allow a constant flow of water into the tank.
- At the circuit breaker panel, switch on the breaker dedicated to the water heater. If your water heater has an additional on/off switch, turn it on as well.
- Allow the water heater some time to heat the water. You will notice hot water flowing from the hot water faucet once the tank is heated to the set temperature.
Congratulations! You have successfully installed your electric hot water heater and confirmed its functionality. Now you can enjoy a consistent supply of hot water for your daily needs.
Troubleshooting Common Issues With Electric Hot Water Heaters
Electric hot water heaters are essential for providing us with warm water for various daily activities. However, like any appliance, they can encounter problems from time to time. Troubleshooting and resolving these issues can save you money, prevent inconveniences, and extend the lifespan of your electric hot water heater.
No Hot Water
If you find yourself in a situation where your electric hot water heater is not producing any hot water, there are a few possible causes to investigate:
- Power supply issues: Ensure that the power supply to your hot water heater is not interrupted. Check the circuit breaker for any tripped switches and reset them if necessary. If this doesn’t solve the problem, examine the electrical connections and wiring for any loose or damaged components.
- Thermostat malfunction: The thermostat is responsible for regulating the water temperature. If it is not functioning correctly, it may prevent the water from heating up. Inspect the thermostat settings and adjust them if needed. If the thermostat is faulty, consider replacing it.
- Heating element failure: Electric hot water heaters have one or more heating elements that warm the water. A failure in one of these elements can lead to no hot water. Test the heating elements using a multimeter to determine if they are working properly. Replace any faulty elements as necessary.
Inadequate Hot Water
If your electric hot water heater is producing hot water, but it is not enough to meet your needs, you may be facing one of the following issues:
- Incorrect thermostat setting: Check the temperature setting on the thermostat. It may be set too low, resulting in inadequate hot water. Adjust the setting to a higher temperature if necessary, but be mindful of the recommended safety limits.
- Sediment buildup: Over time, sediment can accumulate at the bottom of the hot water tank, reducing the available volume of hot water. Flushing the tank periodically can help remove the sediment buildup and restore the hot water capacity.
- Undersized hot water tank: If your hot water needs have increased but your tank size remained the same, it may be time to consider upgrading to a larger capacity tank. A professional can assess your requirements and recommend an appropriate size.
Leaks or Water Pooling
Leaking or water pooling around your electric hot water heater can indicate a problem that requires immediate attention. Here are some potential causes:
- Loose connections: Inspect all the connections and fittings for any signs of leaks. Tighten them as needed to ensure a proper seal. If any components appear damaged or worn, replace them.
- Pressure relief valve: The pressure relief valve is a safety feature that releases excess pressure from the tank. If it is leaking, it may indicate a malfunction or excessive pressure buildup. Contact a professional to inspect and replace the valve if necessary.
- Tank corrosion: Corrosion can lead to leaks in the tank itself. If you notice rust or signs of corrosion, it is crucial to address the issue promptly. Depending on the extent of the corrosion, you may need to replace the tank or seek professional repairs.
Troubleshooting these common issues with electric hot water heaters can help you resolve problems promptly, ensuring you have a steady supply of hot water for your everyday needs. Remember, if you’re unsure about handling any repairs or troubleshooting steps, it’s always advisable to seek guidance from a qualified professional.
Regular Maintenance For Optimal Performance
Regular maintenance is crucial for ensuring optimal performance of your electric hot water heater. By implementing a maintenance routine, you can not only extend the lifespan of your unit but also maintain its efficiency and functionality over time. In this section, we will discuss three key maintenance tasks that will help you keep your hot water heater running smoothly: flushing the tank, checking the anode rod, and inspecting and cleaning the heating elements. Let’s dive into each of these tasks in detail.
Flushing the Tank
Flushing the tank of your electric hot water heater is an essential maintenance task that helps remove sediment buildup and ensures the longevity of your unit. Over time, mineral deposits and sediments can accumulate at the bottom of the tank, reducing the efficiency and performance of your water heater. Flushing the tank regularly helps remove these deposits, allowing your heater to operate at its full potential.
To flush the tank, follow these steps:
- Turn off the power supply to the water heater by switching off the circuit breaker dedicated to it.
- Locate the drain valve at the bottom of the tank. Attach a garden hose to the valve.
- Open the valve and let the water drain out into a suitable drainage area. Be careful as the water might be hot.
- Once the tank is empty, close the drain valve and remove the hose.
- Turn on the cold water inlet valve to refill the tank. Keep the hot water faucet on in a nearby sink to release any air pockets.
- Once the tank is full, restore the power supply by switching on the circuit breaker.
Checking the Anode Rod
The anode rod plays a crucial role in preventing corrosion and extending the life of your electric hot water heater. Over time, the rod gradually deteriorates due to its sacrificial nature, sacrificing itself to protect the tank from rust and corrosion. Regularly checking and replacing the anode rod, if necessary, is important to maintain the integrity of your water heater.
To check the anode rod, follow these steps:
- Turn off the power supply to the water heater by switching off the circuit breaker dedicated to it.
- Locate the anode rod, typically located on top of the water heater or attached to the hot water outlet.
- Using a wrench, unscrew the anode rod from the heater.
- Inspect the rod for signs of corrosion or significant wear. If the rod is heavily corroded or has eroded to less than 6 inches in length, it’s time for a replacement.
- Purchase a new anode rod that matches the specifications of your water heater.
- Screw in the new anode rod and tighten it securely.
- Turn on the power supply by switching on the circuit breaker.
Inspecting and Cleaning the Heating Elements
The heating elements of your electric hot water heater are responsible for heating the water. Over time, these elements can accumulate scale buildup, which can reduce their efficiency and performance. Regularly inspecting and cleaning the heating elements is vital to maintain the effectiveness of your unit and optimize its energy consumption.
To inspect and clean the heating elements, follow these steps:
- Turn off the power supply to the water heater by switching off the circuit breaker dedicated to it.
- Remove the access panel cover to expose the heating elements.
- Inspect the elements for any signs of scale buildup or damage. Scale buildup appears as a white or rusty residue on the elements.
- If there is scale buildup, use a stiff brush or a vinegar solution to clean the elements. Gently scrub the elements to remove the deposits.
- After cleaning, wipe the elements with a clean cloth to remove any remaining debris.
- Replace the access panel cover.
- Turn on the power supply by switching on the circuit breaker.
By regularly performing these maintenance tasks, you can ensure that your electric hot water heater operates at its best and provides you with a reliable and efficient hot water supply. Incorporate these tasks into your maintenance routine to maintain the performance and longevity of your water heater.
Handling The Electric Hot Water Heater Safely
Installing a hot water heater can be a challenging task, especially when it comes to handling the electrical aspect. It’s crucial to prioritize safety throughout the installation process to avoid any accidents or damage. Here are three important steps to follow to ensure that you handle the electric hot water heater safely.
Use of Safety Gloves and Goggles
When working with an electric hot water heater, it is vital to wear safety gloves and goggles. These protective gears can safeguard you from potential electrical shocks and prevent any water or debris from entering your eyes. Safety gloves made of insulated material provide an extra layer of protection, allowing you to handle the electrical components without the risk of electrocution. Additionally, wearing goggles keeps your eyes shielded from any sparks or particles that may be released during the installation process, ensuring your eyes remain safe and unharmed.
Turning off the Power and Water Supply
Prior to beginning the installation process, it is essential to turn off both the power supply and the water supply connected to the electric hot water heater. By doing this, you eliminate the risk of electrical shock and avoid any water damage. Locate the circuit breaker that controls the electricity supply to the water heater and flip it off.
This action ensures that no electrical current is flowing through the heater, providing a safe environment to work with. Additionally, shutting off the water supply valves prevents water from continuing to flow into the tank, minimizing any potential leaks or water-related accidents during the installation.
Properly Grounding the Water Heater
Properly grounding the electric hot water heater is of utmost importance to ensure the safety of both the device and those in the vicinity. Grounding enables the safe dissipation of any excess electrical energy and prevents the accumulation of static electricity in the system.
To properly ground the water heater, locate the grounding screw on the device and ensure it is securely tightened to establish a reliable connection between the heater and the ground. By doing so, you significantly reduce the risk of electrical shocks and other electrical hazards associated with improper grounding.
Taking Precautions During Installation
When it comes to installing an electric hot water heater, taking precautions is of paramount importance. Following proper safety measures not only ensures the smooth installation process but also guarantees the safety of both the installer and the household members. In this section, we will discuss three crucial precautionary steps to consider during the installation process.
Following the Manufacturer’s Instructions
Before you start installing the electric hot water heater, it is imperative to carefully read and understand the manufacturer’s instructions. These instructions provide step-by-step guidance on how to install the heater correctly. Make sure you have a clear understanding of the requirements and adhere to the specifications outlined by the manufacturer.
Avoid assuming that you know the process based on prior experience with other heaters. Each model may have different installation requirements, so it is crucial to familiarize yourself with the specific instructions provided by the manufacturer.
Checking for Gas Leaks
Although electric hot water heaters do not require a direct gas connection, it is essential to check for potential gas leaks if you have a gas supply system in your property. Gas leaks can pose a serious safety hazard, leading to fire or explosions. Therefore, it is crucial to ensure that the gas supply lines are properly sealed and do not have any leaks.
Here’s a step-by-step guide to check for gas leaks:
- Turn off all the gas appliances in your home.
- Apply a mixture of soap and water to the gas connections and joints.
- Observe if any bubbles form; this indicates a gas leak.
- If you detect any gas leaks, immediately turn off the gas supply and contact a professional plumber or gas technician for assistance.
Testing for Electrical Safety
Prior to installing the electric hot water heater, it is crucial to ensure electrical safety through appropriate testing. This step is essential to prevent any potential electrical hazards during and after the installation process.
Here are a few electrical safety measures you should consider:
- Ensure the power supply to the heater is turned off before installation.
- Use a voltage tester to confirm that no electricity is flowing to the unit.
- Double-check the wiring connections to ensure they are secure and properly tightened.
- Once the installation is complete, test the hot water heater system to verify that it is functioning correctly.
- If you encounter any electrical issues or abnormalities during the testing process, consult a certified electrician for further assistance.
By following the manufacturer’s instructions, checking for gas leaks, and testing for electrical safety, you can ensure a safe and successful installation of your electric hot water heater. Prioritizing these precautions not only guarantees the smooth functioning of the system but also prioritizes the safety of your household.
Frequently Asked Questions For How To Install Hot Water Heater Electric
Can I Install An Electric Hot Water Heater Myself?
No, it is not recommended to install an electric hot water heater yourself. It should be done by a professional to ensure safety and proper functioning.
Do Electric Water Heaters Need Special Wiring?
Yes, electric water heaters require special wiring. This is necessary due to the high amount of electrical power they consume. It ensures the proper functioning and safety of the water heater.
Is It Easy To Install a Water Heater Yourself?
Installing a water heater yourself can be a complex task. It requires plumbing and electrical expertise, proper tools, and knowledge of local building codes. We recommend hiring a professional plumber or electrician for a safe and efficient installation.
What Are The Electrical Requirements For Electric Hot Water Heater?
Electric hot water heaters typically require a dedicated circuit with a 30 Amp breaker and 10-gauge wiring. It’s important to consult an electrician to ensure proper installation and adherence to local electrical codes.
Conclusion
Installing an electric hot water heater is a straightforward process that can be accomplished with a few simple steps. By following the instructions outlined in this blog post, you can ensure a successful and efficient installation. Remember to turn off the power supply, drain the old water heater, and carefully connect the new one.
With the helpful tips provided, you’ll have your hot water flowing in no time!