To install heat tape on water pipes, first clean the pipes thoroughly, then wrap the tape tightly around the pipes, ensuring it covers the entire length without overlapping itself. Heat the tape using a heat gun or hairdryer, and secure it in place using zip ties or aluminum tape.
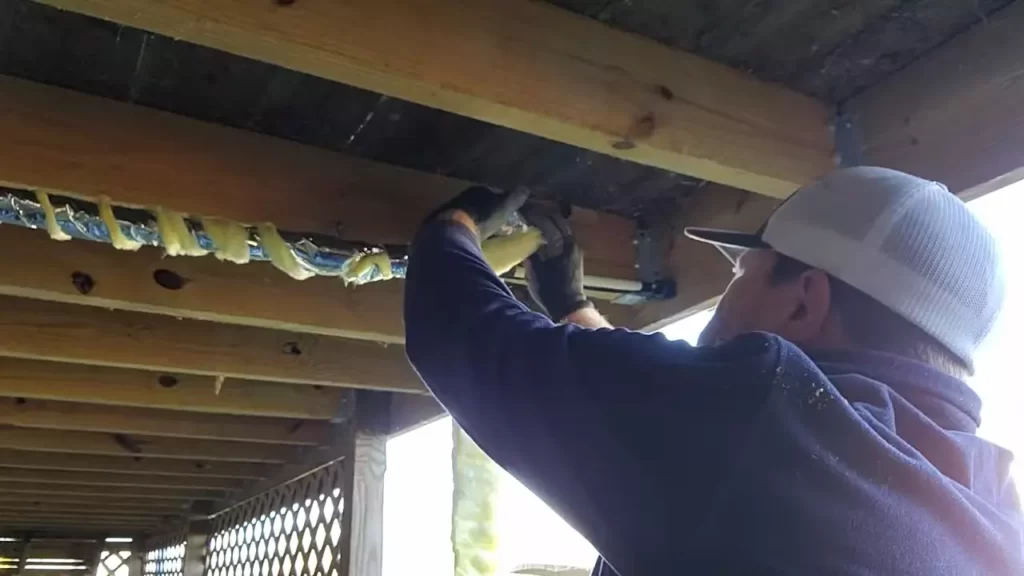
Finally, insulate the pipes with pipe insulation to enhance heat retention. Ensuring the proper functioning of water pipes during cold weather is essential to prevent freezing and potential damage. One effective way to achieve this is by installing heat tape on the pipes.
Heat tape, also known as heat cable or heat trace, is a flexible electric heating cable that helps to maintain the temperature of water pipes above freezing. It works by producing heat that warms the pipes and prevents the water inside from freezing. Installing heat tape on water pipes is a straightforward process that requires a few simple steps to protect your pipes from freezing temperatures. We will guide you through the process of installing heat tape on water pipes efficiently and effectively.
Choosing The Right Heat Tape For Water Pipes
When it comes to protecting your water pipes from freezing during harsh winter months, installing heat tape is a smart solution. However, not all heat tapes are created equal, and it’s important to choose the right one for your specific needs. In this section, we will discuss the factors to consider when selecting heat tape for water pipes, including the pipe material and size, the length of the pipe, and the power source options for the heat tape.
Factors to consider when selecting heat tape
Choosing the right heat tape for your water pipes involves considering several important factors. By taking these factors into account, you can ensure that you select a heat tape that will effectively protect your pipes from freezing and potential damage.
Pipe material and size
The material and size of your water pipes play a crucial role in determining the type and specifications of the heat tape you should choose. Different pipe materials, such as copper, plastic, or galvanized steel, require different heat tapes to ensure optimal performance. Additionally, the size of your water pipes will affect the amount of heat tape you need, as well as the power requirements.
Length of the pipe
The length of the pipe that needs to be protected with heat tape is another important factor to consider. Longer pipes may require multiple runs of heat tape or a longer heat tape with higher wattage. It’s important to accurately measure the length of the pipe to ensure you purchase the right amount of heat tape and avoid any gaps in coverage.
Power source options for the heat tape
When it comes to powering your heat tape, you have a few options to consider. Some heat tapes are self-regulating and only require a standard electrical outlet, while others may require a dedicated circuit or a power source such as a generator. It’s important to understand the power requirements of the heat tape you choose and ensure that your power source can accommodate it.
By considering factors such as the pipe material and size, the length of the pipe, and the power source options, you can make an informed decision when selecting heat tape for your water pipes. Taking the time to choose the right heat tape will not only protect your pipes but will also provide you with peace of mind during the winter months.
Preparing For Installation
Welcome to our step-by-step guide on how to install heat tape on water pipes. In this section, we will discuss the necessary preparations that need to be made before installing the heat tape. By following these instructions, you can ensure a successful and efficient installation process.
Gathering the necessary tools and materials
Before you begin, it’s important to have all the required tools and materials in place. Being prepared will save you time and hassle, allowing the installation process to proceed smoothly. Here are the items you will need:
- Heat tape
- Insulation
- Electrical supplies
Measuring the length of the pipe for heat tape installation
The next step involves accurately measuring the length of the pipe where you want to install the heat tape. This measurement is crucial as it determines how much heat tape you will need. It’s essential to measure the pipe length precisely to avoid any wastage or shortage of heat tape. Use a tape measure or ruler to get an accurate measurement in feet or meters.
Cleaning the pipe surface for better adhesion
Prior to heat tape installation, it’s vital to clean the surface of the pipe. Dirt, dust, and debris on the pipe can hinder the adhesion of the heat tape. To ensure optimal adhesion, clean the pipe surface thoroughly using a cloth or brush. Remove any grease, oils, or other contaminants that might be present. A clean surface will allow the heat tape to adhere properly, ensuring effective heat transfer and preventing any potential issues.
We hope this section has provided you with the necessary information on preparing for the installation of heat tape on water pipes. By gathering the necessary tools and materials, measuring the length of the pipe accurately, and cleaning the pipe surface for better adhesion, you are now ready to proceed with the next steps. Stay tuned for the next section where we will guide you through the actual installation process.
Installing Heat Tape On Water Pipes
One effective way to prevent frozen pipes during cold winter months is by installing heat tape. Heat tape is a specialized electrical tape that provides heat to pipes, keeping them warm and preventing freezing. In this article, we will guide you through the process of installing heat tape on water pipes, ensuring your pipes remain protected and functional all winter long.
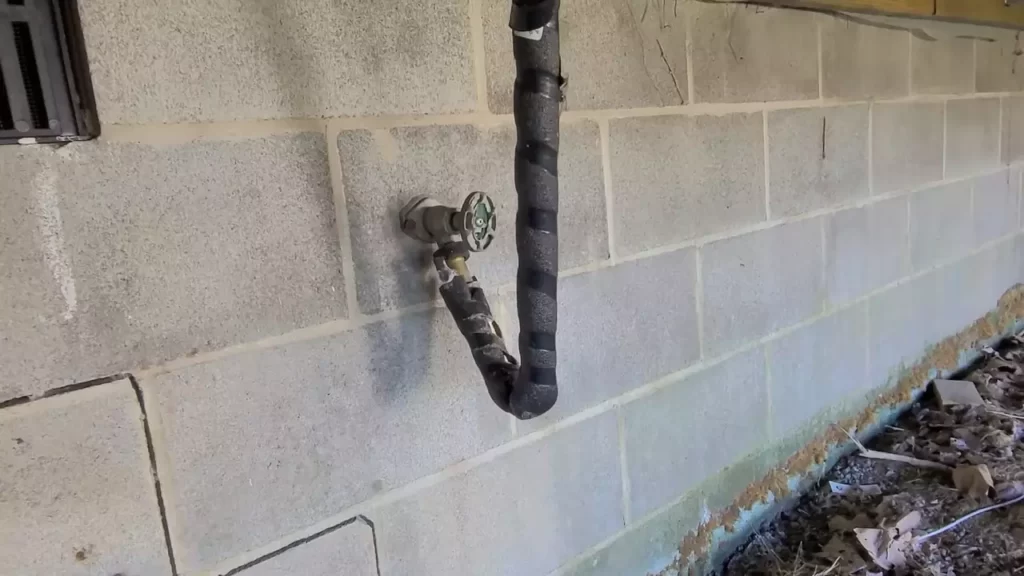
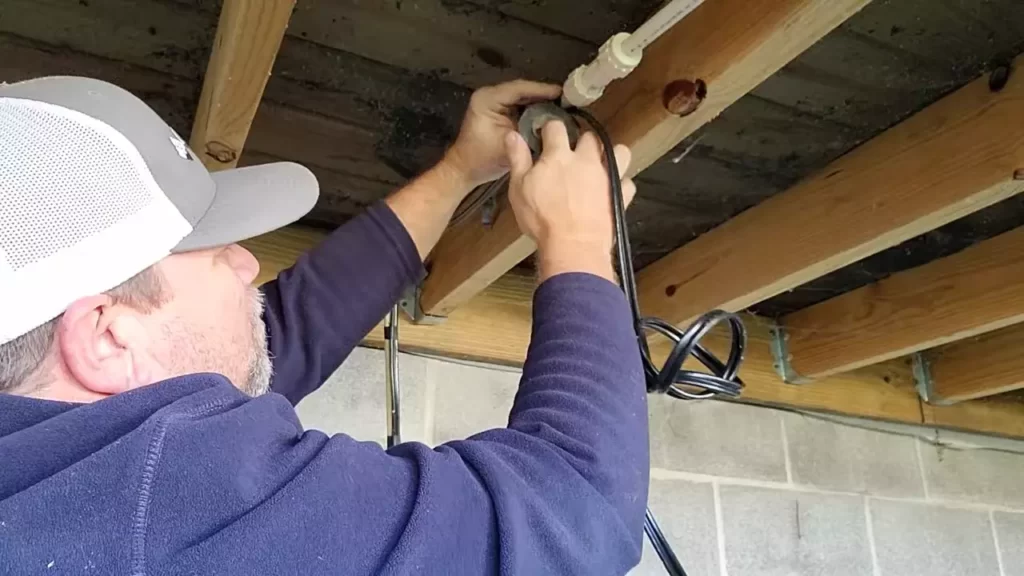
Wrapping the heat tape around the pipe
The first step in installing heat tape on water pipes is to wrap the tape evenly around the pipe. Start at the bottom and work your way up the length of the pipe, making sure to overlap the tape slightly to ensure proper coverage. It’s important to wrap the tape snugly around the pipe, but not too tightly that it restricts the flow of heat.
Ensuring proper coverage and tightness
After wrapping the heat tape around the pipe, it’s crucial to check for proper coverage and tightness. Carefully inspect the tape to ensure it is firmly attached to the pipe without any gaps or loose sections. Any areas left uncovered or with a loose grip could result in cold spots and potential freezing. Take your time to ensure complete and tight coverage of the entire pipe.
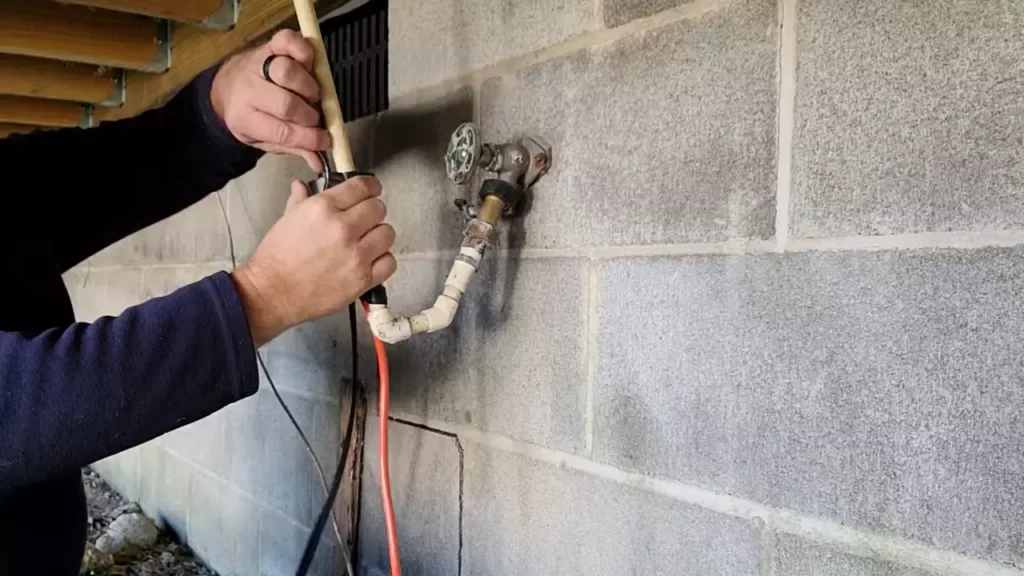
Securing the tape with adhesive or electrical tape
To ensure the heat tape stays in place, it’s recommended to secure it with adhesive or electrical tape. This will provide additional support and prevent the heat tape from unraveling or shifting. Wrap the adhesive or electrical tape over the heat tape, securing it firmly to the pipe. This extra layer of protection will help keep the heat tape in place and maintain its effectiveness.
Connecting the power supply to the heat tape
Once the heat tape is securely wrapped around the water pipe, it’s time to connect it to a power source. There are two options for powering heat tape: plugin or hardwired. Plugin heat tape is simple to install as it plugs directly into a nearby electrical outlet. On the other hand, hardwired heat tape requires professional electrical work and connects directly to the building’s electrical system.
Options for different power sources
If you choose to use plugin heat tape, ensure there is a nearby outlet available. It’s essential to consider safety precautions, such as using a Ground-Fault Circuit Interrupter (GFCI) outlet to minimize the risk of electrical hazards. Hardwired heat tape, on the other hand, is typically installed by an electrician and requires a dedicated circuit breaker. This ensures a reliable power supply specifically for the heat tape.
Testing the heat tape for functionality
After connecting the heat tape to a power supply, it’s essential to test its functionality. This step ensures that the heat tape is working correctly and providing the necessary heat to the water pipes. Run your hand along the length of the heat tape to feel for warmth. Additionally, you can use a non-contact infrared thermometer to measure the temperature of the pipe. If the heat tape is functioning properly, it should maintain a consistent and safe temperature.
By following these steps and carefully installing heat tape on your water pipes, you can effectively prevent freezing, reduce the risk of pipe bursts, and ensure a reliable water supply during cold winter months. Don’t forget to check the heat tape periodically throughout the season to verify its continued functionality. Stay warm and worry-free with the installation of heat tape on your water pipes.
Monitoring And Maintenance
Checking the heat tape regularly for signs of wear or damage
One of the key steps in ensuring the effectiveness of heat tape on water pipes is regular monitoring for any signs of wear or damage. This not only helps in maintaining the efficiency of the heat tape but also prevents any potential water damage caused by a malfunctioning system. It is crucial to perform visual inspections regularly to identify any visible wear and tear on the heat tape. Look out for frayed or exposed wires, cracks in the outer casing, or any other signs of damage. If you notice any of these issues, it is important to replace the heat tape immediately to prevent further damage. Remember, a small amount of time invested in checking the heat tape regularly can save you from costly repairs down the line.
Inspecting insulation for any gaps or deterioration
In addition to checking the heat tape itself, it is equally important to inspect the insulation surrounding the water pipes for any gaps or deterioration. Insulation plays a crucial role in retaining the heat generated by the tape and preventing heat loss. Any gaps or deterioration in the insulation can significantly reduce the efficiency of the heat tape system. Take the time to visually inspect the insulation for any signs of wear, such as cracks, gaps, or compression. Additionally, ensure that the insulation is properly installed and covers the entire length of the heat tape. If you come across any issues with the insulation, promptly replace or repair it to maintain the proper functionality of the heat tape system.
Performing annual maintenance to ensure continued effectiveness
To ensure the long-term effectiveness of the heat tape on your water pipes, it is essential to perform annual maintenance. Annual maintenance helps in identifying and addressing any potential problems before they escalate into major issues. During the maintenance process, check the heat tape connections for loose or corroded terminals, and ensure they are secure and tightly fastened. Inspect the overall system for any signs of leaks or water damage.
Additionally, clean the heat tape and remove any debris or dirt that may have accumulated over time. Regular maintenance not only ensures the continued effectiveness but also extends the lifespan of the heat tape system, saving you both time and money in the long run.
By regularly checking the heat tape for signs of wear or damage, inspecting the insulation for any gaps or deterioration, and performing annual maintenance, you can ensure the efficient functioning of your heat tape system. Remember, proactive monitoring and maintenance are key to preventing potential water damage and maintaining the effectiveness of your water pipe heat tape installation.
Safety Precautions And Considerations
Understanding the Hazards Associated with Heat Tape Installation
Installing heat tape on water pipes is a simple and effective way to prevent freezing, but it’s important to be aware of the potential hazards involved. By understanding and taking appropriate safety precautions, you can ensure a smooth installation process while minimizing any risks.
Electrical Safety Precautions
Before starting the installation, it is crucial to focus on electrical safety to avoid any accidents or injuries. Here are some important precautions to keep in mind:
- Make sure to turn off the electricity supply to the area where you will be working. This can be done by switching off the circuit breaker that controls the electrical outlet where the heat tape will be plugged in.
- Inspect the power cord and heat tape for any signs of damage. If you notice any frayed wires, exposed conductors, or other issues, do not proceed with the installation and replace the damaged parts.
- Use an outlet equipped with ground fault circuit interrupter (GFCI) protection. This will help prevent electrical shocks and reduce the risk of accidents.
- Do not overload the electrical circuit by plugging in multiple devices on the same outlet. Refer to the manufacturer’s instructions for the recommended load capacity and adhere to it.
Fire Safety Measures
While installing heat tape on water pipes, it’s also essential to take fire safety measures into consideration. Here are some precautions to keep your property safe:
- Keep flammable materials away from the heat tape and the pipes. This includes any nearby insulation, paper, or other combustible substances. Maintaining a clear area around the installation site will help prevent fire hazards.
- Regularly inspect the installation for any signs of overheating, such as hot spots, discoloration, or melting. If you notice any of these indicators, immediately disconnect the heat tape and consult a professional to address the issue.
- Do not use damaged or old heat tape that does not meet the manufacturer’s recommended specifications. Using faulty tape can increase the risk of fire and should be replaced.
Following Manufacturer’s Instructions Closely to Prevent Accidents
To ensure a safe installation process, it is vital to follow the manufacturer’s instructions closely. These instructions are specifically designed to prevent accidents and protect both you and your property. Here are some key points to keep in mind:
- Read the instruction manual thoroughly before starting the installation. Familiarize yourself with the product’s specifications, recommended usage, and any specific safety precautions provided.
- Pay special attention to the recommended positioning and spacing of the heat tape along the pipe. Improper placement can lead to inadequate heat distribution or potential damage to the pipe.
- Avoid exceeding the recommended length of the heat tape to prevent overheating and potential fire hazards. Cutting or extending the tape beyond the manufacturer’s guidelines can compromise its effectiveness and safety.
- If you encounter any difficulties or questions during the installation process, do not hesitate to contact the manufacturer’s customer support for assistance or clarification. They are there to help you ensure a safe and successful installation.
By understanding the hazards associated with heat tape installation and following these safety precautions and considerations, you can confidently protect your water pipes from freezing while maintaining a safe environment in your home or property.
Frequently Asked Questions Of How To Install Heat Tape On Water Pipes
How Do I Put Heat Tape On Water Pipes?
To put heat tape on water pipes, follow these steps: 1. Clean the pipes thoroughly. 2. Measure the length of the pipes and cut the heat tape accordingly. 3. Wrap the heat tape around the pipes, ensuring it overlaps slightly. 4.
Secure the tape with electrical tape or zip ties. 5. Plug in the heat tape and monitor it regularly to ensure proper functioning and prevent any issues.
Can You Leave Heat Tape Plugged In?
Yes, you can leave heat tape plugged in.
Why Not Wrap Heat Tape On Pipes?
Wrapping heat tape on pipes is not recommended because it can cause overheating and potential fire hazards. The tape needs proper ventilation to prevent heat buildup. Instead, consider using insulation or pipe sleeves to protect your pipes against freezing temperatures.
Can Pipes Still Freeze With Heat Tape?
Yes, pipes can still freeze with heat tape.
Conclusion
Congratulations! You’ve successfully learned how to install heat tape on water pipes. By following the step-by-step instructions and safety precautions outlined in this blog post, you can effectively protect your pipes from freezing temperatures. Remember, regular maintenance and monitoring is essential to ensure the heat tape is working properly.
Keep your pipes warm and your worries at bay with this simple DIY solution. Stay warm and enjoy peace of mind throughout the winter months!