To install foil insulation on walls, first, clean the surface thoroughly and ensure it is dry. Then, cut the foil to the size required, attach it to the wall using adhesive or staples, and seal any gaps for maximum effectiveness.
Foil insulation is a cost-effective and energy-efficient solution that helps to regulate the temperature and reduce heat loss in buildings. Whether you are looking to insulate your home or a commercial space, installing foil insulation on walls can provide numerous benefits.
We will discuss the step-by-step process of how to install foil insulation on walls effectively. By following these instructions, you can enhance the thermal performance of your walls and create a more comfortable living or working environment. So, let’s delve into the details of installing foil insulation on walls and reap the rewards it offers.
Understanding The Benefits Of Foil Insulation On Walls
Insulation materials and their impact on energy efficiency
Before delving into the benefits of foil insulation on walls, it is crucial to understand how different insulation materials can impact the overall energy efficiency of a building. Insulation plays a vital role in reducing heat transfer through walls, ceilings, and floors. By minimizing the amount of heat that escapes during colder months and preventing excessive heat from entering during warmer months, insulation helps maintain a comfortable indoor temperature while reducing the need for excessive heating or cooling.
There are various types of insulation materials available in the market, each with its own unique properties and energy-saving benefits. Common insulation materials include fiberglass, cellulose, foam board, and spray foam. These materials are effective in reducing heat transfer, but there is another innovative solution that offers additional advantages – foil insulation.
Introduction to foil insulation and its unique features
Foil insulation, also known as reflective insulation, is a popular option for many homeowners due to its exceptional thermal performance and unique features. Unlike traditional insulation materials, foil insulation incorporates a layer of reflective foil which helps to create a radiant barrier. This barrier reflects heat, preventing it from passing through the walls and into the building interior.
One of the key advantages of foil insulation is its ability to effectively block radiant heat. This means that during summer months when the sun’s rays are at their strongest, foil insulation helps to keep the indoor space cooler by reflecting the heat back. In winter, when indoor heating is essential, the foil insulation acts as a barrier, reducing heat loss and maintaining a warm and cozy environment.
Another significant benefit of foil insulation is its durability. The reflective foil layer is resistant to tearing and damage, ensuring that the insulation remains intact and effective over time. Additionally, foil insulation is non-combustible, making it a safer option compared to other insulation materials.
Furthermore, foil insulation is easy to install, lightweight, and flexible, making it suitable for a wide range of applications. Whether you are insulating a residential home or a commercial building, foil insulation can be seamlessly integrated into the walls with minimal effort.
Overall, the use of foil insulation on walls provides an efficient and cost-effective solution for improving energy efficiency in buildings. By effectively reducing heat transfer, foil insulation helps homeowners save on energy costs while creating a more comfortable living environment all year round.
Factors To Consider Before Installing Foil Insulation On Walls
You’ve made the decision to install foil insulation on your walls, but before diving into the project, it’s important to consider a few key factors. Assessing the existing wall structure and insulation, as well as identifying areas for potential installation, are crucial steps that will ensure the effectiveness and efficiency of your insulation. Let’s take a closer look at each of these factors:
Assessing the existing wall structure and insulation
Before installing foil insulation, it’s essential to fully understand the current state of your walls. **Assessing the existing wall structure and insulation** will help you determine the best approach for installing foil insulation. Consider the following points:
- Examine the thickness and condition of your walls: Ensure that the walls are in good condition and can support the additional weight of foil insulation.
- Evaluate the existing insulation: Determine whether your walls already have insulation installed. If so, you need to determine its condition and compatibility with foil insulation.
- Identify any structural issues: Look for any cracks, leaks, or damage that may need to be addressed before installing foil insulation.
By thoroughly assessing the existing wall structure and insulation, you can address any potential issues and ensure a smooth and successful installation process.
Identifying areas for potential installation
Once you’ve evaluated the existing wall structure and insulation, the next step is to identify areas for potential installation Here’s what you need to consider:
- Focus on areas with minimal insulation: Check for areas where the existing insulation is inadequate or absent, as these areas will benefit the most from the added insulation provided by foil.
- Pay attention to rooms with temperature variations: If you have rooms that tend to be significantly hotter or colder than the rest, these can be areas where foil insulation will make a noticeable difference.
- Consider moisture-prone areas: Kitchens, bathrooms, and laundry rooms are often subject to moisture buildup. Applying foil insulation in these areas can help prevent mold and mildew growth.
By targeting specific areas for foil insulation, you can maximize its effectiveness and minimize unnecessary installation costs and efforts.
Step-By-Step Guide To Installing Foil Insulation On Walls
Installing foil insulation on walls is a great way to enhance energy efficiency and reduce heat loss in your home. This step-by-step guide will walk you through the process, from preparing the wall surface to ensuring proper insulation coverage and sealing gaps. With these simple instructions, you’ll be able to effectively install foil insulation and enjoy a more comfortable environment.
Preparing the wall surface for installation
Before you begin installing foil insulation on your walls, it’s important to prepare the wall surface. Follow these steps to ensure a proper installation:
- Clean the wall surface thoroughly, removing any dirt, dust, or debris. This will help the foil insulation adhere properly.
- If there are any existing holes or cracks on the wall, patch them up with spackle or caulk. Smooth the surface to create a flat and even base for the insulation.
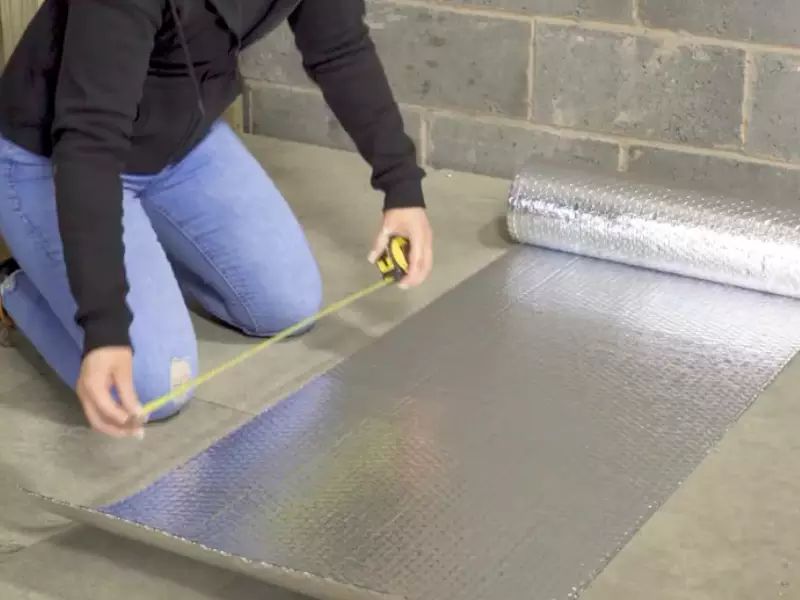
- Measure the dimensions of the wall and cut the foil insulation panels accordingly, leaving a small allowance for trimming and overlap. This will ensure a snug fit once installed.
Cutting and fitting the foil insulation panels
Once the wall surface is prepared, it’s time to cut and fit the foil insulation panels. Follow these steps for accurate installation:
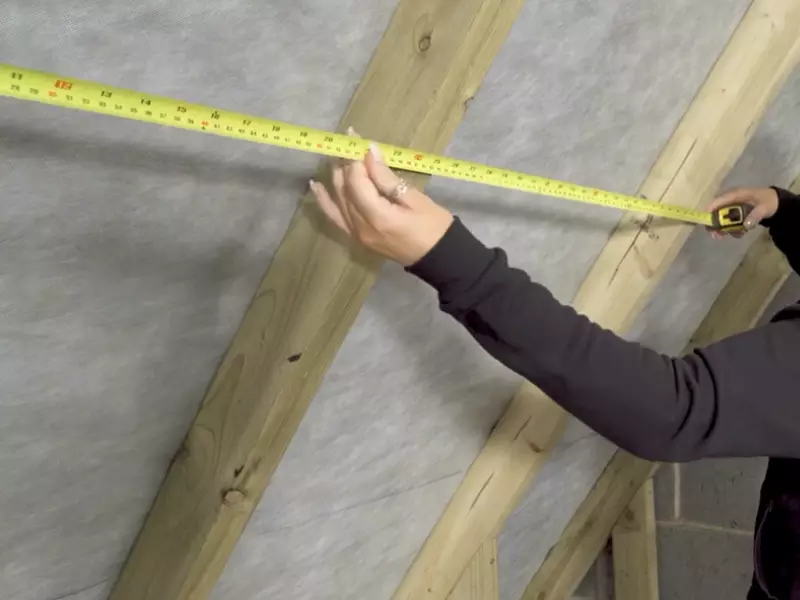
- Measure the height and width of the wall and transfer these measurements onto the foil insulation panels.
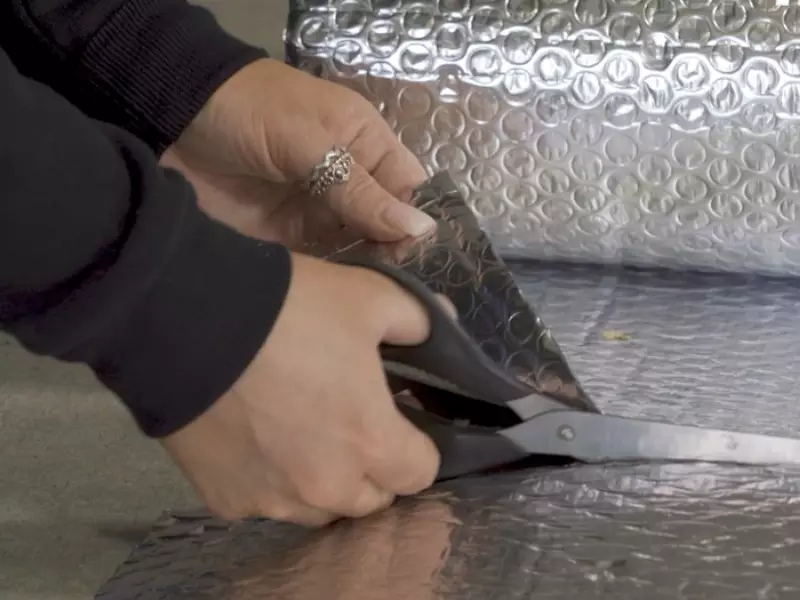
- Using a utility knife, carefully cut along the marked measurements to create panels that fit the wall perfectly.
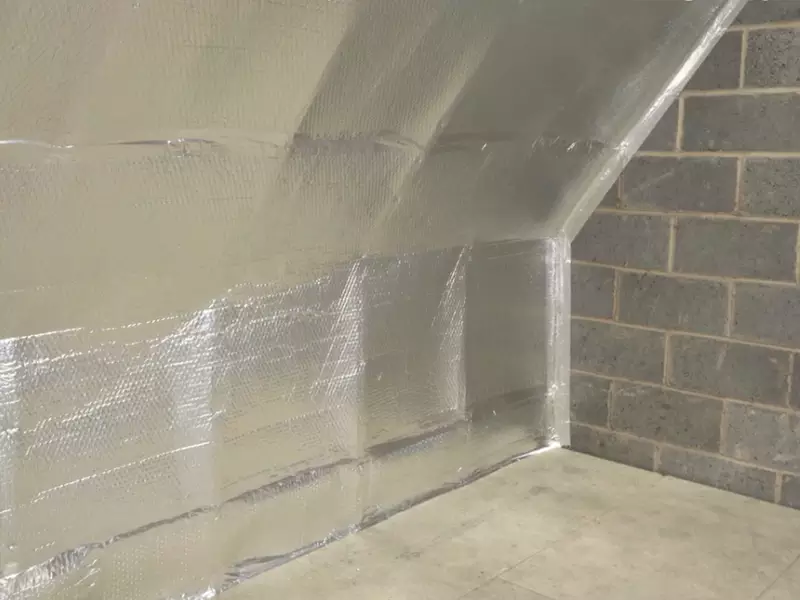
- Fit each panel onto the wall, starting from the top and working your way down. Ensure that the panels overlap slightly to form a tight seal.
Securing the panels to the wall surface
To secure the foil insulation panels onto the wall surface, follow these steps:
- Apply an adhesive recommended for foil insulation to the back of each panel.
- Press the panel firmly onto the wall, starting from one corner and smoothing it out towards the edges. Ensure there are no air bubbles or wrinkles.
- For additional support, use mechanical fasteners, such as screws or nails, to secure the panels in place. Place them at regular intervals along the edges and corners.
Ensuring proper insulation coverage and sealing gaps
After securing the foil insulation panels, it’s crucial to ensure proper insulation coverage and seal any gaps for maximum effectiveness. Here’s what you need to do:
- Inspect the wall surface to ensure there are no gaps or overlaps between the panels. If any gaps are present, use additional foil insulation pieces to fill them in.
- Seal the edges and corners of the foil insulation panels using aluminum foil tape or an appropriate sealing material. This will create an airtight barrier and prevent heat loss.
- Double-check the entire wall surface to ensure there are no gaps or loose areas. Properly sealed and covered insulation will provide optimal energy efficiency.
By following this step-by-step guide, you can easily install foil insulation on walls and improve the energy efficiency of your home. Enjoy a more comfortable living space and reduced energy bills with this simple yet effective insulation solution.
Tips And Best Practices For Installing Foil Insulation On Walls
Proper installation of foil insulation on walls is crucial to maximizing its effectiveness and ensuring energy efficiency in your home. By following these tips and best practices, you can achieve a successful installation that helps to regulate temperature, reduce energy consumption, and improve comfort levels.
Proper handling and storage of foil insulation materials
To ensure the integrity and performance of your foil insulation, it is important to handle and store the materials correctly. Here are some tips:
- Store the foil insulation rolls in a clean and dry area, away from moisture, direct sunlight, and extreme temperatures.
- Avoid any sharp objects or rough handling that may damage the surface of the foil insulation.
- If the foil insulation becomes wrinkled or creased during storage or transportation, gently smooth it out before installation to maximize its effectiveness.
- Always follow the manufacturer’s guidelines for handling and storage to avoid any potential damage to the foil insulation.
Avoiding common installation mistakes
Proper installation techniques are key to ensuring the effectiveness of your foil insulation. Here are some common mistakes to avoid:
- Make sure to measure and cut the foil insulation accurately to fit the wall dimensions. Cutting it too short or leaving gaps can compromise its insulating properties.
- Secure the foil insulation firmly to the wall using adhesives or staples, ensuring there are no air leaks or loose sections.
- Properly seal any joints or seams in the foil insulation using HVAC tape or foil insulation tape to prevent air leakage.
- When installing foil insulation on exterior walls, ensure that the insulation is protected from moisture by using a vapor barrier or installing it in a well-ventilated area.
Ensuring adequate ventilation and moisture control
Proper ventilation and moisture control are essential when installing foil insulation on walls. Consider the following tips:
- Ensure that there is adequate air circulation between the foil insulation and the wall surface, especially in areas prone to condensation.
- Install a vapor barrier between the foil insulation and the interior wall surface to prevent moisture buildup and potential damage.
- Inspect your walls for any signs of existing moisture or leaks before installing the foil insulation. Address any underlying issues before proceeding.
- Consider consulting a professional for guidance on proper ventilation and moisture control in areas where moisture problems are common, such as bathrooms and kitchens.
By following these tips and best practices, you can ensure a successful installation of foil insulation on your walls, providing an effective barrier against heat loss or gain and contributing to energy savings in your home.
Maintaining And Maximizing The Efficiency Of Foil Insulation On Walls
Installing foil insulation on walls is a great way to increase energy efficiency and reduce heat loss or gain in your home. However, to ensure that the insulation continues to perform optimally, it’s important to implement regular inspection and maintenance routines, as well as monitor energy usage and cost savings. In this section, we will explore these key steps to help you maintain and maximize the efficiency of foil insulation on walls.
Regular inspection and maintenance routines
Regular inspection and maintenance of your foil insulation on walls not only helps identify any issues early on but also ensures its long-term effectiveness. Here are some recommendations to keep in mind:
- Inspect the walls regularly, checking for any signs of damage, moisture, or wear and tear. Look for any gaps, tears, or loose seams in the foil insulation.
- Repair any damaged areas promptly. Use foil tape to seal any gaps, tears, or loose seams. This will help maintain the integrity of the insulation and prevent heat transfer.
- Keep the walls clean and free from dust or debris. Vacuum or wipe down the walls periodically to remove any dirt or obstructions that may affect the insulation’s performance.
- Ensure proper ventilation in the room. Good airflow helps prevent moisture buildup and condensation, which can adversely impact foil insulation.
- Consider hiring a professional for an annual inspection. They can identify any potential issues and provide expert guidance on maintaining your foil insulation.
Monitoring energy usage and cost savings
One of the main benefits of foil insulation on walls is its potential to save energy and reduce utility costs. Monitoring your energy usage and cost savings can help you assess the effectiveness of the insulation and identify opportunities for improvement. Here’s how you can track and analyze this data:
| Step | Action |
|---|---|
| Step 1 | Record your energy usage before installing foil insulation. |
| Step 2 | Calculate your average energy consumption over a specific period (e.g., monthly or annually) and compare it to the pre-installation data. |
| Step 3 | Calculate the cost savings achieved after installing the foil insulation. |
| Step 4 | Compare the cost savings with the initial installation cost to determine the return on investment (ROI). |
| Step 5 | Continue monitoring and recording your energy usage and cost savings periodically. |
By consistently monitoring your energy usage and cost savings, you can evaluate the effectiveness of your foil insulation and make informed decisions to improve its efficiency further.
Remember, maintaining and maximizing the efficiency of foil insulation on walls requires regular inspection, prompt repairs, and monitoring of energy usage and cost savings. By implementing these practices, you can ensure optimal performance and enjoy the benefits of energy-efficient living.
Frequently Asked Questions Of How To Install Foil Insulation On Walls
How Do You Install Foil Insulation On A Wall?
To install foil insulation on a wall, follow these steps:
1. Clean the wall surface thoroughly.
2. Measure and cut the foil insulation to fit the wall.
3. Apply adhesive or double-sided tape to the back of the insulation.
4. Press the insulation onto the wall.
5. Use a roller or squeegee to smooth out any air bubbles. Done!
Can You Use Foil Insulation On Walls?
Yes, foil insulation can be used on walls. It helps to reflect heat and improve energy efficiency. Foil insulation is often installed behind drywall or attached directly to the wall. It can be a cost-effective way to reduce heat transfer and improve insulation in homes or buildings.
Which Side Of the Foil Insulation Faces Out?
The shiny side of the foil insulation faces out to reflect heat away and keep the space cooler.
Does Foil Insulation Need Air Gap On Both Sides?
Foil insulation requires an air gap on at least one side for proper functioning.
Conclusion
To ensure an energy-efficient home, installing foil insulation on walls is a smart choice. By reflecting heat back into the room, it helps maintain a comfortable temperature while reducing energy consumption. With the easy-to-follow steps outlined in this guide, you can confidently install foil insulation on your walls and reap the benefits of lower energy bills and improved insulation.
Don’t delay; start saving energy today!