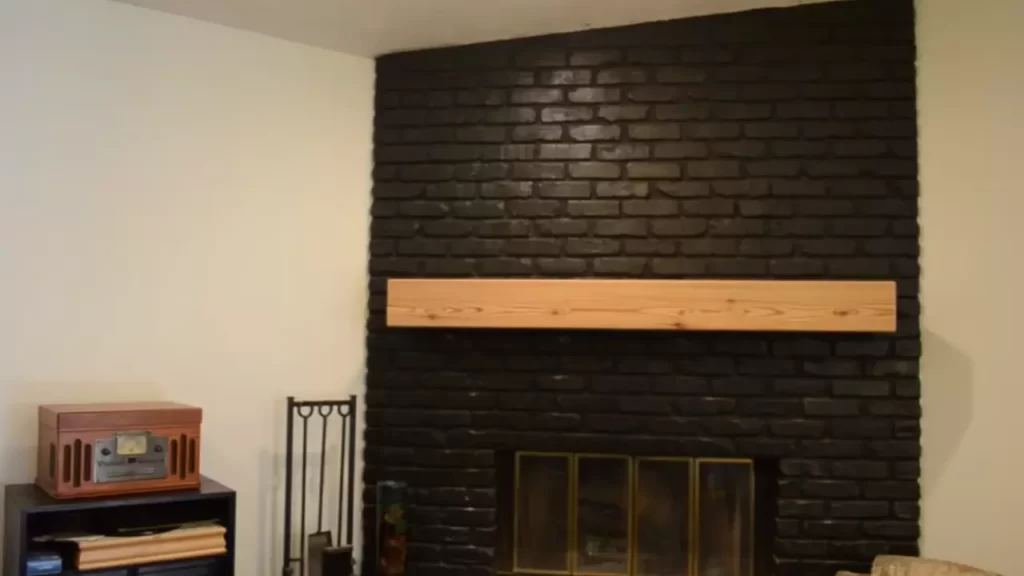
To install a fireplace mantel on brick, first, use a stud finder to locate the studs in the wall behind the brick. Then, use a drill to attach a ledger board to the wall, ensuring it is level.
Finally, attach the mantel to the ledger board using screws and adhesive, making sure it is securely in place. A fireplace mantel can add charm and character to any interior space. Installing a mantel on a brick fireplace may seem daunting, but with the right tools and steps, it can be a straightforward process.
By following these simple guidelines, you can successfully install a fireplace mantel on brick and enhance the aesthetic appeal of your home. We will provide a step-by-step guide to help you through the installation process. So, let’s get started and transform your fireplace into a stunning focal point.
Factors To Consider When Selecting A Mantel
When it comes to installing a fireplace mantel on brick, there are several factors you should consider before making your final decision. From the style and design to the size and proportion, each element plays a crucial role in creating the perfect focal point in your living space. Additionally, material options are another key consideration, as they can drastically impact the overall aesthetic and durability of your mantel.
Style and Design
One of the first things to think about when selecting a mantel is the style and design that will best complement your existing decor. The mantel should seamlessly integrate with the overall theme of the room, whether it’s modern, rustic, or traditional. Consider the architectural style of your home as well, as you want the mantel to enhance the overall aesthetic appeal.
Size and Proportion
The size and proportion of the mantel are crucial in achieving a visually balanced and harmonious look. The mantel should be proportional to the size of the fireplace and the room itself. An oversized mantel in a small room can overwhelm the space, while a small mantel in a large room may look out of place. Take accurate measurements of your fireplace and the surrounding area to ensure the mantel fits perfectly.
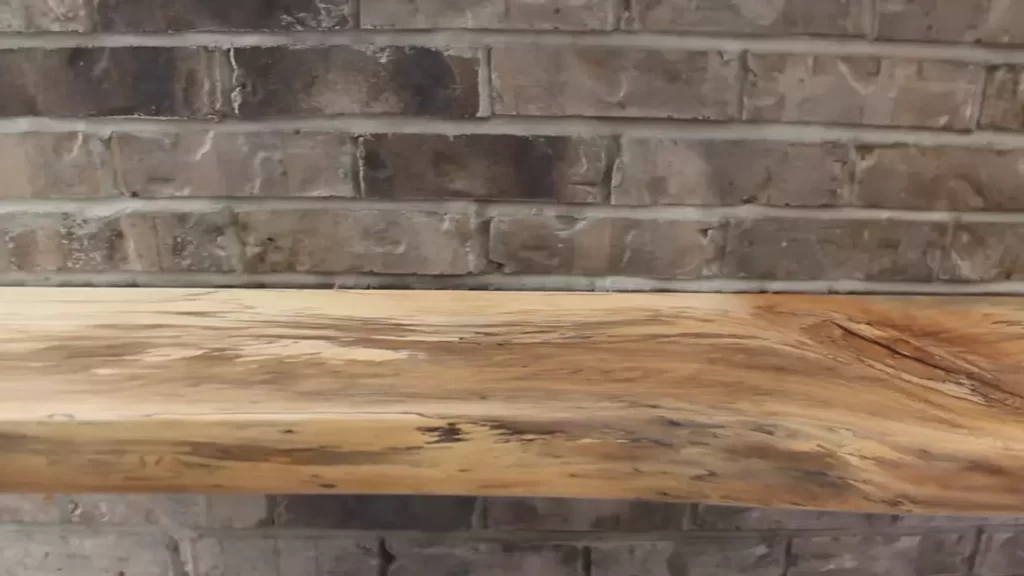
Material Options
The material you choose for your mantel can greatly impact its longevity and visual appeal. There are various options to choose from, including wood, stone, marble, or even reclaimed materials for a unique and eco-friendly touch. Each material has its own distinct characteristics, so it’s important to consider factors such as durability, maintenance requirements, and aesthetics when making your selection.
Here’s a breakdown of some common material options for fireplace mantels:
| Material | Pros | Cons |
|---|---|---|
| Wood | Timeless beauty, versatility, and customization options | May require periodic maintenance and can be susceptible to warping or damage |
| Stone | Durable, adds a natural and rustic charm | Can be more expensive and heavier to install |
| Marble | Elegant and luxurious appearance | Higher cost and can be prone to staining or scratching |
| Reclaimed Materials | Unique, environmentally friendly, and adds character | Availability may be limited, and matching pieces can be challenging |
By considering these factors – style and design, size and proportion, and material options – you can make an informed decision when selecting a mantel for your fireplace. Remember, the mantel is not only a functional addition but also a design statement that can enhance the overall ambiance of your living space.
Cleaning The Brick Surface
When it comes to installing a fireplace mantel on brick, one of the crucial steps is preparing the brick surface. Cleaning the brick surface thoroughly will ensure a strong and secure installation. In this section, we will discuss the important steps in cleaning the brick surface, including removing dust and debris, as well as removing any loose mortar.
Removing Dust and Debris
Before you begin installing the fireplace mantel, it’s essential to remove any dust and debris from the brick surface. Dust and debris can interfere with the adhesion of the adhesive or mortar, compromising the stability of the mantel.
To remove dust and debris effectively, follow these steps:
- Start by putting on safety goggles and a dust mask to protect yourself from dust and debris.
- Use a stiff-bristle brush or a vacuum cleaner with a brush attachment to sweep or vacuum the brick surface, removing loose dirt and dust.
- Pay special attention to the mortar joints and crevices, as they tend to accumulate more dust and debris. Use a narrow brush or a toothbrush to clean these hard-to-reach areas.
- For stubborn dirt or stains, mix a solution of mild soap and warm water. Dip a soft cloth or sponge into the soapy water and gently scrub the affected areas.
- Rinse the brick surface thoroughly with clean water to remove any soap residue.
- Allow the brick surface to dry completely before proceeding to the next step.
Removing Any Loose Mortar
In addition to removing dust and debris, it’s important to check for any loose mortar on the brick surface. Loose mortar can affect the stability of the mantel and should be addressed before installation.
Here’s how to remove loose mortar from the brick surface:
- Inspect the brick surface carefully, paying attention to the mortar joints.
- If you spot any loose or crumbling mortar, use a chisel and hammer to carefully chip away the affected mortar.
- Be cautious not to damage the surrounding bricks or mortar that is intact.
- Once you’ve removed the loose mortar, use a small brush or a vacuum cleaner to remove any debris or dust from the joints.
- Ensure that the joints are clean and free of any loose materials before proceeding with the mantel installation.
By thoroughly cleaning the brick surface, removing dust and debris, and addressing any loose mortar, you can create a solid foundation for installing your fireplace mantel on brick. Taking the time to clean and prepare the brick surface will help ensure a stable and visually appealing finished product.
Marking The Position On The Brick
Measuring and Leveling
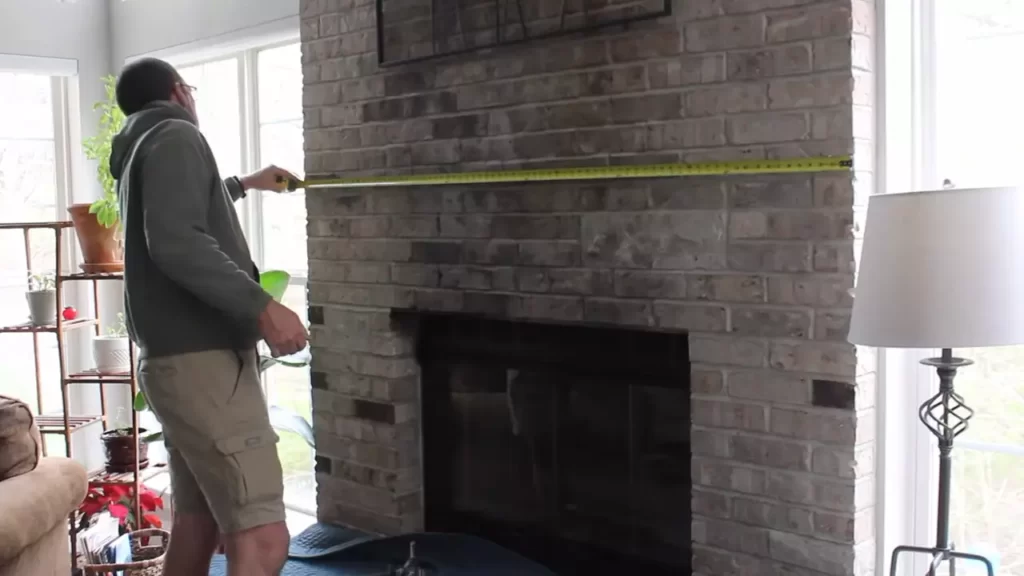
When it comes to installing a fireplace mantel on brick, one of the most crucial steps is marking the position on the brick. Before you can do this, it is important to measure and ensure that the mantel is level. A level mantel not only looks aesthetically pleasing but also ensures the stability and longevity of the installation.
Here’s how you can measure and level your fireplace mantel:
- Use a measuring tape to determine the desired height of the mantel from the floor. Measure and mark this height using a pencil or marker on both sides of the fireplace opening. This will serve as your reference point for the installation.
- Next, use a level to check if the markings are even and level. Adjust the markings as necessary to ensure that they are straight and evenly aligned. Double-checking the level will help you achieve a professional and visually appealing installation.
Using a Pencil or Marker to Mark the Position
Once you have measured and leveled the mantel, the next step is to mark the position on the brick. Here’s how you can do it with a pencil or marker:
- Start by placing the mantel against the wall, and aligning it with the previous markings. Ensure that it is centered and level.
- Once the mantel is in the desired position, use a pencil or marker to mark the top, bottom, and sides of the mantel on the brick. This will serve as your guide when installing the mantel securely.
- To create crisp and precise markings, you can utilize painter’s tape as a guide. Place the tape along the edges of the mantel and mark on top of it for clean and accurate lines.
Remember to take your time and double-check the positioning and levelness of the mantel before making any permanent markings. This will help you avoid any mistakes or misalignments during the installation process.
Attaching Mounting Brackets To The Brick
When it comes to installing a fireplace mantel on brick, one crucial step is attaching the mounting brackets securely. This ensures that your mantel is firmly supported and will stay in place for years to come. In this guide, we’ll walk you through each step of the process, starting with drilling holes in the brick and finishing with inserting anchors and screws.
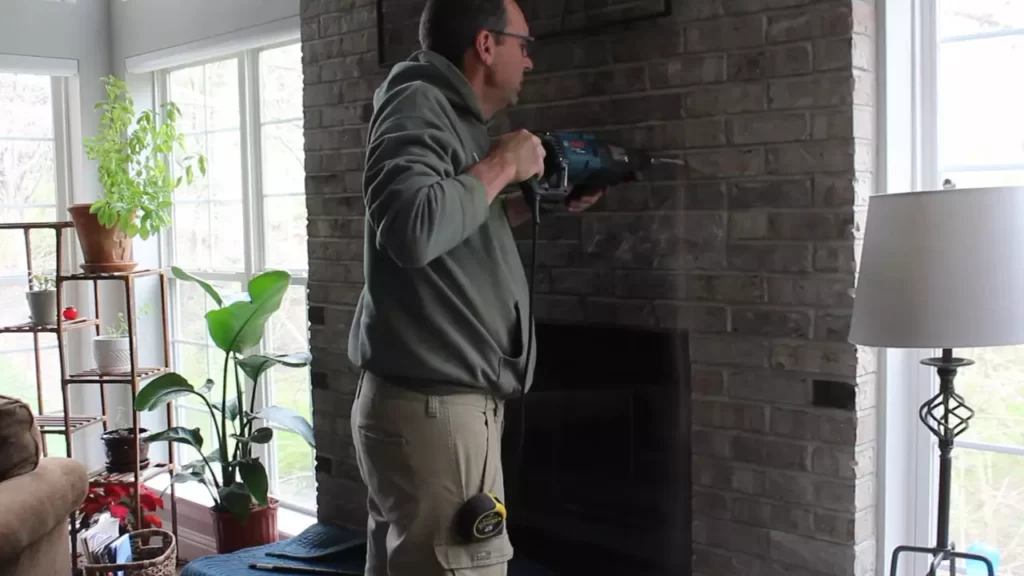
Drilling Holes in the Brick
The first step in attaching mounting brackets to the brick is drilling holes. To do this, you’ll need a masonry drill bit that is specifically designed for drilling into brick or concrete. Here’s how to proceed:
- Start by positioning the mounting bracket on the brick in the desired location. Ensure that it is level and aligned properly.
- Using a pencil, mark the spots on the brick where you need to drill the holes.
- Put on your safety goggles and insert the masonry drill bit into your power drill.
- Before you start drilling, make sure the drill is set to the correct rotation and speed for masonry. Start slow and gradually increase the speed.
- Position the drill bit on the marked spot and apply firm, steady pressure as you drill into the brick. Take your time to prevent the drill bit from overheating.
- Continue drilling until you reach the desired depth for your anchors.
Inserting Anchors and Screws
Once you’ve drilled the holes, the next step is to insert anchors and screws to secure the mounting brackets. Follow these steps:
- Remove any dust or debris from the holes by blowing on them or using a small brush.
- Take your anchors and gently tap them into the holes using a hammer. Make sure they fit snugly and are flush with the surface of the brick.
- Place the mounting brackets over the anchors, ensuring they align with the drilled holes.
- Using a screwdriver or power drill, insert screws through the holes in the brackets and tighten them into the anchors.
- Check that the brackets are securely attached to the brick by giving them a gentle tug. They should be firmly in place without any wobbling.
By following these steps, you’ll be able to attach the mounting brackets to the brick and prepare your fireplace mantel for installation. Remember, it’s essential to take your time and follow each step carefully to ensure a sturdy and safe installation. Once the brackets are securely in place, you can move on to mounting your mantel and adding the finishing touches to your fireplace.
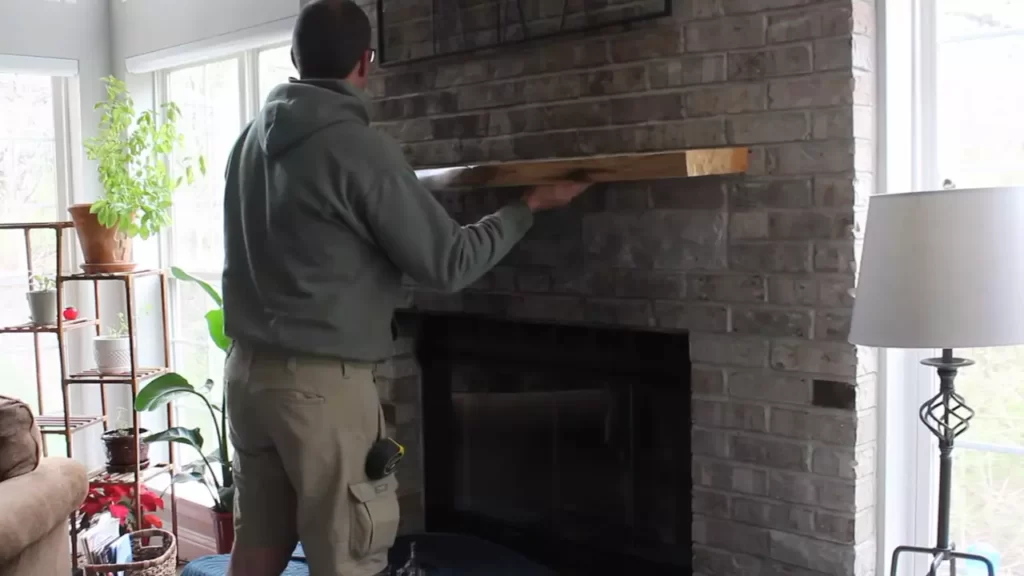
Placing The Mantel On The Brackets
Ensuring Proper Alignment and Leveling
Before placing the fireplace mantel on the brackets, it is crucial to ensure proper alignment and leveling. This will not only enhance the visual appeal of your fireplace but also ensure stability and safety. Here are the steps to follow:
- Measure the distance between the brackets to determine the exact placement for your mantel. This measurement will help you center the mantel properly.
- Use a level to check if the brackets are aligned horizontally. Adjust the position of the brackets if necessary to achieve a level surface.
- Similarly, use the level to check if the brackets are aligned vertically. This will ensure that the mantel is straight and not tilted.
- Make any adjustments needed to ensure proper alignment and leveling. It’s important to take your time during this step to get it right.
Securing the Mantel in Place
Once you have ensured proper alignment and leveling, it’s time to secure the fireplace mantel in place. Follow these steps:
- Apply adhesive to the top of the brackets. This will help create a strong bond between the mantel and the brackets.
- Place the mantel onto the brackets, aligning it with the measurements you previously determined. Press down firmly to ensure a secure fit.
- Use clamps to hold the mantel in place while the adhesive dries. This will prevent any accidental movement during the drying process.
- Allow the adhesive to dry completely as per the manufacturer’s instructions. This drying time will vary depending on the adhesive used, so be sure to read the label carefully.
- Once the adhesive is completely dry, remove the clamps and admire your beautifully installed fireplace mantel.
Installing a fireplace mantel on brick may seem like a daunting task, but with the right tools and steps, it can be done successfully. By ensuring proper alignment and leveling and securing the mantel in place, you can create a focal point that adds warmth and charm to your living space. Remember to follow the manufacturer’s instructions for the specific mantel and adhesive you are using to achieve the best results.
Filling In Screw Holes And Gaps
Using Wood Filler or Epoxy
One of the key steps in installing a fireplace mantel on brick is filling in screw holes and gaps to ensure a seamless and professional finish. To achieve this, you have a couple of options – using wood filler or epoxy. Both products have their own advantages, so choose the one that best suits your needs.
If you decide to go with wood filler, start by selecting a high-quality wood filler that closely matches the color of your fireplace mantel. This will help camouflage any filled areas and create a cohesive look. Using a putty knife, carefully fill in the screw holes and gaps with the wood filler, making sure to press it in firmly and remove any excess. Allow the filler to dry completely before sanding and painting.
On the other hand, opting for epoxy can provide a more durable and sturdy solution. Epoxy is a two-part resin that, when mixed together, forms a strong and long-lasting material. To fill in the screw holes and gaps using epoxy, first, mix the two parts according to the manufacturer’s instructions. Using a small spatula or putty knife, apply the epoxy mixture into the holes and gaps, ensuring that it is evenly distributed. Allow the epoxy to cure completely before proceeding to the next step.
Sanding and Painting
Once the wood filler or epoxy has dried or cured, the next step is to sand the filled areas to create a smooth surface. Use fine-grit sandpaper and gently sand the filled spots until they are level with the surrounding surface of the mantel. Take care not to sand too aggressively, as this may damage the finish of the mantel.
After sanding, it’s time to apply a fresh coat of paint to your fireplace mantel. Choose a high-quality paint that is suitable for the material of your mantel and complements the overall aesthetic of your space. Whether you prefer a natural wood finish or a bold color, be sure to apply the paint in thin, even coats for the best results. Allow each coat to dry before applying the next one, and follow the manufacturer’s instructions for drying times.
Remember, filling in screw holes and gaps and ensuring a smooth, painted finish is essential for achieving a professional and polished look when installing a fireplace mantel on brick. Take your time and pay attention to detail during this step to achieve the best possible results.
Ensuring Proper Distance From Fireplace Opening
The proper distance from the fireplace opening is crucial when installing a fireplace mantel on brick. This ensures safety and functionality, allowing you to enjoy the warmth and beauty of your fireplace without any risks. In this section, we’ll explore two important factors to consider when determining the appropriate distance: following the manufacturer’s guidelines and installing heat-resistant materials.
Following the Manufacturer’s Guidelines
When it comes to installing a fireplace mantel on brick, it’s essential to carefully follow the manufacturer’s guidelines. Every fireplace mantel may come with specific instructions regarding the recommended distance from the fireplace opening. These guidelines are designed to ensure the safety and efficient use of your fireplace.
The manufacturer’s guidelines will typically consider several factors, such as the type and size of the fireplace and the specific model of the mantel. Adhering to these guidelines guarantees that you keep the appropriate space for heat dispersion and prevent any potential damage caused by excessive heat reaching the mantel.
Installing Heat-resistant Materials
In addition to following the manufacturer’s guidelines, installing heat-resistant materials is another crucial step in ensuring the proper distance from the fireplace opening. The intense heat generated by a fireplace can pose a risk to combustible materials near the fireplace, including a mantel.
When installing a mantel on brick, consider utilizing heat-resistant materials. These materials can withstand high temperatures and minimize the risk of fire hazards. Options like stone, marble, or concrete can provide both aesthetic appeal and durability in your mantel design. Additionally, using non-combustible construction materials such as metal studs or cement board for the mantel framework further enhances the fire resistance and safety of the installation.
Final Inspection And Maintenance Tips
Once you have successfully installed your fireplace mantel on brick, it’s crucial to perform a final inspection and establish a maintenance routine. This will help you ensure the stability and longevity of your fireplace mantel while keeping it in pristine condition. By following these simple steps, you can enjoy your beautifully adorned fireplace for years to come!
Checking for Stability and Leveling
Before you consider your fireplace mantel installation complete, it’s vital to check for stability and ensure that it is properly leveled. A stable and level mantel not only enhances the aesthetic appeal but also prevents any potential safety hazards. Here’s how you can easily inspect the stability and leveling of your fireplace mantel:
- Place a level on top of the mantel, both vertically and horizontally, to check for any unevenness.
- Using shims or adjustable brackets, make necessary adjustments to bring the mantel to a perfectly level position.
- Ensure that the mantel is securely fixed to the wall by gently pushing and pulling it. If you notice any wobbling or movement, reinforce it with additional support.
Regular Cleaning and Maintenance
To maintain the beauty and functionality of your fireplace mantel, regular cleaning and maintenance is essential. Here are some tips to keep your mantel looking its best:
- Dust the mantel regularly using a soft cloth or a feather duster to remove any accumulated debris.
- Avoid using abrasive cleaners or rough materials that may damage the surface of the mantel. Instead, use a mild soap solution and a soft cloth for gentle cleaning.
- Inspect the mantel periodically for any signs of wear or damage. If you notice any cracks, chips, or discoloration, take immediate action to address the issue.
- Consider applying a protective coat of polyurethane or a similar sealant to preserve the finish of your mantel and protect it from potential damage.
By incorporating these final inspection and maintenance tips into your fireplace mantel installation, you can ensure its stability, longevity, and overall appeal. Remember, a well-maintained mantel not only enhances the ambiance of your living space but also adds value to your home.
Frequently Asked Questions For How To Install Fireplace Mantel On Brick
How Do You Attach A Mantel To A Brick Fireplace?
Attach a mantel to a brick fireplace by following these steps:
- Measure the mantel’s placement on the fireplace.
- Use a masonry bit to drill holes into the brick.
- Insert wall anchors into the holes.
- Secure a mantel support bracket to the anchors.
- Attach the mantel to the bracket using screws or adhesive.
Can You Install A Mantle On A Brick Wall?
Yes, you can install a mantle on a brick wall. It is a popular choice and can enhance the aesthetic appeal of your fireplace. Make sure to use appropriate tools and techniques for secure installation.
How Is A Fireplace Mantel Mounted?
To mount a fireplace mantel, secure it to the wall using mounting brackets or anchors. Measure the height and width of the fireplace to determine the placement. Use a drill to create holes in the wall for the brackets or anchors.
Attach the mantel to the brackets or anchors using screws for a secure installation.
How Wide Should A Mantel Be On A Brick Fireplace?
A mantel on a brick fireplace should be wide enough to proportionally fit the size of the fireplace. Typically, a mantel that extends 3-6 inches on each side of the fireplace is recommended. It’s important to consider the overall aesthetic and balance of the space when determining the width of the mantel.
Conclusion
Installing a fireplace mantel on brick requires careful planning and execution. By following the step-by-step instructions mentioned in this blog post, you can successfully enhance the look and functionality of your fireplace. Remember to gather the necessary tools, measure correctly, use a strong adhesive, and secure the mantel firmly to the brick.
With these tips, you’ll be able to enjoy a beautiful and functional fireplace mantel in no time.