To install a ductless heat pump, hire a professional HVAC technician who will assess your space, recommend the right unit size, mount the indoor and outdoor units, connect the refrigerant lines, and test the system for proper operation. This process ensures a successful and efficient installation that will provide heating and cooling for your home or business.
Ductless heat pumps are an effective solution for heating and cooling spaces without the need for ductwork. With their compact design and versatile installation options, these systems are gaining popularity among homeowners and business owners looking for energy-efficient HVAC solutions.
If you’re considering installing a ductless heat pump, it’s essential to understand the process and hire a professional technician to ensure a successful installation. We will provide a step-by-step guide to help you navigate the installation process, ensuring optimal performance and comfort for your space. Save time and money while enjoying the benefits of a ductless heat pump with these expert tips.
Factors To Consider When Selecting A Ductless Heat Pump
When it comes to selecting a ductless heat pump for your home, there are several important factors to consider. The right choice will ensure optimal heating and cooling performance, energy efficiency, and overall comfort. In this article, we will explore the key considerations when selecting a ductless heat pump.
Size and capacity requirements
The first factor to consider is the size and capacity requirements of the ductless heat pump. Proper sizing is crucial to ensure that the heat pump effectively heats and cools the space. An undersized unit may struggle to reach the desired temperature, while an oversized unit may cycle on and off frequently, resulting in energy wastage and reduced comfort.
When determining the size and capacity requirements, it’s essential to consider the square footage of the area, insulation levels, ceiling height, and the number of windows in the space. Consulting with a professional HVAC technician can help ensure accurate calculations and proper sizing.
Energy efficiency ratings
Energy efficiency plays a significant role in the long-term cost savings and environmental impact of a ductless heat pump. When selecting a unit, it’s important to look for a higher Seasonal Energy Efficiency Ratio (SEER) and Heating Seasonal Performance Factor (HSPF) rating. These ratings indicate the efficiency of the heat pump in cooling and heating modes, respectively.
Choosing a heat pump with a higher SEER and HSPF rating can significantly reduce energy consumption and lower your utility bills. It’s worth noting that while higher-rated units may have a higher upfront cost, the energy savings over time can outweigh the initial investment.
Noise levels
Noise levels can be an important consideration, especially if you require a quiet and peaceful indoor environment. Ductless heat pumps operate using both an indoor and outdoor unit. While the outdoor unit tends to produce more noise due to the compressor and fan, the indoor unit can also generate some noise during operation.
When selecting a ductless heat pump, look for units that have a lower decibel (dB) rating. Many manufacturers provide this information to help consumers make an informed decision. Additionally, you can consider units with features like “quiet” or “silent” mode, which can further reduce noise levels during operation.
Brand reputation and warranty
Brand reputation and warranty are crucial factors in selecting any HVAC equipment, including ductless heat pumps. It’s essential to choose a reputable brand known for manufacturing high-quality and reliable products. A reputable brand is more likely to have a robust support system in place, including readily available spare parts and knowledgeable technicians.
Furthermore, reviewing the warranty provided by the manufacturer is vital. A comprehensive warranty can provide peace of mind and protect your investment. Look for warranties that cover both the indoor and outdoor units, as well as the compressor, which is often the most critical component.
In conclusion, when selecting a ductless heat pump, consider the size and capacity requirements, energy efficiency ratings, noise levels, and brand reputation and warranty. Taking these factors into account will help you make an informed decision and ensure optimal comfort and performance.
Sizing Guide: Determining The Correct Size For Your Space
Calculating the Heating and Cooling Load
When it comes to installing a ductless heat pump, determining the correct size for your space is crucial for optimal performance and energy efficiency. The first step in this process is calculating the heating and cooling load of your area.
The heating load refers to the amount of heat needed to keep your space warm during the coldest days, while the cooling load determines the amount of cooling required to maintain a comfortable temperature in the hottest months. Calculating these loads accurately ensures that the ductless heat pump is neither undersized nor oversized for your space, leading to efficient heating and cooling.
Assessing the Insulation and Airflow of the Area
Another important factor to consider when sizing a ductless heat pump is the insulation and airflow of the area. Proper insulation helps in retaining the desired temperature and prevents any heat loss or gain from outside. Additionally, assessing the airflow ensures that the ductless heat pump can distribute warm or cool air evenly throughout the space.
Inspecting the insulation and airflow involves evaluating the windows, doors, walls, and ceilings for any potential leaks or insufficient insulation. This will help in determining the capacity required by the heat pump to effectively heat or cool your space.
Consulting a Professional for Accurate Measurements
While it’s possible to estimate the size of the ductless heat pump using calculators or general guidelines, consulting a professional is highly recommended for accurate measurements. An HVAC specialist has the expertise and tools to perform an in-depth analysis of your space and provide precise recommendations.
The professional will take into account various factors such as the square footage of your area, the layout of the space, ceiling height, and other specific requirements. By relying on their expertise, you can be confident that the ductless heat pump is sized correctly for your space, maximizing its efficiency and performance.
Remember, properly sizing your ductless heat pump plays a crucial role in its effectiveness and energy efficiency. Take the time to calculate the heating and cooling load, assess insulation and airflow, and consult a professional for accurate measurements. This way, you can enjoy optimal comfort and cost savings without any compromise.
Preparing The Indoor And Outdoor Locations For Installation
Installing a ductless heat pump is an efficient way to keep your home comfortable throughout the year. Before you begin the installation process, it is important to properly prepare the indoor and outdoor locations. This ensures a smooth and hassle-free installation, allowing your heat pump to function optimally. In this section, we will discuss three important steps to prepare the designated areas for installation.
Clearing the designated areas of any obstructions
Obstructions in the indoor and outdoor areas can hinder the installation process and affect the performance of your ductless heat pump. To begin, clear the indoor area of any furniture, decor, or any other objects that might hinder access to the installation location. This will make it easier for the technician to work and ensure a seamless installation.
Similarly, it is important to clear the outdoor area of any debris, plants, or other objects that might obstruct the airflow of the heat pump. Ensure there is ample space for the outdoor unit to be installed without any obstructions.
Ensuring proper ventilation and airflow
Proper ventilation and airflow are crucial for the efficient operation of your ductless heat pump. Check the indoor area for any vents, registers, or air returns that might be blocked by objects. Clear away any obstructions to ensure the smooth flow of air throughout your living space.
Additionally, make sure the outdoor unit is placed in a location where it has sufficient space for the airflow and ventilation. Avoid installing the unit near walls, fences, or any other structures that might restrict the airflow. This will ensure optimal performance and energy efficiency of your heat pump.
Installing a wall mounting bracket (if required)
In some cases, a wall mounting bracket might be required for the installation of your ductless heat pump. This bracket provides additional support and stability to the indoor unit. Before installing the heat pump, ensure that the wall mounting bracket is securely fixed to the designated indoor location. This will guarantee the safe and secure installation of your heat pump.
Once the wall mounting bracket is installed, the technician can proceed with the rest of the installation process, ensuring that your ductless heat pump is ready to provide you with efficient heating and cooling.
Gathering The Necessary Tools And Equipment
Before you start the installation process for your ductless heat pump, it’s important to gather all the necessary tools and equipment to ensure a smooth and efficient installation. In this section, we will outline the list of required tools, discuss safety equipment and precautions, and highlight the importance of acquiring the necessary refrigerant and electrical wiring. Let’s dive in!
List of required tools
Having the right tools at your disposal is crucial for a successful ductless heat pump installation. Here’s a list of tools you will need:
- Power drill: You’ll need a power drill to secure mounting brackets and create holes for running electrical wiring.
- Level: A level will help you ensure that the indoor and outdoor units are properly aligned.
- Measuring tape: Accurate measurements are essential to determine the optimal location for the indoor and outdoor units.
- Screwdriver set: Different sizes and types of screwdrivers will be needed throughout the installation process.
- Wire strippers: Wire strippers are essential for cutting and stripping electrical wires.
- Tubing cutter: A tubing cutter will be required to cut refrigerant lines to the appropriate length.
- Flaring tool: If your system requires flared connections, a flaring tool is necessary to create a secure connection between refrigerant lines.
- Vacuum pump: A vacuum pump is needed to remove any air and moisture from the refrigerant lines before charging the system.
- Refrigerant manifold gauge set: This set will enable you to measure refrigerant pressure and ensure proper system operation.
- Adjustable wrench: An adjustable wrench will come in handy for tightening various connections.
- Pipe bender: If you need to bend refrigerant lines, a pipe bender is essential.
- Electrical tester: An electrical tester will help you verify proper voltage and identify any electrical issues.
- Insulation tape: Insulation tape is important for wrapping and insulating refrigerant lines to prevent heat loss.
Safety equipment and precautions
Ensuring safety during the installation process is crucial. Here are some safety equipment and precautions to keep in mind:
- Safety goggles: Protect your eyes from any debris or potential hazards during the installation.
- Gloves: Wear gloves to protect your hands from sharp edges and potential injuries.
- Protective clothing: It’s important to wear long-sleeved shirts and pants to safeguard your skin from any accidental contact.
- Ladder: A sturdy ladder will help you reach higher areas safely.
- Turn off power: Before starting any electrical work, make sure to turn off the power at the circuit breaker for your own safety.
- Follow manufacturer instructions: Always refer to the manufacturer’s instructions and guidelines for safe and proper installation.
- Work in pairs: Having an extra set of hands will not only make the installation process easier but also ensure safety.
Acquiring the necessary refrigerant and electrical wiring
Proper refrigerant and electrical wiring are essential for the efficient functioning of your ductless heat pump. Here’s what you need to know:
Refrigerant: Refrigerant is responsible for transferring heat between the indoor and outdoor units. It’s important to acquire the appropriate type and amount of refrigerant specified by the manufacturer. If you’re unsure, consult a professional HVAC technician.
Electrical wiring: Adequate electrical wiring is necessary to power your ductless heat pump. Ensure that the electrical wiring is correctly sized and meets local electrical codes. If you’re not confident in your electrical expertise, it’s advisable to hire a licensed electrician to perform this part of the installation.
By ensuring you have all the necessary tools, safety equipment, and proper refrigerant and electrical wiring, you’ll be well-prepared to start the installation process of your ductless heat pump. Let’s move on to the next step!
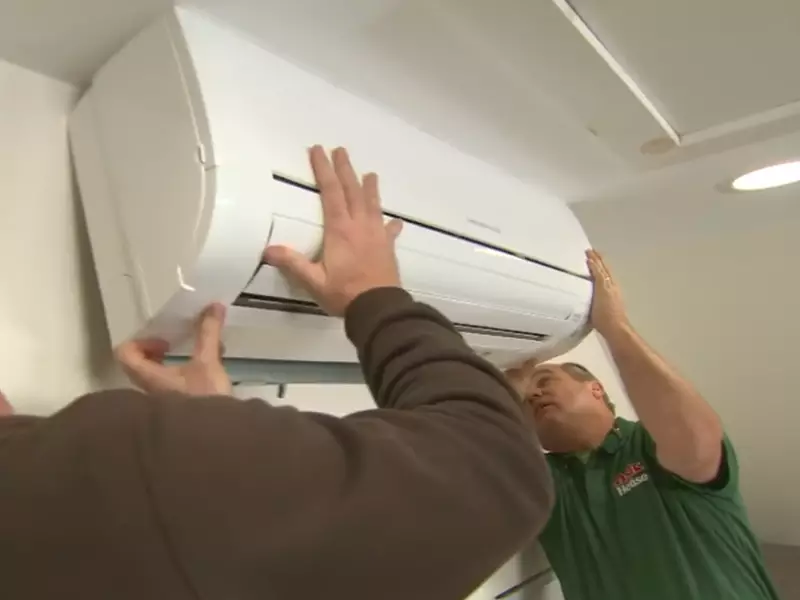
Mounting The Indoor Air Handling Unit
Properly mounting the indoor air handling unit is crucial for efficient air circulation and optimum performance of your ductless heat pump. In this section, we will discuss how to choose the ideal placement for efficient air circulation, how to install the wall sleeve, and how to securely mount the indoor unit.
Choosing the ideal placement for efficient air circulation
When choosing the placement for your indoor air handling unit, consider the following:
- Ensure the unit is positioned in a central location that allows for even air distribution throughout the room.
- Avoid placing the unit near sources of heat or cold, such as direct sunlight, windows, or drafts. This can affect its efficiency and performance.
- Make sure there is sufficient space around the unit for proper airflow and maintenance access.
Installing the wall sleeve
Before mounting the indoor unit, you need to install the wall sleeve. Follow these steps:
- Locate a suitable spot on the wall where the unit will be installed.
- Use a stud finder to identify the studs in the wall. Mark the location of the studs.
- Measure and mark the dimensions of the wall sleeve on the wall, ensuring it aligns with the studs.
- Use a reciprocating saw to cut through the wall, following the marked dimensions.
- Insert the wall sleeve into the opening, making sure it is level and securely positioned.
- Attach the wall sleeves to the studs using screws and a power drill.
- Seal any gaps around the wall sleeve with caulk to prevent air leakage.
Mounting the indoor unit securely
Once the wall sleeve is properly installed, you can proceed with mounting the indoor unit. Here’s how:
- Place the indoor unit onto the wall sleeve, ensuring it is level and aligned with the mounting brackets.
- Tighten the mounting bracket screws to securely hold the unit in place.
- Check the unit’s stability and make any adjustments if necessary.
- Connect the refrigerant lines and electrical wiring according to the manufacturer’s instructions.
- Once everything is properly connected, turn on the power and test the unit to ensure it is functioning correctly.
By following these steps, you will effectively mount the indoor air handling unit of your ductless heat pump, allowing for efficient air circulation and optimal performance. Remember to refer to the manufacturer’s instructions for specific guidelines and consult a professional if you are unsure about any step of the installation process.
Connecting The Indoor And Outdoor Units
Connecting the indoor and outdoor units is a crucial step in installing a ductless heat pump system. This section will guide you through the process of running the refrigerant lines through the wall or ceiling, connecting the electrical wiring, testing the connections for leaks, and conducting a pressure test. By following these steps accurately, you’ll ensure that your ductless heat pump operates efficiently and effectively.
Running the refrigerant lines through the wall or ceiling
To connect the indoor and outdoor units, start by running the refrigerant lines through the wall or ceiling. This step requires careful planning and precision to ensure a proper connection. Here’s a step-by-step guide:
- Locate the best spot on the wall or ceiling for the refrigerant lines to pass through. It should be away from any electrical or plumbing components to prevent potential damage.
- Measure the distance between the indoor and outdoor units. This measurement will help you determine the length of the refrigerant lines needed.
- Drill a hole through the wall or ceiling at the chosen spot. Use appropriate tools and techniques to create a clean hole without causing any structural damage.
- Thread the refrigerant lines through the hole carefully. Make sure to protect the lines from sharp edges to prevent any potential leaks or damages.
- Secure the refrigerant lines in place. Use clamps or brackets to keep the lines organized and prevent any unnecessary strain on the connections.
Connecting the electrical wiring
Once the refrigerant lines are properly installed, it’s time to connect the electrical wiring. Follow these steps to ensure a safe and reliable connection:
- Turn off the power supply before working with electrical wiring. This step is crucial to prevent any accidents or damages.
- Consult the manufacturer’s instructions to identify the electrical connections for the indoor and outdoor units.
- Strip the insulation from the electrical wires as instructed by the manufacturer.
- Connect the wires with the corresponding terminals, ensuring a secure connection.
- Use electrical tape or wire nuts to insulate the connections and protect them from moisture or accidental contact.
- Double-check all the connections to make sure they are tight and properly insulated.
Testing the connections for leaks and conducting a pressure test
After completing the refrigerant line and electrical wiring connections, it’s essential to test for leaks and conduct a pressure test to ensure the system operates smoothly. Follow these steps:
- Apply a solution of soapy water to all the refrigerant line connections.
- Closely observe the connections for any signs of bubbles. If you notice bubbles forming, it indicates a leak that needs to be addressed.
- Fix any leaks by tightening the connections or applying appropriate sealants as recommended by the manufacturer.
- Once the connections are confirmed leak-free, conduct a pressure test. This test involves pressurizing the system to verify its ability to hold the required pressure without any leaks.
- Refer to the manufacturer’s instructions for specific pressure testing procedures and recommended pressure levels.
- If the pressure test is successful, you can proceed with the installation process. If any issues arise, consult a professional for further assistance.
By following these steps, you’ll successfully connect the indoor and outdoor units of your ductless heat pump system. Remember to double-check all the connections and ensure that everything is securely fastened before proceeding to the next steps in the installation process.

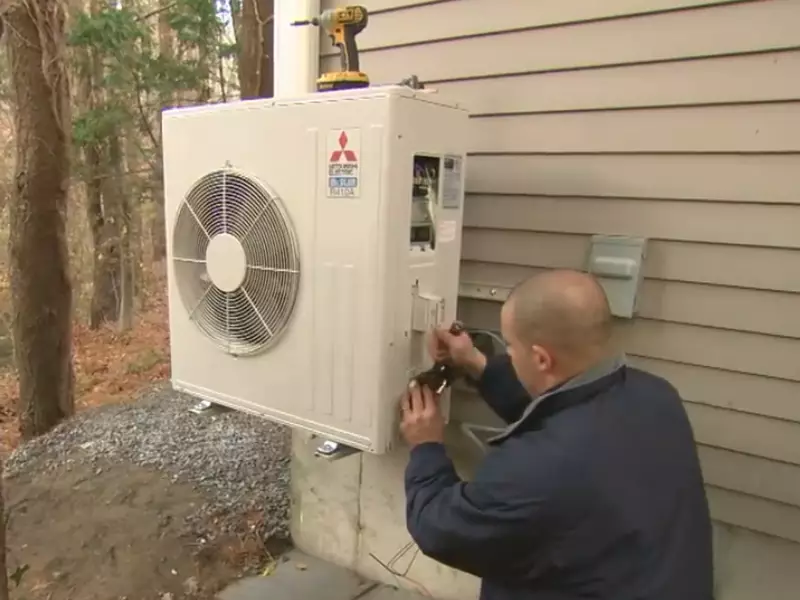
Installation Of The Outdoor Condenser Unit
Proper installation of the outdoor condenser unit is essential for the optimal performance of a ductless heat pump system. The outdoor unit is responsible for releasing heat in the cooling mode and absorbing heat in the heating mode. This section will guide you through the crucial steps of installing the outdoor condenser unit, ensuring a safe and efficient system.
Selecting an Appropriate Location for the Outdoor Unit
When it comes to selecting the location for your outdoor condenser unit, there are a few factors to consider. First, choose a spot that is easily accessible for maintenance and repairs. You don’t want to place it in a tight corner where it will be difficult to reach when needed.
Second, ensure proper clearance around the unit. It should be positioned at least two feet away from any obstructions, such as walls, fences, or vegetation. This will ensure efficient airflow and allow for easy servicing.
Placing the Unit on a Stable and Leveled Surface
Next, it is crucial to place the outdoor condenser unit on a stable and leveled surface. This will prevent any vibrations or movement that could impact its performance and durability. A concrete pad or a sturdy metal stand can be used to provide a stable foundation for the unit.
Using a leveling tool, ensure that the unit is perfectly level in both directions. This will optimize its functionality and prevent any potential issues.
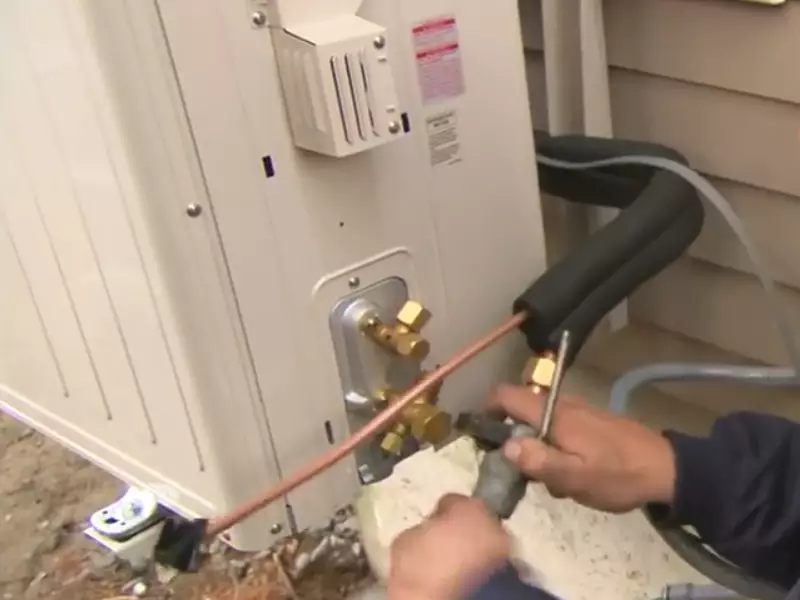
Connecting the Refrigerant Lines and Electrical Wiring
Now comes the crucial step of connecting the refrigerant lines and electrical wiring to the outdoor condenser unit. It is essential to follow the manufacturer’s instructions and use the appropriate tools for this task.
First, connect the refrigerant lines according to the specifications provided. Make sure all connections are tight and properly sealed to avoid any refrigerant leaks.
Second, connect the electrical wiring, ensuring that all connections are secure. It is important to follow the electrical codes and guidelines to ensure safety.
| Refrigerant Line Connections | Electrical Wiring Connections |
|---|---|
|
|
By following these steps and adhering to the manufacturer’s instructions, you will ensure a successful installation of the outdoor condenser unit for your ductless heat pump system. This will contribute to the overall efficiency and longevity of the system, providing you with reliable heating and cooling throughout the year.
Electrical Wiring And Power Supply
When it comes to installing a ductless heat pump, ensuring proper electrical wiring and power supply is essential for the system to function efficiently. In this section, we will guide you through the steps of installing the subpanel and disconnect switch, connecting the outdoor unit to the power supply, and confirming proper electrical connections and grounding. By following these instructions carefully, you can ensure a safe and reliable power supply for your ductless heat pump.
Installing the Subpanel and Disconnect Switch
The first step in the electrical wiring process is to install the subpanel and disconnect the switch. The subpanel acts as the central control point for the electrical connections, while the disconnect switch allows you to easily turn off the power supply to the heat pump when needed. Here’s how you can install them:
- Choose a suitable location for the subpanel near the outdoor unit. Make sure it is easily accessible and protected from weather conditions.
- Mount the subpanel securely on the wall using appropriate fasteners.
- Connect the main power supply to the subpanel by running electrical wires from the main breaker box to the subpanel. Follow the local electrical codes and regulations.
- Install the disconnect switch next to the subpanel, ensuring that it is within easy reach.
Connecting the Outdoor Unit to the Power Supply
Once the subpanel and disconnect switch are in place, you can proceed with connecting the outdoor unit to the power supply. This step requires precision and attention to ensure a proper electrical connection. Follow these steps:
- Turn off the electrical power to the subpanel by switching off the appropriate breaker in the main breaker box.
- Remove the cover of the outdoor unit’s electrical box.
- Connect the power supply wires to the corresponding terminals in the electrical box, following the manufacturer’s instructions.
- Tighten the wire connections securely using the appropriate tools, ensuring there are no loose or exposed wires.
- Replace the cover of the electrical box, making sure it is properly sealed to protect the wires from moisture or debris.
Confirming Proper Electrical Connections and Grounding
After completing the electrical wiring, it’s crucial to confirm that all connections are secure and properly grounded. This step ensures the safety and performance of your ductless heat pump. Here’s how you can do it:
- Double-check all electrical connections in the subpanel, disconnect switch, and outdoor unit’s electrical box. Make sure there are no loose or damaged wires.
- Inspect the grounding wire and verify that it is securely connected to the grounding terminal in the subpanel and outdoor unit’s electrical box.
- Test the electrical circuit by turning on the power to the subpanel and disconnect switch. Ensure that the ductless heat pump receives power and functions properly.
By following these steps and confirming proper electrical connections and grounding, you can ensure a safe and efficient power supply for your ductless heat pump. If you are unsure about any electrical work, it is always recommended to seek the assistance of a professional electrician to ensure a proper installation.
Refrigerant Charge And Pressure Adjustment
One crucial aspect of installing a ductless heat pump is ensuring the refrigerant charge and pressure are properly adjusted. This step is essential for the system’s efficiency and optimal performance. In this section, we will delve into how to check the refrigerant charge levels, adjust the pressure following the manufacturer’s guidelines, and verify the optimal operating conditions.
Checking the refrigerant charge levels
To start, you must carefully inspect the refrigerant charge levels in your ductless heat pump system. Accurate refrigerant charge ensures the efficient transfer of heat and provides comfort in your home or office. Here’s a step-by-step guide on how to check the refrigerant charge:
- Firstly, make sure the heat pump is turned off. It is vital to assess the refrigerant charge when the system is not in operation.
- Next, locate the service valves on the outdoor unit. These valves control the flow of refrigerant in the system.
- Using a refrigerant pressure gauge, attach it to the service valve ports – the high-pressure port and the low-pressure port.
- Once connected, record the pressure readings indicated on the gauge for both the high and low-pressure sides.
- Compare the recorded pressures to the manufacturer’s recommended levels provided in the system’s documentation or the guidelines supplied with the heat pump.
By following these steps, you can ensure that the refrigerant charge in your ductless heat pump is within the specified levels.
Adjusting the pressure using manufacturer guidelines
If the pressure readings from the previous step indicate that the refrigerant charge is not within the recommended range, adjustments are necessary. Here’s how you can adjust the pressure:
- Consult the manufacturer’s guidelines or the system’s documentation to determine the correct adjustment method and the tools required.
- Typically, adjusting the refrigerant pressure involves manipulating the service valves. These valves regulate the flow of refrigerant into the evaporator and condenser coils.
- Use the appropriate tools specified in the guidelines to make the necessary adjustments to the service valves.
- Monitor the pressure readings on the gauge as you make adjustments, ensuring they fall within the recommended range.
Keep in mind that precise adjustments are crucial to maintain the optimal performance of your ductless heat pump system. Incorrect pressure adjustments can potentially lead to poor efficiency and even system malfunction.
Verifying the optimal operating conditions
After adjusting the refrigerant pressure, it is vital to verify the optimal operating conditions of your ductless heat pump. This step helps ensure that the system is functioning effectively. Here are a few key factors to consider while verifying the optimal operating conditions:
- Check the temperature of the air blowing from the unit. The air should be warm during heating mode and cool during cooling mode.
- Ensure there are no unusual noises or vibrations originating from the heat pump. Any unusual sounds indicate a potential problem that should be addressed.
- Monitor the pressure and temperature readings on the gauges to ensure they remain stable within the recommended range.
- Inspect the air filters and clean or replace them as necessary. Clogged filters can obstruct airflow, affecting the system’s performance.
By taking these steps to verify the optimal operating conditions of your ductless heat pump, you can guarantee its efficiency and long-term functionality.
Thorough System Test And Inspection
The thorough system test and inspection is a crucial step in the installation process of a ductless heat pump. It ensures that the system is functioning properly, eliminates any potential issues, and guarantees the installation is of high quality and meets safety standards. In this section, we will discuss the important aspects of the system test and inspection.
Testing the heating and cooling functions
One of the key elements of the system test and inspection is to ensure that both the heating and cooling functions of the ductless heat pump are working correctly. This involves activating the heat mode and verifying that warm air is being produced efficiently. Similarly, the cooling mode should be activated to confirm that cool air is being circulated effectively throughout the room. By testing these functions, any issues or malfunctions can be identified and resolved promptly.
Checking for any air leaks or abnormal noises
Another crucial step is to thoroughly inspect the installation for any air leaks or abnormal noises. Leaks can reduce the system’s efficiency and result in energy wastage. To check for leaks, a professional technician will carefully examine all connections, joints, and seals, ensuring they are properly sealed and airtight. Additionally, they will listen for any abnormal noises, which could indicate loose components or mechanical problems that need attention. Identifying and rectifying these issues will prevent further damage and ensure optimal system performance.
Inspecting the overall installation for quality and safety
During the system test and inspection, the overall installation is carefully inspected to ensure it adheres to high-quality and safety standards. The technician will evaluate the positioning and spacing of the indoor and outdoor units, making sure they are mounted securely and in the appropriate locations. They will also check the electrical connections, ensuring they are safely installed and meet all necessary codes and regulations. Inspecting the installation for quality and safety guarantees the longevity of the system and ensures the well-being of the occupants.
In conclusion, a thorough system test and inspection is an essential step in the installation process of a ductless heat pump. By testing the heating and cooling functions, checking for air leaks or abnormal noises, and inspecting the overall installation for quality and safety, any potential issues can be identified and resolved, ensuring optimal performance and peace of mind.
User Guidance And Maintenance Tips
Providing the user with instructions and guidelines
If you are planning to install a ductless heat pump in your home, it is essential to have a clear understanding of the process involved. To help you out, here are some user guidance and installation instructions:
- Choose the right location: Before you start installing the heat pump, decide on the ideal location where it will be most effective. Keep in mind factors such as the size of the room, the layout of your home, and the availability of electricity.
- Prepare the space: Once you have selected the location, make sure the area is clear and free from any obstructions. Remove any furniture or objects that may hinder the installation process.
- Mounting the indoor unit: Carefully follow the manufacturer’s instructions to mount the indoor unit on the wall. Ensure that it is securely fastened and levelled to guarantee optimal performance.
- Installing the outdoor unit: Find a suitable spot outside your home to install the outdoor unit. Make sure it is placed on a stable surface and has proper airflow to prevent any overheating issues.
- Connecting the refrigerant lines: Connect the refrigerant lines between the indoor and outdoor units. It is crucial to follow the specified guidelines and use the appropriate tools to ensure a secure and leak-free connection.
- Electrical connections: Connect the electrical wiring to the indoor and outdoor units while adhering to safety guidelines. It is recommended to consult a professional electrician to handle this step if you are not confident in your electrical skills.
- Test and fine-tune: Once the installation is complete, turn on the heat pump and test its functionality. Make any necessary adjustments or fine-tuning to ensure that it is operating efficiently.
Discussing the regular maintenance requirements
To keep your ductless heat pump operating at its best, regular maintenance is crucial. Here are some tips to help you maintain your system:
- Clean or replace air filters: Dirty or clogged filters can restrict airflow and reduce the efficiency of your heat pump. Clean or replace the filters regularly, following the manufacturer’s instructions.
- Inspect outdoor unit: Check the outdoor unit for any debris, leaves, or dirt that may have accumulated. Clear away any obstructions to ensure proper airflow.
- Inspect and clean indoor unit: Regularly inspect the indoor unit for dust or debris that may have accumulated. Use a soft cloth or brush to clean any dirt, ensuring that the vents and coils are clear.
- Check refrigerant levels: Low refrigerant levels can indicate a leak in the system. If you notice a drop in performance or cooling/heating capacity, contact a professional to inspect and recharge the refrigerant.
- Inspect electrical components: Periodically inspect the electrical connections and components for any signs of damage or wear. If you notice any issues, contact a qualified technician to address the problem.
- Schedule professional maintenance: It is recommended to schedule regular professional maintenance for your ductless heat pump. A trained technician can thoroughly inspect and service your system, helping to prevent potential problems and ensure optimal performance.
Offering troubleshooting advice for common issues
Even with regular maintenance, there may be instances when your ductless heat pump encounters common issues. Here are some troubleshooting tips:
| Issue | Troubleshooting |
|---|---|
| No Power | Check the electrical connections and ensure that power is reaching the unit. If necessary, reset the breaker and contact a professional if the issue persists. |
| Poor Cooling/Heating | Check the air filters and clean or replace them if necessary. Also, ensure that there are no blockages hindering airflow around the indoor and outdoor units. |
| Strange Noises | Inspect the unit for any loose components or debris that may be causing the noise. Tighten any loose screws and remove any obstructions. |
| Water Leaks | Check the drain line and remove any blockages. If the issue persists, contact a professional to inspect and repair the system. |
By following these user guidance and maintenance tips, you can ensure the proper installation, maintenance, and troubleshooting of your ductless heat pump. This will help you enjoy efficient heating and cooling throughout the seasons, contributing to a comfortable and energy-efficient home environment.
Frequently Asked Questions On How To Install Ductless Heat Pump
Can I Install A Ductless Heat Pump Myself?
No, it is not recommended to install a ductless heat pump yourself. It is a complex process that requires professional expertise to ensure proper installation, efficiency, and safety. Hiring a certified HVAC technician is the best way to guarantee a successful installation and avoid costly mistakes.
How Much Does It Cost To Install Ductless Heat?
The cost of installing ductless heat varies depending on factors like the size of the area, type of system, and additional features. Generally, you can expect to pay around $3,000 to $5,000 for the equipment and installation. However, the final price may be higher or lower based on your specific needs.
What Are The Cons To Ductless Heat Pumps?
Cons of ductless heat pumps include potential higher upfront costs, limited heating capacity in extreme cold climates, and the need for regular maintenance and cleaning. However, they offer energy efficiency, zoning options, and ease of installation compared to traditional heating systems.
Are Ductless Mini-Splits Hard To Install?
Ductless mini-splits are not hard to install. They come with detailed instructions and can be set up by a qualified technician. The installation process typically involves mounting the indoor and outdoor units, connecting the refrigerant lines, and configuring the system.
Professional assistance ensures correct installation and optimal performance.
Conclusion
Installing a ductless heat pump is a practical and energy-efficient solution to keep your home comfortable all year round. By following the step-by-step instructions in this guide, you can successfully install your own ductless heat pump without professional help. Remember to check the manufacturer’s instructions for specific requirements and safety precautions.
With proper installation, your ductless heat pump can provide reliable heating and cooling, while also lowering your energy bills. Enjoy the benefits of a comfortable and efficient home with a ductless heat pump installation.