To install drywall, watch a video guide. Master drywall installation with step-by-step instructions and tips from professionals.
Learn how to install drywall with the help of an instructional video. Drywall installation can be a challenging task if you don’t have the right knowledge and skills. However, by following a video guide, you can easily learn the techniques and tricks used by professionals.
This comprehensive video tutorial will walk you through each step of the process, from preparing the area to cutting and hanging the drywall sheets. You will also learn how to properly tape, mud, and sand the seams for a flawless finish. With this instructional video, you can achieve a professional-looking result on your drywall installation project.
Getting Started With Drywall Installation
When it comes to home renovation projects, installing drywall is a common task that can help transform a space. Whether you’re tackling a small repair or a complete renovation, knowing how to properly install drywall is crucial. In this guide, we will walk you through the steps of getting started with drywall installation, including the tools and materials you will need, how to prepare the workspace, and important safety precautions to keep in mind.
Tools and materials needed
Before you begin installing drywall, it’s important to gather all the necessary tools and materials. Here is a list of what you’ll need:
| Tools | Materials |
|
|
Preparing the workspace
Before diving into the installation process, you’ll need to prepare your workspace. Follow these steps to ensure a smooth installation:
- Clear the area: Remove any furniture or obstacles from the room to create a clean and open space.
- Measure and mark: Use a tape measure and pencil to mark where the drywall sheets will be installed, ensuring accurate measurements and a professional finish.
- Secure electrical wires: Safely secure any electrical wires that may be exposed, either by using wire staples or by consulting a professional electrician.
- Cut the drywall sheets: Use a T-square and utility knife to mark and cut the drywall sheets to the desired size.
- Install corner bead: Apply corner bead to the corners of the walls, ensuring a straight and finished edge.
Safety precautions
When working with drywall, it’s important to prioritize safety. Take these precautions to protect yourself and ensure a safe installation process:
- Wear safety goggles and a dust mask to protect your eyes and lungs from dust and debris.
- Use caution when handling heavy drywall sheets, and consider using a mechanical lift for larger sheets.
- Always use the appropriate tools for the job, such as a drywall saw or drill, to avoid accidents or damage.
- Avoid over-tightening screws or nails, as this can cause the drywall to crack or break.
- Keep the workspace well-ventilated by opening windows or using fans to minimize exposure to dust and fumes.
By following these steps and taking the necessary precautions, you’ll be well on your way to successfully installing drywall. Stay tuned for our next article in this series, where we will guide you through the step-by-step process of hanging and finishing drywall.
Understanding The Drywall Installation Process
Installing drywall is a crucial step in creating a smooth and polished finish for your walls or ceilings. Whether you are a seasoned DIY enthusiast or a novice homeowner, understanding the drywall installation process is essential. In this article, we will go through each step, from measuring and cutting the drywall panels to sanding and applying the finishing touches.
By following this guide, you will be well-equipped to tackle your next drywall installation project with confidence.
Measuring and Cutting the Drywall Panels
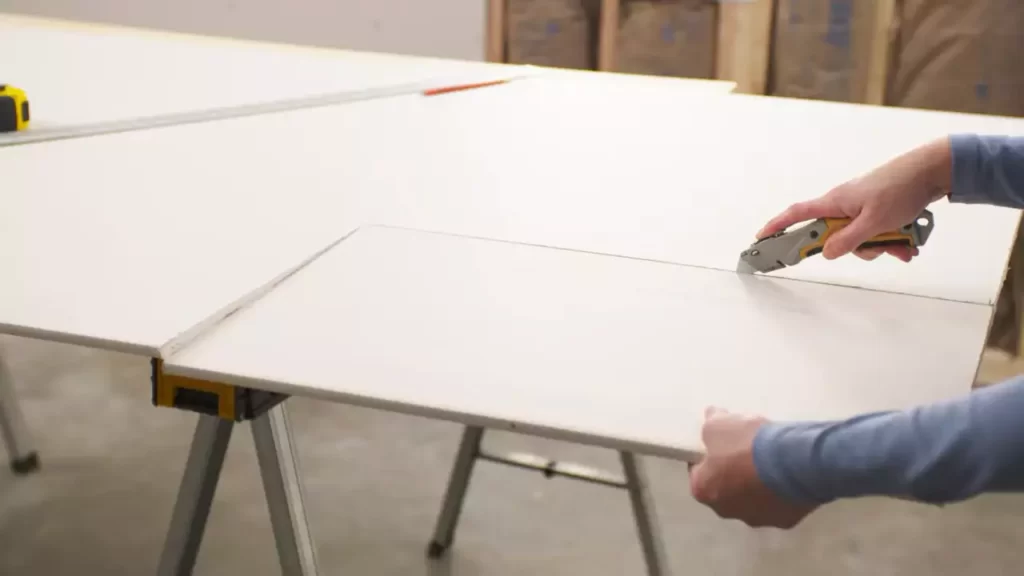
Accurate measurement is key to ensure a proper fit for your drywall panels. Start by measuring the length and height of the area where the drywall will be installed. Use a tape measure to get precise dimensions. With the measurements in hand, transfer them onto the drywall panels, using a pencil or marker.
Then, using a utility knife, carefully score the drywall along the marked lines. Gently snap the drywall along the scored line to separate it into individual panels.
Preparing the Drywall Panels for Installation
Before installing the drywall panels, it is crucial to prepare them properly. Inspect each panel for any dents, cracks, or irregularities. If any panel is damaged, replace it with a new one. Additionally, check the edges of the panels to ensure they are straight and free of debris. If needed, use a sanding block to smooth out any rough edges. Dust the panels to remove any loose particles that could affect the installation.
Securing the Drywall to the Walls or Ceiling
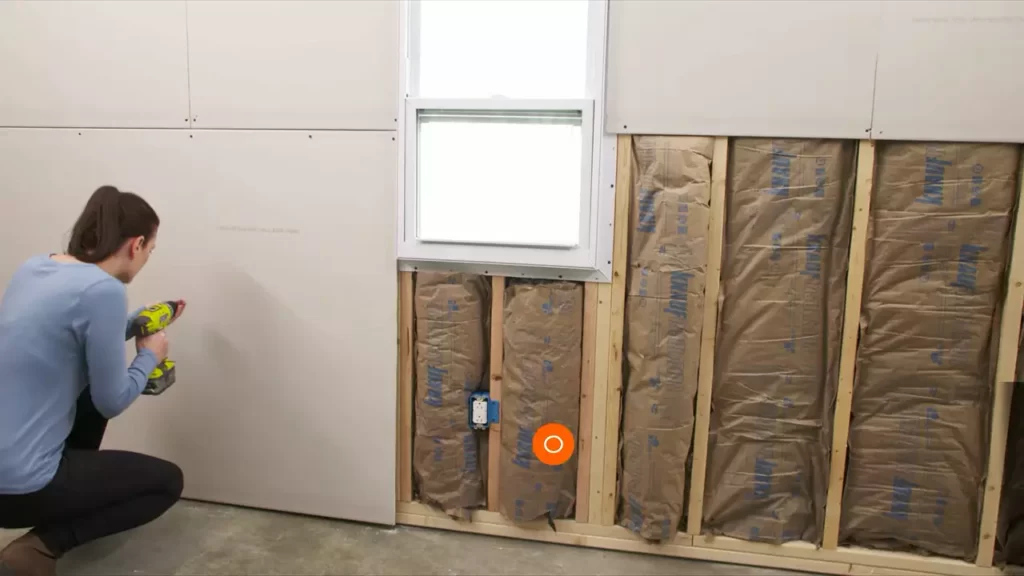
To secure the drywall panels to the walls or ceiling, start by applying construction adhesive along the studs or joists. This will ensure a strong bond between the drywall and the surface. Then, lift the drywall panel and carefully position it against the wall or ceiling, aligning it with the studs or joists.
Begin by screwing the drywall panel in place, starting from the center and working your way toward the edges. Repeat this process for each panel, making sure they are tightly secured.
Finishing the Seams and Joints
Finishing the seams and joints is crucial to create a seamless appearance. Start by applying joint compound to the seams, using a drywall knife. Place a strip of joint tape over the compound and press it firmly into place. Smooth out any excess compound, ensuring the tape is fully embedded. Allow the joint compound to dry completely before applying additional coats. Repeat this step until the seams and joints are smooth and invisible.
Sanding and Applying Finishing Touches
Once the joint compound is completely dry, it’s time to sand the surface to create a smooth finish. Use a medium-grit sandpaper to gently sand the seams and joints until they are flush with the rest of the drywall. Avoid applying too much pressure to prevent damaging the drywall. After sanding, apply a thin layer of joint compound over the seams and joints to fill any imperfections.
Sand again to achieve a flawless finish. Finally, wipe away any dust and debris before priming and painting the drywall.
Tips And Tricks For A Successful Drywall Installation
Installing drywall is a crucial step in creating a beautiful and sturdy wall surface. While it may seem like a simple task, there are several tips and tricks that can make the process go smoothly and ensure a successful installation. In this section, we will explore some of the key techniques for lifting and maneuvering drywall panels, overcoming obstacles and irregularities, and selecting the right type of drywall for your project.
Proper technique for lifting and maneuvering drywall panels
Lifting and maneuvering drywall panels can be physically demanding, but with the right technique, you can make the process much easier. Here are some tips to keep in mind:
- Start by assessing the weight of the drywall panel and make sure you have sufficient help if needed. Always lift with your legs, rather than your back, to avoid strain or injury.
- Use a sheetrock or drywall lift to hoist the panels into place. These handy tools can be rented from your local hardware store and make the task much more manageable.
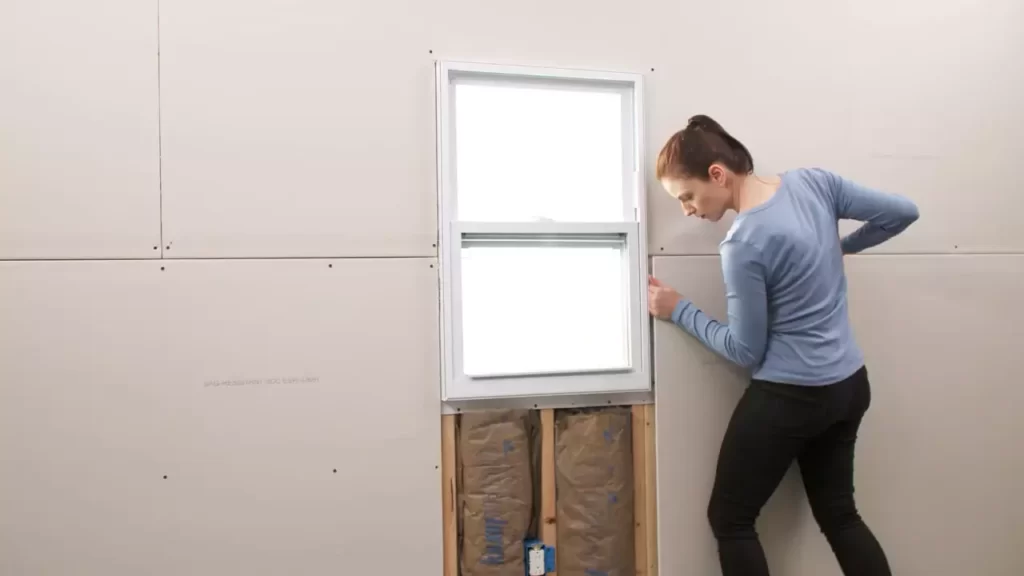
- When positioning the panel against the wall, make sure to align it properly and leave a 1/2-inch gap at the bottom to allow for expansion.
- Secure the panel by screwing it into the studs, starting from the center and working your way outwards. Use a power drill for efficient installation.
Dealing with obstacles and irregularities
During a drywall installation, you may encounter obstacles such as electrical outlets, pipes, or irregularities in the existing wall surface. Here are some tips to handle these challenges:
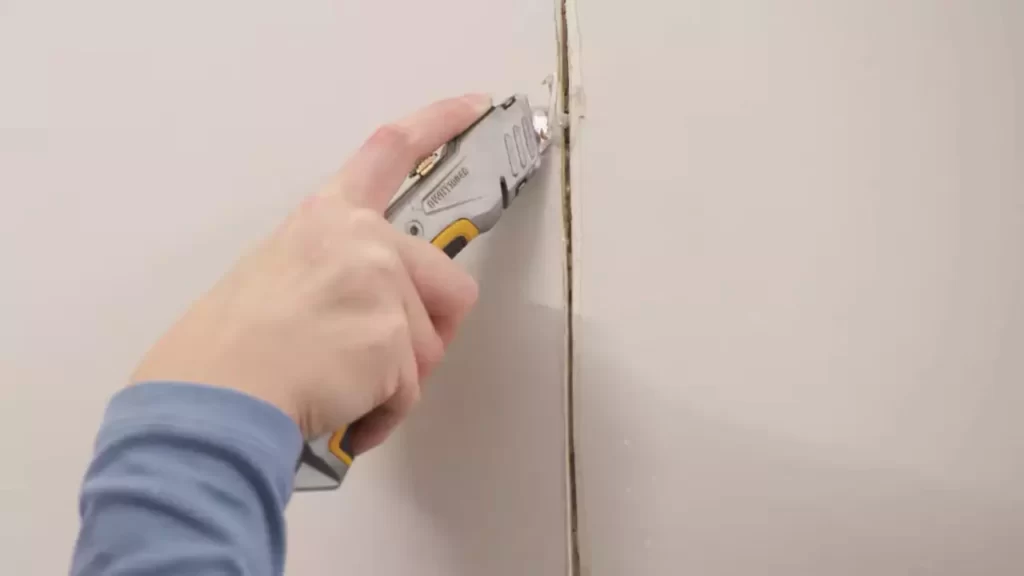
- If you come across an electrical outlet, use a utility knife to carefully cut around it, making sure to leave a slight overlap for a seamless finish.
- For pipes or other protrusions, mark the location and cut out a section from the drywall panel to accommodate them. Use a keyhole saw or rotary tool for precision.
- If the existing wall surface is uneven or has minor imperfections, consider using joint compound to fill in the gaps and create a smoother finish. Sand the surface after the compound dries to ensure a seamless appearance.
Choosing the right type of drywall for your project
Selecting the appropriate type of drywall is crucial for a successful installation. Consider the following factors:
| Type of Drywall | Recommended Location |
|---|---|
| Regular drywall (Type X) | General interior use |
| Greenboard drywall | Moisture-prone areas such as bathrooms and kitchens |
| Fire-resistant drywall (Type X) | Areas requiring enhanced fire protection, such as garages or near furnaces and fireplaces |
| Soundproof drywall | Noisy environments or rooms requiring sound insulation |
By choosing the right type of drywall for your specific project, you can ensure enhanced durability, safety, and functionality.
With these tips and tricks in mind, you are now well-equipped to tackle your drywall installation with confidence and achieve exceptional results. Remember to take your time, use proper techniques, and choose the right materials for a successful and visually appealing outcome.
Troubleshooting Common Issues In Drywall Installation
When it comes to installing drywall, even experienced DIYers can run into some common issues. Troubleshooting these issues can save you time, money, and frustration. In this section, we will discuss some of the most common problems that arise during drywall installation and provide you with practical solutions to address them. Whether you are dealing with warped or damaged panels, uneven seams and joints, or holes and dents in the drywall, we’ve got you covered.
Dealing with warped or damaged panels
Warped or damaged panels can be a challenge to work with during drywall installation. These issues can compromise the structural integrity of the wall and affect the overall finish. Here are some steps you can take to deal with this problem:
- Inspect each panel carefully before installation, looking for any signs of warping or damage. This includes checking for cracks, bends, or uneven surfaces.
- If you come across a warped panel, try to gently straighten it by applying pressure on the opposite sides. This can help bring it back to a more even shape.
- In case of severe warping, it may be necessary to replace the panel altogether. Measure and cut a new piece to fit the area.
- Ensure that all panels are properly secured to the wall studs or ceiling joists to minimize any movement that can further amplify the warping.
Correcting uneven seams and joints
Uneven seams and joints can result in unsightly gaps or bulges that are difficult to hide. To address this issue and achieve a smooth finish, follow these steps:
- Use a utility knife to cut away any excess drywall tape or compound that may have built up along the seams. This will help create a clean and even surface.
- Apply a thin layer of joint compound over the seams, using a drywall knife. Feather out the edges to blend it with the surrounding area.
- Allow the joint compound to dry completely. Sand the area gently with fine-grit sandpaper to achieve a smooth finish.
- Apply a second coat of joint compound if necessary, following the same process. Repeat until the seams are completely even.
Repairing holes or dents in the drywall
Holes or dents in the drywall can occur during installation or as a result of accidental damage. Here’s how you can repair them:
| To repair small holes: | To repair larger holes or dents: |
|
|
By following these troubleshooting tips, you can overcome common issues that may arise during drywall installation. Remember to take your time, be patient, and use the right tools and materials for the best results.
Enhancing The Aesthetics Of Your Drywall Installation
When it comes to renovating or building a new space, installing drywall is a key step in creating a beautiful and functional interior. However, the process doesn’t end with simply putting up the drywall. To truly enhance the aesthetics of your drywall installation, you need to consider priming and painting the drywall, adding texture or wallpaper for a unique look, and installing trim and molding for a polished finish. In this article, we will explore each of these aspects in detail, helping you achieve a professional and visually appealing result for your space.
Priming and Painting the Drywall
Priming and painting the drywall is an essential step to create an even and smooth surface, as well as to protect it from moisture and damage. Here’s a step-by-step guide on how to achieve a flawless paint job:
- Clean the drywall surface by removing any dust or debris using a broom or vacuum cleaner.
- Fill any gaps or imperfections in the drywall with a joint compound, using a putty knife to create a smooth finish.
- Once the compound is dry, sand the surface lightly to remove any roughness.
- Apply a coat of primer using a roller or paintbrush, ensuring full coverage.
- After the primer is dry, apply your chosen paint color, using a high-quality roller or paintbrush.
- Allow the paint to dry completely before applying a second coat, if necessary.
- If desired, add a protective top coat for added durability and longevity.
Adding Texture or Wallpaper
If you want to add a unique touch to your drywall, consider adding texture or wallpaper. Textured drywall can create depth and visual interest, while wallpaper allows for a wide range of designs and patterns. Here’s how you can achieve the desired effect:
- If you choose to add texture, use a drywall compound or texture spray to create the desired texture pattern, such as a swirl or stipple.
- Allow the textured surface to dry completely before priming and painting as mentioned before.
- If you prefer wallpaper, measure your wall accurately and cut the wallpaper accordingly.
- Apply wallpaper adhesive to the back of the wallpaper and carefully place it on the wall, smoothing out any bubbles or wrinkles.
- Use a wallpaper roller to ensure proper adhesion and trim any excess wallpaper.
Installing Trim and Molding
Installing trim and molding is the final step in achieving a polished look for your drywall installation. It not only adds a decorative element but also covers any rough edges and gaps. Here’s a simple guide to installing trim and molding:
- Measure and cut the trim or molding according to the length needed.
- Pre-paint or stain the trim or molding if desired.
- Apply adhesive or nails to attach the trim or molding to the drywall, ensuring it is level and straight.
- Use a caulk or wood filler to fill any gaps between the trim or molding and the drywall.
- Allow the caulk or wood filler to dry and then sand the surface for a smooth finish.
- Finally, paint or stain the trim or molding to match the surrounding surfaces.
By following these steps and paying attention to the details, you can truly enhance the aesthetics of your drywall installation. Whether it’s through priming and painting, adding texture or wallpaper, or installing trim and molding, each of these elements will contribute to a visually stunning result that will transform your space. So grab your tools and get ready to turn your drywall into a blank canvas for your creativity!
If you’re planning on installing drywall in your home or office, you probably have some questions. In this section, we’ll address some of the most commonly asked questions about drywall installation. From the time it takes to install drywall to the types of walls it can be installed on, we’ve got you covered. Read on to find out more.
Frequently Asked Questions Of How To Install Drywall Video
How Do You Install Drywall For Beginners?
To install drywall if you’re a beginner, follow these steps:
1. Measure and cut the drywall to fit the desired area.
2. Attach the drywall to the studs using screws or nails, leaving a small gap between panels.
3. Apply joint compound to seams and screw/nail heads, smoothing it out with a trowel.
4. Allow the compound to dry, then sand it down to create a smooth surface.
5. Finally, prime and paint the drywall for a finished look.
What Is The Correct Way To Install Drywall?
To correctly install drywall, follow these steps: Measure and cut the drywall to fit your space. Hold the drywall against the studs and secure with screws. Fill in the seams with joint compound, then sand and apply more compound if necessary.
Prime and paint the drywall for a finished look.
Is It Better To Hang Drywall Horizontally Or Vertically?
Hang drywall vertically as it provides better support for the seams and reduces the risk of sagging. It also minimizes the number of joints, resulting in a smoother finish.
How Do You Hang Drywall Step By Step?
To hang drywall, follow these steps: – Measure and cut drywall to fit the area. – Attach drywall to the wall or ceiling using screws or nails. – Tape the seams between drywall panels. – Apply joint compound to the seams and smooth it out.
– Sand the joints and apply a second coat of joint compound if needed.
Conclusion
To sum it up, installing drywall may seem like a daunting task at first, but with the right tools and step-by-step guidance, you can easily achieve professional results. From preparing the area to taping and mudding the joints, this video has provided a comprehensive tutorial for successfully installing drywall.
So go ahead, follow the instructions, and transform your space into a beautiful and functional one. Happy drywalling!