To install a dryer vent cover, start by positioning the cover over the vent opening and marking the screw holes. Then, drill pilot holes into the marked areas and secure the cover with screws, ensuring it’s tightly attached.
Reasons To Install A Dryer Vent Cover
Installing a dryer vent cover is an essential step in ensuring the proper functioning and safety of your dryer. A dryer vent cover serves as a protective barrier between your dryer and the outside environment, preventing potential hazards and damage. In this section, we will explore the importance of a dryer vent cover, the benefits it provides, and the role it plays in preventing safety hazards.
Importance of a dryer vent cover
A dryer vent cover is not just a decorative feature but a vital component of your dryer system. Here are a few reasons why installing a dryer vent cover is crucial:
- Prevents pests and critters: A dryer vent cover acts as a barrier, keeping unwanted pests, insects, and critters from entering your home through the dryer vent. It blocks their access, reducing the risk of infestation and damage to your property.
- Prevents outdoor elements: A dryer vent cover shields your dryer from outdoor elements such as rain, snow, debris, and leaves. These elements can clog the vent, disrupt the airflow, and even lead to potential damage to your dryer.
- Improves energy efficiency: By ensuring that the airflow in your dryer vent is unobstructed, a vent cover helps improve the overall energy efficiency of your dryer. This leads to shorter drying times, lower energy consumption, and reduced utility bills.
Benefits of installing a dryer vent cover
When you install a dryer vent cover, you can enjoy several benefits that contribute to the smooth operation and longevity of your dryer system. Here are some advantages:
- Enhanced safety: A proper dryer vent cover prevents lint buildup, reducing the risk of dryer fires. It also helps to maintain the optimal temperature of the dryer system, preventing overheating and potential hazards.
- Prolongs dryer lifespan: By keeping the outside elements and debris away from your dryer, a vent cover helps to extend the lifespan of your appliance. It reduces the chances of damage caused by weather conditions, pests, or obstructions in the vent.
- Easy maintenance: With a dryer vent cover in place, cleaning and maintaining your dryer vent becomes easier. The cover acts as a barrier, preventing lint from settling outside, allowing you to effectively remove it during regular cleaning sessions.
The role of a dryer vent cover in preventing safety hazards
A dryer vent cover plays a crucial role in preventing safety hazards that can arise from a poorly maintained or unprotected dryer vent. Here’s how it contributes to your safety:
- Lint buildup prevention: Lint is highly flammable and can accumulate in the dryer vent over time, increasing the risk of a dryer fire. A vent cover acts as a barrier, preventing lint from escaping into your home and reducing the chances of a potential fire hazard.
- Airflow regulation: Proper airflow in your dryer vent is essential for efficient drying and preventing overheating. A vent cover helps to regulate the airflow, ensuring that the hot air and moisture from your dryer are effectively expelled outdoors.
- Protection against carbon monoxide: In gas-powered dryers, a vent cover is essential for venting out harmful carbon monoxide gas. It ensures the safe release of these gases outdoors, protecting you and your family from potential health hazards.
By understanding the importance of a dryer vent cover and its role in preventing safety hazards, you can ensure the efficient and safe operation of your dryer system. Make sure to invest in a quality vent cover and regularly clean and maintain your dryer vent to optimize its performance and longevity.
Step-By-Step Guide On How To Install A Dryer Vent Cover
Step-by-Step Guide on How to Install a Dryer Vent Cover
Installing a dryer vent cover is an important step in ensuring proper ventilation and preventing debris, pests, and birds from entering your dryer vent. Fortunately, with the right tools and materials, this is a straightforward task that you can complete on your own. In this step-by-step guide, we will walk you through the process of installing a dryer vent cover, from preparing the dryer vent opening to securing the cover in place.
Tools and materials needed for installation
Before you begin the installation process, make sure you have the following tools and materials on hand:
| Tools | Materials |
|---|---|
|
|
Preparing the dryer vent opening
The first step in installing a dryer vent cover is to prepare the dryer vent opening. This involves measuring the dimensions of the opening, marking the center, and clearing any obstructions or debris. Follow these steps:
- Using a tape measure, determine the size of your dryer vent opening. This will help you choose a suitable vent cover.
- Mark the center of the opening with a pencil or marker. This will serve as your reference point when attaching the vent cover.
- Inspect the opening for any obstructions or debris. Clear away anything that may hinder the installation or proper ventilation.
Attaching the dryer vent cover
Once the dryer vent opening is ready, it’s time to attach the vent cover. Follow these steps:
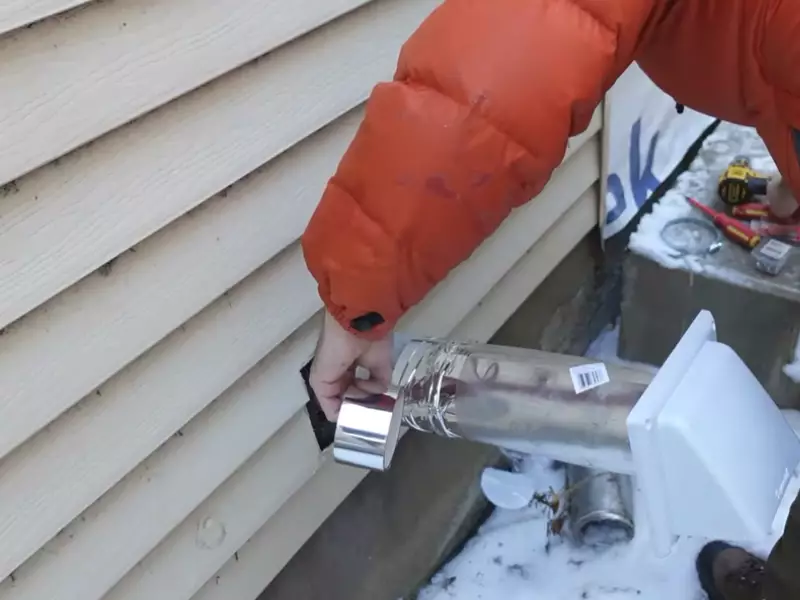
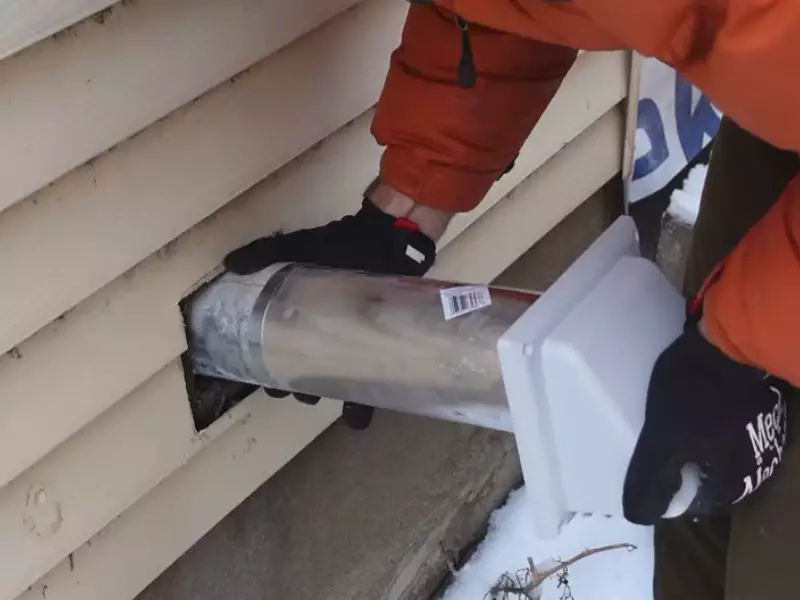
- Position the dryer vent cover over the vent opening, aligning it with the center mark you made earlier.
- Using a drill, screw the vent cover into place. Make sure to apply enough pressure to secure it firmly.
- Repeat this step for all sides of the vent cover, ensuring uniform attachment.
Securing the dryer vent cover in place
Now that the vent cover is attached, it’s essential to secure it in place to prevent it from becoming loose or dislodged. Follow these steps:
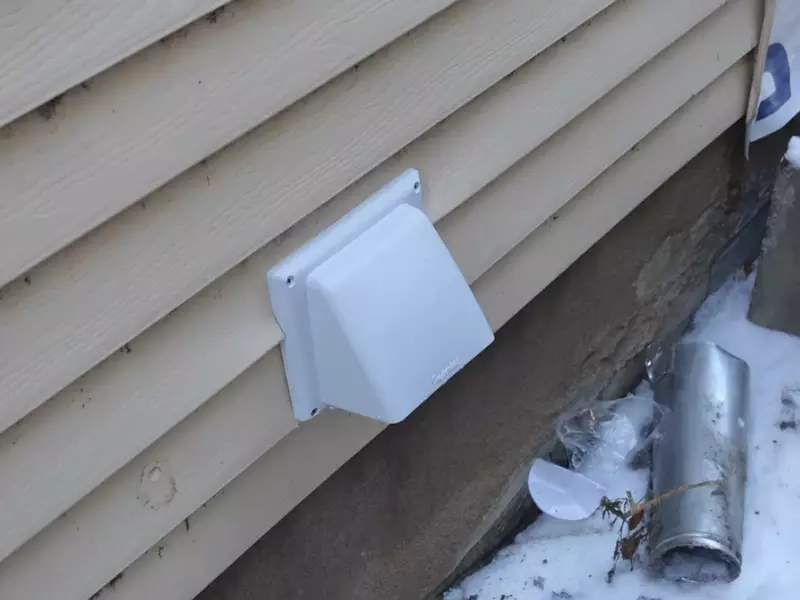
- Inspect the vent cover to ensure it is properly aligned and securely attached.
- Apply weatherproof sealant around the edges of the vent cover to create a tight seal.
- Allow the sealant to dry completely before using your dryer.
By following this step-by-step guide, you can successfully install a dryer vent cover and promote proper ventilation in your laundry area. Remember to regularly clean and maintain your vent cover to ensure its effectiveness and longevity.
Common Mistakes To Avoid When Installing A Dryer Vent Cover
When it comes to installing a dryer vent cover, it’s important to get it right the first time. Making mistakes during the installation process can lead to inefficient dryer performance, potential safety hazards, and even costly repairs down the line. To help you avoid these pitfalls, we’ve identified three common mistakes to watch out for when installing a dryer vent cover.
Incorrectly measuring the dryer vent opening
One of the most common mistakes people make when installing a dryer vent cover is incorrectly measuring the dryer vent opening. Failing to measure accurately can result in a vent cover that is too small or too large, leaving the opening exposed to the elements or restricting proper airflow. To avoid this mistake, be sure to take precise measurements of your dryer vent opening before purchasing a vent cover.
Improper installation of the vent cover
Another mistake to avoid is improper installation of the vent cover. It’s essential to follow the manufacturer’s instructions carefully and ensure proper alignment and attachment of the cover to the vent opening. Improper installation can cause the vent cover to become loose or disconnected, allowing moisture, debris, and even pests to enter your dryer system. Taking the time to install the vent cover correctly can prevent these issues from occurring.
Failure to check for obstructions or debris in the vent opening
Prior to installing the vent cover, it’s crucial to check for any obstructions or debris in the vent opening. Blocked or clogged vents can lead to reduced airflow, poor dryer performance, and even fire hazards. Take the time to inspect the vent opening and remove any lint, debris, or other obstructions before installing the cover. This simple step can greatly improve the safety and efficiency of your dryer system.
Proper Maintenance And Care For A Dryer Vent Cover
Regular maintenance and care for your dryer vent cover are essential to keep it functioning properly and prevent potential fire hazards. By following a few simple steps, you can ensure that your dryer vent cover stays clean, free from debris, and in good working condition. In this section, we will discuss how to regularly clean the vent cover, check for any damage or wear, and remove debris or lint buildup.
Regularly cleaning the vent cover
To maintain optimal airflow and prevent lint accumulation, it is crucial to clean your dryer vent cover on a regular basis. Here are the steps to follow:
- Turn off your dryer and unplug it from the power source for safety.
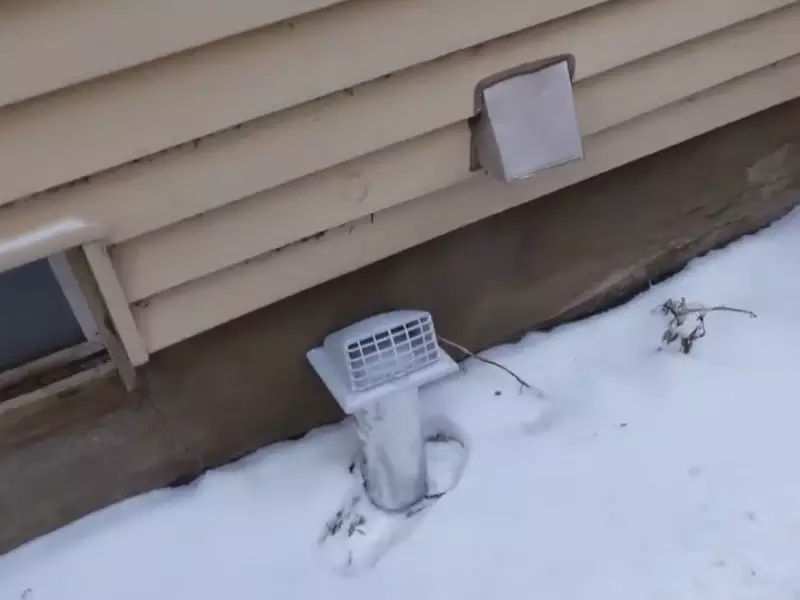
- Locate the dryer vent cover, which is usually positioned on the outside wall of your home.
- Using a screwdriver or similar tool, remove the screws that secure the vent cover in place.
- Gently lift off the vent cover and set it aside.
- Inspect the vent cover for any visible lint or debris accumulation.
- Using a soft-bristle brush or a vacuum cleaner with a brush attachment, carefully remove the lint or debris from the vent cover.
- Once the vent cover is clean, reattach it to the wall by securing it with the screws.
- Plug in your dryer and turn it on to test the airflow through the vent cover.
By performing this cleaning routine regularly, you can keep your dryer vent cover clear of any obstructions and ensure that your dryer operates efficiently.
Checking for any damage or wear
Periodically inspecting your dryer vent cover for any damage or wear is essential to maintain its effectiveness and prevent potential issues. Follow these steps:
- Visually examine the vent cover for any cracks, holes, or signs of deterioration.
- If you notice any damage, immediately replace the vent cover to prevent air leaks and potential fire hazards.
- Ensure that the vent cover closes securely and opens smoothly. If it is difficult to open or close, it may require adjustment or replacement.
- Check the surrounding area for any loose or damaged vent ducts. These should be repaired or replaced to maintain proper airflow.
Performing regular checks for damage and wear will help you identify any issues early on and address them promptly.
Removing debris or lint buildup in the vent cover
Over time, lint and debris can accumulate inside the vent cover, obstructing airflow and increasing the risk of a lint fire. Here’s how you can remove this buildup:
- Follow the steps 1 to 4 mentioned in the previous section (Regularly cleaning the vent cover) to access the vent cover.
- Inspect the interior of the vent cover for any visible lint or debris.
- Using a soft cloth or a brush, carefully wipe away the lint or debris, ensuring not to push it further into the vent system.
- If the buildup is extensive, consider using a vacuum cleaner with a narrow attachment to gently suction out the lint or debris.
- Once the vent cover is clean, reattach it securely to the wall using the screws.
- Turn on your dryer and check if the airflow is restored.
Regularly removing lint and debris buildup from your dryer vent cover is crucial for efficient operation and minimizing the risk of fire.
By following these maintenance and care tips, you can keep your dryer vent cover in optimal condition and ensure the safety and efficiency of your dryer. Regularly cleaning the vent cover, checking for any damage or wear, and removing debris or lint buildup are essential steps that should not be overlooked. Incorporating these practices into your routine maintenance will contribute to the longevity of your dryer vent cover and help prevent potential hazards. Remember, a well-maintained dryer vent cover promotes proper airflow, saving energy and reducing the risk of fire.
Recommended Dryer Vent Cover Types For Different Situations
When it comes to the installation of a dryer vent cover, it’s crucial to choose the right type for your specific situation. The right dryer vent cover not only ensures proper airflow but also protects your vent from external elements. In this section, we will explore the recommended dryer vent cover types for different situations, helping you make an informed decision.

Choosing the right material for your dryer vent cover
Before diving into the different types of dryer vent covers, it’s essential to consider the material options available. The material of your vent cover can greatly impact its durability and performance. Here are some popular materials to choose from:
- Plastic: Plastic vent covers are lightweight and affordable, making them a popular choice for many homeowners. However, they may not be as durable as other options and may not withstand extreme weather conditions.
- Aluminum: Aluminum vent covers are more durable than plastic ones and provide better protection against harsh outdoor elements. They are lightweight and resistant to rust, making them suitable for various climates.
- Stainless Steel: For those looking for maximum durability, stainless steel vent covers are an excellent option. They are resistant to corrosion and are capable of withstanding extreme weather conditions. While they may be pricier, they are a long-term investment.
Options for different outdoor conditions
Outdoor conditions can vary greatly depending on your geographical location. To ensure your dryer vent cover performs optimally, consider the following options based on your outdoor conditions:
| Outdoor Condition | Recommended Dryer Vent Cover |
|---|---|
| Sunny and Dry | A plastic or aluminum vent cover should suffice, providing adequate protection against dust and debris. |
| Rainy or Humid | An aluminum or stainless steel vent cover is ideal, as it can withstand moisture and prevent water from seeping into your dryer vent. |
| Snowy or Freezing | A stainless steel vent cover is the best choice for extreme cold conditions, as it is resistant to rust and can handle heavy snow accumulation. |
Additional features to consider for optimal functionality
Aside from the material and outdoor conditions, there are additional features you should consider when choosing a dryer vent cover. These features can enhance the functionality and efficiency of your vent cover. Here are some key features to keep in mind:
- Bird and Pest Protection: Look for a vent cover with a built-in screen or grill to prevent birds and pests from entering your dryer vent. This not only maintains proper airflow but also reduces the risk of obstructions.
- Screw-On Design: Opt for a vent cover that can be easily installed and secured using screws. This ensures a tight seal and minimizes the chances of the cover getting dislodged during strong winds.
- Metal Louvers: Vent covers with metal louvers offer better airflow control. The louvers can open and close to prevent drafts and moisture from entering your dryer vent.
Safety Tips For Installing A Dryer Vent Cover
When it comes to installing a dryer vent cover, safety should be your number one priority. Taking the necessary precautions will not only protect you from potential hazards, but also ensure the longevity and functionality of your dryer vent. In this article, we will provide you with essential safety tips for installing a dryer vent cover.
Shutting off the power before installation
Before working on any electrical appliance, it is crucial to shut off the power supply. In the case of installing a dryer vent cover, you must turn off the electricity to your dryer. This will prevent any accidental shocks or electrocution while handling the vent components. To disconnect the power, simply unplug the dryer from the outlet or switch off the circuit breaker dedicated to the dryer in your electrical panel.
Safety precautions for working at heights
When installing a dryer vent cover, it is common to work at heights, either on a ladder or on the roof. To ensure your safety, consider the following precautions:
- Choose a sturdy and stable ladder, preferably one with slip-resistant footing.
- Inspect the ladder for any defects or damages before using it.
- Place the ladder on a level surface and secure it properly to prevent it from shifting or tipping.
- Whenever possible, have someone hold the ladder steady while you work.
- Wear appropriate personal protective equipment (PPE) such as a hard hat, safety glasses, and non-slip footwear.
- Be cautious of your surroundings, especially if there are power lines or other obstacles nearby.
- If working on a roof, use fall protection equipment like safety harnesses and anchor points.
Testing the functionality of the dryer vent cover
Once the dryer vent cover is installed, it is essential to test its functionality. This step ensures that the vent cover is properly installed and functioning as intended. Follow these steps to test your dryer vent cover:
- Turn on your dryer and let it run for a few minutes.
- Locate the dryer vent opening on the exterior of your home.
- Check for the presence of exhaust airflow. You should feel a steady stream of warm air coming out of the vent.
- Inspect the vent cover for any obstructions or blockages that may hinder the airflow. Clear away any debris or lint buildup if necessary.
By following these safety tips, you can confidently install a dryer vent cover without compromising your well-being or the effectiveness of your dryer vent. Remember, it is always better to prioritize safety and take preventive measures to avoid accidents and ensure optimal performance.
Troubleshooting Common Issues With Dryer Vent Covers
Installing a dryer vent cover is an essential step to ensure the proper functioning of your dryer and prevent potential hazards. However, like any other appliance, dryer vent covers can encounter a few common issues that may hinder their effectiveness. In this section, we will discuss these problems and provide simple solutions to troubleshoot them. By addressing these issues promptly, you can maintain optimal airflow, reduce noise, and increase the lifespan of your dryer vent cover.
Vent cover not closing properly
One of the most common issues with a dryer vent cover is when it fails to close properly. This can result in unwanted drafts entering your home, allowing cold air, debris, or pests to infiltrate. If you notice that your vent cover is not closing as it should, you can try the following troubleshooting steps:
- Inspect the hinges or flaps: Check if any hinges or flaps on the vent cover are damaged or obstructed. If so, try to realign them or clear away any debris that may be causing the issue.
- Ensure proper installation: Verify that the vent cover is correctly installed and securely attached to the vent pipe. Loose screws or incorrect positioning can prevent the cover from closing tightly.
- Replace damaged parts: If the vent cover is significantly damaged or worn out, it may be necessary to replace it with a new one. Look for a replacement that matches the specifications of your dryer vent system.
Blockage or restricted airflow in the vent
Another issue that can arise with dryer vent covers is the blockage or restricted airflow through the vent. Restricted airflow can reduce the drying efficiency of your dryer and even pose a fire hazard. Here are some troubleshooting steps to address this issue:
- Clean the vent system: Regularly inspect and clean the vent system to remove any lint build-up, debris, or blockages. Use a vacuum or vent cleaning brush to clean the vent pipe and ensure a clear passage for the airflow.
- Check for obstructions: Look for any obstructions, such as bird nests or vegetation, around the vent cover. Clear them away to allow proper airflow.
- Consider vent extensions: In some cases, the length or design of the vent system may be causing restricted airflow. If this is the case, consider installing vent extensions or modifying the vent system to improve airflow.
Handling excessive vibration or loud noise from the vent cover
Excessive vibration or loud noise coming from the dryer vent cover can be annoying and indicate an underlying issue. To troubleshoot this problem, follow these steps:
- Tighten connections: Ensure that all connections between the vent cover and the vent pipe are secure. Loose connections can cause vibrations or rattling noises.
- Inspect the vent cover for damage: Examine the vent cover for any cracks, dents, or loose components that may be causing the noise. If necessary, replace the vent cover.
- Consider adding insulation: If the noise persists, adding insulation around the vent cover can help reduce vibrations and dampen sound.
By troubleshooting these common issues with dryer vent covers, you can maintain the efficient operation of your dryer and enjoy peace of mind knowing that you have taken the necessary steps to prevent potential hazards. Regular maintenance and addressing issues promptly will ensure the safe and effective functioning of your dryer vent cover for years to come.
Frequently Asked Questions On How To Install Dryer Vent Cover
How Do You Install A Dryer Vent Cage?
To install a dryer vent cage, follow these steps:
1. Measure the vent opening.
2. Purchase a vent cage that fits the dimensions.
3. Remove the existing vent cover.
4. Place the new vent cage over the opening.
5. Secure it in place with screws or clips.
What Is The Best Way To Hook Up A Dryer Vent?
To hook up a dryer vent:
1. Determine the location near an exterior wall and select a vent that matches the dryer’s exhaust port.
2. Attach the vent opening to the dryer’s exhaust port using a clamp or screw.
3. Insert the other end of the vent into a hole or connect it to a duct leading outside.
4. Secure the vent in place with screws or a clamp.
5. Ensure there are no obstructions and test for proper airflow.
How Do You Cap Off A Dryer Vent?
To cap off a dryer vent, follow these steps:
1. Turn off the dryer and unplug it.
2. Disconnect the vent hose from the dryer.
3. Attach a vent cap to the exterior end of the vent pipe.
4. Secure the cap with screws or clamps.
5. Ensure there are no gaps or leaks. Done!
How Do You Seal An Exterior Dryer Vent?
To seal an exterior dryer vent, follow these steps:
1. Clean the vent and remove any debris.
2. Use foil tape or silicone caulking to seal any gaps or cracks around the vent.
3. Install a vent cover or hood to prevent rain or pests from entering.
4. Check the seal regularly and reseal it as needed to maintain proper ventilation and prevent energy loss.
Conclusion
To sum up, installing a dryer vent cover is a simple yet essential step in ensuring the proper functioning and safety of your dryer. By following the steps outlined in this guide, you can easily install a dryer vent cover and protect your home from potential hazards.
Remember to choose a suitable vent cover, measure accurately, and secure it tightly. Regular maintenance and cleaning of the vent cover will also help maintain efficiency and prevent lint buildup. Enjoy the benefits of a properly installed dryer vent cover, such as improved energy efficiency and increased fire safety.