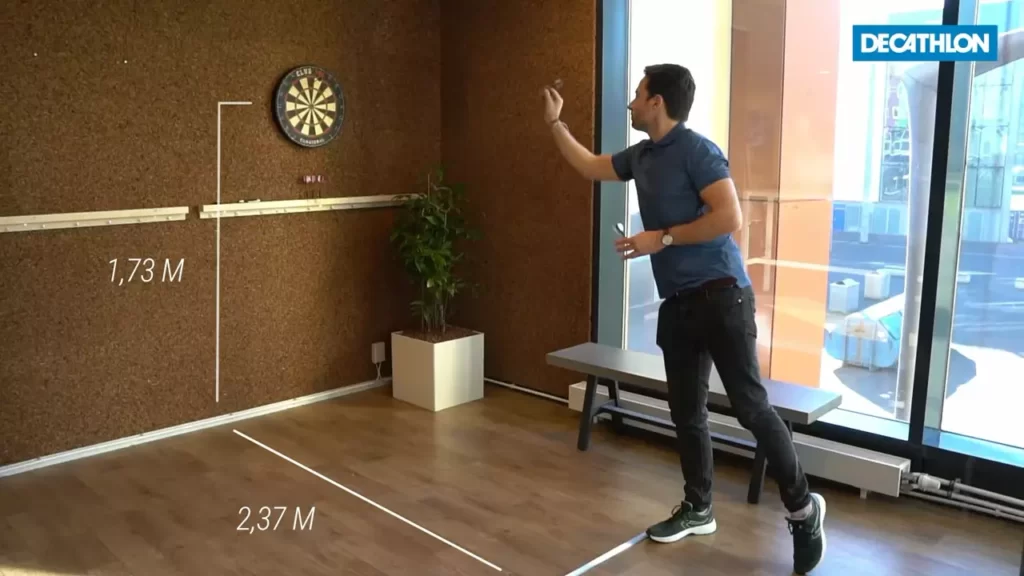
To install a dartboard, first, securely mount the board on the wall, ensuring it is level and at the correct height. Then, mark the throwing line or oche on the floor, measuring 7 feet 9.25 inches from the face of the board.
Stand at the oche when throwing darts. Darts is a popular game that can be enjoyed by people of all ages, making it a great addition to a home or recreational space. However, before you can start playing, you need to know how to properly install a dartboard.
Installing a dartboard may seem like a simple task, but it requires careful attention to detail to ensure that it is mounted securely and at the correct height. In this guide, we will discuss the step-by-step process of installing a dartboard, from mounting it on the wall to marking the throwing line on the floor. With these instructions, you’ll be ready to start playing darts in no time.
Understanding The Basics Of Dart Boards
Dart boards are a popular pastime that can be enjoyed by people of all ages. Whether you’re a casual player looking to have fun with friends or a serious player aiming to improve your skills, understanding the basics of dart boards is crucial. In this section, we will delve into the different types of dart boards, the materials used in their construction, and the key components that make up these boards.
Types of Dart Boards
There are several types of dart boards available in the market, each with its own unique characteristics. Here are some of the most common types you may come across:
- Bristle Dart Boards: Bristle dart boards are widely regarded as the best option for serious dart players. These boards are made from compressed sisal fibers, which offer excellent durability and self-healing properties. Due to their high quality, bristle boards are commonly used in professional dart tournaments.
- Electronic Dart Boards: Electronic dart boards have gained popularity among casual players due to their added features and versatility. These boards use electronic sensors to detect and calculate scores, making it easier to keep track of your game. They often come with a variety of game modes and built-in scoreboards.
Materials Used in Dart Boards
The material used in dart boards plays a crucial role in their overall performance and longevity. The following materials are commonly used in the construction of dart boards:
- Sisal Fibers: Sisal fibers, extracted from the leaves of the Agave sisalana plant, are the primary material used in bristle dart boards. These fibers are tightly packed together, providing a dense surface that can withstand repeated dart impacts. Sisal fibers also have the unique ability to self-heal, which helps to extend the lifespan of the board.
- Wiring System: The wiring system in a dart board is usually made of steel or similar strong materials. These thin, metal wires serve as the division lines between the scoring segments. A good wiring system ensures clear visibility of the individual scoring areas and helps prevent bounce-outs.
Key Components of a Dart Board
To fully understand the workings of a dart board, it’s important to know its key components. These include:
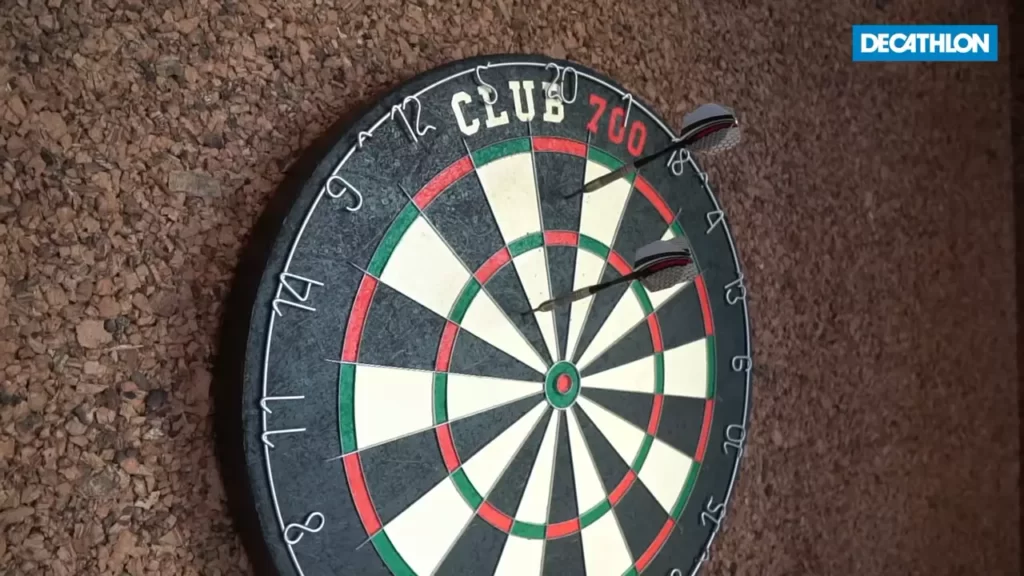
- Outer Bullseye: The outer bullseye, also known as the single bull, is the outermost ring on the board. It carries a higher scoring value than the other segments on the board, typically worth 25 points.
- Double and Triple Rings: The double and triple rings, located closer to the center of the board, offer multiplied scoring opportunities. Darts that land in the double ring receive double the score, while darts in the triple ring earn three times the score.
- Inner Bullseye: The inner bullseye, or the bullseye, is the small, circular area at the center of the board. It is worth the highest scoring value, typically 50 points. Hitting this area requires precise aim and skill.
Understanding the basics of dart boards is essential for players of all levels. By familiarizing yourself with the different types of dart boards, the materials used in their construction, and the key components that make up these boards, you can enhance your game and make informed decisions when it comes to purchasing a dart board for your own enjoyment. So let’s move on to the next section and learn about how to set up a dart board.
Preparing For Dart Board Installation
Choosing the Right Location
Before installing your dart board, it is crucial to choose the right location that will provide you with optimal playing conditions. Consider the following factors when selecting the perfect spot:
- Ensure there is enough space around the dart board for players to comfortably stand and throw the darts.
- Find a location with good lighting to help you see the dartboard clearly.
- Avoid areas with excessive noise or distractions, as they can interfere with your concentration.
- Make sure the chosen spot has a sturdy wall or backing that can withstand frequent dart impacts.
By carefully considering these factors, you can create an enjoyable and safe environment for playing darts.
Measuring and Marking the Dart Board Position
Once you have chosen the ideal location, it is time to measure and mark the position where the dart board will be installed. You will need the following tools:
- Tape measure
- Pencil
Follow these steps to accurately mark the dart board position:
- Stand 7 feet 9.25 inches away from the floor where you will throw the darts. This is the official competition throwing distance.
- Mark the exact height on the wall with a pencil. Ensure the marking is at the center point of the throw line.
- Using a tape measure, measure 9 feet 7 3/8 inches horizontally along the floor from the marked throwing position.
- Make another mark on the floor to indicate the exact position where the front of the toe line should be.
- Now, measure the distance from the floor to the center of the bullseye, which should be 5 feet 8 inches.
- Mark this height on the wall, aligning it with the previously marked throwing height.
By following these steps, you can ensure that your dart board will be positioned correctly according to the official regulations.
Gathering the Necessary Tools and Equipment
Before you proceed with the installation, gather all the necessary tools and equipment to make the process smoother and hassle-free. Here’s a list of items you will need:
- Drill
- Stud finder
- Screws
- Level
- Dart board
- Bracket or mounting hardware specific to your dart board model
It’s important to have these items on hand to ensure a successful and secure installation of your dart board.
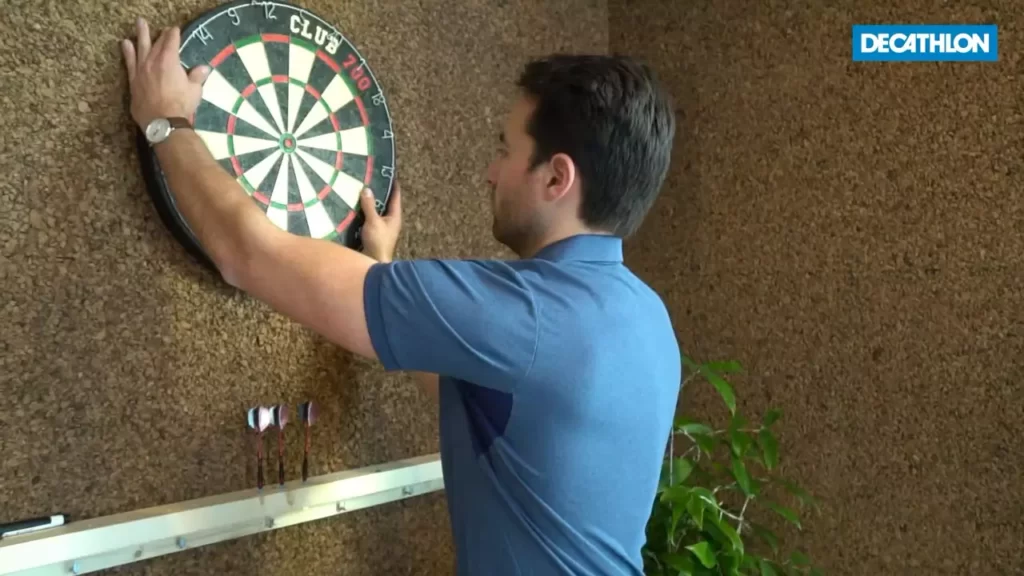
Installing The Dart Board
Once you’ve chosen the perfect location for your dart board, it’s time to install it. In this section, we will guide you through the step-by-step process of installing your dart board, ensuring that it is securely mounted and ready for play.
Mounting options for dart boards
Before we dive into the installation process, it’s important to understand the different mounting options for dart boards. There are two popular methods: using a bracket or a backboard. Each has its own advantages, so choose the one that suits your preferences and playing style.
Installing the bracket or backboard
When installing a dart board using a bracket, follow these steps:
- Identify a suitable location on the wall for your dart board. Make sure there is enough space around the board for players to comfortably throw their darts.
- Hold the bracket against the wall at the desired height and mark the screw holes with a pencil.
- Drill pilot holes for the screws using an appropriate-sized drill bit.
- Secure the bracket to the wall using screws, making sure it is level.
- If you prefer installing a backboard, follow these steps:
- Choose a backboard material that fits your style and budget. Popular options include cork, sisal, and felt.
- Mark the area on the wall where you want to install the backboard.
- Attach the backboard to the wall using screws, ensuring it is level and securely mounted.
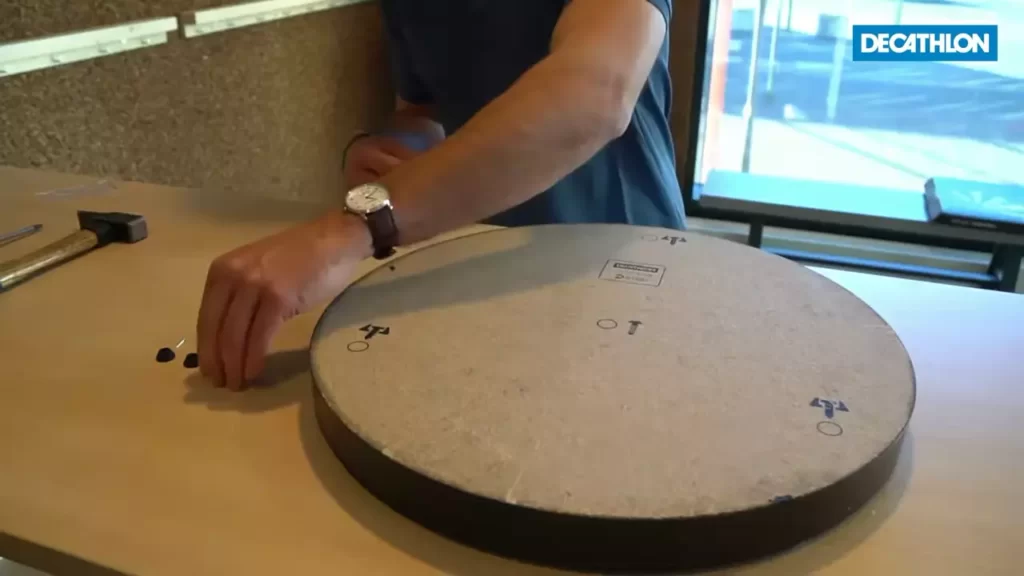
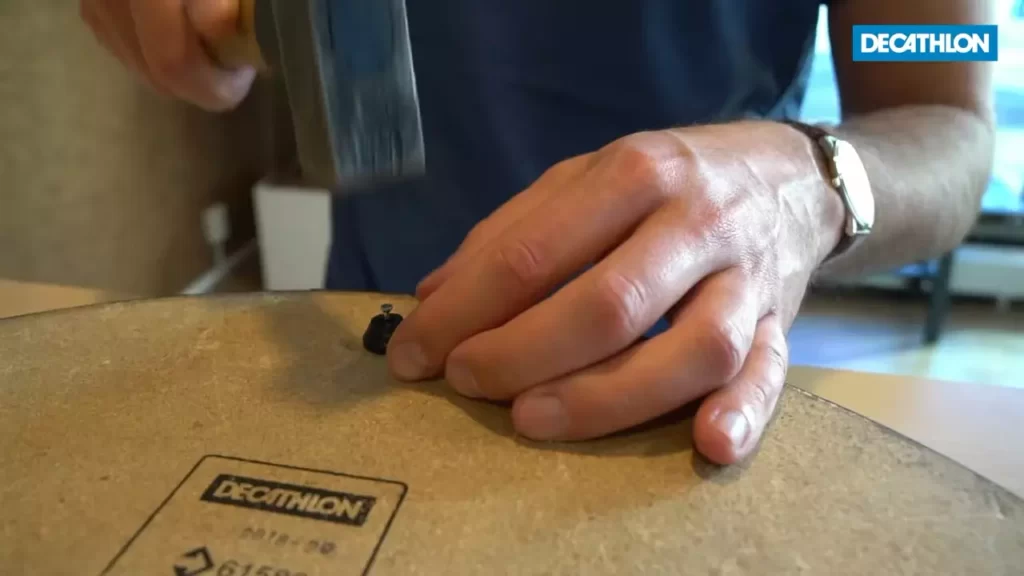
Attaching the dart board to the bracket or backboard
Now that you have your bracket or backboard installed, it’s time to attach the dart board. Here’s how:
- Place the dart board on the bracket or against the backboard.
- Align the screw holes on the dart board with the holes on the bracket or backboard.
- Insert the screws through the holes and tighten them using a screwdriver.
Make sure that the dart board is securely attached and does not wobble. Give it a slight tug to ensure it is properly mounted before starting your game.
By following these simple steps, you can easily install your dart board and get ready for hours of fun and competitive gameplay.
Enhancing Safety Measures
When it comes to playing darts, safety should always be a top priority. Installing safety measures not only helps prevent accidents but also ensures a smooth and enjoyable dart playing experience. In this article, we’ll explore two important safety measures – installing a dart mat or surround and ensuring proper lighting for the dart board area.
Installing a dart mat or surround
One of the first steps in enhancing safety when installing a dart board is to consider using a dart mat or surround. A dart mat or surround acts as a protective barrier, absorbing the impact of the darts and preventing them from damaging walls or floors. Additionally, it helps to reduce noise and vibration caused by the darts hitting the board. Here are a few options to choose from:
| Option | Description |
|---|---|
| Cork Dart Board Surround | Provides a thick cushioning around the dart board, absorbing dart impacts and preventing them from bouncing off the board. |
| Dart Mat | A rubber or foam mat placed on the floor, providing a non-slip surface and protecting the area from any stray darts. |
By installing a dart mat or surround, you not only protect the walls and floors but also create a designated area for playing darts. This ensures that the darts stay within the intended playing space, reducing the risk of accidents or damages.
Ensuring proper lighting for the dart board area
Proper lighting is essential for a dart board area to enhance visibility and prevent eye strain. Insufficient lighting can lead to inaccurate throws and higher chances of dart-related accidents. Here are a few tips for ensuring proper lighting:
- Use bright, focused lighting: Install a bright light fixture directly above the dart board, preferably an LED light, to ensure sufficient illumination.
- Avoid shadows: Position the light in a way that eliminates any shadows on the dart board. Shadows can make it difficult to see the dartboard clearly and affect accuracy.
- Adjustable lighting: Consider installing adjustable lighting options, such as dimmer switches or movable lights, to customize the lighting according to personal preferences.
By following these lighting tips, you create a well-lit dart board area, enabling players to have clear visibility of both the board and the darts. This promotes accuracy and reduces the chances of accidents caused by inadequate lighting.
Maintaining Your Dart Board
Regular cleaning and maintenance
To keep your dart board in optimal condition, regular cleaning and maintenance is essential. Dust and dirt can accumulate over time, affecting the performance of the board. Follow these simple steps to keep your dart board clean:
- Start by removing the darts from the board.
- Use a soft brush or a vacuum with a brush attachment to gently remove any dust or dirt from the surface of the board.
- If there are any stains or marks on the board, you can use a mild soap and water solution to gently clean the surface. Avoid using harsh chemicals or abrasive cleaners, as they can damage the board.
- After cleaning, make sure to thoroughly dry the board before reattaching the darts.
Replacing worn-out parts
Over time, certain parts of your dart board may become worn out and need to be replaced. The most common parts that may need replacing are the dart board itself and the dartboard wiring. Here’s how you can replace these parts:
- To replace the dart board, start by removing the old board from the cabinet or wall bracket. Unscrew any screws or brackets that are holding it in place. Then, simply attach the new board to the same location.
- If the dartboard wiring is worn or damaged, you can purchase a replacement wire set. Remove the old wires by unscrewing them from the board. Attach the new wires to the appropriate locations on the board, according to the manufacturer’s instructions.
- Once you have replaced any worn-out parts, make sure to test the board to ensure that it is functioning properly.
Tips for extending the lifespan of your dart board
By following these tips, you can extend the lifespan of your dart board and enjoy many games without the need for frequent replacements:
- Rotate the dart board regularly. This will help distribute the wear and tear more evenly, prolonging the life of the board.
- Avoid using excessively sharp or heavy darts. These can cause unnecessary damage to the board.
- Store your dart board in a cool and dry place when not in use. Exposure to extreme temperatures or humidity can damage the board.
- Consider using a dartboard surround or backboard to protect the walls around the dart board from stray darts.
- Finally, always follow the manufacturer’s instructions for use and maintenance of your dart board.
By regularly cleaning and maintaining your dart board, replacing worn-out parts when needed, and following these tips, you can ensure that your dart board lasts for years to come.
Troubleshooting Common Dart Board Installation Issues
Installing a dart board can be a fun addition to your home or game room, but it’s not uncommon to run into some issues along the way. In this section, we will address common problems that may arise during the dart board installation process and provide you with practical solutions to troubleshoot these issues.
Dart board not hanging properly
If you find that your dart board is not hanging properly, it could impact the accuracy and enjoyment of your dart games. Here are a few steps you can take to fix this problem:
- Check the height: Ensure that the dart board is hung at the regulation height of 5 feet 8 inches from the floor. Use a measuring tape to double-check the distance.
- Use the right wall anchors: Make sure you are using the appropriate wall anchors or screws to secure the dart board. If the ones provided are not holding up the weight, consider investing in stronger wall anchors or consult a hardware store for advice.
- Balance the weight distribution: Ensure that the weight of the dart board is evenly distributed on the hangers or wall mounts. If the dart board seems tilted or hanging at an angle, adjust the hangers accordingly.
Dart board not aligned correctly
Alignment is crucial for a smooth dart playing experience. Incorrect alignment can affect the accuracy of your throws. Here’s how you can troubleshoot this issue:
- Measure the distance: Check if the distance between the throwing line (oche) and the dart board is accurate. The regulation distance is 7 feet 9 1/4 inches. Use a measuring tape to ensure the proper placement of the oche.
- Use a level: Make use of a bubble level to ensure that the dart board is correctly aligned horizontally and vertically. This will help you achieve a level playing surface.
- Adjust the position: If the dart board is not aligned correctly, you may need to remove it from the wall and readjust the position. Always double-check the alignment after making any adjustments.
Dart board falling off the wall
If your dart board keeps falling off the wall, it can be frustrating and potentially dangerous. Here are some steps you can take to secure it properly:
- Check the mounting surface: Ensure that the wall surface where you are mounting the dart board is sturdy and capable of supporting the weight. If the dart board keeps falling off, you may need to consider installing a backboard or reinforcing the wall with a plywood backing.
- Use multiple mounting points: Consider using multiple hangers or wall-mounting points to distribute the weight of the dart board evenly. This will provide additional support and help prevent it from falling off.
- Use adhesive or double-sided tape: For extra security, you can use a strong adhesive or double-sided tape on the back of the dartboard to help it stay in place more effectively.
By following these troubleshooting tips, you should be able to overcome common dart board installation issues and enjoy countless hours of dart throwing fun. Remember to always prioritize safety and take the necessary precautions while installing and playing with a dart board.
Frequently Asked Questions Of How To Install Dart Board
What Is The Proper Height To Hang A Dartboard?
Hang a dartboard at a height of 5 feet 8 inches from the center of the bullseye to the ground.
How Do You Align A Dartboard?
To align a dartboard, follow these steps:
1. Hang the dartboard at eye level.
2. Make sure the “20” section is at the top.
3. Measure the distance from the throwing line (7 feet, 9. 25 inches) and mark it.
4. Place a measuring tape on the floor and center it on the board.
5. Adjust as needed, ensuring the board is straight and level.
Do You Need A Stud To Hang A Dartboard?
Yes, you need a stud to hang a dartboard.
How Do You Set Up A Dart Board Without Damaging The Wall?
To set up a dart board without damaging the wall, follow these steps:
1. Choose a suitable location with enough space.
2. Use a dart board mounting bracket or a backing board to protect the wall.
3. Measure the correct height and distance according to official regulations.
4. Attach the bracket or backing board securely to the wall.
5. Hang the dartboard onto the bracket or backing board.
Conclusion
Installing a dart board can be an exciting and enjoyable experience. By following these simple steps, you can easily set up your dart board and start playing in no time. From finding the perfect location to mounting the board and setting up accurate measurements, this guide has provided you with a comprehensive understanding of the installation process.
Get ready to improve your aim and have endless hours of fun with your new dart board!