To install chair rail molding, measure and cut the molding to the desired length, then attach it to the wall using adhesive or nails. Chair rail molding is a popular decorative feature that adds a touch of elegance to any room.
It not only helps protect the walls from scuffs and scratches but also adds dimension and visual interest to the space. Whether you’re a seasoned DIY-er or a beginner, installing chair rail molding can be a straightforward process. We will walk you through the steps to install chair rail molding in your home.
So, let’s get started and transform your walls with this stylish and functional feature. By the end of this guide, you’ll have the knowledge and confidence to install chair rail molding like a pro.
Understanding The Purpose Of Chair Rail Molding
Chair rail molding is a decorative and functional element that can instantly elevate the look of any interior space. Understanding the purpose of chair rail molding is essential when it comes to selecting the right style and installing it correctly. So, let’s dive into why chair rail molding is important in interior design and how you can choose the perfect style for your space.
Importance of chair rail molding in interior design
Chair rail molding serves multiple purposes in interior design. It not only adds an elegant and sophisticated touch to a room but also serves as a practical element that protects walls from potential damage. Here are a few key reasons why chair rail molding is so important:
- Visual appeal: Chair rail molding is an excellent way to create visual interest and break up the monotony of a plain wall. It adds depth, texture, and character to any space, making it more aesthetically pleasing.
- Defining spaces: Installing chair rail molding at a certain height can visually divide a room into different sections, such as separating the lower part from the upper part. This technique helps to give each area its own distinct identity and can create a sense of balance in the overall design.
- Protection: One of the primary purposes of chair rail molding is to protect walls from everyday wear and tear. Whether it’s accidental chair scuffs or the occasional bumps from moving furniture, chair rail molding acts as a barrier, preventing the walls from getting damaged.
Choosing the right chair rail molding style for your space
When it comes to choosing the right chair rail molding, there are countless styles and options available. Selecting the perfect style that complements your space can enhance the overall aesthetics of a room. Here are a few considerations to keep in mind:
- Cohesion with existing decor: Consider the existing style and decor of the room. You want the chair rail molding to seamlessly blend in and complement the overall design rather than standing out as an eyesore. Whether your space is modern, traditional, or eclectic, there is a chair rail molding style that can enhance its beauty.
- Proportions and scale: Take into account the size of the room and furniture. For larger spaces, taller chair rail moldings can create a grander aesthetic, while narrower moldings work well in smaller rooms. The proportions and scale should be balanced to achieve a harmonious look.
- Personal preference: Ultimately, choose a chair rail molding style that resonates with your personal taste. This is your opportunity to showcase your unique style and make a statement. Whether you prefer simple and sleek moldings or intricate and ornate designs, there is something for everyone.
By understanding the purpose of chair rail molding and carefully selecting the right style, you can elevate the visual appeal of your space while adding a practical element of protection. So, take your time, explore various options, and make an informed decision that will transform your room into a stunning masterpiece.
Tools And Materials Needed For Chair Rail Molding Installation
Installing chair rail molding can instantly elevate the look and feel of any room. It adds a touch of elegance and enhances the overall aesthetic appeal. However, to achieve a successful installation, it is important to have the right tools and materials at hand. In this section, we will take a closer look at the essential tools and materials required for chair rail molding installation.
Essential tools for chair rail molding installation
- Measuring Tape: Accurate measurements are crucial for a precise and professional-looking installation. A measuring tape helps you determine the length and height of the moldings, ensuring they fit perfectly into your space.
- Miter Saw: A quality miter saw allows you to cut the chair rail molding at precise angles. It is ideal for creating clean and seamless corners, giving your installation a polished and seamless finish.
- Level: A level is essential to ensure that your chair rail molding is straight and properly aligned. It helps you avoid crooked or uneven installations, ensuring a visually pleasing result.
- Pencil: Marking the walls and molding before cutting and installing is vital for accuracy. A pencil allows you to make clear and visible markings, ensuring a smooth and efficient installation process.
- Nail Gun (or Hammer and Nails): Fastening the chair rail and molding securely to the wall is essential for long-lasting durability. A nail gun (or hammer and nails) helps you firmly attach the molding to the wall, providing stability and strength.
- Sanding Block: A sanding block is useful for smoothing out any rough edges or imperfections on the chair rail molding. It allows you to achieve a flawless and seamless finish, ready for painting or staining.
Materials required for a successful installation
- Chair Rail Molding: The main material needed is, of course, the chair rail molding itself. You can choose from a variety of materials, such as wood or synthetic options, depending on your preferences and budget.
- Construction Adhesive: A reliable construction adhesive helps you bond the chair rail molding to the wall securely. It provides additional support and prevents any potential shifting or movement over time.
- Screws (optional): If you prefer additional reinforcement, you may opt to use screws in conjunction with the construction adhesive. This provides extra stability and ensures a long-lasting chair rail installation.
- Primer and Paint/Sandpaper and Stain: The final touch is applying primer and paint or sanding and staining the chair rail molding. This step allows you to customize the molding to match your room’s color scheme or desired aesthetic.
- Paint Brush or Staining Cloth: To apply the primer, paint, or stain to the chair rail molding, you will need a paintbrush or staining cloth. Make sure to choose a brush or cloth suitable for the type of finish you will be using.
By having these essential tools and materials on hand, you’ll be well-prepared to tackle your chair rail molding installation project with confidence. Remember, attention to detail and careful execution will result in a visually stunning and professionally finished look.
Measuring And Marking The Wall For Chair Rail Molding
Installing chair rail molding is a great way to add elegance and a touch of sophistication to any room. Not only does it protect your walls from scuffs and scratches, but it also adds a decorative element that can enhance the overall aesthetic appeal. However, before you begin the installation process, it is crucial to measure and mark the wall accurately to ensure that your chair rail molding is perfectly aligned. In this section, we will guide you through the steps of measuring and marking the wall for chair rail molding, so you can achieve professional-looking results.
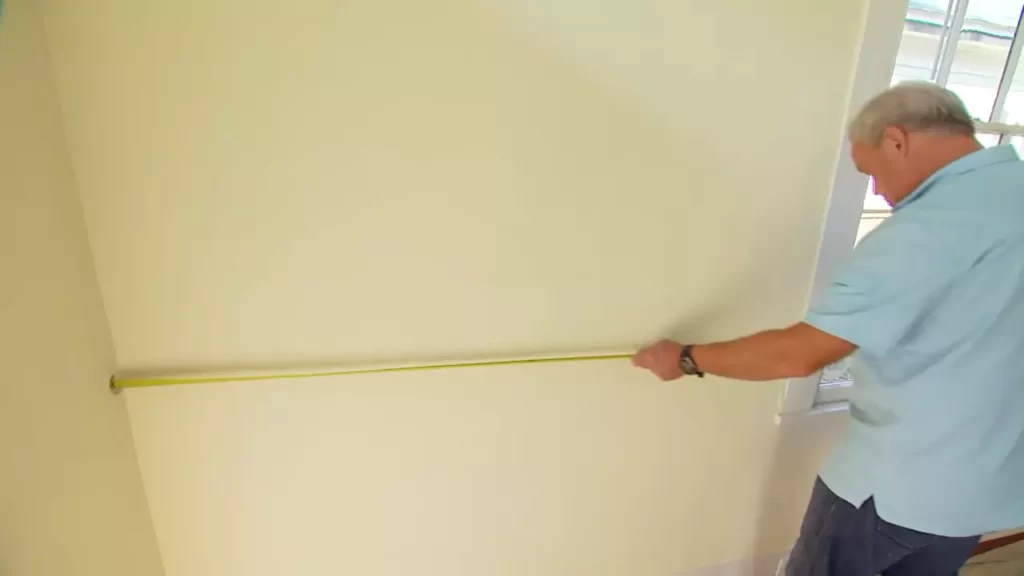
Accurate measurements for chair rail placement
Proper measurements are a crucial first step in installing chair rail molding. Before you start measuring, gather the necessary tools: a tape measure, a pencil, and a level. Begin by deciding the height at which you want to install the chair rail molding. Typically, chair rail molding is placed about 36 inches from the floor, but you can adjust this height based on your preferences and the room’s dimensions.
Once you have determined the desired height, use a tape measure to measure and mark the wall at regular intervals. It is recommended to space the marks every 6 to 8 feet for consistency. By doing so, you will ensure that the chair rail molding is evenly spaced and visually appealing.
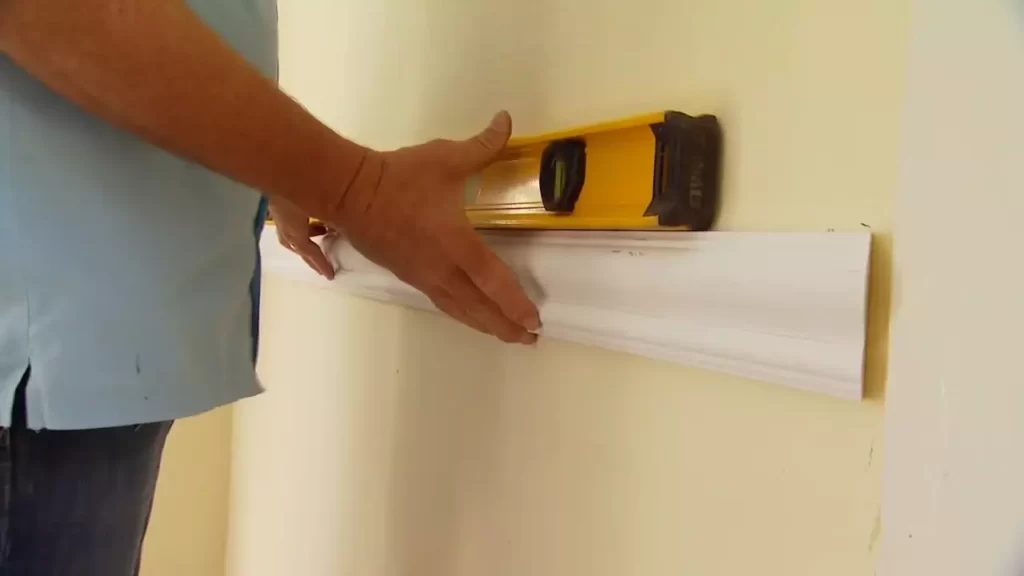
Marking the wall using a level and chalk
After marking the height and intervals, it’s time to draw a level line along the wall to guide the installation of the chair rail molding. Start by finding the highest point on the floor and measure up to the desired height. Use a pencil to mark this point.
Next, take a level, and position it horizontally against the marked point on the wall. Adjust the level until the bubble is centered, indicating that it is perfectly level. Once the level is in place, use a pencil to draw a straight line along the top edge of the level. This line will serve as your guide when installing the chair rail molding, ensuring that it is straight and level throughout.
For added precision, you can also use chalk to mark the wall instead of a pencil. The chalk line will be more visible and guide your installation process even more effectively. Simply snap the chalk line against the wall, starting at the highest marked point, and pull it taut along the entire length. The chalk line will leave a visible reference line for you to follow during the installation.
By accurately measuring and marking the wall for chair rail molding, you are setting the foundation for a successful installation. Taking the time to ensure precise measurements and using a level and chalk will result in a chair rail molding that looks polished and professionally installed. With these guidelines in mind, you can transform your space and elevate its visual appeal with chair rail molding.
Removing Existing Baseboards And Trim
Steps to Safely Remove Baseboards and Trim
- Step 1: Begin by gathering the necessary tools for this task. You will need a pry bar, a putty knife, a hammer, a utility knife, safety glasses, and a dust mask.
- Step 2: Start by scoring the caulk line on both sides of the baseboard or trim with the utility knife. This will help prevent any damage to the wall when you start prying it off.
- Step 3: Next, position the pry bar between the baseboard and the wall at one end of the piece. Gently pry the baseboard away from the wall using the hammer for additional leverage if needed. Work your way along the board, repeating this process until the entire piece is free.
- Step 4: Once the baseboard is removed, take a moment to inspect the wall for any damage. If you notice any holes or cracks, now is the time to patch them up.
- Step 5: Now it’s time to remove any trim around windows or doors. This can be done using the same method as before, scoring the caulk line and prying the trim away from the wall.
- Step 6: As you remove each piece of baseboard or trim, be sure to label them if you plan to reuse them. This will make reinstalling them easier later on.
Proper Handling and Disposal of Old Materials
Handling: When handling old baseboards and trim, it’s important to wear safety glasses and a dust mask to protect yourself from any dust or debris that may be released. Additionally, use caution when using the pry bar and hammer to avoid injury.
Disposal: If you don’t plan on reusing the old materials, it’s important to dispose of them properly. Check with your local waste management facility to find out if they can be placed in the regular garbage or if they need to be taken to a specific recycling center.
Note: If you plan to reuse the baseboards or trim, store them in a safe location where they won’t get damaged or lost. You may also want to clean them up and touch up any paint or stain before reinstalling them.
Patching And Sanding The Wall
Before installing chair rail molding, it’s important to ensure that the wall surface is smooth and free from any damages or imperfections. In this step-by-step guide, we’ll walk you through the process of repairing any damages and imperfections on the wall, as well as sanding the wall for a smooth finish.
Repairing any damages or imperfections on the wall
If there are any cracks, dents, or holes on the wall, it’s important to patch them up before installing the chair rail molding. Here are the steps you need to follow:
- Clean the area: Start by cleaning the damaged area to remove any dust or loose particles. Use a damp cloth or sponge to wipe the surface.
- Apply spackling compound: Take a small amount of spackling compound and apply it to the damaged area using a putty knife. Make sure to fill the crack, dent, or hole completely.
- Smooth the surface: Use the putty knife to smooth the surface of the spackling compound, ensuring it blends in seamlessly with the surrounding wall. Scrape off any excess compound using the knife.
- Let it dry: Allow the spackling compound to dry completely according to the manufacturer’s instructions. This usually takes a few hours.
- Sand the patched area: Once the compound is dry, use a fine-grit sandpaper to sand the patched area until it is smooth. Sanding in a circular motion can help achieve a more even finish.
- Remove dust: Use a clean cloth or vacuum cleaner to remove any dust or debris from the patched area.
Sanding the wall for a smooth surface
After repairing any damages or imperfections, it’s time to sand the entire wall to ensure a smooth surface for the chair rail molding. Follow these steps:
- Cover adjacent areas: Protect adjacent areas from dust by using plastic sheets or painter’s tape.
- Choose the right sandpaper: Depending on the condition of your walls, choose a medium or fine-grit sandpaper. Coarser grits are more suitable for removing stubborn paint or rough surfaces.
- Sand the wall: Start sanding the wall in long, even strokes. Apply moderate pressure to smooth out any uneven areas. Pay extra attention to corners and edges to ensure they are properly sanded.
- Clean the wall: Once you’re done sanding, use a damp cloth or vacuum cleaner to remove any dust or debris from the wall. Ensuring a clean surface will help the chair rail molding adhere properly.
By following these steps to patch and sand the wall, you’ll be well on your way to achieving a flawless finish for your chair rail molding installation. Now that the wall is prepped and ready, the next steps will guide you through measuring, cutting, and installing the chair rail molding efficiently.
Priming And Painting The Wall
When it comes to installing chair rail molding, priming and painting the wall is an essential step that should not be overlooked. Not only does it provide a clean and finished look to the wall, but it also helps protect the surface from moisture and impurities. In this section, we will discuss the importance of priming before painting and how to choose the right paint color for your chair rail molding.
Importance of priming before painting
Before you begin painting the wall, it is crucial to prime the surface to ensure a smooth and even finish. Priming serves several purposes:
- Sealing the wall: Priming helps seal any porous surfaces, such as drywall or plaster, preventing the paint from being absorbed unevenly. This ensures that the topcoat adheres properly and provides a more uniform finish.
- Improving adhesion: Primers have better adhesion properties compared to regular paint. They create a bond between the paint and the wall, helping the paint stick more effectively and reducing the chances of peeling or chipping.
- Preventing stains and discoloration: Certain types of stains, like water spots or smoke damage, can seep through the paint if not properly sealed. Priming creates a barrier that prevents these stains from bleeding through the topcoat, resulting in a cleaner and more vibrant finish.
By taking the time to prime the wall before painting, you ensure a smoother application and a longer-lasting result for your chair rail molding.
Choosing the right paint color for your chair rail molding
When selecting a paint color for your chair rail molding, there are a few factors to consider:
- Contrast or coordination: Decide whether you want the chair rail molding to stand out by selecting a color that contrasts with the wall color, or if you prefer a more coordinated look by using a similar shade. Both options can create a visually appealing effect.
- Room size and lighting: Consider the size of the room and the amount of natural light it receives. Lighter colors can make a small room appear larger and enhance natural light, while darker colors can add warmth and coziness to larger spaces.
- Style and mood: Think about the overall style and mood you want to achieve in the room. Cool tones like blues and greens can create a calming atmosphere, while warm tones like reds and yellows can add energy and vibrancy.
Remember, you can always test paint samples on a small section of the wall or use online visualization tools to see how different colors will look with your chair rail molding and existing decor. Take your time to find the perfect paint color that enhances the beauty of your chair rail molding and complements your personal style.
Selecting Chair Rail Molding
When it comes to installing chair rail molding, one of the most important steps is selecting the right molding for your project. Chair rail molding not only adds a touch of elegance and sophistication to any room, but it also serves as a practical way to protect your walls from chair backs and other potential damage. In this section, we will explore the different types and styles of chair rail molding, as well as considerations for choosing the appropriate molding for your needs.
Different types and styles of chair rail molding
Chair rail molding comes in a variety of types and styles, each with its own unique characteristics and aesthetic appeal. Here are some common types and styles to consider:
- Wooden chair rail molding: This is the most traditional and classic option. Wooden chair rail molding can be found in a variety of wood species, such as pine, oak, or mahogany, allowing you to choose the one that best matches your existing woodwork or furniture pieces.
- MDF chair rail molding: MDF (medium-density fiberboard) chair rail molding offers a cost-effective alternative to wooden molding. It is made from compressed wood fibers and is available in various finishes that can mimic the look of real wood.
- Plastic or PVC chair rail molding: Plastic or PVC molding is a popular choice for areas that are prone to moisture, such as bathrooms or kitchens. It is lightweight, durable, and easy to install, making it a practical option for DIY enthusiasts.
- Metal chair rail molding: For a contemporary or industrial look, consider metal chair rail molding. It is available in various metals, including aluminum, stainless steel, and brass, and can add a stylish touch to any room.
Considerations for choosing the appropriate molding
When choosing chair rail molding for your project, there are several key considerations to keep in mind:
- Style and aesthetics: Consider the overall style and aesthetics of your space. Choose a molding that complements the architectural features, color scheme, and decor of the room.
- Height and proportion: Chair rail molding is typically installed at a height of 30 to 36 inches from the floor. Ensure that the chosen molding has an appropriate height and proportion for your room to achieve a visually balanced look.
- Durability and maintenance: Consider the durability and maintenance requirements of the molding material. Some materials may be more prone to damage or require more frequent upkeep.
- Budget: Determine your budget for the project and choose a molding material that fits within your financial constraints.
In conclusion, selecting the right chair rail molding involves considering the different types and styles available, as well as various factors such as style, height, durability, and budget. Taking the time to choose the appropriate molding will ensure that your installation not only protects your walls but also enhances the overall look and feel of your space.
Measuring And Cutting Chair Rail Molding
When it comes to installing chair rail molding, accurate measurements and precise cutting are essential to achieve a professional and polished look. In this article, we will guide you through the process of measuring and cutting chair rail molding, ensuring that your installation is both visually appealing and structurally sound.
Accurate measurements for chair rail molding length and angles
Before you begin cutting your chair rail molding, it is important to take accurate measurements of the area where the molding will be installed. This will ensure that you have the correct length of molding and also determine any angles or corners that need to be accounted for.
Here’s a step-by-step guide to measuring your chair rail molding:
- Start by measuring the total length of the wall where the chair rail molding will be installed, using a tape measure. Make sure to account for any door frames or windows.
- Next, measure the height where you want the chair rail molding to be installed, ensuring that it is evenly spaced and aesthetically pleasing.
- If your walls are not perfectly straight, measure the distance from the floor or ceiling at various points along the wall to determine any inconsistencies.
- Finally, measure any angles or corners where the chair rail molding will need to be cut. Use an angle finder or a protractor to accurately measure these angles.

Proper techniques for cutting the molding
Once you have measured the chair rail molding and determined any angles or corners, it is time to cut the molding to the correct lengths and angles. Here are some proper techniques to ensure precise cutting:
- Always use a miter saw with a fine-toothed blade for accurate and clean cuts. This will ensure that your chair rail molding fits together seamlessly.
- Start by making straight cuts for the length of the molding using a miter saw. Remember to double-check your measurements before cutting.
- For angled cuts, adjust the miter saw to the desired angle and carefully cut the molding. It is recommended to make 45-degree cuts for corners.
- If your chair rail molding has multiple angles or corners, label each piece with its corresponding location to avoid confusion during installation.
- Always make test cuts on scrap pieces of molding before cutting the actual pieces to ensure accuracy.
By following these accurate measuring and proper cutting techniques, you can install chair rail molding that adds a touch of elegance and sophistication to any space. Attention to detail and precision will ensure a seamless installation that enhances the aesthetic appeal of your room.
Attaching Chair Rail Molding To The Wall
When it comes to adding a touch of elegance and style to your walls, chair rail molding is an excellent choice. Adding chair rail molding not only protects your walls from chair damage, but it also gives your space a timeless and sophisticated look. However, before you can enjoy the benefits of chair rail molding, you need to know how to properly attach it to the wall.
Using adhesive or nails for secure attachment
There are two common methods for attaching chair rail molding to the wall: using adhesive or nails. Both methods have their pros and cons, so it’s important to choose the one that best suits your needs and preferences.
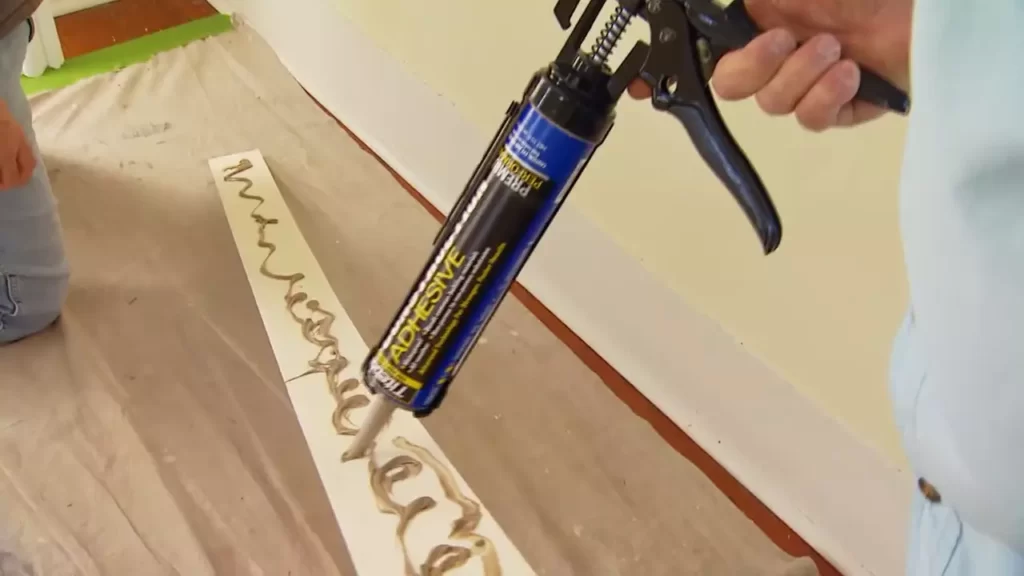
1. Using adhesive for secure attachment
If you want to avoid drilling holes in your walls or if you’re working with a fragile wall material like plaster, using adhesive is a good option. Adhesive can provide a secure and seamless attachment, ensuring that your chair rail molding stays in place for years to come.
To attach chair rail molding using adhesive, follow these steps:
- Start by cleaning the wall surface thoroughly to remove any dust, dirt, or grease. This will ensure that the adhesive bonds properly.
- Apply a thin, even layer of construction adhesive to the back of the chair rail molding using a caulk gun or a putty knife.
- Press the chair rail molding firmly against the wall, making sure it is level and aligned with your markings.
- Hold the molding in place for a few minutes to allow the adhesive to set.
- Remove any excess adhesive using a damp cloth.
2. Installing the chair rail molding with nails
If you prefer a more traditional approach or if you’re working with a sturdier wall material like drywall or wood, using nails is a reliable choice. Nails provide a sturdy and secure attachment, ensuring that your chair rail molding remains in place even under pressure.
To install chair rail molding using nails, follow these steps:
- Start by marking the desired height of your chair rail molding on the wall. Use a measuring tape and a pencil to create level markings.
- Pre-drill pilot holes along the markings to prevent the wood from splitting when you insert the nails.
- Align the chair rail molding with the markings and press it firmly against the wall.
- Secure the chair rail molding to the wall by hammering finishing nails through the pre-drilled holes and into the wall.
- Use a nail set to countersink the nails slightly below the surface of the molding.
- Fill the nail holes with wood filler and sand them smooth once it dries.
Whether you choose to use adhesive or nails, the key to a successful installation is careful measuring, proper alignment, and taking your time to ensure a flawless finish. Once you’ve successfully attached the chair rail molding to the wall, step back and admire the instant transformation it brings to your space.
Filling Nail Holes And Caulking
Techniques for filling nail holes and gaps
When it comes to installing chair rail molding, one important step is filling nail holes and gaps to achieve a smooth and flawless finish. Whether you are a DIY enthusiast or a professional, it is essential to know the right techniques for achieving a seamless result.
Here are some effective techniques for filling nail holes and gaps in chair rail molding:
- Use wood filler or putty: For small nail holes, wood filler or putty can be your best friend. Simply squeeze a small amount of filler or putty onto your finger or a putty knife and press it firmly into the hole. Smooth the surface and remove any excess filler using a putty knife. Allow it to dry completely before sanding.
- Color-matching: If you are working with stained or painted chair rail molding, it’s crucial to use a wood filler or putty that matches the color of the molding. This way, the filled holes will blend seamlessly into the rest of the surface.
- Wooden toothpicks: In case of larger gaps or damaged areas, wooden toothpicks can be a quick and affordable solution. Dip the wooden toothpicks into wood glue and firmly insert them into the gaps or damaged areas. Once dry, cut off any excess toothpick and sand the surface to achieve a smooth finish.
Remember, the key to success is to ensure that the filled holes are level with the surrounding surface. Once the filler or putty has dried, sand the area gently using fine-grit sandpaper until it feels smooth to the touch.
Caulking to achieve a seamless finish
After filling the nail holes and gaps, caulking is the next crucial step to achieve a seamless finish for your chair rail molding installation. Caulk is used to fill any remaining gaps between the molding and the wall, creating a tight and professional-looking finish.
Here’s how to caulk chair rail molding:
- Choose the right caulk: Select a high-quality caulk that is specifically designed for interior use. Depending on the material of your chair rail molding and the wall, you may need either a painter’s caulk or a silicone caulk.
- Prepare the caulk gun: Load the caulk tube into a caulk gun and cut the tip at a 45-degree angle. Make sure the hole is big enough to allow a smooth flow of caulk but not too large that it creates excessive mess.
- Apply the caulk: Squeeze a thin and even bead of caulk along the gap between the molding and the wall. Hold the caulk gun at a consistent angle and move it steadily along the gap, applying gentle pressure to ensure the caulk fills the entire space.
- Smooth the caulk: After applying the caulk, use a caulk finishing tool or a wet finger to smooth and level the caulk. This will help create a seamless finish and remove any excess caulk.
- Clean up: Wipe away any excess caulk with a damp cloth or sponge. Make sure to remove any smudges or smears before the caulk dries.
Allow the caulk to dry completely according to the manufacturer’s instructions. Once dry, you can paint over the caulk to further blend it with the surrounding surface or leave it as is for a more natural look.
By following these techniques for filling nail holes and gaps, as well as caulking your chair rail molding, you can achieve a professional and seamless finish that adds both style and charm to your space.

Painting And Touching Up Chair Rail Molding
Once you have successfully installed chair rail molding, it’s time to give it a finishing touch to enhance its aesthetic appeal. Painting and touching up chair rail molding is a crucial step in the installation process. This step not only adds a polished look to your room but also protects the molding from wear and tear. In this section, we will guide you on how to apply the final coat of paint to the molding and how to touch up any imperfections or blemishes that may have occurred during the installation.
Applying the final coat of paint to the molding
Now that your chair rail molding is securely installed and any previous coats of paint have dried completely, it’s time to apply the final coat of paint. Follow these steps to achieve a professional and flawless finish:
- Clean the molding: Before painting, ensure that the chair rail molding is completely clean and free from dust or any debris. Use a gentle household cleaner and a soft cloth to wipe down the molding surface. This will ensure better adhesion of the paint and a smoother finish.
- Apply painter’s tape: To protect the adjacent surfaces, such as the wall or the baseboard, apply painter’s tape along the edges of the chair rail molding. This will create clean and crisp lines after painting and reduce the risk of accidentally painting on other surfaces.
- Choose the paint: Select a high-quality paint that is specifically formulated for trim or molding. Opt for either a gloss or semi-gloss finish, as these are more durable and easier to clean. Consider the color scheme of your room and choose a paint color that complements it.
- Use a brush or a roller: Start by using a brush to cut in along the edges of the molding. Apply an even coat of paint, making sure to maintain a smooth and consistent stroke. Once the edges are painted, use a small roller to cover the larger surface area of the chair rail molding. Roll the paint on evenly without leaving any streaks or drips.
- Dry and inspect: Allow the first coat of paint to dry completely before applying a second coat. Once the final coat is applied, inspect the chair rail molding for any uneven coverage or imperfections. This will help you identify areas that may require additional touch-ups.
Touching up any imperfections or blemishes
Despite your best efforts, there might be some imperfections or blemishes on the chair rail molding that need to be addressed. Here’s how you can touch up these areas:
- Identify the imperfections: Carefully examine the molding for any areas that have uneven paint coverage, visible brush strokes, or nicks. These can easily be addressed with some touch-up paint.
- Prepare the touch-up paint: Mix a small amount of the original paint with a touch-up paintbrush to match the color and consistency. Alternatively, you can use a paint marker for smaller touch-ups.
- Touch up the imperfections: Using a steady hand, apply the touch-up paint directly to the imperfections. Take your time and be patient to ensure a seamless blend with the surrounding paint. If necessary, apply multiple thin layers of touch-up paint, allowing each layer to dry before applying the next.
- Blend the touch-up paint: Once the touch-up paint has dried, lightly sand the area with a fine-grit sandpaper to smooth out any rough edges. Wipe away any dust with a damp cloth to achieve a smooth finish that seamlessly blends with the rest of the molding.
By following these steps, you can ensure that your chair rail molding looks flawless and enhances the overall appearance of your room. The final coat of paint and the touch-ups will give your molding a professional finish that adds an elegant touch to your home.
Showcasing The Chair Rail Molding With Decorative Enhancements
Adding additional elements such as picture frames or wainscoting
When it comes to installing chair rail molding, the possibilities for adding decorative enhancements are endless. One way to take your chair rail molding to the next level is by incorporating additional elements such as picture frames or wainscoting. These decorative enhancements not only add visual interest but also showcase the chair rail molding in a unique and personalized way.
Picture Frames:
Adding picture frames along the chair rail molding can create a stunning gallery wall effect. Whether you choose to hang a collection of family photos or display an assortment of artwork, picture frames can instantly elevate the look of your space. To achieve a cohesive and balanced design, consider selecting frames that match the style and finish of your chair rail molding.
Wainscoting:
Another way to enhance your chair rail molding is by incorporating wainscoting. Wainscoting is a decorative paneling that is installed below the chair rail. It not only adds architectural interest but also provides a beautiful backdrop for your chair rail molding. Whether you prefer traditional raised panels or modern shiplap, wainscoting can add depth and texture to your walls.
Choosing complementary decor to enhance the chair rail molding
Once you have installed your chair rail molding and added decorative enhancements such as picture frames or wainscoting, it’s time to choose complementary decor that will further enhance the overall look and feel of your space. By carefully selecting decor elements, you can create a cohesive and harmonious design scheme that highlights and accentuates the chair rail molding.
Color Scheme:
Start by considering the color scheme of your space. The chair rail molding itself can serve as a focal point, so choose decor elements that complement its color or finish. For example, if you have installed a white chair rail molding, consider incorporating pops of color through artwork, curtains, or decorative accents. On the other hand, if your chair rail molding has a rich wood finish, opt for decor pieces that enhance the warmth and natural beauty of the wood.
Lighting:
In addition to color, lighting can also play a significant role in showcasing your chair rail molding. Consider installing wall sconces or picture lights above the chair rail to create a dramatic effect. These lighting fixtures can help draw attention to the molding and the decorative elements you have added. Additionally, strategically placed floor or table lamps can create a cozy and inviting atmosphere.
Frequently Asked Questions For How To Install Chair Rail Molding
How Do You Hang Chair Rail Molding?
To hang chair rail molding, follow these steps:
1. Measure and mark the desired height for the chair rail.
2. Use a level to draw a straight line along the wall.
3. Cut the molding to the appropriate length and angle.
4. Apply adhesive or use nails to attach the molding to the wall.
5. Ensure the molding is straight and secure.
How Do You Secure A Chair Rail To The Wall?
Secure a chair rail to the wall by following these steps:
1. Measure and mark the desired height for the rail.
2. Use a level to draw a level line along the wall.
3. Pre-drill holes for the screws or nails on the line.
4. Attach the rail to the wall using screws or nails.
5. Ensure it is level and secure.
Should I Glue the Chair Rail To the Wall?
Yes, you should glue the chair rail to the wall. Gluing ensures a secure and long-lasting installation. It is important to follow the manufacturer’s instructions and use adhesive suitable for the type of material used for the chair rail.
What Kind Of Nails To Use For Chair Rail?
For chair rail installation, it is recommended to use finishing nails. Finishing nails are slim and have small heads, providing a clean and inconspicuous look. These nails are typically 6d or 8d in size and are driven into the wall studs to securely hold the chair rail in place.
Conclusion
Installing chair rail molding is a simple and effective way to add a touch of elegance and sophistication to any room. By following the step-by-step guide outlined in this blog post, you can confidently tackle this home improvement project. Remember to take precise measurements, choose the right materials, and use the correct tools to ensure a seamless installation.
With a little time and effort, you can transform your space and create a stunning accent that will enhance the overall look and feel of your home.