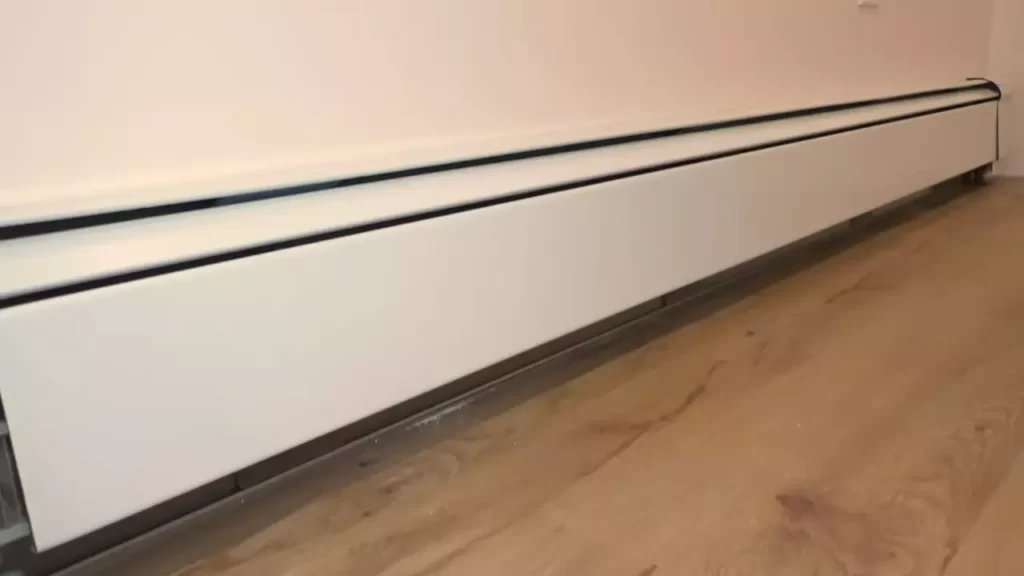
To install baseboard heater covers, follow these steps: measure the length of the baseboard, purchase covers of the same size, remove old covers and clean the area, align the new covers and secure them with screws. Installing baseboard heater covers is a simple process that can be done in a few easy steps.
First, measure the length of your baseboard to ensure you purchase the correct size covers. Next, remove the old covers and clean the area to prepare for the new ones. Then, align the new covers with the baseboard and secure them in place using screws.
By following these steps, you can easily install baseboard heater covers and improve the appearance of your heating system.
Understanding The Importance Of Baseboard Heater Covers
When it comes to home heating, baseboard heaters are a popular choice. They are efficient, cost-effective, and provide consistent warmth throughout the room. However, many homeowners overlook an essential aspect of their baseboard heaters – the heater covers. These covers not only enhance the overall look and feel of your space but also play a crucial role in improving safety.
Benefits of using baseboard heater covers
- Enhancing the overall look and feel of your space
Your home is a reflection of your personal style and taste. Why settle for plain, utilitarian baseboard heaters when you can enhance the overall aesthetic of your space with beautiful and stylish heater covers? These covers come in a variety of designs, finishes, and materials, allowing you to choose the perfect option that complements your home decor. Whether you prefer a sleek and modern look or a more traditional and rustic feel, there’s a baseboard heater cover that can elevate the look of your space.
2. Improving safety by preventing contact with hot surfaces
Baseboard heaters can reach high temperatures during operation, posing a risk of burns or injuries, especially for curious toddlers or pets. Heater covers act as a protective barrier, preventing direct contact with the hot surface and reducing the chances of accidents. By ensuring that your baseboard heaters are properly covered, you create a safer environment for everyone in your home.
Tools And Materials Needed
When it comes to installing baseboard heater covers, it’s important to have the right tools and materials on hand to ensure a smooth and successful installation process. In this section, we will discuss the essential tools you will need, the recommended materials for baseboard heater covers, and some safety precautions to keep in mind while working with tools.
List of essential tools required for the installation process
To properly install baseboard heater covers, you’ll need a few tools to get the job done right. Here is a list of essential tools you should have:
- Measuring tape to accurately measure the length and width of your baseboard heater.
- Hacksaw or a similar cutting tool to cut the baseboard cover to the correct size.
- Screwdriver or a drill to secure the cover to the wall.
- Safety goggles to protect your eyes from any debris or particles while cutting or drilling.
- Sanding paper or a file to smooth out any rough edges after cutting the baseboard cover.
- Painter’s tape to mark the areas where you plan to install the baseboard covers.
- Level to ensure that the covers are installed straight and evenly.
Recommended materials for baseboard heater covers
When choosing the materials for your baseboard heater covers, it’s important to consider both durability and aesthetic appeal. Here are some recommended materials:
| Material | Description |
|---|---|
| Wood | A popular choice for its natural beauty and versatility. Wood covers can be stained or painted to match your decor. |
| Metal | Provides a sleek and modern look. Metal covers are often available in various finishes, such as brushed nickel or bronze. |
| Plastic | An affordable and lightweight option. Plastic covers are easy to install and come in a variety of colors. |
Safety precautions to keep in mind while working with tools
Working with tools can be potentially hazardous if proper safety precautions are not followed. Here are some safety tips to keep in mind:
- Always wear safety goggles to protect your eyes from debris or particles.
- Use caution when handling sharp cutting tools and follow the manufacturer’s instructions.
- Secure the baseboard cover firmly to the wall to prevent it from falling or becoming a tripping hazard.
- Be mindful of your surroundings and make sure there are no electrical wires or outlets near the installation area.
- If you are unsure about any step of the installation process, consult a professional or refer to the manufacturer’s guidelines.
By having the right tools, choosing the appropriate materials, and prioritizing safety, you can confidently install baseboard heater covers that not only enhance the look of your space but also ensure the proper functioning of your heating system.
Measuring And Preparing For Installation
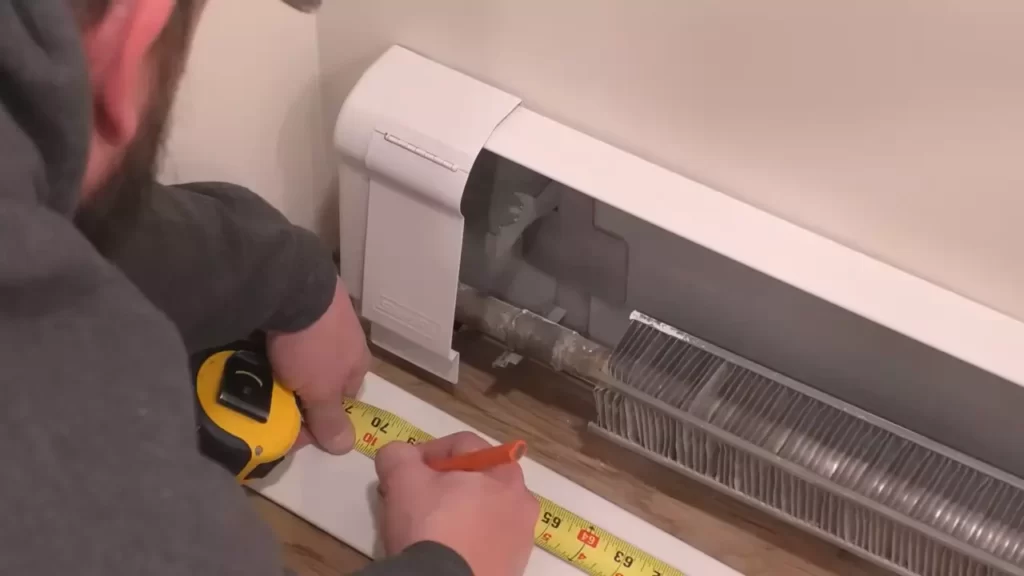
Before installing baseboard heater covers, it is important to take accurate measurements and assess the condition of your existing baseboard heater. This initial step will ensure a smooth and successful installation process. In this section, we will guide you through determining the correct size and dimensions for your baseboard heater covers, measuring the existing baseboard heater, and assessing its condition. Let’s get started!
Determining the correct size and dimensions for your baseboard heater covers
When it comes to selecting the right baseboard heater covers, size matters. To ensure a perfect fit, you first need to measure the dimensions of your existing baseboard heater. Here’s a simple step-by-step guide:
- Start by measuring the length of your baseboard heater. Use a tape measure to get an accurate measurement from one end to the other.
- Next, measure the height of the baseboard heater. This measurement will determine the required height of your new heater cover.
- Finally, measure the depth of the baseboard heater. This measurement will help you select a cover that fits over the entire baseboard without interfering with its functionality.
Once you have these measurements, you can easily find baseboard heater covers that are a perfect match for your existing unit.
Measuring the existing baseboard heater
Measuring the existing baseboard heater is a crucial step to ensure the new cover fits seamlessly. You’ll need the following tools:
- Tape measure
- Pencil or marker
Here’s how to measure your existing baseboard heater:
- Start by measuring the length of the metal housing of the baseboard heater. Use the tape measure to measure from one end to the other.
- Next, measure the height of the metal housing from top to bottom.
- Finally, measure the depth of the baseboard heater by measuring from the wall to the front of the metal housing.
Make sure to write down these measurements as you will need them when selecting the appropriate baseboard heater covers.
Assessing the condition of the baseboard and identifying potential issues
Before installing new baseboard heater covers, it’s essential to assess the condition of the existing baseboard and identify any potential issues. This step will help ensure a successful installation and prevent any complications. Here are a few things to look out for:
| Potential Issues | Solutions |
|---|---|
| The baseboard heater is rusty or corroded. | Consider cleaning or replacing the baseboard heater to ensure proper functionality and aesthetic appeal. |
| The baseboard shows signs of damage or wear. | Repair any visible damage or replace the baseboard if necessary. It’s important to have a sturdy base before installing the new cover. |
| The baseboard is not level or securely attached to the wall. | Make sure to level the baseboard before installing the new cover. If it is not securely attached to the wall, reinforce it with additional screws. |
Identifying and addressing these potential issues will ensure a smooth installation process and prolong the lifespan of your new baseboard heater covers.
Now that you have measured the dimensions of your baseboard heater and assessed its condition, you are ready to move on to the installation process. Stay tuned for our next blog post, where we will guide you through the step-by-step process of installing your new baseboard heater covers.

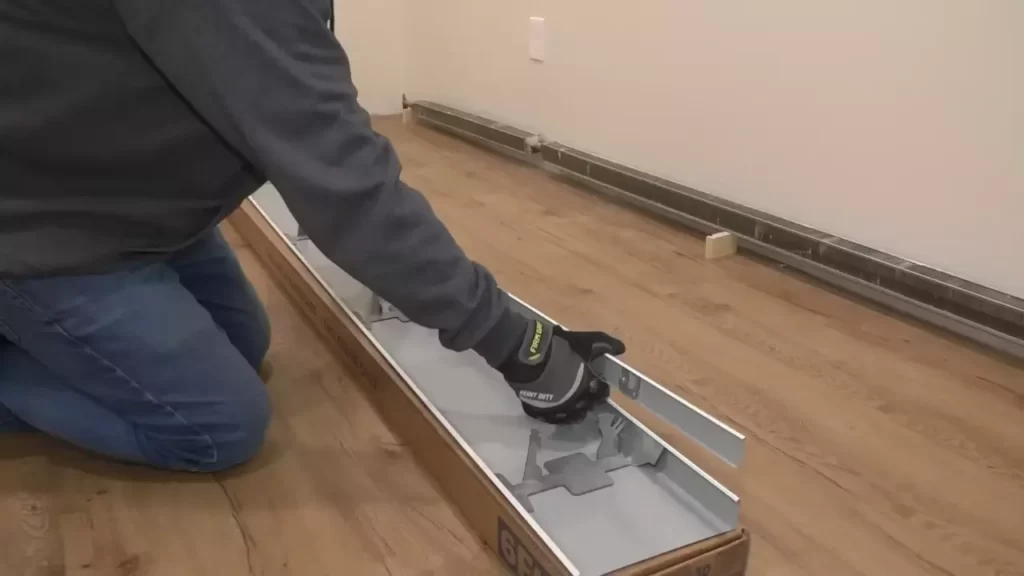
Removing The Old Baseboard Heater Cover
When it comes to installing baseboard heater covers, one of the first steps is removing the old cover. This task may seem daunting, but with the right approach, it can be done safely and efficiently. In this section, we will provide you with step-by-step instructions to remove the old baseboard heater cover. Additionally, we will address any obstacles or challenges that may arise during this process.
Step-by-step instructions for safely removing the old cover:
- Start by preparing the workspace. Make sure there is ample room to maneuver around the baseboard heater. Clear away any furniture or obstacles that may be in the way.
- Before proceeding, turn off the power to the baseboard heater at the main circuit breaker. This is crucial for your safety.
- Inspect the old cover for any screws or fasteners that may be securing it to the wall. In most cases, you will find screws along the top edge or bottom flange of the cover. Use a screwdriver to carefully remove these screws. Place them in a small container to avoid misplacing them.
- Once the screws are removed, gently pull the old cover away from the wall. Be mindful of any pipes or electrical wires that may be connected to the cover. If necessary, use a flashlight to inspect the area behind the cover for any potential obstacles.
- If there are any obstacles or challenges, such as pipes or wires blocking the removal of the cover, you may need to consult a professional electrician or plumber. It is crucial to avoid damaging any existing components or creating a hazardous situation.
- If the cover seems stuck or difficult to remove, it may be helpful to tilt the top edge of the cover away from the wall while simultaneously lifting it upwards. This motion can sometimes dislodge the cover from its position.
- Once the old cover is successfully removed, set it aside. If the cover is still in good condition, you may choose to clean and reuse it later. However, if it is damaged or worn, it is recommended to purchase a new cover for optimal performance and aesthetics.
Choosing The Right Replacement Cover
Exploring different types of baseboard heater covers available
When it comes to choosing the right replacement cover for your baseboard heater, it’s important to explore the different types available in the market. By understanding the various options, you can make an informed decision that not only fits your aesthetic preferences but also meets your functional requirements. Let’s take a closer look at some of the common types of baseboard heater covers you can consider:
- 1. Metal covers: These covers are often made of durable materials like steel or aluminum. They offer a sleek and modern look, making them a popular choice for contemporary interiors. Metal covers also tend to provide better heat conduction, ensuring efficient heating in your space.
- 2. Wood covers: If you want to add a touch of warmth and elegance to your room, wood covers can be an excellent option. They come in various finishes, allowing you to choose the one that complements your existing decor. Wood covers are also great at insulating heat, which can help in energy efficiency.
- 3. Plastic covers: Plastic covers are lightweight, easy to install, and budget-friendly. They are often available in various colors, giving you the flexibility to match them with your room’s color scheme. While they may not offer the same level of durability as metal or wood covers, they can still be a suitable choice for certain settings.
Factors to consider when selecting a replacement cover
When selecting a replacement cover for your baseboard heater, it’s essential to consider several factors to ensure the best possible fit and performance. Here are some factors you should keep in mind:
- 1. Size and dimensions: Measure your existing baseboard heater accurately to determine the right size for the replacement cover. This will ensure a snug fit and prevent any gaps that may affect the heating efficiency.
- 2. Style and design: Consider the overall style and design of your space. Choose a replacement cover that blends seamlessly with your room’s aesthetics, whether it’s classic, contemporary, or a unique theme.
- 3. Ventilation: Adequate ventilation is crucial for efficient heating. Look for replacement covers that have proper gaps or vents to allow proper airflow, ensuring that the heat produced by the heater circulates effectively in the room.
- 4. Safety features: Ensure that the replacement cover you choose has safety features such as rounded edges or childproof locks, especially if you have children or pets at home.
Ensuring compatibility with your existing heating system
Before finalizing a replacement cover for your baseboard heater, it’s crucial to ensure its compatibility with your existing heating system. Here are a few steps you can take to ensure a seamless fit:
- 1. Check the manufacturer’s specifications: Refer to the manufacturer’s documentation or website to find information about compatible replacement covers for your specific baseboard heater model.
- 2. Seek professional assistance if needed: If you are unsure about which replacement cover to choose or if you have a complex heating system, it’s always a good idea to seek professional assistance. An HVAC technician can guide you in selecting the right cover that ensures compatibility and optimal performance.
- 3. Measure the clearance space: Note down the clearance space required for your baseboard heater to function safely and efficiently. Ensure that the replacement cover allows for adequate clearance to avoid any obstruction.
By exploring the different types of baseboard heater covers available, considering important factors, and ensuring compatibility with your existing heating system, you can make an informed decision when choosing the right replacement cover. Remember, a well-chosen cover not only enhances the aesthetics of your space but also contributes to optimal heating performance.
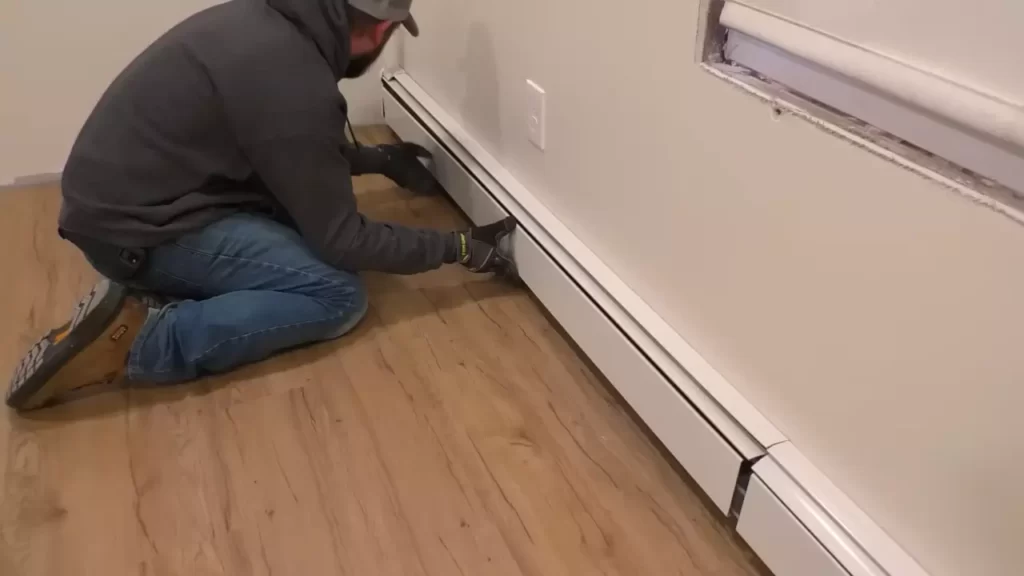
Installing The New Baseboard Heater Cover
Step-by-step instructions for installing the new cover
Installing a new baseboard heater cover can instantly upgrade the look and functionality of your heating system. To guide you through the installation process, below are step-by-step instructions:
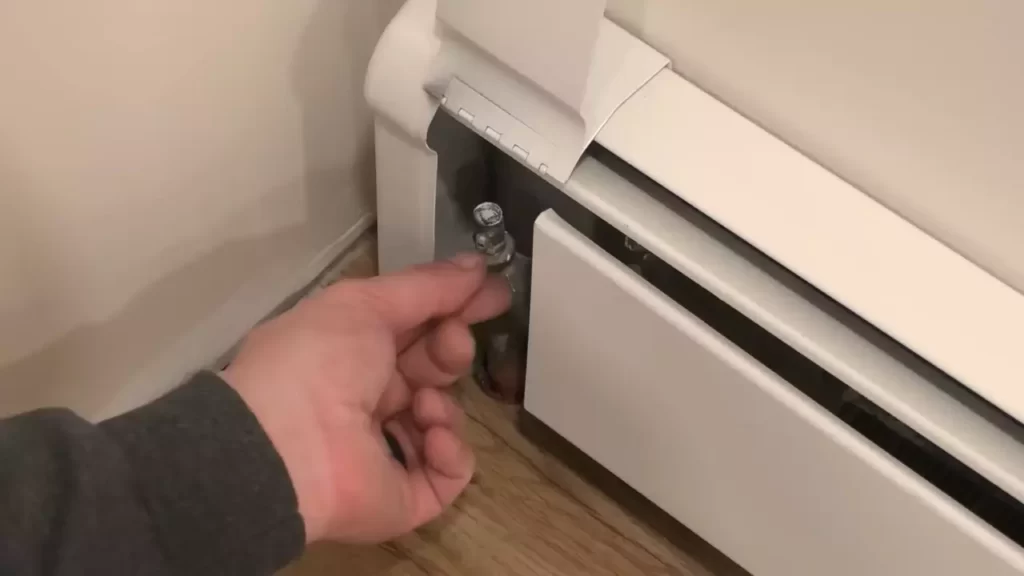
- Begin by carefully removing the old baseboard heater cover. Use a screwdriver to loosen and remove any screws holding it in place.
- Once the old cover is removed, inspect the heating unit itself for any dust or debris. Use a vacuum or a brush to clean it thoroughly, ensuring optimal performance.
- Measure the length of your baseboard heater accurately. This measurement will determine the size of the new cover you need to purchase.
- Choose a baseboard heater cover that matches the dimensions of your heater. There are various styles and materials available to suit your aesthetic preferences and budget.
- Before installing the new cover, check the alignment of the heating unit. Ensure that it is securely mounted and level. Make any necessary adjustments before proceeding.
- Gently slide the new cover over the heating unit, aligning it with the mounting brackets or clips provided. Secure the cover in place by tightening the screws using a screwdriver.
- Inspect the cover for any gaps or misalignments. If necessary, adjust the position and tighten the screws further to ensure a snug fit.
- Once the cover is securely installed, give it a final visual inspection to ensure it is level and straight. This will not only enhance the appearance but also improve its functionality.
Tips for ensuring a secure and proper fit
Installing a baseboard heater cover requires attention to detail to achieve a secure and proper fit. Here are some useful tips to consider:
- While measuring the length of your baseboard heater, allow a small clearance of about 1/8 to 1/4 inch on either side. This will ensure a better fit and facilitate easier installation.
- Before purchasing a new cover, consult the manufacturer’s specifications to ensure compatibility with your heater model. Choosing a cover that is specifically designed for your type of heater will guarantee a proper fit.
- Consider using adhesive foam strips on the back of the cover to provide additional support and prevent any rattling noise.
- If the cover has multiple sections, join them together snugly to eliminate any gaps. This will create a consistent and visually appealing appearance.
- Regularly inspect the cover and the surrounding area for any signs of wear or damage. Replacing the cover promptly will ensure the continued efficiency and safety of your baseboard heater.
Addressing any potential installation issues or concerns
While installing a new baseboard heater cover is a relatively straightforward process, you may encounter some issues or concerns along the way. Here are a couple of common problems and their solutions:
| Potential Issue | Solution |
|---|---|
| The cover is difficult to slide onto the heating unit. | Apply a small amount of lubricant or talcum powder to the heating unit before sliding the cover on. This will reduce friction and make the installation smoother. |
| The cover does not align properly with the mounting brackets. | Check if the mounting brackets are aligned properly and securely attached to the wall. If necessary, adjust or replace the brackets to ensure a proper fit. |
By following the step-by-step instructions, considering the fitting tips, and addressing potential installation issues, you can confidently install a new baseboard heater cover. This simple upgrade will not only enhance the look of your space but also improve the efficiency and effectiveness of your heating system.
Enhancing The Look And Functionality Of Baseboard Heater Covers
Enhancing the Look and Functionality of Baseboard Heater Covers is a great way to elevate the overall aesthetic appeal and improve the performance of your baseboard heating system. With the right decorative options, additional features, and regular maintenance, you can transform these essential components into stylish and efficient elements of your home decor.
Exploring decorative options and styles for baseboard heater covers
When it comes to baseboard heater covers, decorative options and styles can truly transform them from mundane to eye-catching. Whether you prefer a modern, minimalist look or a more traditional approach, there are various options to suit your personal taste and interior design. Here are some popular decorative options and styles for baseboard heater covers:
- Wooden covers: Choose from a range of wood species, such as oak, maple, or cherry, to add warmth and elegance to your space.
- Metallic covers: Opt for sleek and contemporary covers made of brushed stainless steel or aluminum for a modern touch.
- Custom covers: Consider custom-made covers that can be tailored to fit your specific design preferences, including unique patterns, colors, and finishes.
- Painted covers: Give your baseboard heater covers a fresh look by painting them in a color that complements your room’s color scheme or acts as an accent.
- Patterned covers: Add visual interest with covers featuring intricate patterns or designs, such as geometric shapes or floral motifs.
Adding additional features for improved functionality and safety
Enhancing the functionality and safety of baseboard heater covers can significantly improve the overall performance of your heating system. Here are some additional features you can consider:
- Adjustable airflow vents: Install covers with adjustable airflow vents to control the amount of heat reaching the room, ensuring optimal comfort.
- Childproofing features: If you have young children or pets, consider covers with built-in safety features like childproof locking mechanisms or rounded edges.
- Noise reduction features: Look for covers with noise reduction properties to minimize any operational sounds, creating a quieter and more peaceful environment.
- Heat-resistant materials: Opt for covers made from heat-resistant materials that can withstand high temperatures without warping or discoloration.
Maintaining and cleaning baseboard heater covers for longevity
Regular maintenance and cleaning are essential to ensure the longevity and optimal performance of your baseboard heater covers. Here are some tips to keep them in excellent condition:
- Vacuum: Remove any dust or debris by using a vacuum cleaner with a brush attachment. Make sure to clean both the exterior and interior of the covers.
- Wipe down: Use a damp cloth or sponge to wipe down the covers, removing any stubborn dirt or stains. Avoid using abrasive cleaners that can damage the finishes.
- Inspect for damage: Periodically inspect the covers for any signs of damage, such as cracks or dents. Replace any damaged covers promptly to maintain their functionality.
- Paint touch-ups: If you have painted covers, perform touch-ups as needed to keep them looking fresh and vibrant.
- Keep vents clear: Ensure that the airflow vents are not blocked by furniture or objects, as it can obstruct the heat distribution and reduce efficiency.
By exploring decorative options and styles, adding additional features for improved functionality and safety, and maintaining and cleaning your baseboard heater covers regularly, you can enhance the look and functionality of these essential heating components. Embrace the opportunity to transform your baseboard heater covers into stylish elements that seamlessly blend with your home decor while efficiently heating your space.
Troubleshooting And Common Issues
During the installation of baseboard heater covers, you may encounter certain common issues that can hinder the process. It is important to be aware of these issues and have the necessary troubleshooting skills to address them effectively. In this section, we will discuss some of the most common problems that may arise during the installation and provide you with useful tips to troubleshoot them. Moreover, we will emphasize the importance of seeking professional assistance when needed. Let’s get started!
Identifying common issues that may arise during installation
Before we delve into troubleshooting methods, it is crucial to have a clear understanding of the common issues that you may encounter when installing baseboard heater covers. By being aware of these issues, you can identify them early on and take appropriate action. Here are some issues commonly faced:
- Uneven heating: One of the most common problems is uneven heating, where certain areas of the room do not receive adequate warmth. This can be caused by air pockets or obstructions in the heating element.
- Noise and rattling: Another common issue is noise and rattling, which can be quite frustrating. These noises can occur due to loose components or the buildup of dust and debris within the baseboard heater.
- Inadequate airflow: If you find that your baseboard heater is not providing the desired amount of airflow, it can be due to blocked or dirty vents. Inefficient airflow can result in poor heating performance.
- Thermostat malfunction: A malfunctioning thermostat can cause temperature discrepancies, making it difficult to maintain a comfortable indoor climate. This can occur due to faulty wiring or a malfunctioning thermostat unit.
- Water leaks: Water leaks can be a significant concern when installing baseboard heater covers. Issues with pipe connections or damaged pipes can lead to leaks, which require immediate attention.
Troubleshooting tips for addressing these issues effectively
Now that we have identified the common issues, let’s move on to discussing effective troubleshooting tips to address them:
- Uneven heating: To address uneven heating, start by bleeding the air from your heating system. Make sure there are no air pockets trapped within the heating element. Additionally, check for any obstructions in the system’s flow, such as furniture or curtains blocking the vents.
- Noise and rattling: If you are experiencing noise and rattling, inspect the heating element for any loose components. Tighten any loose screws or fasteners. Clean the baseboard heater thoroughly to remove dust and debris that may contribute to the noise.
- Inadequate airflow: To improve airflow, ensure that the vents are not blocked by any objects or debris. Clean the vents regularly to prevent the buildup of dust and dirt. If the problem persists, consider replacing old or damaged vents with new ones.
- Thermostat malfunction: If you suspect a thermostat malfunction, check the wiring connections to ensure they are secure. If the wiring appears to be intact, consider replacing the thermostat unit. Consult an electrician or HVAC professional if you are uncertain about handling electrical components.
- Water leaks: In case of water leaks, shut off the water supply immediately. Inspect the pipe connections for any loose or damaged parts. Replace or repair any faulty components to prevent further leaks. If necessary, contact a professional plumber for assistance.
Seeking professional assistance when needed
While troubleshooting and addressing common issues can be done by following the aforementioned tips, it is important to recognize when professional assistance is needed. Certain problems may require expertise and specialized knowledge to resolve effectively.
Seeking professional help ensures the safety and efficiency of your baseboard heater installation. If you are unsure about any aspect or encounter complex issues, do not hesitate to reach out to a qualified HVAC technician or plumber.
Remember, troubleshooting common issues during baseboard heater cover installation is essential for ensuring the proper functioning and longevity of your heating system. By being proactive and diligent in addressing these issues, you can enjoy a comfortable and cozy environment in your home. Stay tuned for our next section on maintaining baseboard heater covers!
Cost Considerations And Additional Resources
Estimating the cost of baseboard heater cover installation
When it comes to installing baseboard heater covers, one of the first considerations is the cost. Estimating the cost beforehand will help you budget accordingly and plan for the installation process. The total cost of installation can vary depending on several factors, such as the number of baseboard heaters you have and the type of covers you choose.
To get a rough estimate, you can consider the following factors:
1. Number of baseboard heaters: Calculate the number of baseboard heaters in your home that require covers. This will determine the quantity you need to purchase.
2. Type and material of the covers: The cost of baseboard heater covers can vary based on their type and material. There are various options available, including metal, wood, and plastic covers, each with their own price range.
3. Installation method: The complexity of the installation method can also affect the overall cost. If you plan on hiring a professional, consider including their fees in your estimate.
By considering these factors, you can have a better understanding of the costs involved and plan your budget accordingly.
Exploring budget-friendly options and DIY alternatives
If you’re looking to install baseboard heater covers on a tighter budget, there are several budget-friendly options and DIY alternatives available. These can help you achieve an updated look for your heating system without breaking the bank. Here are some options to consider:
- 1. Purchasing prefabricated covers: Prefabricated covers can be a budget-friendly option, especially if you choose materials like plastic or affordable metals. These covers come in standard sizes and are ready to install.
- 2. Repurposing materials: If you’re feeling crafty, consider repurposing materials such as wood or metal to create your own covers. This DIY approach can help you achieve a unique and cost-effective solution.
- 3. Refurbishing existing covers: If your current covers are in decent condition, you can refurbish them by repainting or refinishing. This can give them a fresh look without the need for replacement.
Exploring these budget-friendly options and DIY alternatives can help you save money while still achieving the desired outcome for your baseboard heater covers.
Additional resources for further information and assistance
For further information and assistance on installing baseboard heater covers, here are some additional resources you can refer to:
- Manufacturer’s websites: Visit the websites of manufacturers that produce baseboard heater covers. They often provide detailed installation instructions and additional resources to guide you through the process.
- Online forums and communities: Join online forums and communities where homeowners share their experiences and tips on installing baseboard heater covers. These platforms can provide valuable insights and recommendations.
- Home improvement websites and blogs: Many home improvement websites and blogs offer step-by-step guides, tutorials, and expert advice on various DIY projects, including baseboard heater cover installation.
By utilizing these resources, you can gather the necessary information and assistance to ensure a successful installation of your baseboard heater covers.
Frequently Asked Questions For How To Install Baseboard Heater Covers
How Do You Attach Baseboard Covers?
Attach baseboard covers by following these steps:
1. Measure the length needed and cut the cover to fit.
2. Use construction adhesive to secure the cover to the wall.
3. Use finishing nails or screws to further secure it in place.
4. Fill any gaps or seams with caulk or putty.
5. Finally, paint or stain the cover to match your decor.
Is It Easy To Replace Baseboard Heater Covers?
Yes, replacing baseboard heater covers is easy. It can be done quickly and requires minimal effort.
How Do You Replace Old Baseboard Heater Covers?
To replace old baseboard heater covers, follow these steps:
1. Turn off the power and remove the old cover by unscrewing it.
2. Measure the dimensions of the opening to find the right size replacement cover.
3. Install the new cover by aligning it with the brackets and screwing it securely in place.
4. Ensure the cover is properly aligned and level.
5. Finally, restore power and enjoy your newly replaced baseboard heater cover.
Do Baseboard Heater Covers Need To Be Metal?
No, baseboard heater covers do not necessarily need to be made of metal. They can be made of various materials such as wood, plastic, or even fabric. The choice of material for the cover depends on personal preference, aesthetics, and specific heating needs.
Conclusion
Updating and installing baseboard heater covers can greatly enhance the appearance and functionality of your space. By following the step-by-step instructions provided in this blog post, you can easily replace old and worn-out covers with new ones. Remember to measure accurately, choose the right materials, and secure the covers properly for long-lasting results.
With a little effort and attention to detail, you can have a beautifully renovated baseboard heating system that adds value to your home.