To install an attic ladder, measure the height and width opening of the attic entrance, mark the measurements on the ceiling, cut an opening in the ceiling, install the attic ladder frame into the opening, attach the ladder to the frame, and secure it with screws. Installing an attic ladder is a practical solution for homeowners who need easier access to their attics.
Whether you want to store items, perform maintenance tasks, or simply make use of the extra space, having a sturdy and easy-to-use attic ladder can make your life much more convenient. In this guide, we will walk you through the steps of installing an attic ladder in a simple and straightforward manner.
By following these steps, you will be able to successfully install an attic ladder and enjoy the benefits it provides. So let’s get started!
Choosing The Right Attic Ladder
Factors to consider before installation
Installing an attic ladder can greatly enhance the accessibility and functionality of your attic space. However, before you start the installation process, there are several important factors you should consider. These factors will ensure that you choose the right attic ladder that fits your specific needs.
Ceiling height and clearance requirements
One of the first factors to consider when choosing an attic ladder is the ceiling height and clearance requirements of your space. Measure the distance from the floor to the ceiling to determine the appropriate ladder size. Remember to take into account any additional clearance required for the ladder to unfold and easily descend into the attic.
It’s crucial to choose a ladder that allows for comfortable and safe access without compromising the headroom in the area below.
Weight capacity and ladder size options
Next, you need to consider the weight capacity and ladder size options. Attic ladders come in various weight capacities, so it’s important to choose a ladder that can safely support the weight of the individuals using it as well as any items they may be carrying. Additionally, ladder size options should be determined based on the available space in your attic and the dimensions of the access point.
Ensure that the ladder you choose fits securely and sturdily into your attic space, providing a stable and reliable means of access.
Material and insulation features
The material and insulation features of an attic ladder play a crucial role in its performance and energy efficiency. Common materials used for attic ladders include aluminum, wood, and steel. Each material has its own advantages, so consider factors such as durability, weight, and aesthetic appeal when making your decision. Insulation features are also important, as they help to prevent heat loss and maintain a comfortable temperature within your home.
Look for attic ladders with insulation options such as weather stripping or insulated door panels to maximize energy efficiency and reduce heating or cooling expenses.
In conclusion, choosing the right attic ladder requires careful consideration of factors such as ceiling height and clearance requirements, weight capacity, and ladder size options, as well as material and insulation features. Taking the time to evaluate these factors will ensure that you install an attic ladder that not only provides convenient access to your attic but also meets your safety, functionality, and energy efficiency requirements.
Gathering The Necessary Tools And Materials
Before you begin installing an attic ladder, it’s crucial to gather all the necessary tools and materials. Having everything in place will save you time and ensure a smooth installation process. In this section, we will discuss the essential tools and materials you will need for this project. Make sure to have them ready before you get started.
Essential Tools for Attic Ladder Installation
Having the right tools at your disposal will make the attic ladder installation process much easier and more efficient. Here are the essential tools you will need:
Tape measure, pencil, and level
Accuracy is key when it comes to installing an attic ladder. To ensure precise measurements and alignment, you will need a tape measure, pencil, and level. The tape measure allows you to measure the dimensions of the installation area, while the pencil helps mark where the ladder should be placed. Additionally, a level ensures that the ladder is perfectly straight and leveled for safe use.

Power drill and screwdriver
A power drill and screwdriver are necessary for attaching the ladder components securely. These tools allow you to drill holes and drive screws into the appropriate positions. Make sure to have different drill bits and screwdriver tips handy, as you may require different sizes depending on the ladder and fasteners you are using.
Safety equipment (gloves, goggles, and helmet)
Safety should always be a top priority when working on any home improvement project. When installing an attic ladder, protect your hands with gloves to avoid injuries while handling tools and materials. Wear goggles to shield your eyes from dust, debris, and potential hazards. Wearing a helmet is also recommended to protect your head in case of accidental falls or bumps.
Materials Needed for Installation
Along with the tools, you will also need specific materials to complete the installation of your attic ladder. Here is a list of the materials you should have:
Attic ladder kit
An attic ladder kit typically includes all the necessary components, such as the ladder itself, hinges, brackets, and installation instructions. Make sure to choose a ladder kit that is suitable for your ceiling height and weight requirements. The kit should also come with all the accompanying hardware.
Screws, nails, and fasteners
You will need screws, nails, or other fasteners to secure the ladder components to the ceiling and attic floor. Make sure to use the appropriate type and size of fasteners recommended in the installation instructions or provided with the ladder kit. Using the wrong fasteners can compromise the stability and safety of the ladder.
Insulation material (if required)
Depending on the type of attic ladder and your insulation needs, you may require insulation material. Insulating the attic around the ladder helps maintain energy efficiency and prevents drafts. If your attic lacks insulation or requires additional insulation, make sure to have the appropriate materials on hand before starting the installation process.
By gathering all the essential tools and materials mentioned above, you will be well-prepared to install an attic ladder efficiently and safely. With everything organized and ready to go, you can proceed to the next steps of the installation process without any delay.
Preparing For Installation
Before you start the installation process for your attic ladder, it’s important to properly prepare the area. This will ensure a smooth and safe installation, saving you time and effort in the long run. Here are the steps you need to follow to prepare for the installation:
Measuring and marking the location
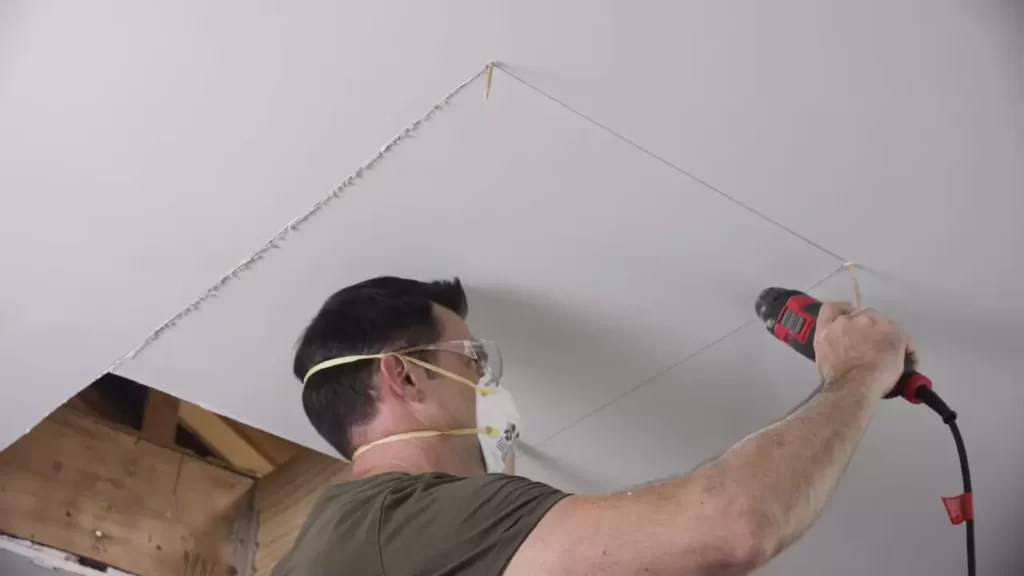
The first step in preparing for the installation is to accurately measure and mark the location of the attic ladder. Measure the distance from the floor to the ceiling in the intended location and mark it with a pencil. This will serve as a guide for the later steps, ensuring precise placement of the ladder.
Identifying the ideal access point and stud locations
Next, it’s crucial to identify the ideal access point for your attic ladder. Consider factors such as the layout of your home and the convenience of access. Once you have determined the access point, locate the studs in the ceiling using a stud finder. Marking the stud locations will help you with the framing process and ensure a sturdy installation.
Ensuring proper ceiling and floor clearance
One important aspect of preparing for installation is ensuring that you have proper clearance both in the ceiling and on the floor. Measure the distance between the marked location on the ceiling and any potential obstructions, such as light fixtures or ceiling joists. Make sure there is enough clearance for the ladder to fully extend and retract without any hindrance. Similarly, clear any furniture or items from the floor below the access point to create a safe and unobstructed pathway.
Checking for obstructions and making adjustments
Before you begin cutting the hole for the attic ladder, thoroughly check for any obstructions such as electrical wires, plumbing pipes, or ductwork. Once you are certain there are no obstructions in the way, you can proceed with making adjustments to accommodate the ladder’s dimensions and ensure a precise fit.
Moving any attic insulation or wiring if necessary
If you come across any attic insulation or wiring obstructing the installation process, it’s essential to carefully move them out of the way. Ensure that the insulation is properly repositioned to maintain its effectiveness and that any wiring is safely rerouted or secured to prevent damage.
Clearing debris and creating a clean work area
Prior to cutting the hole and installing the ladder, take the time to clear any debris or dust in the attic and create a clean work area. This will make the installation process more manageable and help prevent any unwanted particles from entering your home.
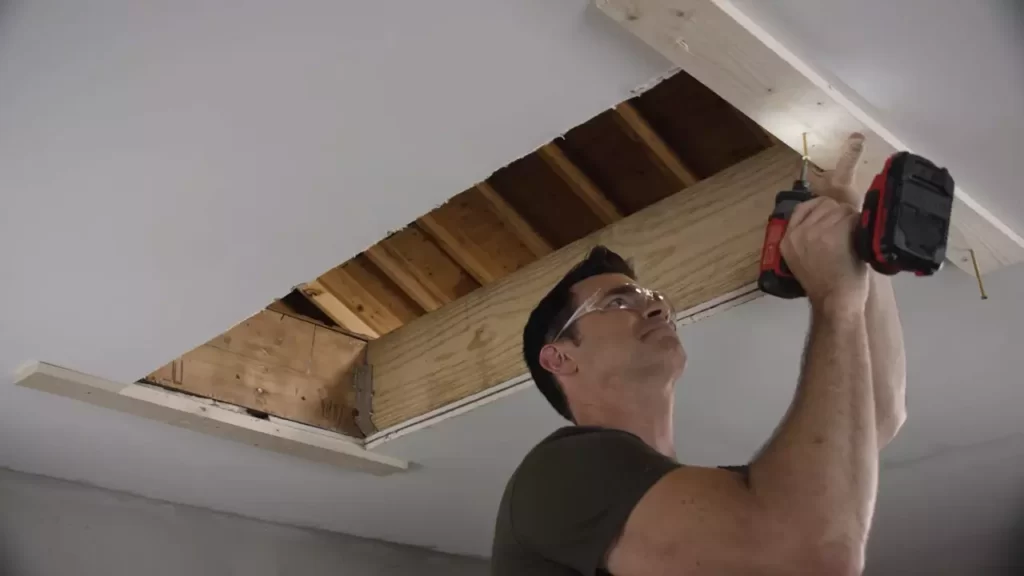
Preparing the opening and framing
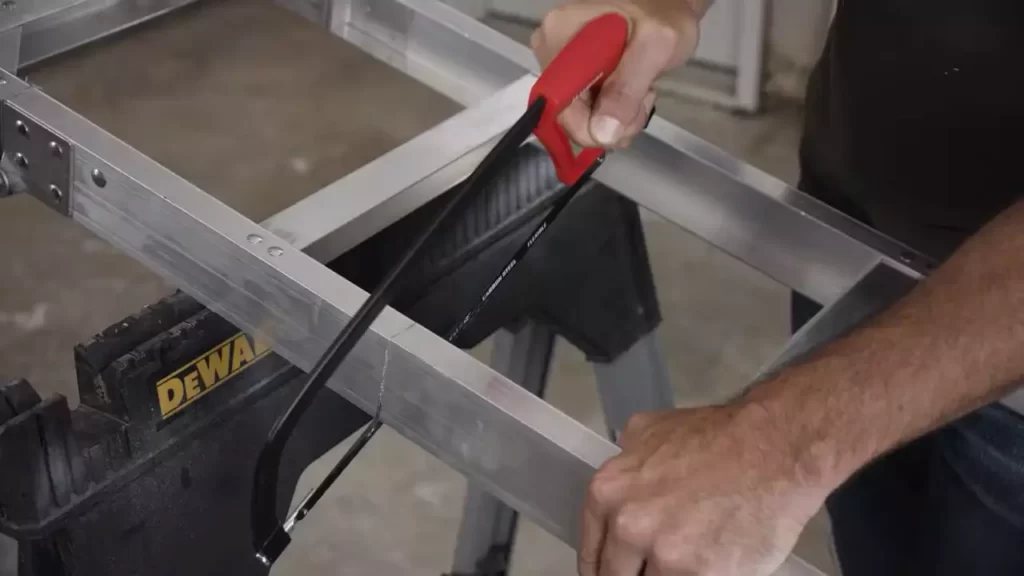
Now it’s time to prepare the opening and framing for the attic ladder. Carefully follow the manufacturer’s instructions to properly cut the hole in the ceiling, ensuring the dimensions align with the ladder’s specifications. Once the hole is cut, install supports and framing around the opening to provide stability and structural integrity for the ladder.
By following these steps to prepare for the installation, you’ll ensure a smooth and successful attic ladder installation process. With the area properly prepared, you can proceed confidently to the next steps and enjoy easy access to your attic space.
Attic Ladder Installation Process
Installing an attic ladder is a great way to gain easy access to your attic space while also maximizing storage potential. Whether you’re looking to declutter or create a usable space, installing an attic ladder is a straightforward process that can be done with a few basic tools and some handyman know-how. In this guide, we’ll take you through the step-by-step process of installing an attic ladder, from attaching the ladder brackets and hinges to adding insulation and finishing touches.
Attaching the ladder brackets and hinges
The first step in installing an attic ladder is to attach the ladder brackets and hinges. These components are essential for securely connecting the ladder to the attic floor and ensuring stability. Begin by positioning the ladder brackets in the desired location, making sure they are evenly spaced and level. Use a pencil to mark the screw hole locations.
Next, using a drill, create pilot holes at the marked locations. This will prevent the wood from splitting when you screw in the brackets. Align the brackets with the pilot holes and secure them in place using a screwdriver or drill. Repeat this process for all the ladder brackets.
Aligning and securing the ladder brackets
Once you have attached the ladder brackets, the next step is to align and secure them. This will ensure that the ladder sits securely in place and functions smoothly. Place the ladder on top of the brackets and adjust it until it is level and centered in the opening.
Use a spirit level to check the alignment of the ladder. Adjust the brackets as necessary to achieve a level position. Once the ladder is aligned, secure the brackets to the ladder using screws or bolts. This will ensure that the ladder remains stable during use.
Attaching the hinges to the attic floor and ladder
With the ladder brackets securely in place, it’s time to attach the hinges to the attic floor and ladder. The hinges allow the ladder to fold up and down, providing easy access to the attic space. Position the hinges along the edge of the ladder and mark the screw hole locations.
- Create pilot holes at the marked locations using a drill.
- Align the hinges with the pilot holes and secure them in place using screws.
- Attach the other end of the hinges to the attic floor, ensuring they are aligned with the ladder. Use screws to secure the hinges in place.
Securing the ladder and testing stability
Once the hinges are securely attached, it’s time to secure the ladder in place and test its stability. Carefully unfold the ladder and ensure that it is fully extended and locked into position. Verify that the ladder feels sturdy and does not wobble or shake when weight is applied.
To further secure the ladder, use brackets or straps to fasten it to the attic floor or wall. This will provide added stability and prevent any accidental movement during use. Once the ladder is secured, test its stability by gently applying weight and stepping on each rung. If the ladder feels secure and stable, you can proceed to the next step.
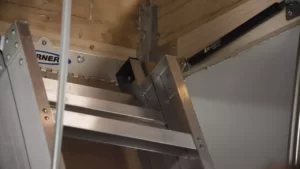
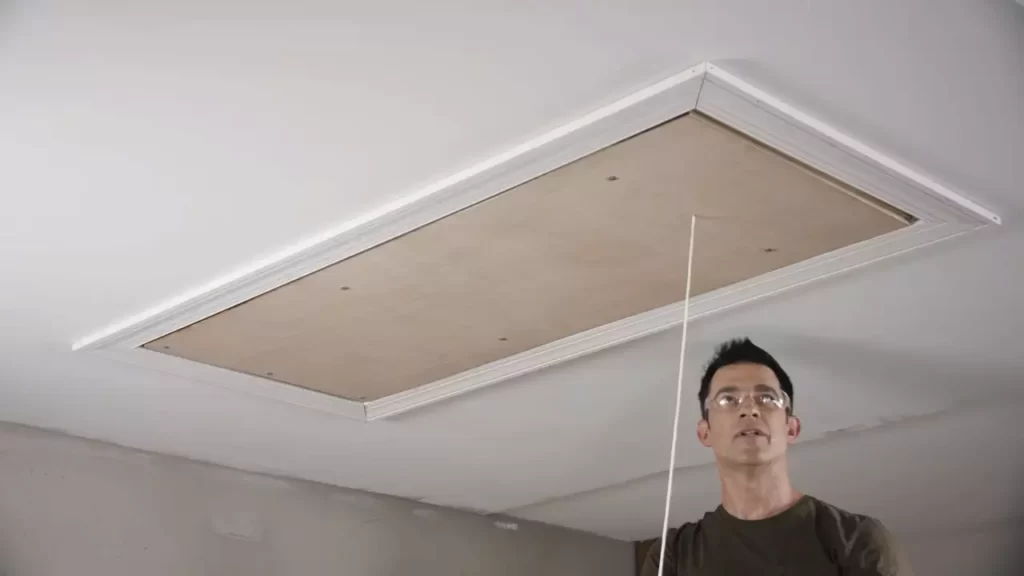
Placing the ladder in the opening and securing it
With the ladder secured and tested for stability, it’s time to place it in the attic opening and secure it in place. Carefully lift the ladder and place it inside the opening, making sure the hinges align with the brackets attached to the attic floor. Lower the ladder into position until it rests securely on the brackets.
- Use screws or bolts to secure the ladder to the brackets, ensuring it remains in place.
- Check for any gaps or unevenness and adjust the ladder if necessary.
Testing the ladder for stability and smooth operation
Once the ladder is securely in place, it’s important to thoroughly test it for stability and smooth operation. Carefully climb up and down the ladder, making sure it feels secure and steady with each step. Pay attention to any squeaks or sticking points and identify if any adjustments need to be made.
Test the ladder multiple times to ensure consistent stability and ease of use. If any issues are detected, address them immediately to prevent accidents or further damage. It is essential to resolve any problems before finalizing the installation process.
Insulating and finishing touches
After confirming the stability and smooth operation of the ladder, it’s time to focus on insulation and finishing touches. The attic opening may cause air leakage, so it’s important to properly insulate and seal the area to maintain energy efficiency. Begin by adding insulation around the ladder opening to prevent drafts and heat loss.
- Measure the dimensions of the opening and cut insulation to fit.
- Place the insulation around the opening, ensuring a snug fit.
- Secure the insulation in place with adhesive or insulation tape.
Additionally, consider installing a handrail for added safety when using the ladder. A handrail provides extra support and stability, especially when carrying items up and down the attic. Install the handrail according to the manufacturer’s instructions, making sure it is securely fastened and at a comfortable height.
With the insulation and handrail in place, the installation process is complete. Take a moment to admire your work and enjoy the convenience and accessibility provided by your newly installed attic ladder.
Tips For Safe And Efficient Attic Ladder Installation
If you’re considering installing an attic ladder, it’s important to prioritize safety and efficiency. By following these tips, you can ensure a smooth and secure installation process that will provide easy access to your attic while minimizing any potential risks or accidents.
Following Safety Precautions
Before you start the installation, it’s crucial to familiarize yourself with the safety precautions. This includes wearing appropriate protective gear, such as gloves and safety goggles, to protect yourself from any potential hazards.
Wearing Appropriate Protective Gear
Wearing the right protective gear is essential when installing an attic ladder. Gloves will provide you with a better grip and protect your hands from any sharp edges, while safety goggles will shield your eyes from dust or debris that may be stirred up during the installation process.
Working with a Partner if Needed
Installing an attic ladder can be a challenging task. If the ladder is heavy or the installation requires lifting or holding items in place, it’s advisable to work with a partner. This will not only make the process easier but also reduce the risk of accidents or injuries.
Maintaining Stability and Balance
When working on a ladder, maintaining stability and balance is crucial for safety. Make sure your ladder is on a stable surface and use levelers if necessary. Ensure that all four legs of the ladder are firmly planted on the ground before climbing up or down.
Using a Stable Ladder or Scaffolding
Using a stable ladder or scaffolding system is vital during the installation process. Opt for a ladder that meets safety standards and has a high weight capacity. If you’re working in tight spaces or on uneven surfaces, consider using a scaffolding system for added stability and support.
Ensuring Proper Weight Distribution
Attic ladders need to support the weight of both individuals and any items being carried. Before installation, read the ladder’s weight capacity specifications and ensure that the ladder is adequate for your needs. Distribute weight evenly while climbing and avoid overloading the ladder.
Checking and Maintaining the Ladder
Regularly inspecting your attic ladder is important for its long-term performance and safety. Check for any signs of damage, such as loose rungs or bent hardware, and promptly address any issues. Additionally, make sure that all moving parts are lubricated for smooth operation.
Regularly Inspecting for Damage or Wear
After installation, it’s crucial to periodically inspect your attic ladder for any signs of damage or wear. Look out for cracks, loose bolts, or weakened steps. A regular maintenance routine can prevent potential accidents caused by a compromised ladder.
Lubricating Moving Parts for Smooth Operation
To ensure your attic ladder operates smoothly, it’s important to lubricate all moving parts periodically. This includes hinges, pulleys, and other mechanisms. Proper lubrication will minimize friction and make opening and closing the ladder effortless.
With these tips in mind, you can confidently install an attic ladder that prioritizes safety and efficiency. By following the proper precautions and conducting regular maintenance, you’ll have easy and secure access to your attic whenever the need arises.
Frequently Asked Questions For How To Install Attic Ladder
What Is The Easiest Attic Ladder To Install?
The easiest attic ladder to install is the pull-down folding attic ladder. It is designed for easy installation and comes with clear instructions. Simply follow the step-by-step guide and you’ll have your attic ladder installed in no time. It’s a convenient option for accessing your attic space with minimal effort.
How Much Does Labor Cost To Install An Attic Ladder?
The cost of labor to install an attic ladder varies, but it typically ranges between $150 and $300. Prices can vary depending on factors like the complexity of the installation and the contractor’s fees. It’s best to get a quote from a professional to get an accurate estimate.
Can You Install A Loft Ladder Yourself?
Yes, you can install a loft ladder yourself. It’s a simple and straightforward process. Just follow the installation instructions provided with the ladder, and make sure to use proper tools and safety precautions. Enjoy easy access to your loft with your new ladder!
Is An Attic Ladder Worth It?
Yes, an attic ladder is worth it. It provides easy access to your attic, making storage and retrieval of items convenient.
Conclusion
Installing an attic ladder is a straightforward process that can greatly enhance your home’s convenience and functionality. With the right tools and instructions, you can safely and efficiently add an attic ladder to your space. By following the step-by-step guide in this blog post, you can confidently take on this DIY project.
Remember to prioritize safety and consult the manufacturer’s instructions for any specific details. Enjoy easy access to your attic and make the most of your space!