To install an AC filter at home and in the ceiling, follow these steps: First, turn off the AC unit. Next, locate the filter slot in the unit or ceiling.
Then, remove the old filter and clean the area if necessary. Finally, insert the new filter, ensuring it fits securely, and turn the AC unit back on. Keeping the air in your home clean and fresh is essential for your health and well-being.
One way to do this is by regularly changing the filters in your air conditioning system. However, many homeowners are unsure of how to install an AC filter, especially if the unit is located in the ceiling. In this guide, we will provide simple, step-by-step instructions on how to install an AC filter both at home and in the ceiling. By following these instructions, you can ensure that your air conditioning system is running efficiently, providing you with clean and comfortable air to breathe. So let’s get started!
Understanding The Importance Of Ac Filters
The Role of AC Filters in Maintaining Indoor Air Quality
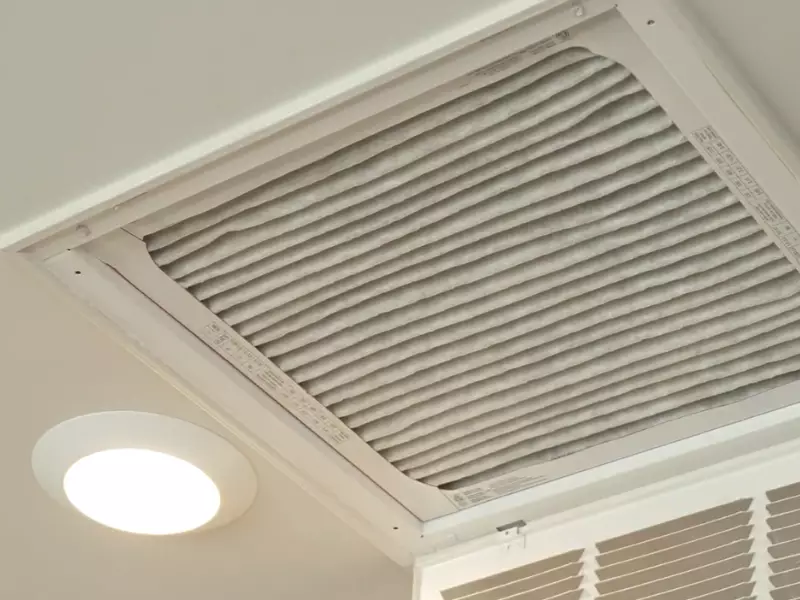
AC filters play a crucial role in maintaining the indoor air quality of your home or office. These filters act as a line of defense against harmful pollutants and allergens, ensuring that the air you breathe is clean and healthy. By understanding the importance of AC filters, you can take the necessary steps to ensure that your air conditioning system functions optimally.
Common Pollutants and Allergens Filtered by AC Filters
AC filters are designed to capture a wide range of pollutants and allergens, which can have detrimental effects on your health if left unchecked. Some of the common pollutants that AC filters are capable of filtering include:
| Pollutant | Effect on health |
|---|---|
| Dust particles | Dust particles can trigger allergies and respiratory issues, especially in individuals with pre-existing conditions such as asthma. |
| Pollen | Pollen is a common allergen that can cause symptoms such as sneezing, itchy eyes, and congestion. |
| Mold spores | Mold spores can lead to respiratory problems, allergic reactions, and even infections in individuals with weakened immune systems. |
| Bacteria and viruses | AC filters can help trap bacteria and viruses, reducing the risk of airborne illnesses. |
| Pet dander | Pet dander is a common allergen that can cause discomfort and respiratory issues in individuals with pet allergies. |
By effectively filtering out these pollutants and allergens, AC filters contribute to a healthier indoor environment, especially for those who suffer from allergies, asthma, or other respiratory conditions.
It is important to note that to maintain optimal indoor air quality, AC filters need to be regularly cleaned or replaced. Over time, the filters can become clogged with debris, reducing their efficiency. Regular maintenance will ensure that your AC system continues to filter out pollutants effectively.
In conclusion, understanding the importance of AC filters is essential for maintaining a clean and healthy indoor environment. By capturing common pollutants and allergens, these filters help safeguard your health and well-being. Remember to prioritize regular maintenance to ensure that your AC system continues to function optimally.
Types Of Ac Filters
When it comes to selecting an air conditioning filter for your home, there are several options available. Each type of filter has its own advantages and disadvantages, so it’s important to understand the differences before making a decision. In this section, we will explore three common types of AC filters: disposable filters, washable filters, and electrostatic filters.
Disposable filters: Pros and cons
Disposable filters are the most common type of AC filters found in homes. These filters are made from materials such as fiberglass or pleated paper and are designed to be replaced regularly, usually every 30 to 90 days. Some of the pros and cons of disposable filters are:
- Pros:
- Easy to replace
- Relatively inexpensive
- Can be found in various sizes and efficiencies
- Cons:
- Not as durable as other filter types
- May need to be replaced more frequently
- Cannot be washed and reused

Washable filters: Pros and cons
Washable filters, also known as reusable filters, are designed to be cleaned and reused instead of being replaced. These filters are typically made from materials like aluminum or foam and require regular maintenance to ensure optimal performance. Here are the pros and cons of washable filters:
- Pros:
- Eco-friendly and cost-effective in the long run
- Durable and can last for several years
- Reusable, reducing waste
- Cons:
- Require regular cleaning and maintenance
- May not be as efficient in capturing smaller particles
- Less variety in terms of sizes and efficiency ratings
Electrostatic filters: Pros and cons
Electrostatic filters utilize charged fibers to capture airborne particles, making them more effective than disposable or washable filters. These filters can be made from materials like polypropylene or polyurethane and are available in both disposable and washable options. Here are the pros and cons of electrostatic filters:
- Pros:
- Highly efficient in capturing small particles
- Available in both disposable and washable options
- Can help reduce allergy symptoms
- Cons:
- Higher initial cost compared to other filter types
- Reusable electrostatic filters require regular cleaning
- Not suitable for all HVAC systems
Each type of AC filter has its own pros and cons, so it’s important to consider your specific needs and preferences when choosing the right filter for your home. Whether you opt for the convenience of disposable filters, the eco-friendliness of washable filters, or the efficiency of electrostatic filters, regular filter maintenance is key to ensuring better indoor air quality and optimal HVAC system performance.
Steps To Install Ac Filters At Home And In Ceiling
Installing an AC filter at home is a relatively simple task that can greatly enhance the efficiency and lifespan of your air conditioning unit. Regularly changing the filter ensures better airflow, cleaner air, and reduced energy consumption. If you have a ceiling AC unit, the process may vary slightly, but the steps are fundamentally the same. In this article, we will guide you through the process of installing AC filters at home and in the ceiling, ensuring you can enjoy the benefits of fresh, cool air in an effortless way. Let’s dive into the step-by-step instructions!
Step 1: Turn off the AC unit and locate the filter slot
The first and most crucial step is to turn off your AC unit to prevent any potential accidents or damage. Once the unit is safely powered down, locate the filter slot. In most AC units, the filter slot can be found near the air intake or the air handler. It may be covered with a panel or grille, so remove any screws or fastenings to gain access to the filter slot. Take a moment to examine the filter slot and understand how the filter fits into it before proceeding to the next step.
Step 2: Measure the dimensions of the filter slot
Before purchasing a new filter, it’s essential to measure the dimensions of the filter slot accurately. Use a tape measure to determine the width, height, and depth of the slot. Note down these measurements so that you can purchase a filter with the right size. Having the correct filter size is crucial as it ensures a proper fit and optimal performance of your air conditioning system.
Step 3: Choose the appropriate filter size and type
Once you have the measurements, it’s time to choose the appropriate filter size and type. AC filters come in various sizes and types, including fiberglass, pleated, electrostatic, and high-efficiency filters. Consider factors like your HVAC system requirements, indoor air quality needs, and budget when selecting the filter. The packaging of the filter will indicate the recommended filter slot size and whether the filter is suitable for residential or commercial use.
Step 4: Remove the old filter, if present
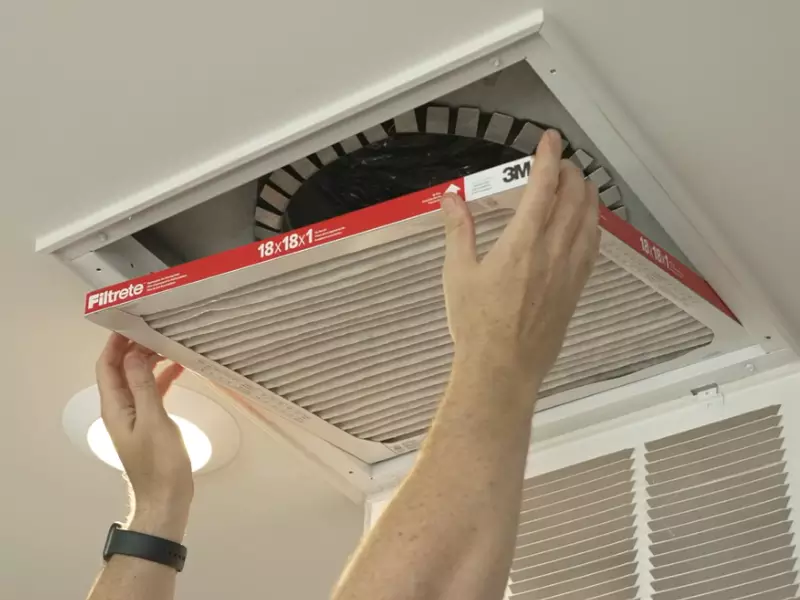
If there is an existing filter in the filter slot, carefully remove it by pulling it out. Take note of its placement and orientation, as this will help you correctly install the new filter. Inspect the old filter for dirt, dust, and debris. If it looks excessively dirty or damaged, it’s time to replace it.
Step 5: Insert the new filter into the slot
Take the new filter and ensure it matches the size and type requirements of your AC unit. Insert the filter into the filter slot, keeping in mind the direction of airflow. Most filters have arrows indicating the proper direction, so align them accordingly. Gently slide the filter into place until it fits snugly within the slot.
Step 6: Ensure proper alignment and secure the filter
After inserting the new filter, double-check its alignment to ensure it is positioned correctly and sits flush within the slot. Improperly installed filters may result in reduced efficiency and compromised air quality. If there are any fastenings or locking mechanisms, ensure they are properly engaged to secure the filter in place.
Step 7: Turn on the AC unit and check for proper airflow
With the new filter securely in place, it’s time to turn the AC unit back on. Monitor the airflow to ensure it is consistent and unrestricted. Ideally, the airflow should feel steady and strong, indicating that the new filter is functioning correctly. If you notice weak or insufficient airflow, recheck the filter installation to ensure it is properly aligned and securely in place.
That’s it! By following these simple steps, you can easily install AC filters at home and in the ceiling, ensuring optimal performance and clean air circulation throughout your space. Regularly replacing the filter according to the manufacturer’s recommendation will help prolong the life of your AC unit and create a more comfortable living environment. Stay cool and enjoy the benefits of a well-maintained air conditioning system!
Maintenance Tips For Ac Filters
Regular cleaning or replacement schedule
Maintaining a regular cleaning or replacement schedule for your AC filters is crucial to ensure optimal functionality and prevent dust and debris buildup. The frequency of cleaning or replacement depends on various factors, such as the type of filter and environmental conditions.
As a general guideline, it is recommended to clean or replace disposable filters every 1 to 3 months, while washable filters should be cleaned every 1 to 2 months. However, it is important to consult your manufacturer’s instructions as they may provide specific recommendations for your particular model.
Proper handling and disposal of disposable filters
Disposable filters are designed for single-use, and therefore require proper handling and disposal. When removing the old filter, be cautious not to spill the accumulated dirt or debris. Carefully seal the used filter in a plastic bag before disposing of it in the trash.
This prevents the spread of allergens and maintains cleanliness in your home. Always follow local regulations for proper disposal methods and consider environmentally-friendly options, such as recycling, if available in your area.
Cleaning techniques for washable filters
Washable filters offer a more sustainable option as they can be reused after thorough cleaning. To clean washable filters, first, turn off your AC system and carefully remove the filter according to the manufacturer’s instructions. Gently wash the filter with warm water and mild soap, ensuring all dust, dirt, and contaminants are removed.
Avoid using harsh chemicals or scrubbing vigorously as this can damage the filter’s fibers. Allow the filter to air dry completely before placing it back into the AC unit. Ensure the filter is fully dry to prevent mildew or mold growth.
Additional steps for maintaining ceiling-mounted filters
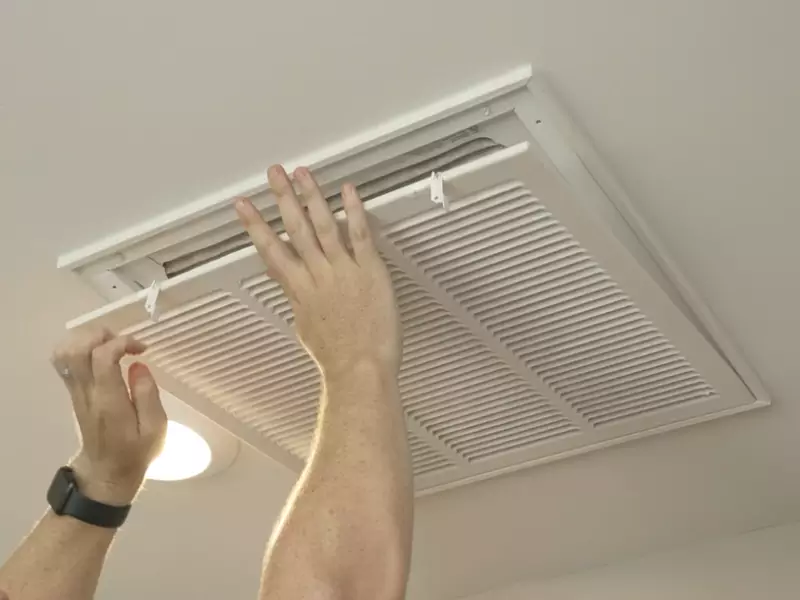
For ceiling-mounted filters, there are a few additional steps to consider. Start by turning off the AC system and using a ladder or step stool to safely reach the filter. Carefully remove the filter, taking note of any specific instructions provided by the manufacturer. In some cases, ceiling-mounted filters may require more frequent cleaning due to their exposure to large amounts of dust and particles.
After removing the filter, clean it using the appropriate method mentioned earlier, ensuring all dirt and debris are thoroughly removed. Once cleaned and dry, reinsert the filter into its designated slot, making sure it is aligned properly. Finally, turn on the AC system and enjoy the refreshed air flowing through your space.
Benefits Of Proper Ac Filter Installation
Installing the AC filter properly is crucial for maintaining a healthy and comfortable living environment. It not only helps improve indoor air quality but also enhances energy efficiency, extends the lifespan of the AC unit, and reduces allergy symptoms. Let’s explore these benefits in detail:
Improved Indoor Air Quality
By installing the AC filter correctly, you can significantly enhance the indoor air quality of your home or office. The AC filter traps pollutants, dust, allergens, and airborne particles, preventing them from circulating in the air you breathe. This reduces the chances of respiratory issues, such as allergies and asthma, and promotes a healthier living space for you and your family.
Enhanced Energy Efficiency
Proper AC filter installation plays a vital role in improving the energy efficiency of your cooling system. When the filter is clean and correctly installed, it allows for better airflow, which enables the AC unit to operate more efficiently. This, in turn, can lead to reduced energy consumption and lower utility bills. Additionally, an AC unit that operates efficiently puts less strain on its components, reducing the risk of breakdowns and costly repairs.
Extended Lifespan of the AC Unit
Regularly installing and replacing the AC filter can help extend the lifespan of your cooling system. When the filter is clean, it prevents debris and dust from accumulating on the unit’s components, such as the evaporator coil and blower motor. This reduces the strain on these crucial parts, leading to better performance and a longer lifespan for your AC unit. By properly maintaining your filter, you can increase the longevity of your cooling system, saving you the expense of premature replacements.
Reduced Allergy Symptoms
For individuals who suffer from allergies, proper AC filter installation is paramount. The filter acts as a barrier, capturing and trapping allergens like pollen, dust mites, pet dander, and mold spores. By effectively filtering out these allergens, the AC system helps alleviate allergy symptoms and improves overall comfort. Breathing in clean, filtered air can make a significant difference, allowing allergy-prone individuals to enjoy their living space without constant sneezing, itching, or congestion.
In conclusion, properly installing the AC filter not only improves indoor air quality and reduces allergy symptoms but also enhances energy efficiency and extends the lifespan of your cooling system. It is a simple yet powerful way to create a healthier and more comfortable environment for you and your loved ones. So, make sure to regularly inspect, clean, and replace your AC filter to enjoy these numerous benefits.
Troubleshooting Common Ac Filter Installation Issues
Installing an AC filter is an essential part of maintaining a clean and efficient cooling system. However, there can be some common issues that arise during the installation process. In this section, we will address these issues and provide practical solutions to help you troubleshoot any problems that may occur. Let’s take a closer look at the filter compatibility issues, incorrectly aligned or loose filters, and restricted airflow and cooling problems.
Filter Compatibility Issues
Filter compatibility is a crucial factor to consider when installing an AC filter. Using the wrong filter can lead to complications, resulting in suboptimal air quality and potential damage to your HVAC system. To avoid compatibility issues, make sure to:
- Consult the manufacturer’s specifications: Refer to the instruction manual or the manufacturer’s website to find the recommended filter type and size for your particular air conditioning unit.
- Check the filter dimensions: Measure the existing filter or the filter slot to ensure the new filter you purchase matches the required dimensions.
- Consider the MERV rating: The Minimum Efficiency Reporting Value (MERV) indicates the effectiveness of the filter in removing particles from the air. Choose a filter with a MERV rating that suits your air quality needs and HVAC system requirements.
Incorrectly Aligned or Loose Filters
Proper alignment and secure positioning of your AC filter are crucial for effective filtration and efficient airflow. Here are some key tips to ensure your filter is correctly aligned:
- Inspect the filter slot: Remove any debris or obstructions that might prevent the filter from fitting securely.
- Follow the arrow markings: Most filters have arrow markings indicating the direction of airflow. Make sure to align the filter accordingly.
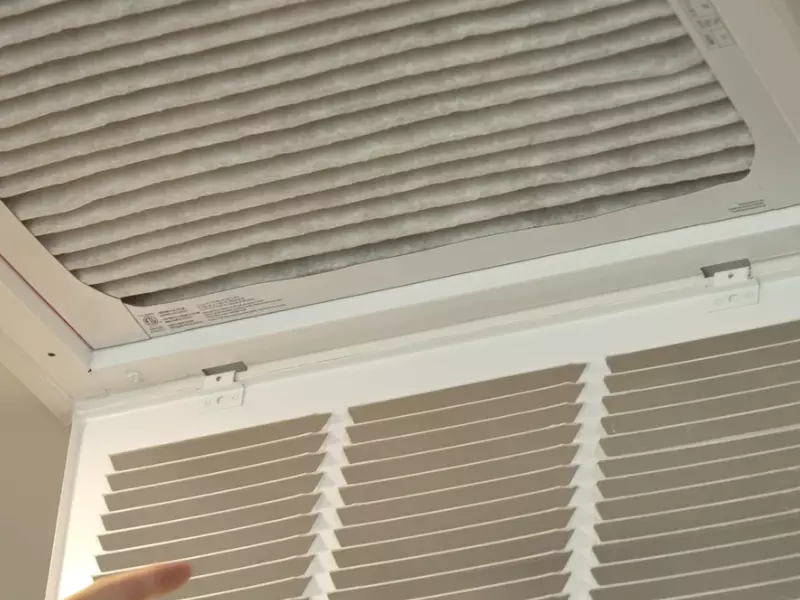
- Double-check the filter fit: Ensure that the filter is snugly inserted and that there are no gaps between the filter frame and the filter slot.
- Tighten any fasteners: If your filter requires fasteners, such as clips or screws, double-check that they are securely tightened.
Restricted Airflow and Cooling Problems
Restricted airflow and cooling problems can occur if the air conditioning filter is not installed correctly. Improper installation can lead to reduced airflow, decreased cooling efficiency, and increased energy consumption. Here’s what you can do to address these issues:
- Regularly clean or replace the filter: Follow the manufacturer’s recommendation for cleaning or replacing the AC filter to prevent dirt, dust, and other debris from clogging the filter and obstructing airflow.
- Inspect for blockages: Check for any blockages in the ductwork or vents that might impede the airflow. Clear away any obstacles or obstructions that can restrict the air circulation.
- Ensure proper filter installation: Refer back to the guidelines mentioned above to ensure the filter is correctly installed and securely fit.
- Consider professional maintenance: If you continue to experience airflow and cooling issues, it may be advisable to seek the assistance of a professional HVAC technician to diagnose and resolve the problem.
By troubleshooting these common AC filter installation issues, you can ensure optimal performance from your air conditioning system while enjoying cleaner and healthier indoor air. Take the time to address these issues properly, and you’ll be rewarded with a comfortably cool living space.
Frequently Asked Questions On How To Install Ac Filter At Home And In Ceiling
Which Way Does An Air Filter Go In The Ceiling?
The air filter in the ceiling should be installed with the arrows or markings pointing towards the air conditioning unit.
Can You Put Filters In Ceiling Vents?
Yes, you can install filters in ceiling vents.
How Do You Change An Air Filter On A High Ceiling?
To change an air filter on a high ceiling, follow these steps –
1. Use a ladder to reach the filter.
2. Remove the cover and take out the old filter.
3. Insert the new filter, making sure it fits securely.
4. Put the cover back on and check for proper installation.
5. Dispose of the old filter responsibly.
What Happens If Air Filter Is Backwards?
If the air filter is backwards, it can cause poor engine performance and reduce fuel efficiency. It can also lead to dust and debris bypassing the filter and entering the engine, causing damage over time. Make sure to install the air filter correctly to avoid these issues.
Conclusion
Installing an AC filter at home and in the ceiling is a simple yet essential task for maintaining a clean and efficient cooling system. By following the step-by-step guide provided, you can easily accomplish this task without any professional assistance.
Remember, regularly replacing and cleaning your AC filter not only ensures a healthier indoor environment but also prolongs the lifespan of your HVAC system. Take charge of your air quality and enjoy optimal performance from your AC unit by making filter installation a regular maintenance practice.
