To install a water heater element, turn off the power and water supply, drain the tank, remove the access panel, disconnect the wires, unscrew the old element, screw in the new one, reattach the wires, refill the tank, and restore power. When it comes to maintaining your water heater, installing a new water heater element may be necessary at times.
Whether you’re experiencing a decrease in hot water or your current element is faulty, knowing how to install a water heater element can save you money and time. We will guide you through the process step by step, ensuring a smooth installation process for your water heater element.
Let’s dive in!
Understanding Water Heater Elements
Water heater elements are crucial components that play a vital role in heating the water in your home. Without a properly functioning element, your water heater will not be able to provide hot water efficiently. In this section, we will dive deeper into the different types of water heater elements and understand their importance in ensuring a continuous supply of hot water.
Different types of water heater elements
Water heater elements come in various types, each designed for specific applications and requirements. Understanding the different types can help you choose the most suitable element for your water heater. Here are the common types:
- Screw-In Elements: These are the most commonly used water heater elements. As the name suggests, they are screwed into the water tank and have a threaded base. Screw-in elements are available in different wattages and voltages to accommodate various water heating needs.
- Flange Elements: Flange elements are attached to the water tank through a flanged connection. They are often used in commercial and industrial water heaters due to their robust design and high heating capacity. Flange elements are known for their durability and ability to withstand harsh conditions.
- Foldback Elements: Foldback elements are a popular choice for residential water heaters. They feature a unique design that allows the heating element to fold back into the tank, maximizing contact with the water and increasing energy efficiency. This design also helps reduce the accumulation of sediment and scale on the element.
- Stud Mount Elements: Stud mount elements are commonly used in smaller water heaters or point-of-use units. They are designed to be installed through a threaded stud, providing a secure and reliable connection. Stud mount elements are compact and efficient, making them ideal for limited-space installations.
The importance of a functioning water heater element
A functioning water heater element is essential for the proper operation of your water heater. Here’s why:
1. Efficient heating: A working element ensures efficient heating of water, providing you with a steady supply of hot water whenever you need it.
2. Energy savings: A well-maintained element can help reduce energy consumption, resulting in lower utility bills. The more efficient the element, the less energy it will require to heat the water.
3. Longevity of the water heater: By ensuring the element is in good condition, you can extend the lifespan of your water heater. Regular maintenance and timely replacement of faulty elements can prevent damage to the tank and other components.
4. Consistent hot water: A functioning element guarantees a consistent flow of hot water. Whether it’s for showers, washing dishes, or doing laundry, you can rely on a well-performing water heater element to deliver the hot water you need.
In conclusion, understanding the different types of water heater elements and the importance of a functioning element is crucial for maintaining an efficient and reliable water heating system. Whether you opt for a screw-in, flange, foldback, or stud mount element, make sure to choose one that suits your needs and follow proper maintenance practices to keep your water heater in optimal condition.
Preparing For Installation
Preparing for installation is an important step when it comes to installing a water heater element. Taking the necessary precautions and ensuring you have the right tools and equipment will help make the installation process smooth and hassle-free. In this section, we will guide you through the essential steps before starting the installation process.
Ensuring safety before starting the installation process
When it comes to working with electrical equipment, safety should always be a top priority. Before you begin installing a new water heater element, make sure to follow these safety guidelines:
- Wear protective gear such as gloves and safety goggles.
- Ensure the power supply to the water heater is switched off.
- Disconnect the water heater from its power source to reduce the risk of electrical shock.
- Check that the area around the water heater is clear of any debris or obstructions.
- Keep a fire extinguisher nearby in case of emergencies.
Tools and equipment needed for the installation
Having the right tools and equipment on hand will significantly simplify the installation process. Here is a list of the essential items you will need:
- Adjustable wrench
- Screwdriver (flathead and Phillips)
- Socket set
- Pipe wrench
- Teflon tape
- Flux and solder (if working with copper pipes)
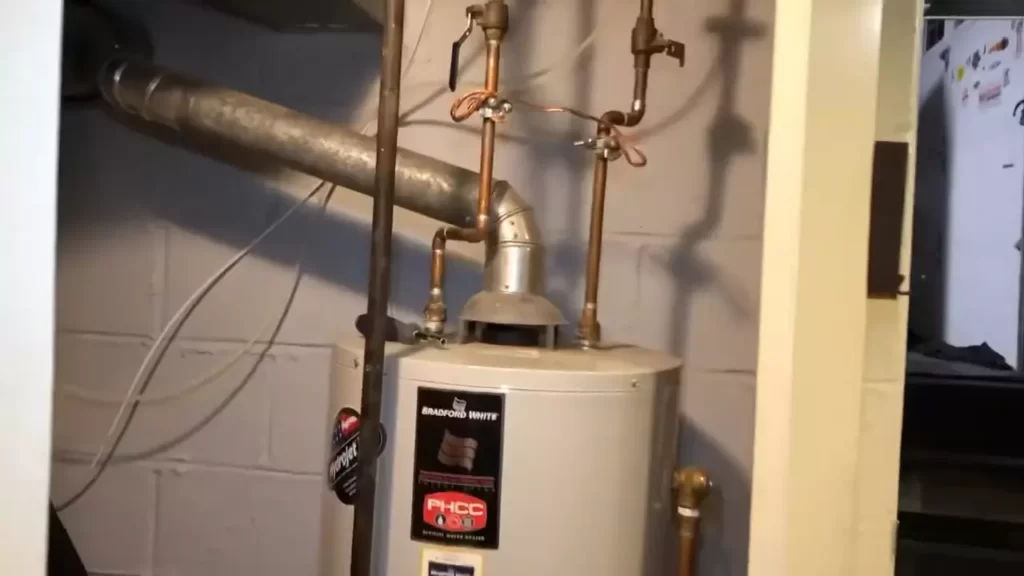
Shutting off the power supply and draining the water heater
Before you can begin removing the old water heater element, it is important to shut off the power supply and drain the water heater. Follow these steps:
- Locate the circuit breaker that controls the power supply to the water heater.
- Switch off the circuit breaker to ensure there is no electricity flowing to the water heater.
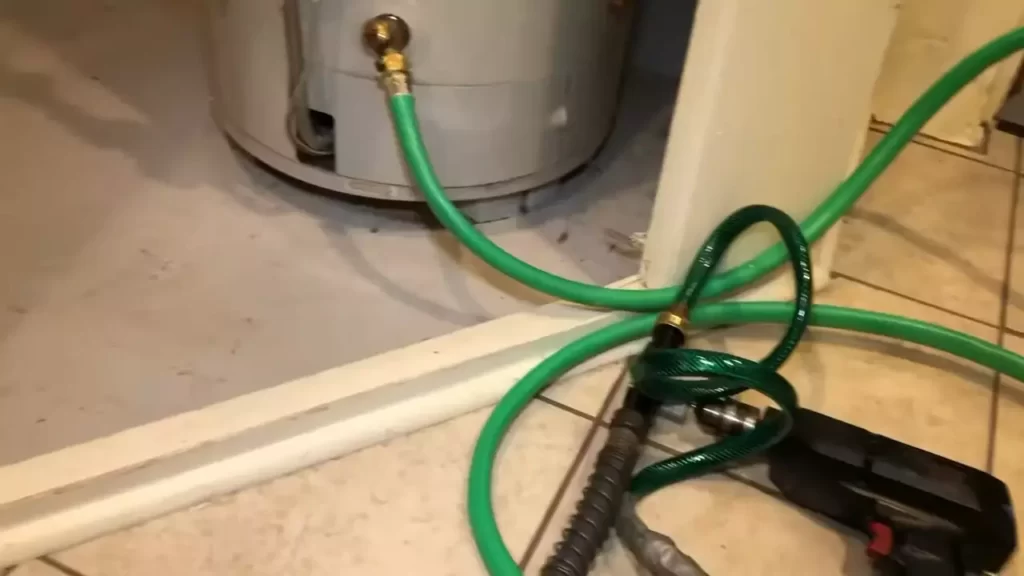
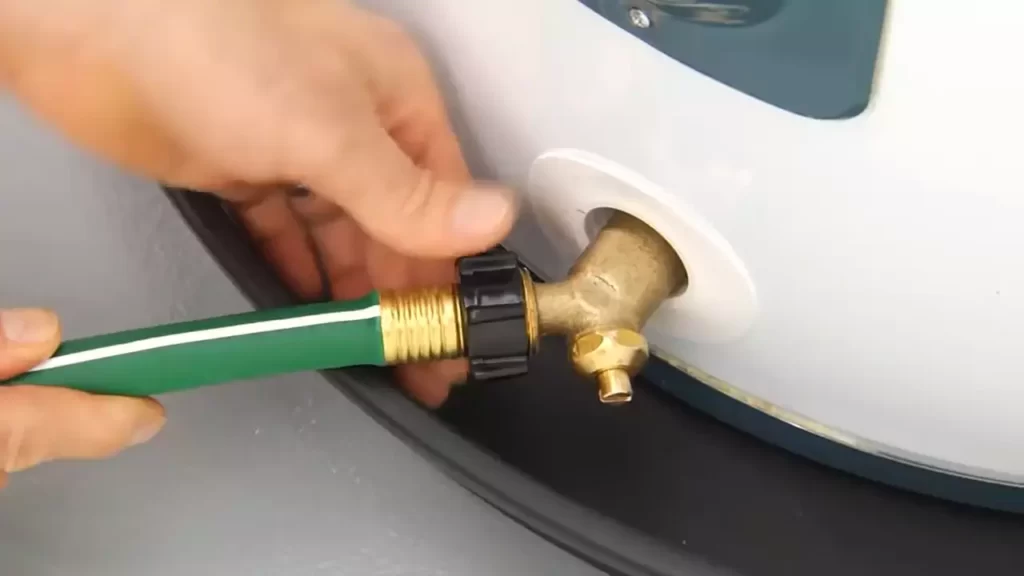
- Next, locate the drain valve at the bottom of the water heater.
- Attach a hose to the drain valve and direct the other end to a suitable drainage location.
- Open the drain valve and allow the water heater to completely drain.
- Once the water heater is drained, close the drain valve and remove the hose.
By following these steps, you will be well-prepared for the installation of a water heater element. Ensuring safety, having the necessary tools, and properly draining the water heater are essential for a successful installation process. In the next section, we will guide you through the actual installation of the element.
Removing The Old Water Heater Element
Step-by-step process of removing the old element
Removing the old water heater element is an essential step when installing a new one. Here’s a step-by-step guide on how to remove the old element:
- Turn off the power supply: Before starting any work on the water heater, always make sure to turn off the power supply. Locate the circuit breaker for the water heater and switch it off to prevent any accidents.
- Shut off the water supply: Next, locate the shut-off valve for the water heater. Turn it clockwise to shut off the water supply. This will prevent any water from leaking when you remove the element.
- Drain the water tank: Attach a garden hose to the drain valve at the bottom of the water heater tank. Place the other end of the hose in a suitable drainage area. Open the drain valve and allow the water to drain completely from the tank.
- Disconnect the electrical wiring: Once the tank is empty, locate the wires connected to the water heater element. Carefully disconnect the wires, ensuring that they are no longer connected to the power source.
- Remove the old element: Using a suitable wrench, turn the old element counterclockwise to loosen it. Be careful not to damage the threads while removing the element. Once loose, pull the old element out from the water heater.
Common challenges and troubleshooting tips
While removing the old water heater element, you may encounter some common challenges. Here are a few troubleshooting tips to help you overcome them:
- Stuck element: If the old element is stuck, try using a heating element removal wrench or pliers to increase leverage and loosen it. Applying heat to the surrounding area with a blowtorch can also help expand the metal and make it easier to remove.
- Corroded threads: Over time, the threads of the water heater element can become corroded, making it difficult to remove. Spraying penetrating oil on the threads and letting it sit for a few minutes can help loosen the corrosion.
- Leaking water: If water continues to leak from the tank after shutting off the water supply, check if the drain valve is fully closed. Tighten it if necessary, or consider replacing the valve if it is damaged.
- Damaged wires: If the electrical wires connected to the old element are damaged or worn out, replace them with new ones before installing the new element. It’s crucial to ensure a secure and reliable electrical connection.
- Professional assistance: If you are unsure or uncomfortable with removing the old water heater element, it’s best to seek professional assistance. They have the expertise and tools to handle the task safely and efficiently.
By following these step-by-step instructions and troubleshooting tips, you can successfully remove the old water heater element. Remember to always prioritize safety and caution when working with electrical appliances.
Installing The New Water Heater Element
When it comes to replacing a faulty water heater element, it is crucial to install the new one correctly to ensure efficient and safe operation. In this section, we will guide you through the step-by-step process of installing the new water heater element, focusing on choosing the right replacement element, properly connecting it to the water heater, and providing tips for achieving a secure and watertight installation.
Choosing the Right Replacement Element
Before diving into the installation process, it is essential to choose the right replacement element for your water heater. Here are a few key factors to consider:
- Wattage Rating: Select a replacement element with the same wattage rating as the one you are replacing. This information can usually be found on the old element or your water heater’s manual.
- Voltage: Ensure that the replacement element matches your water heater’s voltage to prevent any electrical issues.
- Size: Measure the length and diameter of the old element to find a replacement with the correct dimensions. Using an ill-fitting element can hinder performance and efficiency.
By considering these factors, you will be able to choose a replacement element that is compatible with your water heater.
Properly Connecting the New Element to the Water Heater
Now that you have chosen the right replacement element, it’s time to connect it to your water heater. Follow these steps for a successful installation:
- Turn off the Power: Before starting any work, switch off the power supply to the water heater by turning off the corresponding breaker in your electrical panel.
- Drain the Tank: Next, drain the hot water tank to a level below the element you are replacing. You can do this by attaching a hose to the drain valve and letting the water flow into a drain or bucket.
- Remove the Old Element: Use a suitable wrench or socket to loosen and unscrew the old element from the water heater. Be cautious as the element may still have hot water inside.
- Apply Teflon Tape: Before installing the new element, wrap several layers of Teflon tape around the threading to create a watertight seal.
- Install the New Element: Carefully insert the new element into the water heater’s opening and hand-tighten it. Then, use a wrench or socket to securely tighten it without over-tightening.
Tips for Ensuring a Secure and Watertight Installation
To ensure a secure and watertight installation of the new water heater element, consider the following tips:
- Check for Leaks: Once the new element is installed, check for any leakage around the threads. If you notice any leaks, tighten the element a little more until the leaks cease.
- Inspect Electrical Connections: Double-check that the electrical connections are properly tightened and securely fastened to avoid any electrical hazards.
- Refill the Tank: After confirming a secure installation, close the drain valve and refill the tank with water. Ensure that the tank is filled completely before restoring power to the water heater.
- Monitor the Operation: Keep an eye on the water heater’s operation for the first few days after installation. If you notice any unusual noises, drops in hot water temperature, or persistent leaks, consult a professional for further assistance.
By following these tips, you can ensure a successful and trouble-free installation of your new water heater element.
Testing And Maintenance
Regular testing and maintenance of your water heater element are crucial for ensuring its optimal performance and longevity. By carefully monitoring for leaks and regularly inspecting its functionality, you can identify and address any potential issues before they turn into costly problems. In this section, we will guide you through the process of checking for leaks and ensuring proper functionality, as well as provide tips on regular maintenance to extend the lifespan of your water heater element.

Checking for leaks and ensuring proper functionality
Before getting started, it’s essential to emphasize the significance of performing a thorough check for leaks and ensuring the proper functionality of your water heater element. Leaks can not only lead to wasted water and increased utility bills but also result in potentially damaging water damage to your home. Therefore, it’s crucial to take the following steps:
- Inspect the connections: Start by visually examining all the connections of your water heater element. Look for any signs of moisture, rust, or loose fittings. If you notice any water droplets or signs of corrosion, it may indicate a leak.
- Pressure relief valve examination: Check the pressure relief valve on your water heater element. This valve is designed to release excess pressure to prevent your water heater from exploding. Carefully lift the valve’s lever to ensure it opens and closes smoothly. If it doesn’t, it may require replacement.
- Drain valve inspection: Examine the drain valve at the base of your water heater element. Ensure it is tightly closed and not leaking. If you find a leak, it may be a sign of a faulty valve that needs replacement.
- Turn on the power supply: Once you have checked for leaks, it’s time to test the functionality of your water heater element. Turn on the power supply and give it ample time to heat the water. Listen for any unusual noises, such as hissing or buzzing. These noises may indicate a malfunctioning component that should be addressed immediately.
Regular maintenance to extend the lifespan of the water heater element
Performing regular maintenance on your water heater element is vital for ensuring its longevity and efficient operation. Here are a few recommended maintenance tasks you should include in your routine:
- Flushing the tank: Over time, sediment and mineral buildup can accumulate at the bottom of your water heater tank, reducing its efficiency. To flush the tank, follow the manufacturer’s instructions. Flushing once or twice a year can help maintain optimal performance.
- Testing the pressure relief valve: To ensure the pressure relief valve is working correctly, you should test it annually. Simply lift the valve’s lever to allow a small amount of water to discharge. If the valve fails to release water or continues to leak afterward, it may need to be replaced.
- Insulating the tank: To help reduce heat loss and improve energy efficiency, consider insulating your water heater tank. This can be done using an insulation blanket or jacket specifically designed for water heaters. Be sure to follow the manufacturer’s instructions when installing the insulation.
- Anode rod inspection and replacement: Anode rods are sacrificial rods that help prevent corrosion within your water heater tank. Over time, these rods can become corroded and require replacement. Check your owner’s manual to determine how often the anode rod should be inspected and replaced.
- Checking the thermostat settings: Periodically check the temperature settings on your water heater thermostat. Lowering the temperature can help lower energy consumption and reduce the risk of scalding.
By incorporating these testing and maintenance practices into your water heater element care routine, you can ensure its proper functionality, detect and address leaks promptly, and extend its lifespan. Regular maintenance not only saves you money in the long run but also ensures you have access to a reliable and efficient source of hot water whenever you need it.
Troubleshooting Common Issues
Common problems that may arise after installation
After successfully installing a water heater element, it’s not uncommon to encounter a few hiccups along the way. Although frustrating, these issues can usually be easily resolved with the right troubleshooting techniques. Understanding the common problems that may arise allows you to equip yourself with the knowledge to handle them effectively. Here are some of the most frequently encountered issues:
- Water temperature fluctuations: One common problem is when the water temperature fluctuates unexpectedly. This can be caused by a variety of factors such as a malfunctioning thermostat or a build-up of sediment in the water tank. It’s crucial to identify the root cause to address the issue appropriately.
- Inadequate hot water supply: If you notice that your water heater is not providing enough hot water, it could be due to a faulty heating element or a problem with the water pressure. Insufficient hot water can be particularly bothersome, especially during colder months or when multiple appliances are in use simultaneously.
- Strange noises: Unusual noises coming from your water heater can be unsettling. These noises can range from rumbling sounds to popping or hissing. In most cases, these noises are caused by mineral deposits or sediments accumulating in the tank. Regular maintenance and cleaning can help alleviate this issue.
- Water leakage: Discovering water leakage around your water heater is a cause for concern. Leakage can occur from various points, including loose connections, faulty valves, or a damaged heating element. Promptly identifying and resolving the source of the leakage is important to prevent further damage or potential accidents.
- Power supply problems: If your water heater fails to turn on or experiences intermittent power supply issues, the problem may lie with the electrical connections or the thermostat. It’s crucial to ensure that power is reaching the water heater and that the electrical components are functioning correctly.

Solutions and troubleshooting tips
Now that you’re aware of the common issues that may arise, it’s time to discuss troubleshooting tips and solutions to ensure a smoothly functioning water heater system. Here are some practical steps to resolve these common problems:
- Adjust the thermostat: If you’re experiencing water temperature fluctuations, check the thermostat settings. You may need to adjust and calibrate the thermostat to ensure a consistent water temperature.
- Flush the tank: To tackle inadequate hot water supply and strange noises, regularly flushing the tank can help eliminate sediment build-up. Consult the manufacturer’s instructions for the proper flushing procedure.
| Problem | Solution |
|---|---|
| Water temperature fluctuations | Adjust the thermostat settings |
| Inadequate hot water supply | Regularly flush the tank to remove sediment build-up |
| Strange noises | Flush the tank to eliminate mineral deposits |
| Water leakage | Inspect and tighten connections, replace faulty valves or heating element |
| Power supply problems | Check electrical connections and test the thermostat |
- Inspect and tighten connections: When dealing with water leakage, it’s important to inspect all connections and tighten any loose fittings. If you identify a faulty valve or heating element, prompt replacement is necessary to prevent further damage.
- Check electrical connections: For power supply problems, ensure that all electrical connections are secure and undamaged. Test the thermostat and replace it if necessary.
By being aware of these common problems and following the troubleshooting steps highlighted above, you’ll be well-equipped to tackle any issues that may arise after installing a water heater element. Remember, it’s crucial to always prioritize safety and consult a professional if you encounter complex or potentially hazardous situations.
Frequently Asked Questions For How To Install A Water Heater Element
Can You Replace A Water Heater Element Yourself?
Yes, you can replace a water heater element yourself. It’s a DIY task that doesn’t require professional help. Just follow the instructions carefully and make sure to turn off the power before starting. Stay safe and consult your manual for specific guidance.
Does It Matter Which Wire Goes Where On A Water Heater Element?
It doesn’t matter which wire goes where on a water heater element. The two wires are interchangeable and can be connected to either terminal without affecting the functionality of the element.
Is It Hard To Replace A Heating Element In A Water Heater?
Replacing a heating element in a water heater is not difficult. Just follow the manufacturer’s instructions, turn off the power supply, drain the tank, disconnect the old element, and install the new one. It’s a simple process that can be done with basic tools and some DIY knowledge.
How Do You Wire A Hot Water Heater Element?
To wire a hot water heater element, follow these steps:
1. Turn off the power supply to the heater.
2. Remove the access panel to reach the element.
3. Disconnect the wires from the existing element.
4. Connect the new element’s wires to the correct terminals.
5. Securely fasten the element and replace the access panel. (Note: Seek professional assistance if unsure about electrical work. )
Conclusion
Installing a water heater element is a task that can be easily accomplished with the right knowledge and tools. By following the step-by-step guide provided in this blog post, you can safely and efficiently replace a faulty element in your water heater.
Remember to always turn off the power and water supply before beginning the installation process. Regular maintenance and timely replacement of the water heater element will ensure optimal performance and prolong the lifespan of your appliance.