To install a tankless water heater in an RV, follow these steps: first, choose a suitable location for installation, ensuring access to necessary connections; then, turn off the water and gas supply to the RV; next, disconnect the existing water heater and remove it; after that, mount the tankless water heater securely and connect the water and gas lines; finally, test the unit for leaks and ensure proper functionality before use. This guide will help you easily and efficiently install a tankless water heater in your RV, providing instant hot water and convenience on the go.
Choosing The Right Tankless Water Heater For Your RV
Installing a tankless water heater in your RV can provide numerous benefits, such as saving space, ensuring a constant supply of hot water, and increasing energy efficiency. However, with several options available in the market, choosing the right one can be a daunting task. In this section, we will explore the key factors to consider when selecting a tankless water heater for your RV.
Factors to Consider When selecting a tankless water heater
Before making your purchase, it’s important to evaluate various factors to ensure you choose a tankless water heater that meets your specific needs. Here are some essential considerations:
- Proper sizing for your RV water heating needs: The size of the tankless water heater is crucial in catering to your RV’s hot water demand. Consider the number of people using hot water, the number of appliances requiring hot water simultaneously, and the desired flow rate. Choosing a properly sized unit will ensure an uninterrupted supply of hot water throughout your RV.
- Energy efficiency considerations: As an RV owner, energy efficiency is of utmost importance. Look for tankless water heaters with a high energy efficiency rating. This will not only reduce your carbon footprint but also save you money in the long run.
- Durability and quality: Invest in a tankless water heater that is made from durable materials and comes with a reputable warranty. This will give you peace of mind knowing that your water heating system will last for years to come.
- Installation requirements: Consider the ease of installation and compatibility with your RV’s existing plumbing system. Some tankless water heaters may require additional modifications or professional assistance for installation.
- Budget: Determine your budget before making a purchase. While it’s important to balance cost with quality, remember that investing in a reliable tankless water heater will pay off in terms of long-term durability and efficiency.
By carefully considering these factors, you can choose a tankless water heater that aligns with your RV water heating needs and ensures a comfortable camping experience.
Assessing Your Rv’S Water System
When it comes to installing a tankless water heater in your RV, it’s essential to assess your RV’s existing water system before making any changes. This preliminary step will ensure a smooth installation process and help you avoid any compatibility issues or potential damage to your plumbing system.
Understanding your RV’s existing water heater
The first step in assessing your RV’s water system is to understand your RV’s existing water heater. Take note of its size, type, and any specific features it may have. This information will help you determine the appropriate tankless water heater for your RV and guide your decision-making process as you evaluate compatibility.
Evaluating the compatibility of your RV’s plumbing system with a tankless water heater
Next, it’s crucial to evaluate the compatibility of your RV’s plumbing system with a tankless water heater. Consider the following factors:
- Flow rate and water pressure: Tankless water heaters require a certain flow rate and water pressure to function optimally. Check your RV’s specifications to ensure they meet the requirements of the tankless water heater you plan to install.
- Gas or electric: If your current water heater operates on gas, you’ll need to ensure that your RV has a gas supply line and adequate ventilation for the tankless water heater. If it’s electric, you’ll need to ensure that your RV’s electrical system can support the additional power requirements.
- Size and space: Consider the physical dimensions of the tankless water heater and compare them to the available space in your RV. Ensure there’s enough room for installation and ventilation.
- Pipe type and size: Check the type and size of pipes in your RV’s plumbing system. The new tankless water heater should be compatible with the existing pipe setup to avoid any leaks or issues.
Determining the appropriate location for the tankless water heater installation
Once you’ve assessed your RV’s water system and confirmed compatibility, it’s time to determine the appropriate location for the tankless water heater installation. Consider the following factors:
- Accessibility: Ensure that the tankless water heater is easily accessible for maintenance and repairs.
- Ventilation: Tankless water heaters require proper ventilation to ensure safe operation. Choose a location that allows for adequate airflow.
- Protection from freezing: Rvs are often exposed to colder temperatures, so it’s crucial to install the tankless water heater in a location that provides protection from freezing.
- Proximity to water sources: Consider the proximity of the installation location to your RV’s water sources to minimize any potential loss of heat in the plumbing system.
By carefully assessing your RV’s water system, evaluating compatibility, and determining the appropriate location for the tankless water heater installation, you’ll be on your way to enjoying a more efficient and reliable hot water supply in your RV.
Preparing For The Installation Process
Before installing a tankless water heater in an RV, it’s important to properly prepare for the installation process. This involves gathering the necessary tools and materials, shutting off the RV’s water and propane systems, and draining and removing the old water heater. Taking these steps ensures a smooth and efficient installation, allowing you to enjoy the benefits of a tankless water heater while on the road.
Gathering the necessary tools and materials
First and foremost, you’ll need to gather all the tools and materials required for the installation. This includes:
- Adjustable wrench
- Plumbing tape
- Plumbing fittings
- Drain valves
- Propane fittings
- Propane detector
- Flame-retardant insulation
- Electrical wiring
Having these tools and materials ready before starting the installation will save you time and effort, ensuring a more streamlined process.
Shutting off the RV’s water and propane systems
Prior to removing the old water heater, it’s essential to shut off the RV’s water and propane systems to prevent accidents or leaks. To do this, follow these steps:
- Locate the main water supply valve and turn it off in a clockwise direction.
- Next, disconnect the propane gas line by turning the valve located near the water heater to the “off” position.
- Ensure that all propane appliances are turned off inside the RV, including the stove and refrigerator.
- Remember to open windows for ventilation while working with the propane system.
Taking these precautions will ensure a safe working environment as you proceed with the installation.
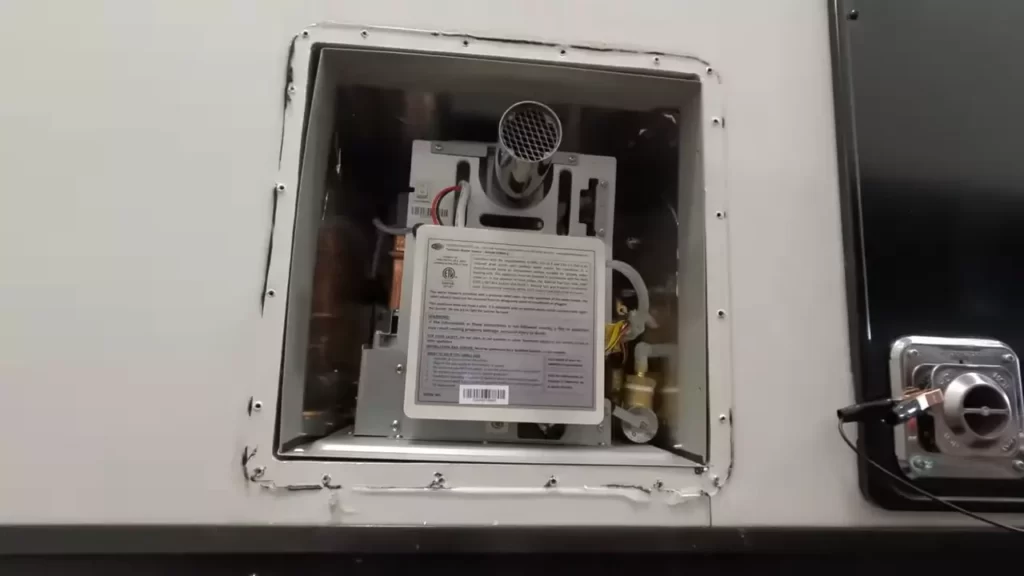
Draining and removing the old water heater
Once the water and propane systems are shut off, it’s time to drain and remove the old water heater. Follow these steps to complete this process:
- Attach a hose to the water heater’s drain valve and direct the hose to a suitable drainage area outside the RV.
- Open the drain valve to allow the water heater to empty completely.
- Once drained, disconnect the water lines from the old water heater using an adjustable wrench.
- Remove any remaining screws or attachments holding the old water heater in place.
- Lift the old water heater out of the RV carefully, ensuring to avoid any damage to the surrounding area.
By diligently following these steps, you’ll successfully remove the old water heater, making way for the installation of a new tankless system.
Installing The Tankless Water Heater
Once you have chosen the perfect tankless water heater for your RV, it’s time to tackle the installation process. With some basic tools and a little bit of know-how, you can install the tankless water heater yourself and enjoy the convenience of hot water on demand during your travels. In this section, we will guide you through the steps of mounting the tankless water heater, connecting the water lines and fittings, and installing the venting system for proper exhaust.
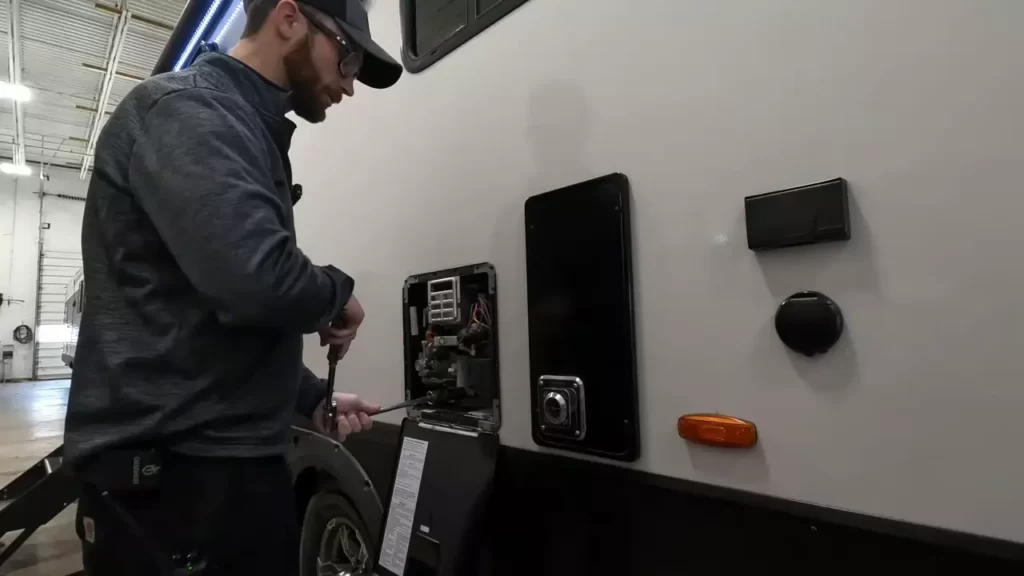
Mounting the Tankless Water Heater in the Designated Location
The first step in installing your tankless water heater is to find the designated location for mounting. Ensure that the chosen spot is well-ventilated and easily accessible for maintenance and repairs. Use the following steps to properly mount the tankless water heater:
- Locate a secure and sturdy wall where the tankless water heater will be mounted.
- Using appropriate brackets or mounting hardware, attach the tankless water heater securely to the wall.
- Make sure the unit is level and aligned properly.
- Verify that there is sufficient clearance around the unit for proper airflow and maintenance access.
Connecting the Water Lines and Fittings
Now that you have successfully mounted the tankless water heater, it’s time to connect the water lines and fittings. Follow these steps for a successful installation:
- Identify the incoming cold-water line and the hot-water line in your RV’s plumbing system.
- Turn off the water supply to the RV to prevent any leaks or accidents during the installation process.
- Connect the appropriate fittings to the cold-water line and the hot-water line, ensuring a tight and secure connection.
- Use Teflon tape or pipe joint compound to seal the connections and prevent any leaks.
- Open the water supply valves and check for any leaks. If there are any, tighten the connections further.
Installing the Venting System for Proper Exhaust
A vital step in the installation process is setting up the venting system to ensure proper exhaust. This helps to remove any harmful gases from the combustion process. Follow these steps to install the venting system:
- Refer to the manufacturer’s instructions for the specific venting requirements of your tankless water heater model.
- Choose the appropriate venting materials, such as stainless steel or PVC, based on the guidelines provided.
- Measure and cut the venting pipes accordingly, ensuring a proper fit and secure connection.
- Attach the venting pipes to the tankless water heater, following the manufacturer’s instructions and guidelines.
- Extend the venting system to the exterior of your RV, making sure to follow any necessary angles or slopes for proper exhaust flow.
- Inspect the entire venting system for any leaks or loose connections.
- Once everything is securely in place, test the tankless water heater to ensure it is functioning correctly.
By following these steps for installing your tankless water heater in your RV, you can enjoy the benefits of hot water on demand while on your travels. Remember to check the manufacturer’s instructions for any additional steps or guidelines specific to your tankless water heater model. With a properly installed tankless water heater, you can enhance your RV experience and never worry about running out of hot water again.
Connecting The Propane Supply
Selecting the appropriate propane regulator and gas piping
Before connecting the propane supply to your tankless water heater in your RV, it’s crucial to select the appropriate propane regulator and gas piping. The regulator is responsible for controlling the pressure of the propane gas that flows into the water heater, ensuring it operates safely and efficiently. Here’s what you need to consider:
- Regulator Type: There are two main types of regulators available: single-stage and two-stage. Single-stage regulators are commonly used for RVs and provide a consistent propane pressure, while two-stage regulators give better performance in colder weather conditions. Choose the regulator that suits your specific needs and climate.
- Gas Piping: When connecting the water heater to the propane supply, make sure to use the appropriate gas piping. Generally, it’s recommended to use rigid metal piping such as copper or steel. This type of piping ensures durability and minimizes the risk of gas leaks. Avoid using flexible hoses or plastic piping, as they may not be suitable for high-pressure gas systems.
- Sizing: It’s essential to ensure that the regulator and gas piping are properly sized to handle the gas flow required by the tankless water heater. Refer to the manufacturer’s guidelines or consult an expert to determine the appropriate sizing for your specific water heater model.
Connecting the propane supply to the tankless water heater
Once you have selected the appropriate regulator and gas piping, it’s time to connect the propane supply to your tankless water heater in the RV. Follow these steps to ensure a safe and proper connection:
- Locate the propane supply: Identify the propane supply line in your RV. It is usually located near the water heater or in the utility compartment.
- Shut off the propane supply: Before making any connections, ensure that the propane supply valve is turned off. This step is crucial for your safety and prevents any gas leakage during the installation process.
- Connect the gas piping: Using the appropriate fittings, connect the gas piping to both the propane supply line and the inlet connection of the tankless water heater. Ensure that the connections are tight and secure to prevent any gas leaks.
- Test for gas leaks: After making the connections, it’s essential to test for any gas leaks. Apply a solution of soapy water to all the connections and joints. If you notice bubbles forming, it indicates a gas leak. In such cases, immediately switch off the propane supply and rectify the connection.
Testing for gas leaks and ensuring proper ventilation
After connecting the propane supply to the tankless water heater, it’s crucial to test for gas leaks and ensure proper ventilation inside your RV. Here are the steps to follow:
- Test for gas leaks: Reiterate the gas leak testing process described earlier by applying a solution of soapy water to all the connections and joints. Monitor for any signs of bubbles forming, which indicate a gas leak. Ensure all connections are secure and tight.
- Verify proper ventilation: Proper ventilation is essential to ensure the safe operation of the tankless water heater. Ensure that the RV has adequate exhaust venting and fresh air intake as specified by the manufacturer. Blocked or inadequate ventilation can lead to improper combustion and the accumulation of harmful gases.
- Run a test cycle: After confirming there are no gas leaks and ventilation is adequate, run a test cycle of the tankless water heater. Observe its performance and verify that it operates smoothly and without any issues.
Ensuring a secure and proper connection of the propane supply is a crucial step in installing a tankless water heater in your RV. By carefully selecting the appropriate regulator and gas piping, making tight connections, testing for gas leaks, and ensuring proper ventilation, you can enjoy the benefits of a reliable and efficient water heating system during your RV adventures.
Wiring And Electrical Connections
Understanding the electrical requirements of the tankless water heater
To ensure a successful installation of a tankless water heater in your RV, it is crucial to have a good understanding of the electrical requirements. Unlike traditional water heaters, tankless models require a significant amount of power to operate efficiently. The specific electrical requirements can vary depending on the make and model of the tankless water heater, so it is essential to consult the manufacturer’s documentation for accurate information.
Before proceeding with the installation, verify the voltage and amperage requirements of your tankless water heater. Typically, RV tankless water heaters run on either 120V or 240V. Determine the maximum power draw of the unit, measured in kilowatts (kW), and ensure your RV’s electrical system can handle that load. This information will help you choose the appropriate wiring and circuit breaker size for your installation.
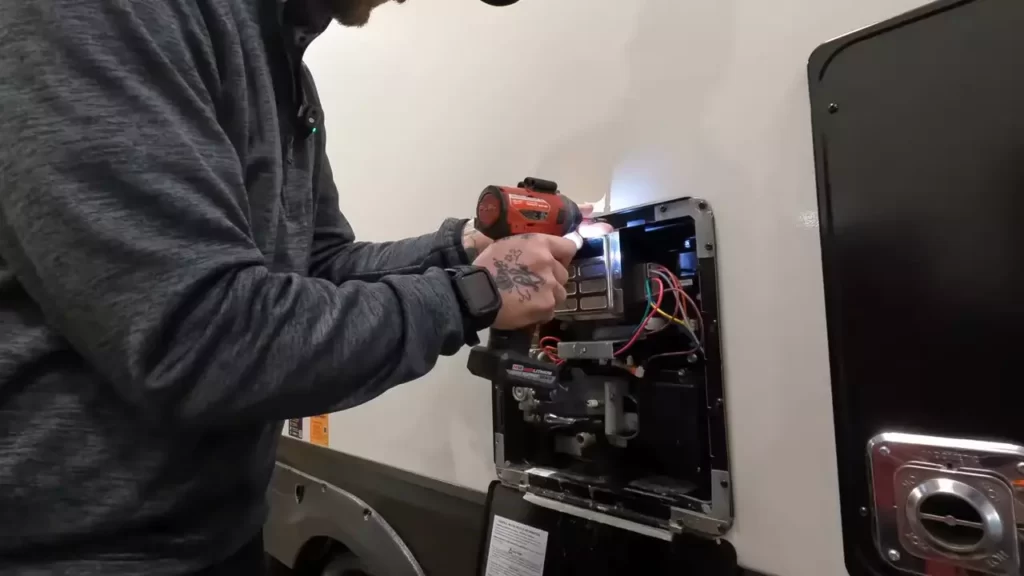
Connecting the electrical wiring safely
Once you have determined the electrical requirements of your tankless water heater, it’s time to connect the electrical wiring. Safety should be the utmost priority during this process, so make sure to follow all proper procedures and guidelines.
To begin, gather all the necessary tools for the job, such as wire cutters, wire strippers, electrical tape, and appropriate wire connectors. Ensure that you have the correct gauge wire for the amperage requirements of your tankless water heater.
Start by shutting off the power supply to your RV’s electrical system. Identify the circuit breaker that controls the power to the water heater and turn it off. Confirm that there is no power running through the wires by using a non-contact voltage tester.
Next, measure and cut the appropriate lengths of wire for the connections. If you are using a conduit, thread the wires through it before attaching them to the water heater. Strip about ½ inch of insulation from the ends of the wires, making sure not to damage the conductors.
Using the proper wire connectors, secure the wires to the corresponding terminals on the tankless water heater. Follow the manufacturer’s instructions to ensure you make the correct connections. Double-check that all connections are tight and secure to prevent any future electrical issues.
Testing the electrical connections and ensuring proper grounding
After connecting the electrical wiring, it is essential to test the connections to ensure everything is functioning properly and safely. Additionally, you must ensure that the water heater is properly grounded to prevent electrical shocks and other hazards.
Turn on the power supply to the RV’s electrical system and verify that the tankless water heater is receiving power. Use a multimeter to check the voltage at the connections and confirm that it matches the specified voltage requirements of the unit.
Next, test the functionality of the tankless water heater by turning on the hot water faucet and noting if the unit activates. Make sure hot water flows consistently and that there are no leaks or abnormal sounds coming from the unit. Address any issues immediately before proceeding.
Lastly, ensure the tankless water heater is properly grounded. This step is crucial for safety purposes. Connect the grounding wire from the water heater to your RV’s grounding system, following the manufacturer’s instructions. Test the grounding using an ohmmeter to confirm proper continuity.
By understanding the electrical requirements, connecting the wiring safely, and thoroughly testing the connections and grounding, you can successfully install a tankless water heater in your RV. Remember to consult the manufacturer’s documentation throughout the installation process, as different models may have specific requirements. Prioritize safety at all times, and if you are unsure about any step or encounter any difficulties, seek assistance from a qualified electrician.
Testing And Commissioning The Tankless Water Heater
Testing and commissioning the tankless water heater is an essential step in ensuring its proper installation in an RV. This process involves restoring the RV’s water and propane systems, checking for proper functionality, troubleshooting common issues, adjusting the temperature settings, and ensuring a consistent supply of hot water. Let’s dive into each step below:
Restoring the RV’s water and propane systems
Before testing the tankless water heater, you need to restore the RV’s water and propane systems. Follow these steps to ensure a smooth process:
- Turn off the water supply to the RV.
- Turn on the RV’s water pump or reconnect it to the city water source.
- Inspect the water lines for any leaks or damages. Fix them if necessary.
- Turn on the propane supply, ensuring the tank is sufficiently filled.
- Check all the propane connections for leaks using a propane leak detector or soapy water. If a leak is detected, tighten the connection or replace the faulty part.
Checking for proper functionality and troubleshooting common issues
Once the water and propane systems are restored, it’s time to test the functionality of your tankless water heater. Follow these steps to ensure it is operating correctly:
- Turn on the hot water faucet in your RV’s kitchen or bathroom.
- Observe the tankless water heater for any signs of ignition failure or error codes. These could indicate an issue with the heater’s ignition system or gas supply.
- If the heater fails to ignite or displays an error code, refer to the manufacturer’s troubleshooting guide. Follow the recommended steps to resolve the problem.
- Check the hot water flow and temperature. It should correspond to the settings on the water heater. Adjust the temperature if necessary, ensuring it’s safe and comfortable for use.
Adjusting the temperature settings and ensuring hot water supply
Once you have verified the tankless water heater’s functionality, you can proceed to adjust the temperature settings and ensure a consistent supply of hot water:
- Locate the temperature control panel on the tankless water heater or the designated control panel inside the RV.
- Using the provided instructions, adjust the temperature settings to your desired level. Be cautious not to set it too high to avoid scalding.
- Test the hot water supply in multiple faucets and fixtures throughout the RV to ensure it remains consistent and at the desired temperature.
- If you encounter any issues with inconsistent hot water supply or temperature fluctuations, refer to the manufacturer’s troubleshooting guide for further assistance or consider contacting a professional RV technician.
Testing and commissioning your tankless water heater is a crucial step in its installation process. By following the steps outlined above, you can ensure that your tankless water heater is functioning optimally, providing you with a reliable and efficient source of hot water during your RV adventures.
Maintenance And Care Tips For Tankless Water Heater In An Rv
Proper maintenance and care are essential for keeping your tankless water heater in optimal condition. By performing regular maintenance tasks, such as flushing and descaling the unit, you can ensure that it continues to provide an efficient and reliable source of hot water during your RV adventures. In this section, we will discuss important maintenance tasks, step-by-step instructions for flushing and descaling, as well as troubleshooting common problems that you may encounter. It’s important to seek professional assistance when needed to prevent further damage to your tankless water heater. Let’s delve into the details.
Important maintenance tasks to keep your tankless water heater in optimal condition
Here are some crucial maintenance tasks that you should perform periodically to ensure that your tankless water heater continues to operate at its best:
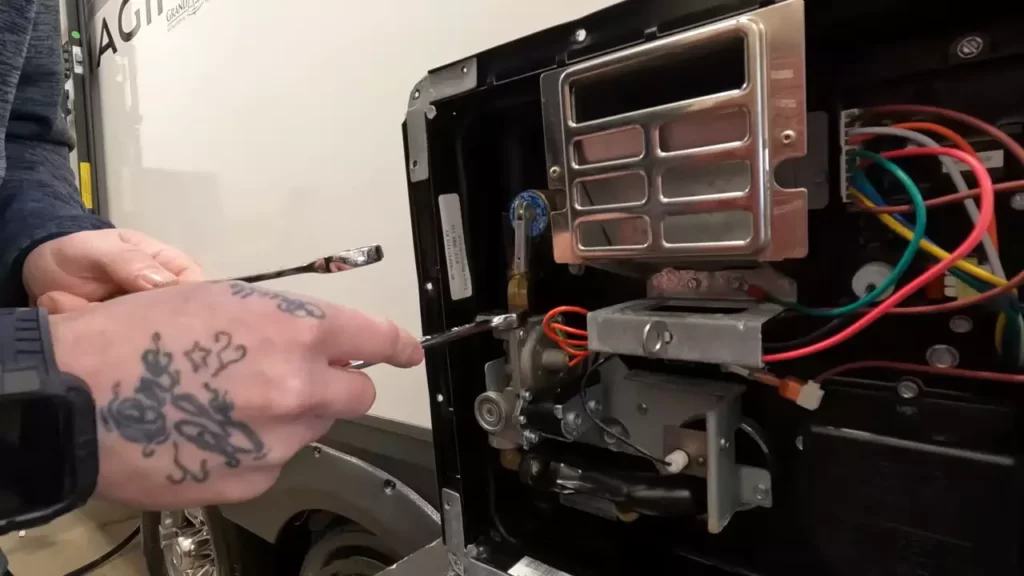
- Check for leaks: Regularly inspect all connections and fittings for any signs of leakage. Tighten loose connections as necessary to prevent water damage.
- Clean the air intake filter: The air intake filter helps prevent debris from entering the unit. Clean it regularly by removing it and gently wiping away any accumulated dirt or dust. A clogged filter can affect the performance of your water heater. Remember to turn off the power supply before removing the air intake filter.
- Inspect the venting system: The venting system ensures the safe exhaust of combustion gases. Check for any obstructions or damage that could hinder proper ventilation. Clear any debris and ensure the vent pipe is securely attached.
- Check the pressure relief valve: The pressure relief valve helps regulate the pressure inside the tankless water heater. Test it periodically by lifting the lever and allowing water to flow out. If the valve doesn’t release water or leaks continuously, it may require professional attention.
How to flush and descale the unit regularly
To maintain the efficiency of your tankless water heater, it is crucial to flush and descale it regularly. Follow these steps to accomplish this:
- Turn off the power supply to the water heater and close the gas valve (if applicable).
- Attach a garden hose to the drain valve on the unit.
- Place the other end of the garden hose in a suitable drainage area.
- Open the drain valve and allow the water to flow out. Keep in mind that the water may initially be hot.
- Continue flushing the system until the water runs clear, indicating the removal of any sediment or mineral buildup.
- Once flushed, close the drain valve and remove the garden hose.
- Turn on the water supply and allow it to run through the unit for a few minutes to ensure any remaining debris is flushed out.
In addition to flushing, it is important to descale your tankless water heater to remove any mineral buildup that can impact its performance. Consult your manufacturer’s guidelines for the appropriate descaling solution and procedure.
Troubleshooting common problems and seeking professional assistance when needed
Even with regular maintenance, you may encounter some common issues with your tankless water heater. Here are a few troubleshooting tips:
- Check for error codes: Tankless water heaters often have built-in diagnostic systems that display error codes to indicate specific problems. Consult the user manual to understand the meaning of the codes and take appropriate action.
- Check the gas supply: If you have a gas-powered water heater, ensure that the gas supply valve is open and that there is an adequate supply of gas.
- Check the water flow: Insufficient water flow can trigger the heater’s safety mechanisms, causing it to shut off. Check for any obstructions in the water lines and ensure the intake filter is clean.
- Seek professional assistance: If you are unable to resolve the issue on your own or if you are uncomfortable performing troubleshooting tasks, it is advisable to seek professional assistance. They have the expertise to diagnose and repair any major problems to ensure your tankless water heater operates smoothly.
Frequently Asked Questions Of How To Install A Tankless Water Heater In An Rv
Can You Install A Tankless Hot Water Heater In An Rv?
Yes, it is possible to install a tankless hot water heater in an RV. It can save space and provide hot water on demand.
How Much Does It Cost To Put A Tankless Water Heater In A RV?
The cost of installing a tankless water heater in an RV can vary depending on factors such as brand, capacity, and additional installation requirements. On average, you can expect to pay around $500 to $1,500 for both the unit and installation.
Do Tankless Water Heaters Work For RVs?
Yes, tankless water heaters can work for RVs. They provide hot water on demand, are efficient, and save space.
Can I Install A Tankless Water Heater By Myself?
Yes, you can install a tankless water heater by yourself. However, it’s important to have some knowledge of plumbing and electrical work. Make sure to follow all safety guidelines and manufacturer instructions. If you’re unsure, it’s best to hire a professional plumber to ensure proper installation.
Conclusion
Installing a tankless water heater in your RV is a practical and efficient solution for your hot water needs on the road. By following the steps outlined in this guide, you can easily enjoy the benefits of continuous hot water while conserving energy and space.
With the right tools and a little bit of patience, you’ll be able to successfully install a tankless water heater and experience the convenience it brings during your RV adventures. So, don’t hesitate to make this upgrade and enjoy a constant supply of hot water wherever your travels take you.