Installing a tankless toilet requires some basic plumbing knowledge and tools. In this guide, we will show you how to install a tankless toilet in a few simple steps.
By following these instructions, you can have a functional and space-saving toilet in your bathroom. So, let’s get started with the installation process.
What Is A Tankless Toilet And How Does It Work?
A tankless toilet, also known as a wall-mounted toilet or concealed cistern toilet, is a modern bathroom fixture that offers a sleek and space-saving design. Unlike traditional toilets that rely on a tank to store and release water for flushing, tankless toilets eliminate the need for a visible tank by incorporating a hidden cistern system.
Description of the tankless toilet system
The tankless toilet system comprises a hidden cistern that is concealed either behind the wall or within a furniture unit. This innovative design not only saves space but also adds a modern touch to your bathroom décor. The cistern is usually made of durable materials such as plastic or stainless steel, ensuring longevity and durability.
Contrary to traditional toilets, tankless toilets use a flush valve and a fill valve instead of a tank. The flush valve allows water to flow directly into the toilet bowl, while the fill valve replenishes the cistern with water after each flush.
Explanation of how water is flushed without a tank
In a tankless toilet system, the water supply is connected to the flush valve, which is responsible for releasing a powerful surge of water into the toilet bowl to flush away waste. The absence of a tank means that the flushing process is quicker and more efficient, as the water is not limited by the capacity of a tank.
This type of toilet also incorporates a dual flush mechanism, offering two options for flushing – a smaller flush for liquid waste and a larger flush for solid waste. This not only helps conserve water but also provides flexibility in flushing power.
Additionally, tankless toilets often include a built-in pressure-assist system that enhances flushing performance. This system uses the water pressure supplied by the plumbing to deliver a forceful flush, ensuring thorough cleaning and preventing clogs.
Tools And Materials Needed For Installation
List of necessary tools for the installation process
When it comes to installing a tankless toilet, having the right tools is essential to ensure a smooth and successful installation. Not only will the right tools make the process easier, but they will also help you avoid any potential damage or mishaps along the way. To help you get started, here is a list of the necessary tools you will need:
- Adjustable wrench
- Screwdriver (both flathead and Phillips)
- Tape measure
- Pipe cutter or hacksaw
- Plumber’s tape
- Plunger
- Level
- Bucket
Having these tools on hand will make the installation process much easier and ensure that you have everything you need to tackle any challenges that may arise.
Materials required for a successful installation
In addition to the tools mentioned above, there are also specific materials that you will need for a successful tankless toilet installation. These materials will help ensure that everything is properly sealed and connected, allowing your tankless toilet to function efficiently. Here are the materials you will require:
- Tankless toilet
- Wax ring
- Toilet flange
- Water supply line
- Silicone caulking
- Plumber’s putty
- Sealant
- Bolts and washers
Ensuring that you have these materials on hand will save you time and allow for a hassle-free installation process. Remember, having everything you need before you begin will help make the installation process go smoothly and allow you to enjoy your new tankless toilet in no time.
Preparation And Planning
Before installing a tankless toilet, it is essential to conduct proper preparation and planning. This includes evaluating the existing plumbing system, measuring and determining the installation location, and calculating water supply requirements. By taking the time to prepare adequately, you can ensure a successful installation process and a more efficient toilet system. Let’s explore each step in detail:
Evaluating the existing plumbing system
Prior to installing a tankless toilet, it is crucial to assess the condition and layout of your existing plumbing system. This evaluation will ensure compatibility and identify any necessary modifications that need to be made. Here are a few factors to consider:
- The main water supply line location
- The sewage drain line position
- The condition of the pipes and fittings
- Any potential restrictions or obstacles in the plumbing system
Evaluating these aspects will help you determine whether any additional plumbing work is required before proceeding with the tankless toilet installation.
Measuring and determining the installation location
Next, you need to measure and select the ideal location for your tankless toilet. Here’s how you can do it:
- Measure the available space in your bathroom to ensure the tankless toilet can fit properly.
- Choose a location that provides easy access to the existing plumbing system, including the water supply line and sewage drain line.
- Consider the proximity to electrical outlets if your tankless toilet requires an electrical connection.
- Take into account any building codes or regulations regarding the installation location of toilets.
By carefully measuring and determining the installation location, you can avoid any obstacles or inconveniences during the installation process.
Calculating water supply requirements
Calculating the water supply requirements is an essential step in installing a tankless toilet. This ensures sufficient water flow for the toilet to function optimally. Here’s how you can calculate your water supply requirements:
- Determine the flow rate needed for the tankless toilet. Refer to the manufacturer’s specifications for this information.
- Identify the flow rate of your existing water supply. This can be done using a water flow meter or consulting your water utility provider.
- Compare the flow rate required by the tankless toilet with the available flow rate to ensure compatibility.
- If the existing flow rate is insufficient, consider upgrading your water supply system or consulting a professional plumber for assistance.
By calculating your water supply requirements accurately, you can guarantee a steady and adequate water supply for your tankless toilet.
Shutting Off The Water Supply And Draining The Existing Tank
Before starting the installation process of a tankless toilet, it is essential to shut off the water supply and drain the existing tank. This step is crucial to avoid any potential water leaks or damage during the installation process.
Turning off the main water supply
The first step in shutting off the water supply is to locate the main water valve in your home. In most cases, you can find it near the water meter or where the water line enters your property. Turn the valve clockwise to shut off the water supply to your entire house.
If you have trouble locating the main water valve or if it is difficult to turn off, you may need to consult a professional plumber to ensure it is done correctly. It’s important to note that shutting off the main water supply will stop the flow of water to all fixtures and appliances in your home, so make sure to inform other household members to avoid any inconvenience.
Draining the tank to remove excess water
Once you have successfully shut off the main water supply, the next step is to drain the tank of the existing toilet. This process ensures that there is no excess water remaining in the tank, which could cause spillage during the removal process.
To drain the tank, locate the shut-off valve near the base of the existing toilet. Turn the valve clockwise to close it, preventing any water from flowing into the tank. Flush the toilet to remove as much water as possible from the tank.
Next, disconnect the water supply line that connects the shut-off valve to the bottom of the toilet tank. Use a wrench to loosen the nut and carefully remove the supply line. Have a towel or bucket ready to catch any remaining water that may come out during this step.
After disconnecting the water supply line, you can then remove the tank from the bowl by unscrewing the bolts or screws that hold them together. Carefully lift the tank away and place it aside. Take caution as the tank may still contain residual water that could spill if tipped or mishandled.
Once the tank is removed, inspect the bowl for any remaining water. If there is, use a sponge or towel to soak up any excess moisture. Ensure that the bowl is completely dry before proceeding with the installation of the tankless toilet.
In conclusion, shutting off the water supply and draining the existing tank is a vital step when installing a tankless toilet. By following these steps, you can prevent water leaks and ensure a smooth installation process.
Removing The Old Toilet Fixture
Before installing a tankless toilet, you need to remove the old toilet fixture. This process involves disconnecting the water supply lines and unscrewing and removing the old toilet. Let’s go through each step in detail:
Disconnecting water supply lines
The first step is to disconnect the water supply lines connected to the old toilet. To do this, follow these steps:
- Turn off the water supply: Locate the shut-off valve, usually located near the base of the toilet. Turn it clockwise to shut off the water supply.
- Flush the toilet: This will help remove any remaining water in the tank and bowl.
- Disconnect the supply line: Use an adjustable wrench to loosen the nut connecting the water supply line to the toilet. Once loose, carefully twist and remove the supply line.
- Cap the water supply line: To avoid any water leakage, it’s recommended to cap the exposed water supply line using a cap or plug.
Unscrewing and removing the old toilet
Once you have disconnected the water supply lines, it’s time to unscrew and remove the old toilet. Follow these steps:
- Remove the tank cover: Lift up the tank cover and set it aside in a safe place.
- Disconnect the tank from the bowl: Locate the bolts connecting the tank to the bowl. Use a wrench to unscrew these bolts and carefully separate the tank from the bowl.
- Unscrew the floor bolts: The toilet bowl is secured to the floor with bolts. Use a wrench to unscrew these bolts and remove any rubber or wax seals attached to them.
- Remove the old toilet: With the bolts removed, carefully lift the old toilet off the floor and place it on a protective surface or dispose of it appropriately.
Congratulations! You have successfully removed the old toilet fixture. In the next section, we will learn how to prepare for the installation of a tankless toilet.
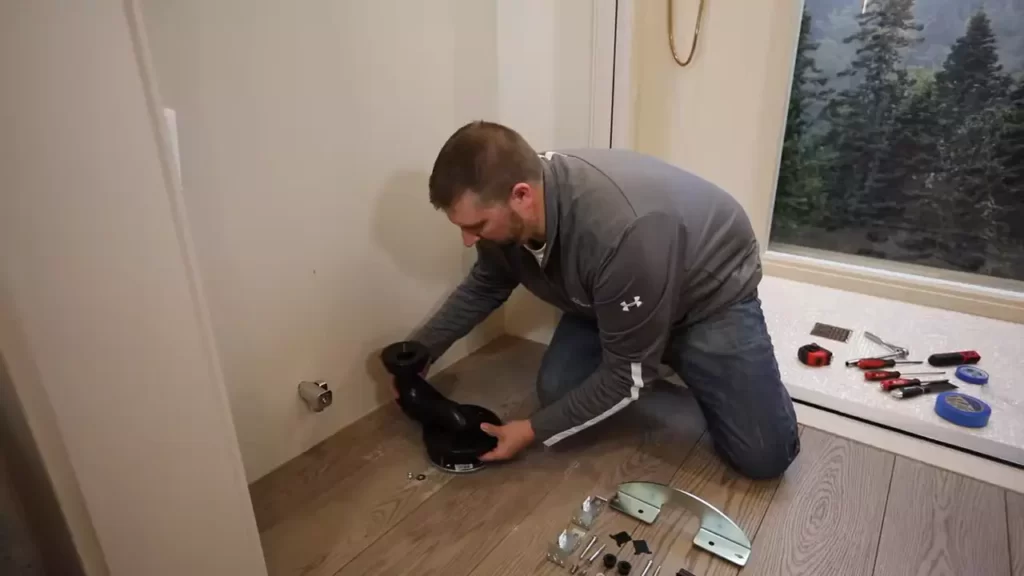
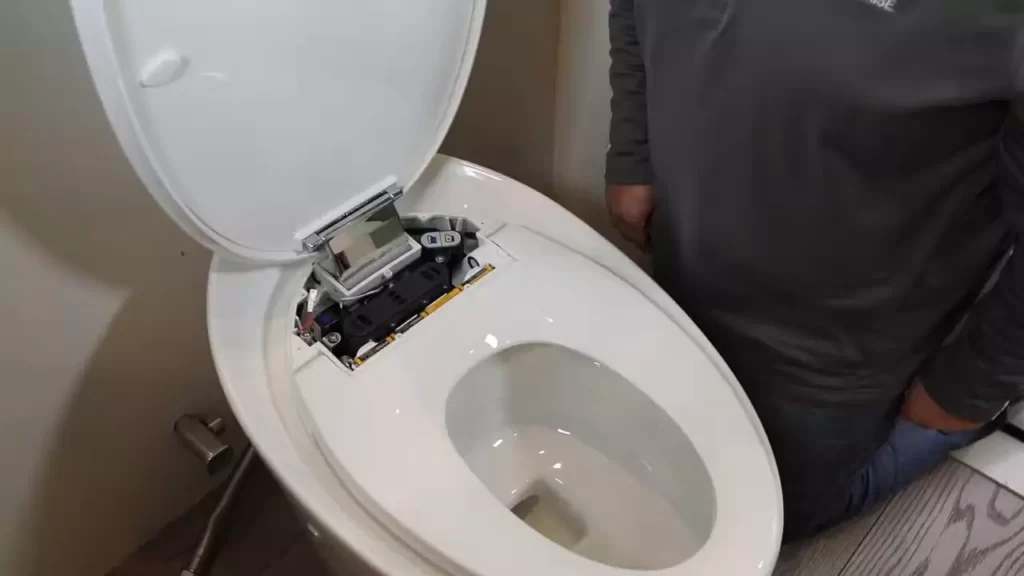
Installing The Tankless Toilet
Installing the tankless toilet is a straightforward process that can be completed with a few basic tools and a little patience. In this section, we will guide you through each step of installing a tankless toilet, from attaching the mounting bracket to securing the toilet itself. By following these instructions, you’ll have your new tankless toilet up and running in no time.
Attaching the mounting bracket to the wall
To begin the installation, you’ll first need to attach the mounting bracket to the wall. This bracket will serve as the support system for your tankless toilet. Here’s how to do it:
- Locate the desired position for your toilet and mark the holes for the mounting bracket on the wall using a pencil or marker.
- Using a drill, create pilot holes at the marked positions to ensure accurate and secure placement of the bracket.
- Line up the bracket with the pilot holes and secure it to the wall using appropriate screws and a screwdriver.
- Verify that the bracket is level and securely attached to the wall before moving on to the next step.
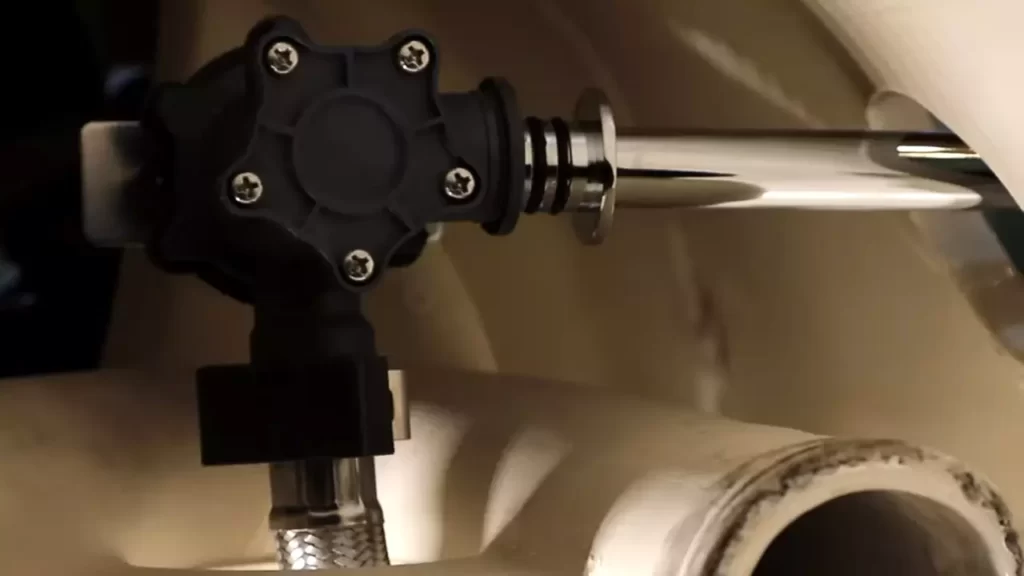
Connecting the water supply lines
Once the mounting bracket is securely in place, the next step is to connect the water supply lines. Follow these steps to ensure a proper connection:
- Locate the water supply valve in close proximity to your toilet installation area.
- Turn off the water supply by closing the valve in a clockwise direction.
- Using an adjustable wrench, disconnect the existing water supply line from the valve.
- Attach a flexible supply line to the valve by screwing it on clockwise.
- Connect the other end of the flexible supply line to the bottom of the tankless toilet by screwing it on clockwise.
- Tighten both connections with the adjustable wrench, ensuring a secure fit.
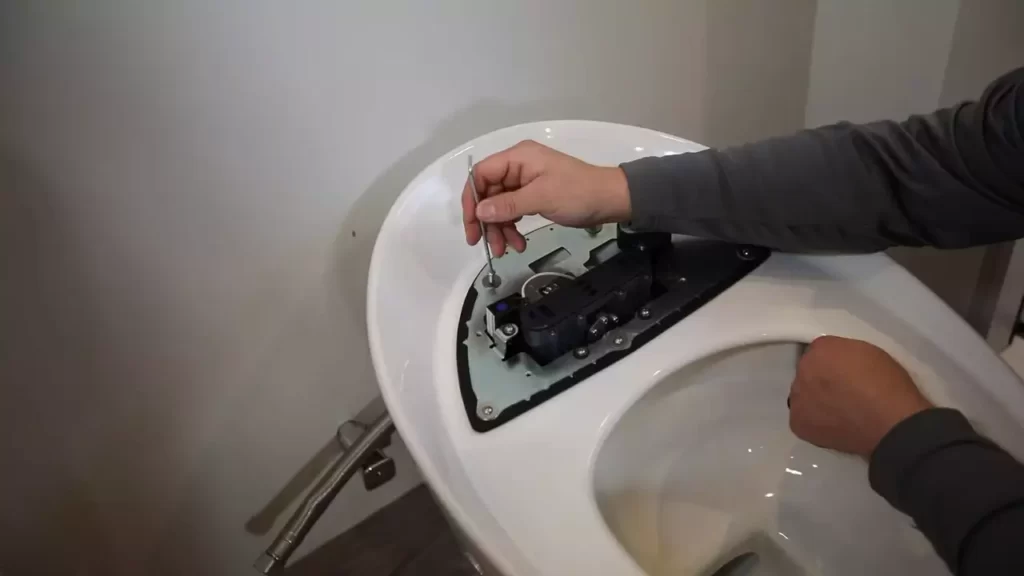
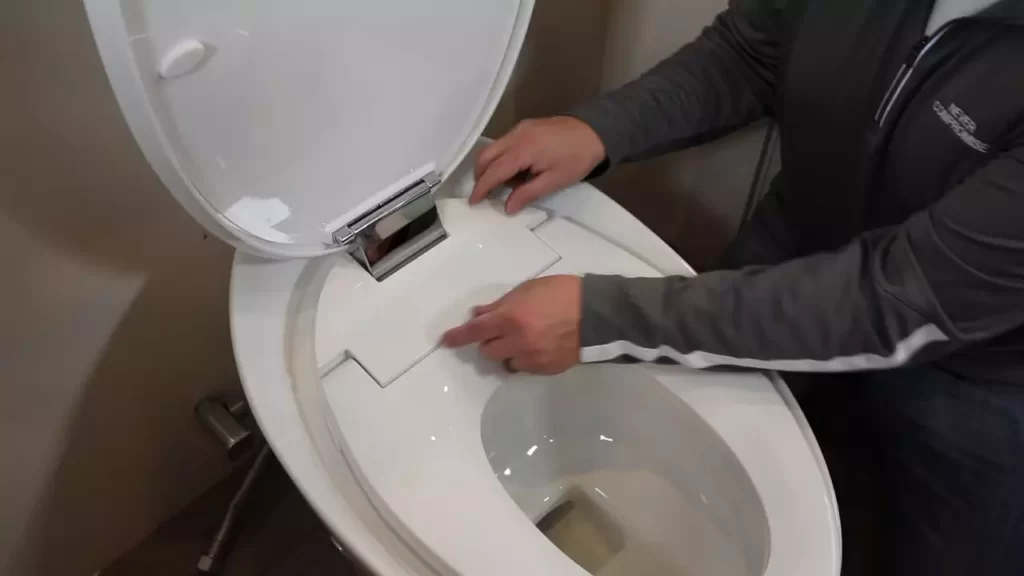
Securing the tankless toilet to the bracket
With the mounting bracket securely attached to the wall and the water supply lines connected, it’s now time to secure the tankless toilet to the bracket. Here’s how to do it:
- Carefully lift the tankless toilet and align it with the mounting bracket.
- Lower the toilet onto the bracket, making sure it fits snugly and securely.
- Locate the bolts on the bottom of the toilet and insert them into the corresponding holes on the bracket.
- Tighten the nuts onto the bolts using a wrench, ensuring that the toilet is firmly attached to the bracket.
By following these steps in proper sequence, you’ll successfully install your new tankless toilet. It’s important to take your time and ensure that each step is completed accurately for a secure and functional installation. Now, your bathroom is one step closer to being upgraded with a sleek and space-saving tankless toilet.
Testing The Installation
Restoring water supply
Before you move on to testing your newly installed tankless toilet, it’s essential to restore the water supply. Now, you can finally reconnect the water line to the shut-off valve you previously turned off. Remember to use a wrench to tighten the connection securely.
Once you’ve made sure that the water line is properly connected, it’s time to open the shut-off valve. Be attentive and take it slow, gradually turning the valve to release water into the tankless toilet’s system.
Checking for leaks and proper functionality
Leakage can be problematic and even damage your floors or walls. So, it’s of utmost importance to carefully inspect your newly installed tankless toilet for any signs of leaks. Start by examining the water line connections, making sure they are tight and secure. If you notice any leakage, turn off the shut-off valve immediately and address the issue before proceeding.
After ensuring there are no leaks, it’s time to test the proper functionality of your tankless toilet. Begin by flushing the toilet a few times to check if water flows smoothly through the system. Listen for any unusual noises or vibrations during the flushing process as they may indicate an underlying problem.
In addition to flushing, pay attention to the refill process. The tankless toilet should promptly refill without any delays or abnormalities. Observe the fill valve and float assembly to ensure they are operating as intended. Adjustments may be necessary if the water level is too high or too low.
Remember, testing the installation of your tankless toilet is crucial to avoid any inconveniences later on. By following these simple steps and paying careful attention to details, you can ensure that your toilet functions properly without any leaks or malfunctions.
Poor Flushing Performance
If you’ve noticed that your tankless toilet has poor flushing performance, it can be a frustrating problem to deal with. But fear not, there are steps you can take to improve the flushing performance and ensure that your toilet is functioning optimally.
Possible Causes of Low Water Pressure
Low water pressure can be one of the causes of poor flushing performance in a tankless toilet. Several factors can contribute to this issue:
- A clogged water supply valve
- A partially closed main water supply valve
- A dirty or clogged inlet filter
- An inadequate water supply line
Identifying the specific cause will help you determine the best course of action to improve flushing performance.
Steps to Improve Flushing Performance
To regain proper flushing performance in your tankless toilet, follow these steps:
- Check the water supply valve: Ensure that the water supply valve is fully open and not clogged. A clogged valve can restrict the water flow and result in poor flushing. Clean the valve if necessary.
- Inspect the main water supply valve: Make sure that the main water supply valve is fully open. Adjust it if necessary to maintain optimal water pressure for flushing.
- Clean the inlet filter: Locate the inlet filter, which is typically located where the water supply line connects to the toilet. Remove the filter and clean it thoroughly to remove any debris or sediment that may be causing a restriction in water flow.
- Check the water supply line: Examine the water supply line for any leaks or kinks. These issues can affect water pressure and consequently impact flushing performance. Replace or repair the supply line as needed.
- Consider a pressure booster pump: If the above steps do not resolve the flushing problem, you may need to install a pressure booster pump to increase water pressure. Consult a professional plumber for assistance.
By following these steps, you can enhance the flushing performance of your tankless toilet and ensure that it is working efficiently. Remember to regularly maintain your toilet to prevent future issues and enjoy optimal performance.
Leaks And Water Damage
When installing a tankless toilet, one crucial aspect to consider is the potential for leaks and water damage. Even a small leak can lead to significant structural problems, such as mold growth and deterioration of surrounding materials. To ensure the longevity and proper functioning of your tankless toilet, it is essential to be aware of common sources of leaks and take preventive measures to mitigate water damage.
Identifying and Fixing Common Sources of Leaks
It is important to regularly inspect your tankless toilet for potential leaks and address them promptly to prevent further damage. Here are some common sources of leaks and how to fix them:
| Leak Source | Action |
|---|---|
| Loose connections | Tighten any loose fittings or connections with an adjustable wrench, ensuring a secure seal. |
| Damaged supply line | If you notice any cracks or leaks in the supply line, replace it immediately with a new one. Ensure proper installation and check for any signs of leakage. |
| Faulty flush valve | If water keeps running into the toilet bowl, the flush valve may be malfunctioning. Replace the flush valve and ensure a proper seal. |
Preventing Water Damage to the Surrounding Area
Alongside fixing leaks, it is crucial to take preventive measures to protect the surrounding area from water damage. Here are some steps you can take:
- Install a leak detection device: Use a water leak detection device near your tankless toilet. These devices can alert you to any leaks, giving you time to address the issue before significant damage occurs.
- Regularly check for moisture: Periodically inspect the area around your tankless toilet for any signs of moisture or water damage such as discoloration, soft spots, or peeling paint. If you notice any issues, investigate immediately and fix the underlying cause.
- Properly seal gaps: Ensure that all gaps between the toilet and surrounding surfaces are properly sealed with caulk. This prevents water from seeping into cracks and causing damage.
- Use a waterproof floor covering: Consider using a waterproof floor covering, such as a rubber mat or tile, beneath the tankless toilet. This can provide an additional layer of protection against potential water damage.
By identifying and fixing common sources of leaks and taking preventive measures, you can safeguard your tankless toilet installation from potential water damage. Regular maintenance and vigilance are key to maintaining a dry and functional bathroom environment.
Maintenance And Care Tips For Tankless Toilets
Maintenance and care are crucial for ensuring the longevity and optimal performance of your tankless toilet. By following these tips, you can keep your toilet clean, free from clogs, and functioning at its best.
Regular cleaning and sanitizing practices
Keeping your tankless toilet clean is essential for maintaining its hygiene and extending its lifespan. Here are some cleaning and sanitizing practices to follow:
- Regularly wipe down the exterior surfaces of the toilet using a mild bathroom cleaner or soap and water.
- Use a non-abrasive sponge or cloth to clean the toilet bowl and seat.
- Avoid using harsh chemicals or scouring pads, as they can damage the toilet’s surface.
- For stubborn stains, you may use a mixture of vinegar and baking soda, which is a natural and eco-friendly cleaning solution.
- Ensure that you clean around the toilet base, including the area where it attaches to the floor.
- Regularly disinfect the toilet handle and flush buttons with a disinfectant wipe or spray.
How to prevent clogs and maintain optimal performance
To prevent clogs and maintain the optimal performance of your tankless toilet, keep the following tips in mind:
- Never flush anything other than toilet paper down the toilet. Dispose of feminine hygiene products, wipes, or other non-flushable items in a trash bin.
- Encourage household members to use small amounts of toilet paper to avoid excessive accumulation in the pipes.
- Consider placing a small wastebasket next to the toilet for easy disposal of items that should not be flushed.
- If you experience slow-flushing or clogs, use a plunger specifically designed for toilets to unclog the pipes.
- Regularly inspect the water supply lines and valves for any leaks or damage. If necessary, replace them to prevent potential issues in the future.
- Consider installing a drain strainer to catch any debris or hair that may enter the toilet drain.
By following these regular maintenance and care tips, you can keep your tankless toilet clean, clog-free, and performing at its best. Regularly cleaning and sanitizing will not only keep your toilet looking its best but also help maintain its hygiene. With proper care, your tankless toilet will continue to provide efficient and trouble-free service for years to come.
Frequently Asked Questions For How To Install A Tankless Toilet
Can I Install A Tankless Toilet In My House?
Yes, you can install a tankless toilet in your house. It is a convenient and space-saving option. Tankless toilets use an electric or gas heating element to instantly warm water, eliminating the need for a water tank. They are efficient and can provide a continuous supply of hot water for flushing.
Is It Hard To Install A Tankless Toilet?
Installing a tankless toilet is not difficult. It can be easily done with basic plumbing skills. Just follow the manufacturer’s instructions and make sure you have the necessary tools.
Do You Need Special Plumbing For A Tankless Toilet?
No, a tankless toilet does not require special plumbing. It can be installed using standard plumbing connections, making it a convenient and easy option for any bathroom.
What Are The Disadvantages Of A Tankless Toilet?
Tankless toilets have a few drawbacks. They require electricity or batteries, so power outages could render them useless. They also tend to cost more upfront and need frequent maintenance. Additionally, some users find the water pressure not as strong compared to traditional toilets.
Conclusion
Installing a tankless toilet can be a simple and efficient way to update your bathroom. By following the step-by-step guide provided in this blog post, you can successfully complete the installation process without any complications. From choosing the right toilet model to properly connecting the water supply, every detail has been covered to ensure a smooth installation.
With the benefits of saving space, water, and energy, a tankless toilet is a smart and modern choice for any bathroom renovation project. Upgrade your bathroom today and enjoy the convenience and efficiency of a tankless toilet!