To install a stove top, first, turn off the power and gas supply. Then, carefully remove the old stove top and disconnect the gas and electrical connections.
Next, place and align the new stove top over the cutout in the countertop, ensuring it fits properly. Finally, connect the gas and electrical supply to the new stove top, and secure it in place using screws or brackets. Installing a stove top can be a straightforward process if you follow the right steps.
Whether you are replacing an old stove top or installing a new one, it’s important to handle the task with precision and caution. In this guide, we will walk you through the necessary steps to install a stove top safely and efficiently. From turning off the power and gas supply to properly connecting the gas and electrical connections, we will cover all the essential details to ensure a successful installation. So, let’s dive in and learn how to install a stove top in a few simple steps.
Factors To Consider When Selecting A Stove Top
Choosing the right stove top for your kitchen can have a significant impact on your cooking experience. With so many options available in the market, it’s important to consider several factors to ensure you make the best decision. Here are a few key factors to keep in mind when selecting a stove top:
Budget and Cost Considerations
Before you start exploring the various stove top options, it’s essential to determine your budget. Stove tops can range in price depending on their size, features, and brand. Assessing how much you’re willing to spend will help you narrow down your choices and avoid overspending. It’s also important to factor in the long-term cost, including energy consumption, maintenance, and any additional installation requirements. Remember, finding a stove top that fits your budget and meets your cooking needs will yield the most satisfactory results.
Available Space in the Kitchen
The size of your kitchen plays a crucial role in determining the suitable stove top for your space. Measure the area where the stove will be installed to ensure a proper fit. Additionally, consider the layout of your kitchen and the proximity of other appliances and cabinets. This will help you determine whether you need a freestanding stove top or one that fits into a built-in countertop. By taking the available space into account, you can find a stove top that seamlessly integrates into your kitchen without compromising functionality.
Fuel Type Options: Gas, Electric, Induction
The choice of fuel type is a critical decision when selecting a stove top. The three main options include gas, electric, and induction. Each has its own set of advantages and considerations. Gas stove tops offer precise heat control and instant heat, which can be preferable for avid cooks. Electric stove tops, on the other hand, are often more affordable and easier to clean. Lastly, induction stove tops provide fast and efficient heating while remaining the safest option as they only heat the cookware, not the surface. Consider your cooking style, energy preferences, and safety concerns when deciding on the fuel type for your stove top.
Desired Cooking Features and Functions
The features and functions offered by stove tops vary widely. Consider the specific cooking techniques and methods you frequently use in your kitchen. If you enjoy baking, look for a stove top with convection capabilities. If you love to stir-fry, consider a model with high heat burners. Additionally, some stove tops come with built-in grills, griddles, or even advanced cooking technologies. Make a list of the non-negotiable features you desire in a stove top, and narrow down your options based on these preferences.
In conclusion, when selecting a stove top for your kitchen, it’s crucial to consider your budget, available space, fuel type preferences, and desired cooking features and functions. By thoroughly evaluating these factors, you’ll be able to find a stove top that not only meets your cooking needs but also complements your kitchen aesthetics.
Pros And Cons Of Different Stove Top Types
When it comes to choosing a stove top for your kitchen, there are several options available to suit your cooking needs. Each type of stove top comes with its own set of advantages and disadvantages. In this article, we will explore the pros and cons of gas, electric, and induction stove tops. Read on to determine which stove top type is the right fit for your culinary adventures.
Gas Stove Tops
Gas stove tops have long been a popular choice among home cooks and professional chefs. Here are the advantages and disadvantages of using a gas stove top.
Advantages:
- Instant heat: Gas stove tops provide instant heat and allow for precise temperature control. This makes it easier to cook delicate dishes that require precise heat adjustments.
- Even heat distribution: Gas burners distribute heat evenly across the bottom of the cookware, which helps in preventing hot spots and ensures even cooking.
- Visible flame: The presence of a visible flame makes it easier to gauge the intensity of the heat and adjust accordingly.
Disadvantages:
- Installation requirements: Installing a gas stove top may require professional assistance to ensure proper gas line connection and ventilation.
- Higher maintenance: Gas burners and grates require regular cleaning to prevent grease buildup and ensure safe operation.
- Combustion byproducts: Gas burners produce combustion byproducts, such as carbon monoxide, which need to be properly vented to ensure safety.

Electric Stove Tops
Electric stove tops are a common choice in many households. Here are the advantages and disadvantages of using an electric stove top.
Advantages:
- Easy to clean: Electric stove tops are usually flat, making them easy to wipe clean with a damp cloth.
- Heat adjustment: Electric stove tops come with temperature dials that allow for precise heat adjustments.
- Wide range of options: Electric stove tops come in different types, including coil burners and smooth glass surfaces, providing options to suit personal preferences.
Disadvantages:
- Slower heat response: Electric stove tops take longer to heat up and cool down compared to gas and induction stove tops.
- Uneven heat distribution: On coil burners, the heat tends to be more concentrated in certain spots, which can result in uneven cooking.
- Heat retention: Electric stove tops retain heat for a longer period, which could lead to overcooking if not monitored carefully.
Induction Stove Tops
Induction stove tops are gaining popularity for their energy efficiency and precise heat control. Here are the advantages and disadvantages of using an induction stove top.
Advantages:
- Efficiency: Induction stove tops are highly energy-efficient as they directly heat the cookware rather than the surrounding air.
- Fast heating: Induction cooktops heat up quickly, reducing cooking time and allowing for faster meal preparation.
- Safe to touch: The cooktop surface remains cool to the touch during cooking, reducing the risk of burns.
Disadvantages:
- Special cookware required: Induction stove tops require the use of cookware with a ferromagnetic bottom, such as cast iron or stainless steel.
- Higher cost: Induction stove tops are generally pricier than gas or electric options.
- No visible flame: Some cooks might miss the visual cue of a flame, as induction stove tops use electromagnetic fields to generate heat.
Now that you are aware of the pros and cons of different stove top types, you can make an informed decision based on your cooking preferences, budget, and kitchen requirements. Whether you opt for the instantaneous heat of a gas stove top, the easy cleaning of an electric stove top, or the energy efficiency of an induction stove top, the choice ultimately rests in your hands.
Measuring And Preparing The Counter Space
Taking Accurate Measurements for the Stove Top
Before installing a new stove top, it is crucial to take accurate measurements of your counter space to ensure a seamless fit. Taking these measurements properly will save you time and effort in the long run. To start, gather a measuring tape, a pencil, and a piece of paper to record your measurements.
- Clear off your countertop completely. Remove any items that may obstruct your measurements.
- Locate the area where the stove top will be installed. Ensure that there is enough space between the stove top and any neighboring appliances or walls. This clearance is essential for proper ventilation and safety.
- Measure the length and width of the designated area for your stove top. Record these measurements accurately.
- Measure the depth or thickness of the countertop where the stove top will sit. This measurement is vital, as it will determine how the stove top will sit flush with your counter surface.
- Consider any additional space requirements. Some stove tops may have additional features, such as knobs or control panels, that need extra space. Make sure to account for these dimensions during your measurements.
Ensuring Proper Ventilation and Clearance Requirements
Proper ventilation and clearance are essential for the safe and efficient operation of your stove top. Before proceeding with the installation, it is crucial to ensure that your kitchen meets the ventilation and clearance requirements set by the manufacturer. Here are a few key points to consider:
- Check the manufacturer’s guidelines for the minimum clearance required between the stove top and nearby cabinets, walls, or appliances. This clearance ensures that heat is dissipated properly and minimizes the risk of fire hazards.
- Ensure that your kitchen has proper ventilation. This may involve having an overhead range hood or an exhaust fan installed. Adequate ventilation removes any smoke, odors, and excess heat generated during cooking.
- If your kitchen lacks proper ventilation, consider consulting a professional to install a ventilation system that meets the necessary requirements.
- Remember to comply with any local building codes or regulations regarding the installation of stove tops. These codes are in place to ensure the safety of your kitchen and its occupants.
Properly measuring and preparing the counter space is a crucial step in installing a stove top. By taking accurate measurements and ensuring proper ventilation and clearance requirements, you can ensure a successful and safe installation process. So, take the time to measure precisely and check all the necessary guidelines before moving on to the next step in installing your stove top.
Gathering The Tools And Materials
Before starting the installation process for your new stove top, it’s important to gather all the necessary tools and materials. Having everything at your fingertips will not only save you time, but also ensure a smooth and hassle-free installation. Let’s take a look at the tools and materials you’ll need:
Tools required for the installation:
- Screwdriver – Having a screwdriver with multiple interchangeable heads will come in handy for various tasks throughout the installation process.
- Adjustable wrench – This tool will be essential for tightening and loosening bolts and connections.
- Level – To ensure that the stove top is installed flat and even, a level will be necessary to check for any discrepancies.
- Drill – A drill with the appropriate drill bits will be required if you need to make any holes in your countertops for the installation.
- Tape measure – Accurate measurements are crucial when it comes to fitting the stove top into your countertop. A tape measure will help you get precise measurements.
- Pliers – Pliers will be needed to grip and twist wires or tighten small bolts.
Necessary materials and supplies:
- Stove top – Of course, you’ll need the stove top itself. Make sure you have the correct size and type for your kitchen.
- Gas or electric connection – Depending on the type of stove top you have, you’ll need the appropriate gas or electric connection to ensure it functions properly.
- Countertop support – If your countertop is not sturdy enough to support the weight of the stove top, additional support may be needed. This can range from brackets to reinforcement bars.
- Sealant – To prevent any leaks, it’s important to have a high-quality sealant that is designed for stove top installations.
- Gloves – Safety should always be a priority. Protect your hands with a pair of gloves while handling any sharp or heavy objects.
- Cleaning supplies – Lastly, have some cleaning supplies on hand to clean any residue or mess that may occur during the installation process.
With these tools and materials in your arsenal, you’ll be ready to tackle the installation of your new stove top with confidence. Take the time to gather everything you need beforehand, and the process will be smooth sailing from start to finish.
Shutting Off Gas Or Power Supply
Before installing a stove top, it’s crucial to ensure that the gas or power supply is shut off. This step is essential to maintain safety during the installation process. In this section, we will discuss how to turn off the gas supply for gas stove tops and disconnect the power for electric stove tops.
Turning off the gas supply for gas stove tops
If you’re dealing with a gas stove top, it’s important to take care while shutting off the gas supply. Follow these steps:
- Locate the gas shut-off valve: The gas shut-off valve is typically found behind the stove or in a nearby cabinet. Take a moment to identify the valve’s exact location before proceeding.
- Turn off the valve: Using a wrench or pliers, turn the valve clockwise to shut off the gas supply. Ensure that the valve is completely closed.
- Verify the gas supply is off: To double-check that the gas supply is indeed shut off, attempt to turn on a burner on the stove top. If there is no gas flow, this confirms that the supply has been successfully turned off.
Once the gas supply is shut off, proceed to the next steps of your stove top installation process.
Disconnecting the power for electric stove tops
If you’re working with an electric stove top, disconnecting the power is a crucial step to ensure safety. Here’s how you can do it:
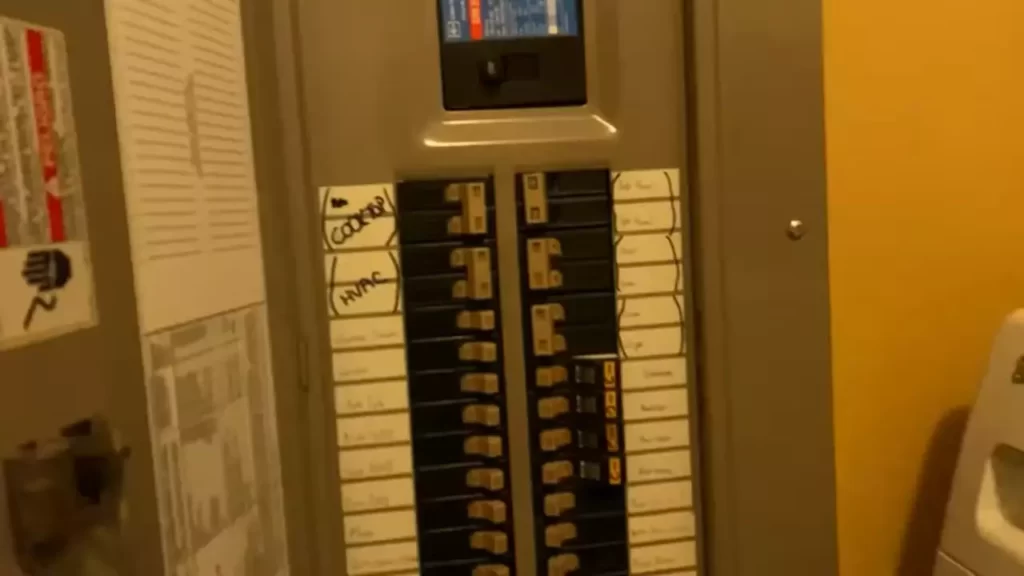
- Locate the circuit breaker: Find the circuit breaker box in your home. This can typically be found in the basement, utility room, or garage.
- Identify the stove top circuit: Locate the circuit breaker that controls power to the stove top. It is usually labeled in the breaker box.
- Switch off the circuit breaker: Flip the switch corresponding to the stove top circuit to the “off” position. This will disconnect power to the stove top.
- Verify the power is disconnected: Once the circuit breaker is off, test the stove top to ensure that it is no longer receiving power. Try turning on one of the burners and check if it remains unresponsive.
Now that the power supply to your electric stove top is disconnected, you can move forward with the installation process confidently.
Gas Stove Top Installation
Preparing the Gas Line Connection
Before you begin installing your gas stove top, it is essential to ensure that the gas line connection is properly prepared. Safety should be your top priority when working with gas, so make sure to follow these steps:
- Turn off the gas supply: Locate the gas shutoff valve and turn it off to stop the flow of gas. This will prevent any accidents or leaks from occurring during the installation.
- Inspect the gas line: Take a close look at the gas line to ensure that it is in good condition. Look for any signs of damage, such as cracks or corrosion. If you notice any issues, it is important to have a professional technician repair or replace the gas line before proceeding.
- Prepare the gas line: You will need to install a flexible gas line connector to connect the stove top to the gas line. Make sure to choose a connector that is compatible with your specific gas stove top model. Follow the manufacturer’s instructions to attach the connector securely to the gas line.
- Tighten the fittings: Use an adjustable wrench to tighten the fittings on the gas line connection. Be careful not to overtighten, as this could cause damage to the fittings.
Attaching the Stove Top to the Counter
Once you have prepared the gas line connection, you can proceed with attaching the stove top to the counter. Follow these steps to ensure a secure installation:
- Measure and mark: Use a measuring tape to determine the exact position where the stove top will be installed on the countertop. Mark this spot using a pencil or marker.
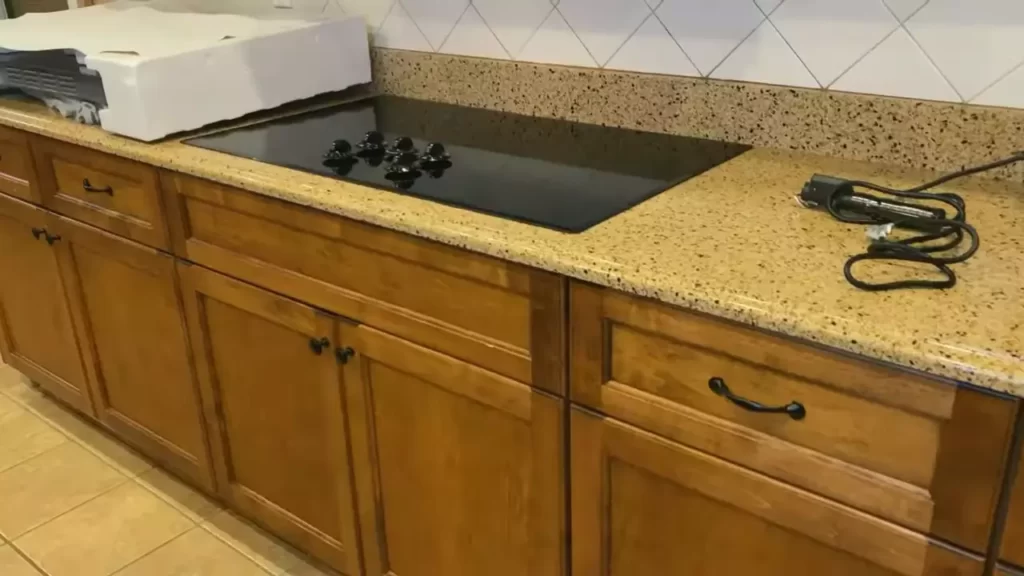
- Place the stove top: Carefully position the stove top on the marked spot. Make sure it aligns perfectly with the surrounding countertop.
- Secure the stove top: Depending on the model, you may need to use brackets, screws, or other securing mechanisms to keep the stove top in place. Follow the manufacturer’s instructions to attach the stove top securely to the counter.
Testing for Leaks and Ensuring Proper Gas Flow
After attaching the stove top to the counter, it is crucial to test for leaks and ensure that there is proper gas flow before using the appliance. Here’s how:
- Apply a gas leak detection solution: Use a gas leak detector or a mixture of soapy water to check the gas line connections for leaks. Apply the solution to the fittings and connections, then carefully inspect for any bubbles. If bubbles appear, there is a leak that needs to be addressed by a professional.
- Check the gas flow: Turn on the gas supply and light each burner on the stove top to verify that there is a consistent and steady flame. If the flame is weak or irregular, it could indicate a problem with the gas flow.
- Ensure proper ventilation: To maintain optimal safety, make sure the area around the stove top is well-ventilated. This will help prevent the buildup of any potentially harmful gas fumes.
By following these steps for gas stove top installation, you can ensure a safe and reliable cooking experience in your home. Remember, if you are unsure about any step of the process, it is always best to consult a professional technician to avoid any risks or mistakes.
Electric Stove Top Installation
Installing an electric stove top can be a straightforward process if you follow the proper steps. In this guide, we will walk you through the installation process, from connecting the power supply to securing the stove top to the counter. By the end, you will have a fully functional stove top ready to use in your kitchen.
Connecting the power supply
Before you begin the installation process, make sure to turn off the power supply to the area where you will be working. This will prevent any accidents or electrical mishaps. Once the power is turned off, follow these steps to connect the power supply:
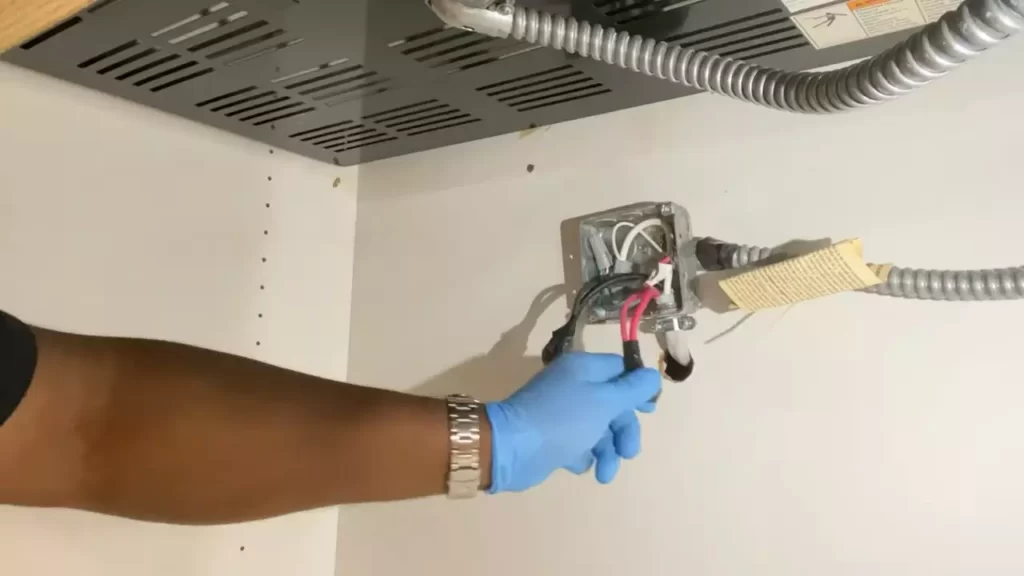
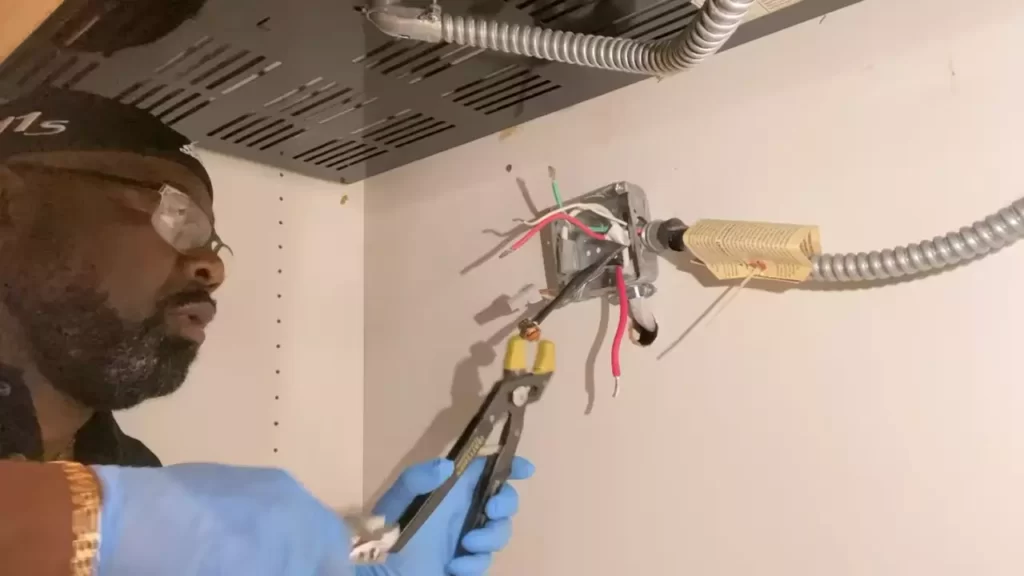
- Locate the electrical junction box near the installation area.
- Open the junction box and identify the wires: black (hot), white (neutral), and green or bare copper (ground).
- Connect the black wire from the stove top to the black wire in the junction box, using a wire nut or terminal connector.
- Connect the white wire from the stove top to the white wire in the junction box, again using a wire nut or terminal connector.
- Connect the green or bare copper wire from the stove top to the ground wire in the junction box.
- Tightly secure all connections with wire nuts or terminal connectors.
Securing the stove top to the counter
Now that the power supply is connected, it’s time to secure the stove top to the counter. Follow these steps to ensure a stable installation:
- Position the stove top on the counter, making sure it is centered and level.
- Using a drill, create pilot holes through the mounting brackets of the stove top.
- Secure the stove top to the counter by screwing in screws through the pilot holes.
- Tighten the screws until the stove top is firmly attached to the counter.
Checking the functionality and testing the burners
With the stove top securely in place, it’s time to check its functionality and test the burners. Follow these steps to ensure everything is working smoothly:
- Turn on the power supply to the stove top.
- Check if the control knobs are functioning properly.
- Turn on each burner and adjust the heat settings to test their functionality.
- Ensure that each burner heats up consistently and evenly.
- If any issues are detected, such as uneven heating or faulty knobs, consult the manufacturer’s instructions or contact a professional for assistance.
By following these steps, you can successfully install an electric stove top in your kitchen. Remember to always prioritize safety and consult the manufacturer’s instructions for any specific requirements or precautions. With your new stove top installed, you’ll be cooking up delicious meals in no time!
Induction Stove Top Installation
Induction stove tops are a popular choice for their sleek design and efficient cooking capabilities. However, installing an induction stove top requires attention to detail to ensure a seamless and safe installation. In this guide, we will walk you through the steps of installing an induction stove top, focusing on key considerations such as compatibility with the power source, installing the necessary electrical connections, and verifying the functionality of the cooktop.
Ensuring compatibility with the power source
Before diving into the installation process, it is crucial to ensure that the power source in your kitchen is compatible with an induction stove top. Induction cooktops typically require a dedicated 240-volt circuit to operate efficiently. Consult an electrician to assess your kitchen’s electrical setup and confirm if any modifications need to be made.
Installing the necessary electrical connections
Once you have determined the compatibility of your power source, it is time to install the necessary electrical connections for your induction stove top. This step involves various components, including wiring, junction boxes, and circuit breakers. Here is a step-by-step guide on how to install the electrical connections:
- Turn off the power to the kitchen area where the stove top will be installed.
- Remove the old stove top, if applicable, by disconnecting the existing electrical connections and carefully lifting it out.
- Position the new induction stove top in the designated area and align it properly.
- Connect the wiring from the stove top to the electrical junction box, following the manufacturer’s instructions.
- Securely fasten the electrical connections using wire nuts and ensure proper grounding.
- Turn on the power to the kitchen area and test the functionality of the induction stove top.
Verifying the functionality of the induction cooktop
Once the electrical connections are properly installed, it is crucial to verify the functionality of the induction cooktop before regular use. Check the following aspects:
- Turn on each heating element and ensure it heats up efficiently.
- Check if the control settings work as intended, allowing you to adjust heat levels smoothly.
- Verify if any additional features, such as timers or boost functions, operate correctly.
- Inspect the surface of the cooktop for any defects or damage.
- Ensure that the cookware you plan to use is compatible with induction cooking.
By following these installation steps and verifying the functionality of your induction stove top, you can enjoy hassle-free cooking while ensuring the safety of your kitchen and home. Remember, if you encounter any complexities during the installation process, it is always recommended to seek professional assistance to guarantee a seamless installation.
Securing The Stove Top
Properly securing the stove top is crucial to ensure its stability and alignment. This step is essential to prevent any accidents or mishaps while using the stove. To help you secure your stove top effectively, follow the guidelines below:
Checking Stability and Alignment
Before proceeding, it is vital to make sure that your stove top is stable and properly aligned. This will ensure that it sits evenly on your countertop, allowing for safe and efficient cooking. Follow these steps to check stability and alignment:
- Place a level tool, such as a carpenter’s level, on top of the stove.
- Check if the bubble in the level tool is centered. If it is, then the stove top is level and stable.
- If the stove top is not level, adjust the height of its legs using a wrench until it becomes evenly balanced.
- Ensure that the stove top is properly aligned with any adjacent countertops or cabinets. Use a tape measure to measure the distance between them and make adjustments as necessary.
Using Brackets or Securing Clips if Necessary
If you find that your stove top is not stable enough on its own, you may need to use brackets or securing clips to provide additional support. Here’s how:
- Choose brackets or securing clips that are suitable for your stove top model.
- Position the brackets or clips underneath the stove top, near the edges.
- Secure the brackets or clips to the countertop or cabinets by screwing them in tightly using a drill or screwdriver.
- Double-check the stability of the stove top by gently pushing on it from different angles. If it feels secure, then you have successfully installed the brackets or clips.
Keep in mind that not all stove tops require brackets or securing clips. However, it is important to be aware of your stove top’s stability and use these additional supports if necessary, especially for heavier or larger models.
By following these steps, you can ensure that your stove top is properly secured, stable, and aligned. This will provide you with peace of mind while cooking, knowing that your stove top is safe and reliable.
Connecting Gas Or Power Supply
Once you have positioned your stove top securely in place, the next step is to connect the gas or power supply. This is a crucial step in ensuring that your stove top functions properly and safely. In this section, we will guide you through the process of reconnecting the gas or power supply and testing the stove top for proper operation.
Reconnecting the gas or power supply
First, let’s take a look at how to reconnect the gas supply:
- Make sure the gas valve is turned off. This valve is usually located near the stove, either on the wall or floor.
- Inspect the gas line and fittings for any damage or leaks. If you notice any issues, it’s important to address them before proceeding.
- Connect the gas line to the stove top, using a wrench to ensure a tight connection.
- Turn on the gas valve and check for any leaks by applying a soapy water solution to the connections. If you see bubbles forming, there is a leak which needs to be repaired before using the stove top.
If you are installing an electric stove top, follow these steps to reconnect the power supply:
- Turn off the circuit breaker that controls the power to the stove top.
- Make sure the electrical wiring is in good condition, with no frayed or exposed wires.
- Connect the wires from the stove top to the corresponding wires in the electrical box, ensuring a secure connection.
- Turn on the circuit breaker and test the stove top to ensure it is receiving power.
Testing the stove top for proper operation
Once you have successfully connected the gas or power supply, it’s important to test the stove top to ensure it is operating correctly. Follow these steps:
- Turn on each burner and check for a flame. The flame should be steady and blue, without any sputtering or irregularities.
- Test the oven by preheating it to a desired temperature. Make sure it reaches the set temperature and maintains it consistently.
- Check all the knobs and buttons to ensure they are functioning properly.
- Inspect the surface of the stove top for any signs of damage or uneven heating.
- If you notice any issues during the testing process, refer to the manufacturer’s instructions or contact a professional for assistance.
By following these steps and testing the stove top for proper operation, you can ensure that your installation is successful and that you can enjoy using your new stove top safely and efficiently.
Cleaning And Maintenance Tips
Proper cleaning and regular maintenance are essential for keeping your stove top in optimal condition. By following the right techniques and schedule, you can ensure that your stove top remains clean, functional, and capable of providing you with delicious meals for years to come. In this section, we will explore the proper cleaning methods for your stove top and highlight the regular maintenance tasks you should perform to prolong its lifespan.
Proper cleaning methods for the stove top
Regular cleaning of your stove top not only enhances its appearance but also prevents the build-up of grime, grease, and food debris that can affect its performance. Here are some effective techniques to help you maintain a sparkling clean stove top:
- Remove loose debris: Start by removing any loose food particles or debris from the surface of your stove top. You can use a soft brush or a damp cloth to gently wipe away these particles.
- Use suitable cleaners: Depending on the material of your stove top, choose a suitable cleaner. For glass or ceramic stove tops, a non-abrasive cleaner specifically designed for this surface is recommended. Apply the cleaner to the stove top and let it sit for a few minutes to loosen any stubborn stains.
- Scrub gently: After the cleaner has had time to work, use a non-abrasive sponge or cloth to gently scrub the surface in circular motions. Avoid using abrasive materials or harsh chemicals, as they can cause damage to your stove top.
- Rinse thoroughly: Once you have scrubbed away the stains and grime, rinse the stove top thoroughly with warm water. Make sure to remove all traces of the cleaner to prevent any residue from affecting your cooking or damaging the surface.
- Dry with a clean cloth: To complete the cleaning process, use a clean, dry cloth to dry the stove top. This step helps to prevent water spots or streaks from forming.
Regular maintenance to prolong the lifespan
In addition to regular cleaning, proper maintenance is essential for prolonging the lifespan of your stove top. By incorporating these maintenance tasks into your routine, you can ensure that your stove top continues to operate efficiently:
- Check the burners: Periodically inspect the burners to ensure they are in good condition. Clean any clogs, remove any debris, and replace any faulty parts promptly.
- Inspect the ignition system: Verify that the ignition system is working properly. If you notice any issues, such as delayed ignition or weak sparks, consider contacting a professional for service.
- Monitor the ventilation: Ensure the ventilation system is free from obstructions, such as grease or dust buildup. Clean or replace the filters as needed to maintain proper airflow.
- Keep the knobs and controls clean: Regularly wipe down the knobs and controls to remove any grease or food residues. This helps prevent sticky knobs and ensures smooth and accurate operation.
- Inspect the power supply: Periodically check the power cord and the electrical connections to verify that they are secure. Any signs of wear or damage should be addressed promptly by a qualified electrician.
Maintaining a clean and well-maintained stove top not only extends its lifespan but also contributes to the overall safety of your kitchen. By following these proper cleaning methods and incorporating regular maintenance tasks into your routine, you can enjoy the benefits of a well-functioning stove top for years to come.
Troubleshooting Common Issues
Identifying and Resolving Potential Problems
Installing a new stove top can be an exciting project to undertake, but like any home improvement task, it can come with its fair share of challenges. If you encounter any issues during the installation process, it’s important to troubleshoot and address them promptly to ensure a successful outcome. In this section, we will discuss some common stove top problems and provide tips for resolving them.
Tips for Troubleshooting Common Stove Top Issues
1. Uneven Heating
One of the most common issues that people face with their stove tops is uneven heating. This can result in food being overcooked on one side while undercooked on the other. If you notice this problem, there are a few steps you can take to resolve it:
- Check the Burner: Ensure that the burner is properly seated and centered on the stove top. Sometimes, a loose or misaligned burner can cause uneven heating.
- Clean the Burner: A buildup of grease or debris on the burner can also lead to uneven heating. Use a clean cloth or sponge to wipe away any residue, and ensure that the burner is dry before using it again.
- Inspect the Stovetop Surface: Sometimes, an uneven stovetop surface can be the root cause of uneven heating. If the surface is damaged or warped, consider contacting a professional for repair or replacement.
2. Ignition Problems
Another common issue that stove top owners may encounter is problems with ignition. If your burners fail to ignite, try the following troubleshooting tips:
- Check the Power: Ensure that the stove is properly connected to a power source and that the circuit breaker has not tripped. If necessary, reset the breaker and try again.
- Clean the Igniter: Over time, igniters can become clogged with food particles or debris, inhibiting their ability to create a spark. Use a soft brush or cloth to gently clean the igniter and remove any obstructions.
- Inspect the Control Knobs: Sometimes, faulty control knobs can prevent the burners from igniting. Make sure that the knobs are in the proper position and securely attached to the stove top.
3. Burner Overheating
If you find that your stove top burners are overheating, it’s crucial to address the issue promptly to prevent any potential hazards. Here are some troubleshooting steps to follow:
- Adjust the Flame: If the flame on your burner is too high, it can cause overheating. Use the stove’s control knobs to lower the flame to a more suitable level.
- Clean the Burner: A dirty or clogged burner can contribute to overheating. Clean the burner thoroughly, removing any buildup that may hinder proper airflow.
- Inspect the Gas Supply: Ensure that the gas supply to your stove is properly regulated. Excessive gas pressure can lead to burners overheating. If you suspect an issue with the gas supply, contact a professional for assistance.
By following these troubleshooting tips, you can address common stove top problems effectively and enjoy a fully functional cooking appliance in your kitchen. Remember, safety should always be a top priority when dealing with any stove-related issues. If you encounter a problem that you are unsure how to resolve or that poses a safety risk, it’s best to seek professional assistance.
Frequently Asked Questions On How To Install A Stove Top
Can You Install A Stove Top Yourself?
Yes, you can install a stove top yourself. However, it is essential to follow the manufacturer’s instructions carefully to ensure proper installation and safety. If you are not confident in your DIY skills, it is recommended to hire a professional for the installation.
Can I Install Gas Cooktop Myself?
No, it is not recommended to install a gas cooktop yourself. It involves complex gas connections and can be dangerous if not done correctly. It is best to hire a professional technician who is trained and licensed to install gas appliances.
How Much Does It Cost To Install A Stove Top?
Installing a stove top typically costs between $150 and $500, depending on factors like the type of stove top and any additional work needed. Get an accurate estimate by consulting with a professional installer or contacting a home improvement service.
How Do You Secure A Cooktop?
To secure a cooktop, follow these steps: 1. Choose a suitable location for the cooktop. 2. Ensure the surface it will be installed on is stable and level. 3. Use the provided brackets to anchor the cooktop securely. 4. Connect the cooktop to the power supply and follow installation instructions carefully.
5. Regularly check and maintain the cooktop to ensure it remains secure and safe.
Conclusion
Installing a stove top can be a challenging but rewarding project. By following the steps outlined in this blog post, you can successfully install a stove top in your kitchen. Remember to carefully read and follow the manufacturer’s instructions, gather all necessary tools beforehand, and take safety precautions throughout the process.
With a little patience and attention to detail, you’ll have a functional and stylish stove top that enhances your cooking experience.