To install a smart thermostat with only 2 wires, follow these steps. First, turn off the power to the thermostat at the breaker box.
Then, remove the old thermostat from the wall and disconnect the wires. Next, connect the R wire to the RC or RH terminal on the new thermostat and the W wire to the W terminal. Finally, mount the new thermostat on the wall and restore power.
Enjoy the convenience and energy savings of your new smart thermostat!
Understanding Your Smart Thermostat Options
When it comes to upgrading your home to a smart thermostat, the first step is to understand your options. Smart thermostats offer a range of features and functionalities that can help you save energy and optimize comfort. But if you only have 2 wires connected to your thermostat, you may wonder if it’s even possible to install a smart thermostat. The good news is that there are options available specifically designed for this situation.
In this article, we will explore the different types of smart thermostats available and the benefits of installing one with only 2 wires.
Different types of smart thermostats available
Before diving into the installation process, it’s important to know the different types of smart thermostats available. These options cater to various needs and preferences, ensuring that there is a suitable solution for every home. Here are the main types:
- Wireless thermostats: These thermostats communicate with your heating and cooling system wirelessly. They eliminate the need for wired connections, making them compatible with 2-wire setups. They often come with a smart hub or gateway that connects to your Wi-Fi network, enabling remote control and access through a smartphone app.
- Power-stealing thermostats: Some smart thermostats are designed to draw power from the existing 2 wires connected to your old thermostat. These thermostats are specifically engineered to operate on minimal power, allowing for a simple installation without requiring additional wiring.
- Battery-powered thermostats: Another option for 2-wire installations is a battery-powered smart thermostat. These thermostats run on battery power and do not rely on a wired connection for electricity. They are easy to install and offer flexibility in terms of placement.
Benefits of installing a smart thermostat with only 2 wires
Installing a smart thermostat with only 2 wires may have its limitations, but it still offers several benefits. Here’s what you can expect:
- Energy savings: Smart thermostats are designed to optimize your home’s energy usage. Even with just 2 wires, a smart thermostat can provide precise temperature control, allowing you to set customized heating and cooling schedules. By reducing energy waste, you can enjoy lower utility bills.
- Convenience and control: With a smart thermostat, you gain the ability to control your home’s temperature from anywhere using your smartphone. Whether you’re at work, on vacation, or simply lounging on the couch, you can adjust the temperature to your liking with ease. Some models even have voice control capabilities, adding an extra layer of convenience.
- Smart features: Smart thermostats come with a variety of advanced features that enhance your comfort and convenience. These may include learning capabilities, geofencing, and integration with other smart home devices. With a 2-wire installation, you can still enjoy many of these features and take advantage of the latest technologies.
In conclusion, even if you only have 2 wires connected to your thermostat, you have options when it comes to installing a smart thermostat. Understanding the different types available and the benefits they offer can help you make an informed decision. Whether you choose a wireless thermostat, a power-stealing thermostat, or a battery-powered thermostat, upgrading to a smart thermostat can bring energy savings, convenience, and enhanced comfort to your home.
Assessing Your Hvac System Compatibility
Checking if your current HVAC system is compatible with a smart thermostat
When it comes to upgrading your home with smart technology, installing a smart thermostat can greatly enhance your comfort and energy efficiency. However, before diving into the installation process, it’s important to assess the compatibility of your HVAC system with a smart thermostat. This step is crucial to ensure a smooth and successful installation.
Most modern HVAC systems are compatible with smart thermostats, but some older systems may not be. To check if your current HVAC system is compatible, you’ll need to locate your existing thermostat and take note of the number of wires connected to it.
Understanding the limitations of a 2-wire system
A two-wire HVAC system, also known as a 2-wire heat-only system, is a common configuration in older homes. These systems typically consist of two wires: one for heating and one for cooling. While a 2-wire system can still function properly with a basic thermostat, it may require additional considerations when installing a smart thermostat.
One of the limitations of a 2-wire system is that it may not support all the features and functionalities offered by smart thermostats, such as remote control via mobile apps or voice assistants. Additionally, some smart thermostats require a C-wire, also known as a common wire, which provides continuous power to the thermostat for optimal performance. Unfortunately, 2-wire systems often lack a C-wire, making it challenging to install certain smart thermostat models.
However, don’t lose hope if you have a 2-wire HVAC system. There are workarounds and alternative solutions available, such as using a power extender kit or utilizing a smart thermostat specifically designed for 2-wire systems. These options can provide the necessary power for your smart thermostat without the need for a C-wire.
Preparing Your Home For Installation
Before you can install a smart thermostat with only 2 wires, it’s important to properly prepare your home for the installation process. This will ensure that everything goes smoothly and that you can enjoy the benefits of a smart thermostat without any issues.
Gathering the necessary tools and equipment
To begin, gather the following tools and equipment:
- Screwdriver (usually a Phillips head)
- Wire strippers
- Electrical tape
- Smart thermostat (compatible with 2-wire systems)
- Mobile device or computer with internet access
Switching off the power to your HVAC system
Before starting the installation process, it’s crucial to switch off the power to your HVAC (Heating, Ventilation, and Air Conditioning) system. This will prevent any electrical mishaps and ensure your safety throughout the process.
To switch off the power:
- Locate your circuit breaker panel or fuse box.
- Identify the circuit that powers your HVAC system.
- Turn off the corresponding circuit breaker or remove the fuse.
Once you have switched off the power, it’s recommended to use a voltage tester to double-check that the power is indeed off. This extra precaution will give you peace of mind and prevent any accidents.
Installing A Smart Thermostat With Only 2 Wires
Are you ready to upgrade your home with a smart thermostat but worried about the limited number of wires? Installing a smart thermostat with only 2 wires may seem like a daunting task, but fear not! In this guide, we will walk you through the step-by-step process of how to install a smart thermostat with only 2 wires, ensuring you can enjoy the convenience and energy savings that come with this advanced technology.
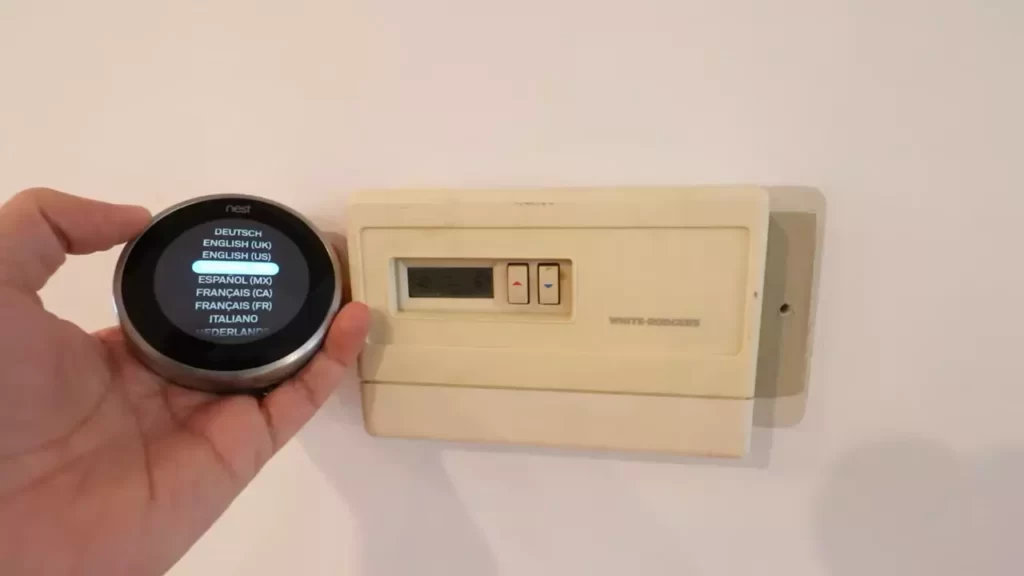
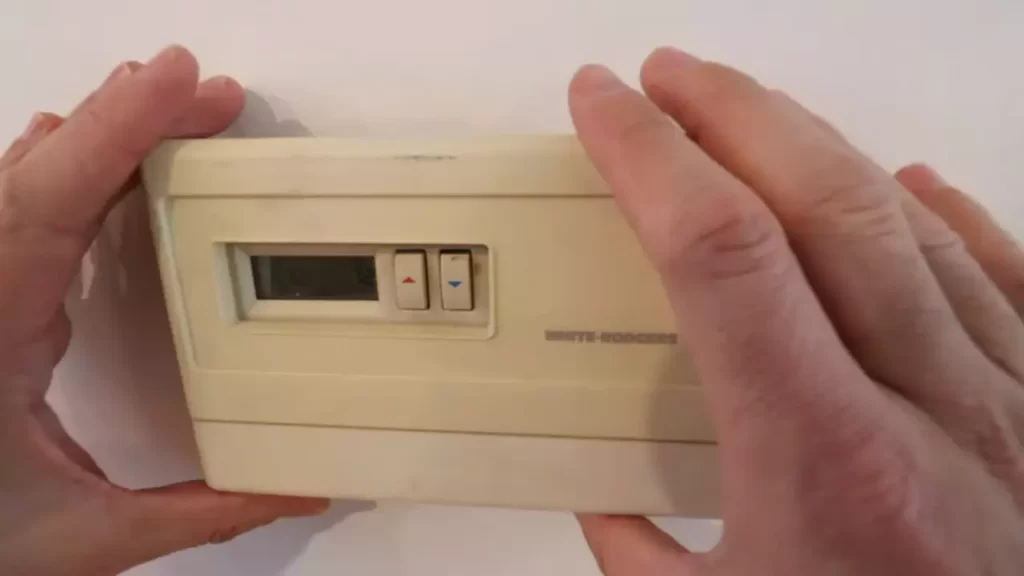
Step 1: Removing the old thermostat
The first step in installing a smart thermostat with only 2 wires is to remove the old thermostat from your wall. To do this, follow these simple instructions:
- Turn off the power supply: Before starting any electrical work, it’s crucial to turn off the power supply to your heating and cooling system. Locate the breaker box and switch off the corresponding circuit.
- Detach the existing thermostat from the wall: Carefully remove the cover of the old thermostat by unscrewing it. Once the cover is off, you will see the wiring connected to the terminals. Take note of which wire is connected to which terminal; this will be helpful later.
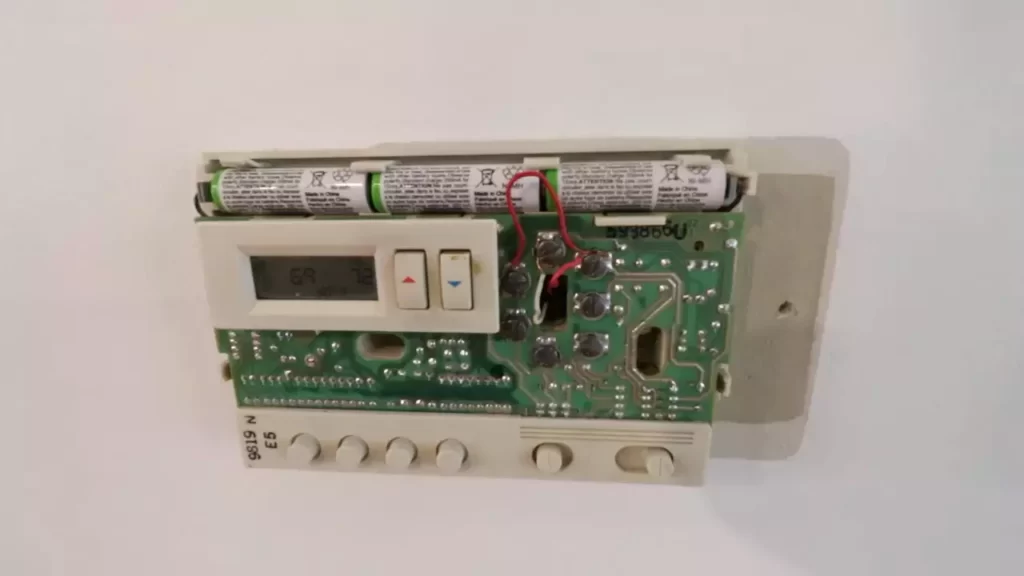
Step 2: Identifying the 2 wires
Now that the old thermostat is removed, the next step is to identify the 2 wires that will be used for the smart thermostat:
- Locating the two control wires connected to your HVAC system: Look closely at the wires that were connected to the terminals of the old thermostat. Identify the two wires that are responsible for controlling the heating and cooling of your home. These two wires will be connected to the smart thermostat.
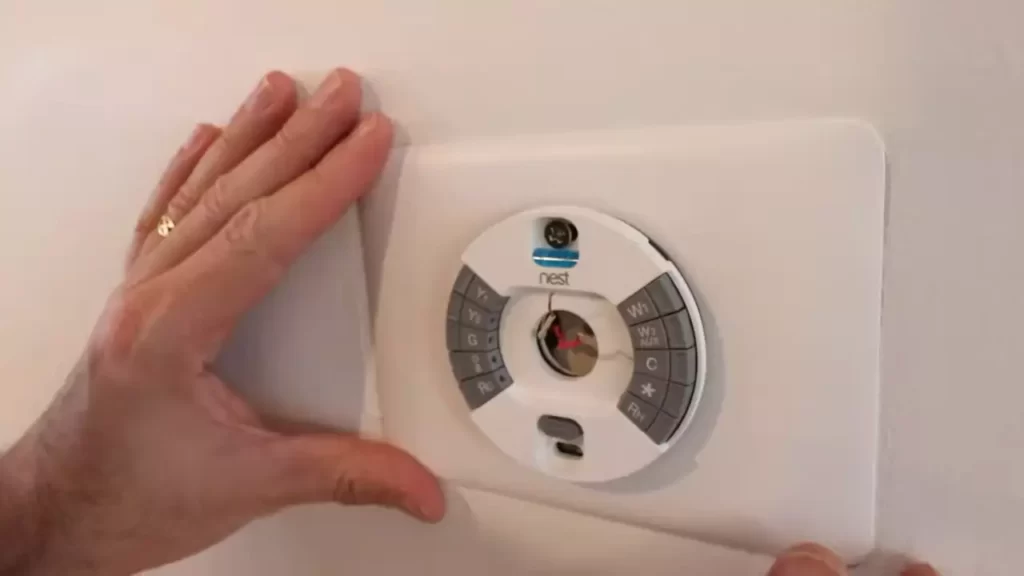
Step 3: Connecting the smart thermostat
With the wires identified, it’s time to connect the smart thermostat. Here’s how to do it:
- Understanding the wiring diagram provided with the thermostat: Refer to the wiring diagram provided with your smart thermostat. This diagram will guide you on how to correctly connect the wires to the corresponding terminals.
- Connecting the wires to the corresponding terminals on the smart thermostat: Following the wiring diagram, carefully insert the two control wires into the appropriate terminals on the smart thermostat. Make sure the connections are secure and snug.
Step 4: Mounting the smart thermostat
Now that the wiring is complete, it’s time to mount the smart thermostat onto the wall:
- Positioning the thermostat on the wall and securing it: Choose a suitable location on your wall for the smart thermostat. Ensure it is away from direct sunlight, drafts, and other heat sources. Use the provided mounting plate to attach the thermostat securely to the wall.
Step 5: Powering up the smart thermostat
Once the smart thermostat is mounted, it’s time to power it up:
- Restoring power to the HVAC system: Head back to the breaker box and switch on the circuit for your heating and cooling system, restoring power.
- Testing the thermostat: Take a moment to test the smart thermostat to ensure it is functioning correctly. Adjust the temperature settings and observe if the HVAC system responds accordingly. You’re now ready to enjoy the benefits of your new smart thermostat!
With these steps, you can confidently install a smart thermostat with only 2 wires, bringing modern convenience and energy efficiency to your home. Take control of your HVAC system, reduce energy consumption, and create a comfortable living environment with this innovative technology.
Troubleshooting Common Installation Issues
Installing a smart thermostat with only 2 wires can be a convenient and energy-efficient solution for your home. However, you might encounter some common installation issues along the way. In this section, we will address these issues and provide step-by-step solutions to ensure a successful installation.
Addressing issues with incompatible systems
In some cases, you may find that your smart thermostat is incompatible with your home’s existing heating and cooling system. This can be frustrating, but there are a few things you can do to troubleshoot this issue:
- Check the compatibility list: Before purchasing a smart thermostat, always refer to the manufacturer’s compatibility list. This will help you ensure that the thermostat is compatible with your specific system.
- Verify wiring compatibility: Double-check the wiring of your current thermostat to make sure it matches the requirements of the smart thermostat. You may need to consult the thermostat’s installation guide for a clear understanding of the wiring requirements.
- Contact the manufacturer: If you have confirmed that your system should be compatible, but you are still experiencing issues during the installation, it’s a good idea to reach out to the manufacturer for further assistance. They may have additional troubleshooting steps or recommendations specific to your system.
Dealing with wiring complications
Wiring complications can arise when installing a smart thermostat with only 2 wires. Here are some steps to follow to overcome this issue:
- Identify the wires: Start by identifying the two wires connected to your current thermostat. Typically, these wires will be labeled as “R” (power) and “W” (heat). Take note of their colors as well.
- Check for a C-wire compatibility: Most smart thermostats require a C-wire (common wire) for proper functioning. If your existing thermostat does not have a C-wire, there are alternative solutions available, such as using a power extender kit or utilizing an adapter.
- Consult the smart thermostat installation guide: Follow the step-by-step instructions provided in the smart thermostat installation guide. This will walk you through the process of connecting the wires correctly and configuring the thermostat.
- Seek professional help if needed: If you are uncertain about handling the wiring complications yourself, it is always wise to seek assistance from a professional HVAC technician. They can help troubleshoot the issues and ensure a safe and proper installation.
By addressing common installation issues related to incompatible systems and wiring complications, you can install a smart thermostat with only 2 wires successfully. It is important to carefully follow the instructions provided by the manufacturer and reach out for support when needed. With the right troubleshooting steps, you’ll be enjoying the benefits of a smart thermostat in no time!
Setting Up And Configuring Your Smart Thermostat
After successfully installing your smart thermostat with only 2 wires, it’s time to move on to the next step: setting up and configuring your device. This crucial stage allows you to connect your thermostat to your Wi-Fi network and take advantage of its remote control capabilities. In this section, we will guide you through the process step by step, ensuring a seamless and hassle-free experience.
Connecting the thermostat to your Wi-Fi network
The first step in configuring your smart thermostat is to connect it to your Wi-Fi network. This allows you to control the temperature of your home from anywhere using your smartphone or computer. To ensure a smooth connection, follow these simple steps:
- Access the thermostat settings on the device or through the manufacturer’s mobile app.
- Locate the Wi-Fi setup or network configuration option.
- Select your Wi-Fi network from the list of available networks.
- Enter your Wi-Fi password when prompted.
- Wait for the thermostat to establish a connection with your network. This usually takes a few seconds.
- Once connected, your thermostat will display a confirmation message or symbol indicating the successful connection.
Now that your smart thermostat is connected to your Wi-Fi network, it’s time to take control of your home’s temperature even when you’re away. Let’s explore how to use the manufacturer’s mobile app or website to control your thermostat remotely.
Using the manufacturer’s mobile app or website to control your thermostat remotely
Modern smart thermostats come with a dedicated mobile app or a website that allows you to control and monitor your thermostat remotely. This feature gives you the flexibility to adjust the temperature, set schedules, and monitor energy usage from anywhere, anytime, using your smartphone or computer. Follow these steps to get started:
- Visit the app store on your smartphone or tablet and search for the manufacturer’s app.
- Download and install the app onto your device.
- Launch the app and log in using your account credentials. If you haven’t created an account, follow the on-screen instructions to register.
- Once logged in, the app will automatically detect your smart thermostat if it’s connected to the same Wi-Fi network.
- Follow the prompts to pair your device with the app securely.
- Once paired, you will have full access to your thermostat’s features and settings through the app’s intuitive interface.
Alternatively, if the manufacturer provides a web portal, you can access it by visiting their website and signing in with your account credentials. This way, you can control your smart thermostat remotely from any computer with internet access.
With the ability to control your thermostat remotely, you can ensure your home is always at the perfect temperature, whether you’re on vacation or just arriving home from work. Take advantage of this convenient feature to save energy and optimize the comfort of your living space.
Maximizing The Benefits Of Your Smart Thermostat
Installing a smart thermostat with only 2 wires can be a game-changer for your home. Not only does it provide convenience and control at your fingertips, but it also offers numerous benefits when it comes to optimizing energy savings and comfort. In this post, we’ll explore the advanced features of your smart thermostat and share some tips for getting the most out of your 2-wire system.
Exploring the Advanced Features of Your Smart Thermostat
Your smart thermostat is more than just a device to control the temperature. It comes loaded with advanced features that can enhance your comfort and energy efficiency. Here are a few notable features to explore:
- Smart Scheduling: With the ability to set different temperature schedules for different times of the day, your smart thermostat adapts to your routine automatically. This means you won’t have to remember to adjust the temperature each time you leave the house or go to sleep.
- Energy Reports: Many smart thermostats provide detailed energy reports that show how much energy you’re using and offer suggestions on how to save more. These reports can be accessed through the companion app, giving you valuable insights into your energy consumption patterns.
- Geofencing: Geofencing is a feature that uses your smartphone’s location to automatically adjust the temperature when you leave and return home. This ensures that you’re always greeted with a comfortable environment without wasting energy when you’re away.
- Integration with Smart Home Systems: Smart thermostats often integrate with other smart home systems, allowing you to create custom automation routines. For example, you can set your thermostat to lower the temperature when you arm your security system or turn off lights, further optimizing energy savings.
Tips for Optimizing Energy Savings and Comfort with a 2-Wire System
Even with a 2-wire system, you can still enjoy the benefits of a smart thermostat and maximize energy savings. Here are some tips to help you optimize your system:
- Ensure Proper Wiring: Correctly wiring your smart thermostat is essential for it to function properly. Consult the manufacturer’s instructions or hire a professional to ensure your thermostat is wired correctly.
- Utilize Auxiliary Power: Some smart thermostats come with a power extender kit or offer the option to install an additional power source. This can be beneficial for systems with limited wiring and helps avoid potential compatibility issues.
- Use Temperature Averaging: If your home has multiple zones and you’re using a 2-wire system, consider using temperature averaging. This feature allows the thermostat to combine the temperatures from different zones to create a more balanced and comfortable environment.
- Take Advantage of Smart Features: Make the most of the advanced features discussed earlier. Set customized schedules, monitor energy usage, and explore integrations with other smart devices in your home to enhance comfort and efficiency.
- Consider Professional Assistance: If you’re unsure about the installation or setup process, don’t hesitate to seek professional assistance. HVAC technicians or smart home installers can ensure your smart thermostat is properly installed and functioning optimally.
By following these tips and exploring the advanced features of your smart thermostat, you can create an energy-efficient and comfortable environment in your home, even with a 2-wire system. Start maximizing the benefits of your smart thermostat today!
Frequently Asked Questions On How To Install A Smart Thermostat With Only 2 Wires
Can You Have A Smart Thermostat With 2 Wires?
Yes, it is possible to have a smart thermostat with only 2 wires. Some newer thermostats are designed to work with minimal wiring, making it easier to upgrade to a smart thermostat without rewiring your entire system.
Can I Install A Smart Thermostat Without C Wire?
Yes, you can install a smart thermostat without a C wire. There are other options available, such as using a power extender kit or a compatibility bridge. These alternatives allow the smart thermostat to function properly without the need for a C wire.
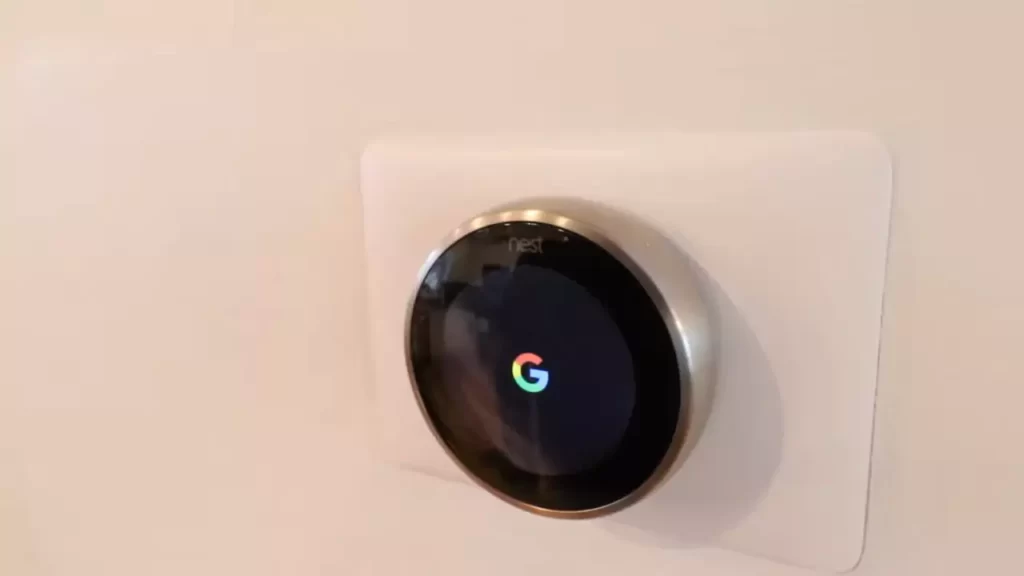
Does Nest Work With 2 Wires?
Yes, Nest can work with 2 wires. It has specific wiring requirements but can function with a minimal setup.
How Many Wires Should A Smart Thermostat Have?
A smart thermostat should have at least three wires for basic functionality. However, the number of wires required may vary depending on the specific features and compatibility of the thermostat with your heating and cooling system. It is recommended to consult the manufacturer’s guidelines or hire a professional for installation.
Conclusion
Upgrading your thermostat to a smart one with just two wires is not only possible but also an affordable and energy-efficient solution. By following the step-by-step guide provided in this blog post, you can easily install a smart thermostat without the need for additional wiring.
Enjoy the convenience and control that a smart thermostat offers while reducing your energy consumption and saving on utility bills. Embrace the future of home automation today!