To install a smaller window, measure the window opening, remove the existing window, prepare the opening, and then insert and secure the new window. Installing a smaller window involves a few simple steps that can be easily done with the right tools and knowledge.
By following these steps, you can successfully replace your old window with a smaller one, improving your home’s aesthetics and functionality. We will guide you through the process of installing a smaller window in a concise and informative manner. Read on to learn more about how to install a smaller window and transform your living space.
Factors To Consider For Window Size Selection
When installing a smaller window, it is crucial to consider various factors to ensure a seamless and functional result. The size of the window plays a significant role in determining the overall aesthetics, natural light, ventilation, and energy efficiency of a room. By carefully considering these aspects, you can make an informed decision about the window size that best suits your needs. Let’s dive into the key factors to consider for window size selection.
Room dimensions and layout
One of the primary factors to consider when selecting the size of a window is the room’s dimensions and layout. Assessing the size of the room will help determine the suitable window dimensions that will complement the space. A large window in a small room might overpower the space and limit available wall space for furniture or decorations. On the other hand, a small window in a spacious room might not provide sufficient light and ventilation. Therefore, carefully examining the room’s dimensions and layout is essential in finding the right window size.
Natural light and ventilation requirements
Natural light and ventilation are crucial elements in creating a comfortable and inviting living environment. When selecting the size of a window, it is important to consider the amount of natural light and ventilation you desire in the room. Assess the direction and intensity of sunlight in the room throughout the day to determine the ideal window size. Additionally, think about the air circulation and ventilation needs in the room. A larger window can offer more light and better airflow, while a smaller window might be suitable for rooms that require privacy or have limited views.
Energy efficiency considerations
Energy efficiency is another vital factor to consider when selecting the size of a window. The size of the window can impact heating and cooling costs, as it affects the amount of heat gain or loss. A well-insulated window with proper sizing can enhance energy efficiency by minimizing air leakage and reducing the need for artificial lighting and heating or cooling systems. Consider the insulation properties of the window material and the overall energy efficiency rating to ensure optimal energy performance. By selecting the right window size, you can contribute to a more sustainable and cost-effective living environment.
In conclusion, when installing a smaller window, it is crucial to take into account various factors such as room dimensions and layout, natural light and ventilation requirements, and energy efficiency considerations. By carefully considering these aspects, you can select the window size that best fits your needs and enhances the overall functionality and aesthetics of your space. Remember, striking a balance between functionality and style is key to achieving an optimal window installation.
Required Tools And Materials
Before you start installing a smaller window, make sure you have all the necessary tools and materials. Having these items on hand will not only ensure a smooth installation process, but also save you time and frustration.
1. Measuring tape
The first tool you’ll need is a measuring tape. This essential device will help you accurately measure the dimensions of your window frame and the new window you’ll be installing. Make sure to measure both the height and width of the frame, as well as the depth of the window sill.
2. Screwdriver
A screwdriver is another essential tool you’ll need to install a smaller window. It will come in handy for removing the existing window frame, as well as attaching the new one. Depending on the type of screws used, you may need either a flathead or Phillips screwdriver.
3. Pry bar
A pry bar is a useful tool for gently removing the old window frame from the opening. It can help loosen any stubborn nails or screws, allowing you to safely take out the old window without damaging the surrounding structure. Be sure to use the pry bar with caution to avoid any injuries.
4. Caulk and caulk gun
Caulk is an important material for sealing gaps and cracks around the window frame, ensuring a watertight and airtight seal. A caulk gun will help you apply a smooth and even bead of caulk, making the installation more secure and weatherproof.
5. Window insulation foam
Window insulation foam is a must-have material for improving energy efficiency and reducing drafts. It fills gaps and provides additional insulation between the window frame and the wall, helping keep your home comfortable and your energy bills in check.
6. Safety goggles and gloves
Don’t forget about safety! When installing a smaller window, it’s important to protect yourself with safety goggles and gloves. These will shield your eyes from any flying debris and protect your hands from cuts or scrapes.
By having these tools and materials ready, you can confidently tackle the installation of a smaller window. Remember to take accurate measurements, use caution when removing the old window, and seal everything properly for a job well done.
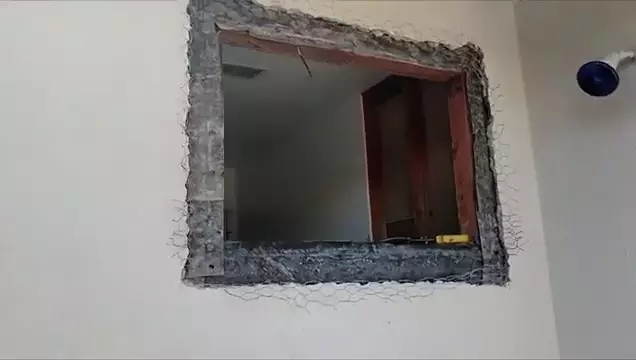
Measuring And Removing The Existing Window
Accurately measuring the window frame
Before installing a smaller window, the first step is to accurately measure the window frame. This ensures that the new window will fit perfectly and prevent any drafts or leaks. To get started, follow these simple steps:
- Using a measuring tape, measure the width of the window frame from the inside edge to the inside edge. Write down this measurement.
- Next, measure the height of the window frame from the top to the bottom. Write down this measurement as well.
- Double-check your measurements to ensure accuracy. It’s always a good idea to measure both the width and height multiple times to be certain.
Once you have accurately measured the window frame, you will be ready to move on to the next step.
Removing the window sash and hardware
Now that you have the measurements, it’s time to remove the existing window sash and hardware. Follow these steps to complete this task:
- Carefully remove any window coverings such as blinds or curtains to avoid potential damage.
- Start by removing the window sash. Some windows have removable stops that hold the sash in place. Use a screwdriver to remove these stops and set them aside.
- Once the stops are removed, you can gently push up or down on the sash to release it from the frame. Be mindful of any caulk or sealant and take care not to damage the surrounding area.
- After removing the sash, take a moment to inspect the hardware. It may be necessary to unscrew or detach any remaining hardware pieces, such as handles or locks.
- Store the hardware in a safe place, as it may be reusable for your new window installation.
Disposing of the old window properly
Now that the window sash and hardware have been removed, it’s important to dispose of the old window properly. Here’s how:
- Check local regulations for proper disposal methods. Some areas require specific recycling or disposal procedures for windows.
- If the window is still in good condition, consider donating it to a local salvage or reuse center.
- If the window is damaged or cannot be reused, contact your local waste management facility to find out the best way to dispose of it.
- Remember to handle the old window with care to avoid injury or damage.
By measuring the window frame accurately, removing the window sash and hardware correctly, and disposing of the old window properly, you are well on your way to installing a smaller window successfully.
Understanding The Window Installation Process
Installing a smaller window in your home can bring in more natural light and improve the overall aesthetic of the space. However, before you begin the installation process, it’s crucial to understand the step-by-step procedure involved. In this guide, we’ll take you through each stage, from evaluating the condition of the window frame to the final touches of sealing and insulation. By following these steps, you’ll be able to complete the window installation with confidence and ensure a seamless finish.
Evaluating the condition of the window frame
Before you start installing a smaller window, it’s essential to assess the condition of the existing window frame. A sturdy and solid frame is crucial for maintaining the window’s structural integrity and preventing any future issues. Here’s how you can evaluate the condition of the window frame:
- Inspect for signs of damage, rot, or decay. Look for visible cracks, warping, or water damage.
- Check the frame for stability by gently pushing or pressing against it. A secure frame should not wobble or feel loose.
- Evaluate the overall condition of the frame material – whether it’s wood, vinyl, or aluminum.
If you notice any significant damage or instability in the frame, it may be necessary to repair or replace it before proceeding with the window installation. In such cases, consider consulting a professional to ensure proper remediation.
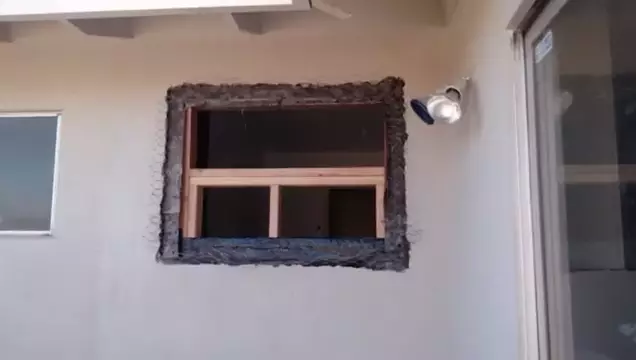
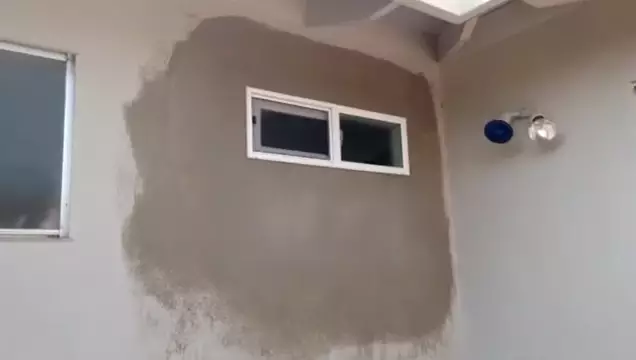
Preparing the window opening
Once you have assessed the window frame and ensured its suitability for installation, the next step is to prepare the window opening. This involves taking precise measurements and making any necessary adjustments to accommodate the smaller window. Follow these steps to prepare the window opening:
- Measure the width, height, and depth of the existing window opening using a tape measure. Ensure accuracy by measuring multiple times.
- Consider the space required for the window frame, trim, and any additional insulation materials.
- If the new window is smaller than the existing opening, use a saw or other appropriate tools to adjust the dimensions accordingly.
By accurately preparing the window opening, you’ll ensure a snug fit for the smaller window and minimize the chances of air leakage or drafts. This will contribute to energy efficiency and improve the overall insulation of your home.
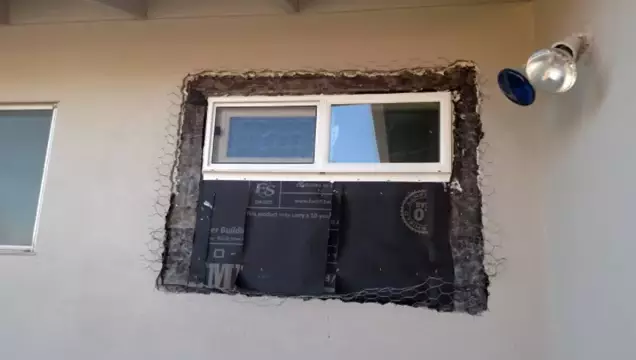
Applying sealing and insulation materials
To complete the window installation, it’s vital to apply appropriate sealing and insulation materials. These help create a weather-tight and energy-efficient barrier, preventing air and moisture infiltration. Here’s a breakdown of the steps involved in this process:
- Clean the window opening thoroughly, removing any debris, dust, or old caulking.
- Apply a bead of high-quality silicone caulking around the perimeter of the window opening, ensuring full coverage and creating a watertight seal.
- Place the smaller window into the opening, pressing it firmly against the caulking to create a secure bond.
- Insulate the gaps between the window frame and the opening using expanding foam insulation. Be careful not to overfill, as it can exert excessive pressure on the window frame.
- Trim any excess foam insulation using a utility knife, ensuring a neat and tidy finish.
By following these steps, you’ll effectively seal the window installation, enhancing energy efficiency and preventing any potential water damage or draft issues. Take your time to complete this process accurately, as it’s a crucial element in achieving a professional and long-lasting window installation.
Securing The Window In Place
Now that you’ve positioned the new window in the frame and ensured a proper fit, it’s time to secure it in place. This step is crucial in ensuring the window remains sturdy and functions properly. In this section, we’ll guide you through the process of aligning the window and fastening it securely with screws.
Positioning the new window in the frame
To begin securing the window, you must first position it correctly within the frame. This involves aligning the window so that it sits evenly and flush against the frame. Here’s how you can do it:
- Carefully lift the window and align it with the opening in the frame.
- Ensure that the window is positioned centrally within the frame for a balanced look.
- Check if the window is level by using a spirit level.
- Adjust the positioning if necessary until the window is perfectly level.
By following these steps, you can guarantee that your window is positioned correctly within the frame, creating a neat and professional finish for your installation.
Aligning the window and ensuring proper fit
Once the window is positioned correctly, the next step is to align it precisely for a proper fit. This ensures that the window operates smoothly and provides a reliable seal against any outside elements. Here’s what you need to do:
- Check all sides of the window to ensure equal spacing between the window and the frame.
- Use shims or spacers to adjust the spacing if necessary, ensuring a uniform fit.
- Ensure that the window sits snugly within the frame without any wobbling or looseness.
This meticulous alignment process guarantees that the window fits securely within the frame, minimizing the risk of any air or water leakage.
Fastening the window securely with screws
With the window properly aligned, it’s time to fasten it securely using screws. This step is vital in ensuring the window remains firmly in place over time. Follow the steps below:
- Using a power drill or screwdriver, attach the window to the frame using screws specifically designed for window installation.
- Start by inserting the screws into the pre-drilled holes located around the perimeter of the window.
- Tighten the screws evenly, being careful not to overtighten and damage the window or frame.
- Verify that all screws are tightly secured, double-checking any areas that may require additional reinforcement.
By fastening the window securely with screws, you can be confident in the window’s stability and longevity.
Following these steps and guidelines will ensure that your smaller window is secured firmly in place once installed. This is an essential aspect of the installation process that guarantees the window’s stability, functionality, and longevity. Take your time with this step to ensure a professional finish, and enjoy the benefits of your newly installed window.
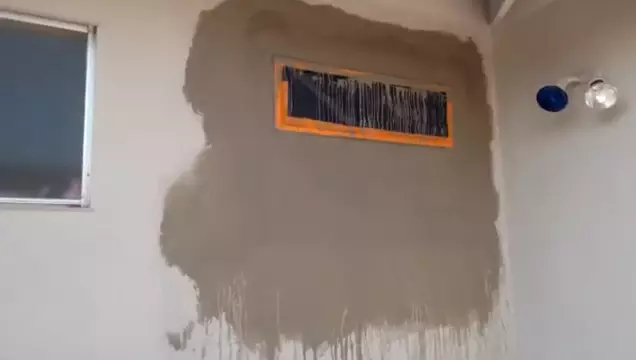
Insulating And Sealing The Window
Insulating and sealing your new smaller window is an essential step to ensure energy efficiency and to prevent any drafts or leaks in your home. By following these simple steps, you can ensure that your window is well-insulated and properly sealed.
Applying window insulation foam
The first step in insulating your smaller window is to apply window insulation foam. This foam is designed to fill in any gaps or spaces between the window frame and the wall, creating an airtight seal. To apply the insulation foam, follow these steps:
- Clean the window frame and surrounding area to ensure proper adhesion of the foam.
- Cut the nozzle of the foam canister at a 45-degree angle to allow for better control and distribution of the foam.
- Insert the foam canister into a foam gun, if available, for easier application.
- Starting at one corner of the window frame, apply the foam in a smooth, continuous motion along the perimeter of the frame.
- Continue applying the foam along all sides of the frame, making sure to fill in any gaps or voids.
- Allow the foam to expand and cure according to the manufacturer’s instructions.
- Trim any excess foam using a utility knife to ensure a neat and tidy finish.
Caulking the edges for an airtight seal
Once the insulation foam has cured, the next step is to caulk the edges of the window for an airtight seal. Caulking helps to seal any remaining gaps or cracks and prevent air leakage. Follow these steps to properly caulk the window:
- Choose a high-quality silicone or acrylic caulk suitable for exterior use.
- Prepare the caulk tube by cutting the tip at a 45-degree angle and puncturing the seal with a nail or small tool.
- Starting at one corner of the window, apply a thin, even bead of caulk along the edge of the frame.
- Smooth the caulk bead using a caulk smoothing tool or your finger dipped in soapy water to create a clean finish.
- Continue applying and smoothing the caulk along all sides of the window frame.
- Allow the caulk to cure according to the manufacturer’s instructions.
Checking for any gaps or leaks
After insulating and caulking the window, it’s important to check for any gaps or leaks to ensure a proper seal. Here are some steps to follow when checking for gaps or leaks:
- Inspect the window frame and surrounding areas for any noticeable gaps or cracks.
- Use a flashlight to identify any areas where light is visible through the window frame.
- Run your hand along the edges of the window frame to feel for any drafts or air leakage.
- If any gaps or leaks are detected, reapply insulation foam or caulk as necessary to seal the window properly.
By properly insulating and sealing your smaller window, you can enjoy a more comfortable and energy-efficient home. Take the time to follow these steps, and you’ll be rewarded with a window that keeps the elements out and your energy bills down.
Testing And Adjusting The Window
After successfully installing a smaller window in your desired location, it’s important to test its functionality and make any necessary adjustments for smooth operation. This step is crucial in ensuring that your new window not only looks great but also functions properly. In this section, we will guide you through testing the functionality of the window and making necessary adjustments for a flawless installation.
Testing the functionality of the window
Once the smaller window is securely in place, take a moment to check its functionality. Start by opening and closing the window multiple times to ensure it moves smoothly along its tracks. Pay attention to any resistance or uneven movement that may indicate misalignment or other issues.
Next, test the window’s locking mechanism. Ensure that it securely locks in place when closed, providing you with the necessary security and protection. If you encounter any difficulties with the locking mechanism, it could indicate a misalignment that needs to be addressed.
Inspect the window for any gaps or cracks that may allow drafts or moisture to enter your home. Check around the frame and seals to ensure they are properly sealed and in good condition. Address any issues promptly to prevent energy loss and potential damage.
Making necessary adjustments for smooth operation
If you encounter any issues during the functionality testing, it’s important to make the necessary adjustments for optimal performance. Here are some steps you can follow:
- Check the window’s alignment by visually inspecting the frame and tracks. Look for any signs of misalignment or obstructions that may be hindering smooth movement.
- If misalignment is detected, use a level to ensure the window is plumb and level. Adjust the frame and tracks as needed to achieve proper alignment.
- Inspect the window’s hinges and hardware for any signs of wear or damage. Replace any worn-out or broken parts to ensure smooth operation.
- Apply lubricant to the window’s tracks, hinges, and other moving parts to reduce friction and enhance functionality.
- Re-test the window’s functionality after making adjustments to ensure that the issues have been resolved and that it operates smoothly.
By testing the functionality of your newly installed smaller window and making necessary adjustments, you can ensure that it not only looks great but also functions flawlessly. Taking the time to address any issues or misalignments will help you enjoy the benefits of your new window for years to come.
Cleaning Up The Workspace
Removing any debris and cleaning the area
Before you start the installation of a smaller window, it’s essential to clean up the workspace properly. Cleaning the area not only ensures a smooth installation process but also helps enhance the overall appearance of the window once it’s in place.
First, carefully remove any debris from the surrounding area. This includes dust, dirt, loose pieces of the old window frame, or any other unwanted materials. Be gentle during this process to avoid damaging the window sill or adjacent surfaces.
Once the debris is cleared, it’s time to thoroughly clean the area. Begin by wiping down the window sill with a damp cloth to remove any dust or dirt. Pay attention to corners and edges, as these areas tend to accumulate grime over time.
Next, use a mild household cleaner to clean the entire window frame. Dampen a clean cloth with the cleaner and gently wipe down the frame, focusing on areas that may have accumulated grease or stains.
To ensure the best adhesive bond between the new window and the surrounding surface, it’s crucial to remove any old caulking or residue. Carefully scrape away the residue using a putty knife or scraper. Take your time and be cautious not to scratch the window frame or nearby surfaces.
Proper disposal of old materials
Once the workspace is clean, it’s important to dispose of the old window and related materials properly. This ensures both environmental safety and compliance with local regulations.
- Old Window: If the old window is intact and in good condition, you may consider donating it to a local charity or community organization. However, if the window is damaged or beyond repair, it’s best to contact your local waste disposal facility to inquire about their procedures for disposing of large items like windows.
- Glass: Handle broken glass with extreme caution. Place it in a thick, puncture-resistant bag or wrap it in several layers of newspaper for safe handling. Ensure the bag or wrapping is secure and labeled appropriately before disposing of it in a designated glass recycling bin or contacting your local waste management facility for further instructions.
- Caulking and Sealant Tubes: Check with your local waste management facility to determine if caulking and sealant tubes can be recycled. If recycling is not an option, dispose of the tubes in accordance with local guidelines for hazardous waste.
- Packaging Materials: Dispose of any packaging materials, such as cardboard boxes or plastic wraps, following your regular recycling practices. Flatten cardboard boxes to save space in your recycling bin.
By cleaning up the workspace and properly disposing of old materials, you not only maintain a tidy environment but also contribute to the overall sustainability of your community. Take the time to carry out these tasks conscientiously, ensuring a successful window installation and a positive impact on the environment.
Frequently Asked Questions For How To Install A Smaller Window
How To Make A Window Smaller?
To make a window smaller, you can resize it by clicking and dragging the edges or corners. Position the cursor over the edge or corner of the window, click and hold the mouse button, then move the cursor inward to reduce its size.
Can A Window Be Made Smaller?
Yes, a window can be made smaller by resizing it or installing a smaller window frame.
Can You Replace Windows With Smaller Windows?
Yes, it is possible to replace windows with smaller ones.
How Do You Change The Size Of A Window?
To change the size of a window, click and hold the edges or corners of the window. Then, drag them outward or inward to resize it.
Conclusion
To sum up, installing a smaller window is a straightforward process that can greatly enhance the aesthetic and functionality of your space. By following the steps outlined in this guide, you’ll be well-equipped to take on this project with confidence.
Remember to carefully measure, prepare the opening, secure the window, and seal any gaps for optimal results. With a little patience and effort, you’ll be enjoying the benefits of a smaller window in no time. Get started today and transform your space effortlessly!