To install a natural gas water heater, first, shut off the gas supply and disconnect the old water heater. Then, install the new water heater according to the manufacturer’s instructions and connect the gas line.
Choosing The Right Location
When it comes to installing a natural gas water heater, choosing the right location is a crucial step. The location of your water heater can impact safety, efficiency, and ease of access for maintenance or repairs. To ensure you make the best decision, consider the following factors:
Consider Safety Factors
Safety should be your top priority when selecting a location for your natural gas water heater. Keep in mind that the water heater will emit hot air and potentially produce carbon monoxide. To mitigate potential hazards, follow these guidelines:
- Place the water heater in a well-ventilated area to allow for proper air circulation.
- Avoid installing the water heater in confined spaces or areas with limited airflow.
- Keep a safe distance from combustible materials like clothing, paper, or chemicals.
- Install a carbon monoxide detector near the water heater for added safety.
Assess Available Space
Before choosing a location, assess the available space in your home. The water heater should be placed in an area that provides easy access for maintenance and repairs. Consider the following:
- Determine the dimensions of the water heater and ensure the selected location can accommodate it.
- Leave sufficient space around the water heater for servicing and ventilation.
- Consider nearby plumbing connections to ensure easy access for installation.
Verify Local Building Codes
It is essential to verify the local building codes and regulations before installing a natural gas water heater. Different regions may have specific requirements and restrictions. Here’s what you need to do:
- Contact your local building department or check their website to obtain information on water heater installation guidelines.
- Ensure compliance with any required permits or inspections.
- Follow any additional specifications, such as the distance from walls or floors.
By considering safety factors, assessing available space, and verifying local building codes, you can choose the right location for your natural gas water heater. Remember to prioritize safety, accessibility, and compliance with regulations to ensure a successful installation.
Gathering The Necessary Tools And Materials
Gathering the necessary tools and materials is the crucial first step when it comes to installing a natural gas water heater. With the right equipment on hand, you can ensure a smooth and successful installation process. This section will guide you through the essential tools and materials you’ll need to gather before starting the installation. From a gas pipe wrench to a gas connector, let’s explore what each item entails.
Gas Pipe Wrench
A gas pipe wrench is a must-have tool for any natural gas water heater installation. This specialized wrench is designed with a long handle and a durable gripping mechanism. Its purpose is to tighten or loosen threaded gas pipes with ease. The gas pipe wrench provides a firm grip, ensuring that you can securely connect or disconnect gas pipes during the installation process.
Pliers
Pliers are versatile tools that come in handy during various stages of the installation. With their adjustable jaw size and gripping capabilities, they allow you to firmly hold and manipulate different materials. From tightening nuts and bolts to bending pipes, pliers are essential for ensuring a secure and leak-free connection.
Pipe Cutter
A pipe cutter is an essential tool for cutting and shaping pipes to fit the desired length and angle. This tool is especially useful when it comes to working with metal pipes, as it provides a clean and precise cut. With a pipe cutter, you can ensure that the pipes are accurately measured and trimmed, allowing for proper fitting and alignment during the installation process.
Teflon Tape
Teflon tape, also known as plumber’s tape, is a thin white tape made from polytetrafluoroethylene (PTFE). It is used to create a watertight seal on threaded pipe connections. Applying Teflon tape around the threads of the gas pipes helps prevent leaks by filling any gaps or imperfections. This inexpensive yet essential material is a must-have for ensuring a secure and leak-free connection.
Vent Pipe
A vent pipe is an integral part of a natural gas water heater installation. It allows for the safe expulsion of toxic gases produced during the heating process. The vent pipe should be made from a suitable material, such as galvanized steel or PVC, to withstand the high temperatures and corrosive nature of the exhaust gases. It is essential to properly measure, cut, and secure the vent pipe during installation to ensure the efficient and safe operation of the water heater.
Gas Connector
The gas connector is a flexible hose that connects the natural gas supply to the water heater. It is typically made of stainless steel and is designed to withstand high gas pressures and vibrations. The gas connector is a crucial component for ensuring a secure and leak-free connection between the gas supply line and the water heater. It offers flexibility and ease of installation, allowing for proper alignment and positioning of the water heater.
Preparing For Installation
Turn off the gas supply
Before starting the installation process, it is crucial to turn off the gas supply. Safety should always be the top priority when dealing with natural gas appliances. Locate the gas valve that supplies the water heater and turn it clockwise to shut it off. Make sure the valve is fully closed and in the “off” position. This step will prevent any gas leakage during the installation process, minimizing the risk of accidents.
Drain the old water heater
The next step in preparing for the installation is to drain the old water heater. Before doing this, ensure that the power supply to the heater is switched off. Most water heaters have a dedicated shut-off valve located near the base of the unit. Turn this valve clockwise to shut off the water flow. Then, connect a hose to the drain valve at the bottom of the heater and direct it to a suitable drainage area. Open the drain valve to let the water flow out of the tank. It is advised to open a nearby hot water faucet to facilitate the draining process. Once the tank is empty, close the drain valve securely.
Disconnect the plumbing connections
After draining the old water heater, you can proceed to disconnect the plumbing connections. Start by turning off the water supply to the entire house. Next, disconnect the hot and cold water pipes connected to the water heater. Use an adjustable wrench to loosen the pipe fittings and carefully remove them. Additionally, if your water heater has a pressure relief valve, disconnect it as well. Remember to use Teflon tape or pipe compound when reconnecting the plumbing connections later to ensure a watertight seal.
Installing The Water Heater
Installing a natural gas water heater is a straightforward process that can be done with a few basic tools and some careful attention to detail. In this section, we will guide you through the step-by-step process of installing a water heater, ensuring a safe and efficient setup for your home.
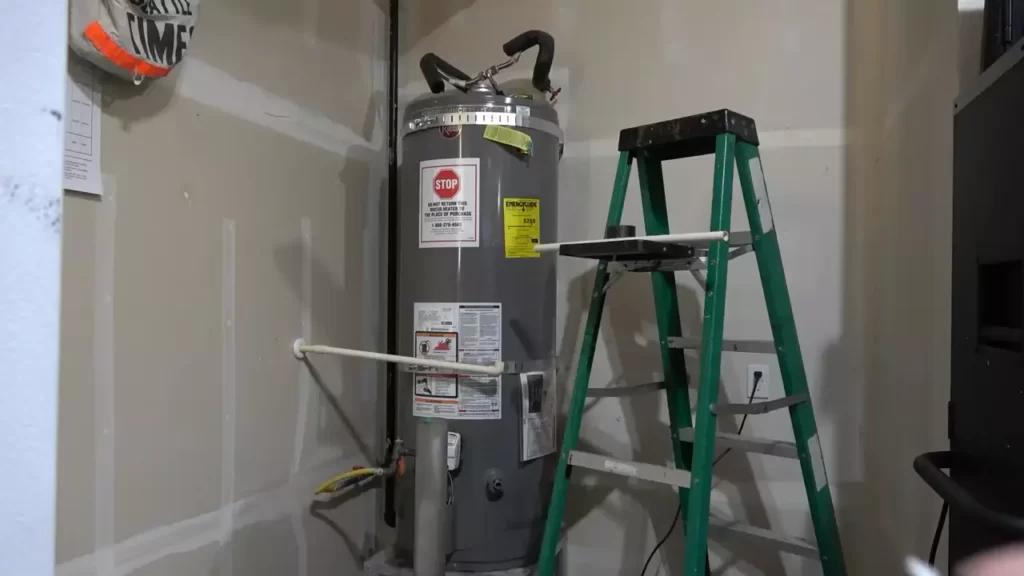
Position the water heater
The first step in installing a natural gas water heater is to determine where it will be positioned. You want to choose an area that is easily accessible for maintenance and repairs, as well as providing proper ventilation. Consider placing the water heater in the basement, garage, or utility room. Ensure that there is enough clearance around the unit for safe operation.
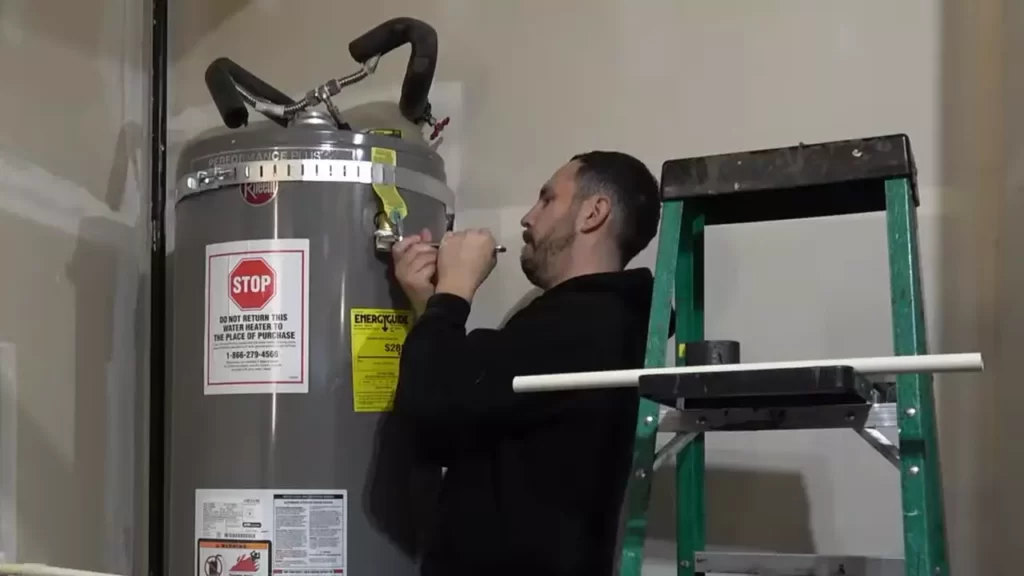
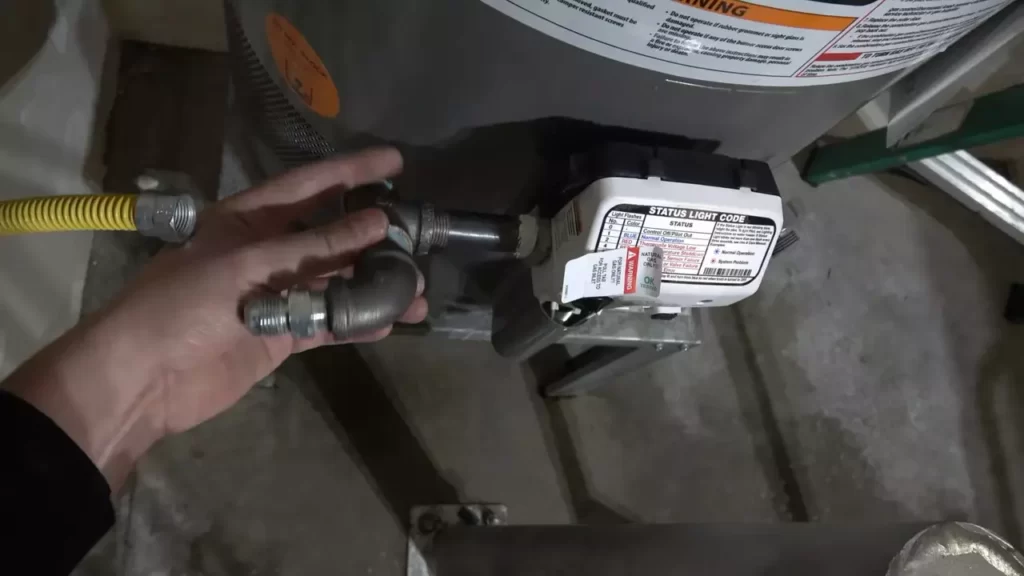
Connect the gas line
Once you have positioned the water heater, the next step is to connect the gas line. This is a crucial step that requires caution and accuracy. Start by turning off the gas supply to the house. Then, use a wrench to connect the gas line to the water heater, ensuring a secure fit. Make sure to test for any gas leaks by applying a solution of soapy water to the connections. If you see any bubbles forming, tighten the connections until the leak stops.
Attach the vent pipe
Proper ventilation is essential for the safe operation of a natural gas water heater. To ensure proper airflow, attach the vent pipe to the top of the water heater. The vent pipe should be directed towards the outside of the house to expel any potentially harmful gases. Use metal screws to secure the vent pipe in place, ensuring a tight seal. Check the manufacturer’s instructions for specific guidelines on vent pipe installation.
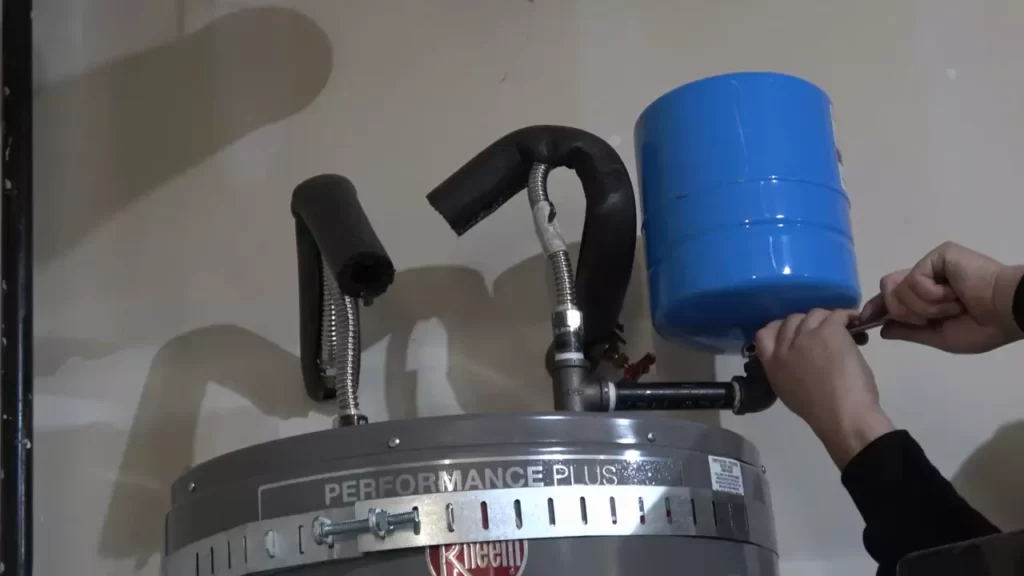
Install the pressure relief valve
The pressure relief valve is a vital component of a water heater, as it releases excess pressure to prevent any potential damage or explosion. To install the pressure relief valve, locate the valve port on the side of the water heater and clean the threads. Wrap plumber’s tape around the threads to create a tight seal. Then, carefully screw the pressure relief valve into place, making sure not to overtighten. Test the valve by pulling the lever to release any trapped air or water.
Connect the water supply pipes
Lastly, you need to connect the water supply pipes to the water heater. You will typically have a cold water inlet and a hot water outlet. Use a wrench to tighten the connections securely, ensuring there are no leaks. If necessary, you can add pipe insulation to help reduce heat loss from the hot water pipes.
By following these steps, you can successfully install a natural gas water heater in your home. Remember to consult the manufacturer’s instructions for any specific guidelines and safety precautions. If you are unsure or uncomfortable with any step of the installation, it is always best to consult a professional plumber or technician.
Testing And Safety Checks
Before connecting your natural gas water heater, it is crucial to perform a series of testing and safety checks. These measures ensure that your installation is secure and compliant with the necessary safety standards. In this section, we will discuss three important aspects to address during this phase.

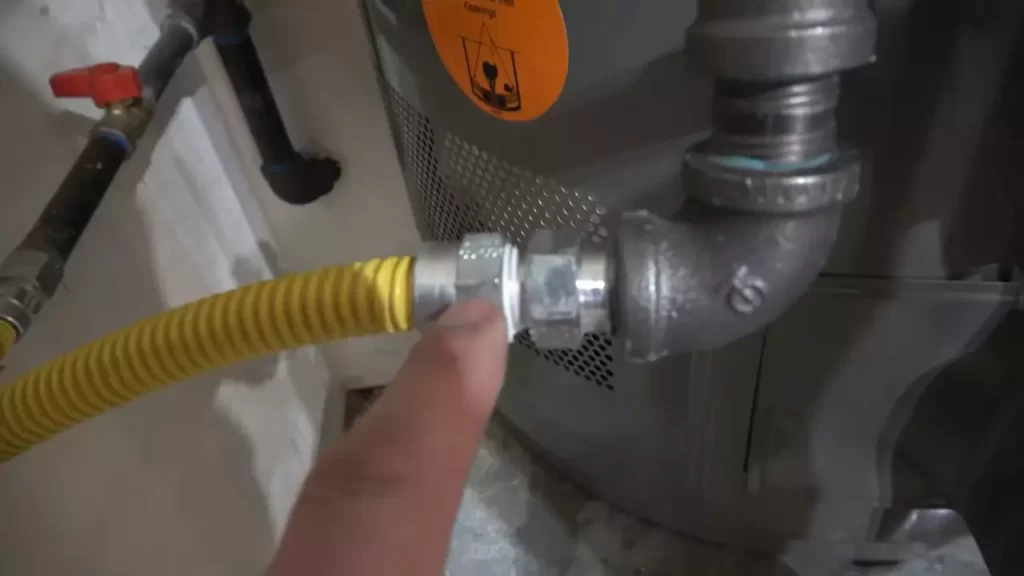
Assess for gas leaks
First and foremost, you must check for gas leaks to guarantee the safety of your gas water heater installation. Even a small gas leak can lead to hazardous situations. Here’s how you can conduct a thorough assessment for gas leaks:
- Use a mixture of dish soap and water to create a solution.
- Apply the solution using a brush or spray bottle to the gas connections, including the supply line and shut-off valve.
- Observe for any bubbles forming on the connections.
- If you notice bubbles, it indicates a gas leak, and you must tighten the connections or replace any faulty parts.
- Once you have resolved the issue, reapply the solution and check for additional leaks.
Remember, never use an open flame or any source of ignition while conducting this assessment.
Check for proper ventilation
Proper ventilation is essential for the safe operation of your natural gas water heater. Inadequate ventilation can lead to a buildup of harmful gases, such as carbon monoxide. Follow these steps to ensure proper ventilation:
- Inspect the vent pipe to confirm it is securely connected and free from any obstructions.
- Check if the vent cap is in place and functioning correctly.
- Examine the surrounding area to ensure there is sufficient clearance for ventilation.
- Refer to the manufacturer’s guidelines for specific ventilation requirements and follow them diligently.
By verifying the ventilation, you can prevent the accumulation of toxic gases and safeguard your household.
Verify water flow and pressure
To optimize the performance of your new natural gas water heater, it is vital to verify the water flow and pressure. Follow these steps to ensure an efficient system:
- Turn on a hot water faucet and observe the water flow rate. It should be steady and free from any unusual fluctuations.
- Check the pressure relief valve on the water heater to ensure it is functioning properly and is not leaking.
- If you notice any irregularities, you may need to adjust the water pressure using the pressure regulator valve.
- Refer to the manufacturer’s instructions to determine the recommended water pressure range for your specific water heater model.
By verifying the water flow and pressure, you can optimize the performance of your water heater and maintain a steady supply of hot water throughout your home.
Troubleshooting Common Issues
Even with proper installation, natural gas water heaters can sometimes experience common issues that may disrupt their performance. In this section, we will address three of the most frequent problems users encounter, namely insufficient hot water, a pilot light that won’t stay lit, and water leaking from connections. By understanding these issues and their potential solutions, you will be better equipped to identify and resolve any problems that may arise.
Insufficient Hot Water
If you find yourself experiencing insufficient hot water despite having a natural gas water heater, there are a few potential causes to consider. One common reason is a faulty thermostat setting. To troubleshoot this issue, check your thermostat and adjust it to a higher temperature setting if necessary. Additionally, make sure the water heater is not being overwhelmed by excessive demand.
If you have recently had guests or increased your hot water usage, it is possible that the water heater is struggling to keep up. Consider reducing your hot water usage during peak times or consider upgrading to a larger capacity water heater if the problem persists.
Pilot Light Won’t Stay Lit
A pilot light that won’t stay lit can be frustrating and impact the performance of your natural gas water heater. If you are experiencing this issue, the first step is to ensure that the gas supply to the water heater is on. If the gas supply is functioning correctly, it may be an issue with the thermocouple.
The thermocouple is a safety device that senses the pilot flame and signals the gas valve to remain open. Over time, the thermocouple can become dirty or worn out, causing it to malfunction. To resolve this issue, carefully clean the thermocouple with a soft cloth or replace it if necessary. If the problem persists, it may be best to consult a professional plumber to diagnose and resolve the issue.
Water Leaking from Connections
Another common issue that may arise with a natural gas water heater is water leaking from the connections. This can occur due to loose or damaged fittings, faulty valves, or excessive pressure within the system. To troubleshoot this problem, start by inspecting all the connections and fittings for any signs of leaks or damage. Tighten any loose fittings and replace any damaged components as needed. If the leak persists, it is essential to check the pressure relief valve.
This valve helps regulate the pressure within the water heater and prevent excessive build-up. If the valve is faulty or malfunctioning, it may need to be replaced. Remember, if you are unsure or uncomfortable with any troubleshooting steps, it is best to consult a professional plumber for assistance.
Maintaining Your Natural Gas Water Heater
Maintaining your natural gas water heater is crucial for ensuring its efficiency and longevity. Regular maintenance tasks such as flushing the tank, insulating the pipes, and checking the anode rod are simple yet effective ways to keep your water heater running smoothly. In this section, we will discuss each of these tasks in detail.
Flushing the Tank
Flushing the tank is an essential step in maintaining your natural gas water heater. Over time, sediment and mineral deposits can accumulate at the bottom of the tank, reducing its efficiency and causing potential damage. Flushing the tank at least once a year will help remove these deposits and prolong the life of your water heater.
To flush the tank, follow these steps:
- Turn off the gas supply to the water heater and let it cool down.
- Locate the drain valve at the bottom of the tank.
- Attach a garden hose to the drain valve and place the other end in a suitable drainage area.
- Open the drain valve and allow the water to flow out until it runs clear.
- Close the drain valve and remove the hose.
- Turn on the cold water supply to the heater to refill the tank.
- Once the tank is full, turn on the gas supply and relight the pilot if necessary.
Insulating the Pipes
Insulating the pipes connected to your natural gas water heater can help prevent heat loss and improve its overall efficiency. Insulation keeps the hot water hot and prevents the pipes from freezing during cold weather. Here’s how you can insulate your pipes:
- Measure the length and diameter of the pipes.
- Purchase pre-slit foam pipe insulation that matches the measurements.
- Cut the insulation to fit the pipes, leaving no gaps.
- Secure the insulation with duct tape or zip ties.
- Inspect the insulation regularly for any signs of wear or damage and replace if necessary.
Checking the Anode Rod
The anode rod plays a vital role in preventing corrosion inside the tank of your natural gas water heater. Over time, the rod gradually deteriorates and should be inspected periodically. To check the anode rod, follow these steps:
- Turn off the gas supply and let the water heater cool down.
- Locate the anode rod on the top of the tank.
- Use a socket wrench to loosen the hex head of the rod.
- Inspect the rod for any signs of corrosion or significant reduction in size.
- If the rod is heavily corroded or less than 1/2 inch thick, it is time for a replacement.
- Tighten the hex head of the new anode rod securely.
- Turn on the gas supply and relight the pilot if necessary.
By following these maintenance tasks, you can extend the life of your natural gas water heater and ensure optimal performance. Remember to consult your manufacturer’s manual for specific instructions and guidelines tailored to your water heater model.
Wrapping Up
Congratulations! You have successfully installed your natural gas water heater and now you can enjoy all the benefits it brings. Before you start using it, there are a few final safety checks and operation guidelines to keep in mind. Let’s go through them to ensure the safe and efficient operation of your new water heater.
Final Safety Checks
Ensuring the safety of your natural gas water heater is crucial. Here are the final safety checks you need to perform:
- Check for gas leaks: Start by checking all connections using a gas leak detector or soapy water. If you notice any bubbles or smell gas, immediately contact a professional technician to fix the issue.
- Test the pressure relief valve: Make sure the pressure relief valve is properly installed and functioning correctly. Lift the lever to release some water, and it should stop when you let go. If it continues to flow, replace the valve immediately.
- Inspect the venting system: Verify that the venting system is connected securely and there are no obstructions. Improper venting can lead to carbon monoxide buildup, so it’s essential to ensure proper ventilation.
- Double-check electrical connections: If your natural gas water heater has electrical components, ensure all connections are tight and secure.
Operation Guidelines
Now that your natural gas water heater is installed and checked for safety, it’s time to understand how to operate it correctly:
- Adjust the temperature: Set the temperature to your desired level, but remember that higher temperatures can increase the risk of scalding. Consult the manufacturer’s guidelines for the recommended temperature range.
- Monitor the pilot light: The pilot light should burn steadily, without any flickering. If you notice any issues with the pilot light, refer to the manufacturer’s instructions or contact a professional technician.
- Regular maintenance: Keep your natural gas water heater in good condition by performing regular maintenance tasks. This may include checking the anode rod, flushing out sediment, and inspecting the burner assembly.
- Be mindful of energy usage: While natural gas water heaters are energy-efficient, it’s still important to be mindful of your usage. Avoid wasting hot water and consider energy-saving features when available.
Enjoying Your New Natural Gas Water Heater!
Now that you understand the final safety checks and operation guidelines, you can confidently start enjoying the benefits of your new natural gas water heater. With its efficient performance and reliable heating, you can look forward to hot showers and convenient access to hot water whenever you need it. Remember to follow the maintenance schedule and stay mindful of energy usage to prolong the lifespan of your water heater. Sit back, relax, and enjoy the convenience and comfort of your new appliance!
Frequently Asked Questions For How To Install A Natural Gas Water Heater
Is It Safe To Install A Gas Water Heater Yourself?
Yes, it is safe to install a gas water heater yourself if you have the necessary skills and knowledge. However, it is recommended to hire a professional to ensure proper installation and minimize safety risks.
Can You Install A Water Heater Yourself?
Yes, you can. However, it is essential to follow safety guidelines and have the necessary skills and knowledge. Consider local codes, permits, and potential risks. If unsure, it’s best to hire a professional for installation to ensure proper setup and avoid any potential hazards.
Do Natural Gas Water Heaters Need To Be Vented?
Yes, natural gas water heaters need to be vented. Venting allows harmful gases produced during the heating process, such as carbon monoxide, to safely escape your home. Venting also assists in maintaining proper air circulation for efficient operation and prevents potential hazards.
How Long Does It Take To Replace A Natural Gas Water Heater?
A natural gas water heater replacement can typically be completed within a few hours.
Conclusion
Installing a natural gas water heater can be a straightforward process if you follow the proper steps and guidelines. From turning off the power supply to connecting the gas and water lines, this blog post has provided a comprehensive guide on how to safely and effectively install a natural gas water heater.
By carefully adhering to these instructions, you can ensure that you have a reliable and efficient water heating system in your home.