To install an Insinkerator garbage disposal, first, turn off the power and water supply, then remove the existing drain or disposal assembly, attach the mounting collar to the sink drain, and connect the disposer to the mounting assembly. Finally, connect the disposer to the dishwasher and the power supply, and test for leaks and proper functionality.
Installing an Insinkerator garbage disposal involves disconnecting the old unit, attaching the mounting collar, connecting the disposer, and testing for leaks and functionality. It’s important to follow specific instructions to ensure a successful and safe installation of the garbage disposal.
Get Ready: Tools And Materials Needed
Before you begin installing your new Insinkerator garbage disposal unit, it’s essential to gather all the necessary tools and materials. By being prepared with the right equipment, you can streamline the installation process and ensure a successful outcome. Here is a list of the tools and materials you will need:
Basic Plumbing Tools
- Wrenches
- Pliers
Electrical Tools
- Wire nuts
- Screwdriver
In addition to these tools, you will also require a waterproof sealant, such as silicone, to provide a secure and watertight connection. This sealant will help prevent any leaks and keep your installation intact for years to come.
Since you will be working with water during the installation process, it’s crucial to have a bucket or container handy to dispose of any water that may be present in the plumbing system. This will help you avoid creating a mess and allow for a more organized and efficient installation. Make sure your bucket or container is easily accessible.
A new Insinkerator Garbage Disposal Unit and Its Components
Finally, you’ll need your new Insinkerator garbage disposal unit and all its accompanying components. Ensure that you have the main disposal unit, the mounting hardware, the discharge tube, and any other parts specific to your model. Take the time to familiarize yourself with each component to ensure proper installation.
Now that you have all the necessary tools and materials gathered, you can move on to the next steps of the installation process. Having everything prepared will enable you to work efficiently and successfully complete the installation of your new Insinkerator garbage disposal unit.
Assessing Your Plumbing And Electrical System
Before you embark on the installation of an InSinkErator garbage disposal unit, it’s important to thoroughly assess your plumbing and electrical system to ensure everything is in place and functioning properly. This step is crucial for a smooth installation process and to avoid any potential hazards or complications down the line.
Checking for any leaks or faulty pipes
The first aspect to assess is the condition of your plumbing system. Start by carefully examining all the pipes and connections under your sink. Look for any signs of leaks, corrosion, or damage. Even minor leaks can escalate into major problems if left unattended. It is advisable to address any leaks or faulty pipes before proceeding with the installation of your garbage disposal unit.
If you find any leaks or suspect any underlying issues, it is recommended to consult a professional plumber who can assess the situation and provide appropriate solutions. Taking this proactive step can help avoid costly repairs or potentially damaging your new disposal unit.
Ensuring the electrical circuit can handle the disposal unit’s power requirements
Next, turn your attention to the electrical system. To ensure the smooth operation of your InSinkErator garbage disposal unit, it’s crucial to verify that the electrical circuit can handle the appliance’s power requirements. Failure to do so can result in electrical malfunctions, tripped circuit breakers, or even fire hazards.
Begin by identifying the breaker switch that controls the power supply to the area where you plan to install the garbage disposal unit. Switch off the breaker to cut off the power, ensuring your safety during the assessment process. Once the power is off, you can proceed with checking the circuit wiring.
First, examine the gauge of wiring used for the circuit. A disposal unit typically requires a dedicated 15-amp circuit with 14-gauge wiring. Any wiring of a lower gauge may not be capable of providing sufficient power to the unit, leading to frequent tripping or overheating.
Inspect the wiring for any signs of wear, fraying, or damage. If you observe any issues, it’s essential to replace the wiring before proceeding with the installation. Electrical repairs should always be done by a licensed electrician to ensure compliance with safety codes.
In addition to the wiring, check the electrical box where the disposal unit will be connected. Ensure that it is properly grounded and secure. Loose or improperly grounded boxes can pose a safety risk and should be addressed promptly by a professional electrician.
Remember, assessing your plumbing and electrical system is a crucial preliminary step before installing an InSinkErator garbage disposal unit. Taking the time to check for leaks, faulty pipes, and suitable wiring will help prevent future headaches and ensure a successful installation process.
Preparing The Work Area
Clearing the space under the sink
Before you start installing your Insinkerator garbage disposal, it’s important to clear the space under your sink to ensure smooth and safe work. A clutter-free area will give you the necessary room to work and maneuver easily. Here are some steps to clear the space under the sink:
- Remove any objects, cleaning supplies, or storage items that are currently occupying the space.
- If there are any leaky pipes or water damage, make sure to address these issues before proceeding with the installation.
- Wipe down the area to remove any dirt or debris that may have accumulated under the sink. This will help create a clean and organized work environment.
Disconnecting the existing garbage disposal if present
If you already have a garbage disposal installed under your sink, you’ll need to disconnect it before installing the new Insinkerator model. Follow these steps to ensure a proper disconnection:
- First, turn off the power to the existing garbage disposal at the circuit breaker to avoid any electrical accidents. Safety should always be a top priority.
- Next, disconnect the electrical wiring by removing the wire nuts that connect the disposal to the power source.
- Using a pipe wrench, loosen the connections between the disposal and the drain pipes. Be prepared for any water that may still be trapped in the pipes; a bucket or towels can come in handy.
- Once the connections are loosened, carefully remove the old disposal unit from under the sink.
- Inspect the drain pipes for any blockages or damage. If necessary, clean or replace them before proceeding with the installation of the new garbage disposal.
Preparing a stable working surface
Having a stable working surface is crucial when installing a garbage disposal. This will provide a secure foundation for the unit and make the installation process much easier. Here’s how you can prepare a stable working surface:
- Start by placing a piece of plywood or a workbench under the sink. This will help distribute the weight of the garbage disposal and provide stability.
- Ensure that the area is level by using a spirit level. This will prevent any potential issues or leaks in the future.
- Position the plywood or workbench in a way that allows you to comfortably access the underside of the sink and work on the installation.
- Secure the plywood or workbench in place using clamps or brackets, if necessary. This will prevent any movement or shifting during the installation process.
By following these steps, you’ll be well-prepared and have a clear and stable work area for installing your new Insinkerator garbage disposal. Remember to always prioritize safety and take your time to ensure a successful installation.
Installation Steps
Installing an Insinkerator garbage disposal is a relatively straightforward process that can be completed in just a few simple steps. Whether you’re a DIY enthusiast or a homeowner looking to upgrade their kitchen, this guide will walk you through the installation process, ensuring that your new garbage disposal is up and running in no time.
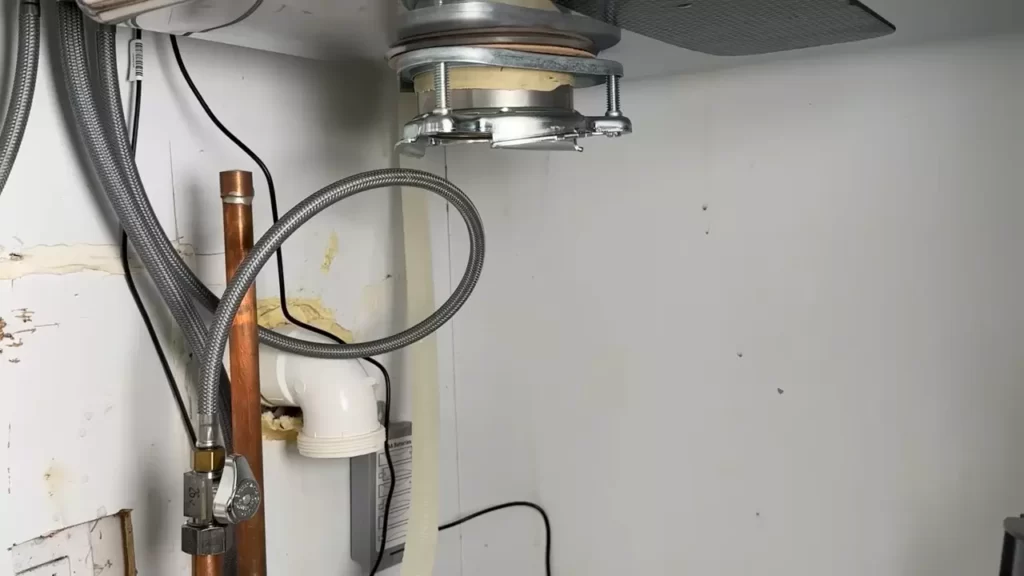
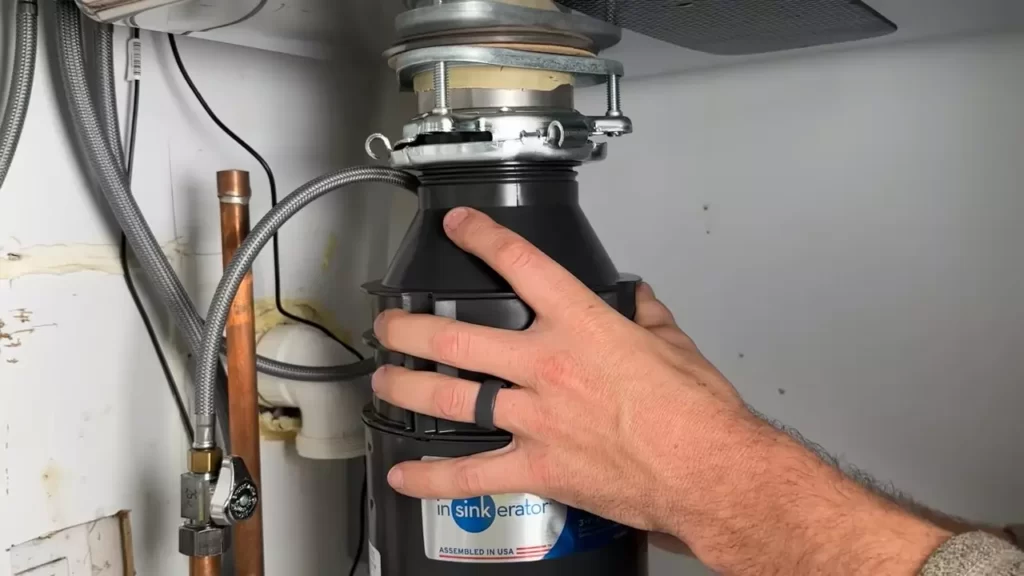
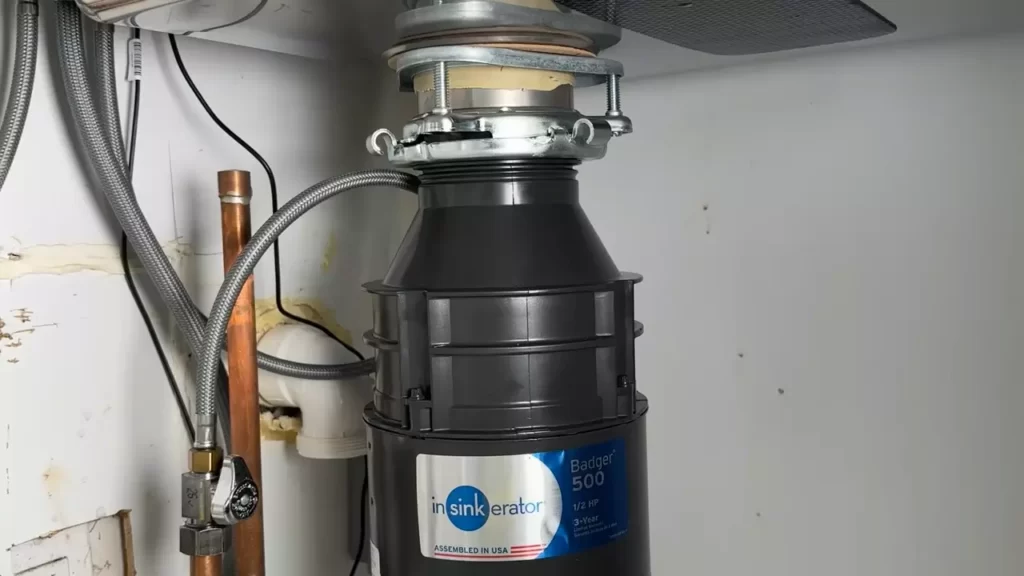
Step 1: Mounting the Garbage Disposal Unit
The first step in installing your Insinkerator garbage disposal is to mount the unit under your sink. This involves attaching the mounting assembly to the sink flange and securing the disposal unit to the assembly.
Attaching the mounting assembly to the sink flange
To begin, align the mounting assembly with the sink flange and insert the mounting screws through the mounting ring. Tighten the screws evenly to ensure a secure fit.
Securing the disposal unit to the assembly
Once the mounting assembly is securely attached to the sink flange, it’s time to connect the disposal unit. Slide the disposal unit onto the mounting assembly and rotate it clockwise until it locks into place. This will ensure that the disposal unit is securely fastened and ready for the next step.
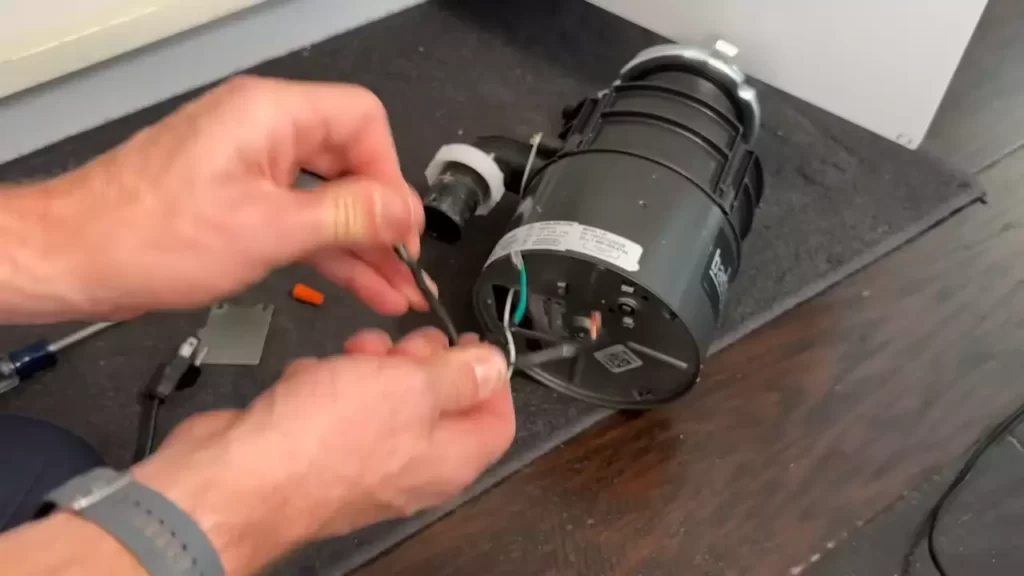
Step 2: Electrical Connections
Now that the disposal unit is mounted, it’s time to connect it to the electrical circuit in your home. This step involves turning off the power supply, connecting the disposal unit to the electrical circuit, and securing the wiring with wire nuts.
Turning off the power supply
Before working on any electrical connections, it’s important to ensure that the power supply is turned off. Locate the circuit breaker that controls the power to your kitchen and switch it off to prevent any potential hazards during the installation process.
Connecting the disposal unit to the electrical circuit
Next, connect the wires from the disposal unit to the electrical circuit. Match the colors of the wires (typically black to black and white to white) and twist them together. Once the wires are securely connected, use wire nuts to cover the exposed wires and ensure a safe and reliable electrical connection.
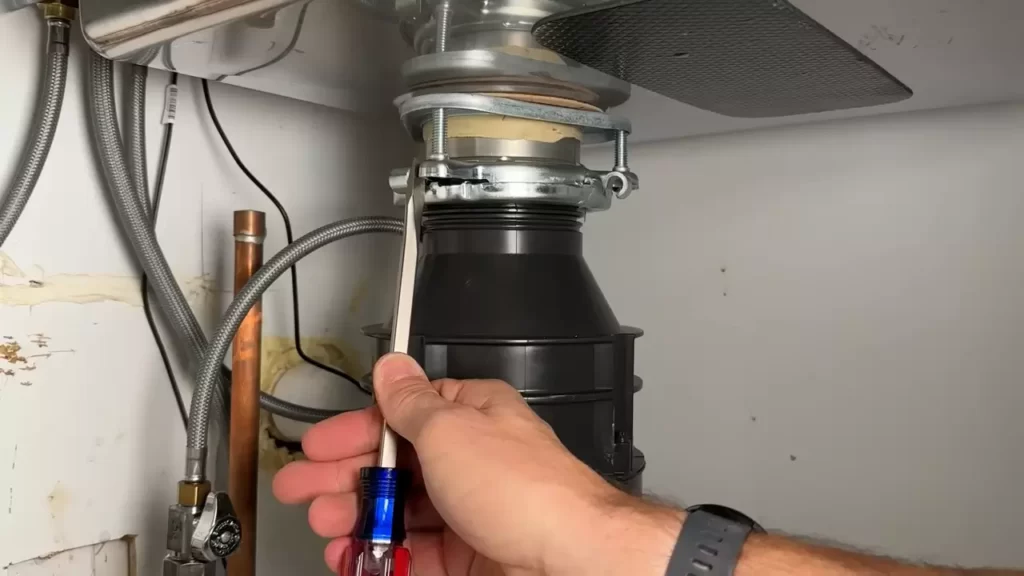
Step 3: Plumbing Connections
With the electrical connections in place, it’s time to connect the disposal unit to your plumbing system. This step involves connecting the discharge pipe to the disposal’s outlet, attaching the disposal unit to the drain pipe, and securing all connections with appropriate fittings and sealant.
Connecting the discharge pipe to the disposal’s outlet
Start by attaching the discharge pipe to the outlet of the disposal unit. Slide the pipe onto the outlet and secure it in place using a metal hose clamp or an appropriate fitting. Ensure that the connection is tight to prevent any leaks.
Attaching the disposal unit to the drain pipe
Next, connect the disposal unit to the drain pipe. This is typically done using a slip-joint connection or a compression fitting. Make sure the connection is secure and use a wrench to tighten any nuts or bolts as needed.
Step 4: Testing and Troubleshooting
With all the connections in place, it’s time to test your new Insinkerator garbage disposal and troubleshoot any potential issues. This step involves restoring the power supply, checking for leaks or malfunctions, and troubleshooting common issues to ensure that your garbage disposal is functioning properly.
Restoring the power supply
Turn the circuit breaker back on to restore power to your kitchen and activate the garbage disposal. Test the disposal by running water and allowing it to process food waste. Listen for any unusual sounds or vibrations, which could indicate an issue that needs further attention.
Checking for any leaks or malfunctions
Inspect all the plumbing connections for leaks or dripping water. Tighten any loose connections and use a plumber’s tape or sealant to ensure a watertight seal. If any leaks persist, contact a professional plumber for assistance.
Troubleshooting common issues
If you encounter any issues during the testing phase, consult the user manual or the Insinkerator website for troubleshooting tips. Common issues include clogged drains, jammed blades, or a disposal unit that won’t turn on. Follow the recommended steps to resolve the issue and ensure that your garbage disposal is functioning effectively.
By following these installation steps, you can easily install an Insinkerator garbage disposal in your kitchen. Remember to read the user manual and follow all safety precautions while undertaking any installation or repair work.
Maintenance And Safety Tips
When it comes to maintaining and using your Insinkerator garbage disposal, it’s important to follow some key maintenance and safety tips. Regular cleaning and maintenance are necessary to prevent clogs and unpleasant odors. Additionally, proper use and disposal of waste can help avoid any potential damage to your disposal unit. Lastly, it is crucial to take proper safety precautions when working with electricity and plumbing. In this section, we will explore each of these aspects in detail, ensuring you can safely and effectively maintain your Insinkerator garbage disposal.
Regular Cleaning and Maintenance to Prevent Clogs and Odors
To keep your Insinkerator garbage disposal functioning properly and to prevent any unpleasant odors from developing, it is essential to perform regular cleaning and maintenance. Here are some key tips to help you with this:
- Run cold water before and after using the disposal to ensure smooth waste flow.
- Regularly clean the disposal by grinding ice cubes to remove debris and sharpen the blades.
- Occasionally, use a mixture of baking soda and vinegar to eliminate any lingering odors.
- Check for any leaks or loose connections and address them promptly to prevent damage.
By incorporating these cleaning and maintenance practices into your routine, you can minimize the risk of clogs and keep your disposal smelling fresh.
Proper Use and Disposal of Waste to Avoid Damage
Using your Insinkerator garbage disposal correctly is essential for its long-term functionality and durability. Follow these best practices to avoid any potential damage:
- Avoid putting non-food items, large bones, or fibrous materials like banana peels into the disposal.
- Cut larger food waste into smaller pieces to make the grinding process more efficient.
- Dispose of waste gradually, rather than in large amounts, to prevent overwhelming the unit.
- Keep fatty or greasy substances away from the disposal, as they can cause clogs.
By adhering to proper waste usage and disposal techniques, you can maintain the efficiency and longevity of your Insinkerator garbage disposal.
Safety Precautions When Working with Electricity and Plumbing
It is crucial to prioritize safety when working with electricity and plumbing during the installation and maintenance of your Insinkerator garbage disposal. Follow these precautions:
- Before starting any work, ensure that the power to the disposal unit is turned off and the corresponding circuit breaker is deactivated.
- When connecting or disconnecting the disposal, use insulated gloves to protect yourself from electrical shock.
- Double-check that all connections are secure and leak-free before restoring power to the unit.
- If you encounter any plumbing issues during installation or maintenance, it is advisable to consult a professional plumber.
By taking these necessary safety precautions, you can confidently work on your Insinkerator garbage disposal without compromising your well-being or causing any damage to your plumbing or electrical systems.
Remember, regular maintenance, proper waste disposal, and safety measures are essential for the optimal performance and longevity of your Insinkerator garbage disposal. By following these tips, you can ensure a smooth and trouble-free experience with your disposal unit.
Troubleshooting Common Problems
Installing an Insinkerator garbage disposal can be a convenient addition to your kitchen. However, like any other appliance, you may encounter some common problems along the way. In this section, we will discuss how to troubleshoot these issues effortlessly, so you can enjoy the benefits of your garbage disposal without any hassle.
How to fix a jammed disposal unit
A jammed disposal unit can be frustrating but don’t worry, it can be easily fixed. Here’s a step-by-step guide to help you resolve this problem:
- First, make sure the disposal unit is turned off and unplugged from the power source to avoid any accidents. Safety always comes first.
- Locate the manually-operated Allen wrench provided by the Insinkerator. Insert it into the opening at the bottom of the disposal unit.
- Gently move the wrench back and forth in a 360-degree motion to dislodge any obstruction that may be causing the jam.
- Once the obstruction is cleared, remove the wrench and plug the unit back into the power source.
- Finally, turn on the disposal unit and test it to ensure it is working properly.
Following these steps should fix the jammed disposal unit and restore it to normal functionality.
Dealing with foul odors
Foul odors emanating from your garbage disposal can be unpleasant and unwanted. To get rid of these odors, try the following remedies:
- Turn off the disposal unit and unplug it from the power source.
- Pour a mixture of equal parts of white vinegar and warm water down the disposal.
- Let the vinegar and water mixture sit in the disposal for about 15 minutes to eliminate any lingering odors.
- After 15 minutes, turn on the cold water faucet and run it for a few seconds to flush out the vinegar and water mixture.
- Next, plug the disposal back into the power source and turn it on for a few seconds to ensure the odors are completely gone.
By following these simple steps, you can effectively tackle foul odors and keep your kitchen smelling fresh and clean.
Repairing leaks in the connections
If you notice leaks in the connections of your Insinkerator garbage disposal, it’s crucial to address them promptly to avoid further damage. Follow these steps to repair leaks:
- Begin by turning off the disposal unit and unplugging it from the power source.
- Inspect the connections to identify the source of the leak. Check the pipe connections, the mounting bracket, and the sink flange.
- If you find any loose connections, tighten them using an adjustable wrench or pliers.
- If the connections are damaged or faulty, you may need to replace the faulty parts. It is recommended to consult the Insinkerator user manual or contact their customer support for guidance in finding the appropriate replacement parts.
- Once the connections are secure, plug the disposal back into the power source and turn it on to ensure there are no more leaks.
By following these steps, you can effectively repair leaks in the connections of your Insinkerator garbage disposal and prevent any further issues.
Frequently Asked Questions Of How To Install A Insinkerator Garbage Disposal
Can I Install An Insinkerator Myself?
Yes, you can install an InSinkErator yourself. Just follow the provided guidelines and instructions carefully. Ensure that you have the necessary tools and plumbing knowledge. Installing it correctly will save you money and time. However, if you are unsure or uncomfortable, it’s best to hire a professional plumber.
Is An Insinkerator Easy To Install?
Yes, an InSinkErator is easy to install. Its installation process is simple and straightforward.
How Long Does It Take To Install An Insinkerator?
Installing an InSinkErator usually takes around 1 to 2 hours.
How Do You Install An Insinkerator Lift And Latch?
To install an InSinkErator lift and latch, follow these steps:
1. Turn off electrical power and disconnect plumbing connections.
2. Remove existing disposal and mounting assembly.
3. Align the new lift and latch assembly with the sink opening.
4. Secure the assembly with the provided hardware and tighten the screws.
5. Reconnect plumbing and electrical connections, and test the disposal for proper functionality.
Conclusion
Installing an Insinkerator garbage disposal is a straightforward process that can greatly enhance the functionality of your kitchen. By following the step-by-step instructions provided in this blog post, you can easily install your new garbage disposal with ease. Remember to read the manufacturer’s manual and take all necessary safety precautions.
With your new garbage disposal in place, you’ll be able to efficiently dispose of food waste and keep your kitchen clean and odor-free. Happy installing!