To install a gas hot water heater, turn off the gas supply, drain the tank, disconnect the old heater, connect the new heater, test for leaks, and ignite the pilot light. Welcome to our comprehensive guide on how to install a gas hot water heater.
Whether you’re replacing an old unit or installing a new one, this step-by-step process will help you navigate the installation with ease. We’ll walk you through the necessary steps, from shutting off the gas supply to ensuring proper connections and testing for leaks.
By the end, you’ll have a fully operational gas hot water heater ready to provide you with a constant supply of hot water. So let’s jump right in and get started on this important home improvement project.
Choosing The Right Hot Water Heater Gas Model
When it comes to installing a hot water heater gas, choosing the right model is crucial. With so many options available, you need to consider various factors to ensure you make the best choice for your needs. In this section, we will discuss important factors to consider when choosing a hot water heater gas model, including determining the required size and capacity, considering energy efficiency ratings, and assessing the available space for installation.
Determining the required size and capacity
Before purchasing a hot water heater gas, it is essential to determine the required size and capacity. This depends on the number of people in your household and your usage patterns. To ensure an adequate supply of hot water, it is important to choose a heater that can provide enough gallons per minute (GPM) based on your needs. Here’s a simple guide to help you calculate:
- For 1-2 people: A heater with a capacity of 30-40 gallons and a GPM of 5-7 is usually sufficient.
- For 3-4 people: A heater with a capacity of 40-50 gallons and a GPM of 7-9 is generally recommended.
- For 5 or more people: A heater with a capacity of 50+ gallons and a GPM of 9+ is usually necessary.
Considering energy efficiency ratings
When choosing a hot water heater gas model, it is important to consider its energy efficiency ratings. Energy-efficient heaters can help you save money on your utility bills and minimize your environmental impact. Look for models that are ENERGY STAR certified, as they meet strict efficiency guidelines set by the Environmental Protection Agency (EPA). These heaters generally have higher Energy Factor (EF) ratings, indicating greater efficiency.
Assessing the available space for installation
Another crucial factor to consider when choosing a hot water heater gas model is the available space for installation. You need to ensure that the heater you choose fits properly in the designated area. Measure the height, width, and depth of the space to determine the maximum size that will fit comfortably. Additionally, consider any ventilation requirements for the heater, as proper ventilation is essential for safe operation.
By considering factors such as size and capacity, energy efficiency ratings, and available space, you can choose the right hot water heater gas model that meets your needs and ensures efficient and reliable hot water supply. Let’s now move on to the installation process, where we will guide you on how to install your chosen hot water heater gas model.
Gathering The Required Tools And Materials
Before you begin the installation process for your hot water heater gas, it’s crucial to gather all the necessary tools and materials. By having everything readily available, you can ensure a smooth and efficient installation process. In this section, we will list down the required tools and materials you’ll need to successfully complete your installation.
List of necessary tools for installation
To make your installation process easier, here is a comprehensive list of tools you’ll need:
- Adjustable wrench
- Pipe wrench
- Plumber’s tape
- Screwdrivers (both flathead and Phillips head)
- Tubing cutter
- Measuring tape
- Torch kit
- Flux paste
- Bucket
Ensure that you have all these tools handy before you begin the installation process. This will save you time and prevent delays during the installation.
Required materials and components for connecting to the gas supply
In addition to the tools, there are specific materials and components you’ll need to connect your hot water heater to the gas supply. Here’s a comprehensive list:
| Materials | Components |
|---|---|
| Gas flex line | Gas valve |
| Teflon tape | Sediment trap |
| Fittings | Gas shut-off valve |
| Flame arrestor | Pipe sealant |
| Safety valve |
Make sure you have these materials and components ready in order to connect your hot water heater to the gas supply successfully.
Gathering the required tools and materials is an essential step in installing a gas hot water heater. By being prepared, you can ensure a smoother and more efficient installation process. In the next section, we will move on to the actual installation steps, so let’s get started!
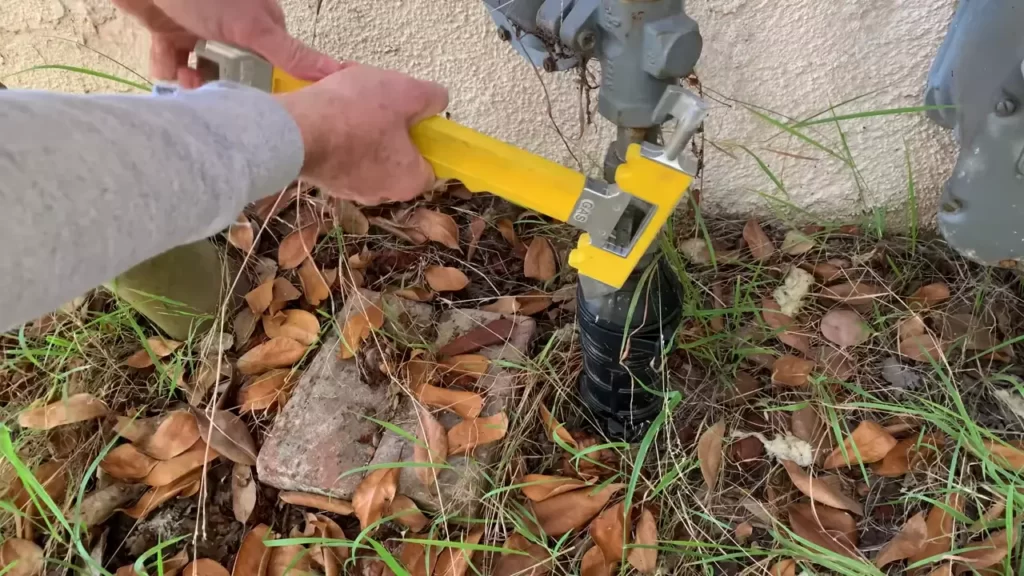
Turning Off The Gas Supply
When installing a hot water heater gas, one of the crucial steps is turning off the gas supply. This step ensures safety and prevents any accidents or gas leaks during the installation process. By following these steps, you can confidently proceed with the installation while minimizing any potential risks. The process involves shutting off the main gas valve and checking for any residual gas in the lines. Here’s how to do it:
Shutting off the main gas valve
The first step in turning off the gas supply is to locate and shut off the main gas valve. This valve is typically found near the gas meter or propane tank. It’s crucial to familiarize yourself with the location of this valve before attempting to install the hot water heater gas. Once you’ve located the valve, follow these steps:
- Locate the handle or lever attached to the main gas valve.
- Turn the handle or lever 90 degrees clockwise to shut off the gas supply.
- Ensure the handle or lever is perpendicular to the gas pipe, indicating that the valve is fully closed.
By shutting off the main gas valve, you effectively cut off the gas flow to your hot water heater gas, keeping you safe during the installation process.
Checking for any residual gas in the lines
After shutting off the main gas valve, it’s essential to check for any residual gas in the lines to prevent any potential hazards. Here’s how to ensure the lines are clear:
- Ensure all gas appliances, including the hot water heater, are turned off.
- Open any windows or doors to ventilate the area.
- Leave the gas supply turned off for a few minutes to allow any remaining gas to dissipate.
- Once sufficient time has passed, use a gas leak detector or a mixture of soapy water to check for any gas leaks.
- If you detect any gas leaks, do not proceed with the installation and contact a professional plumber immediately.
By thoroughly checking for any residual gas in the lines, you can ensure a safe and smooth installation process for your hot water heater gas.
Remember, turning off the gas supply is a crucial step when installing a hot water heater gas. By properly shutting off the main gas valve and checking for any residual gas in the lines, you can proceed with the installation confidently, prioritizing safety throughout the process. Following these steps will help you successfully replace or install a hot water heater gas.
Disabling The Electricity
Before you begin installing a hot water heater gas, it’s crucial to disable the electricity supply to the unit. This step is vital for your safety and to avoid any electrical mishaps during the installation process. By following the instructions below, you can ensure that there is no electrical supply to the unit, giving you peace of mind as you proceed with the installation.
Turning off the circuit breaker for the water heater
The first step in disabling the electricity for your hot water heater gas is to turn off the circuit breaker that powers it. This breaker is usually located in your electrical panel or fuse box. Follow these steps:
- Locate your electrical panel or fuse box in your home.
- Open the panel cover to access the breakers or fuses.
- Look for the breaker that controls your water heater. It is typically labeled.
- Switch off the breaker by pushing it to the “Off” position.
Double-check to ensure that the breaker is indeed switched off. You can do this by looking for the indicator on the breaker or by checking if the water heater is still receiving power. If the water heater is still on, repeat the steps to turn off the breaker properly.
Ensuring there is no electrical supply to the unit
Simply turning off the circuit breaker is not enough. You must also ensure that there is no electrical supply to the hot water heater gas unit. Follow these steps:
- Inspect the water heater to locate the power supply conduit or electrical wires.
- Trace the conduit or wires back to the electrical panel or fuse box.
- Disconnect the power supply conduit or wires from the water heater unit.
- Securely cap or tape off the exposed wires to prevent any accidental contact.
By disconnecting and securing the power supply conduit or wires, you can be confident that there is no electrical supply to the hot water heater gas unit.
Remember, safety should always be a priority when installing any gas appliance, and taking the time to disable the electricity is an essential step in the process. By following the instructions above, you can ensure a smooth and safe installation of your hot water heater gas.
Ventilation And Airflow
Proper ventilation and airflow are crucial when installing a gas hot water heater. This ensures the safe and efficient operation of the appliance and prevents the build-up of harmful gases, such as carbon monoxide. In this section, we will discuss how to check existing ventilation systems and ensure proper airflow for the new water heater.
Checking Existing Ventilation Systems
The first step is to inspect the existing ventilation systems in your home. This includes any vents or flues connected to other gas appliances, such as furnaces or stoves. It is essential to ensure that these systems are in good condition and able to handle the increased airflow required by the new water heater.
If you notice any signs of damage, such as cracks, gaps, or rust, it is crucial to repair or replace these components before installing the new water heater. Damaged ventilation systems can lead to improper airflow and potentially hazardous conditions.
Ensuring Proper Airflow for the New Water Heater
Once you have checked the existing ventilation systems, it’s time to focus on ensuring proper airflow for the new water heater. Here are a few steps you can follow:
- Clear the Area: Before installing the water heater, make sure the area around it is clear of any obstructions. This includes removing any debris or storage items that might block the airflow.
- Provide Adequate Space: The new water heater should have sufficient space around it to allow for proper ventilation. Check the manufacturer’s guidelines for the recommended clearance distances.
- Install Ventilation Pipes: Connect the water heater’s ventilation pipe to the flue or vent system. Ensure that the pipe is securely connected and properly sealed to prevent any leaks.
- Position the Exhaust Flue: The exhaust flue should be properly positioned to expel combustion gases outside. Make sure it’s directed away from any windows, doors, or areas where people gather.
- Test the Airflow: After installation, it’s important to test the airflow to ensure everything is functioning correctly. This can be done using a smoke pencil or a simple piece of tissue paper. Hold it near the vent or flue while the water heater is running, and check if the smoke or paper is drawn into the vent. If not, there may be an airflow issue that needs to be addressed.
By following these steps, you can ensure proper ventilation and airflow for your new gas hot water heater. This not only enhances the performance and efficiency of the appliance but also promotes a safe environment for you and your family.
Draining The Old Water Heater
Draining the old water heater is an essential step when installing a hot water heater gas. It not only helps in removing any sediment or debris that may have accumulated over time, but it also ensures a clean and smooth start for the new water heater. This process requires a few simple steps that can be easily done by following these instructions.
Turning off the water supply and opening the drain valve
Before draining the old water heater, you need to turn off the water supply to avoid any water flow. Locate the shut-off valve connected to the water heater and turn it clockwise until it is fully closed. This will prevent any new water from entering the tank.
Once the water supply is successfully turned off, it is time to open the drain valve. Position a bucket or a hose below the drain valve to collect the water that will be released. Using a wrench or pliers, rotate the drain valve counterclockwise until it is fully open. It might take a few minutes for the water to start flowing, so be patient.
Emptying the tank completely
Now that the drain valve is open, the old water heater will start emptying. Leave the water heater for a while or until the water stops flowing completely. Take note that the water might still be hot, so avoid any direct contact with it to prevent burns or injuries.
Ensure that the tank is fully emptied of water before proceeding with the installation. The draining process helps remove any sediment or debris that may have settled at the bottom of the tank, thereby ensuring optimal performance and longevity of your new hot water heater gas.
Once the tank is completely emptied, you can proceed with the installation of your new hot water heater gas. Remember to follow the manufacturer’s instructions and safety guidelines throughout the installation process.
Summary:
- Turning off the water supply by closing the shut-off valve connected to the water heater is the first step in draining the old water heater.
- Opening the drain valve counterclockwise allows the water to flow out of the tank. Position a bucket or hose below the drain valve to collect the water.
- Wait until the tank is fully emptied and the water stops flowing to ensure all water is removed.
- Emptying the tank completely removes any sediment or debris, preparing it for the installation of the new hot water heater gas.
By thoroughly draining the old water heater, you are setting the stage for a successful installation of your new hot water heater gas. This process ensures that your new water heater functions optimally and provides reliable hot water for your household needs.
Disconnecting The Existing Gas Supply
Closing the gas control valve
Before starting the process of disconnecting the existing gas supply to your hot water heater, it is crucial to ensure your safety. The first step is to locate the gas control valve, typically positioned near the bottom of the water heater. To close the gas control valve, follow these simple steps:
- Identify the lever or knob on the gas control valve.
- Gently turn the lever or knob clockwise until it stops. This effectively shuts off the gas supply to the water heater.
- Check that the gas control valve is firmly closed by visually confirming that the lever or knob is perpendicular to the gas supply line.
By closing the gas control valve, you are preventing any gas flow to the water heater during the disconnection process. This preserves your safety and prevents any potential gas leaks.
Detaching the gas supply line from the old water heater
Once the gas control valve is closed, you can proceed to detach the gas supply line from the old water heater. This process requires careful attention to detail. Follow the steps below:
- Wear protective gloves and goggles to safeguard yourself.
- Inspect the gas supply line connection to the water heater. It will be secured with a union nut.
- Using an adjustable wrench, turn the union nut counterclockwise to loosen it. Ensure you have a firm grip on the wrench to avoid damaging the gas supply line.
- Once the union nut is loose, carefully detach the line from the water heater.
- It is advisable to have a bucket or drip pan underneath the gas supply line to catch any residual water or gas that may escape upon disconnection.
- Inspect the gas line for any obvious signs of damage or wear. If you notice any issues, it is recommended to have a professional plumber assess and repair it before proceeding with the installation.
By diligently following these steps, you can safely disconnect the existing gas supply from your old water heater. This allows you to proceed with the installation of your new hot water heater gas unit with confidence.
Removing The Old Water Heater
Before installing a new hot water heater gas, it’s important to remove the old one safely and efficiently. In this section, we will discuss the necessary steps to disconnect the water supply lines and move the old water heater out of the way. Follow these guidelines carefully to ensure a smooth transition and make way for your new hot water heater gas installation.
Disconnecting the Water Supply Lines
To begin, we need to disconnect the water supply lines from the old water heater. This step requires caution and proper handling to avoid any water leakage or damage:
- Turn off the gas supply to the water heater. Locate the gas control valve and turn it to the “off” position.
- Next, you’ll want to turn off the water supply to the heater. Locate the water shut-off valve and turn it clockwise until it is fully closed.
- Attach a hose to the drain valve of the heater. It’s important to direct the other end of the hose to a suitable drainage area to avoid any water spillage.
- Open the drain valve to release any remaining water from the old heater. Make sure to let all the water drain completely.
- Using a wrench, carefully disconnect the water supply lines from the heater. You may need to use a little force to loosen the connections.
- Once the water supply lines are disconnected, ensure that you cap any exposed pipes to prevent any leakage during the installation process.
Safely Moving the Old Water Heater Out of the Way
Now that the water supply lines are disconnected, it’s time to safely move the old water heater out of the way. Follow these steps to ensure a smooth and accident-free removal:
- Ensure you have enough space to safely maneuver the old water heater. Clear any obstacles and create a clear path for the removal process.
- If the heater is in a tight or enclosed space, use a dolly or a hand truck to carefully transport it. Secure the heater to the dolly or hand truck to avoid any accidents or damage.
- Slowly and steadily roll the dolly or hand truck away from the installation area. Take caution to not tip over or damage the heater during the process.
- Once you have moved the old water heater to a suitable location, ensure it is placed on a stable and level surface to prevent any accidents or damage.
By following these steps, you can safely remove the old water heater and make way for the installation of your new hot water heater gas. Remember to always prioritize safety, and if you are unsure about any step in the process, it is recommended to consult a professional to avoid any potential hazards.
Preparing The Installation Area
1. Clearing space for the new water heater
Before installing a hot water heater gas, it is important to prepare the installation area. Clearing space for the new water heater is the first step in this process. This involves identifying an appropriate location for the water heater and ensuring there is enough clearance around it. Here are some key considerations:
- Choose a location that is close to your gas supply and water lines.
- Ensure there is adequate ventilation in the area to allow for proper combustion and venting of exhaust gases.
- Clear any obstructions that may prevent easy access to the water heater for installation and future maintenance.
By clearing the space for the new water heater, you will create a safe and accessible area for the installation process.
2. Leveling the area and ensuring stability
Once you have cleared the space, the next step is to level the area and ensure the stability of the installation. This is crucial for the proper functioning and longevity of the water heater. Here’s what you need to do:
- Use a level to check if the floor is even. If it’s not, you may need to make adjustments by adding shims or leveling the floor.
- Ensure that the area is free from any debris or objects that could potentially cause instability or damage to the water heater.
- If necessary, consider installing a platform or base to provide additional support and stability for the water heater.
By leveling the area and ensuring stability, you can prevent any issues that may arise from an uneven installation surface. This will help maintain the efficiency and proper functioning of your hot water heater gas.
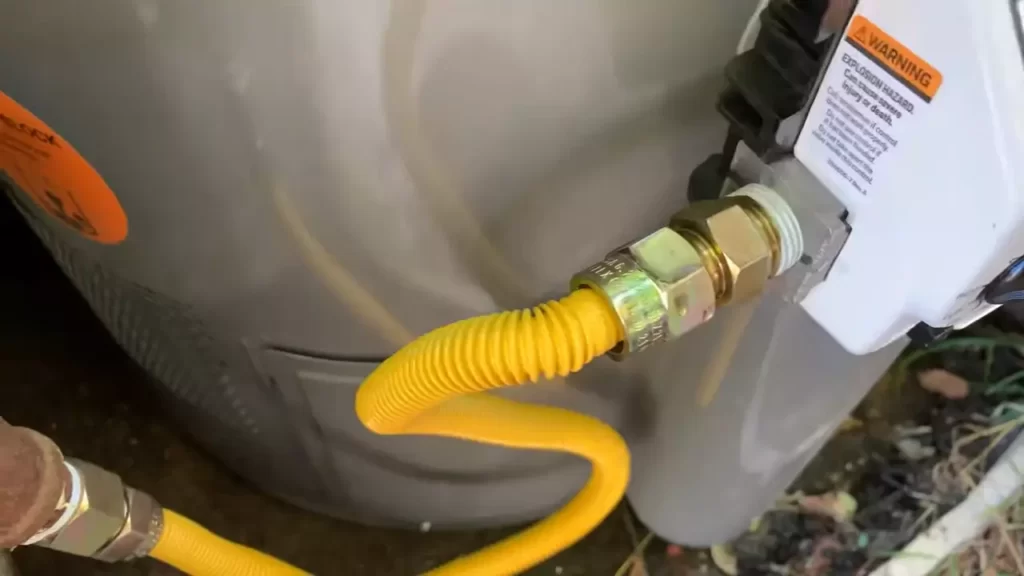
Connecting The Gas Supply Line
Connecting the gas supply line is a crucial step in ensuring that your hot water heater functions safely and efficiently. It involves selecting the correct size and type of gas flex line, and properly attaching it to both the water heater and the gas supply. By following these guidelines, you can complete the installation with confidence.
Choosing the Correct Size and Type of Gas Flex Line
When selecting a gas flex line for your hot water heater, it is important to consider both the size and type of the line. The size of the flex line refers to its diameter, which determines the volume of gas it can handle. It is crucial to choose a flex line with the correct diameter that matches the gas supply line and the water heater’s requirements. Refer to the manufacturer’s instructions or consult a professional to determine the appropriate size.
Additionally, the type of gas flex line you choose is also essential. It must be approved for use with natural gas or propane, depending on your water heater’s fuel source. Check the product specifications to ensure compatibility and safety.
Properly Attaching the Flex Line to the Water Heater and the Gas Supply
Once you have chosen the correct size and type of gas flex line, it is important to properly attach it to both the hot water heater and the gas supply.
- Start by ensuring that both the gas supply and the water heater valves are turned off.
- Using an adjustable wrench, carefully thread one end of the flex line onto the gas supply pipe. Make sure it is securely tightened, but be cautious not to overtighten and risk damaging the threads.
- Next, attach the other end of the flex line to the gas supply port on the water heater. Again, ensure it is tightened securely but not excessively.
- To ensure a proper connection, apply a solution of soapy water to the threaded connections. This will help you identify any gas leaks, as bubbles will form if there is a problem.
- If you notice any leaks, immediately turn off the gas supply and seek professional assistance. Do not attempt to fix gas leaks yourself.
- Once you have confirmed that there are no leaks, you can proceed with the rest of the hot water heater installation process.
By following these steps, you can effectively connect the gas supply line of your hot water heater, ensuring a safe and reliable installation. Remember to always prioritize safety and consult a professional if you have any concerns or difficulties.
Installing The New Water Heater
Installing the new water heater is a crucial step in ensuring efficient and reliable hot water supply in your home. By carefully positioning the water heater in the designated area and aligning and connecting the water supply lines, you can ensure a smooth installation process. In this section, we will guide you through each step, providing clear instructions to help you install your gas hot water heater without any hassle.
Positioning the water heater in the designated area
To begin the installation process, it is important to position the water heater in the designated area. Follow the steps below:
- Choose a suitable location: Select a well-ventilated area near a gas supply line and a flue for proper exhaust.
- Clear the area: Remove any obstacles or clutter to make space for the water heater.
- Place a platform: Use a sturdy platform or stand to elevate the water heater, ensuring stability and easy access for maintenance.
- Check the clearances: Refer to the manufacturer’s guidelines to determine the required clearances around the water heater. This ensures safety and proper operation.
- Secure the water heater: Once positioned correctly, secure the water heater to the platform using straps or brackets, as recommended by the manufacturer.
Aligning and connecting the water supply lines
The next step is aligning and connecting the water supply lines. Follow these instructions:
- Shut off the water supply: Locate the main water shut-off valve and turn it off to stop the flow of water.
- Drain the old water heater: Attach a hose to the drain valve of the old water heater and direct the other end to a suitable drainage location. Open the valve to release any remaining water.
- Disconnect the old water heater: Carefully disconnect the water supply lines and gas line from the old water heater.
- Attach the water lines: Use new, flexible water supply lines to connect the cold-water inlet and hot-water outlet pipes to the new water heater. Ensure a tight connection using pipe wrenches or adjustable pliers.
- Check for leaks: Once the water lines are connected, turn on the main water supply and inspect the connections for any leaks. Repair or tighten as necessary.
By following these steps, you can successfully install your gas hot water heater. Remember to consult the manufacturer’s instructions for specific details and safety precautions. In the next section, we will cover the important steps for connecting the gas supply and testing the water heater to ensure seamless operation.
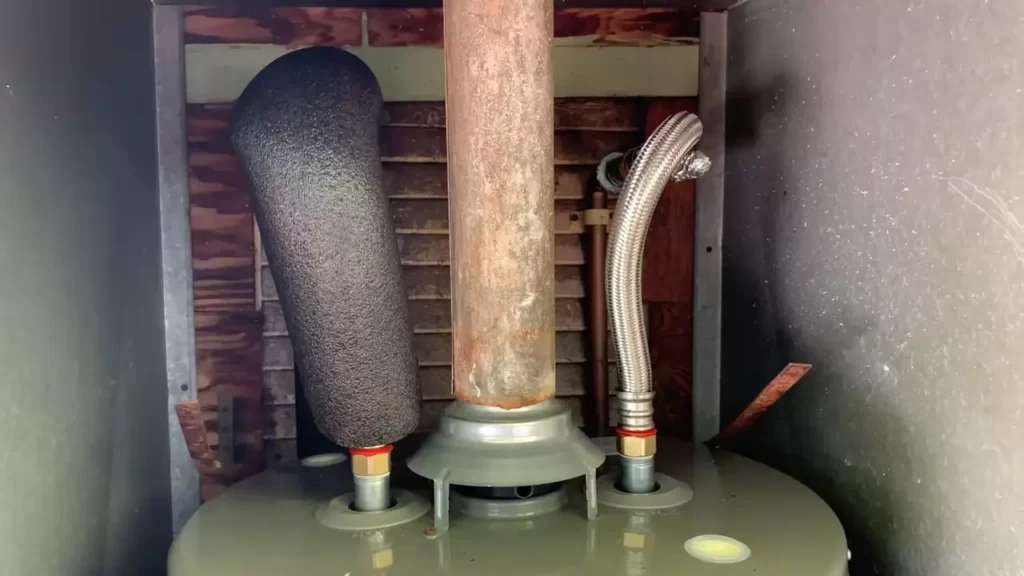
Venting The Water Heater
Checking the manufacturer’s specifications for proper venting
Before you begin installing a hot water heater gas, it is crucial to check the manufacturer’s specifications for the proper venting requirements. Each hot water heater comes with specific guidelines for venting, which must be followed to ensure safe and efficient operation. Ignoring these specifications can result in potential hazards such as carbon monoxide leaks or insufficient ventilation, which can lead to damage to both the water heater and your health.
Installing the required vent pipe and ensuring proper ventilation
Once you have familiarized yourself with the manufacturer’s specifications, it’s time to install the required vent pipe and ensure proper ventilation for your gas water heater. Vent pipes are designed to carry exhaust gases and moisture out of the house, preventing any build-up of harmful gases and allowing fresh air to enter.
To install the vent pipe correctly, follow these steps:
- Measure the distance from the top of the water heater to the point where the vent pipe will exit your home. This measurement will help you determine the length of the vent pipe you need to purchase.
- Choose a vent pipe material that meets local building codes and the manufacturer’s specifications. Generally, vent pipes can be made of materials such as galvanized steel, stainless steel, or PVC (if allowed by local codes).
- Connect the vent pipe to the water heater’s draft hood or flue collar using appropriate connectors or adapters. Ensure a secure fit to prevent any leaks.
- Extend the vent pipe vertically through the roof or horizontally through an exterior wall, following the manufacturer’s guidelines. Use the appropriate supports to anchor the pipe and ensure it stays in place.
- Seal any gaps or joints in the vent pipe with high-temperature silicone caulk to prevent any gas leaks.
- Install a vent cap at the termination point to prevent rain or debris from entering the vent pipe. Ensure the cap is securely in place but allows for proper airflow.
Proper ventilation is essential for efficient operation and safety. Here are a few tips to ensure adequate ventilation:
- Ensure the vent pipe is not blocked or obstructed by any objects, such as insulation or debris.
- Regularly inspect the vent pipe for any signs of damage or corrosion, and promptly repair or replace any compromised sections.
- Keep the area around the water heater clear of any flammable materials that could impede proper ventilation.
- Regularly clean the vent cap and remove any accumulated debris or blockages.
By following these steps and adhering to the manufacturer’s specifications, you can ensure the proper venting of your hot water heater gas, promoting a safe and efficient operation for years to come.
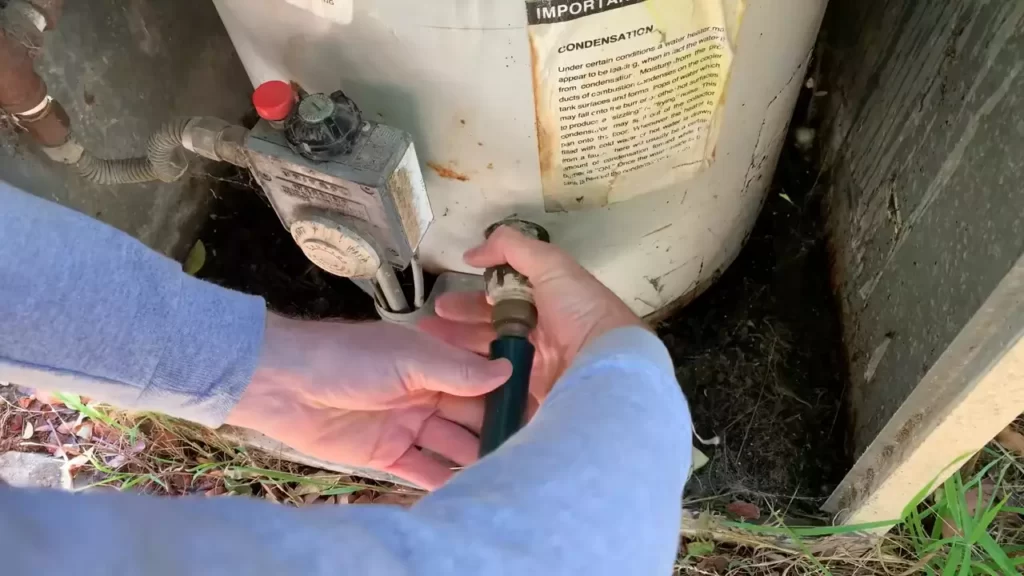
Checking For Gas Leaks
When it comes to installing a hot water heater gas, it is crucial to ensure that there are no gas leaks that could potentially be hazardous. Checking for gas leaks is an important step that should never be overlooked during the installation process. Here, we will explore two effective methods for checking gas leaks: using a gas leak detector and a soapy water solution. Additionally, we will discuss inspecting all connections for any signs of leaks.
Using a Gas Leak Detector or Soapy Water Solution
To check for gas leaks, you can readily use a gas leak detector or a simple soapy water solution. Here’s how to implement both methods:
1. Gas Leak Detector:
– Before you begin, make sure the gas valve is closed to prevent any potential accidents.
– With the gas valve closed, turn on the gas supply and carefully scan the area around the connections and fittings.
– The gas leak detector will emit an audible or visual alarm if it detects any traces of leaking gas.
– If you come across a gas leak, immediately turn off the gas supply and rectify the issue before proceeding with the installation.
2. Soapy Water Solution:
– Create a solution by mixing liquid dish soap with water in a spray bottle.
– Once the gas supply is closed, gently spray the soapy water solution onto all the connections and fittings.
– Observe the area closely and look for any signs of bubbling or foaming.
– If you notice bubbling or foaming, it indicates a gas leak.
– In such a case, turn off the gas supply and address the leaking connection before proceeding further.
Inspecting All Connections for Any Signs of Leaks
Apart from utilizing a gas leak detector or soapy water solution, it is crucial to visually inspect all connections for any signs of leaks. Here’s what you need to do:
1. Inspect all Connections:
– While wearing protective gloves, carefully examine each connection point, including the gas valve, gas line, and fittings.
– Visually check for any loose connections, damaged pipes, or signs of corrosion.
– Ensure that all connections are secure and tightly fitted.
– If you notice any abnormalities or suspect a potential leak, consult a professional plumber to rectify the issue promptly.
2. Testing with a Gas Leak Detector:
– As an additional precautionary measure, you can also test each connection individually with a gas leak detector.
– Simply bring the gas leak detector close to the connection point and observe if it detects any leaking gas.
– If there is any indication of a gas leak, follow the necessary steps to fix the issue before proceeding with the installation.
By following these steps and performing thorough checks, you can ensure that your hot water heater gas installation is free from any gas leaks. Remember, safety should always be a top priority.
Filling And Testing The Water Heater
Now that you have successfully installed the gas hot water heater, it’s time to move on to the crucial step of filling and testing the water heater. This step ensures that the tank is properly filled and functioning optimally, providing you with hot water when you need it. In this section, we will cover the two important steps: turning on the water supply and filling the tank and checking for proper functioning and temperature regulation.
Turning on the water supply and filling the tank
The first step in this process is to turn on the water supply and fill the tank. Follow these simple steps to ensure a smooth and efficient filling of your hot water heater:
- Locate the cold water supply valve, which is typically located near the top of the water heater. In some cases, it may be a lever-type valve that needs to be turned on.
- Slowly open the cold water supply valve, allowing the tank to fill gradually. This prevents any potential damage to the tank or pipes.
- Keep an eye on the pressure relief valve during the filling process. As the tank fills, you may notice some water coming out of the relief valve. This is normal and helps release any excess pressure.
- Once the tank is full, close the cold water supply valve.
With these steps, you have successfully filled the tank of your hot water heater and set the stage for the next crucial step: checking its proper functioning.
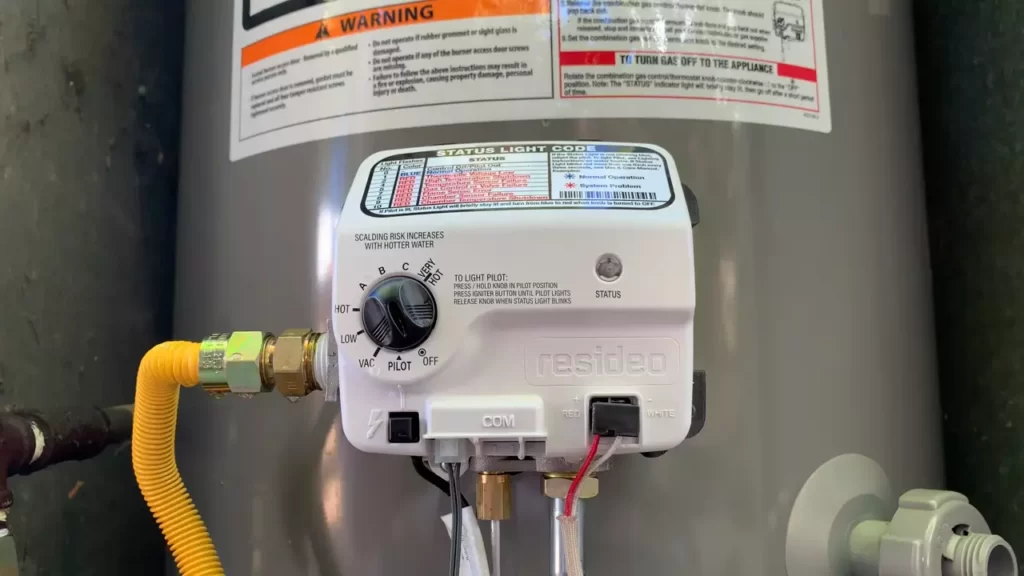
Checking for proper functioning and temperature regulation
After filling the tank, it’s essential to ensure that your hot water heater is functioning correctly and maintaining the desired temperature. Follow these steps to verify the proper functioning and temperature regulation of your hot water heater:
- Check for any leaks around the connections and valves. Start from the top and work your way down to the bottom, paying close attention to any signs of water leakage.
- Once you have inspected for leaks, turn on the gas supply to the water heater. Take caution and follow the manufacturer’s instructions for lighting the pilot light, if required.
- Allow the pilot light to ignite the burner. You should hear the burner kick in and observe the flame. Check if the flame appears blue and steady. If it’s yellow or flickering, there may be an issue with the gas mixture, and you should contact a professional for assistance.
- Next, adjust the temperature settings on the thermostat to your desired hot water temperature preference. Typically, a temperature between 120°F and 140°F is recommended for optimal energy efficiency and safety.
- Give the water heater some time to reach the desired temperature. Check the hot water faucet nearest to the water heater to ensure that the water is flowing and at the expected temperature. This step ensures that the water heater is supplying hot water effectively throughout your home.
By carefully following these steps, you can be confident that your gas hot water heater is filled, functioning properly, and ready to provide you with a constant supply of hot water. Remember, if you encounter any issues or have concerns about the installation or performance of your hot water heater, it’s always best to consult a professional plumber to ensure optimal safety and efficiency.
Adjusting The Gas Pressure And Temperature
When it comes to installing a hot water heater gas, it is crucial to properly adjust the gas pressure and temperature to ensure optimal operation. This step is essential for both the safety and efficiency of your new hot water heater. In this section, we will guide you through the process of setting the desired temperature on the gas control valve and adjusting the gas pressure if necessary.
Setting the desired temperature on the gas control valve:
- Locate the gas control valve on your hot water heater. It is usually located on the front or side of the unit.
- Carefully remove the cover from the gas control valve to access the temperature adjustment dial.
- The temperature dial is typically marked with temperature settings in degrees Fahrenheit. Use a flathead screwdriver or similar tool to turn the dial and set it to your desired temperature. Be sure to consult the manufacturer’s instructions for recommended temperature settings.
- Once you have set the desired temperature, replace the cover on the gas control valve.
Adjusting the gas pressure if necessary for optimal operation:
- Before adjusting the gas pressure, it is important to note that this task should be performed by a qualified professional. Gas pressure adjustments require specialized tools and knowledge to ensure safety.
- If you notice any issues with your hot water heater’s performance, such as fluctuating water temperatures or inadequate hot water supply, it may indicate a problem with the gas pressure.
- Contact a licensed plumber or gas technician to inspect your hot water heater and make the necessary adjustments to the gas pressure. They will use a manometer to measure the gas pressure and adjust it to the manufacturer’s specifications.
- It is essential to rely on a professional for this task to avoid safety hazards and ensure proper operation of your hot water heater.
By setting the desired temperature on the gas control valve and adjusting the gas pressure if needed, you can ensure that your hot water heater operates efficiently and provides you with the desired temperature for all your daily needs. Remember to always consult the manufacturer’s instructions and seek professional assistance when necessary to maintain safety and maximize the performance of your hot water heater.
Wrapping Up The Installation
Cleaning up the work area and disposing of any leftover materials
Now that you have successfully installed your hot water heater gas, it’s time to tidy up the work area and ensure that everything is properly cleaned and disposed of. This step is essential to maintain a safe and organized environment. Follow these simple guidelines to efficiently clean up after the installation:
1. Remove any tools, equipment, or debris:
- Clear the area of any tools, equipment, or materials used during the installation process. This includes pipes, fittings, tape, and packaging.
- Place these items in designated storage or dispose of them properly according to local waste management guidelines.
2. Sweep and vacuum the area:
- Start by sweeping the floor to remove any loose dirt, dust, or debris that may have accumulated while working.
- Use a vacuum cleaner to thoroughly clean the area, paying attention to corners and hard-to-reach spots.
3. Wipe down surfaces:
- Using a damp cloth or sponge, wipe down any surfaces that may have come into contact with dirt or dust during the installation process.
- Pay special attention to areas around the hot water heater gas, ensuring they are clean and free from any contaminants.
4. Dispose of leftover materials:
- Dispose of any leftover materials, such as packaging, old pipes, or fittings, in accordance with local waste management guidelines.
- Separate recyclable materials from non-recyclable items to minimize environmental impact.
Double-checking all connections and ensuring everything is properly secured
Before you finalize the installation process, it is crucial to double-check all connections and ensure that everything is properly secured. This step will help prevent leaks, improve efficiency, and enhance the overall performance of your hot water heater gas. Follow these steps to ensure a secure and reliable connection:
- Inspect all connections:
- Check all nuts, bolts, and fittings to ensure they are tightened properly.
- Examine the pipes for any signs of wear or damage.
- Test for leaks:
- By carefully observing the connections, check for any visible leaks.
- Apply a soapy water solution to identify any hidden leaks – if bubbles form, there is a leak that needs to be addressed.
- Secure the connections:
- If you find any loose connections or leaks, take appropriate measures to tighten or seal them.
- Use the appropriate tools, like a wrench or plumber’s tape, to secure the connections.
Remember, ensuring that all connections are secure and leak-free is vital to ensure the proper functioning and safety of your hot water heater gas. Take the time to conduct a thorough inspection before considering the installation complete.
Enjoying Efficient And Reliable Hot Water
BENEFITS OF PROPERLY INSTALLED GAS WATER HEATERS
Properly installing a gas water heater goes beyond just ensuring a smooth process. It actually offers a range of benefits that can enhance your overall experience of enjoying efficient and reliable hot water in your home.
Here are some key advantages that come with a correctly installed gas water heater:
- Energy Efficiency: One of the biggest benefits of a well-installed gas water heater is its energy efficiency. Gas heaters are known for their ability to quickly heat water, resulting in reduced energy consumption and lower utility bills. By opting for a gas water heater, you can enjoy hot water while minimizing your environmental impact and saving money in the long run.
- Rapid Heating: Gas-powered heaters have a distinct advantage when it comes to heating water quickly. Unlike electric heaters that may require some time to warm up, gas heaters provide near-instant heat, ensuring you have hot water at your disposal whenever you need it. Say goodbye to waiting around for your morning shower to warm up!
- Continuous Supply: With a properly installed gas water heater, you can enjoy a continuous supply of hot water. Gas heaters are designed to heat water as it flows through the system, meaning you won’t experience a sudden loss of hot water during long showers or while performing household chores.
- Reliability and Durability: Gas water heaters are known for their durability and long lifespan. When installed correctly, they can provide years of reliable hot water service without the need for frequent repairs or replacements. This means you can have peace of mind and save costs on maintenance in the long term.
TIPS FOR MAINTAINING AND PROLONGING THE LIFESPAN OF YOUR WATER HEATER
To ensure that your gas water heater continues to perform optimally and lasts for years to come, it’s essential to follow a few simple maintenance tips. By taking proactive measures, you can extend the lifespan of your water heater and avoid unexpected issues.
Consider these tips for maintaining and prolonging the lifespan of your gas water heater:
- Regular Inspection: Schedule periodic inspections of your water heater to check for signs of damage, leaks, or corrosion. This will help you catch any potential issues early on and address them promptly.
- Flushing the Tank: Sediment and mineral buildup can reduce the efficiency of your water heater. Regularly flushing the tank helps remove these deposits, ensuring that your water heater operates at its optimal performance level.
- Adjusting the Temperature: Consider lowering the temperature setting on your water heater to conserve energy and reduce wear and tear on the appliance. This can also help prevent scalding incidents and maintain a safe water temperature throughout your home.
- Insulating Exposed Pipes: Insulate any exposed hot water pipes to minimize heat loss during distribution. This will not only help maintain a higher water temperature but also save energy by reducing the need for excessive reheating.
By following these simple tips, you can ensure that your gas water heater remains efficient, reliable, and provides hot water whenever you need it, helping you make the most of your investment for years to come.
Frequently Asked Questions On How To Install A Hot Water Heater Gas
Is It Safe To Install A Gas Water Heater Yourself?
Installing a gas water heater yourself is not safe. It’s best to hire a professional plumber for installation to ensure proper safety measures are followed and to prevent potential hazards.
How To Install A Gas Hot Water Heater?
To install a gas hot water heater, follow these steps:
1. Turn off the gas and water supply.
2. Drain the old heater.
3. Connect the gas line and flue pipe to the new heater.
4. Attach the water supply pipes.
5. Ignite the pilot light. Remember to consult the installation manual for specific instructions.
How Long Does It Take To Install A 50-Gallon Gas Water Heater?
On average, it takes around 2-4 hours to install a 50-gallon gas water heater.
Why Does It Cost So Much To Install A Gas Water Heater?
Gas water heaters can be costly to install due to several factors. Firstly, the initial expense includes purchasing the heater itself, along with necessary materials and permits. Secondly, installation may require professional expertise to ensure proper venting, gas line connections, and safety measures.
Lastly, labor costs for installation can also contribute to the overall expense.
Conclusion
Installing a gas hot water heater may seem daunting at first, but with the right tools and knowledge, it can be a manageable DIY project. By following the steps outlined in this guide, you can ensure a safe and efficient installation process.
Remember to consult with a professional if you encounter any difficulties or have concerns about gas connections. Stay mindful of safety measures and enjoy the convenience of a reliable hot water supply in your home.