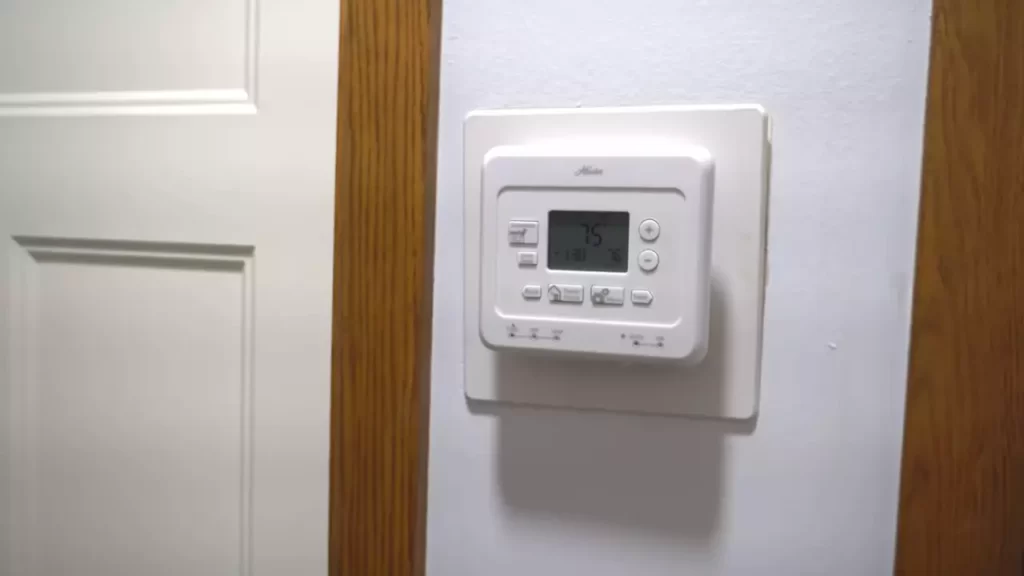
To install a Honeywell thermostat, follow these steps: Turn off the power, remove the old thermostat, install the new baseplate, connect the wires, attach the thermostat, and restore power. Introducing a Honeywell thermostat to your home offers control over heating and cooling while enhancing energy efficiency.
By replacing your old thermostat with a Honeywell model, you can optimize comfort and save on utility bills. In this guide, we provide a step-by-step explanation of how to install a Honeywell thermostat. By following these simple instructions, you can enjoy the benefits of a modern and efficient thermostat in no time.
From shutting off power to connecting the wiring and attaching the thermostat itself, this installation process is straightforward and user-friendly. Keep reading to discover the precise steps for installing a Honeywell thermostat.
Understanding The Honeywell Thermostat Model
When it comes to installing a Honeywell thermostat, it’s essential to have a clear understanding of the different models available. Each Honeywell thermostat model offers unique features and functionalities, catering to different needs and preferences. In this section, we will explore the key features of the Honeywell thermostat, as well as the various models available for installation.
Key Features of the Honeywell Thermostat
The Honeywell thermostat is packed with a range of features that make it a popular choice among homeowners. Whether you’re looking to improve energy efficiency, enhance comfort, or streamline your heating and cooling system, the Honeywell thermostat has you covered. Let’s dive into some of its key features:
- Programmable settings: The Honeywell thermostat allows you to set a program, so you can have different temperature settings throughout the day. This feature helps you save energy and ensures optimal comfort when you need it the most.
- Wi-Fi connectivity: With Wi-Fi connectivity, you can control your Honeywell thermostat remotely from your smartphone or tablet. This feature allows you to adjust the temperature settings even if you’re away from home, giving you ultimate control and convenience.
- Energy-saving mode: The energy-saving mode adjusts the temperature settings to save energy when you’re not at home. By reducing heating or cooling when you’re away, the Honeywell thermostat helps you cut down on utility costs without compromising comfort.
- Touchscreen display: Many Honeywell thermostat models come with a sleek touchscreen display, making it easy and intuitive to navigate through settings and make adjustments.
Different Models Available for Installation
Now that we’ve covered the key features, let’s explore the different models of Honeywell thermostats available for installation. Each model offers its own set of advantages and functions, ensuring there’s a perfect fit for every home:
- Honeywell Lyric T5: This model is an excellent entry-level option, offering programmable scheduling, energy-saving features, and compatibility with smart home systems.
- Honeywell T6 Pro: The T6 Pro is a versatile thermostat suitable for both residential and commercial use. It boasts Wi-Fi connectivity, voice control compatibility, and advanced settings for precise temperature management.
- Honeywell Home T9: The T9 is a top-of-the-line thermostat that excels in customization. It features room sensors for temperature monitoring and occupancy detection, ensuring optimal comfort in every space.
- Honeywell Home T10 Pro: The T10 Pro is designed for larger homes with multiple heating and cooling zones. This thermostat offers flexible scheduling, geofencing capabilities, and integration with voice assistants for seamless control.
Preparing For Installation
Before you can install your Honeywell thermostat, it’s crucial to make sure you have everything you need and create the right conditions for a successful installation. This section will guide you through gathering the necessary tools and materials, preparing the installation area, and switching off the power to your heating or cooling system.
Gathering the necessary tools and materials
To ensure a smooth installation process, gather the following tools and materials beforehand:
- Flathead screwdriver
- Phillips screwdriver
- Electrical tape
- Wire stripper
- Wire nuts
- Level
- Drill and drill bits (if required for your installation)
- Honeywell thermostat
- Honeywell thermostat manual
Preparing the installation area
Before you begin installing your Honeywell thermostat, it’s essential to prepare the installation area:
- Identify the location on the wall where you plan to mount the thermostat. Make sure it’s easily accessible and not obstructed by furniture or other objects.
- Remove any existing thermostat from the wall and disconnect the wires if necessary. Keep track of how the wires were connected for reference.
- Ensure the wall surface is clean and free from dust or debris. A clean surface will help the thermostat adhere properly and provide accurate readings.
- Using a level, ensure the surface is even and straight. A level installation will prevent any operational issues and ensure optimal performance.
Switching off power to the heating or cooling system
Before you start working on the wiring of your Honeywell thermostat, it’s important to switch off the power to your heating or cooling system. This step will ensure your safety and prevent any electrical mishaps. Here’s how you can do it:
- Locate the circuit breaker box in your house. It is usually found in the basement, garage, or utility room.
- Identify the circuit breaker that controls your heating or cooling system.
- Switch off the corresponding breaker by flipping it to the “off” position.
- Double-check that the power is indeed off by attempting to turn on your heating or cooling system. If it doesn’t turn on, the power is successfully switched off.
By following these steps, you’re now fully prepared to install your Honeywell thermostat with ease and confidence. In the next section, we will delve into the installation process itself, guiding you through every step in detail.
Removing The Old Thermostat
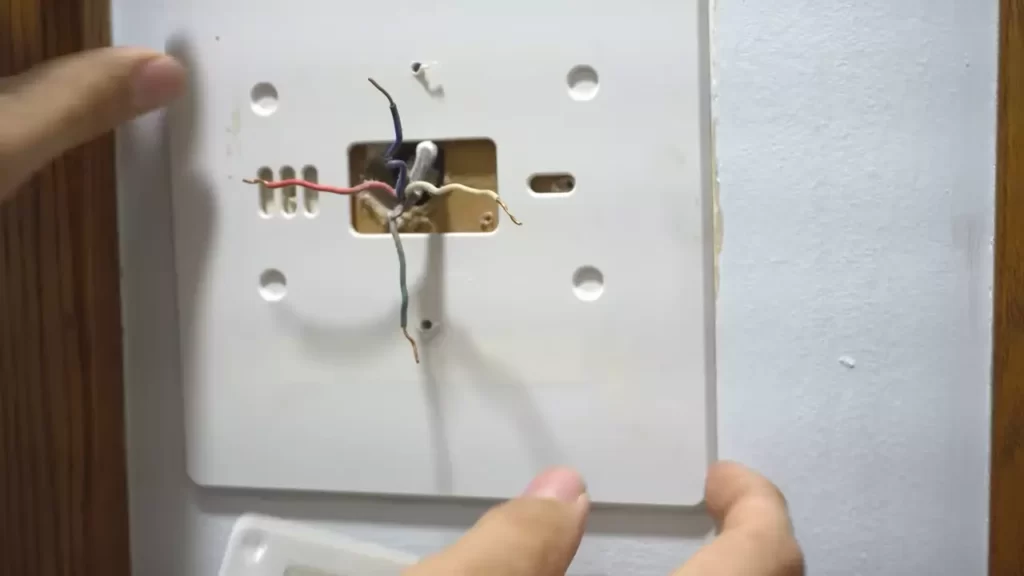
Understanding the existing thermostat wiring
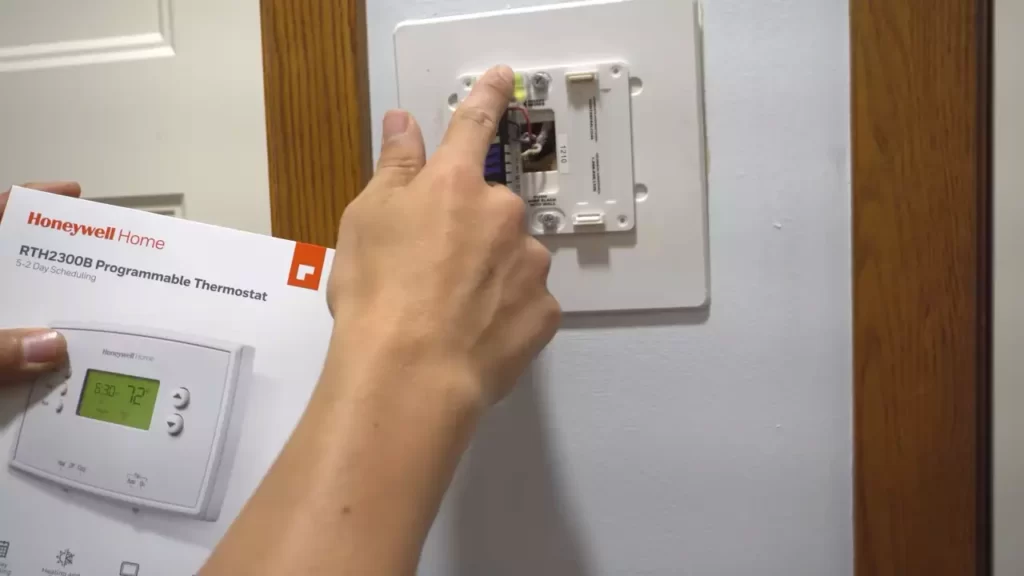
Before you can remove the old thermostat, it’s important to understand the existing thermostat wiring. This will make the installation of your new Honeywell thermostat much easier. Take a close look at the wiring to familiarize yourself with the different colored wires and where they are connected. Each wire serves a specific purpose and it’s crucial to correctly identify them before proceeding.
Disconnecting the wires from the old thermostat
Once you have a good understanding of the existing thermostat wiring, it’s time to disconnect the wires from the old thermostat. To do this, you’ll need a screwdriver to loosen the screws that are holding the wires in place. Take note of where each wire was connected, as this will be important when installing the new thermostat. Carefully remove each wire from its terminal, making sure not to damage the ends in the process.
Removing the old thermostat from the wall
With the wires disconnected, it’s now time to remove the old thermostat from the wall. Most thermostats are held in place by a few screws, so locate these screws and use a screwdriver to remove them. Once the screws are removed, gently pull the thermostat away from the wall. Be careful not to pull too hard, as there may still be some wires connected to the thermostat. Take your time and ensure you remove the thermostat cleanly without causing any damage to the wall.
If there are any remaining wires still connected to the old thermostat, carefully detach them from the thermostat and set them aside. These wires will no longer be needed with your new Honeywell thermostat.
Now that you have successfully removed the old thermostat, you’re one step closer to installing your new Honeywell thermostat. In the next section, we will walk you through the installation process to ensure a smooth and hassle-free transition.
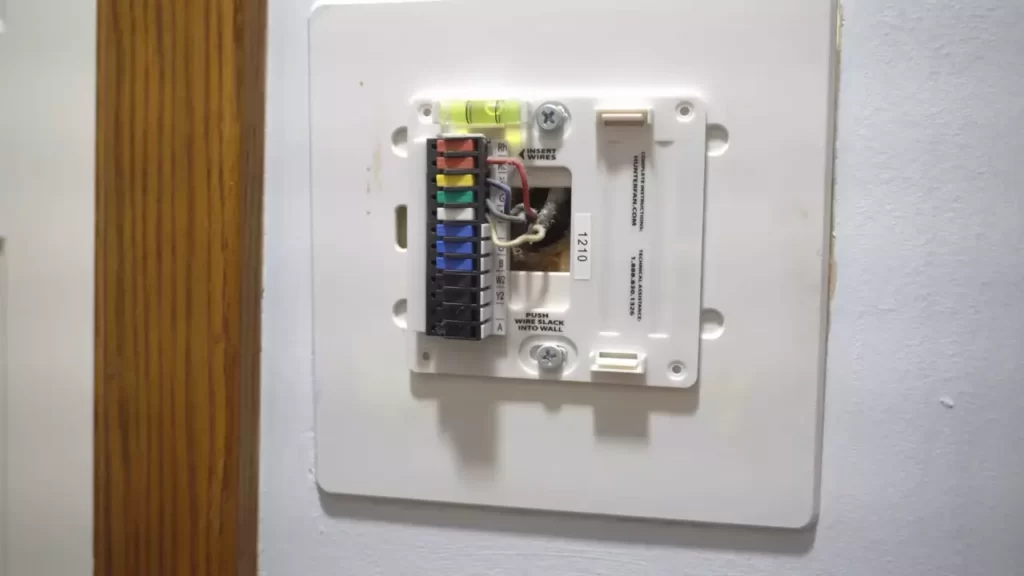
Wiring The New Honeywell Thermostat
Understanding the wiring requirements of the new thermostat
When it comes to installing a new Honeywell thermostat, understanding the wiring requirements is crucial. This step is essential for ensuring that your system operates correctly and efficiently. The new thermostat will have specific terminals for connecting the wires from your HVAC system. To ensure a successful installation, it’s important to match and connect the wires properly.
Matching and connecting the wires to the corresponding terminals
To begin the wiring process, you will need to identify the wires coming from your HVAC system and match them to the corresponding terminals on the new Honeywell thermostat. Each wire is color-coded and serves a specific function. Table 1 below outlines the standard color codes and their corresponding functions:
| Wire Color | Function |
|---|---|
| Red | Power (R) |
| Green | Fan (G) |
| Yellow | Cooling (Y) |
| White | Heating (W) |
| Blue | Common (C) |
Once you have identified the wires and their corresponding functions, you can proceed to connect them to the respective terminals on the new thermostat. It’s essential to refer to the thermostat’s instruction manual or the manufacturer’s website for specific guidelines on identifying the terminals correctly. Make sure to secure the connections firmly to prevent any loose wiring.
Securing the wiring connections
Properly securing the wiring connections is vital to ensure the stability and functionality of your new Honeywell thermostat. Loose connections can lead to faulty operation and potential system damage. Here is a step-by-step guide to help you secure the wiring connections:
- Turn off the power: Before working with any electrical connections, always turn off the power to your HVAC system at the main circuit breaker.
- Strip the wires: Use wire strippers to remove insulation from the ends of the wires, exposing approximately 1/4 inch of bare wire.
- Match the wires to the terminals: Connect each wire to its corresponding terminal based on the color codes and functions discussed earlier.
- Secure the connections: After connecting the wires, tighten the screws on each terminal to secure the wiring connections. Ensure that there are no loose or exposed wires.
- Test the thermostat: Once all the wiring connections are secure, turn the power back on and test your new Honeywell thermostat to ensure proper functionality.
By following these simple steps, you can successfully wire your new Honeywell thermostat and enjoy efficient operation of your HVAC system. It’s important to note that if you encounter any difficulties during the installation process or you are unsure about any step, it’s always best to consult a professional HVAC technician.
Mounting The Honeywell Thermostat
Mounting the Honeywell thermostat is a crucial step in the installation process. Proper positioning and secure attachment ensure the thermostat functions optimally and provides accurate temperature control. This section will guide you through each step of mounting the thermostat, from positioning the base on the wall to securely attaching it.
Positioning the thermostat base on the wall
Before mounting the thermostat base on the wall, it is essential to choose the right location. The thermostat should be placed on an interior wall, away from direct sunlight, drafts, and other sources of heat or cold air. Here are the steps to follow:
- Identify a suitable location on the wall, preferably at eye level and easily accessible.
- Ensure there are no obstructions, such as furniture or curtains, that may affect the thermostat’s performance.
- Use a level to ensure the base will be installed straight on the wall.
Marking the mounting holes and drilling if necessary
Once you have identified the optimal position, the next step is to mark the mounting holes on the wall. Follow these simple steps:
- Hold the base against the wall in the desired position.
- Using a pencil, mark the mounting holes on the wall by pressing gently against the base.
- If the wall surface is hard (e.g., concrete or brick), you may need to use a drill to create pilot holes. Ensure the drill bit size matches the recommended size for the mounting screws.
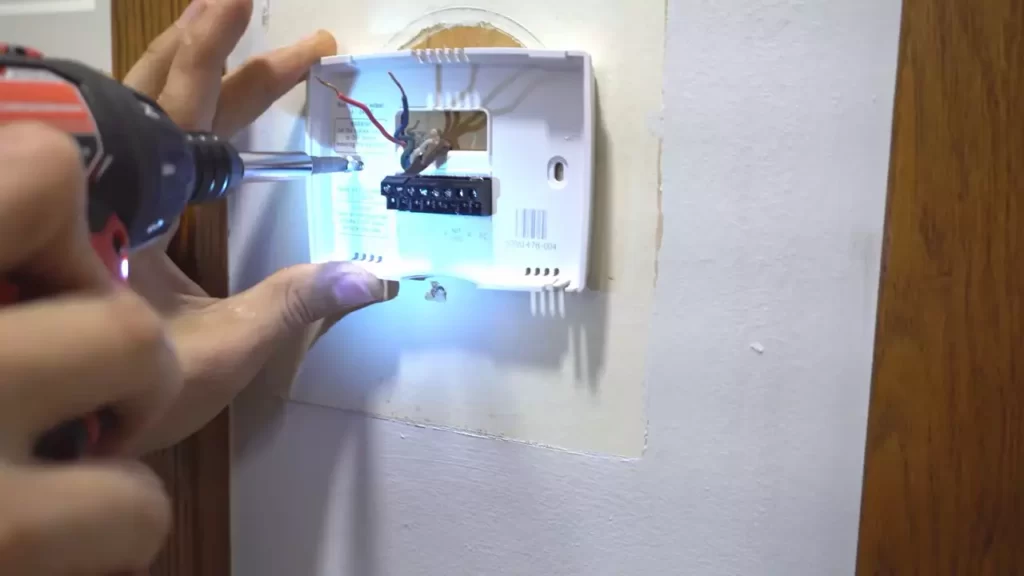
Attaching the base to the wall securely
Proper attachment of the base ensures the thermostat remains stable and firmly fixed on the wall. Follow these steps to securely attach the base:
- Align the base with the marked mounting holes on the wall.
- Insert the mounting screws through the base and into the pilot holes or directly into the wall.
- Tighten the screws using a screwdriver or appropriate tool, ensuring they are snug but not overly tightened.
- Check that the base is level, and make any necessary adjustments before tightening the screws completely.
By following these steps, you will have successfully mounted your Honeywell thermostat. Now you can move on to the next stage of the installation process, which involves connecting the wiring and configuring the thermostat settings.
Connecting The Thermostat To Wi-Fi
Enabling Wi-Fi on the Honeywell thermostat
The first step to connecting your Honeywell thermostat to Wi-Fi is to enable the Wi-Fi feature on the device itself. This allows the thermostat to communicate with your home network and the Honeywell mobile app. Follow the steps below to enable Wi-Fi:
- On the thermostat home screen, touch the “Menu” button.
- Select “Wi-Fi Setup” from the menu options.
- Choose “Enable Wi-Fi” to activate the Wi-Fi feature on the thermostat.
- A list of available Wi-Fi networks will be displayed. Select your home network from the list.
- If prompted, enter your Wi-Fi password using the on-screen keyboard.
- Once the correct password is entered, press the “Connect” button.
Connecting the thermostat to the home network
Once you have enabled Wi-Fi on the Honeywell thermostat, the next step is to connect it to your home network. This allows the thermostat to access the internet and interact with the Honeywell mobile app. Follow the steps below to connect the thermostat to your home network:
- After entering your Wi-Fi password and pressing “Connect”, the thermostat will attempt to connect to your home network.
- It may take a few seconds for the connection to be established. Once connected, the thermostat will display a confirmation message.
- If the connection fails, double-check that you entered the correct Wi-Fi password and try again.
- If the connection is successful, the thermostat will display the Wi-Fi signal strength and the IP address assigned to it.
- Make a note of the IP address, as you will need it later for setting up the Honeywell mobile app.
Downloading and installing the Honeywell mobile app
Now that your Honeywell thermostat is connected to your home network, you can proceed to download and install the Honeywell mobile app on your smartphone or tablet. The mobile app allows you to control your thermostat remotely and access additional features. Follow the steps below to download and install the app:
- Open the app store on your mobile device (e.g., Google Play Store for Android or App Store for iOS).
- Search for “Honeywell Home” in the app store search bar.
- Select the official Honeywell Home app from the search results.
- Tap the “Install” or “Get” button to begin the download and installation process.
- Once the app is installed, open it and follow the on-screen prompts to set up your account and connect to your Honeywell thermostat.
- During the setup process, you will be prompted to enter the IP address of your thermostat. Enter the IP address you noted down earlier.
- Once the app is successfully connected to your thermostat, you will be able to control and monitor your thermostat settings from your mobile device.
Configuring The Thermostat Settings
When it comes to optimizing the performance of your Honeywell thermostat, configuring the settings to suit your preferences is essential. By personalizing features such as the date, time, and location, choosing your preferred temperature units, and customizing options for energy efficiency, you can ensure that your thermostat caters to your needs. In this section, we will guide you through each step, providing clear instructions for easy configuration.
Setting up the date, time, and location
To start, you will need to set up the date, time, and location on your Honeywell thermostat. Follow these simple steps:
- Press the Menu button on the thermostat.
- Navigate to the Settings menu using the arrow keys.
- Select Date & Time.
- Adjust the date and time using the arrow keys.
- Once the date and time are set, select Location.
- Choose your desired location by entering the zip code.
- Confirm the selection and exit the menu.
Choosing the preferred temperature units
Next, you’ll want to choose the temperature units that you are most comfortable with. Whether you prefer Fahrenheit or Celsius, follow these steps to customize your thermostat:
- Press the Menu button on the thermostat.
- Navigate to the Settings menu using the arrow keys.
- Select Preferences.
- Choose Temperature Units.
- Select either Fahrenheit or Celsius.
- Confirm the selection and exit the menu.
Customizing the thermostat options for energy efficiency
To enhance energy efficiency and maximize cost savings, customizing the thermostat options is crucial. Follow these steps to tailor the settings according to your energy preferences:
- Press the Menu button on the thermostat.
- Navigate to the Settings menu using the arrow keys.
- Select Energy & Modes.
- Choose Energy Savings Mode.
- Select your preferred energy-saving option, such as Smart, Comfort, or Custom.
- Make any additional adjustments to the specific settings available.
- Confirm the selection and exit the menu.
By following these simple steps, you can easily configure your Honeywell thermostat settings to match your preferences and ensure optimal energy efficiency. Take advantage of the customization options available and experience a more comfortable and cost-effective living environment.
Testing And Troubleshooting
Once you have successfully installed your Honeywell thermostat, it’s essential to test its functionality and troubleshoot any issues that may arise. This section will guide you through the necessary steps to ensure your thermostat is working properly and address common problems that you may encounter.
Testing the functionality of the thermostat
To ensure your Honeywell thermostat is functioning correctly, follow these steps:
- Set the thermostat temperature to a level that is higher or lower than the current room temperature.
- Wait for a few minutes to see if the thermostat registers the temperature change.
- Check if the heating or cooling systems turn on as expected.
- Verify that the display shows the correct temperature and mode.
- Test all the buttons on the thermostat to confirm they are responsive and perform the intended functions.
Checking the heating and cooling systems
After testing the thermostat functionality, it’s important to ensure that your heating and cooling systems are working correctly. To do this, follow the steps below:
- Turn on the heating mode and set the desired temperature higher than the current room temperature.
- Check if the heating system activates and heats the room appropriately.
- Next, switch to the cooling mode and set the desired temperature lower than the current room temperature.
- Observe if the cooling system starts and effectively cools down the room.
- If any issues arise during this testing phase, refer to the troubleshooting section below.
Troubleshooting common issues and error messages
If you encounter any issues or error messages while testing your Honeywell thermostat, consult the troubleshooting guide provided by Honeywell. Here are some common problems you might encounter:
| Issue | Explanation | Solution |
|---|---|---|
| Thermostat not turning on | The thermostat may not be receiving power or the wiring is incorrect. | Check the power source, ensure the wiring is properly connected, and replace any blown fuses. |
| Inaccurate temperature readings | The thermostat may need calibration or placement adjustment. | Consult the user manual for instructions on calibrating or adjusting the thermostat placement. |
| Error message displayed | An error message indicates a system malfunction or incorrect setup. | Refer to the user manual or Honeywell’s online resources for specific error message troubleshooting steps. |
By following these testing and troubleshooting steps, you can ensure your Honeywell thermostat is working correctly and address any issues that arise along the way. Remember to consult the user manual or reach out to Honeywell’s support for further assistance if needed.
Frequently Asked Questions On How To Install A Honeywell
Can I Replace My Honeywell Thermostat Myself?
Yes, you can replace your Honeywell thermostat yourself. It’s a straightforward process that you can handle without professional assistance. Simply follow the provided instructions and ensure the power is turned off before beginning the installation. Enjoy the benefits of a new thermostat in no time.
What Are The Colors Of The Wires On A Honeywell Thermostat?
The wires on a Honeywell thermostat can be different colors, but commonly include red (R), white (W), yellow (Y), and green (G). These colors correspond to different functions such as power, heating, cooling, and fan control.
Where Does The Orange Wire Go On A Honeywell Thermostat?
The orange wire on a Honeywell thermostat is typically used for controlling the reversing valve in a heat pump system. It connects to the “O” or “B” terminal on the thermostat. Make sure to refer to the thermostat’s manual for specific instructions.
Can I Install A Programmable Thermostat Myself?
Yes, you can install a programmable thermostat yourself. It is a simple and straightforward process that doesn’t require professional help. Just follow the manufacturer’s instructions, and you’ll be able to enjoy the energy-saving benefits of a programmable thermostat in no time.
Conclusion
Installing a Honeywell thermostat is a simple and straightforward process that can make a significant difference in your home’s comfort and energy efficiency. By following the step-by-step instructions provided in this guide, you’ll be able to easily install your new thermostat and enjoy the benefits it offers.
Remember to turn off the power before starting and take your time to ensure accurate wiring connections. With a little effort, you’ll have your new Honeywell thermostat up and running in no time. Enjoy the convenience and control it brings to your home’s heating and cooling system.