To install a gas dryer, first, make sure you have the necessary tools and equipment. Then, follow the manufacturer’s instructions and guidelines provided in the installation manual.
Understanding The Basics Of Gas Dryer Installation
Installing a gas dryer may seem like a daunting task, but with the right knowledge and precautions, it can be a straightforward process. In this guide, we will take a closer look at the basics of gas dryer installation, including the safety precautions you need to consider before starting, the benefits of choosing a gas dryer over an electric one, and an overview of the installation process.
Safety Precautions to Consider Before Installation
Prior to installing a gas dryer, it is crucial to prioritize safety to ensure the well-being of yourself and your home. Here are some essential safety precautions to keep in mind:
- Make sure you have a well-ventilated area for installation to prevent the buildup of harmful gases.
- Turn off the gas supply to your home and disconnect the power source before beginning any installation work.
- Ensure you have the necessary tools for the installation, including a pipe wrench, adjustable wrench, and a gas leak detector.
- Inspect the gas line for any leaks or damage before proceeding. If you detect any issues, it’s best to call a professional for assistance.
- Follow the manufacturer’s instructions carefully and refer to local building codes to guarantee compliance.

Why Choose a Gas Dryer Over an Electric Dryer
When it comes to selecting a dryer for your home, it is essential to understand the advantages that a gas dryer can offer over an electric dryer. Here are a few reasons why many homeowners opt for gas dryers:
- Energy Efficiency: Gas dryers tend to be more energy-efficient than electric dryers, resulting in lower energy costs over time.
- Faster Drying: Gas dryers typically dry clothes faster than electric ones, allowing you to save time and tackle larger loads of laundry.
- Lower Environmental Impact: Gas dryers produce fewer greenhouse gas emissions compared to electric dryers, making them a greener choice for the environmentally conscious.
- Cost Savings: While gas dryers may have a higher upfront cost, the savings in energy expenses can make up for the initial investment in the long run.
Overview of the Gas Dryer Installation Process
Now that you understand the importance of safety precautions and the benefits of choosing a gas dryer, let’s dive into an overview of the installation process. Here are the general steps involved:
- Prepare the area by ensuring proper ventilation and clearing any obstacles around the installation site.
- Inspect the gas line and connections to make sure they are in good condition.
- Connect the gas line to the dryer using the appropriate fittings and sealants.
- Attach the venting system to the dryer and ensure proper airflow.
- Plug in the power cord and turn on the gas supply.
- Conduct a leak test to ensure there are no gas leaks.
- Test the dryer’s functionality by running a short cycle.
Remember, these steps provide a general overview, and it’s crucial to consult the manufacturer’s instructions for your specific model to ensure a successful installation.
Gathering The Necessary Tools And Materials
Installing a gas dryer may seem like a daunting task, but with the right tools and materials, it can be a breeze. Before you begin the installation process, it’s essential to gather all the necessary tools and materials. This will ensure that you have everything you need at your fingertips and can complete the installation smoothly.
List of tools required for a successful installation
To successfully install a gas dryer, you will need the following tools:
- Adjustable wrench
- Pipe wrench
- Tape measure
- Level
- Flathead screwdriver
- Phillips screwdriver
- Drill
- Hacksaw
- Wire stripper
- Plumber’s tape
Types of materials needed for connection
When connecting your gas dryer, you will require the following materials:
- Gas connector hose
- Gas shut-off valve
- Flexible ductwork
- Vent hood
- Duct clamps
- Clamp connectors
- Wall vent
Tips for purchasing the right materials
Before you head to the store to purchase your materials, keep these tips in mind:
- Measure Twice: Make sure to measure the available space for your gas dryer carefully. This will ensure you buy the right-sized materials.
- Quality Matters: Invest in high-quality materials that will last longer and provide a secure connection.
- Check Local Codes: Ensure that the materials you choose meet the local building codes. It’s important to adhere to these regulations for safety reasons.
- Consult the Manufacturer: Check the manufacturer’s instructions for any specific material requirements. Following their guidelines will help you choose the right materials suited for your gas dryer model.
By gathering the necessary tools and materials before you begin, you can save yourself time and frustration during the installation process. Following these guidelines will help ensure a successful and safe installation of your gas dryer. So, grab your tools, double-check your measurements, and get ready to enjoy the convenience of a gas dryer in your home!
Preparing The Installation Area
Preparing the Installation Area
Before you begin installing your gas dryer, it’s crucial to prepare the installation area properly. This involves clearing the space, measuring and ensuring proper ventilation, and creating a safe and accessible area for your new appliance. Paying attention to these details will help ensure a smooth and efficient installation process. Here are the steps to follow:
Clearing the space for the gas dryer
The first step in preparing the installation area is to clear the space where you intend to place your gas dryer. Make sure there is enough room for the appliance and any necessary accessories or attachments. Clear away any debris or obstructions that may impede the installation process or pose a potential safety hazard. This will not only make it easier for you to work but also prevent any damage to the dryer or surrounding area.
Measuring and ensuring proper ventilation
Next, it’s vital to measure the area where you will be installing your gas dryer to ensure a proper fit. Take accurate measurements of the width, depth, and height of the space. This will help you determine if any modifications or adjustments are necessary to accommodate the appliance. Additionally, check for proper ventilation in the installation area. Gas dryers require adequate airflow to operate safely and efficiently. Ensure there is enough space around the dryer for proper air circulation and that the venting system is installed correctly.
Creating a safe and accessible installation area
Finally, create a safe and accessible installation area to ensure the longevity and functionality of your gas dryer. Consider the following tips:
- Ensure a stable surface: Place your gas dryer on a level, sturdy surface to prevent any wobbling or movement during operation. This will minimize the risk of accidents or damage.
- Keep flammable materials away: Clear any flammable materials such as cleaning supplies or cardboard from the immediate vicinity of the dryer. This is essential for safety reasons, as gas dryers generate heat and sparks that can potentially ignite nearby combustible items.
- Allow for easy access: Make sure there is enough space around the dryer for easy access to the control panel, lint filter, and gas connection. This will make maintenance and servicing more convenient in the future.
- Follow manufacturer’s guidelines: Always refer to the manufacturer’s instructions and guidelines for specific installation requirements. They will provide detailed information on clearances, electrical connections, and other important considerations to ensure a successful installation.
By following these steps and adhering to the proper installation requirements, you can ensure a safe, efficient, and long-lasting installation of your gas dryer.
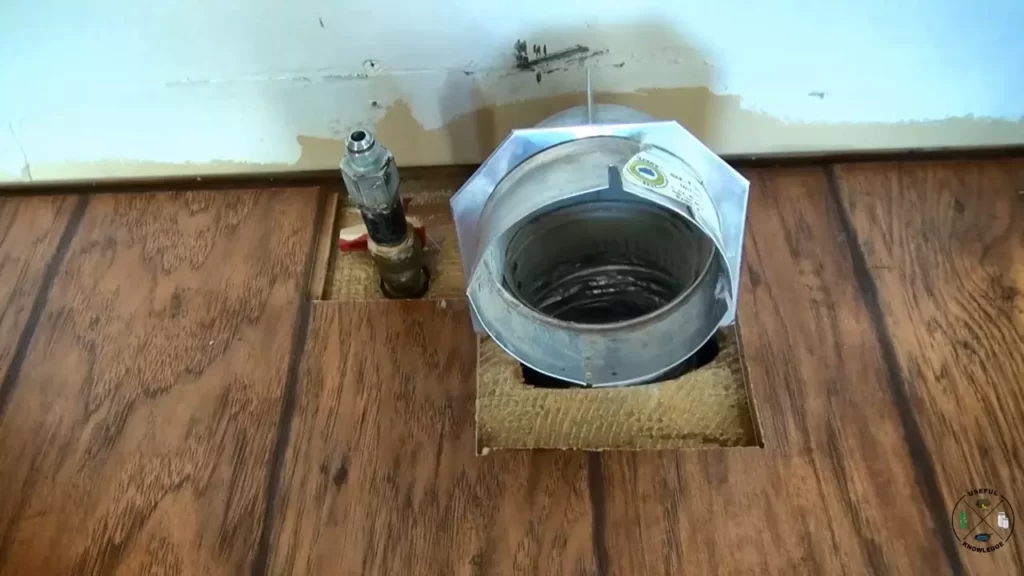
Assessing The Location For Gas Line Installation
Assessing the location for gas line installation is a crucial step when installing a gas dryer. Proper evaluation and consideration of proximity to the gas source, identification of existing gas lines and connections, as well as determining the optimal location for the new gas line are essential for a safe and efficient installation process.
Evaluating the proximity to the gas source
Before installing a gas dryer, it is important to evaluate the proximity to the gas source. Assessing the distance between the appliance and the gas supply connection will help determine if additional piping will be required. The gas source should be conveniently located, ensuring that the installation process is smooth and without any unnecessary complications.
Identifying existing gas lines and connections
Prior to installing a gas dryer, it is crucial to identify any existing gas lines and connections in the designated area. This step ensures that there are no complications or interferences with the gas line installation process. By identifying existing gas lines, potential risks can be avoided, and any necessary adjustments can be made accordingly.
Determining the optimal location for the new gas line
To ensure the smooth operation of your gas dryer, determining the optimal location for the new gas line is very important. You should consider factors such as accessibility, ventilation requirements, and overall convenience when determining the ideal location. Moreover, the chosen location should provide ample space and ensure that the gas line will not be obstructed or hindered in any way.
Assessing the location for gas line installation is a critical process that requires careful evaluation of proximity to the gas source, identification of existing gas lines and connections, and determining the optimal location for the new gas line. By adhering to these guidelines, you can guarantee a safe and efficient installation, ensuring the optimal performance of your gas dryer.
Choosing The Right Type Of Gas Line
Understanding the different types of gas lines available
When it comes to installing a gas dryer, one crucial aspect that you need to consider is choosing the right type of gas line. Gas lines are responsible for carrying the natural gas or propane needed to power your dryer. There are different types of gas lines available on the market, each with its own unique features and compatibility.
To ensure a successful installation, it is important to understand the differences between the types of gas lines available:
- Black Iron Pipe: This is the most common type of gas line used for residential applications. It is made of durable black iron and is capable of handling high-pressure gas. Black iron pipe is known for its strength and ability to withstand corrosion, making it a popular choice for gas installations.
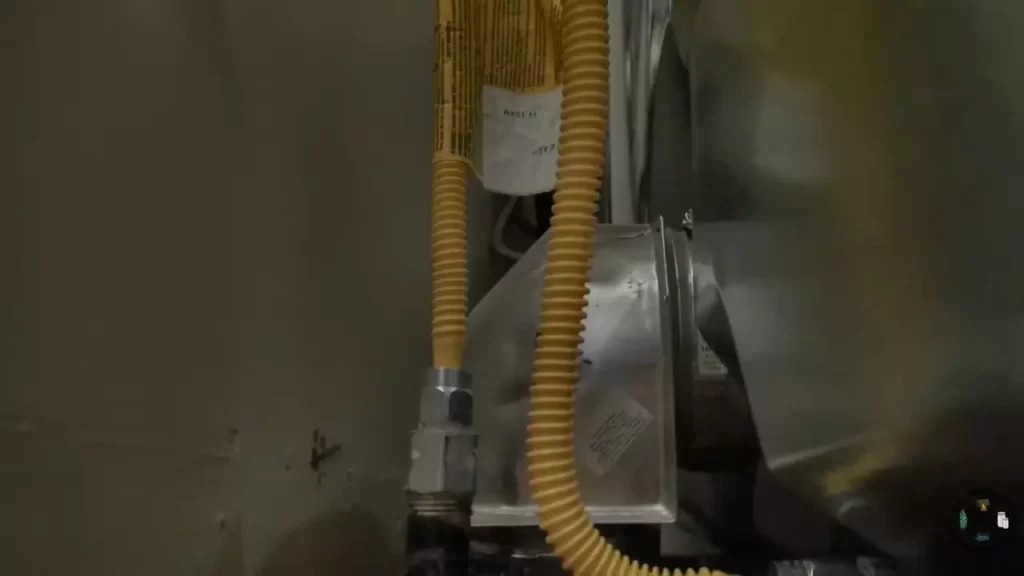
- Flexible Corrugated Stainless Steel Tubing (CSST): This type of gas line consists of a flexible stainless steel tube coated with a yellow or black plastic sheathing. It is easy to install due to its flexibility and can be bent around obstacles, eliminating the need for extra fittings. CSST is also resistant to corrosion and can be used both indoors and outdoors.
- Copper Tubing: Copper tubing is another option for gas line installations. It is known for its excellent heat resistance and durability. Copper tubing is typically used for underground gas lines or in situations where flexibility is not required.
Selecting the appropriate gas line for the installation
When selecting the appropriate gas line for your gas dryer installation, there are a few factors to consider:
- Local Building Codes: Check with your local building codes to determine if there are any specific regulations or requirements regarding the type of gas line permitted for residential use. Ensure that the gas line you choose complies with these regulations to avoid any potential issues or safety hazards.
- Length and Location: Consider the distance between your gas supply and the location of your dryer. Longer distances may require larger diameter lines to ensure an adequate gas flow. Additionally, if the gas line will be located in an area exposed to outdoor elements, such as an unheated basement or crawl space, it is essential to choose a line that is resistant to corrosion and suitable for outdoor use.
- Compatibility: Ensure that the gas line you choose is compatible with your gas dryer model. The manufacturer’s instructions will specify the recommended type and size of gas line needed for the appliance. Using the incorrect gas line may not only cause operational issues but can also void the warranty.
By considering these factors, you can choose an appropriate gas line that meets the requirements for your gas dryer installation. Remember, it is always recommended to consult with a licensed professional or gas technician to ensure a safe and correct installation.
Installing The Gas Line Safely And Securely
Step-by-step instructions for gas line installation
Installing a gas dryer can be a cost-effective and energy-efficient way to dry your clothes. However, it is crucial to prioritize safety during the installation process. This includes properly installing the gas line to ensure a secure and leak-free connection. Below are step-by-step instructions to guide you through the process:
- Turn off the gas supply: Before beginning the installation, it is important to shut off the gas supply to the area. Locate the main gas shut-off valve and turn it clockwise to close it completely.
- Prepare the area: Clear any nearby objects or debris that may hinder your access to the gas line. Ensure proper ventilation to allow any gas fumes to dissipate.
- Measure and cut the gas pipe: Measure the distance between the gas outlet on the wall and the gas inlet on the dryer. Using a pipe cutter, cut the gas pipe to the appropriate length. Remember to leave enough room for the flex hose to attach to both ends.
- Seal the gas pipe: Apply thread sealant to the male threads of the gas pipe. This will help create a tight seal and prevent gas leaks.
- Connect the flex hose: Attach the flex hose to the gas inlet on the dryer, ensuring a secure and snug connection. Use a wrench to tighten the connection, but be careful not to overtighten and damage the threads.
- Connect the gas pipe: Connect the other end of the flex hose to the gas outlet on the wall. Again, use a wrench to tighten the connection securely.
Tips on properly sealing and connecting the gas line
Properly sealing and connecting the gas line is essential to ensure the safe and efficient operation of your gas dryer. Here are some tips to keep in mind:
- Choose the right sealant: When applying thread sealant to the gas pipe, make sure to use a sealant that is specifically made for gas lines. This will provide the necessary protection against leaks and ensure a reliable connection.
- Avoid using excessive force: While it is important to tighten the connections securely, using excessive force can damage the threads and lead to leaks. Use a wrench to tighten the connections firmly, but be cautious not to overtighten.
- Inspect for leaks: After connecting the gas line, use a gas leak detector solution or a mixture of soap and water to check for any gas leaks. Apply the solution to the connections and observe if there are any bubbles forming. If you notice bubbles, immediately turn off the gas supply and re-tighten the connections.
Testing the gas line for leaks and ensuring safety
Testing the gas line for leaks is an important final step to ensure the safety of your gas dryer installation. Follow these guidelines to properly test for leaks:
- Restore the gas supply: Once you have connected and sealed the gas line, carefully turn on the main gas supply valve. Verify that the valve is fully open.
- Perform a leak test: Apply a gas leak detector solution or the soap and water mixture to all connections. If bubbles appear, this indicates a leak. In such a case, turn off the gas supply immediately and recheck the connections.
- Monitor for gas odors: Even after passing the leak test, continuously monitor the area for any gas odors. If you detect a gas smell, open windows for ventilation and contact a professional to inspect and address the issue.
By following these step-by-step instructions and safety measures, you can install a gas dryer with confidence, knowing that the gas line has been installed safely and securely.
Preparing The Dryer For Connection
Before you can start enjoying the convenience of a gas dryer, it’s crucial to properly prepare it for connection. This involves a few important steps, including removing the packaging, checking compatibility with the gas line, and understanding the manufacturer’s instructions and guidelines.
Removing the Packaging and Preparing the Gas Dryer
The first step in preparing your gas dryer for connection is to remove all the packaging materials. Make sure to remove any plastic covers, tape, or foam padding that might be protecting various parts of the dryer. These materials can hinder the proper functioning of the dryer, so it’s important to get rid of them before proceeding.
Once the packaging is removed, give the dryer a quick inspection to ensure there are no obvious damages or defects. Check the vent, control panel, and door for any signs of dents or scratches. It’s also a good idea to verify that the power cord is intact and securely attached to the dryer.
Next, prepare the gas dryer by adjusting the leveling legs if necessary. Use a level to ensure that the dryer is perfectly horizontal. This step is crucial to guarantee the proper operation of the dryer and to prevent any excessive vibration or noise during the drying cycle.
Checking for Compatibility with the Gas Line
Before connecting your gas dryer, it’s important to check its compatibility with the existing gas line in your home. Make sure that the dryer is designed to run on the same type of gas (natural gas or propane) as your household supply. This information is typically found in the dryer’s specifications provided by the manufacturer.
If you’re unsure about the compatibility or need to switch from one type of gas to another, it’s recommended to consult a professional plumber or gas technician. They can help determine whether any modifications or adjustments need to be made to ensure a safe and efficient connection.
Understanding the Manufacturer’s Instructions and Guidelines
Prior to connecting your gas dryer, take the time to thoroughly read and understand the manufacturer’s instructions and guidelines. These instructions will provide you with step-by-step guidance on how to properly install and connect the dryer to the gas line.
Pay close attention to any special requirements or safety precautions mentioned in the manual. These may include specific clearances from walls or other appliances, proper venting procedures, or guidelines for electrical connections. Following the manufacturer’s instructions is essential to prevent any potential hazards and to ensure the longevity of your gas dryer.
Remember, safety should always be your top priority when working with gas appliances. If you encounter any difficulties or uncertainties during the installation process, it’s best to seek professional assistance. A qualified technician or plumber will have the expertise to ensure a safe and successful connection of your gas dryer.
Connecting The Gas Dryer To The Gas Line
Step-by-step instructions for connecting the gas dryer
Connecting your gas dryer to the gas line is an important step in the installation process. It ensures that your dryer functions properly and safely. Follow these step-by-step instructions to connect your gas dryer to the gas line:
- Start by gathering the necessary tools and materials. You will need an adjustable wrench, a gas line connector, Teflon tape, and a leak detection solution.
- Ensure that the gas supply valve is turned off. This valve is usually located near the connection point.
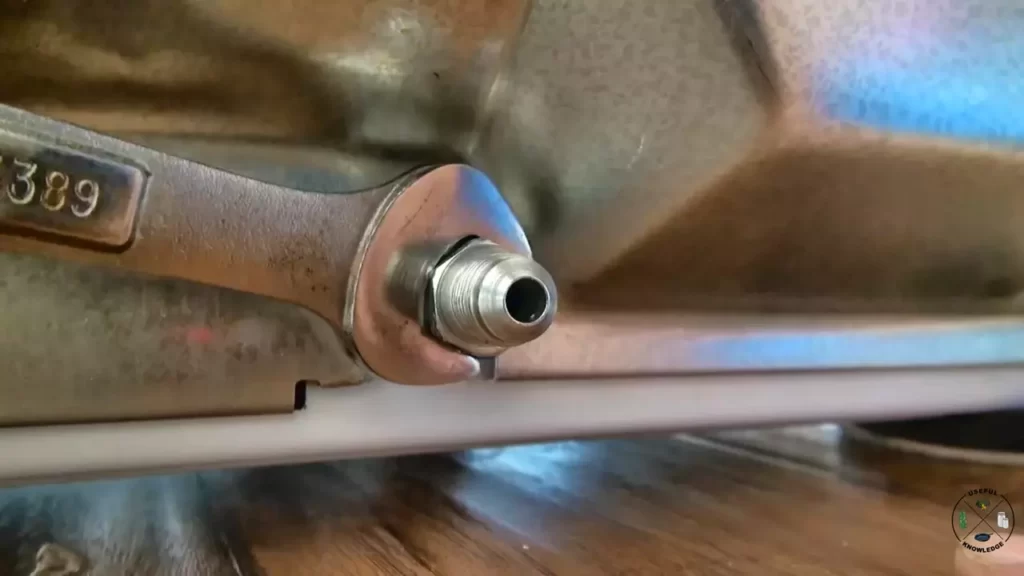
- Locate the gas connection on the back of the dryer. It is typically a metal fitting with a threaded opening.
- Apply Teflon tape to the threads of the gas connection. This helps create a tight seal and prevent leaks.
- Connect the gas line connector to the gas connection on the dryer. Use an adjustable wrench to tighten the connector securely.
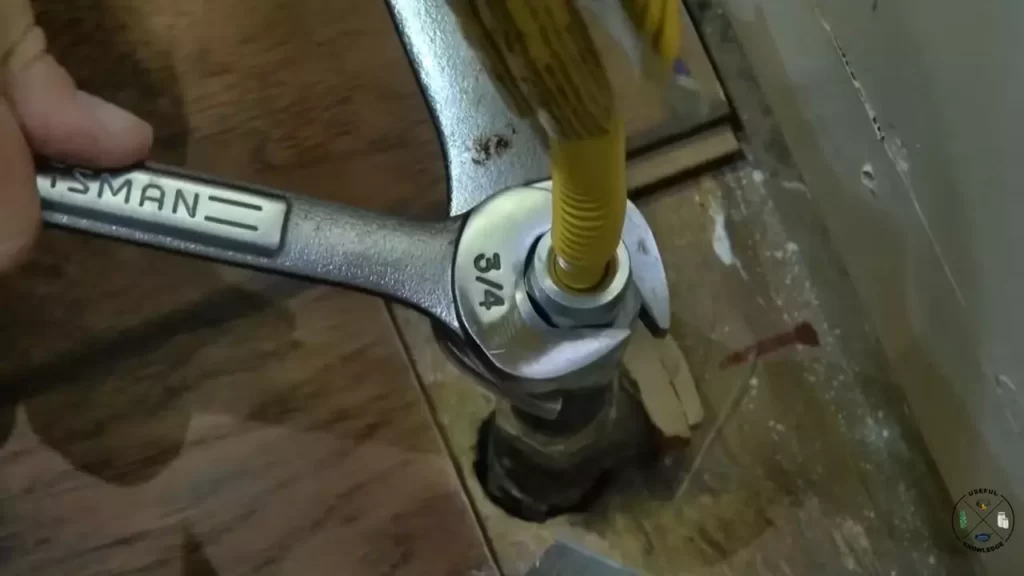
- With the gas line securely connected to the dryer, it’s time to connect the other end of the gas line to the gas supply valve. Ensure the gas line is properly aligned and insert it into the valve.
- Tighten the gas line connection to the supply valve using an adjustable wrench. Make sure it is secure, but be careful not to overtighten as it may damage the connection.
- At this point, double-check all the connections to ensure they are tight and secure. Inspect for any visible leaks or loose fittings.
- Lastly, apply a leak detection solution to the connections. This solution will bubble if there is a leak, making it easy to identify and fix.
Tips for properly aligning and securing the gas line
Proper alignment and secure connection of the gas line is crucial for the safe and efficient operation of your gas dryer. Follow these tips to ensure the gas line is properly aligned and securely connected:
- Always use Teflon tape on the threads to create a tight seal. This helps prevent gas leaks.
- Ensure that the gas line is straight and not kinked or bent. This allows for a consistent gas flow.
- Use an adjustable wrench to tighten the gas line connections. Make sure they are secure but be careful not to overtighten.
- If you are unsure about aligning or securing the gas line, consult a professional for assistance. It’s better to be safe than sorry when it comes to gas connections.
Testing the connection for leaks and ensuring functionality
Once you have connected the gas dryer to the gas line, it’s important to test the connection for leaks and ensure the functionality of your dryer. Follow these steps to test the connection and ensure it is leak-free:
- Mix a solution of equal parts water and dish soap in a spray bottle.
- Spray the solution onto all the gas line connections and fittings.
- Observe for any bubbling or foaming, as this indicates a gas leak.
- If you detect any leaks, immediately turn off the gas supply valve and tighten the affected connections.
- Repeat the leak test until there are no signs of bubbling or foaming.
- Once the connection is leak-free, turn on the gas supply valve and test the functionality of your gas dryer. Start a drying cycle and ensure that the dryer operates properly.
By following these step-by-step instructions, properly aligning and securing the gas line, and testing the connection for leaks and functionality, you can confidently install your gas dryer and enjoy its efficient operation. Remember to always prioritize safety and consult a professional if you are unsure about any aspect of the installation process.
Testing And Troubleshooting
In order to ensure that your gas dryer installation is successful, it is important to conduct a thorough test run and be prepared to troubleshoot any issues that may arise. By following these steps and taking the necessary safety precautions, you can have peace of mind knowing that your gas dryer is working efficiently and safely. Let’s dive into the details of testing and troubleshooting a gas dryer installation.
Conducting a test run of the gas dryer
Once you have installed your gas dryer, it is crucial to run a test to ensure that it is functioning properly. Here’s how you can conduct a test run of your gas dryer:
- Make sure the gas valve to the dryer is turned off.
- Connect the gas supply line to the dryer according to the manufacturer’s instructions.
- Turn on the gas valve and check for any gas leaks. Apply a mixture of soap and water to the connections and watch for bubbles. If you see any bubbles forming, there may be a gas leak, and you should immediately turn off the gas valve and contact a professional.
- Plug in the gas dryer and ensure it is properly grounded.
- Set the dryer controls to a short, timed drying cycle.
- Turn on the dryer and allow it to run for a few minutes.
- Check for any unusual noises, vibrations, or smells that could indicate a problem. If you notice anything out of the ordinary, turn off the dryer and consult the manufacturer’s troubleshooting guide.
Troubleshooting common installation issues
Even with careful installation, there can be some common issues that may arise during a gas dryer installation. Here are a few troubleshooting tips for resolving these common problems:
- If the gas dryer is not heating, check that the gas supply valve is open and the gas line is properly connected.
- If the dryer is not tumbling, ensure that the power cord is securely plugged in and that the circuit breaker has not tripped.
- If there is excessive noise during operation, check for any loose parts, such as the drum or support rollers, and tighten them as necessary.
- If the dryer is not drying clothes effectively, make sure the lint trap is clean and free from blockages, and check that the exhaust vent is not clogged.
Safety precautions to take during testing and troubleshooting
When testing and troubleshooting your gas dryer installation, it is important to prioritize safety. Follow these safety precautions to minimize any risks:
- Always turn off the gas supply valve before performing any tests or troubleshooting.
- Wear protective gloves and safety glasses when working with gas connections or conducting tests.
- Ensure proper ventilation in the dryer area to prevent the buildup of potentially hazardous gases.
- If you detect any gas leaks or smell gas during the test run, immediately turn off the gas valve, open windows for ventilation, and contact a professional.
- Keep flammable materials away from the dryer and its venting system.
By following these guidelines and taking the necessary safety precautions, you can confidently test and troubleshoot your gas dryer installation. Regular maintenance and inspections will also help ensure its long-term performance and safety. Remember, if you ever feel unsure or encounter a complex issue, it’s always recommended to seek professional help to avoid any potential hazards.
Frequently Asked Questions For How To Install A Gas Dryer
Can You Install A Gas Dryer Yourself?
Yes, you can install a gas dryer yourself. Just ensure you follow the manufacturer’s instructions carefully and have the necessary tools to connect the gas line securely. It’s important to prioritize safety and, if unsure, consult a professional installer.
What Hookups Do You Need For A Gas Dryer?
Gas dryers require two types of hookups: a gas supply line and a venting system. The gas supply line connects to a shutoff valve and should be made of durable materials like stainless steel. The venting system is essential for removing moisture and lint.
Make sure to follow the manufacturer’s instructions for proper installation.
Do You Need To Connect Gas To A Dryer?
Yes, a gas dryer needs to be connected to a gas supply in order to operate.
How Does A Gas Dryer Need To Be Vented?
To vent a gas dryer, follow these guidelines:
1. Use a 4-inch diameter vent pipe made of metal or aluminum.
2. Attach the vent pipe securely to the dryer outlet using a clamp.
3. Direct the vent pipe outside, avoiding long runs and elbow turns.
4. Ensure proper ventilation to prevent carbon monoxide buildup.
5. Regularly clean and inspect the vent to maintain efficiency and safety.
Conclusion
Installing a gas dryer doesn’t have to be a daunting task. By following the step-by-step instructions provided in this guide, you can confidently set up your own gas dryer without any professional help. Remember to prioritize safety, such as checking for leaks and ensuring proper ventilation.
With these tips in mind, you’ll soon be enjoying the convenience and efficiency that a gas dryer brings to your laundry routine.