To install a 3 prong dryer cord, disconnect and remove the old cord, connect the new cord’s wires to the corresponding terminals on the dryer, and secure the cord with a strain relief clamp. Installing a 3 prong dryer cord is a relatively simple process that involves replacing the old cord with a new one.
By following the proper steps and ensuring all connections are secure, you can safely install a 3 prong dryer cord and be ready to use your dryer in no time.
Understanding The Different Types Of Dryer Cords
If you’re looking to install a new dryer or replace an old one, it’s essential to understand the different types of dryer cords available. A dryer cord is the link between your dryer and the power source, and choosing the right cord is crucial for safety and functionality.
Three-prong dryer cords
Three-prong dryer cords, also known as NEMA 10-30 cords, were commonly used in older dryer models. These cords have three prongs, two flat parallel blades and a U-shaped grounding pin. The two flat blades connect to the hot wires, while the grounding pin provides protection against electrical shock.
However, it’s important to note that three-prong dryer cords do not include a separate grounding wire. Instead, the grounding pin on the cord is connected to the neutral wire inside the dryer. While this was acceptable in the past, modern electrical codes require dryers to have a separate grounding wire for added safety.
Four-prong dryer cords
With the updated electrical codes, four-prong dryer cords have become the standard for new dryer installations. These cords, also known as NEMA 14-30 cords, feature four prongs: two hot wires, one neutral wire, and one grounding wire.
The two hot wires are connected to the two flat blades of the plug, while the neutral wire connects to the L-shaped prong. The grounding wire is connected to the dryer chassis, providing a direct path for electrical currents in case of a short circuit or malfunction.
Differences in plug configurations
One of the main differences between three-prong and four-prong dryer cords is the plug configuration. The three-prong plug consists of two flat blades at an angle and a circular grounding pin. On the other hand, the four-prong plug has two flat blades, an L-shaped prong, and a circular grounding pin.
To ensure compatibility, it’s important to check the outlet in your home before purchasing a new dryer cord. Most modern homes are equipped with four-prong outlets, but older homes may still have three-prong outlets. In cases where the outlet doesn’t match the dryer cord, an electrician can install a new outlet or provide a suitable adapter.
By understanding the different types of dryer cords, you can ensure a safe and successful installation of your new dryer. Always consult the manufacturer’s instructions and local electrical codes to ensure compliance and seek professional assistance if needed.
Assessing Your Dryer’s Requirements
Checking the manufacturer’s specifications
It is essential to begin by checking the manufacturer’s specifications for your dryer. Each dryer model may have specific requirements when it comes to electrical cords. Look for the manufacturer’s label, which is usually located on the back or inside the dryer door. This label will provide you with important information about the type of cord required.
Determining the electrical system in your home
Next, you need to determine the electrical system in your home. Most dryers require a 220-volt outlet, while some older models may only require a 110-volt outlet. Check the outlet near the dryer to confirm the voltage. If you are unsure, it is recommended to consult with a licensed electrician who can assess your electrical system and advise you accordingly.
Taking safety considerations into account
Safety should be your top priority when installing a dryer cord. Before proceeding, make sure to turn off the power at the circuit breaker to prevent any electrical accidents. Additionally, ensure that the dryer is unplugged throughout the installation process.
To further enhance safety, inspect the dryer cord for any damages or frayed wires. If you notice any issues, it is crucial to replace the cord before proceeding with the installation. Using a damaged cord can lead to electrical shocks or even fire hazards.
Ensuring the proper grounding
Proper grounding is essential to protect both the dryer and your home’s electrical system. The three-prong dryer cord consists of two hot wires and a grounding wire. It is crucial to connect the grounding wire to the dryer’s grounding screw securely. This grounding wire helps to divert any electrical surges, ensuring the safety of both the appliance and the user.
To ensure a proper grounding connection, remove the grounding screw from the dryer’s cabinet and connect the grounding wire securely. Use a screwdriver to tighten the screw, ensuring it is tightly fastened. This step is vital in preventing electrical accidents and potential damage to the dryer.
Tools Needed For The Installation
In order to install a 3 prong dryer cord, you will need a few basic tools to help make the process smooth and hassle-free. These tools are:
Screwdriver
A screwdriver is an essential tool for this installation. It will be used to remove the screws securing the access panel on the back of the dryer. Make sure you have a screwdriver that fits the screws on your dryer to avoid any issues during the installation.
Pliers
Pliers are another tool you will need for the installation. They will be used to tighten the strain relief clamp on the cord. It’s important to have a sturdy pair of pliers that provides a good grip for this task.
Wire Stripper
A wire stripper is an indispensable tool when it comes to installing a 3 prong dryer cord. It will help you remove the insulation from the wires and expose the bare wire ends. Make sure to choose a wire stripper that can handle the gauge of wire you will be working with.
Voltage Tester
Before starting the installation, it’s crucial to ensure that the power to your dryer is completely turned off. A voltage tester will help you confirm that there is no electrical current running through the wires. This tool will help keep you safe throughout the installation process.
Materials Needed For The Installation
When it comes to installing a 3 prong dryer cord, there are a few key materials that you will need. These materials ensure a safe and secure installation, allowing you to connect your dryer to the electrical outlet with ease. In this section, we will discuss the materials needed for the installation, including the 3-prong dryer cord, cord strain relief, wire connectors, and electrical tape.
3-prong dryer cord
The 3-prong dryer cord is an essential component for connecting your dryer to the electrical outlet. This cord has three wires – two hot wires and one neutral wire. The hot wires are responsible for carrying the electrical current to the dryer, while the neutral wire serves as a return path for the current. It is important to choose a high-quality and properly rated 3-prong dryer cord for your specific dryer model.
Cord strain relief
A cord strain relief is a small but crucial device for securing the 3-prong dryer cord to the dryer. It helps relieve stress on the wires by preventing them from being pulled or twisted, which can lead to damage or electrical hazards. The cord strain relief is usually made of durable plastic and easily attaches to the dryer body. It is important to install the cord strain relief correctly to ensure the longevity and safety of your dryer’s electrical connection.
Wire connectors
Wire connectors are necessary for securely connecting the wires of the 3-prong dryer cord to the corresponding wires in the dryer. These connectors come in various types and sizes, so it’s important to choose the ones that are suitable for the gauge and material of the wires. Wire connectors serve as a reliable and safe means of joining the wires together, ensuring a solid electrical connection.
Electrical tape
Electrical tape is a versatile tool that is commonly used in electrical installations, including connecting a 3-prong dryer cord. It provides insulation and protects the wires from moisture, dust, and other potential hazards. When using electrical tape, make sure to wrap it tightly around the exposed wires, covering any exposed conductors completely. This will help prevent any accidental contact with the live wires and ensure the safety of your installation.
Step 1: Disconnecting The Old Cord
Before installing a new 3 prong dryer cord, you’ll first need to disconnect the old cord from your dryer. This step is crucial and requires careful attention to ensure your safety.
Unplugging the dryer
The first thing you need to do is unplug your dryer from the power source. This is a simple but essential step to avoid the risk of electric shock.
Removing the access panel
Once the dryer is unplugged, you’ll need to locate and remove the access panel. This panel is typically located at the back of the dryer and may require a screwdriver or other tools to remove it. Refer to your dryer’s user manual for specific instructions.
Disconnecting the old power cord
With the access panel removed, you’ll now be able to see the old power cord and its connections. Take note of how the cord is connected to the dryer’s terminal block. You may find that each wire is secured using screws or other fasteners.
Using a screwdriver or appropriate tool, carefully unscrew each wire from the terminal block. Pay close attention to the color-coded wires and ensure you disconnect them in the correct order. Typically, the green or bare copper wire is the ground wire, the white wire is neutral, and the black or red wire is the hot wire.
Important: Take a picture or make a note of the wire connections before disconnecting them. This will make the installation of the new cord much easier later on.
Once all the wires are disconnected, remove the old power cord from the dryer completely. You can set it aside or discard it appropriately, as it will no longer be needed.
By following these steps, you’ve successfully disconnected the old power cord from your dryer, preparing it for the installation of the new 3 prong dryer cord. Stay tuned for the next steps in this easy DIY process!
Step 2: Preparing The Dryer
Once you have identified the terminal block on your dryer, it’s time to prepare the dryer for the installation of the 3 prong dryer cord. This step involves a few important tasks to ensure a safe and proper installation.
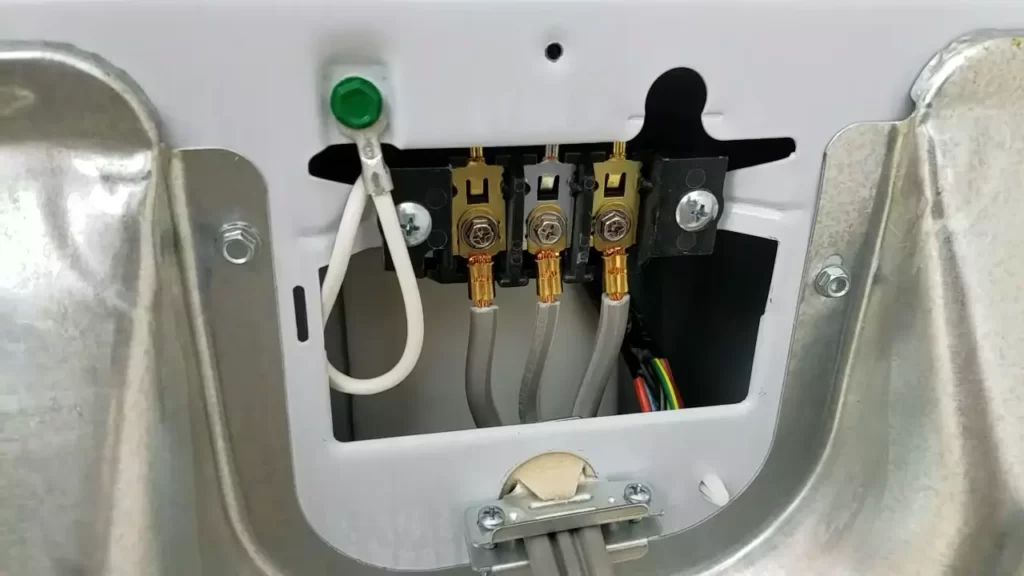
Identifying the terminal block
The terminal block is the connection point where the wires from the dryer cord will be attached. It is usually located at the back of the dryer, near the bottom. Look for a plastic or metal plate with three screws on it. This is where the dryer cord will be connected.
Removing the bonding strap (if applicable)
In some dryer models, there may be a bonding strap or grounding strap connecting the neutral (center) terminal to the ground terminal. This strap needs to be removed in order to install the 3 prong dryer cord. Refer to your dryer’s manual or the manufacturer’s instructions to determine if your dryer has a bonding strap and how to remove it.

Preparing the wires
Before attaching the wires from the dryer cord, it’s important to prepare them properly. Start by stripping about 1 inch of insulation from each of the three wires in the dryer cord. Use a wire stripper tool to carefully remove the insulation, being careful not to nick or damage the wires.
Next, twist the exposed copper strands of each wire together to create a tight bundle. This will ensure a secure connection when attaching the wires to the terminal block.
Finally, attach the prepared wires to the corresponding terminals on the terminal block. The center wire, which is typically white or gray, should be attached to the center or neutral terminal. The other two wires, usually black and red, should be attached to the outer terminals.
Completing the preparation
Once the wires are securely attached to the terminal block, it’s important to double-check all connections to ensure they are tight and properly aligned. Loose or faulty connections can cause electrical issues and potentially lead to a dangerous situation.
Now that the dryer is properly prepared, you are ready to move on to the next step – installing the 3 prong dryer cord. Stay tuned for Step 3!
Step 3: Attaching The New Cord
Now that you have properly prepared the dryer and removed the old cord, it’s time to attach the new 3 prong dryer cord. This step is crucial to ensure the safe and efficient functioning of your dryer. In this step, we will guide you through the process of connecting the ground wire, connecting the neutral wire, and connecting the hot wires.
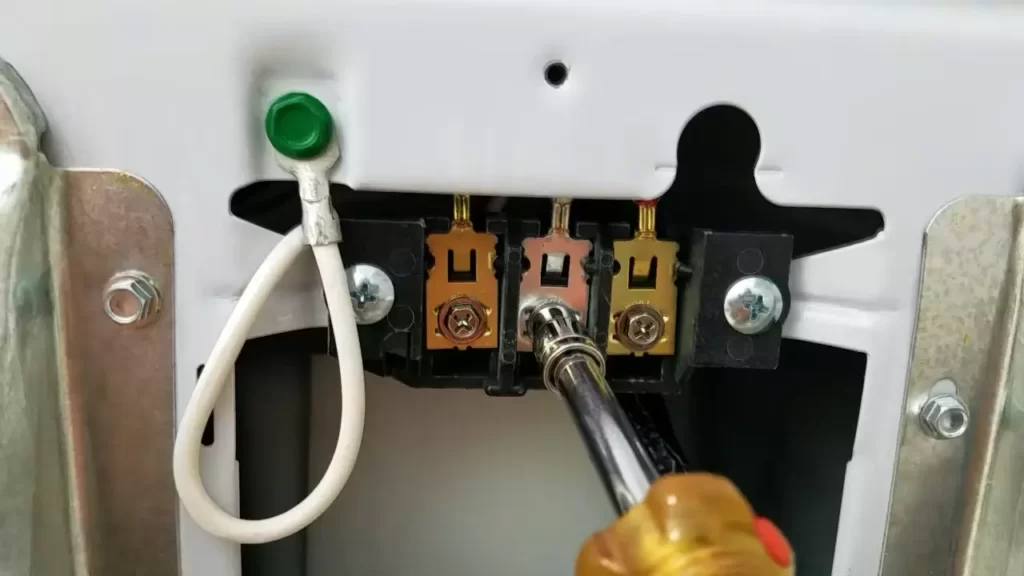
Connecting the ground wire
The ground wire is an essential safety feature that helps protect you from electrical shock. To connect the ground wire, follow these steps:
- Locate the green-colored screw on the dryer’s metal grounding strap.
- Using a screwdriver, loosen the screw to create a gap.
- Insert the end of the ground wire into the gap.
- Tighten the screw securely to ensure a proper connection.
Remember, the ground wire should always be connected to the dryer’s metal chassis, as this creates a path for electrical currents should any faults occur.
Connecting the neutral wire
The neutral wire is responsible for carrying the return current from the dryer back to the electrical panel. To connect the neutral wire, follow these steps:
- Identify the silver terminal screw on the dryer’s terminal block.
- Loosen the screw with a screwdriver to create a space for the wire.
- Insert the end of the white or gray-colored wire into the space.
- Tighten the screw securely to establish a solid connection.
It’s important to note that the neutral wire should never be connected to the ground wire or the metal chassis of the dryer. This ensures the proper functioning of the electrical system and minimizes the risk of electrical hazards.
Connecting the hot wires
The hot wires are responsible for delivering the electricity needed to power the dryer. To connect the hot wires, adhere to the following instructions:
- Identify the two remaining terminal screws on the dryer’s terminal block.
- Loosen these screws using a screwdriver.
- Match the color-coded hot wires (usually red and black) to their corresponding terminal screws.
- Insert each wire into its respective screw and tighten securely.
Remember to double-check the connection of each hot wire to ensure they are secure and snug. Loose connections can lead to electrical issues or even damage the dryer’s internal components.
Once you have successfully connected the ground wire, neutral wire, and hot wires, you can proceed to the next step of installing the dryer cord. Following these steps carefully will help ensure a safe and proper installation of your 3 prong dryer cord.
Step 4: Securing The Cord
Now that you have successfully connected the wires to the dryer terminal block, the next step is to secure the cord in place. This is a crucial step to ensure the safety and functionality of your dryer. In this step, we will go through three important tasks – using a cord strain relief, securing the wires with wire connectors, and insulating the connections with electrical tape.
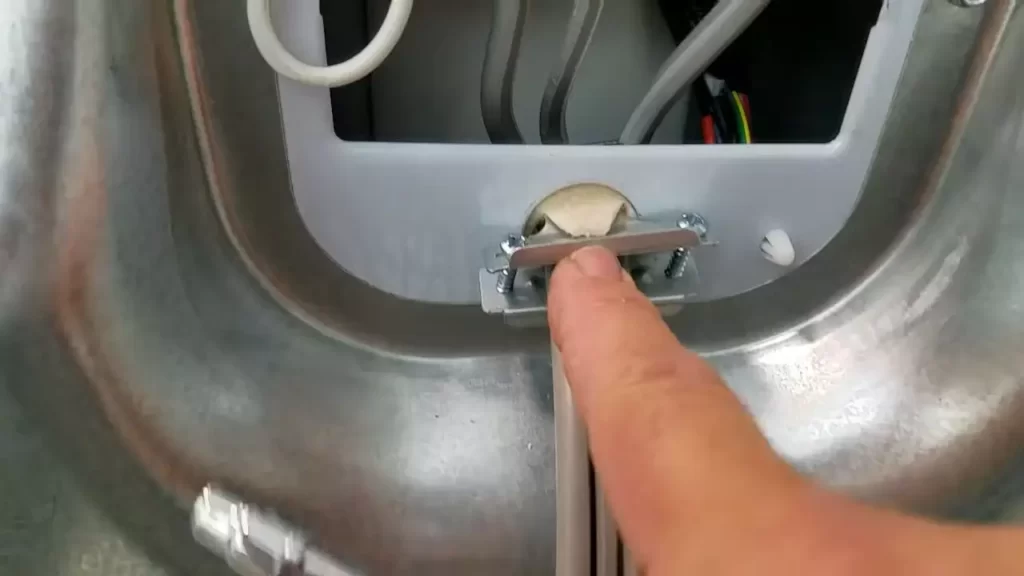
Using a Cord Strain Relief
The cord strain relief is designed to hold the cord firmly in place and prevent it from becoming loose or damaged. It is a small plastic or rubber device that fits over the hole where the cord enters the dryer. To use the cord strain relief:
- Insert the cord through the strain relief hole.
- Tightly screw the strain relief in place to secure the cord.
This ensures that any tension or pulling on the cord will be distributed evenly and reduces the risk of strain on the wires.
Securing the Wires with Wire Connectors
Properly securing the wires with wire connectors is essential to maintain a safe and reliable electrical connection. Here’s how you can do it:
- Strip about half an inch of insulation from the end of each wire.
- Twist together the corresponding wires – black to black, white to white, and green (or bare copper) to green.
- Slide a wire connector over each twisted wire connection.
- Twist the connector clockwise until it is tightly secured on the wires.
- Give the wires a gentle pull to ensure they are securely connected.
Securing the wires with wire connectors creates a strong and reliable electrical connection, minimizing the risk of electrical hazards.
Insulating the Connections with Electrical Tape
The final step in securing the cord is to insulate the connections with electrical tape. This provides an extra layer of protection and prevents any accidental contact with the exposed wires. Follow these steps to insulate the connections:
- Wrap the exposed wires tightly with electrical tape, starting from the point where the wires emerge from the wire connectors.
- Continue wrapping the tape over the wire connectors to fully cover them.
- Ensure that all exposed wires and connectors are completely covered with tape.
By insulating the connections with electrical tape, you create a reliable barrier against any potential electrical hazards.
With the cord strain relief, wire connectors, and electrical tape, you have now securely installed the 3-prong dryer cord. This ensures a safe and efficient operation of your dryer. In the next step, we will move on to connecting your dryer to the power source. Stay tuned!
Step 5: Testing The Dryer
After completing the installation of the 3 prong dryer cord, it’s time to test your dryer to ensure everything is working properly. Testing the dryer is an essential step to ensure safety and functionality. By following these instructions, you can verify that the electrical connection is secure and that the dryer is operating as it should. Let’s dive in!
Using a Voltage Tester
The first step in testing your dryer is to use a voltage tester. A voltage tester is a simple tool that allows you to check if the electrical circuit is live. To use a voltage tester, follow these steps:
- Ensure that the power is turned off at the breaker box.
- Insert the voltage tester into the electrical outlet and observe the reading.
- If the voltage tester indicates no power, proceed to the next step. If the voltage tester shows power, turn off the power at the breaker box and double-check the connections.
Checking for Proper Electrical Connections
Next, you’ll need to check for proper electrical connections. This step is crucial to ensure that the 3 prong dryer cord is securely connected and that there are no loose or exposed wires. Follow these steps:
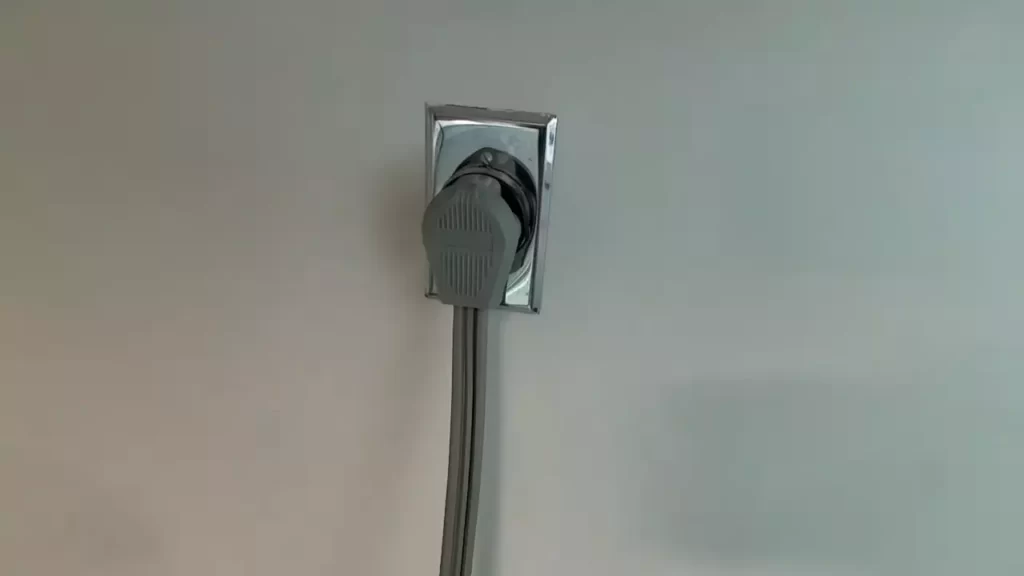
- Inspect the dryer cord and make sure it is securely plugged into the outlet.
- Check that the terminal screws on the dryer are tightened to secure the wires.
- Ensure there are no loose or exposed wires. If you find any issues, tighten the connections or replace the cord if necessary.
Verifying the Dryer’s Functionality
Now that you’ve checked the electrical connections, it’s time to verify that the dryer is functioning correctly. Follow these steps to ensure that your dryer is operating as it should:
- Turn on the power at the breaker box.
- Set the dryer to a short, timed cycle, and allow it to run for a few minutes.
- Check if the dryer is producing heat and if the drum is spinning.
- Ensure that the control panel functions, such as selecting different drying cycles and adjusting the temperature settings, are working correctly.
- If everything is working properly, congratulations! Your dryer is successfully installed and ready to use.
- If you encounter any issues or abnormalities during the verification process, consult the dryer’s manual or seek professional assistance to troubleshoot the problem.
By following these steps for testing the dryer after installing a 3 prong dryer cord, you can ensure both the safety and functionality of your appliance. It’s always better to be safe than sorry when it comes to electrical connections, so take the time to verify everything is in proper working order before using your dryer.
Step 6: Ensuring Safety Measures
Once you have properly connected the 3 prong dryer cord to your dryer, it is crucial to ensure the safety measures are in place. Ensuring safety measures not only protects your dryer from potential damage but also reduces the risk of electrical hazards.
Properly Grounding the Dryer
One of the most important safety measures when installing a 3 prong dryer cord is properly grounding the dryer. This ensures that any electrical faults or surges are directed safely to the ground, preventing shock hazards and potential damage to the dryer.
To properly ground the dryer, follow these steps:
- Make sure the dryer’s power cord is not plugged into an electrical outlet.
- Locate the terminal block on the back of the dryer.
- Connect the grounding conductor (usually green or bare copper wire) to the grounding screw on the terminal block.
- Secure the grounding conductor tightly to ensure a proper connection.
Properly grounding the dryer provides an essential layer of protection for both you and your appliance. It is crucial not to skip this step to avoid any potential electrical hazards.
Securing the Access Panel
After ensuring the dryer is properly grounded, the next step is to secure the access panel. The access panel covers the terminal block and wiring connections, protecting them from dust, moisture, and accidental tampering.
To secure the access panel, follow these steps:
- Align the access panel with the designated slots on the back of the dryer.
- Slide the access panel into place until it clicks or locks securely.
- Check the access panel to ensure it is properly secured and flush with the dryer’s back.
Securing the access panel not only prevents potential damage to the electrical connections but also maintains the overall integrity and safety of your dryer.
Conducting a Final Inspection
Once the dryer is grounded and the access panel is securely in place, it is essential to conduct a final inspection to ensure everything is properly connected and safe for use.
During the final inspection, pay close attention to the following:
- Ensure all connections are tight and secure.
- Check for any exposed or damaged wires.
- Verify that the dryer’s power cord is properly plugged into the electrical outlet.
- Confirm that the dryer is operating without any unusual sounds or vibrations.
By conducting a thorough final inspection, you can have peace of mind knowing that your dryer is installed correctly, grounded, and ready for use. This final step is crucial in ensuring the safety and optimal performance of your dryer.
Frequently Asked Questions Of How To Install 3 Prong Dryer Cord
Does A 3-Prong Dryer Cord Need A Ground?
Yes, a 3-prong dryer cord needs a ground. The ground wire is important for safety reasons as it helps prevent electrical shocks and protects against fire hazards. Make sure your dryer is properly grounded to ensure safe operation.
Can You Put A 3-Prong Cord On A Dryer That Has A 4-Prong Cord?
Yes, you can replace a 4-prong cord with a 3-prong cord on your dryer. However, you need to make sure to follow the proper electrical wiring procedures to ensure safety and avoid any potential damage. It is recommended to consult a professional electrician for help with this task.
Where Does The Green Wire Go On A Three-Prong Dryer?
The green wire on a three-prong dryer should be connected to the grounding screw. This helps to ensure the safety of the appliance by providing a path for electrical current to safely discharge in the event of a fault or short circuit.
What Size Wire Do I Need For A 3-Prong Dryer Outlet?
For a 3-prong dryer outlet, you’ll need a wire size that matches the circuit requirements. Typically, a 10-gauge wire is recommended, but it’s best to consult with an electrician or refer to the manufacturer’s guidelines for your specific dryer model.
Conclusion
Installing a 3-prong dryer cord is a straightforward task that can be completed with a few simple steps. By following the instructions provided in this guide, you can ensure a safe and efficient connection for your dryer. Remember to always prioritize safety and consult a professional if you are unsure about any aspect of the installation process.
With the proper tools and knowledge, you’ll be able to enjoy the convenience and functionality of your dryer in no time.