To install a 220 volt outlet, first turn off the power supply, locate the main breaker panel, and install a double-pole circuit breaker.
Factors To Consider
Installing a 220 volt outlet can be a useful addition to your home, whether you need it for a new appliance or for more power in your workshop. However, before diving into the installation process, there are several important factors to consider. These factors will not only ensure that your outlet is installed correctly, but also guarantee safety and convenience for you and your household. In this article, we will explore three key factors that you need to take into account before installing a 220 volt outlet.
Electrical panel proximity
One crucial factor to consider when installing a 220 volt outlet is the proximity of your electrical panel. The electrical panel, also known as the breaker box, is the heart of your home’s electrical system. It houses the circuit breakers that control the flow of electricity throughout your home. Ensuring that your new outlet is located in close proximity to the electrical panel is essential for several reasons:
- Minimizes the length of the wiring required, reducing potential voltage drops and energy loss.
- Facilitates easy access for electricians during installation and future maintenance or repairs.
- Allows for convenient placement of the circuit breaker that will supply power to your new outlet.
Take the time to assess the distance between your desired outlet location and the electrical panel. If they are too far apart, it may be necessary to consult with a licensed electrician to determine the best solution.
Accessibility and convenience
Another important factor to consider is the accessibility and convenience of the 220 volt outlet. Think about the purpose of the outlet and how you intend to use it. Ask yourself the following questions:
- Will the outlet be used for a specific appliance or multiple devices?
- Is there enough space around the outlet to comfortably plug in and unplug devices?
- Will the outlet need to be easily accessible for individuals with mobility limitations?
By addressing these questions, you can determine the ideal location for your outlet. Consider factors such as proximity to the appliances or tools you will be using, as well as the accessibility needs of all potential users. This will ensure that the outlet is both practical and user-friendly.
Safety precautions
When it comes to electrical installations, safety should always be a top priority. Installing a 220 volt outlet requires knowledge and adherence to several safety precautions. Some key safety measures to consider include:
- Shutting off power to the designated circuit at the electrical panel before beginning any work.
- Using appropriate safety gear, such as insulated gloves and goggles, to protect yourself from electric shocks and debris.
- Properly grounding the outlet to prevent electrical shocks and ensure the safety of your appliances.
- Following local building codes and regulations to ensure that your installation meets the necessary safety standards.
Ensure that you have a good understanding of the safety guidelines associated with installing a 220 volt outlet. If you are unfamiliar with electrical work or unsure about any aspect of the installation process, it is always recommended to seek professional assistance.
By considering these factors – electrical panel proximity, accessibility and convenience, and safety precautions – you can confidently proceed with the installation of your 220-volt outlet. Taking the necessary time and precautions will ensure a safe and efficient installation that meets your specific needs.
Tools
When it comes to installing a 220-volt electrical outlet, having the right tools is essential. With the right set of tools, you can safely and efficiently complete the installation process. Here are some of the tools you’ll need:
Screwdriver
A screwdriver is a versatile tool that is indispensable for electrical installations. It allows you to tighten or loosen screws, which is crucial for securing wires and electrical devices. Make sure to have both a Phillips-head screwdriver and a flathead screwdriver on hand to accommodate different types of screws.
Wire Stripper
A wire stripper is an essential tool for any electrical installation that involves working with wires. It allows you to remove the insulation from the wires without damaging the conductive core. Make sure to choose a wire stripper with adjustable blades, as this will ensure precise and clean cuts.

Voltage Tester
Before working with any electrical outlet, it’s crucial to test the voltage to ensure safety. A voltage tester is a handy tool that allows you to check if the power is off in a particular circuit. This can help prevent accidents and ensure that you are working with a de-energized electrical system.
Drill
A drill is essential for creating holes in the wall or other surfaces to mount the electrical outlet. Look for a drill with a variety of drill bits to accommodate different materials. This will ensure that you have the right drill size for the specific installation requirements.
Pliers
Pliers are versatile hand tools that come in handy during electrical installations. They provide a firm grip and can be used for gripping, twisting, and cutting wires. There are various types of pliers available, such as needle-nose pliers and lineman’s pliers, each with its own specific use.
By having these essential tools at your disposal, you’ll be well-prepared to tackle the installation of a 220-volt outlet. Remember to follow all safety guidelines and consult a professional if you’re unsure about any aspect of the installation process.
Materials
The installation of a 220 volt outlet requires specific materials to ensure the safe and efficient operation of your electrical appliances. By gathering the necessary materials beforehand, you can streamline the installation process and minimize any potential setbacks. Here are the key materials you will need for installing a 220 volt outlet:
220 Volt Outlet
The 220 volt outlet is the centerpiece of this installation. It is designed to provide the higher voltage required for certain appliances, such as dryers and electric ranges. When selecting a 220 volt outlet, ensure that it is compatible with the amperage rating of your specific electrical circuit.
Electrical Wires
Electrical wires are essential for transferring the electricity from the outlet to your appliances. You will need three wires: a black (hot) wire, a white (neutral) wire, and a green or bare copper (ground) wire. These wires should be of proper gauge and insulation material to meet the electrical requirements and safety standards.
Junction Box
A junction box serves as a protective housing for the electrical connections. It prevents accidental contact with live wires and shields them from damage. Make sure to choose a junction box that is large enough to accommodate the wire connections and has proper knockout holes for wire entry and exit.
Wire Connectors
Wire connectors are used to join the electrical wires securely within the junction box. They provide a reliable and insulated connection, ensuring the wires do not come loose or make contact with each other, which could lead to electrical hazards. Use wire connectors that are appropriate for the wire size and material.
Circuit Breaker
A circuit breaker is a crucial safety component that cuts off the power supply in case of electrical faults or overloading. It acts as a safeguard for your appliances and your home’s electrical system. When installing a 220 volt outlet, make sure to connect it to a dedicated circuit breaker of the appropriate amperage rating.
Shutting Off The Power
Before you begin installing a 220 volt outlet, it’s crucial to prioritize your safety by shutting off the power. This will help prevent any potential accidents and ensure a smooth installation process. Here’s a step-by-step guide on how to properly shut off the power:
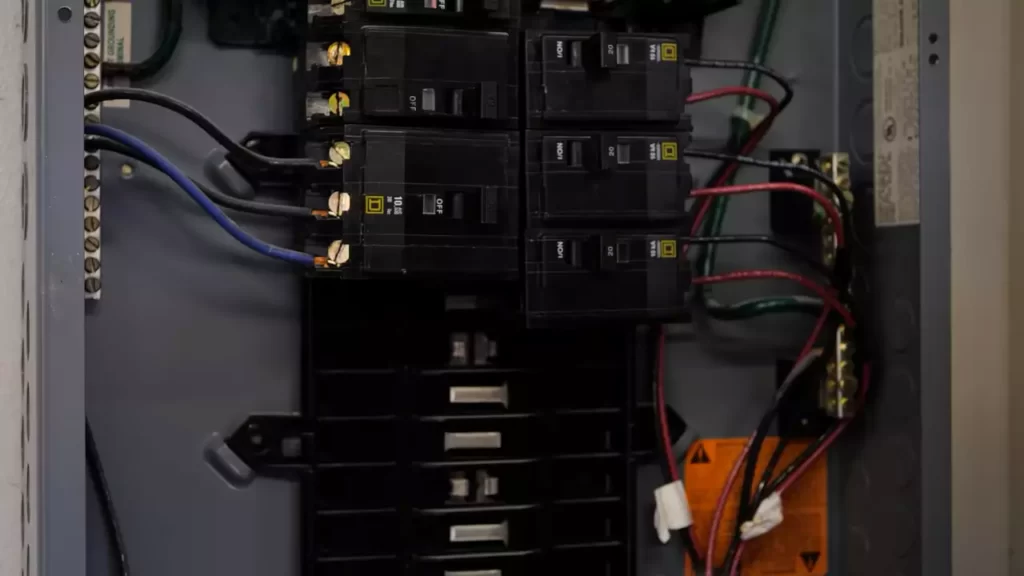
Locating the main circuit breaker
The main circuit breaker is responsible for controlling the electricity flow to your entire house. It’s usually located in a dedicated electrical panel, commonly found in the basement or garage. To locate it, follow these simple steps:
- Locate your electrical panel. This is typically a metal box, often gray or white in color, attached to the wall.
- Open the panel door by either unlatching or unscrewing it, depending on the panel type.
- Inside the panel, you’ll find rows of circuit breakers, each marked with a number or label indicating the area it powers.
- Scan the labels or numbers until you find the main circuit breaker. It’s usually the largest breaker, often labeled as “Main,” “Main Breaker,” or “Main Disconnect.”
Turning off the power to the specific circuit
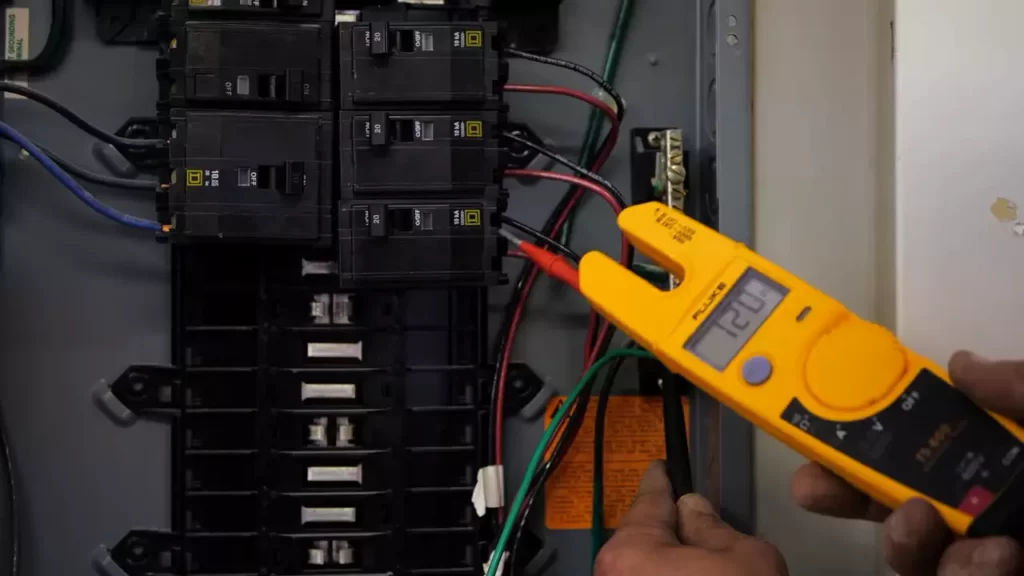
Once you’ve located the main circuit breaker, it’s time to ensure safe electrical work by turning off the power to the specific circuit you’ll be working on. Follow these steps:
- Identify the breaker that corresponds to the particular circuit you’re working on. Look for labels on the breaker itself or refer to your electrical panel’s legend if there’s one available.
- To turn off the power to the circuit, carefully push the corresponding breaker switch to the off position. You should hear a clicking sound, indicating that the power has been turned off.
- Double-check that the power has indeed been shut off. You can use a non-contact voltage tester to confirm if any electricity is still flowing through the circuit. Simply hold the tester near the outlet or wires with the power off, and it should not detect any voltage.
By following these instructions, you’ll successfully shut off the power to ensure your safety while installing a 220 volt outlet. Remember, always exercise caution when dealing with electricity and consult a professional if needed.
Mounting The Junction Box
Once you have selected a suitable location for your 220 volt outlet, the next step is to mount the junction box securely to the wall. This is an important part of the installation process as it ensures the electrical connections are protected and the outlet is securely in place.
Selecting a suitable location
Before you start mounting the junction box, it is crucial to choose a suitable location for the 220 volt outlet. Consider the following factors when selecting a location:
- Proximity to the main electrical panel: The junction box should be close to the main electrical panel to minimize the length of the wiring.
- Accessibility: Ensure that the location is easily accessible and not obstructed by any furniture or other objects.
- Away from moisture: Avoid installing the outlet in areas prone to moisture, such as bathrooms or outdoors, as it can pose a safety hazard.
Once you have identified a suitable location, it’s time to move on to the next step.
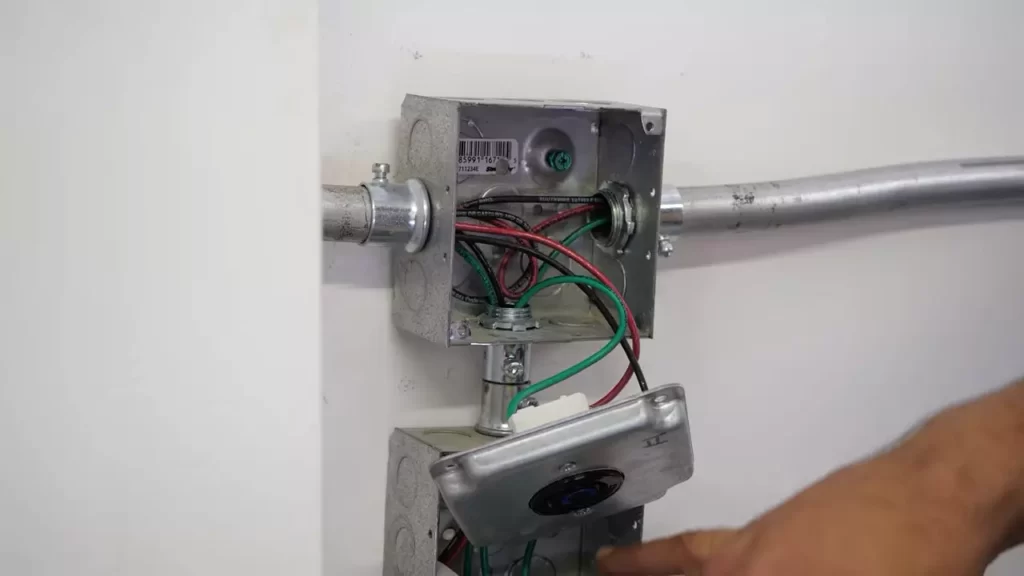
Attaching the junction box securely to the wall
Now that you have chosen the right location, it’s time to attach the junction box securely to the wall. Follow these steps:
- Gather the necessary tools: Before you start, make sure you have the tools you’ll need for this task. This includes a drill, screws, screwdriver, and a level.
- Mark the location: Use a pencil or marker to mark the desired position on the wall. Use a level to ensure the markings are straight.
- Drill pilot holes: Using a drill, create pilot holes at the marked spots. This will make it easier to insert the screws and secure the junction box.
- Attach the junction box: Place the junction box over the pilot holes and use screws to secure it to the wall. Make sure it is level and tightly attached.
By following these steps, you can ensure that the junction box is securely mounted to the wall, providing a stable base for your 220 volt outlet.
Wiring The Outlet
Installing a 220 volt outlet can provide you with the power you need for high-powered appliances and equipment. To complete this task safely and efficiently, you’ll need to understand the process of wiring the outlet. In this section, we will guide you through each step to ensure a successful installation.
Removing the junction box cover
The first step in wiring a 220 volt outlet is to remove the junction box cover. Locate the box, which is typically mounted on the wall or in a concealed area. Use a screwdriver to loosen and remove the screws that hold the cover in place. With gentle force, detach the cover and set it aside.
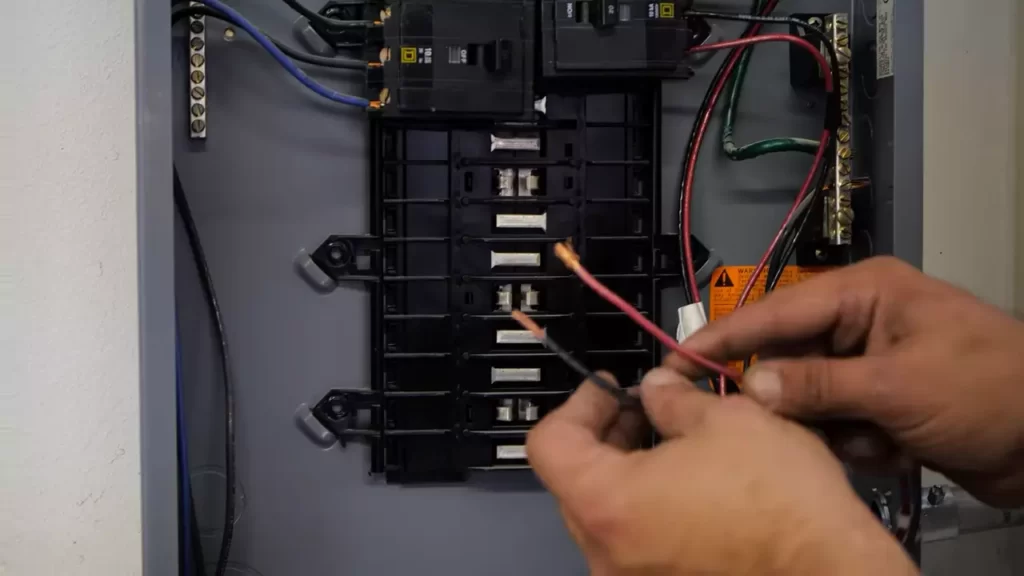
Connecting the wires to the outlet terminals
After removing the junction box cover, it’s time to connect the wires to the outlet terminals. Start by identifying the three wires: the black wire (also known as the “hot” wire), the white wire (the neutral wire), and the green or bare wire (the ground wire). Make sure the power supply is turned off before proceeding.
Using wire cutters, carefully strip about 1 inch of insulation from the ends of each wire. Once the wires are exposed, locate the terminals on the outlet. Attach the black wire to the brass terminal, the white wire to the silver terminal, and the green or bare wire to the green terminal. Ensure each wire is securely fastened by tightening the screws.
Grounding the outlet
Grounding the outlet is an essential step in the wiring process. It helps protect against electrical shocks and prevents damage to your appliances. To ground the outlet, connect the green or bare wire to the grounding screw found near the outlet. This screw is typically colored green and labeled “GRD” for easy identification.
Once the wire is connected, use a screwdriver to tighten the screw until it is snug. Double-check the connections to ensure a proper and secure grounding.
Now that the wiring is complete, you can proceed with installing the outlet into the junction box. Place the outlet in the box and use the screws provided to secure it in place. Finally, replace the junction box cover and tighten the screws to ensure a secure fit.
Following these steps will allow you to successfully wire a 220 volt outlet. However, if you are unsure or uncomfortable working with electrical wiring, it is always recommended to consult a professional electrician to ensure the safety and proper functioning of your outlet.
Testing The Outlet
Once you have successfully installed a 220-volt outlet, it is crucial to test it before plugging in any high-powered appliances or devices. This step ensures not only your safety but also the effectiveness of the outlet. In this section, we will discuss how to properly test the 220-volt outlet using a voltage tester and verify that the wiring and connection are correct.
Using a voltage tester to check for power
To begin testing the 220-volt outlet, you will need a voltage tester. This tool helps you determine if there is power running through the outlet. Follow the steps below to properly check for power:
- Ensure that the voltage tester is functioning correctly by testing it on a known power source, such as an outlet or a light switch. This will verify that the tester is operational.
- Insert one of the voltage tester probes into the left slot of the 220-volt outlet while keeping the other probe in contact with the outlet’s grounding wire or any exposed metal screw.
- Observe the voltage tester’s display or indicator. If it lights up or beeps, it indicates that there is power flowing through the outlet. This result confirms that the outlet is functioning correctly and is ready for use.
- If the voltage tester does not detect any power, it is essential to check the circuit breaker or fuse box to see if there is a tripped breaker or blown fuse. Addressing any electrical issues should be done by a qualified electrician.
Verifying proper wiring and connection
Testing the outlet for power is only the first step. It is equally important to ensure that the wiring and connections are correct to prevent any potential hazards. Follow the steps below to verify proper wiring and connection:
- Inspect the wires connected to the 220-volt outlet, ensuring they are securely attached and that there are no loose or exposed ends. Tighten any loose connections if necessary.
- Check that the wires are color-coded correctly. Typically, the black wire is the hot wire, the white wire is the neutral wire, and the green or bare wire is the grounding wire. Any deviations should be evaluated and addressed by a professional electrician.
- If you notice any frayed or damaged wires, it is crucial to replace them immediately to avoid any electrical hazards. Again, if you are uncertain about handling the wiring, contact a licensed electrician.
- Lastly, double-check the connections inside the outlet box to ensure they are secure and properly tightened. Loose connections can lead to malfunctioning outlets or electrical fires.
By following these steps to test the 220-volt outlet and verify proper wiring and connection, you can be confident in the safety and functionality of your newly installed outlet. Remember, if you encounter any issues or feel uncomfortable during the process, always consult a professional electrician for assistance.
Frequently Asked Questions Of How To Install 220 Volt Outlet
How Much Does It Cost To Install A 220 Volt Outlet?
The cost to install a 220 volt outlet varies depending on factors such as location and complexity. Generally, you can expect to pay between $200 and $500 for installation. Remember to consult with a professional electrician for an accurate cost estimate.
Can I Install 220V Myself?
No, it is not recommended to install 220V yourself. It is dangerous and should be done by a qualified electrician to ensure safety and compliance with regulations.
Can You Convert A Regular Outlet To 220V?
No, you cannot convert a regular outlet to 220V. The voltage of an outlet is determined by the electrical wiring in your home and changing it requires rewiring by a qualified electrician.
Does A 220 Outlet Have To Be Grounded Up Or Down?
A 220 outlet needs to be grounded, but it doesn’t matter if the ground is up or down. Grounding is crucial for safety and to prevent electrical shocks. Make sure to consult a certified electrician to properly install and ground your 220 outlet.
Conclusion
Installing a 220-volt outlet may seem daunting at first, but with the right guidance and tools, it can be a manageable task. By following the steps outlined in this blog post and ensuring safety precautions are taken, you can successfully complete the installation and enjoy the benefits of a higher voltage outlet in your space.
Remember to consult a professional if you are unsure or uncomfortable with any aspect of the process.