To install electric in floor heating, you need to follow these steps: prepare the floor surface, lay down the heating elements, secure the wires, connect them to the thermostat, and finally cover the elements with flooring material. Welcome to the world of electric floor heating!
If you’re someone who enjoys stepping onto cozy and warm floors, even in the coldest of winters, then electric in floor heating is the perfect solution for you. Installing electric in floor heating may seem like a daunting task, but with the right guidance, it can be a straightforward process.
We will provide you with a step-by-step guide on how to install electric in floor heating, allowing you to enjoy the comfort and luxury of toasty floors all year round. Just follow these simple steps, and you’ll be well on your way to a warm and inviting home.
Assessing The Feasibility Of Electric In Floor Heating
Assessing the feasibility of electric in floor heating is an essential step in determining whether this heating system is suitable and can be successfully installed in your home. It involves evaluating the existing flooring and determining the suitable areas for installation. This assessment ensures that you make an informed decision and avoid any potential complications or issues down the line.
Evaluating the Existing Flooring
The first step in assessing the feasibility of electric in floor heating is to evaluate the existing flooring in your home. This involves taking into consideration the type of flooring material, its condition, and any potential limitations it may pose for the installation process. Some flooring materials, such as carpet or vinyl, may not be suitable for electric in floor heating due to their insulating properties. On the other hand, tile or laminate flooring is typically compatible with this type of heating system.
During this evaluation, it is important to take note of any damage, cracks, or unevenness in the flooring. These issues may need to be addressed before the installation of electric in floor heating can take place. Additionally, assessing the flooring’s insulation properties can help determine if it will be suitable for retaining the heat generated by the system, maximizing its efficiency.
Determining the Suitable Areas for Installation
Another crucial aspect of assessing the feasibility of electric in floor heating is determining the suitable areas for installation. Not all rooms or areas of your home may be ideal for this type of heating system. Factors such as the room’s size, purpose, and function should be taken into consideration.
Rooms with high moisture levels, such as bathrooms and kitchens, are particularly well-suited for electric in floor heating as it can help to prevent dampness and provide a comfortable experience. Similarly, areas with high traffic, such as living rooms or hallways, can benefit from the radiant heat provided by this system. However, it is important to consider the practicality and cost-effectiveness of installing electric in floor heating in less frequently used areas.
By carefully evaluating the existing flooring and determining the suitable areas for installation, you can make an informed decision about whether electric in floor heating is a feasible option for your home. This assessment will help ensure that the installation process goes smoothly, maximizing the comfort and efficiency of your heating system.
Calculating The Required Heat Load
Considering the Room Size and Insulation
Calculating the required heat load is an essential step when installing electric in floor heating. This ensures that the system will effectively heat the room while minimizing energy consumption. To accurately determine the heat load, it is important to consider factors such as the room size and insulation.
Room Size: The first consideration in calculating the heat load is the size of the room. The larger the room, the higher the heat load required to maintain a comfortable temperature. To determine the square footage of the room, measure the length and width and multiply these measurements. For irregularly shaped rooms, break them down into smaller, more manageable sections and calculate the square footage of each section separately.
Insulation: Another crucial factor in determining the heat load is the level of insulation in the room. Good insulation helps to retain the heat generated by the heating system, preventing it from escaping and ensuring efficient heating. Take into account the type and thickness of insulation used in the walls, floor, and ceiling. If the room has poor insulation, it will require a higher heat load to compensate for the heat loss.
Choosing the Appropriate Heating System
Once you have calculated the heat load, the next step is to choose the appropriate heating system. There are different types of electric in floor heating systems available, and selecting the right one is essential for optimal comfort and energy efficiency.
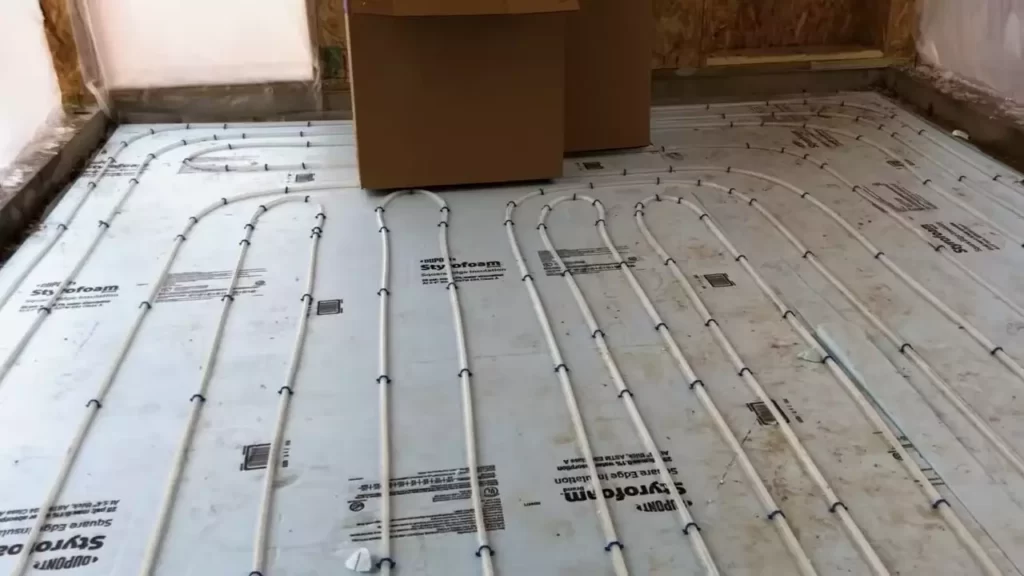
- Radiant Heating Cables: This type of heating system consists of heating cables embedded in the floor. These cables generate heat, which is then radiated upwards, warming the room. Radiant heating cables are suitable for both new constructions and retrofit projects. They provide consistent and even heat distribution, resulting in a comfortable environment.
- Electric Radiant Mats: Electric radiant mats feature pre-spaced heating cables adhered to a mesh backing. These mats are easy to install and suitable for large areas. They offer uniform heating throughout the floor, ensuring no cold spots. Electric radiant mats are a popular choice for bathrooms, kitchens, and other areas with high foot traffic.
- ThermoFloor: ThermoFloor is a unique heating system that combines electric radiant heating cables with an insulating underlayment. It provides both heating and soundproofing benefits, making it an excellent choice for second-floor applications. ThermoFloor is versatile and can be used under various types of flooring, including carpets, hardwood, and tile.
- Insulayment: This type of heating system utilizes an insulating underlayment with embedded heating cables. Insulayment helps to reduce heat loss while providing supplemental heating. It is an ideal solution for rooms with adequate primary heating but requires additional warmth in specific areas, such as bathrooms or basements.
By considering the room size, and insulation, and choosing the appropriate heating system, you can ensure efficient and effective electric in-floor heating installation. This will provide you with a comfortable and cozy living space while minimizing energy consumption.
Gathering The Necessary Tools And Materials
Before installing electric in-floor heating, it’s important to gather all the necessary tools and materials. Having everything ready in advance will save you time and ensure a smooth installation process. Below is a list of essential tools you will need:
List of Essential Tools
- Utility knife
- Tape measure
- Wire strippers
- Screwdriver set
- Impact drill
- Notched trowel
- Pliers
- Level
- Marker
Make sure to check if you already have these tools or if you need to purchase them before starting the installation. Having the right tools on hand will make the process much easier.
Types of Electric Floor Heating Systems
There are two main types of electric floor heating systems available: electric radiant mats and electric heating cables. Depending on your needs and the area you want to heat, you can choose the most suitable system for your installation.
1. Electric Radiant Mats: These mats are pre-sized, making installation quick and easy. They consist of a heating element attached to a mesh or fabric backing.
2. Electric Heating Cables: These cables can be customized to fit any room size or shape. They are usually installed in a serpentine pattern to evenly distribute heat across the floor.
When selecting a system, consider factors such as the size of the room, floor type, and insulation.
Now that you know the essential tools you need and the types of electric floor heating systems available, you are ready to move on to the next step: preparing the subfloor for installation.
Preparing The Subfloor
Before you can install electric in-floor heating, it’s crucial to properly prepare the subfloor. This step is essential in ensuring a successful and long-lasting installation. There are three main tasks involved in preparing the subfloor: cleaning and leveling the subfloor, applying a primer, and using a waterproofing membrane.
Cleaning and Leveling the Subfloor
Prior to installing electric in-floor heating, it’s necessary to clean and level the subfloor. This ensures a smooth and even surface for the heating elements to sit on. Here are the steps to follow:
- Start by removing any existing flooring materials or debris from the subfloor. This includes carpet, tile, adhesive residue, or any other obstructions.
- Inspect the subfloor for any cracks, holes, or uneven areas. Fill in any gaps using a suitable leveling compound and allow it to dry completely. This will provide a solid and uniform surface for the heating elements.
- Once the leveling compound is dry, thoroughly clean the subfloor to remove any dust, dirt, or grease. A clean surface helps ensure proper adhesion of the primer and waterproofing membrane.
- Lastly, ensure that the subfloor is dry and free from moisture. Excessive moisture can interfere with the effectiveness and performance of the electric in-floor heating system.
Applying a Primer and Waterproofing Membrane
After cleaning and leveling the subfloor, the next step is to apply a primer and a waterproofing membrane. These two components provide added protection to the subfloor and facilitate the proper functioning of the electric in-floor heating system. Here’s how to do it:
- Apply a coat of primer to the clean and dry subfloor using a paint roller or brush. The primer helps improve adhesion between the subfloor and the waterproofing membrane.
- Allow the primer to dry completely according to the manufacturer’s instructions. This typically takes a few hours.
- Next, apply the waterproofing membrane over the primed subfloor. Use a trowel or a suitable tool to spread the membrane evenly, creating a consistent layer.
- Ensure that the entire subfloor is covered with the waterproofing membrane, paying extra attention to corners and edges. This will help prevent any moisture or water damage to the heating elements.
- Allow the waterproofing membrane to cure, typically for at least 24 hours, before proceeding with the installation of the electric in-floor heating system.
By following these steps and properly preparing the subfloor, you’ll create a solid and reliable foundation for your electric in-floor heating system. This ensures efficient and comfortable heat distribution in your space, allowing you to enjoy the benefits of a cozy and warm floor throughout the year.
Determining The Layout And Placement
One of the key steps in installing electric in-floor heating is determining the layout and placement of the heating elements. This crucial stage ensures that the heating system is optimized for efficiency and comfort in your space. In this article, we will guide you through the process of planning the layout based on room configuration and ensuring proper spacing and coverage.
Planning the Layout Based on Room Configuration
When planning the layout of your electric in-floor heating system, it is important to consider the unique configuration of each room. Each space may have different obstacles, such as fixtures, appliances, and furniture, that need to be taken into account. By doing so, you can ensure that the heating elements are strategically placed to provide even heat distribution throughout the room.
In order to determine the ideal layout, start by drawing a detailed floor plan of the room. Take accurate measurements and note the location of any potential obstacles. This will give you a clear visual representation of the space and help you determine where the heating elements should be installed.
Consider the usage of the room as well. For example, in a bathroom, you may want to focus on heating the area around the bathtub or shower. In a kitchen, you might want to concentrate on the heating elements near the food preparation and cooking areas. By identifying the specific areas that require more heat, you can create a customized layout that caters to your specific needs.
Ensuring Proper Spacing and Coverage
Once you have determined the layout based on the room configuration, it is crucial to ensure proper spacing and coverage of the heating elements to optimize the efficiency of the system. The spacing between the heating cables should be determined based on the power output of the cables, which will vary depending on the manufacturer and the specific requirements of your space.
A general rule of thumb is to ensure that the heating cables are evenly spaced to avoid any cold spots or overheating. This can typically be achieved by following the manufacturer’s guidelines and recommendations. Additionally, consider the size and shape of the room when spacing the heating elements. Smaller rooms may require closer spacing, while larger rooms may require wider spacing to ensure even heat distribution.
It is also important to ensure that the coverage of the heating elements is sufficient for the entire room. This can be achieved by calculating the required wattage based on the square footage and adjusting the placement of the heating cables accordingly. By ensuring proper spacing and coverage, you can maximize the comfort and efficiency of your electric in-floor heating system.
Installing The Heating Mats Or Cables
One of the most important steps in installing electric in-floor heating is positioning and securing the mats or cables correctly. Ensuring proper placement will ensure efficient heat distribution and an evenly heated floor. Additionally, connecting the heating elements properly is crucial to ensure the system operates safely and effectively. In this section, we will discuss the steps involved in positioning and securing the mats or cables, as well as connecting the heating elements.
Positioning and Securing the Mats or Cables
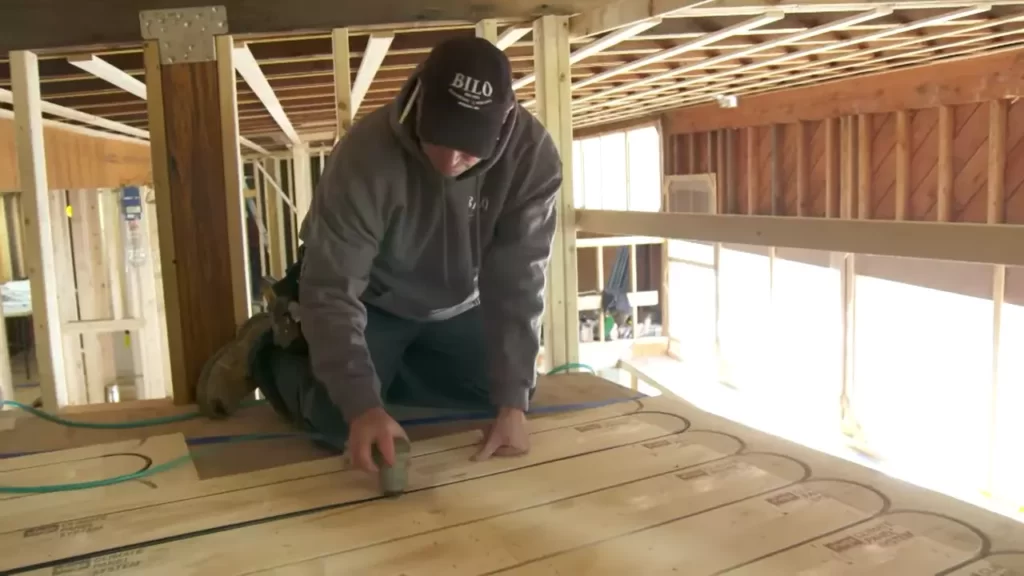
Before you begin, it’s essential to plan the layout of the heating mats or cables to ensure maximum coverage and efficient heating. Here’s how you can position and secure the mats or cables:
- Start by measuring the area and determining the amount of heating material you will need.
- Ensure that the subfloor is clean, dry, and free of any debris or obstacles that may interfere with proper installation.
- If you’re using heating mats, roll them out on the subfloor according to your layout plan. Make sure to leave a gap of at least 2 inches from walls, cabinets, or other fixed objects.
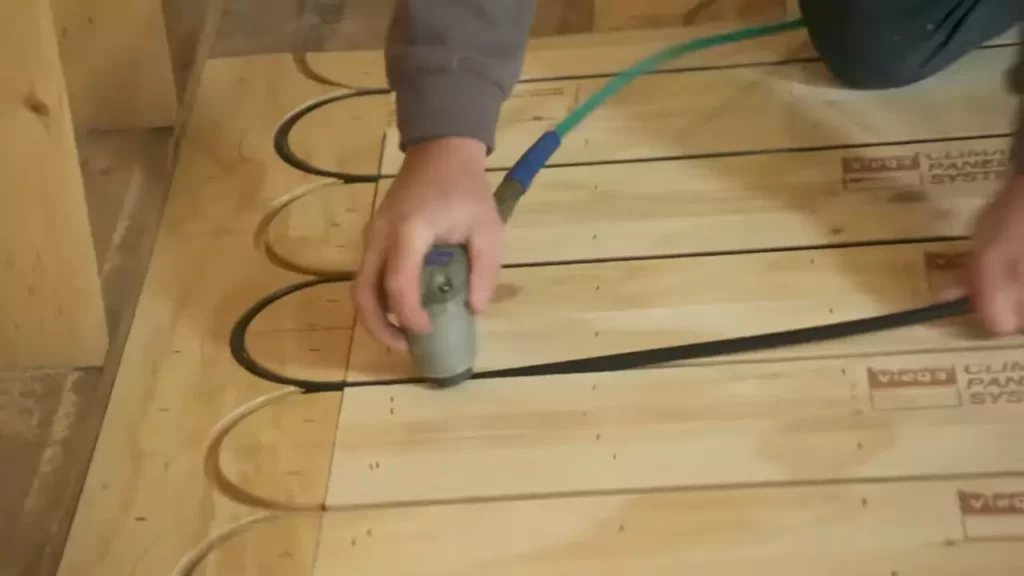
- If you’re using heating cables, use adhesive-backed, metal tape to secure them in place. Place the tape at regular intervals to prevent the cables from shifting during installation.
- Ensure that the mats or cables are evenly spaced and cover the desired heating area. Adjust as necessary to achieve uniform coverage.
- To secure the mats, use double-sided tape or adhesive to attach them to the subfloor. For cables, use additional strips of adhesive-backed metal tape to secure the cables in place.
- Carefully inspect the installation to ensure all mats or cables are securely positioned and there are no kinks, twists, or overlaps.
Connecting the Heating Elements
Once the mats or cables are correctly positioned and secured, the next step is to connect the heating elements. Here’s how you can do it:
- Locate the cold lead wire attached to the mats or cables. The cold lead wire is the section that will connect to the thermostat.
- Use a utility knife or wire strippers to remove the outer insulation from the cold lead wire, exposing the inner conductors.
- Using wire connectors or appropriate terminal blocks, connect the cold lead wires to the corresponding electrical wires from the thermostat. Make sure to follow the manufacturer’s instructions for proper connection.
- Once all the connections are secure, use electrical tape or heat shrink tubing to insulate and protect the connections from moisture or damage.
- Test the system to ensure it’s functioning properly before proceeding with the rest of the installation process.
By following these steps, you will be able to position, secure, and connect the heating mats or cables efficiently, setting the foundation for a successful electric in-floor heating installation.
Wiring And Electrical Connections
When it comes to installing electric in-floor heating, understanding the wiring and electrical connections is crucial. This step ensures a safe and efficient installation that will provide you with comfortable warmth for many years to come. In this section, we will guide you through the process of consulting local electrical codes and regulations, as well as installing thermostats and controllers.
Consulting Local Electrical Codes and Regulations
Before beginning any electrical work, it is essential to consult your local electrical codes and regulations. These codes are put in place to ensure the safety of the electrical system and the people using it. Failure to adhere to these regulations can result in serious consequences, such as electrical hazards, fire hazards, or legal implications. It is advisable to contact a licensed electrician or your local municipality to obtain accurate information regarding the specific requirements for installing electric in-floor heating in your area.
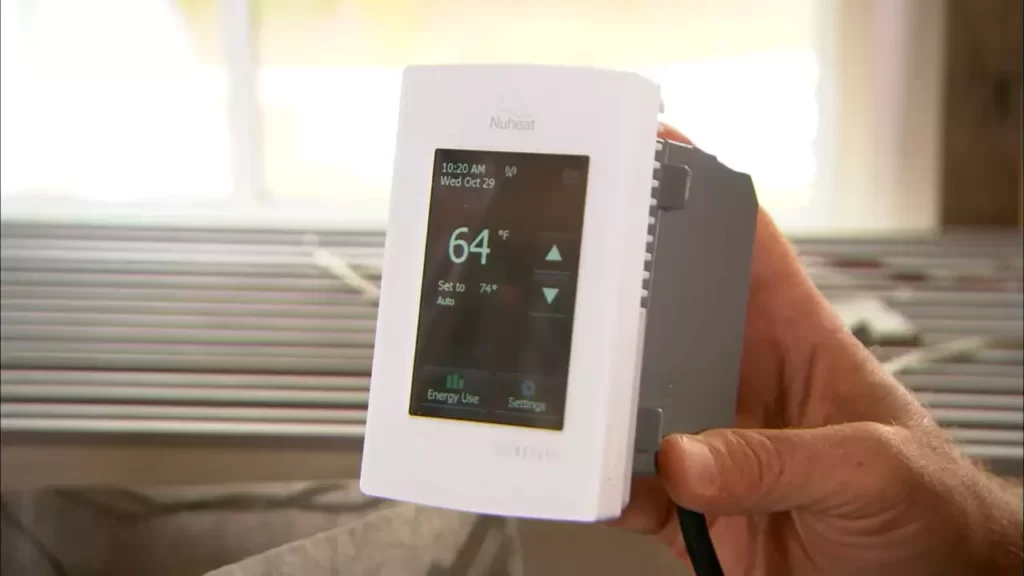
Installing Thermostats and Controllers
In order to control and regulate the temperature of your in-floor heating system, you will need to install thermostats and controllers. These devices allow you to set and adjust the desired temperature within your space, providing optimal comfort and energy efficiency. Before installing thermostats and controllers, ensure that you follow the manufacturer’s instructions and guidelines. Here are some key steps to consider:
- Locate the appropriate location for your thermostats and controllers. Ideally, they should be installed in a central area that allows for easy access and provides accurate temperature readings.
- Follow the wiring instructions provided by the manufacturer. This typically involves connecting the thermostat or controller to the power source and the in-floor heating system.
- Secure the thermostat or controller to the wall using the provided mounting hardware.
- Test the functionality of the thermostats and controllers to ensure proper operation.
By following these steps and consulting your local electrical codes and regulations, you can confidently install the wiring and electrical connections for your electric in-floor heating system.
Conducting A System Test
In order to ensure that your electric in-floor heating system is functioning properly and distributing heat evenly, it is important to conduct a system test. This will help you detect any issues early on and ensure optimal performance for your heating system. In this section, we will discuss two important aspects of conducting a system test: checking for proper functioning and heat distribution, and troubleshooting common issues.
Checking for Proper Functioning and Heat Distribution
Once your electric in-floor heating system is installed, it is crucial to verify that it is functioning as expected. To do so, follow these steps:
- Turn on the thermostat and set it to your desired temperature. Allow the system some time to warm up.
- Walk around the room and feel the floor in different areas. The heat should be evenly distributed and provide a comfortable warmth throughout.
- If you notice any cold spots or areas that feel significantly cooler than others, there might be a problem with the installation or wiring. In such cases, it is recommended to consult a professional electrician to address the issue.
- Check the thermostat readings to ensure that it matches the temperature you have set. If there is a significant difference, it might indicate a thermostat malfunction.
Troubleshooting Common Issues
Despite proper installation, certain issues may arise with your electric in-floor heating system. Here are some common problems and their possible solutions:
| Issue | Possible Solution |
|---|---|
| No heat | Check the circuit breaker to make sure it hasn’t tripped. If it has, reset it and monitor the system. If the problem persists, call a professional electrician. |
| Uneven heat distribution | Inspect the floor for any obstructions such as rugs or furniture that may be blocking the heat from reaching certain areas. If necessary, rearrange the furniture or remove any barriers. |
| Thermostat not responding | Double-check the thermostat settings and ensure it is properly connected to the electrical supply. If the issue persists, replace the batteries or contact the manufacturer for further assistance. |
By conducting a thorough system test and troubleshooting any issues that arise, you can ensure that your electric in-floor heating system operates efficiently and provides optimal comfort throughout your space.
Covering The Heating System
Once you have successfully installed the electric in-floor heating system, it is time to move on to the next crucial step: covering the system to ensure its longevity and efficiency. Proper covering not only protects the heating elements but also provides a smooth surface for the final flooring material. In this section, we will discuss two essential steps for covering the heating system: applying a layer of thinset mortar and installing the final flooring material.
Applying a Layer of Thinset Mortar
To properly cover the electric in-floor heating system, start by applying a layer of thinset mortar. Thinset mortar serves as a protective barrier between the heating system and the final flooring material. It provides stability and prevents any damage to the heating wires or mats.
Here’s a step-by-step guide to applying a layer of thinset mortar:
- Clean the subfloor thoroughly to ensure there is no dust or debris.
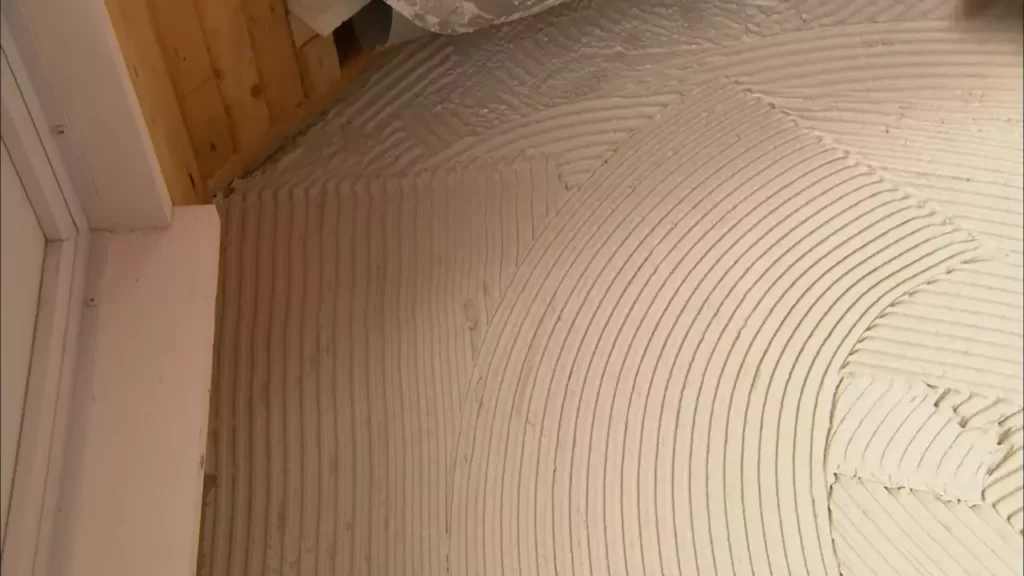
- Prepare the thinset mortar according to the manufacturer’s instructions. Using a trowel, spread a thin, even layer of mortar over the entire floor surface.
- Make sure the mortar is applied evenly and is of the specified thickness. Check the manufacturer’s guidelines for the recommended thickness.
- Use a notched trowel to create ridges in the mortar. This will help with the adhesion of the final flooring material. The size of the notched trowel depends on the size and type of the flooring material you will be using.
- Allow the thinset mortar to cure for the recommended time, typically 24 hours, before proceeding with the installation of the final flooring material.
Installing the Final Flooring Material
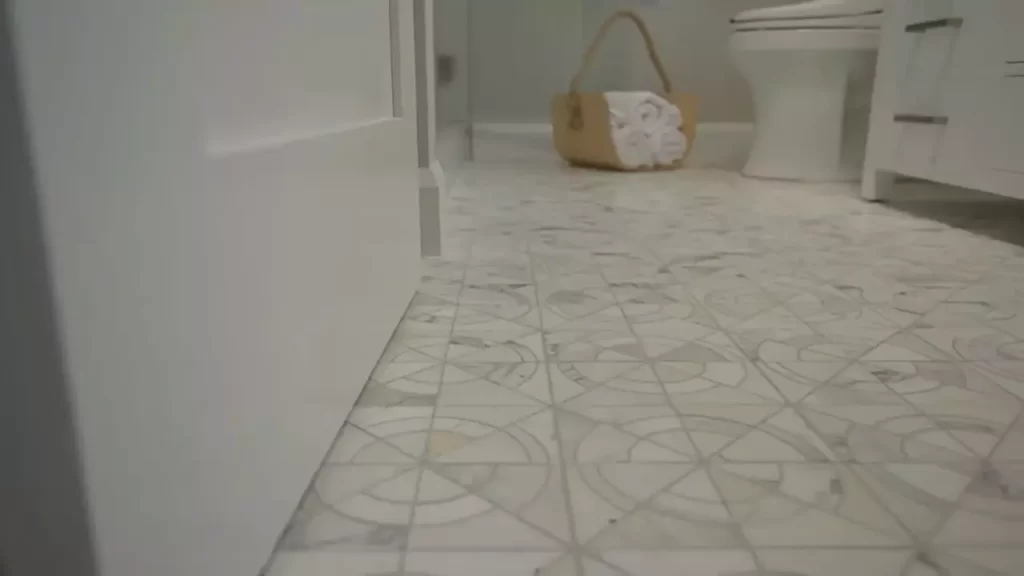
Now that the thinset mortar has cured, it’s time to install the final flooring material. The choice of flooring material depends on your personal preference and the requirements of your space. Some popular options include tile, laminate, and hardwood.
Follow these steps to install the final flooring material:
- Prepare the flooring material according to the manufacturer’s instructions. This may involve cutting the material to the right size or acclimating it to the room temperature.
- Start by laying the first piece of flooring material along one of the walls, leaving a small gap between the material and the wall.
- Continue laying the flooring material, ensuring each piece is properly aligned and fits snugly against the adjacent pieces. Use spacers to maintain consistent spacing between the pieces.
- Work your way across the room, taking care to avoid damaging the heating system as you go.
- Once all the flooring material is installed, allow it to settle for the recommended time before walking on it or applying any additional finishes or treatments.
By following these steps to cover the electric in-floor heating system, you can ensure its longevity and enjoy the comfort of warm floors throughout your space. Remember to refer to the manufacturer’s instructions for specific guidelines and consult a professional if you are unsure about any step in the process.
Regular Maintenance Practices
Regular maintenance is key to maintaining the efficiency and longevity of your electric in-floor heating system. By following a few simple maintenance practices, you can ensure that your system operates smoothly for years to come. In this section, we will discuss two important aspects of maintenance: cleaning and inspecting the heating system and replacing faulty components.
Cleaning and Inspecting the Heating System
Keeping your electric in-floor heating system clean and regularly inspecting it is essential for optimal performance. A thorough cleaning and inspection routine can prevent potential issues and keep your heating system running smoothly. Follow these steps to clean and inspect your heating system:
- Start by turning off the power to the heating system at the main electrical panel. This will ensure your safety during the cleaning and inspection process.
- Remove the floor coverings and expose the heating system’s components.
- Use a soft cloth or vacuum with a brush attachment to remove any dust, dirt, or debris from the heating cables or mats. Take extra care not to damage the cables during the cleaning process.
- Inspect the cables and mats for any signs of wear, damage, or loose connections. Look for frayed wires, exposed insulation, or discolored areas. If you notice any issues, it is important to address them immediately to prevent further damage.
- If there are any visible obstructions such as furniture or rugs on top of the heating system, make sure to remove them, as they can restrict heat distribution and reduce efficiency.
- After cleaning and inspecting the heating system, carefully reinstall the floor coverings, ensuring they are properly aligned and do not interfere with the heating system.
- Lastly, restore power to the heating system and test it to ensure it is functioning correctly.
Replacing Faulty Components
Over time, certain components of your electric in-floor heating system may become faulty or worn out. It is important to replace these components promptly to prevent further damage and ensure the system’s efficiency. Here are some steps to follow when replacing faulty components:
- Identify the specific component that needs replacement. This could be a thermostat, relay, sensor, or any other part of the heating system.
- Turn off the power to the heating system at the main electrical panel.
- Follow the manufacturer’s instructions to safely remove the faulty component.
- Install the new component according to the manufacturer’s instructions, ensuring proper alignment and connection.
- Double-check all connections and secure them tightly to avoid any loose wiring.
- Restore power to the heating system and test the newly installed component to ensure it is functioning correctly.
By regularly cleaning, inspecting, and replacing faulty components, you can maintain the efficiency and effectiveness of your electric in-floor heating system. Remember to always follow the manufacturer’s guidelines and consult a professional if you are unsure about any maintenance procedures.
Troubleshooting Common Problems
Installing electric in-floor heating is an excellent way to create a cozy and comfortable living space. However, like any other electrical system, it can encounter malfunctions and issues that may hinder its proper functioning. In this section, we will discuss how to identify and address common heating system malfunctions and when it’s necessary to seek professional assistance.
Identifying and Addressing Heating System Malfunctions
When your electric in-floor heating system is not working as expected, it’s essential to identify the problem before attempting any repairs. Here are some common malfunctions and troubleshooting steps:
- No Heat Output: If your electric in-floor heating system is not producing any heat, check the thermostat settings first. Ensure that the thermostat is set to the correct temperature and mode (e.g., heating mode). If the settings are correct, inspect the circuit breaker and ensure it is not tripped. Reset it if necessary and monitor if the heat output is restored.
- Inconsistent Heat: In cases where the heat output varies or is inconsistent, check the thermostat calibration. Ensure that the thermostat is correctly calibrated by comparing the displayed temperature with a reliable thermometer. Consider recalibrating it if necessary. Additionally, inspect the floor sensor and verify if it is securely connected to the thermostat.
- Uneven Heat Distribution: If your electric in-floor heating system is not providing uniform heat across the floor, the cause might be improper cable spacing or installation. Refer to the manufacturer’s guidelines to determine the optimal cable spacing for your specific floor heating system. If necessary, reinstall the cables or seek professional assistance to rectify the issue.
- Thermostat Display Issues: Another common problem is when the thermostat display is not functioning correctly. If you notice any blank screens or erratic readings, check the power supply to the thermostat. Ensure it is securely connected and providing the required voltage. If the issue persists, consider replacing the thermostat.
Seeking Professional Assistance
While many electric in-floor heating system issues can be resolved through troubleshooting, there are instances where professional assistance is necessary. These situations include:
- Difficult-to-Identify Problems: If you are unable to determine the cause of the heating system malfunction or the troubleshooting steps do not resolve the issue, it’s best to contact a qualified electrician or HVAC technician. They have the expertise to diagnose and resolve complex problems.
- Electrical Wiring Concerns: Dealing with electrical wiring can be hazardous without proper knowledge and experience. If you suspect any issues with the electrical wiring of your in-floor heating system, it’s crucial to consult an electrician. They can ensure the safety of the installation and rectify any wiring problems.
- Manufacturer Warranty: If your electric in-floor heating system is still under warranty, it’s advisable to seek professional assistance for any repairs or malfunctions. Attempting DIY repairs might void the warranty, causing you unnecessary expenses.
Remember, troubleshooting common problems with your electric in-floor heating system should always be done with caution. Prioritize your safety, and when in doubt, consult a professional to ensure the proper functioning and longevity of your heating system.
Frequently Asked Questions Of How To Install Electric In Floor Heating
Can I Install Electric Underfloor Heating Myself?
Yes, you can install electric underfloor heating yourself. It is a straightforward process that does not require professional help. However, it is important to follow the installation instructions carefully to ensure safety and efficiency.
How Do You Install Electric Floor Heating?
To install electric floor heating, follow these steps:
- Start by carefully measuring the floor area.
- Clean the surface and ensure it is dry.
- Lay out the heating mats or cables evenly.
- Connect the heating system to the thermostat and electrical supply.
- Test the system to ensure it is functioning properly.
Can I Install Radiant Floor Heating Myself?
Yes, you can install radiant floor heating yourself. It’s important to follow installation instructions carefully and have basic knowledge of plumbing and electrical work. However, for complex or large-scale projects, it’s recommended to hire a professional to ensure safety and optimal performance.
Is Electric Under Floor Heating Worth It?
Yes, electric underfloor heating is worth it. It provides efficient and even heat distribution, offering comfort and reducing energy costs. Installed beneath the floor, it’s discreet and allows freedom in room layout. Additionally, it is easy to control and install, making it a popular choice for many homeowners.
Conclusion
To sum up, installing electric in-floor heating is a practical and efficient way to keep your home comfortably warm during the cold months. By following the step-by-step guide provided in this blog post, you can confidently take on this project yourself.
Remember to prioritize safety, consult with professionals if needed, and enjoy the cozy and even heat that electric in-floor heating provides. Start heating your home in style today!