To install a natural gas grill, begin by checking for a nearby gas line and ensuring the grill is compatible with natural gas. Then, connect the grill to the gas line using a flexible gas hose and a shut-off valve.
Finally, test for leaks using soapy water and light the burners to ensure proper functionality.
Getting Started With Natural Gas Grills
Installing a natural gas grill in your backyard can be an exciting and convenient addition to your outdoor cooking experience. With the availability of a continuous fuel supply and the ease of use, natural gas grills have become a popular choice for many outdoor cooking enthusiasts. In this guide, we will take you through the process of installing a natural gas grill, starting with the benefits of using one.
Benefits of using a natural gas grill
There are several advantages to using a natural gas grill:
- Continuous fuel supply: Unlike traditional grills that require propane tanks or charcoal, a natural gas grill is connected to your home’s gas line, ensuring a continuous supply of fuel. You won’t have to worry about running out of propane or making trips to the store.
- Cost-effective: Natural gas is generally cheaper than propane, making it a cost-effective option for cooking outdoors. Additionally, you won’t need to spend money on propane tank refills or charcoal bags.
- Convenience: Natural gas grills are incredibly convenient to use. With just a push of a button, you can start cooking immediately. There’s no need to light charcoal or wait for the grill to heat up.
- Eco-friendly: Natural gas grills produce fewer emissions compared to other types of grills. They are a more environmentally friendly option, as they release fewer pollutants into the air.
- Consistent heat: Natural gas grills provide a consistent heat source, allowing you to achieve even cooking results. You can easily adjust the temperature to suit your specific cooking needs.

Safety precautions for installing a natural gas grill
Before you begin the installation process, it’s important to take the necessary safety precautions:
- Read the manufacturer’s instructions: Familiarize yourself with the manufacturer’s instructions for your specific natural gas grill. Each grill may have unique installation requirements and safety guidelines.
- Check for gas leaks: Before connecting the gas line, make sure to perform a leak test. You can use a mixture of soap and water to check for any bubbles that indicate a gas leak. If you notice any leaks, turn off the gas supply and consult a professional.
- Ensure proper ventilation: When setting up your natural gas grill, make sure there is proper ventilation to allow any gas fumes to dissipate. This can help prevent the buildup of potentially dangerous gases.
- Keep flammable materials away: It’s important to keep flammable materials, such as gasoline or lighter fluid, away from your natural gas grill. These materials can pose a fire hazard if ignited.
- Regular maintenance: Regularly inspect and clean your natural gas grill to ensure it is in good working condition. This can help prevent any potential safety issues and prolong the lifespan of your grill.
By understanding the benefits of using a natural gas grill and taking the necessary safety precautions, you can confidently proceed with installing and enjoying your outdoor cooking experience.
Purchasing The Right Natural Gas Grill
When it comes to BBQ season, there’s nothing quite like grilling up a delicious meal on a natural gas grill. But before you can start cooking, you’ll need to purchase the right grill for your needs. With so many options available, it can be overwhelming to choose the perfect one. In this section, we’ll guide you through the process of selecting the right natural gas grill that meets your requirements.
Factors to consider when buying a natural gas grill
Choosing the appropriate size and features for your needs:
1. __Size:__ The size of your grill should depend on the space available in your outdoor cooking area. Consider the number of people you typically cook for and whether you entertain guests often. A small grill may be sufficient for a couple or small family, while larger grills are better suited for larger gatherings.
2. __Features:__ Different grills come with various features such as side burners, rotisserie kits, and built-in thermometers. Consider what features are important to you and will enhance your grilling experience. For example, if you enjoy cooking sauces and sides simultaneously, a grill with a side burner is essential.
Researching reliable brands and models
Not all grills are created equal, so it’s important to research reliable brands and models. Look for reputable manufacturers known for their quality craftsmanship and durable materials. Consider reading customer reviews and ratings to get an unbiased opinion on various grills. Look for feedback on features, performance, and overall customer satisfaction.
Make a list of the reputable brands and models that meet your desired criteria. Ensure the grill you choose has positive reviews and a high customer satisfaction rating. This way, you can be confident in your purchase and enjoy your natural gas grill for years to come.
Steps For Installing A Natural Gas Grill
If you have recently purchased a natural gas grill and are eager to fire it up, you’ll need to ensure it is properly installed first. Installing a natural gas grill may seem daunting, but with the right steps, you can have it up and running in no time. In this guide, we will walk you through the necessary steps to install a natural gas grill, from selecting the ideal location to conducting safety checks.
Location Selection for the Grill Installation
Before you start installing your natural gas grill, it is essential to choose the right location. Consider the following factors:
- Safety: Select a location that is away from flammable materials, such as overhanging branches or decks.
- Accessibility: Ensure that the grill is easily accessible for cooking and maintenance purposes.
- Ventilation: Opt for an open area with good ventilation to prevent the buildup of gas fumes.
- Proximity to the gas supply line: Ideally, the location should be close to the existing natural gas supply line to minimize installation costs.
Preparing the Area for Installation
Once you have selected the perfect location for your natural gas grill, it’s time to prepare the area for installation. Follow these steps:
- Clear the area: Remove any obstacles, debris, or flammable materials from the installation site.
- Level the ground: Ensure that the ground is level to provide a stable foundation for the grill.
- Set up a non-combustible base: Place a non-combustible base, such as concrete pavers, under the grill to protect the surface beneath.
Connecting the Grill to the Natural Gas Supply Line
Now that the area is prepared, it’s time to connect your natural gas grill to the gas supply line. Follow these instructions:
- Locate the gas supply line: Find the existing natural gas supply line that runs to your home.
- Shut off the gas supply: Make sure to shut off the gas supply before connecting the grill.
- Install a shut-off valve: Install a shut-off valve near the connection site for easy access in case of emergencies or maintenance.
- Connect the grill: Use a flexible hose to connect your grill to the gas supply line, ensuring a tight fit.
- Double-check for leaks: Apply soapy water to the gas connections to detect any leaks. If bubbles form, immediately turn off the gas supply and check the connections.
With the grill installed and connected, it’s crucial to test for gas leaks and perform safety checks. Follow these guidelines:
- Leak detection: Apply soapy water to all gas connections, valves, and joints. If bubbles appear, there may be a gas leak that needs to be addressed before using the grill.
- Check for proper ignition: Test the ignition system of the grill to ensure it is working correctly.
- Inspect the grill: Carefully examine the grill for any damage or loose parts that could pose a safety risk.
- Read the manufacturer’s instructions: Familiarize yourself with the grill’s user manual and follow any additional safety guidelines provided by the manufacturer.
By following these steps, you can safely and correctly install your natural gas grill and enjoy many delicious cookouts in the comfort of your outdoor space. Remember to always prioritize safety and consult a professional if you encounter any issues during the installation process.

Obtaining Necessary Tools And Materials
Before you can begin the installation process for your natural gas grill, it’s important to gather all the essential tools and materials. Having everything you need at hand will not only save you time but also ensure a smooth and trouble-free installation. In this section, we will provide you with a comprehensive list of tools required for installation as well as the components and materials needed for a secure connection.
List of tools required for installation
Make sure you have these tools readily available before you start installing your natural gas grill:
- Adjustable wrench
- Phillips screwdriver
- Flathead screwdriver
- Pipe wrench
- Gas leak detection solution
- Thread sealer (appropriate for natural gas)
- Measuring tape
- Level
- Power drill
- Drill bits (appropriate for your grill’s mounting system)
Components and materials needed for connection
In addition to the tools mentioned above, you’ll need the following components and materials to ensure a secure connection for your natural gas grill:
| Components | Materials |
|---|---|
|
|
|
|
|
|
|
|
|
|
Remember that the specific components and materials required may vary depending on the make and model of your natural gas grill and your existing gas line setup. It’s always a good idea to consult the manufacturer’s instructions or seek professional advice if you’re unsure about the compatibility of certain parts.
Now that you have a clear understanding of the tools and materials needed, you’re ready to move on to the next step: preparing the installation site. Stay tuned for our next section, where we’ll guide you through the process of choosing an ideal location for your natural gas grill.
Checking Local Codes And Regulations
When it comes to installing a natural gas grill, it’s important to start by checking your local codes and regulations. Researching local building codes and regulations, understanding permit requirements if applicable, and hiring a professional if needed are essential steps in ensuring your installation is safe and compliant.
Researching local building codes and regulations
Before you begin the installation process, take the time to research your local building codes and regulations related to outdoor natural gas grill installations. These codes and regulations vary from one jurisdiction to another, so it’s crucial to be well-informed about what is allowed and what is not. This research will help you understand the specific requirements you need to follow when installing your natural gas grill.
Understanding permit requirements, if applicable
In some areas, obtaining a permit for the installation of a natural gas grill may be necessary. Check with your local authorities to determine if a permit is required for your specific installation. If permits are needed, it’s important to ensure you comply with the permit application process and any associated fees. Failing to obtain the necessary permits can result in fines or the need to remove the grill altogether.
Hiring a professional if needed
Installing a natural gas grill can be a complex process that requires expertise in dealing with gas connections and safety precautions. If you’re not confident in your own skills or if local regulations require professional installation, it’s highly recommended to hire a licensed professional to handle the job. They will ensure that the installation is done correctly and safely, giving you peace of mind.
To conclude, checking your local codes and regulations is a vital step in the installation process of a natural gas grill. By researching the local building codes, understanding permit requirements, if applicable, and hiring a professional if needed, you can ensure that your grill installation is compliant with regulations and done safely. Complying with local codes not only helps to ensure your safety but also prevents potential legal issues and fines.
Preparing The Installation Area
Before installing a natural gas grill, it is essential to prepare the installation area properly. This ensures a safe and convenient setup, allowing you to enjoy outdoor cooking without any hassle. Preparing the installation area involves clearing the space for the grill, leveling the ground or patio surface, and considering ventilation and safety precautions.
Clearing the Space for the Grill
Prior to installing a natural gas grill, it is important to clear the space where it will be placed. Begin by removing any debris, including leaves, branches, or rocks. Clearing the area not only improves the aesthetic appeal but also removes any potential fire hazards or obstructions.
Leveling the Ground or Patio Surface
Once the area is clear, the next step is to ensure that the ground or patio surface is level. A level surface is crucial for the stability and safety of your natural gas grill. Use a level or a straightedge to check the ground for any unevenness. If you notice any areas that are not level, you can use a shovel or a rake to adjust the ground appropriately. It is important to have a stable foundation to prevent any accidents or damage to the grill.
Considering Ventilation and Safety Precautions
Ventilation is an important consideration when installing a natural gas grill. Adequate airflow around the grill helps prevent the accumulation of gas and reduces the risk of flare-ups or explosions. Ensure that the grill is placed at a safe distance from any flammable materials, such as wooden structures or vegetation. Also, consider the proximity to your home’s windows or doors to avoid any potential gas buildup indoors.
Furthermore, it is essential to follow safety precautions provided by the grill manufacturer. This may include maintaining a minimum clearance from combustible materials, using a proper gas connection, and checking for any leaks before igniting the grill. Following these safety guidelines ensures that you can safely enjoy your natural gas grill.
Connecting The Grill To The Gas Supply
Installing a natural gas grill in your outdoor space can enhance your culinary experience and make outdoor cooking more convenient. One crucial step in this process is connecting the grill to the gas supply. This ensures that the grill receives the proper fuel it needs to function efficiently. Here’s a step-by-step guide on how to connect your natural gas grill to the gas supply, while prioritizing safety and following the necessary protocols.
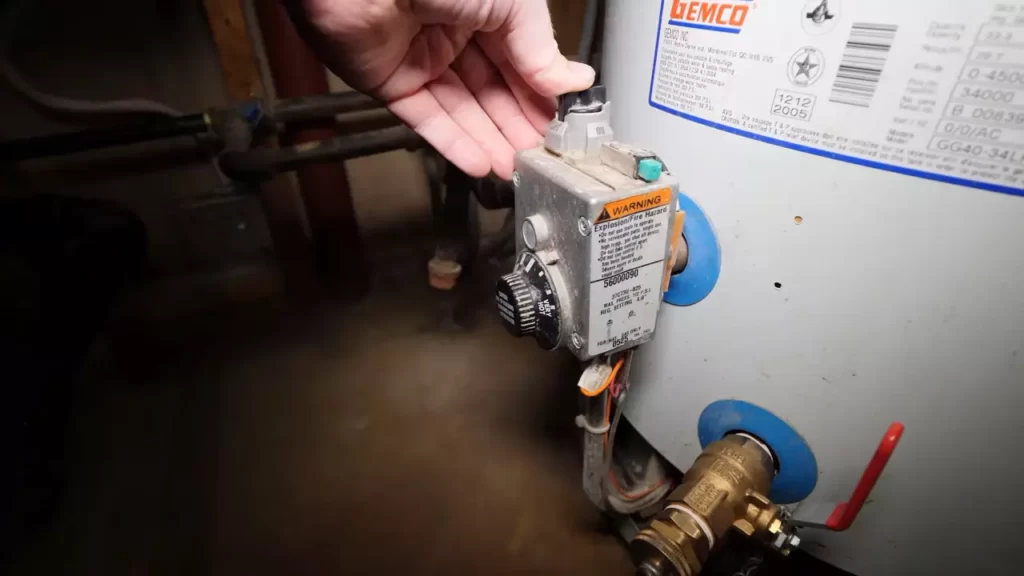
Shutting off the Gas Supply and Ensuring Safety
Before you start connecting your natural gas grill to the gas supply, it is essential to first shut off the gas supply and ensure safety. Follow these steps:
- Locate the gas shut-off valve near your outdoor area or the main gas meter.
- Turn the valve to the “Off” position to cut off the gas supply. This step is crucial for safety reasons and to prevent any potential gas leaks.
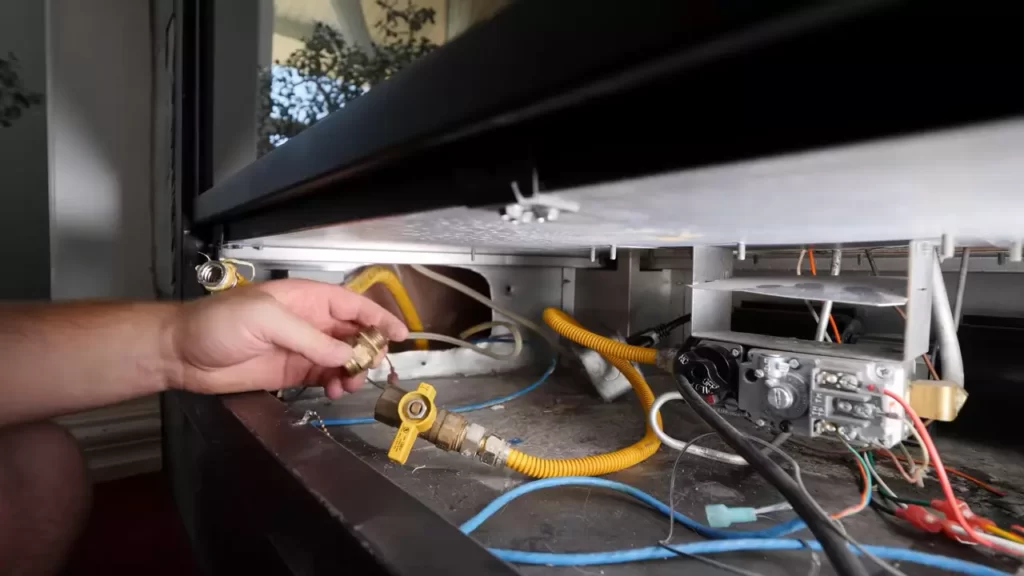
Attaching a Flexible Gas Line to the Grill
Once the gas supply is shut off, you can proceed to attach a flexible gas line to your grill. Here’s how:
- Inspect the gas line and ensure it is free from any damage or wear. If any irregularities are found, it is recommended to replace the line.
- Check the connections on the grill and make sure they are clean and free from dirt or debris.
- Attach one end of the flexible gas line to the grill’s gas connection.
- Apply a thin layer of pipe compound or gas-rated Teflon tape to the threaded end of the gas line to create a secure seal.
- Tighten the connection by using a wrench. Make sure not to overtighten, as it could damage the fittings.
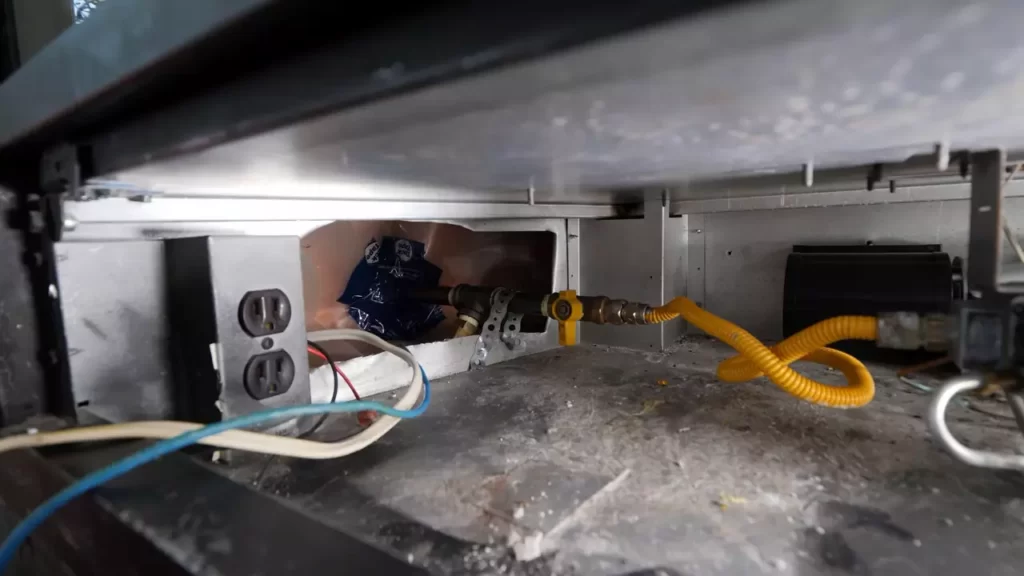
Connecting the Gas Line to the Existing Gas Supply
With the gas line securely attached to the grill, it’s time to connect it to the existing gas supply. Follow these steps:
- Locate the gas supply line already installed in your outdoor area.
- Inspect the gas supply line and ensure it is in good condition without any leaks or damage.
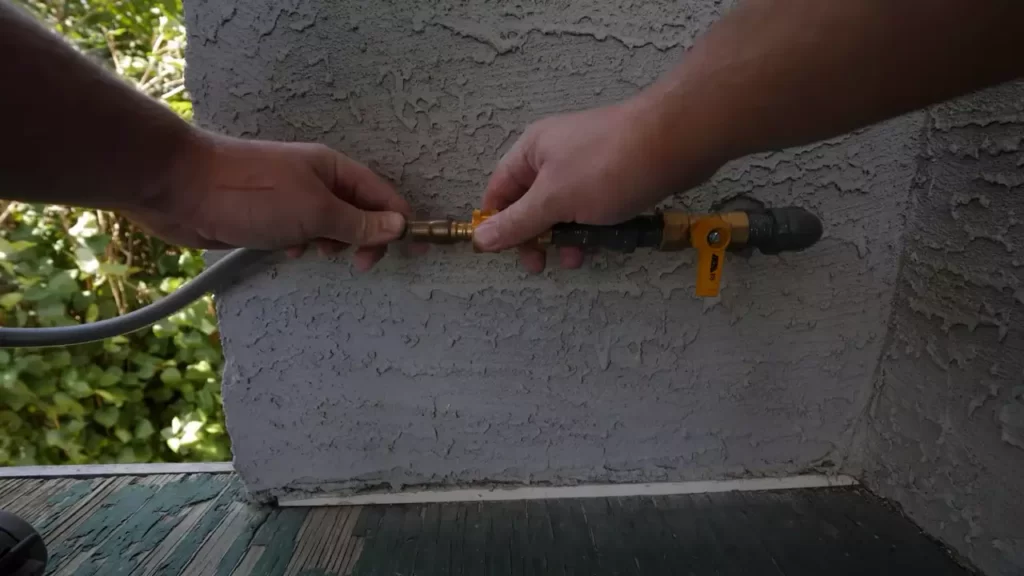
- Attach the other end of the flexible gas line to the gas supply line.
- Apply a thin layer of pipe compound or gas-rated Teflon tape to the threaded end of the gas supply line.
- Tighten the connection using a wrench, ensuring it is securely fastened but not excessively tight.
Connecting your natural gas grill to the gas supply requires careful attention to safety measures and proper installation techniques. By following these steps and adhering to the necessary protocols, you can ensure a reliable and safe connection that will allow you to enjoy your outdoor grilling sessions to the fullest.
Testing For Gas Leaks And Safety Checks
Conducting a Soap and Water Test for Leaks
One of the most important steps in installing a natural gas grill is testing for gas leaks. It is crucial to ensure the safety of your installation and prevent any potential accidents. A simple and effective method to detect gas leaks is by performing a soap and water test.
Here’s how you can conduct a soap and water test for leaks:
- Mix a solution of dish soap and water in a spray bottle.
- Turn on the gas supply valve of the grill.
- Spray the solution onto all the gas connections, including the hose, regulator, and burner valves.
- Observe closely for any signs of bubbles forming.
- If you notice bubbles forming, it indicates a gas leak. In such cases, tighten the affected connection or replace any faulty components before proceeding.
- Repeat the test after tightening or replacing any components to ensure there are no further leaks.
Ensuring Proper Ventilation and Airflow
Proper ventilation and airflow are essential for the safe operation of a natural gas grill. Without adequate ventilation, the buildup of gas can lead to dangerous situations.
Consider the following steps to ensure proper ventilation and airflow:
- Place the grill in an open area, away from any combustible materials and structures.
- Ensure there is sufficient space around the grill to allow for proper airflow.
- If installing the grill in an enclosed space, such as a patio or covered area, make sure there are proper vents to allow gas to dissipate.
- Regularly clean and maintain the ventilation openings to prevent any obstructions.
Verifying All Connections Are Secure and Functioning Correctly
The integrity of the connections in your natural gas grill is crucial to its safe operation. Any loose or faulty connections can lead to gas leaks or inefficient performance. It is vital to verify that all connections are secure and functioning correctly.
Here’s what you should do to ensure all connections are in proper working order:
- Inspect all gas connections, including the hose, regulator, and burner valves.
- Make sure all connections are tight and secure.
- Check for any signs of wear or damage, such as cracks or fraying, and replace any compromised parts.
- Test the functionality of the burner valves to ensure they open and close smoothly.
- Ensure the ignition system is functioning correctly.
- Conduct the soap and water test as described earlier to detect any gas leaks.
By following these steps and conducting thorough gas leak tests and safety checks, you can enjoy the convenience and pleasure of grilling on your natural gas grill with peace of mind.
Maintenance And Care For Natural Gas Grills
Maintaining and caring for your natural gas grill is essential to ensure its longevity and optimal performance. Regular cleaning, inspecting gas lines and connections, and troubleshooting common issues will help keep your grill in top shape and ensure a safe and enjoyable grilling experience. In this section, we will discuss the key aspects of maintaining and caring for your natural gas grill.
Cleaning and maintaining the grill regularly
Regular cleaning is crucial to prevent buildup of grease, food particles, and residue that can affect the flavor of your food and even pose a fire hazard. Here are some simple steps to clean and maintain your natural gas grill:
- Before cleaning, turn off the gas supply and allow the grill to cool down completely.
- Remove the cooking grates and clean them using a grill brush or a wire brush to remove any stuck-on debris.
- Wipe down the burners and heat shields with a damp cloth or sponge to remove grease and residue.
- Check the drip pan and remove any grease or food drippings.
- Clean the exterior of the grill with warm soapy water and a cloth. Rinse thoroughly and dry with a clean towel. Avoid using abrasive cleaners or steel wool, as they may damage the finish.
- Inspect the grill for any signs of damage or wear and tear, such as rusted parts or loose screws. Replace any damaged parts as needed.
Inspecting and replacing gas lines and connections
Regularly inspecting and maintaining the gas lines and connections is crucial for the safe operation of your natural gas grill. Here are some steps to follow:
- Inspect the gas lines for any signs of leaks, such as hissing sounds, the smell of gas, or bubbles forming when applying a soapy solution to the connections.
- If you suspect a gas leak, turn off the gas supply immediately and contact a professional technician to inspect and repair the issue.
- Check the gas connections for any signs of wear or damage. Tighten any loose connections carefully, ensuring not to overtighten.
- If you notice any cracks or damage to the gas lines or connections, it’s essential to replace them promptly to prevent any safety hazards.
Troubleshooting common issues
Despite regular maintenance, natural gas grills may encounter common issues that can affect their performance. Here are some troubleshooting tips:
- If the grill does not ignite, check the gas supply and ensure the gas valve is fully open.
- Uneven heat distribution can be corrected by cleaning the burners and adjusting the burner controls.
- If the flame is low or weak, clean the burners and check for any clogs or blockages that may be inhibiting the gas flow.
- Excessive smoke or flare-ups can be reduced by removing excess grease or adjusting the grill’s heat settings.
- If you encounter any persistent issues with your natural gas grill, consult the manufacturer’s manual or contact a professional technician for assistance.
By following these maintenance and care tips, you can ensure that your natural gas grill remains in excellent condition, providing you with delicious grilled meals for years to come. Remember to prioritize safety, regularly clean your grill, inspect gas connections, and troubleshoot any issues that arise.
Enhancing Your Grilling Experience
Installing a natural gas grill not only brings convenience to your outdoor cooking but also opens up a world of possibilities to enhance your grilling experience. From exploring additional features and accessories to learning new grilling techniques and recipes, and hosting outdoor gatherings, your natural gas grill can truly elevate your culinary adventures.
Exploring Additional Features and Accessories
To take your grilling game to the next level, consider exploring additional features and accessories that can greatly enhance your natural gas grill. These add-ons are designed to maximize convenience, flavor, and versatility, ensuring you can effortlessly create delicious meals with minimal effort.
Here are some popular features and accessories worth considering:
- A rotisserie kit: Perfect for roasting whole chickens or large cuts of meat, a rotisserie kit ensures even cooking and adds a delectable smoky flavor.
- A sear burner: Designed to reach high temperatures quickly, a sear burner allows you to achieve restaurant-quality sear marks on your steaks, burgers, and other meats.
- A smoker box: Ideal for adding a touch of smokiness to your grilled dishes, a smoker box can infuse flavors like hickory, mesquite, or applewood into your food, taking it to a whole new level.
- A temperature control system: Take the guesswork out of grilling with a temperature control system. This advanced feature ensures precise heat regulation, preventing over or undercooking.
- Cover and storage options: Protect your natural gas grill from the elements with a durable cover and keep your tools and accessories organized with storage solutions designed specifically for grilling enthusiasts.
Learning New Grilling Techniques and Recipes
A natural gas grill opens the door to endless possibilities in terms of cooking techniques and recipes. With the ability to control the heat and adjust the settings effortlessly, you can experiment with various techniques and flavors to create mouthwatering dishes that will impress your family and friends.
Here are a few grilling techniques and recipes to master:
- Direct grilling: Perfect for smaller cuts of meat and vegetables, direct grilling involves cooking directly over the heat source. It’s great for achieving that beautiful sear and crispy exterior.
- Indirect grilling: Ideal for larger cuts of meat or delicate foods, indirect grilling involves cooking with the heat source on one side and the food on the other. This allows for slower, more even cooking without the risk of burning.
- Grilling with wood planks: Infuse your food with the smoky flavors of cedar, hickory, or maple by grilling on wood planks. This technique adds a unique taste profile to dishes like salmon, chicken, and vegetables.
- Grilling desserts: Yes, you read that right! Grilling isn’t just for savory dishes. From fruit skewers and grilled peaches to chocolate-stuffed bananas, you can create tantalizing desserts with a natural gas grill.
Hosting Outdoor Gatherings and Enjoying Your Natural Gas Grill
One of the greatest joys of owning a natural gas grill is the ability to host unforgettable outdoor gatherings. Whether it’s a weekend barbecue, a casual get-together, or a festive celebration, your grill will become the centerpiece of your outdoor entertaining.
With a natural gas grill, you have the convenience of consistent heat and quick startup, allowing you to effortlessly cater to your guests’ culinary desires. From juicy burgers and grilled veggies to perfectly cooked steaks and succulent seafood, the possibilities are endless.
So, fire up your natural gas grill, invite your friends and family, and bask in the pleasure of good food, great company, and memorable moments.
Frequently Asked Questions On How To Install A Natural Gas Grill
Can I Hook Up My Own Natural Gas Grill?
Yes, you can hook up your own natural gas grill. Just make sure to follow proper safety protocols and guidelines.
Do You Need A Professional To Install A Natural Gas Grill?
Yes, it’s advisable to hire a professional for the installation of a natural gas grill. They have the expertise to ensure proper connections, safety measures, and efficient functioning.
What Do I Need To Connect My Natural Gas Grill To Gas Line?
To connect your natural gas grill to a gas line, you will need a gas line with a shutoff valve, a flexible gas hose, and a connection kit. The connection kit typically includes a gas regulator, hose fittings, and adapters to ensure a secure and safe connection.
How Close Can A Natural Gas Grill Be To A House?
A natural gas grill should be located at least 10 feet away from any house or structure to ensure safety and prevent fire hazards.
Conclusion
Installing a natural gas grill can be a straightforward process if you follow the right steps. From preparing the area to connecting the gas line and testing for leaks, this guide has provided you with everything you need to know.
By adhering to safety precautions and understanding the manufacturer’s instructions, you can enjoy the convenience and efficiency of grilling with natural gas. So go ahead, install your natural gas grill and get ready to have some amazing outdoor cooking experiences!