Installing Mr Cool is a simple process. Just follow the steps provided in the user manual.
Welcome to the world of Mr Cool, where comfort and convenience go hand in hand. If you’re looking to install a Mr Cool system in your home, this guide will walk you through the process step by step. With Mr Cool, enjoying a perfectly cooled or heated environment is easier than ever.
Whether you’re a seasoned DIYer or a first-time installer, this installation guide will ensure a hassle-free experience. So, let’s dive in and get your Mr Cool system up and running in no time. Say goodbye to discomfort and hello to Mr. Cool’s ultimate climate control. Don’t wait any longer, let’s begin!
Preparing For Installation
Before you begin the installation process of your Mr Cool system, it is essential to adequately prepare to ensure a smooth and successful installation. This involves checking the compatibility of Mr Cool with your space, gathering the necessary tools and materials, and assessing the electrical requirements. By taking these necessary steps, you can avoid any potential setbacks or complications.
Checking the compatibility of Mr Cool with your space
Before diving into the installation process, it is crucial to verify that Mr Cool is compatible with your space. In order to do this, assess the size, layout, and specifications of your area and compare them to the requirements provided by Mr Cool.
Ensure you have enough space to accommodate the unit and that your existing infrastructure can support the system. This will help you avoid any costly mistakes and ensure a snug fit for your Mr Cool system.
Gathering the necessary tools and materials
Having all the required tools and materials on hand before starting the installation process is vital to ensure a smooth and efficient installation. To assist you in this regard, we have compiled a list of the essential tools and materials you will need:
| Tools | Materials |
|---|---|
|
|
Assessing electrical requirements
Prior to installation, it is essential to evaluate the electrical requirements of your Mr Cool system. This involves checking the voltage, amperage, and circuit breaker capacity to ensure your electrical infrastructure can provide the necessary power for the unit.
Consult the manufacturer’s guidelines or seek assistance from a qualified electrician to ensure compliance with the electrical requirements and avoid any potential hazards or malfunctions.
By thoroughly preparing for the installation of your Mr Cool system and following these steps, you can save yourself time, money, and headaches. Remember to double-check compatibility, gather all necessary tools and materials, and assess electrical requirements before starting your installation. This will set you on the path towards enjoying the benefits of a comfortable and energy-efficient living space.
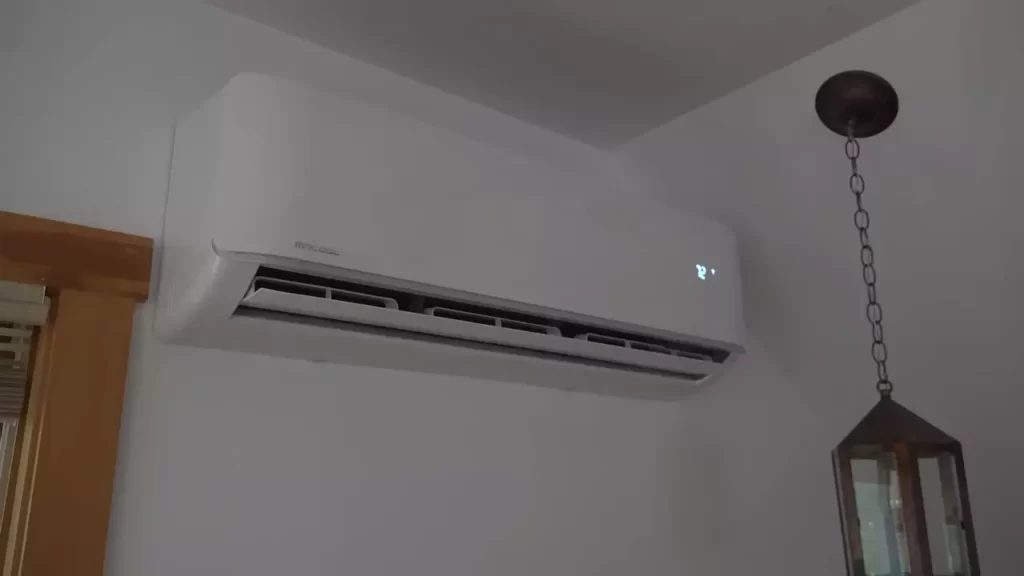
Mounting The Indoor Unit
Selecting the ideal location for the indoor unit
Before we dive into the mounting process, it’s essential to ensure that you select the perfect spot for your Mr Cool indoor unit. The location plays a key role in the efficiency and performance of your unit. Here are a few key factors to consider when choosing the ideal location:
- Optimal airflow: Make sure that the chosen spot allows for proper airflow throughout the room. Avoid obstructing the unit with furniture, curtains, or any other items that may impede the circulation.
- Accessibility: You want to ensure easy access to the unit for maintenance and cleaning purposes. Select a location that allows you to reach the unit without any hassle.
- Even temperature distribution: Aim for a location where the conditioned air can be evenly distributed to all parts of the room. This will help maintain a comfortable environment.
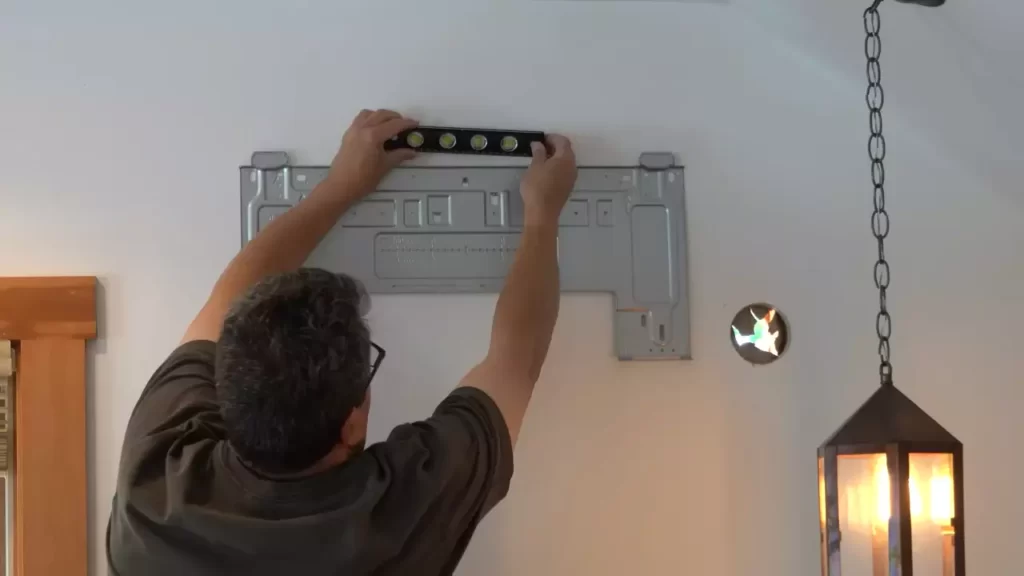
Marking and drilling the holes for the mounting plate
Once you’ve chosen the ideal location for your Mr Cool indoor unit, it’s time to mark and drill the holes for the mounting plate. Follow these simple steps:
- Hold the mounting plate against the wall in the desired location.
- Using a pencil, mark the spots where the holes on the mounting plate align with the wall.
- Carefully remove the mounting plate and set it aside.
- Double-check your markings to ensure accuracy.
- Using an appropriate drill bit for your wall type (e.g., masonry, wood), carefully drill holes at the marked spots.
- Remove any dust or debris from the drilled holes to ensure a secure fit.
Securing the mounting plate to the wall
Now that you’ve drilled the necessary holes, it’s time to secure the mounting plate to the wall. Follow these steps:
- Align the mounting plate with the drilled holes.
- Insert appropriate screws or anchors into the holes and tighten them securely.
- Ensure that the mounting plate is level and properly aligned.
- Check the stability by giving it a gentle tug to ensure it’s securely attached to the wall.
- Once you’re satisfied with the placement and stability of the mounting plate, you’re ready to proceed with the installation of the indoor unit.
Remember, mounting the indoor unit for your Mr Cool system is a crucial step in ensuring optimal performance. Take your time, follow the steps carefully, and you’ll be enjoying the comfort of your newly installed unit in no time!
Connecting The Indoor Unit To The Outdoor Unit
One of the essential steps in installing your Mr Cool system is connecting the indoor unit to the outdoor unit. This is a crucial part of the installation process as it allows for the proper operation and functionality of the system. In this section, we will guide you through the steps involved in running the refrigerant lines and condensate drain, securing them to the wall or ceiling, and making the necessary electrical connections.
Running the refrigerant lines and condensate drain
Before you start running the refrigerant lines and condensate drain, it is crucial to ensure that you have carefully planned their route. This will ensure maximum efficiency and prevent any potential damage to the lines or interference with other systems in your home.
To run the refrigerant lines, follow these steps:
- Locate the small hole in the wall or ceiling where the lines will enter the indoor unit.
- Feed the refrigerant lines through the hole and carefully extend them to the outdoor unit.
- Make sure to avoid any sharp bends or kinks in the lines, as this can affect the performance of the system.
- Secure the lines to the wall or ceiling using appropriate clamps or brackets.
Similarly, for the condensate drain:
- Identify the drain outlet on the indoor unit.
- Connect one end of the condensate drain pipe to the outlet.
- Route the pipe towards a suitable drainage point, ensuring that it has a downward slope.
- Secure the condensate drain pipe to the wall or ceiling to prevent any sagging or obstruction.
Securing the lines and drain to the wall or ceiling
Once you have run the refrigerant lines and condensate drain to their respective locations, it is crucial to secure them adequately to the wall or ceiling. This will ensure their stability and prevent any accidental damage during operation or maintenance.
To do this:
- Use suitable clamps or brackets designed for securing refrigerant lines and condensate drain pipes.
- Position the clamps or brackets at regular intervals along the length of the lines and drain pipe.
- Ensure that the clamps or brackets are tight enough to hold the lines and drain pipe securely, but not so tight as to cause damage.

Making the electrical connections
With the refrigerant lines and condensate drain securely in place, it is now time to make the necessary electrical connections.
Before proceeding, ensure that the power is switched off at the circuit breaker to prevent any electrical mishaps.
To make the electrical connections:
- Identify the electrical terminals on both the indoor and outdoor units.
- Refer to the manufacturer’s instructions to determine which wires need to be connected.
- Securely connect the corresponding wires, making sure to use appropriate wiring connectors.
- Double-check all connections to ensure they are tight and correctly matched.
Once you have completed these steps, you can proceed to the next phase of the installation process. The connections you have made are crucial for the proper functioning of your Mr Cool system, ensuring efficient cooling or heating whenever you need it.
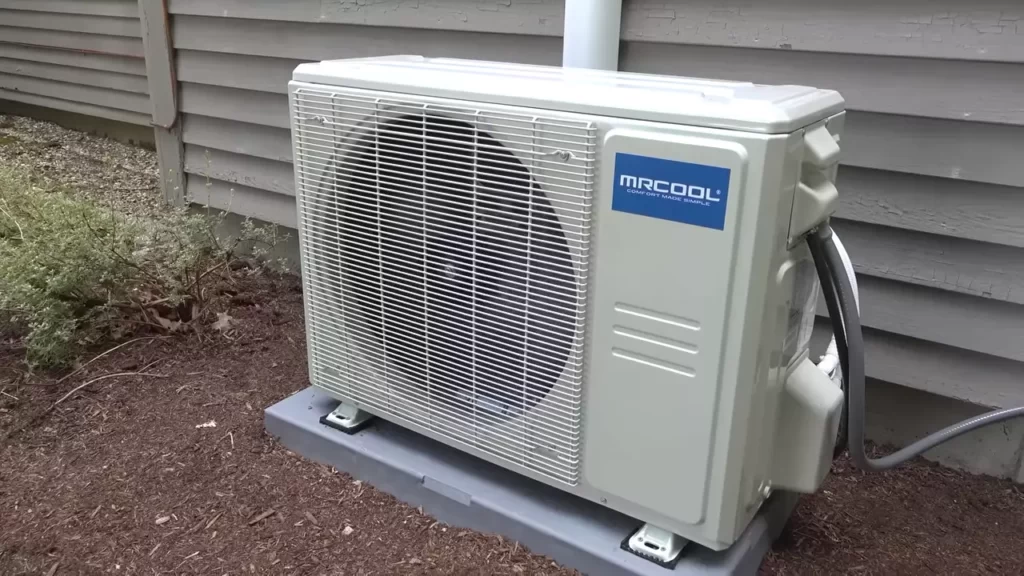
Installing The Outdoor Unit
Installing the outdoor unit is a crucial step in setting up your Mr Cool air conditioner system. Proper installation ensures optimal performance and efficient cooling. In this section, we will guide you through the process of determining the optimal location for the outdoor unit, mounting it on a sturdy surface, and connecting the refrigerant lines and electrical wiring.
Determining the optimal location for the outdoor unit
To ensure the outdoor unit operates effectively, it is essential to choose the right location. Here are a few factors to consider when determining the optimal location:
- Choose a spot that is away from direct sunlight and any sources of heat. Direct exposure to sunlight can cause the unit to work harder and reduce its efficiency.
- Avoid placing the unit in an area prone to strong winds or heavy debris. These can damage the unit and affect its performance.
- Make sure the location allows for proper ventilation. The unit needs sufficient airflow to function efficiently and prevent overheating.
- Ensure there is enough clearance around the unit for maintenance and servicing purposes. Manufacturers often specify the required distance, so refer to the installation manual for precise measurements.
Mounting the unit on a sturdy surface
A sturdy surface is crucial for the stability and safety of the outdoor unit. Follow these steps to mount the unit securely:
- Select a suitable mounting surface, such as a concrete pad or a wall bracket designed for this purpose.
- Ensure that the surface is level and can support the weight of the unit. Refer to the unit’s specifications for its weight and size.
- Follow the manufacturer’s instructions for attaching the mounting brackets securely to the surface.
- Place the unit on the mounting brackets, ensuring it is level and properly aligned.
- Use suitable fasteners to secure the unit to the brackets, following the manufacturer’s recommendations.
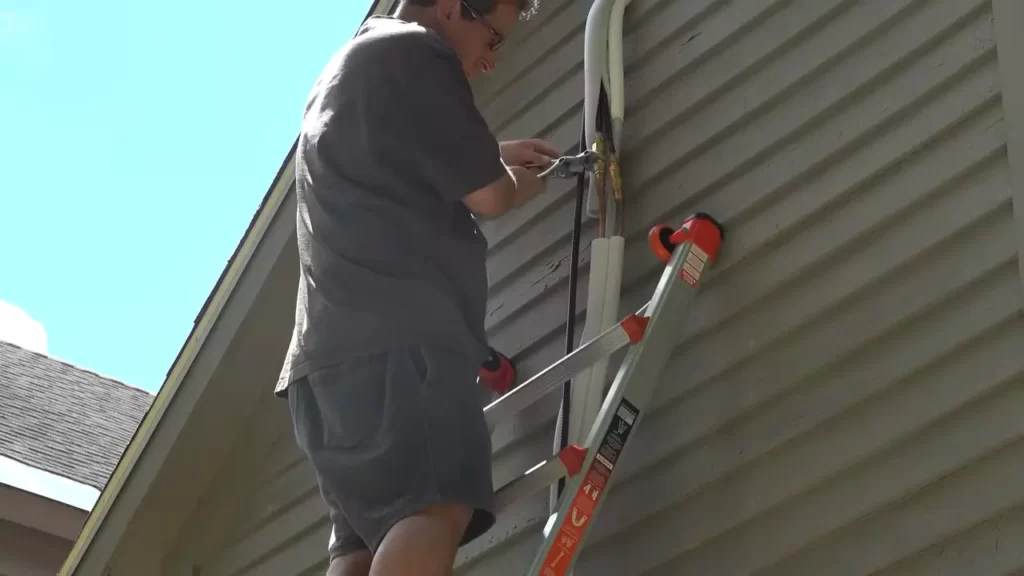
Connecting the refrigerant lines and electrical wiring
Connecting the refrigerant lines and electrical wiring is a crucial part of installing the outdoor unit. Take the following steps for a proper connection:
- Refer to the unit’s installation manual to identify the refrigerant lines and electrical wiring connections.
- Ensure the refrigerant lines are properly insulated to prevent condensation and energy loss.
- Connect the refrigerant lines according to the manufacturer’s instructions, using the appropriate fittings and tools.
- For the electrical wiring, make sure to follow all local codes and regulations.
- Connect the electrical wiring, ensuring each connection is secure and properly insulated.
- Double-check all connections and tighten any loose fittings.
By carefully determining the optimal location, mounting the unit securely, and connecting the refrigerant lines and electrical wiring properly, you can ensure the outdoor unit is installed correctly. This will help maximize the performance and longevity of your Mr Cool air conditioner system.
Testing And Commissioning
The testing and commissioning phase is a crucial step in the installation process of your Mr Cool system. This phase ensures that the system is functioning optimally, making it ready to provide efficient cooling and heating for your space. In this section, we will cover the key tasks involved in testing and commissioning your Mr Cool system.
Checking for leaks in the refrigerant lines
One of the first tasks in the testing and commissioning process is to check for any leaks in the refrigerant lines. Leaks in the lines can lead to a reduction in the system’s efficiency and can even cause potential damage to the compressor.
To check for leaks, carefully inspect the refrigerant lines for any visible signs of leakage, such as oil stains or frost accumulation. You can also use a leak detection solution that is designed specifically for refrigeration systems.
Apply the solution to the connections and joints of the refrigerant lines and observe if there are any bubbles forming, which indicate a leak. If you detect a leak, it is essential to address it before proceeding with the rest of the commissioning process.
Testing the operation of the system
After ensuring that there are no leaks in the refrigerant lines, it is time to test the operation of your Mr Cool system. Start by turning on the system and allowing it to run for a while. Observe if the air filters are working correctly and clean them if necessary.
Check if the airflow coming from the system is strong and consistent. Additionally, test the thermostat by adjusting the temperature settings and ensuring that the system responds accordingly. Pay attention to any unusual sounds or vibrations that may indicate a problem. If everything operates smoothly, it’s a good sign that your Mr Cool system is performing as expected.
Adjusting settings and ensuring proper functionality
Once you have confirmed the basic operation of the system, it is time to fine-tune the settings to ensure optimal functionality. Adjust the fan speed and direction based on your preferences and the specific requirements of your space. Test the cooling and heating modes by setting the desired temperatures and monitoring if the system achieves and maintains them effectively.
Additionally, check the various modes and features of your Mr Cool system, such as sleep mode or energy-saving mode, to ensure they function correctly. Finally, inspect the external parts of the system, such as the outdoor unit, for any issues that may affect its performance.
By following these steps and conducting the necessary checks, you will be able to successfully test and commission your Mr Cool system. This ensures that it is ready to provide you with efficient cooling and heating, creating a comfortable environment in your space.
Troubleshooting Common Installation Issues
If you have recently installed a Mr Cool system but are experiencing some issues, don’t worry! Troubleshooting common installation issues can help you identify and resolve any problems you may be facing. In this article, we will address some common issues like insufficient cooling or heating, leaking refrigerant, and noisy operation, and provide you with practical solutions. So, let’s dive in and get your Mr Cool system working as efficiently as possible!
Insufficient Cooling or Heating
If you find that your new Mr Cool system is not keeping your space cool or warm enough, there could be a few possible causes. Below are some common reasons and their corresponding solutions.
- Check the air filter: A clogged or dirty air filter can restrict airflow and reduce the cooling or heating effect. It’s important to clean or replace the air filter regularly to maintain optimum performance. Refer to the manufacturer’s instructions for the correct procedure.
- Inspect the thermostat settings: Make sure the thermostat is set to the desired temperature and the mode (cooling or heating) is selected correctly. Sometimes, a simple adjustment can make a big difference in the system’s performance.
- Examine the outdoor unit: Ensure that the outdoor unit is free from debris, such as leaves or dirt, that can obstruct the airflow. Clear any obstructions and make sure there is enough space around the unit for proper ventilation.
- Check for air leaks: Inspect the windows, doors, and any other openings in your space for air leaks. Seal any leaks using weatherstripping or caulking to prevent the loss of cool or warm air.
Leaking Refrigerant
Refrigerant leaks can lead to a significant drop in system performance and should be addressed promptly. Here are some troubleshooting steps you can take to identify and fix a refrigerant leak:
- Inspect refrigerant lines: Visually inspect the refrigerant lines for any signs of leakage, such as oil stains or corrosion. If you notice any, it’s crucial to contact a professional technician to repair the leak and recharge the refrigerant.
- Check fittings and connections: Make sure all the fittings and connections are secure and properly sealed. Loose or damaged connections can result in refrigerant leaks. Tighten any loose fittings or replace damaged ones.
- Professional assistance: If you suspect a refrigerant leak but are unsure how to proceed, it’s best to seek help from a certified HVAC technician. They have the expertise and tools to accurately diagnose and repair refrigerant leaks.
Noisy Operation
If your Mr Cool system is making unusual or excessive noise, it’s essential to address the issue to prevent any underlying problems from worsening. Here are some troubleshooting steps to help resolve noisy operations:
- Inspect the fan and blades: Check for any obstructions or debris that may be interfering with the fan’s rotation. Clean the blades and remove any debris gently. If the noise persists, consider contacting a professional technician for further assistance.
- Tighten screws and bolts: Loose screws or bolts can cause vibrations and generate noise. Carefully inspect the unit and tighten any loose screws or bolts using the appropriate tools. Be cautious not to over tighten.
- Call a professional technician: If the noise persists even after attempting the above troubleshooting steps, it’s recommended to contact a qualified HVAC technician. They can accurately diagnose the issue and provide the necessary solutions.
By troubleshooting these common installation issues related to insufficient cooling or heating, leaking refrigerant, and noisy operation, you can maximize the performance of your Mr Cool system. Regular maintenance and timely repairs will ensure a comfortable and energy-efficient environment in your space. If you encounter any issues beyond your expertise, always seek professional assistance to avoid the risk of further complications. Enjoy the optimal performance of your Mr Cool system!
Maintaining And Caring For Your Mr Cool System
Welcome to our comprehensive guide on how to maintain and care for your Mr Cool system. Taking proper care of your system ensures its longevity and efficiency, helping you to enjoy years of comfortable indoor environment. In this section, we will focus on three key aspects of maintenance: Cleaning and replacing filters regularly, Clearing debris around the outdoor unit, and Scheduling professional maintenance checks. By following these guidelines, you can keep your Mr Cool system running smoothly and avoid potential problems in the future.
Cleaning and Replacing Filters Regularly
One of the most important maintenance tasks for your Mr Cool system is cleaning and replacing filters regularly. Filters play a crucial role in keeping your indoor air clean and free from contaminants such as dust, pollen, and pet dander. Over time, these filters can become clogged, inhibiting airflow and reducing the system’s efficiency. To ensure optimal performance, it is recommended to clean or replace the filters every 30 to 60 days, depending on the usage and the manufacturer’s instructions.
To clean the filters, follow these simple steps:
- Turn off the system and locate the air filters.
- Gently remove the filters from their housing.
- Using a vacuum cleaner or a soft brush, remove any visible dust or debris.
- If the filters are washable, rinse them with water and allow them to dry completely before reinstalling.
- If the filters are not washable or heavily soiled, it’s time to replace them with new ones.
- Make sure the filters are properly seated and secure in their housing.
- Turn on the system and enjoy clean and fresh indoor air.
Clearing Debris Around the Outdoor Unit
The outdoor unit of your Mr Cool system is exposed to the elements and can accumulate debris such as leaves, branches, dirt, and grass clippings. This debris can restrict airflow, obstruct heat transfer, and potentially damage the unit if not addressed promptly. To maintain proper airflow and prevent potential issues, it is essential to clear any debris around the outdoor unit on a regular basis.
Follow these steps to clear debris:
- Turn off the system and locate the outdoor unit.
- Remove any large obstructions by hand.
- Use a brush or broom to sweep away smaller debris such as leaves and dirt.
- If necessary, gently hose down the unit to remove stubborn dirt or grime.
- Ensure that the area around the unit is clean and free from any potential obstructions.
- Turn on the system and enjoy uninterrupted cooling or heating.
Scheduling Professional Maintenance Checks
While regular cleaning and maintenance tasks play a crucial role in keeping your Mr Cool system in optimal condition, it is also essential to schedule professional maintenance checks at least once a year. A professional technician will perform a thorough inspection of your system, identify any potential issues, and make necessary adjustments or repairs to ensure its proper functioning.
During a professional maintenance check, the technician will:
- Inspect and clean the indoor and outdoor units.
- Check the refrigerant levels and adjust if necessary.
- Tighten electrical connections and lubricate moving parts.
- Test the system’s performance and efficiency.
- Address any potential issues or concerns.
By investing in professional maintenance checks, you can rest assured that your Mr Cool system is in capable hands and will continue to provide you with optimal comfort and energy efficiency for years to come.
Frequently Asked Questions For How To Install Mr Cool
What Do I Need To Install Mrcool?
To install MRCOOL, follow these guidelines:
- Prepare the necessary tools and materials.
- Find a suitable location for installation.
- Ensure proper electrical connections and wiring.
- Mount the unit securely and level it properly.
- Finally, check and test the system for proper functionality.
Remember to consult the installation manual for detailed instructions.
What Are The Electrical Requirements For Mrcool?
The electrical requirements for MRCOOL systems vary depending on the model and capacity. It is important to refer to the product’s technical specifications or consult with a professional electrician to determine the specific voltage, amperage, and circuit requirements for installation.
How Do I Set Up My Mrcool Thermostat?
To set up your MRCOOL thermostat, follow these steps:
- Install the thermostat correctly and ensure it’s connected to your HVAC system.
- Follow the manufacturer’s instructions to power on the thermostat.
- Use the menu buttons to navigate settings and adjust temperature, fan speed, and other options.
- Save your settings and make any desired adjustments.
- Enjoy the comfort of your MRCOOL thermostat.
Does Mrcool Come With Electrical Wiring?
Yes, MRCOOL comes with electrical wiring included. It is ready to be installed and connected to your electrical system. So you don’t have to worry about buying separate wiring for your MRCOOL unit.
Conclusion
Installing Mr Cool is a straightforward process that can be accomplished with just a few simple steps. By following this guide, you can ensure a smooth installation and enjoy the benefits of a well-cooled space. Remember to gather all the necessary tools and materials before starting, and take your time to carefully follow the instructions provided by Mr Cool.
With proper installation, you can experience optimal cooling comfort for years to come.