To install a gable attic fan, first, determine the location and cut a hole in the gable wall, near the peak of the roof. Next, assemble the fan unit, secure it to the wall, and connect the electrical wiring to a power source.
Finally, seal any gaps around the fan unit to prevent air leaks.
Factors To Consider When Selecting A Gable Attic Fan
When it comes to installing a gable attic fan, there are several factors that you must consider to ensure optimal performance and efficiency. From the size of the attic space to the desired airflow rate, energy efficiency, noise level, and warranty and customer support, each aspect plays a crucial role in selecting the right gable attic fan for your needs. Let’s dive into these factors in detail:
Size of the attic space
The size of your attic space is an important consideration when selecting a gable attic fan. A properly sized fan will effectively ventilate the entire attic, preventing the buildup of heat and moisture. To determine the appropriate fan size, measure the square footage of your attic space. Below is a guide to help you choose the right fan size based on the square footage:
| Attic Size | Fan Size |
|---|---|
| Up to 1,500 sq ft | 24-inch fan |
| 1,500 – 2,500 sq ft | 30-inch fan |
| 2,500 – 4,000 sq ft | 36-inch fan |
| Above 4,000 sq ft | 42-inch fan |
Desired airflow rate
The airflow rate of a gable attic fan is measured in cubic feet per minute (CFM) and determines how quickly the fan can ventilate the attic. It is crucial to select a gable attic fan with an airflow rate that matches the size and ventilation needs of your attic. A general guideline is to have a fan that can provide at least 10 CFM per square foot of attic space. For example, for a 2,000 sq ft attic, the fan should have a minimum airflow rate of 20,000 CFM.
Energy efficiency
When selecting a gable attic fan, energy efficiency should be a top priority. Look for fans that are energy-efficient and have a high CFM per watt ratio. This ensures that the fan operates effectively while consuming less electricity. Energy-efficient fans not only save on your energy bills but also reduce the environmental impact.
Noise level
The noise level of a gable attic fan can be an important consideration, especially if your attic is located near living spaces. Loud fans can cause disturbances and discomfort. Look for gable attic fans that are specifically designed to operate quietly. Some fans come with features like insulated housings and noise-reducing motors, ensuring silent and peaceful ventilation.
Warranty and customer support
Lastly, it is essential to choose a gable attic fan that comes with a reliable warranty and excellent customer support. A quality fan manufacturer will stand behind their product and provide a warranty that protects against any defects or malfunctions. Additionally, good customer support ensures prompt assistance and guidance in case you encounter any issues during or after the installation process. Be sure to read reviews and choose a reputable brand that offers reliable warranty coverage and responsive customer service.
By considering these factors – the size of the attic space, desired airflow rate, energy efficiency, noise level, and warranty and customer support – you can confidently select the perfect gable attic fan that suits your needs, providing optimal ventilation and comfort for your attic space.
Best Gable Attic Fan Models In The Market
When it comes to keeping your attic cool and well-ventilated, installing a gable attic fan is the way to go. These fans are designed to exhaust hot air from the attic, effectively reducing the overall temperature and preventing moisture buildup. However, with so many options available in the market, it can be challenging to choose the right gable attic fan.
Model A: Features, pros, and cons
To help you make an informed decision, we have highlighted the top features, pros, and cons of Model A:
| Features | Pros | Cons |
|---|---|---|
|
|
|
When considering Model A, its powerful motor ensures efficient air circulation, resulting in a well-ventilated attic. With its high airflow capacity, this fan can quickly exhaust hot air from your attic, providing effective cooling throughout the space. Additionally, its durable construction ensures long-lasting performance, allowing you to enjoy the benefits for years to come.
However, it is important to note that Model A comes at a higher price point compared to other models in the market. Additionally, its installation requires the expertise of a professional to ensure proper setup. It’s worth mentioning that some users have reported the fan operating noisily, which can be a consideration if you are sensitive to sound.
Model B: Features, pros, and cons
Model B is another gable attic fan worth considering. Here are the key features, pros, and cons:
| Features | Pros | Cons |
|---|---|---|
|
|
|
Model B stands out for its energy-efficient design, allowing you to reduce energy costs while keeping your attic cool. The fan operates quietly, causing minimal disturbance in your living space. Moreover, its easy installation process makes it a user-friendly choice for homeowners.
However, it is important to consider that Model B has a lower airflow capacity compared to other models. This means that it may take longer to properly ventilate larger attics. Additionally, for optimal performance, you may need to purchase additional accessories, which can add to the overall cost. Lastly, while Model B is reliable, it may not be as durable as some other models, so ongoing maintenance may be necessary.
Model C: Features, pros, and cons
Lastly, let’s explore the features, pros, and cons of Model C:
| Features | Pros | Cons |
|---|---|---|
|
|
|
Model C offers advanced features such as smart thermostat control, allowing you to efficiently control the temperature in your attic. The adjustable fan speed feature enables you to customize the airflow based on your specific needs, ensuring optimal ventilation. Additionally, its weather-resistant design ensures durability even in harsh conditions.
However, it is important to consider that Model C comes with a higher initial investment compared to other models. Its installation may be slightly more complex, requiring additional time and effort. Lastly, to fully utilize the smart features, a Wi-Fi connection is typically required, which may be a consideration for those without an accessible network.
By carefully considering the features, pros, and cons of each model, you can make an informed decision and choose the gable attic fan that best suits your needs and preferences.
Tools And Materials Required
Before you start installing a gable attic fan, you will need to gather some essential tools and materials. Having these items at your disposal will make the installation process more efficient and seamless. Here is a list of the tools and materials you will need:
Screwdriver
A screwdriver is an indispensable tool for any installation project. Ensure you have both a flathead and a Phillips head screwdriver available. These will be used to remove or tighten screws during the installation process.
Power drill
A power drill will come in handy when attaching the gable attic fan to your attic structure. Make sure you have the appropriate drill bits to match the size of the screws you will be using. Having a power drill will save you time and effort compared to using a manual screwdriver.
Utility knife
A utility knife will be necessary for cutting through any materials that may obstruct the installation process. This versatile tool will ensure precise cuts, allowing you to navigate through insulation or other materials with ease.
Ventilation fan kit
The most crucial component of the installation is the ventilation fan kit. This kit typically includes the fan unit, mounting brackets, and necessary electrical components. Make sure to choose a fan that suits the size of your attic and meets your specific airflow requirements.
Roofing nails
Roofing nails will be needed to secure the fan unit and its brackets to the gable in your attic. These nails should be long enough to penetrate the roofing materials and provide a secure attachment. It’s a good idea to have a sufficient supply of these nails to ensure a sturdy and durable installation.
Ventilation ducts
The final item on the list is the ventilation ducts. These ducts will be used to connect the attic fan to the outside of your home, allowing for the proper ventilation of hot air. Ensure that the size and length of the ventilation ducts are appropriate for your setup.
Once you have gathered all the necessary tools and materials, you will be well-prepared to tackle the installation of your gable attic fan. Having everything on hand will enable you to work efficiently and smoothly, ensuring a successful and functional outcome.
Measuring And Sizing The Gable Attic Fan
Determining the Size of the Fan Based on Attic Square Footage
One of the first steps in installing a gable attic fan is to determine the appropriate size of the fan based on the square footage of your attic. This is an important factor as it will determine the fan’s ability to effectively circulate air and maintain proper ventilation. To calculate the square footage of your attic, measure the length and width of the space and multiply the two measurements. For instance, if your attic measures 20 feet by 30 feet, the square footage would be 600 square feet.
Calculating the Required Airflow Rate
Once you have determined the square footage of your attic, the next step is to calculate the required airflow rate for the gable attic fan. This will help ensure that the fan is capable of providing sufficient ventilation for your attic space. To calculate the required airflow rate, a general rule of thumb is to multiply the attic square footage by 0.7. Using the previous example, the required airflow rate for a 600 square foot attic would be 420 cubic feet per minute (CFM).
Evaluating the Existing Attic Ventilation System
Before installing a gable attic fan, it is essential to evaluate the existing attic ventilation system. This evaluation will help determine if additional venting is required to ensure optimal air circulation within the attic. An effective ventilation system helps prevent moisture build-up, reduce heat buildup, and improve overall air quality. Evaluate if there are enough soffit vents, ridge vents, or other forms of ventilation present. If there is an insufficient amount of ventilation in your attic, consider adding additional vents to complement the gable attic fan.
Locating The Optimal Position In The Gable Wall
Installing a gable attic fan is a smart investment that can help improve ventilation and regulate the temperature inside your attic. But before you jump into the installation process, it’s crucial to determine the optimal position on your gable wall. This step ensures that your attic fan functions efficiently and effectively. In this section, we will guide you through the process to choose the correct side of the gable wall and consider any obstacles such as electrical wiring.
Choosing the Correct Side of the Gable Wall
When it comes to locating the perfect spot on your gable wall for installing the attic fan, there are a few factors to consider. First, you need to determine which side of the gable wall will provide the best airflow for your attic. To make an informed decision, follow these guidelines:
- Take note of the prevailing wind direction in your area. This is essential as you want your gable attic fan to be positioned in a way that allows it to harness the natural airflow generated by the prevailing winds.
- Inspect the gable wall for any existing vents or obstructions. It’s important to avoid installing the attic fan on a wall that already has vents, as this can interfere with proper ventilation and create inefficiency.
- Consider the orientation of your home and the position of the sun throughout the day. Ideally, you want to install the attic fan on the side of the gable wall that receives the most direct sunlight. This helps in preventing heat buildup inside the attic during peak hours.
By following these guidelines and carefully assessing your specific situation, you can confidently choose the correct side of the gable wall for installing your attic fan. However, it’s important to note that every home is unique, and you may need to tweak these recommendations based on your personal circumstances.
Considering Obstacles Such as Electrical Wiring
Once you have determined the optimal side of the gable wall, it’s crucial to consider any potential obstacles that may affect the installation process. One common obstacle to be aware of is electrical wiring. Here are some steps to follow:
- Locate the electrical panel in your home and identify the circuits that supply power to the electrical outlets or appliances near the gable wall.
- Turn off the circuit breakers associated with the electrical outlets or appliances on the gable wall to ensure safety during the installation process. You can do this by flipping the corresponding circuit breaker switches to the “off” position.
- Carefully inspect the area where you plan to install the attic fan for any exposed or hidden electrical wiring. Take note of the wiring routes and mark them down to avoid accidentally damaging or interfering with the electrical system.
- If necessary, consult a professional electrician to help you safely reroute any electrical wiring that might be in the way of the attic fan installation. It’s crucial to prioritize safety and ensure that everything is in compliance with electrical codes.
By considering potential obstacles like electrical wiring and taking the necessary precautions, you can overcome any challenges and install your gable attic fan successfully.
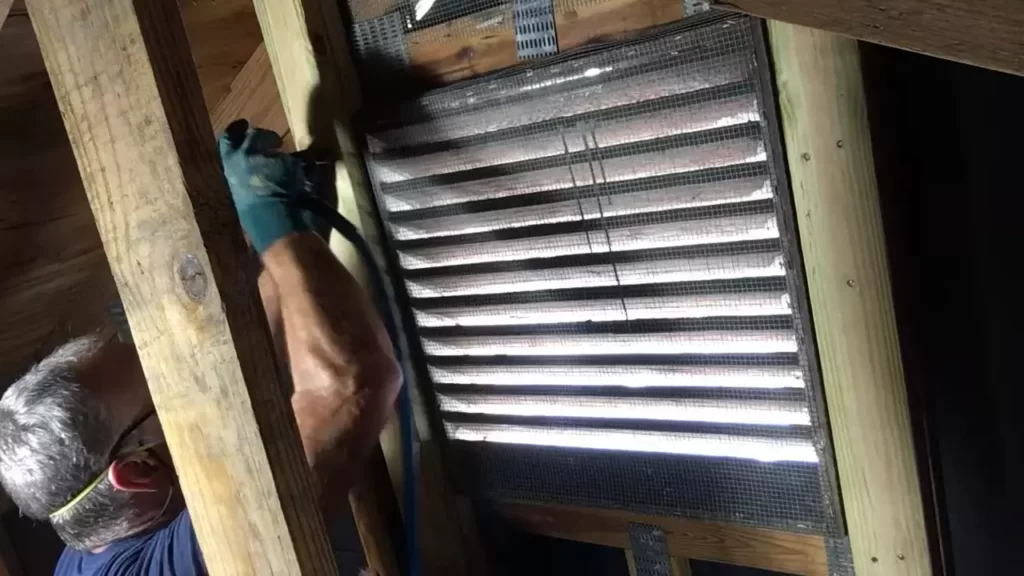
Creating An Opening In The Gable Wall
When installing a gable attic fan, one of the key steps is creating an opening in the gable wall. This allows for proper ventilation and airflow in your attic, helping to regulate temperatures and prevent the buildup of moisture and heat. In this section, we will guide you through the process of measuring and marking the dimensions of the opening, cutting the hole using a power saw, and removing the cut section.
Measuring and marking the dimensions of the opening
The first step in creating an opening in the gable wall is to accurately measure and mark the dimensions of the hole. This ensures a precise fit for your gable attic fan. Here’s how you can do it:
- Start by locating the center of the gable wall where you plan to install the fan. Use a tape measure to find the center point both horizontally and vertically.
- Measure the width and height of the fan unit itself. Take note of these measurements.
- To determine the size of the opening, add an extra inch to both the width and height of the fan unit. This allows for easy installation and removal.
- Use a pencil or a marker to mark the measurements on the gable wall. Make sure the marks are clearly visible and aligned with the center point.
Cutting the hole using a power saw
Once you have marked the dimensions of the opening, it’s time to cut the hole in the gable wall. This step requires the use of a power saw. Follow these steps to ensure a clean and precise cut:
- Put on safety goggles and gloves to protect yourself during the cutting process.
- Select an appropriate power saw for the job. A reciprocating saw or a circular saw with a carbide-tipped blade works well for cutting through gable walls.
- Position the saw blade just inside the marked lines. Start cutting slowly and steadily, following the marked dimensions. Be sure to keep the saw level and maintain a steady hand.
- Once you have completed the cut, stop the saw and carefully remove it from the wall.
Removing the cut section
After cutting the hole, it’s important to remove the cut section from the gable wall. This ensures a clear and unobstructed opening for your gable attic fan. Follow these steps to remove the cut section:
- Using a pry bar or a crowbar, gently pry the cut section away from the surrounding wall. Take your time and apply even pressure to avoid causing any damage.
- Once the cut section is loose, carefully pull it away from the gable wall. Set it aside in a safe location.
- Inspect the edges of the cut opening to ensure they are clean and free from any debris or obstructions. Use a utility knife or sandpaper to smooth out any rough edges if needed.
- With the cut section removed and the opening cleared, you are now ready to proceed with installing your gable attic fan.
By following these steps, you can successfully create an opening in the gable wall for your attic fan installation.
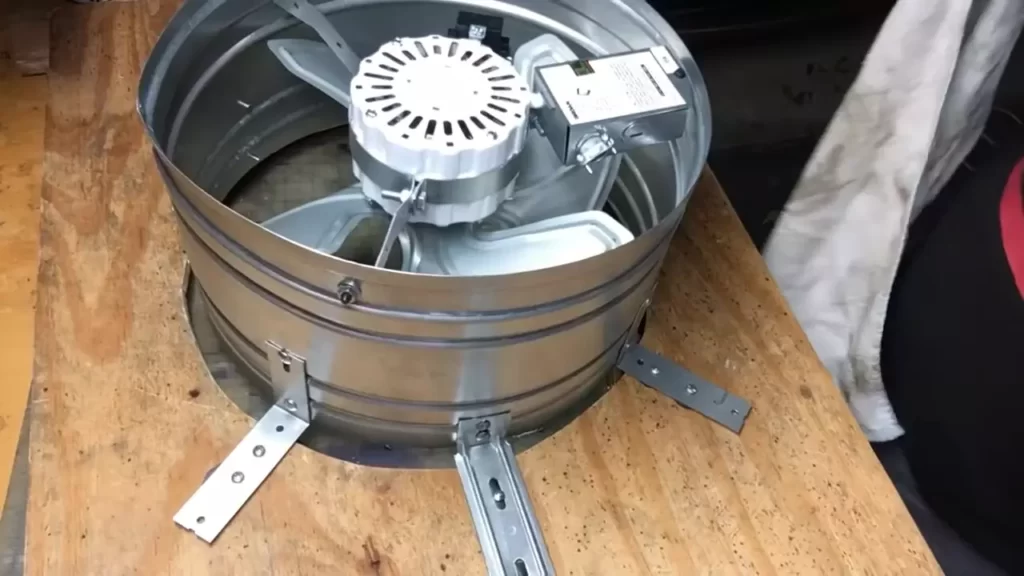
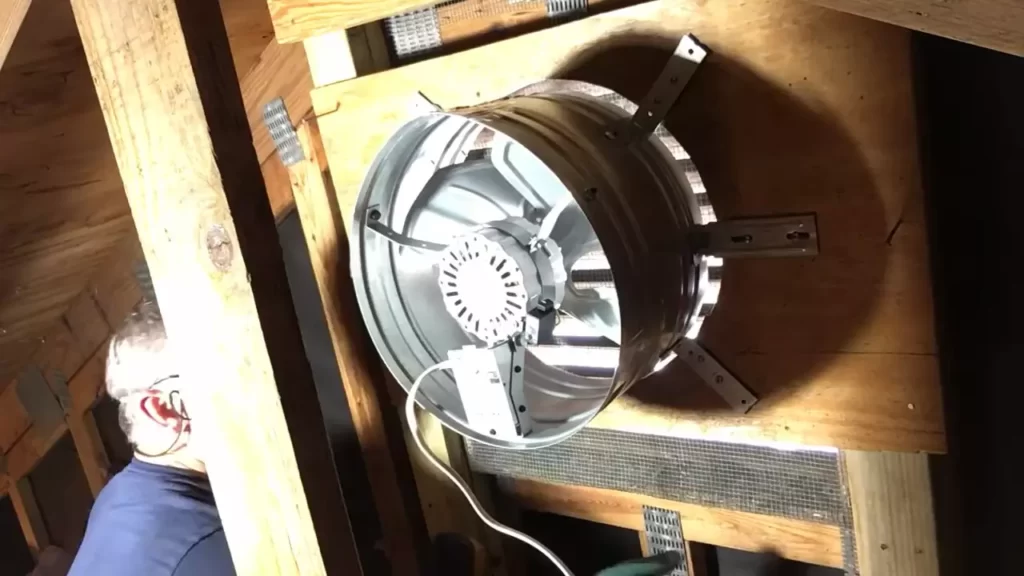
Mounting The Gable Attic Fan
Assembling the Fan Components
Before you start mounting your gable attic fan, it is important to ensure that you have all the necessary components assembled and ready to go. Here is a step-by-step guide on how to assemble your gable attic fan:
- Begin by unpacking the fan and checking that all the components are present.
- Identify the fan motor and attach it securely to the fan housing using the provided screws and bolts. Make sure to follow the manufacturer’s instructions for specific assembly steps.
- Once the motor is attached, connect the wiring according to the manufacturer’s instructions. Be sure to turn off the power before working with any electrical connections.
- Once the fan and motor are assembled, secure the fan guard in place to prevent any unwanted accidents or damage.
- Double-check all connections and ensure that everything is securely fastened before moving on to the next step.
Attaching the Fan to the Gable Wall Using Screws
Now that you have assembled your gable attic fan, it’s time to mount it on the gable wall. Follow these steps to ensure a proper installation:
- Position the fan on the gable wall where you want it to be installed. Ensure that there is enough ventilation clearance and that the fan will be centered properly.
- Hold the fan in place and mark the locations where the mounting brackets will be attached. These brackets will be used to secure the fan to the gable wall.
- Using a drill, create pilot holes at the marked locations. These holes will act as guides for the screws.
- Align the fan mounting brackets with the pilot holes and secure them to the gable wall using screws. Make sure to tighten the screws firmly, but be cautious not to overtighten and damage the brackets or the wall.

Ensuring a Secure and Stable Installation
Now that the fan is attached to the gable wall, it’s important to ensure a secure and stable installation. Here are a few tips to follow:
- Check the fan mounting brackets to make sure they are properly secured and tightened.
- Ensure that the fan is level and centered on the gable wall.
- Inspect the fan housing and guard to ensure there are no loose or damaged parts.
- Test the fan to make sure it is working properly and that it is drawing air efficiently.
- Regularly monitor the fan’s operation and perform any necessary maintenance to keep it functioning optimally.
By following these steps, you can successfully mount your gable attic fan and enjoy the benefits of improved ventilation and energy efficiency in your attic space.
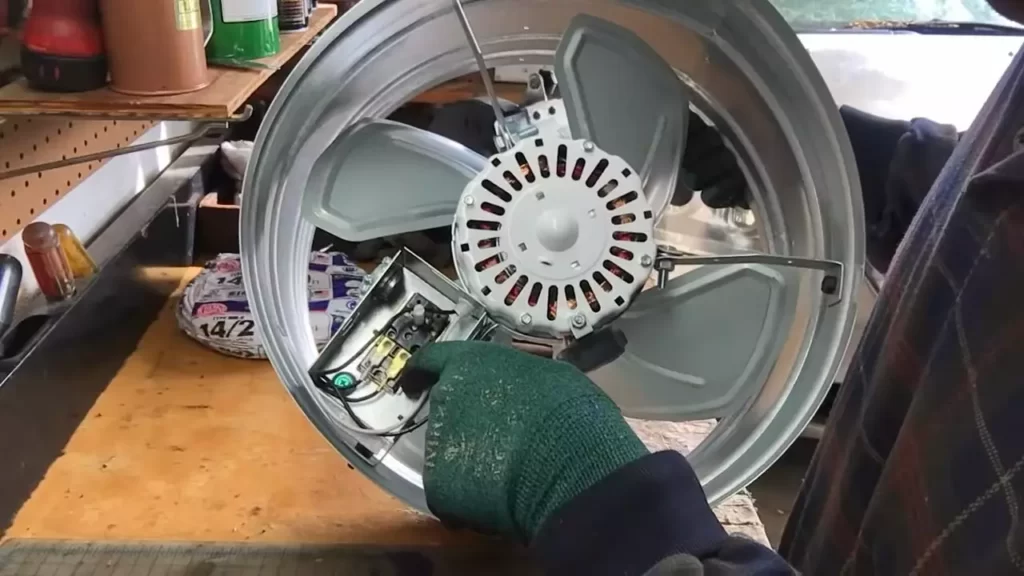
Connecting The Electrical Wiring
Planning the wiring route
Before starting the installation process, it’s important to plan out the wiring route for your gable attic fan. This will ensure that the electrical wiring is properly placed and connected, avoiding any potential issues in the future.
Begin by assessing the area where you plan to install the fan. Take note of any obstacles or obstructions that may affect the wiring route. It’s crucial to avoid any contact between the wires and any sharp objects or insulation materials.
Once you have a clear idea of the route, determine the length of wire you will need. It’s always a good idea to add a little extra length to account for any unforeseen circumstances or potential changes in the future.
Installing an electrical junction box
Next, you’ll need to install an electrical junction box before connecting the wiring. The junction box serves as a secure and protected connection point for the wires.
Find a suitable location for the junction box near the fan installation site. Ensure that the box is easily accessible but also out of the way to avoid any potential damage or interference.
Once you’ve selected the location, use a drill to create the necessary holes for mounting the junction box. Secure the box in place using screws or other appropriate fasteners.
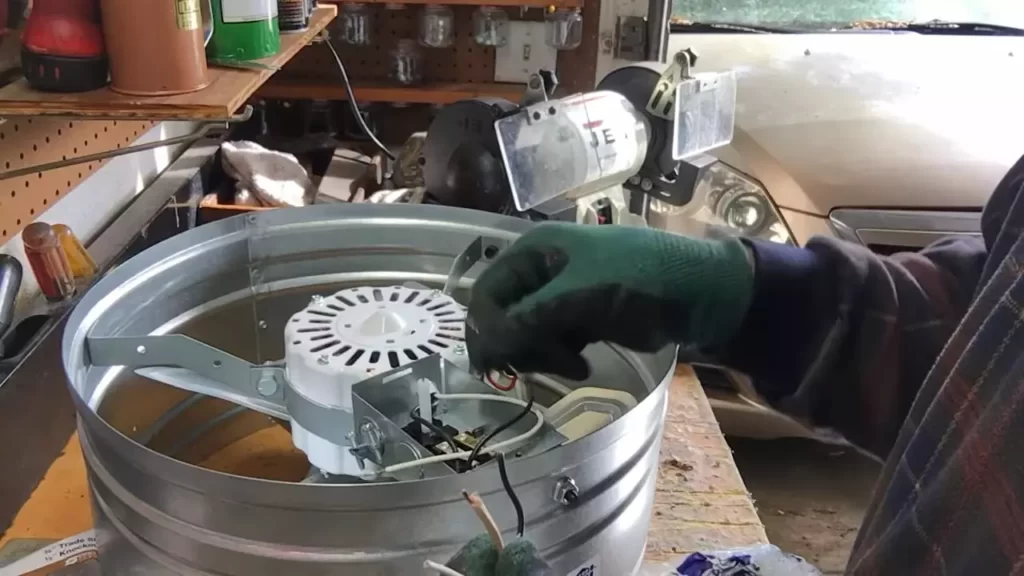
Connecting the fan to a power source
Now it’s time to connect the fan to a power source. This step must be carried out with utmost caution and adherence to safety guidelines to prevent any electrical hazards.
First, ensure that the power source you plan to connect the fan to is turned off. This is crucial for your safety as well as for preventing any damage to the fan or electrical system.
Once you’ve verified that the power is off, connect the wiring from the fan to the electrical junction box. Ensure that the connections are secure and tight. It’s advisable to use wire nuts or other appropriate connectors to ensure a strong and reliable connection.
After connecting the fan wiring to the junction box, double-check all the connections to ensure they are properly connected. Check for any loose wires or signs of damage.
Finally, turn on the power source and test the fan to ensure it is functioning correctly. If everything is in order, you’ve successfully connected your gable attic fan to the electrical wiring and can now enjoy the benefits of improved ventilation in your attic space.
Insulating And Sealing The Installation
When installing a gable attic fan, it is crucial to insulate and seal the installation properly. This ensures that the fan operates efficiently and prevents energy loss in your home. In this section, we will discuss the steps involved in applying weatherproof sealant around the fan edges and opening, insulating the gable attic fan to prevent energy loss, and checking for any gaps or leaks in the installation.
Applying weatherproof sealant around the fan edges and opening
To prevent any water leakage or drafts, it is important to apply weatherproof sealant around the edges of the gable attic fan and its opening. Follow these steps to ensure a watertight seal:
- Firstly, clean the fan edges and opening using a clean cloth to remove any dirt or debris.
- Apply a generous amount of weatherproof sealant around the edges of the fan and the opening using a caulking gun.
- Smooth out the sealant using a putty knife to ensure even coverage and a seamless finish.
- Allow the sealant to dry completely before proceeding with the next steps.
Insulating the gable attic fan to prevent energy loss
Insulating the gable attic fan helps to minimize heat loss during colder months and prevents warm air from escaping during the summer. Follow these steps to effectively insulate your gable attic fan:
- Start by measuring the dimensions of the fan and the opening to determine the amount of insulation required.
- Choose an appropriate insulation material such as fiberglass or foam board that fits snugly around the fan.
- Cut the insulation material to the measured dimensions and fit it tightly around the gable attic fan.
- Secure the insulation in place using adhesive or tape to ensure it does not come loose over time.
Checking for any gaps or leaks in the installation
After completing the installation process, it is essential to check for any gaps or leaks that could compromise the efficiency of the gable attic fan. Follow these steps to ensure a properly sealed installation:
- Inspect the fan edges and the opening for any visible gaps or cracks.
- If you find any gaps or cracks, use additional weatherproof sealant to fill them in.
- Check for any air leaks around the fan by running your hand along the edges while the fan is operating.
- If you feel any air leaks, apply more sealant as needed to create an airtight seal.
By insulating, sealing, and checking for any gaps or leaks in the installation, you can ensure that your gable attic fan operates efficiently and helps to save energy in your home.
Switching On The Fan And Verifying Operation
Turning on the Fan and Checking for Proper Airflow
Once you have successfully installed your gable attic fan, it’s time to switch it on and verify that it is operating correctly. This is an important step to ensure that your fan will effectively cool your attic and prevent moisture buildup.
To turn on the fan, locate the switch that controls its operation. This switch is typically found near the fan itself or inside your attic. Make sure the switch is in the “on” position before proceeding.
After switching on the fan, take a moment to check for proper airflow. Stand near the vent opening or access panel and feel for any air movement. It’s important to note that the amount of airflow may vary depending on the size and power of your fan, but you should be able to feel at least a gentle breeze.
If you are unsure whether the airflow is adequate, you can use a piece of tissue paper or an incense stick to test it. Hold the tissue or stick near the vent opening and observe how it moves. If the tissue flutters or the smoke from the incense stick is drawn into the vent, you can be confident that the fan is functioning properly.
Listening for any Unusual Noises
While the fan is running, it’s important to listen for any unusual noises that could indicate a problem. A properly installed and maintained gable attic fan should operate quietly and smoothly.
Listen closely for any grinding, rattling, or high-pitched sounds. These noises could suggest a mechanical issue or a loose component within the fan. If you notice any of these sounds, it is advisable to turn off the fan immediately and inspect it further. In some cases, professional assistance may be required to resolve the issue.
Ensuring Proper Operation of the Fan
As you inspect your gable attic fan, it’s essential to ensure that it is operating as expected. Here are a few additional checks you can perform to verify its proper operation:
- Check that the fan blades are rotating smoothly and without any obstructions.
- Inspect the vent opening for any debris or blockages that may restrict airflow.
- Ensure that the fan motor is cool to the touch. Overheating may indicate a malfunction.
If you notice any issues during these checks, it is important to address them promptly to prevent any further damage to your gable attic fan.
In conclusion, turning on your gable attic fan and verifying its operation is a crucial step in ensuring its effectiveness. By following these steps and performing the necessary checks, you can enjoy a well-functioning fan that efficiently cools your attic space.
Regular Maintenance And Cleaning
Maintaining your gable attic fan is crucial for its optimal performance and longevity. Regular cleaning and maintenance will ensure that the fan continues to operate efficiently, preventing any issues that may arise from neglect. In this section, we will discuss two essential tasks: cleaning the fan blades and housing, and checking for any loose components. Additionally, we will also cover inspecting the electrical connections, providing you with a comprehensive guide to keeping your gable attic fan in top shape.
Cleaning the Fan Blades and Housing
Dirt, debris, and dust can accumulate on the fan blades and housing over time, impeding the airflow and reducing the fan’s effectiveness. To maintain proper ventilation, it is essential to clean the fan blades and housing regularly. Follow these steps:
- Turn off the power to the fan at the circuit breaker to ensure safety during cleaning.
- Using a soft brush or cloth, gently remove any visible dust or debris from the fan blades and housing. Take care not to apply excessive force, as it may damage the blades or housing.
- For thorough cleaning, dampen a cloth with a mild detergent and water solution. Wipe the blades and housing, ensuring all dirt and grime are removed.
- Rinse the cloth thoroughly and wipe down the blades and housing again to remove any remaining soap residue.
- Allow the blades and housing to air dry completely before restoring power to the fan.
Note: It is crucial to avoid using abrasive cleaners or harsh chemicals, as they can damage the fan components.
Checking for Any Loose Components
A loose component in your gable attic fan can result in increased noise, reduced efficiency, or even complete malfunction. Regularly inspecting for any loose parts ensures that your fan operates optimally. Follow these simple steps:
- Visually inspect the fan housing and all visible components for any signs of looseness or damage.
- Tighten any loose screws or bolts using a suitable tool. Ensure not to overtighten, as it may cause damage.
- Check the fan motor mounting bracket for secure attachment.
- Examine the fan belt, if applicable, for proper tension. Adjust as necessary.
Note: If you encounter any complex issues or unfamiliar components, it is recommended to consult a professional technician for assistance.
Inspecting the Electrical Connections
Checking the electrical connections is crucial for the safe and reliable operation of your gable attic fan. Regular inspections will help identify any loose or damaged connections that require attention. Perform the following steps:
- Ensure the power to the fan is turned off at the circuit breaker before inspecting the electrical connections.
- Carefully examine all visible electrical connections, ensuring they are secure and free from any signs of damage or corrosion.
- If you notice any loose or damaged connections, tighten or repair them immediately. This may involve using appropriate tools or contacting a qualified electrician.
- Once the connections are confirmed to be secure and in good condition, restore power to the fan.
Note: If you are uncertain about any electrical components or connections, it is advised to seek professional assistance to avoid potential electrical hazards.
By regularly maintaining and cleaning your gable attic fan, you can ensure optimal performance, increased energy efficiency, and a prolonged lifespan. Cleaning the fan blades and housing, checking for any loose components, and inspecting the electrical connections are simple tasks that can make a significant difference in the overall effectiveness and longevity of your gable attic fan.
Troubleshooting Common Issues
While installing a gable attic fan can provide many benefits, such as improved air circulation and energy efficiency, it’s not uncommon to encounter a few issues along the way. In this section, we will address some common problems that you may face during the installation process and offer solutions to help you overcome them.
Fan not turning on
If you find that your gable attic fan is not turning on, there are a few potential causes that you can check for. First, ensure that the fan is properly connected to a power source. Check the circuit breaker or fuse box to ensure that there are no issues with the electrical supply. Additionally, inspect the wiring connections to make sure they are secure and not damaged.
If the power supply seems to be fine, the next step is to test the fan itself. Disconnect the power and use a multimeter to check the continuity of the fan motor. If there is no continuity, it may be a sign that the motor is faulty and needs to be replaced. In some cases, the issue may be a result of a faulty thermostat or control switch, so it’s worth checking those components as well.
Insufficient airflow
If you notice that your gable attic fan is not providing enough airflow, there are a few potential reasons for this. First, check the size of the fan and ensure that it is adequately sized for the space. Installing a larger fan may be necessary if the attic is particularly large or if there are obstructions that impede airflow.
Another factor to consider is the ventilation in the attic itself. Ensure that there are enough intake vents to allow for proper air circulation. Without adequate intake vents, the attic fan may struggle to effectively remove hot air from the space. Additionally, check for any blockages, such as debris or insulation, that may be obstructing the fan’s airflow.
Excessive noise
If your gable attic fan is producing excessive noise, it can be a nuisance and interfere with your comfort. One possible cause is improper installation, which can lead to vibrations. Ensure that the fan is securely mounted and all fasteners are tight. If the noise persists, consider adding some padding or insulation around the fan to absorb vibrations.
In some cases, the noise may be a result of worn-out bearings in the fan motor. If this is the case, replacing the motor can solve the problem. Additionally, inspect the fan blade for any damage or debris that may be causing the noise. Cleaning or replacing the blade may help resolve the issue.
By troubleshooting these common issues during the installation process, you’ll be able to ensure that your gable attic fan is functioning properly, providing effective ventilation, and maintaining a comfortable living environment.
Frequently Asked Questions On How To Install Gable Attic Fan
Are Gable Attic Fans Worth It?
Gable attic fans are effective in removing excess heat from your attic, reducing energy costs and preventing moisture buildup. They provide proper ventilation and help extend the lifespan of your roof while improving indoor air quality. Installing gable attic fans is worth it for maintaining a comfortable and energy-efficient home.
Do Attic Fans Work With Gable Vents?
Yes, attic fans can work with gable vents by providing additional ventilation and helping to reduce heat buildup. The fans draw out hot air from the attic, while the gable vents allow fresh air to enter. This combination can enhance the overall effectiveness of attic ventilation, improving air circulation and preventing issues like mold and excessive moisture.
Can I Install An Attic Fan Myself?
Yes, you can install an attic fan yourself. However, it is important to have proper knowledge, tools, and skills for a safe installation. Ensure you follow manufacturer instructions, electrical codes, and safety precautions. Seek professional help if you are unsure or uncomfortable with the process.
What Is The Difference Between A Gable Fan And An Attic Fan?
Gable fans are mounted on the outside wall, while attic fans are installed on the attic floor. Gable fans expel hot air from the attic, while attic fans draw in cool outside air. Both help to reduce heat and humidity, improving overall comfort and energy efficiency.
Conclusion
Installing a gable attic fan is a great way to improve ventilation and reduce energy costs in your home. By following the step-by-step instructions outlined in this blog post, you can easily complete this DIY project. Remember to ensure proper electrical connections and safety precautions for a successful installation.
With a well-functioning gable attic fan, you can enjoy a more comfortable living environment and potentially lower cooling costs. Happy DIYing!