To install an RV plug at home, follow these steps: first, make sure you have the necessary tools and supplies; then, turn off the power supply and locate the main breaker box; next, remove the cover of the breaker box and find a suitable location for the RV plug; finally, connect the wires to the appropriate terminals and secure the plug in place.
Determining The Power Requirements
When it comes to installing an RV plug at home, one of the most critical steps is determining the power requirements of your RV. This ensures that you choose the appropriate RV plug and calculate the power capacity during the installation process. Understanding the electrical needs of your RV, choosing the right RV plug, and calculating the power capacity will help you access electricity safely and efficiently while on the road.
Understanding the electrical needs of your RV
To begin, it is essential to understand the electrical needs of your RV. Each RV is unique, with varying power requirements. Before installing an RV plug at home, it’s crucial to determine the electrical demands of your specific vehicle. Take note of all the appliances and devices that consume power within your RV, such as air conditioning units, refrigerators, televisions, and charging stations. Consider the power ratings and consumption of these appliances to get a clear idea of the electrical load your RV requires.
Choosing the appropriate RV plug
Once you have a good understanding of your RV’s electrical needs, the next step is choosing the appropriate RV plug. RV plugs come in various types, each offering a different level of power output. The two most common types are 30-amp and 50-amp plugs. The 30-amp plug is suitable for smaller RVs with less power-hungry appliances. On the other hand, the 50-amp plug is ideal for larger RVs or those with power-hungry appliances, requiring more electricity. Consider the power requirements of your RV, and choose the appropriate RV plug that can handle the load without any issues.
Calculating power capacity for the plug installation
After selecting the right RV plug, it’s crucial to calculate the power capacity for the plug installation. This ensures that your RV plug can safely handle the electrical load and prevents any potential hazards, such as overheating or electrical failures. To calculate the power capacity, you need to consider the voltage, amperage, and wattage requirements of your RV. These specifications can be found in the RV owner’s manual or on the appliances themselves. Once you have the necessary information, use the following formula to calculate the power capacity: Power Capacity (in watts) = Voltage (in volts) x Amperage (in amps).
By properly determining the power requirements, choosing the appropriate RV plug, and calculating the power capacity, you can ensure a safe and efficient installation of an RV plug at home. Taking these steps not only protects your RV and appliances but also guarantees a worry-free experience while on the road. So, be thorough in your research and calculations before embarking on this installation process.
| RV Plug Type | Power Capacity (Amps) | Recommended for |
|---|---|---|
| 30-amp Plug | 30A | Smaller RVs with less power-hungry appliances |
| 50-amp Plug | 50A | Larger RVs or those with power-hungry appliances |
Remember, it’s always better to err on the side of caution and choose an RV plug with a higher power capacity if you’re unsure. It’s essential to ensure that your RV plug can handle the electrical load without any issues and provide a reliable source of power during your travels.
Essential Tools For Rv Plug Installation
Installing an RV plug at home can be a rewarding and practical DIY project. To successfully complete the installation process, you’ll need a few essential tools. Ensuring that you have the right tools and safety equipment is crucial for a safe and efficient installation. In this guide, we’ll provide you with a comprehensive list of tools required for installing an RV plug, as well as the necessary safety equipment to work with electricity.
List of tools required for the installation process
Before you begin the installation, it’s important to gather all the required tools. Having these tools on hand will make the process smoother and more efficient. Here’s a list of the tools you’ll need:
| Tool | Description |
|---|---|
| Screwdriver | A Phillips or flathead screwdriver, depending on the type of screws used for your RV plug. |
| Wire Strippers | Used to strip the insulation off the electrical wires before connecting them to the RV plug. |
| Wire Cutters | Used to cut the electrical wires to the required length. |
| Electrical Tape | A type of insulating tape used to secure and protect the connections. |
| Wire Nuts | Used to secure the electrical connections and prevent any loose wires. |
| Voltage Tester | Used to ensure that the power is off before starting the installation process. |
| Drill | If necessary, you may need a drill to create holes for mounting the RV plug. |
| Mounting Hardware | If required, you’ll need screws or brackets to securely mount the RV plug. |
Safety equipment needed for working with electricity
Working with electricity can be dangerous, so it’s vital to prioritize safety. Make sure to have the following safety equipment before you begin:
- Insulated Gloves: These gloves provide insulation and protect you from electric shock.
- Safety Glasses: Wearing safety glasses ensures your eyes are protected from any potential hazards.
- Circuit Tester: Use a circuit tester to verify that the power is off before starting the installation process.
- Fire Extinguisher: Keep a fire extinguisher nearby in case of electrical fires.
- First Aid Kit: Have a first aid kit readily available for any potential accidents or injuries.
By having the right tools and safety equipment, you’re setting yourself up for a successful RV plug installation while prioritizing your safety. Always remember to follow proper safety protocols and consult a professional if you’re unsure about any part of the installation process.
Required Materials For RV Plug Installation
RV Plug and Socket
One of the key components you’ll need for installing an RV plug at home is an RV plug and socket. The RV plug is designed to provide power to your recreational vehicle, while the socket allows you to connect your RV to a power source. Before purchasing an RV plug and socket, ensure that it is compatible with your vehicle’s electrical system and meets the necessary safety standards.
Electrical Wires and Connectors
Another essential material for RV plug installation is electrical wires and connectors. These allow you to connect the RV plug and socket to your home’s electrical system. It’s crucial to use wires and connectors that are specifically designed for RV use, as they are built to handle the unique demands of your vehicle’s electrical system.
Mounting Hardware
To secure the RV plug and socket in place, you’ll need mounting hardware. This ensures that the installation is safe and sturdy, preventing any accidental disconnections or damage to the electrical connection. The mounting hardware typically includes screws, brackets, or other fasteners that are suitable for securing the plug and socket to the desired location.
Electrical Tape and Wire Nuts
Proper insulation of the electrical connections is crucial for safety. Electrical tape and wire nuts play a vital role in securing and insulating the wires and connectors. The electrical tape provides additional protection against moisture and ensures that the connections stay in place. Wire nuts, on the other hand, make it easier to join multiple wires securely.
Junction Box (if necessary)
In some cases, you may require a junction box for your RV plug installation. A junction box serves as a connection point for the RV plug, socket, and electrical wires. It provides a safe enclosure for the electrical connections, protecting them from elements such as dust, water, or accidental damage. If your installation requires a junction box, ensure that it is suitable for outdoor use and has proper waterproofing features.
Turning Off Power And Ensuring Safety
When it comes to installing an RV plug at home, one of the most crucial steps is ensuring safety by properly turning off the power. This ensures that you can work safely without the risk of electrical shocks or accidents. In this section, we will discuss how to shut off the electricity in the designated area and implement safety measures to avoid electrical hazards.
Shutting off the electricity in the designated area
Before beginning any electrical work, it is essential to shut off the power to the designated area. This prevents any potential electrical accidents and keeps you safe throughout the installation process. Here’s a step-by-step guide on how to shut off the electricity:
- Locate the main electrical panel in your home. Usually, you can find it in the basement, garage, or utility room.
- Open the panel and find the breaker that controls the power to the designated area where you want to install the RV plug.
- Locate the corresponding breaker switch and flip it to the “Off” position. This action cuts off the power supply to the area.
- Verify that the power is indeed off by using a non-contact voltage tester. This device can detect the presence of electrical currents and ensure that the power is shut off completely.
Implementing safety measures to avoid electrical hazards
Once you have turned off the power, it’s time to implement safety measures to avoid any potential electrical hazards. These safety measures will provide an extra layer of protection throughout the installation process. Here are some important precautions to follow:
- Wear personal protective equipment (PPE), including safety goggles, gloves, and a face mask if necessary, to protect yourself from any debris or electrical sparks.
- Make sure the area where you will be working is well-lit. Proper lighting allows you to see clearly and minimize the chances of making mistakes or causing accidents.
- Avoid working on wet surfaces or during rainy conditions. Moisture can increase the risk of electrical shocks, so make sure the area is dry before proceeding with the installation.
- Keep any flammable materials or liquids away from the installation area. Sparks or electrical malfunctions can quickly ignite these substances, leading to dangerous situations.
By following these safety measures, you can ensure a safe and worry-free installation of the RV plug at home. Remember, safety should always be the top priority when working with electricity. Take your time, double-check everything, and don’t hesitate to ask for professional help if needed. Stay safe!
Installing The Rv Plug
Installing an RV plug at home is essential for powering your recreational vehicle and enjoying all the comforts it has to offer. Whether you are a seasoned RV owner or new to the world of RVing, knowing how to install an RV plug is a valuable skill. In this step-by-step guide, we will walk you through the process of installing an RV plug at home, ensuring a safe and reliable electrical connection.
Removing the old plug (if applicable)
If you already have an existing plug that needs to be replaced or upgraded, the first step is to safely remove the old plug. This ensures a clean installation and avoids any damage to the wiring or connectors. Follow these steps to remove the old plug:
- Disconnect the power source by turning off the electrical breaker or disconnecting the power cord.
- Using a screwdriver or a tool suitable for your plug type, remove the screws or fasteners securing the old plug to the electrical box.
- Gently pull the plug away from the electrical box, exposing the wiring connections.
- Take note of the wire connections and their corresponding colors, as they will be important when installing the new plug.
- After removing the old plug, inspect the wiring for any signs of damage or wear. If necessary, repair or replace any damaged wiring before proceeding.
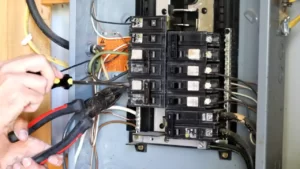
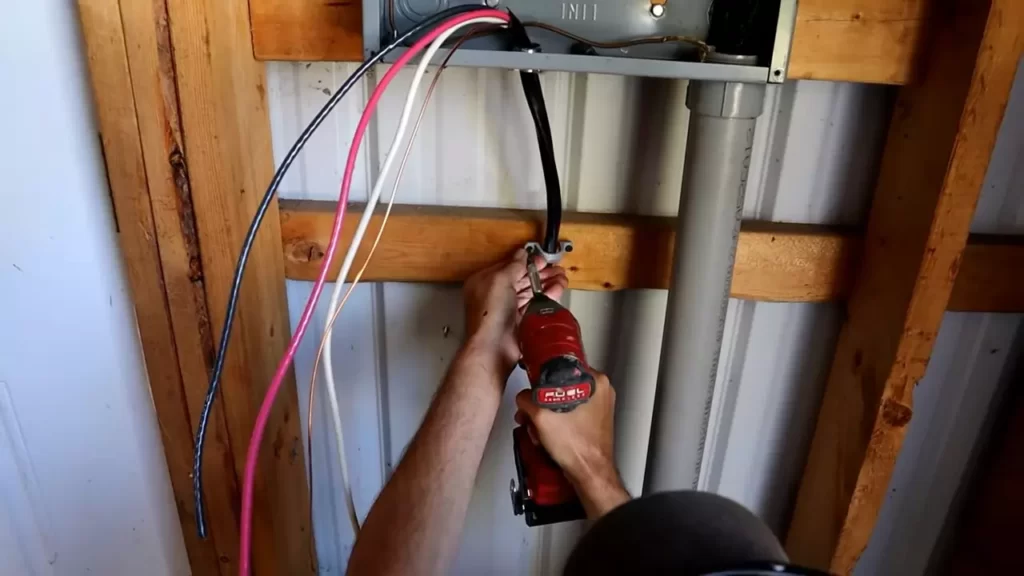
Connecting the RV plug to the electrical source
Once the old plug has been removed (if applicable), it’s time to connect the new RV plug to the electrical source. Follow these steps to ensure a proper connection:
- Identify the wiring connections on the new RV plug and their corresponding colors.
- Strip the insulation from the end of each corresponding wire, exposing the copper conductor underneath.
- Insert each wire into its respective terminal on the RV plug, ensuring a tight and secure fit.
- Tighten the terminal screws using a screwdriver or appropriate tool, making sure the wires are securely fastened.
- Double-check the wiring connections, ensuring that each wire is connected to the correct terminal and there are no loose or exposed wires.
Properly securing the wiring and connectors
Once the RV plug has been connected to the electrical source, it’s crucial to properly secure the wiring and connectors. This ensures the longevity and reliability of the electrical connection. Follow these steps to secure the wiring and connectors:
- Using electrical tape or heat shrink tubing, wrap each individual wire connection, covering the exposed copper conductor.
- Secure the electrical tape or heat shrink tubing by stretching it tightly and applying heat (if using heat shrink tubing) or wrapping it multiple times (if using electrical tape).
- Ensure that the wires are neatly arranged and not tangled or twisted, as this can cause future issues.
- If necessary, use cable ties or wire clips to secure the wiring to nearby supports, preventing any strain or tension on the connections.
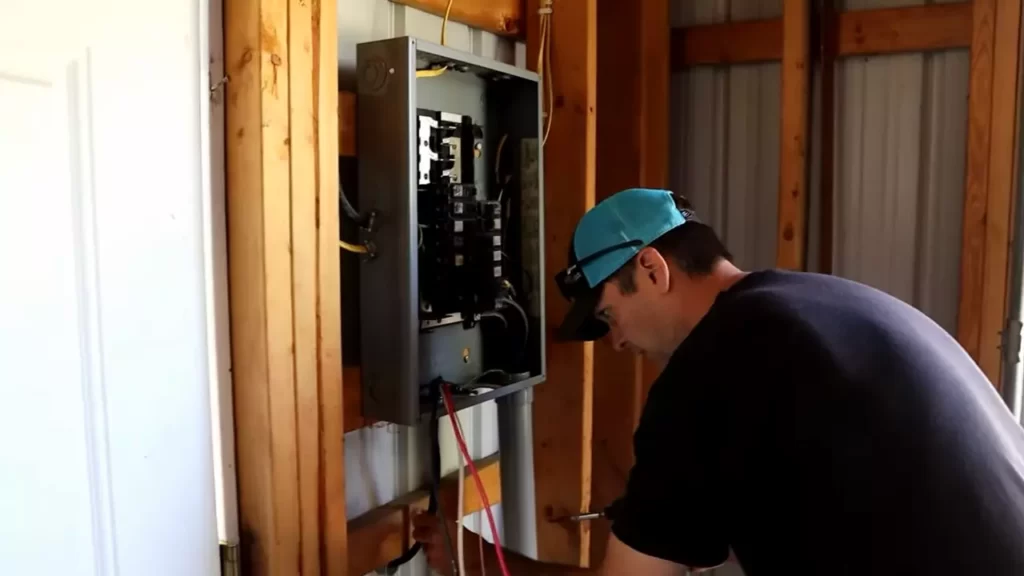
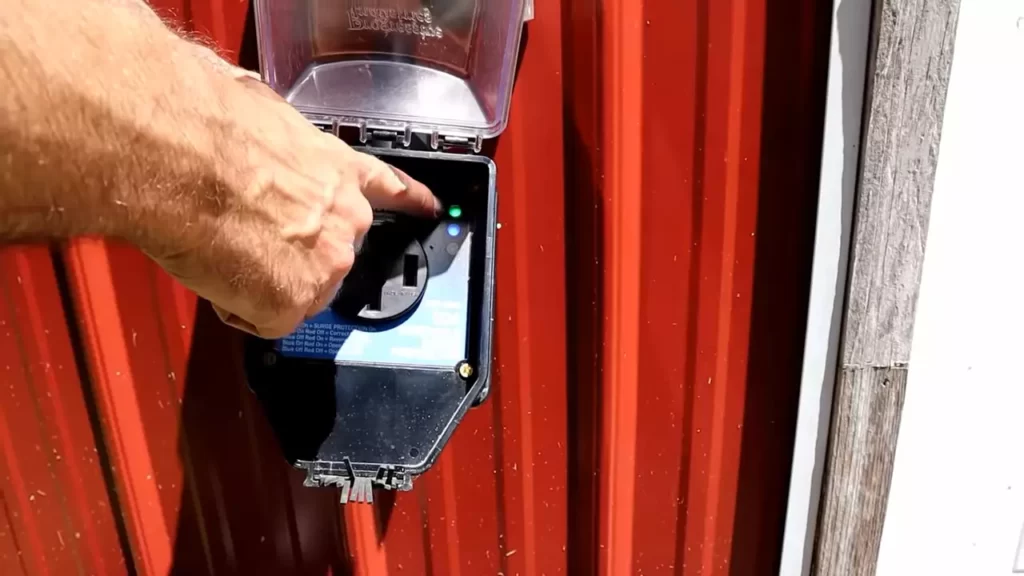
Testing the connection for functionality
After completing the installation and securing the wiring, it’s essential to test the connection for functionality. This ensures that the RV plug is properly installed and will provide the necessary power to your recreational vehicle. Follow these steps to test the connection:
- Turn on the electrical breaker or connect the power cord to the power source.
- Verify that the RV plug is receiving power by checking for the presence of a green LED indicator light or any other indicator specified by the manufacturer.
- Test each electrical outlet in your RV to ensure that they are functioning correctly.
- If any issues are detected, double-check the wiring connections and troubleshoot accordingly.
By following these steps, you can confidently install an RV plug at home, providing the necessary power for your recreational vehicle. Remember to prioritize safety throughout the installation process and consult a professional if you have any doubts or concerns.
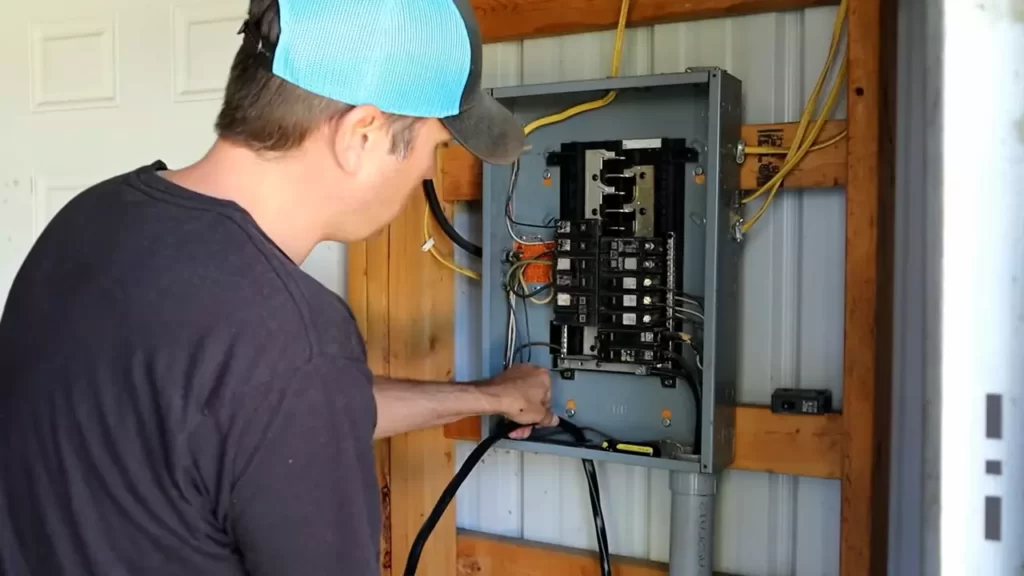
Mounting The Rv Plug Socket
Mounting the RV plug socket is a crucial step in the process of installing an RV plug at home. It ensures that the socket is securely fixed in a convenient location, allowing easy access to power your RV. In this section, we will discuss the factors to consider when choosing the ideal location for the socket, as well as the steps involved in preparing the mounting surface and installing the socket.
Choosing the Ideal Location for the Socket
When choosing the ideal location for the RV plug socket, there are a few factors to consider:
- Accessibility: Ensure that the socket is easily accessible from the area where you park your RV. This will make it convenient to plug in and unplug your RV whenever needed.
- Proximity to Power Source: The socket should be located close to the power source, such as your house’s electrical panel or an exterior power outlet. This will minimize the length of the power cord and reduce the risk of tripping hazards.
- Protection from the Elements: Choose a location that provides some protection from the elements, such as rain or direct sunlight. This will help prolong the lifespan of the socket and prevent any damage caused by exposure to harsh weather conditions.
Preparing the Mounting Surface
Before installing the socket, it is important to prepare the mounting surface to ensure a secure and stable installation:
- Clean the Surface: Clear any dirt, debris, or obstructions from the area where you plan to mount the socket. This will provide a clean surface for proper adhesion.
- Ensure Levelness: Use a level to ensure that the mounting surface is level. This will prevent any tilting or misalignment of the socket once it is installed.
- Measure and Mark: Take measurements and mark the exact location where you plan to mount the socket. This will help you position it accurately during the installation process.
Installing and Securing the Socket
Once the mounting surface is prepared, follow these steps to install and secure the RV plug socket:
- Position the Socket: Place the socket in the marked location on the mounting surface. Ensure that it is aligned properly and flush with the surface.
- Secure with Mounting Screws: Using the appropriate screws, secure the socket to the mounting surface. Make sure to tighten them firmly, but avoid over-tightening to prevent damage.
- Test Stability: Gently push and pull the socket to ensure that it is securely mounted. If there is any wobbling or movement, tighten the screws further or adjust the positioning as needed.
By following these steps, you can effectively mount the RV plug socket in a location that is convenient, safe, and practical for powering your RV at home.
Common Issues In Rv Plug Installation
Installing an RV plug at home can be a convenient and cost-effective solution for RV owners. However, there are a few common issues that can arise during the installation process. Understanding these potential problems and knowing how to troubleshoot them is essential to ensure a successful and safe installation. In this article, we will discuss the most common problems that can occur when installing an RV plug, as well as provide troubleshooting techniques to help you overcome these issues.
Identifying potential problems during installation
When installing an RV plug at home, it is important to be aware of the potential problems that may arise. By being proactive and addressing these issues early on, you can save yourself time, money, and frustration. Here are some common problems to watch out for:
- Poor electrical connections: One of the most common issues during RV plug installation is poor electrical connections. This can result in unreliable power supply or even electrical shorts. It is important to ensure that all electrical connections are tight and secure. Loose connections can lead to overheating and potential hazards. Be sure to check all connections thoroughly, including the wires, terminals, and grounding.
- Incorrect wiring: Another common problem is incorrect wiring. It is crucial to follow the manufacturer’s instructions and adhere to the wiring diagrams provided. Using the wrong wire gauge or connecting wires incorrectly can lead to electrical issues, including voltage drops and circuit overloads. Before starting the installation process, make sure you have the proper knowledge and understanding of wiring techniques.
- Grounding problems: Proper grounding is vital for the safety of your RV’s electrical system. Inadequate or faulty grounding can cause electrical shocks, damage to appliances, and even fire hazards. Ensure that you have a solid and secure grounding connection, and check for any signs of corrosion or damage.
- Insufficient power supply: One of the key aspects of RV plug installation is ensuring an adequate power supply. If your RV requires a higher amperage than your current electrical system can handle, you may need to upgrade your home’s electrical panel. Failure to address this issue can result in power fluctuations, voltage drops, and potential damage to your RV’s electrical components.
Troubleshooting techniques for faulty connections
If you encounter faulty connections during the RV plug installation process, there are several troubleshooting techniques you can try before seeking professional help. Here are some techniques to help you identify and resolve faulty connections:
- Visual inspection: Start by visually inspecting all electrical connections. Look for loose wires, corroded terminals, or any signs of damage. Tighten loose connections and clean any corroded parts.
- Testing with a multimeter: Use a multimeter to test the continuity and voltage at various points of the electrical system. This can help you identify any open circuits, short circuits, or voltage drops. By pinpointing the issue, you can take the necessary steps to rectify the problem.
- Replacing damaged components: If you find any damaged or faulty components during the inspection, such as wires or terminals, consider replacing them. It is crucial to use high-quality and compatible parts to ensure a reliable and safe electrical connection.
- Seeking professional assistance: If you are unable to identify or resolve the faulty connections, it is best to seek professional assistance. An experienced electrician or RV technician will have the expertise and tools to diagnose and fix the electrical issues effectively.
By understanding the common issues in RV plug installation and knowing how to troubleshoot them, you can ensure a successful installation process. Remember to always prioritize safety and follow the manufacturer’s instructions and local electrical codes. With proper installation and maintenance, your RV plug will provide reliable power for your adventures on the road.
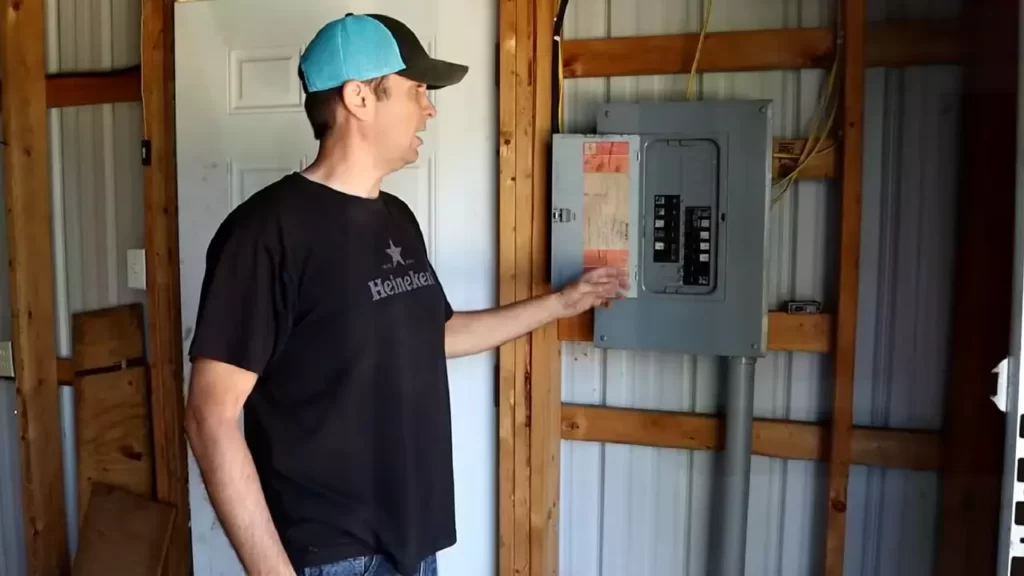
Final Testing And Safety Checks
After successfully installing the RV plug at home, it is crucial to perform final testing and safety checks to ensure a safe and efficient electrical connection for your recreational vehicle. These tests and checks will ensure that the installation has been done correctly, minimizing the risk of electrical accidents and ensuring the smooth operation of your RV.
Verifying the functionality of the RV plug installation
Once the installation is complete, it is important to verify the functionality of the RV plug. This involves checking whether the plug is correctly wired and can supply the necessary power to the RV.
To test the functionality, you will need a voltage tester. Start by turning off the power supply to the RV plug. Insert the voltage tester into each socket of the RV plug and ensure that the tester indicates the correct voltage, according to the requirements of your RV. The voltage should match the specifications outlined in the manufacturer’s documentation.
If the voltages are accurate, proceed to plug in your RV and turn on the power supply. Test each electrical component of the RV, including lights, appliances, and air conditioning, to make sure they are receiving power and functioning correctly. Any issues identified during this testing phase should be addressed promptly.
Conducting safety checks to prevent electrical accidents
Ensuring the safety of your RV electrical installation is paramount to protect yourself, your family, and your property. Before plugging in your RV for the first time, it is essential to conduct safety checks to prevent electrical accidents.
Here are some safety checks you should consider:
- Inspect the RV plug and socket for any signs of damage, such as cracks, wear, or loose connections. If any damage is observed, it is crucial to replace the faulty components before use.
- Confirm that the grounding system is properly connected and functioning. A proper ground connection is essential to prevent electrical shocks.
- Ensure that all electrical connections are tight and secure, including the wiring inside the RV plug and socket. Loose connections can lead to overheating and potential fire hazards.
In addition to these safety checks, it is always recommended to have a qualified electrician perform a thorough inspection of your RV plug installation. They will have the expertise to identify any potential issues and ensure that the installation meets the necessary safety standards.
By taking the time to perform final testing and safety checks on your RV plug installation, you can enjoy the peace of mind knowing that your electrical connection is secure and reliable. A safe and functional installation will allow you to fully enjoy your RV adventures without any electrical concerns.
Frequently Asked Questions For How To Install Rv Plug At Home
How Do I Hook Up My Rv Power To My House?
To connect your RV power to your house, follow these steps:
1. Install a 30-amp RV outlet box outside your home.
2. Connect your RV’s power cord to the outlet box using a suitable extension cord.
3. Make sure the electrical connections are secure and the circuit breaker is off.
4. Turn on the circuit breaker, and your RV should have power from your house. Remember to consult an electrician if you are unsure or need assistance.
How Do I Add A 30 Amp Rv Outlet To My House?
To add a 30 amp RV outlet to your house, follow these steps:
1. Check local electrical codes and obtain permits if required.
2. Hire a licensed electrician for installation.
3. Determine the location of the outlet near your RV parking area.
4. Install a weatherproof box and run appropriate gauge wiring from the main panel to the outlet location.
5. Connect the wires and install the outlet, ensuring it is properly grounded.
How Do You Hook Up A 50 Amp RV Plug At Home?
To hook up a 50 amp RV plug at home, follow these steps:
1. Install a 50 amp circuit breaker in your electrical panel.
2. Connect the red and black wires from the 50 amp outlet to the corresponding terminals in your electrical panel.
3. Connect the white wire to the neutral bus bar and the green wire to the grounding bar.
4. Test the connection to ensure everything works properly.
Can I Plug My 50 Amp Rv Into A 30 Amp Plug Without Damage?
No, it’s not recommended to plug your 50 amp RV into a 30 amp plug as it may cause damage. The 30 amp plug won’t provide enough power, potentially leading to overloading and damaging your RV’s electrical system. Use the correct power source to avoid any harm.
Conclusion
Installing an RV plug at home doesn’t have to be a daunting task. By following the step-by-step instructions outlined in this blog post, you can easily connect your RV to a power source in no time. Remember to always prioritize safety during the installation process, and consult a professional electrician if needed.
Enjoy the freedom and convenience of powering your RV from the comfort of your own home. Happy travels!