To install a mini split heat pump, follow these simple steps: choose the location, mount the indoor and outdoor units, connect the refrigerant lines and electrical wiring, and finally test and commission the system. Welcome!
If you’re looking to install a mini split heat pump, you’ve come to the right place. We’ll guide you through the process step by step, ensuring that you can enjoy the benefits of efficient heating and cooling in your home or office.
Whether you’re a DIY enthusiast or simply looking to understand the installation process better, we’ve got you covered. So let’s dive in and learn how to install a mini split heat pump in an efficient and effective way.
Factors To Consider When Selecting A Mini Split Heat Pump
When it comes to choosing a mini split heat pump for your home, there are several important factors to consider. These factors will help you make an informed decision and ensure that you select a heat pump that meets your specific needs. In this article, we will discuss three key factors to consider when selecting a mini split heat pump: energy efficiency, size and capacity, and noise level. Let’s dive in!
Energy Efficiency
One of the most important factors to consider when selecting a mini split heat pump is its energy efficiency. Energy efficiency not only helps reduce your carbon footprint but also saves you money on your energy bills. When choosing a heat pump, look for the Seasonal Energy Efficiency Ratio (SEER) and Heating Seasonal Performance Factor (HSPF) ratings. Higher SEER and HSPF ratings indicate better energy efficiency. Consider opting for a heat pump with a high SEER and HSPF rating to ensure optimal energy savings.
Size and Capacity
The size and capacity of the mini split heat pump should be carefully considered to ensure effective heating and cooling of your space. A heat pump that is too small may struggle to adequately heat or cool your area, while a heat pump that is too large may result in inefficiency and increased energy consumption. To determine the correct size and capacity, consider the square footage of the room or area you want to heat or cool. Additionally, take into account factors such as insulation, ceiling height, and number of windows. Consulting with an HVAC professional can help you determine the appropriate size and capacity for your specific needs.
Noise Level
Noise level is another important factor to consider, particularly if you plan to install the mini split heat pump in a bedroom or a space where noise could be a concern. Mini split heat pumps typically have two components: an indoor unit and an outdoor unit. The noise level can vary depending on the brand and model. Look for heat pumps that have noise reduction features or are known for their quiet operation. This way, you can enjoy the heating and cooling benefits without any unnecessary distractions or disturbances.
By considering the factors of energy efficiency, size and capacity, and noise level when selecting a mini split heat pump, you can ensure that you choose the right heat pump for your home. Remember to assess your specific heating and cooling needs, consult with professionals if needed, and make an informed decision. With the right mini split heat pump, you can enjoy a comfortable and energy-efficient environment in your home all year round.
Importance Of Proper Sizing For Installation
When it comes to installing a mini split heat pump, proper sizing is crucial for ensuring optimal performance and efficiency. Many homeowners overlook this step, thinking that any size will do. However, installing a system that is either too big or too small for your space can lead to a range of issues, from higher energy bills to poor heating and cooling performance.
Calculating the Heating and Cooling Load
In order to determine the correct size for your mini split heat pump, you need to calculate the heating and cooling load of your space. The heating load refers to the amount of heat needed to warm your home, while the cooling load refers to the amount of cooling required to keep your space comfortable. Several factors need to be considered when calculating the load, including:
- Room dimensions
- Insulation levels
- Number of windows and their orientation
- Number of occupants
Once you have gathered the necessary information, you can use a load calculation formula or consult with a professional to determine the exact heating and cooling load of your space.
Determining the Correct BTU Capacity
After calculating the heating and cooling load, the next step is to determine the correct BTU (British Thermal Unit) capacity for your mini split heat pump. BTU capacity refers to the amount of heat a system can produce or remove per hour. Installing a system with the right BTU capacity is essential for achieving optimal comfort.
To ensure you choose the correct BTU capacity, you should consider the following:
- Size of your space: Larger spaces typically require systems with higher BTU capacities to adequately heat or cool the area.
- Climate: Regions with extreme temperatures may require higher BTU capacities to maintain comfort.
- Insulation: Well-insulated spaces may require smaller BTU capacities, while poorly insulated areas may need larger capacities.
- Additional factors: If your space receives direct sunlight or has a high number of heat-generating appliances, you may need a larger BTU capacity.
By considering these factors and matching the BTU capacity to your specific needs, you can ensure that your mini split heat pump operates efficiently and effectively.
To summarize, properly sizing your mini split heat pump is essential for achieving optimal performance and comfort in your home. Calculating the heating and cooling load and determining the correct BTU capacity are crucial steps in this process. By investing time and effort into these calculations or consulting with a professional, you can choose the right size for your space and enjoy the benefits of a well-functioning mini split heat pump.
Different Types Of Mini Split Heat Pumps
When it comes to installing a mini split heat pump in your home, there are several different options to consider. Understanding the different types of mini split heat pumps available will help you make an informed decision that best fits your heating and cooling needs. In this article, we will explore the three main categories of mini split heat pumps: single-zone, multi-zone, and ducted vs. ductless systems. Let’s dive in!
Single-Zone Mini Split Heat Pumps
A single-zone mini split heat pump is designed to provide heating and cooling to a single area or room. This type of system consists of one outdoor unit and one indoor unit. It’s an ideal choice for homeowners who have specific comfort needs in one particular area of their home, such as a bedroom or living room.
The single-zone mini split heat pump offers several benefits, including:
- Energy efficiency: Since the system only serves one area, it doesn’t waste energy heating or cooling unused spaces.
- Independent control: You have the freedom to set different temperatures in different rooms, providing personalized comfort.
- Easy installation: With only one indoor unit to install, the process is relatively straightforward and less time-consuming.
Multi-Zone Mini Split Heat Pumps
In contrast to single-zone systems, multi-zone mini split heat pumps can provide heating and cooling to multiple areas or rooms. These systems consist of one outdoor unit and multiple indoor units, with each unit serving a specific zone.
The advantages of multi-zone mini split heat pumps include:
- Flexibility: You can customize the temperature in different areas of your home, catering to individual preferences.
- Cost-effective: Instead of installing separate units for each zone, a multi-zone mini split heat pump allows you to save money by having a single outdoor unit.
- Space-saving: With the ability to connect multiple indoor units to one outdoor unit, multi-zone systems help save valuable space.
Ducted vs. Ductless Mini Split Heat Pumps
One of the main considerations when installing a mini split heat pump is whether to choose a ducted or ductless system. The difference lies in the distribution of the conditioned air throughout your home.
| Ducted System | Ductless System |
|---|---|
| A ducted mini split heat pump uses a network of ducts to distribute air to different areas through vents or registers. | A ductless mini split heat pump does not require any ductwork and delivers air directly into each room through individual indoor units. |
| Perfect for whole-house heating and cooling | Ideal for specific zones or areas |
| Requires installation of ducts, which may involve more extensive work | Easy installation without the need for ductwork |
| Offers greater airflow control and consistent temperature throughout the house | Allows independent control of each room’s temperature |
Choosing between a ducted or ductless mini split heat pump depends on your home’s layout and your specific heating and cooling requirements. Take into account factors such as cost, space availability, and desired level of control when making your decision.
Now that you have a better understanding of the different types of mini split heat pumps available, you can confidently choose the system that best suits your needs. Whether you opt for a single-zone, multi-zone, ducted, or ductless system, a mini split heat pump is an efficient and effective solution for heating and cooling your home.
Assessing The Installation Area
When it comes to installing a mini split heat pump, one of the first steps you need to take is assessing the installation area. This is crucial to ensure that your heat pump is installed in an optimal location for efficient operation and easy maintenance. In this section, we will discuss the two key aspects of assessing the installation area: the indoor and outdoor location of the heat pump, as well as clearing any obstructions. Additionally, we will touch on the importance of accessibility for maintenance purposes. So, let’s dive into the details and get started on the installation process!
Indoor and Outdoor Location
The first step in assessing your installation area is to determine the ideal locations for both the indoor and outdoor components of your mini split heat pump. For the indoor unit, it’s important to consider factors such as the layout of the room, the availability of wall space, as well as the proximity to electrical outlets and the outdoor unit. Look for a wall that is free from any obstructions, such as furniture or curtains, as this can impede the airflow of the unit.
As for the outdoor unit, it should be placed in an area that allows for proper ventilation and efficient operation. Ensure that there is enough space around the unit for adequate airflow and heat dissipation. Keep in mind that the outdoor unit should be positioned away from any potential sources of heat or direct sunlight. This will help prevent any unnecessary strain on the unit and ensure optimal performance.
Clearing Obstructions
Once you have identified the indoor and outdoor locations, it’s crucial to clear any obstructions that could hinder the installation and operation of your mini split heat pump. This includes removing any furniture, decor, or other items that may block the airflow or access to the unit. Take a close look at the surrounding area and clear any debris or vegetation that could interfere with the installation or maintenance process.
Accessibility for Maintenance
Lastly, accessibility for maintenance is an important factor to consider when assessing the installation area of your mini split heat pump. Since regular maintenance is essential for the longevity and efficiency of your unit, ensure that there is enough space available around both the indoor and outdoor components. This will make it easier to clean the filters, inspect the coils, and perform any necessary repairs or maintenance tasks. Having unobstructed access to the unit will save you time and effort in the long run, as well as ensure the optimal performance of your heat pump.
Gathering The Necessary Tools And Equipment
Before you begin the installation process for your mini split heat pump, it’s important to gather all the necessary tools and equipment to ensure a smooth and successful installation. Having all the right tools at hand will save you time and frustration during the process. In this section, we will discuss the basic tools, refrigerant lines, insulation, and mounting hardware that are essential for this installation.
Basic Tools
Having the basic tools on hand is vital to the installation of a mini split heat pump. These tools are used for general tasks such as measuring, cutting, and fastening. Here are some basic tools you will need:
- Tape Measure
- Level
- Pencil
- Power Drill
- Screwdriver Set
- Adjustable Wrench
- Wire Cutter
- Nut Driver Set
- Tube Cutter
- Flaring Tool
Make sure to have these tools readily available before starting the installation process to avoid any unnecessary delays.
Refrigerant Lines and Insulation
The refrigerant lines and insulation are crucial components of the mini split heat pump system. These lines are responsible for transferring the refrigerant between the indoor and outdoor units. To ensure optimum performance and energy efficiency, it is important to properly insulate these lines. Here are the tools and equipment you will need:
- Refrigerant Tubing
- Insulation Tape
- Insulation Foam
- Pipe Wrap
The refrigerant tubing should be sized and cut to the appropriate length. It’s also important to secure the insulation tape and foam around the tubing to prevent any air leakage and maintain proper insulation.
Mounting Hardware
The mounting hardware is necessary for securely attaching the indoor and outdoor units of the mini split heat pump system to the wall or ceiling. Here are the tools and materials you will need:
- Mounting Brackets
- Screws and Anchors
- Drill Bits
- Hammer
- Level
Ensure that the mounting hardware is strong enough to support the weight of the units and securely fastened to provide stability.
By gathering all the necessary tools and equipment beforehand, you will be well-prepared for the installation process of your mini split heat pump. Having the right tools at your disposal will help ensure a smooth and efficient installation, resulting in a properly functioning heat pump system.
Electrical Requirements
When installing a mini split heat pump, it is vital to understand the electrical requirements involved. This will ensure a safe and efficient installation that complies with local electrical codes. The electrical requirements for a mini split heat pump include understanding voltage and amperage, as well as hiring a licensed electrician to handle the installation. In this section, we will delve into each of these aspects in detail.
Understanding Voltage and Amperage
Before installing a mini split heat pump, it is essential to have a thorough understanding of voltage and amperage requirements. Voltage refers to the electrical pressure or force that pushes the electric current through the system. Amperage, on the other hand, measures the amount of electric current flowing through the circuit.
Mini split heat pumps typically require both a high voltage and low voltage connection. The high voltage connection typically ranges from 208 to 240 volts and is responsible for powering the compressor and fan motors. The low voltage connection, which is usually 24 volts, controls the thermostat and other system components.
Hiring a Licensed Electrician
Considering the complexity of the electrical work involved in installing a mini split heat pump, it is highly recommended to hire a licensed electrician. A licensed electrician has the necessary knowledge, skills, and experience to handle the electrical requirements safely and effectively.
When hiring a licensed electrician, ensure they have experience specifically with mini split heat pumps. This will guarantee that they are familiar with the unique electrical needs and can adhere to the manufacturer’s installation guidelines. Hiring a professional will not only save you time but also give you peace of mind knowing that the electrical components are properly installed, reducing the risk of potential hazards or damage to the system.
Mounting The Indoor Unit
Installing a mini-split heat pump system can be a convenient and cost-effective way to cool and heat your home. Once you have determined the right location for your indoor unit, it’s time to mount it securely. This step-by-step guide will walk you through the process, ensuring a successful installation.
Determining the Right Height and Location
Before mounting the indoor unit, you need to determine the right height and location for optimal performance. Consider the following factors:
- Ceiling height: The indoor unit should be mounted high enough to avoid obstructions and allow for proper airflow. Typically, a height of 7-8 feet from the floor is recommended.
- Obstructions: Ensure that there are no obstructions such as furniture, curtains, or shelves that could hinder airflow and affect the unit’s performance.
- Interior design considerations: Mount the unit in a location that blends well with your interior design and does not disrupt the aesthetics of the room.
By considering these factors, you can determine the ideal height and location for the indoor unit.
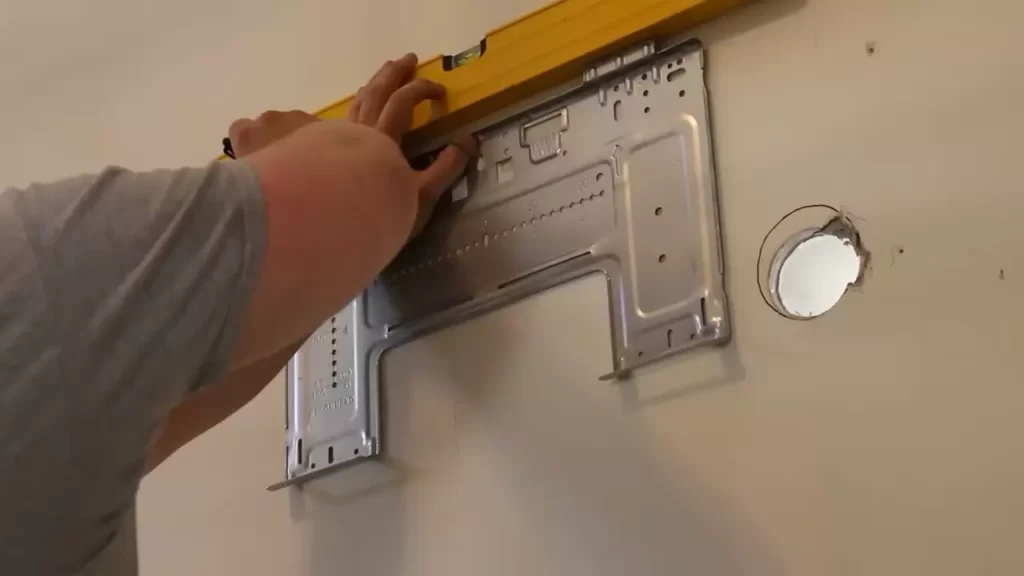
Properly Securing the Wall Bracket
Once you have determined the right height and location, it’s time to secure the wall bracket. Follow these steps:
- Locate wall studs: Use a stud finder to locate the wall studs in the desired location. Mark the positions of the studs with a pencil.
- Attach the wall bracket: Place the wall bracket on the wall, aligning it with the marked stud positions. Use screws and a power drill to securely attach the bracket to the wall studs.
- Check for level: Use a level to ensure that the bracket is perfectly horizontal. Adjust if necessary.
Properly securing the wall bracket is crucial for the stability and safety of the indoor unit. Double-check the bracket’s stability before proceeding to the next step.
Drilling Holes for the Piping and Wiring
Once the wall bracket is securely in place, you need to drill holes for the piping and wiring to connect the indoor unit to the outdoor condenser. Here’s what you need to do:
- Plan the hole locations: Determine the best locations to drill the holes. Keep in mind the shortest and most direct route for the piping and wiring.
- Drill the holes: Use a suitable drill bit to drill the holes carefully. Ensure the holes are the right size to accommodate the piping and wiring.
- Seal the holes: Once the holes are drilled, seal them with appropriate waterproof sealant to prevent any air or water leakage.
By drilling the holes properly, you can ensure a seamless connection between the indoor and outdoor units, allowing for optimum performance.
Now that you have successfully mounted the indoor unit and prepared the necessary holes for piping and wiring, you are one step closer to completing the installation. In the next step, we will guide you through connecting the indoor and outdoor units for a fully functional mini-split heat pump system.
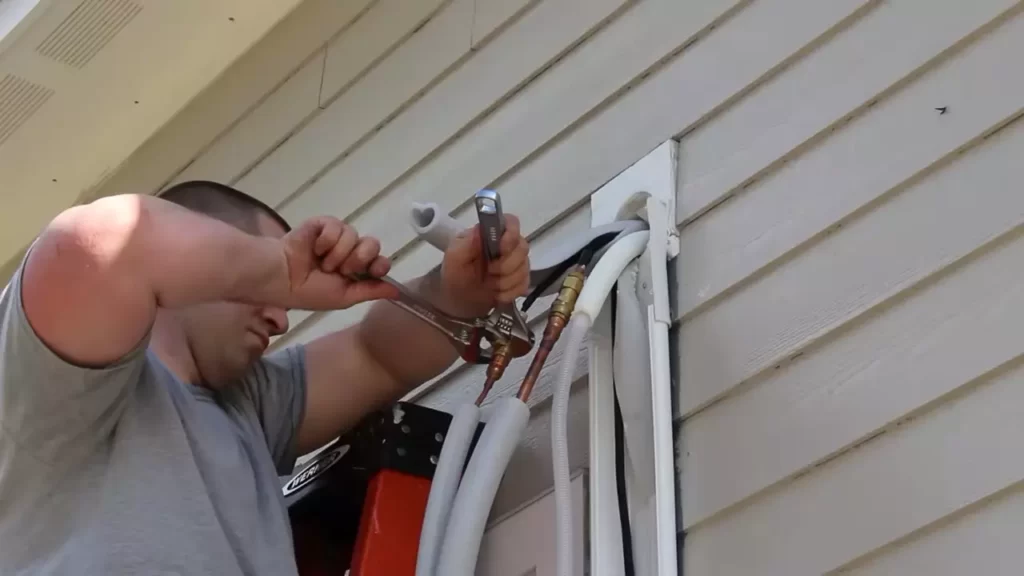
Connecting The Refrigerant Lines
Connecting the Refrigerant Lines is an essential step in installing a mini-split heat pump. This process involves routing the refrigerant lines and checking for leaks to ensure proper functioning of your heat pump system. In this section, we will discuss these steps in detail, providing you with the necessary information to successfully connect the refrigerant lines of your mini-split heat pump.
HTML Syntax:
Routing the Refrigerant Lines
Before connecting the refrigerant lines, it is crucial to route them properly. This involves running the lines from the indoor unit to the outdoor unit, ensuring they are secured and protected throughout the entire pathway.
To route the refrigerant lines effectively, follow these steps:
1. Determine the shortest and most efficient route for the lines to travel from the indoor unit to the outdoor unit.
2. Use suitable conduit or ducting to protect the lines against any physical damage.
3. Ensure that the lines are not kinked or twisted, as these can hinder the flow of refrigerant.
4. Keep the lines away from any sources of heat or electrical wiring, as these can negatively affect the performance of the heat pump.
5. Secure the lines at regular intervals using brackets or clips to prevent them from sagging or coming loose.
Checking for Leaks
Once the refrigerant lines are properly routed, it is crucial to check for any leaks before proceeding. Leaks can lead to a loss of refrigerant, efficiency issues, and potential damage to your system. To check for leaks, follow these steps:
1. Use a refrigerant leak detector or a solution of soapy water applied to the connections and joints of the refrigerant lines.
2. Slowly inspect each connection, joint, and fitting, paying close attention to any bubbles forming, which indicate a leak.
3. If a leak is found, immediately tighten the connection or fitting to stop the leak.
4. If the leak persists, consider consulting a professional technician to resolve the issue.
HTML Syntax:
Routing the Refrigerant Lines
- Determine the shortest and most efficient route for the lines to travel from the indoor unit to the outdoor unit.
- Use suitable conduit or ducting to protect the lines against any physical damage.
- Ensure that the lines are not kinked or twisted, as these can hinder the flow of refrigerant.
- Keep the lines away from any sources of heat or electrical wiring, as these can negatively affect the performance of the heat pump.
- Secure the lines at regular intervals using brackets or clips to prevent them from sagging or coming loose.
Checking for Leaks
- Use a refrigerant leak detector or a solution of soapy water applied to the connections and joints of the refrigerant lines.
- Slowly inspect each connection, joint, and fitting, paying close attention to any bubbles forming, which indicate a leak.
- If a leak is found, immediately tighten the connection or fitting to stop the leak.
- If the leak persists, consider consulting a professional technician to resolve the issue.
Wiring The Indoor Unit
One crucial step in the installation process of a mini split heat pump is wiring the indoor unit. This step ensures that the indoor unit is properly connected to the power supply and functions efficiently. In this section, we will guide you through the process of wiring the indoor unit, focusing on following the manufacturer’s wiring diagram and connecting the power supply.
Following the Manufacturer’s Wiring Diagram
Before you begin the wiring process, it’s essential to familiarize yourself with the manufacturer’s wiring diagram provided with your mini split heat pump. The wiring diagram serves as a visual representation of how the indoor unit should be wired, including the connection points, wire colors, and any additional components that may be required.
Follow these steps to ensure you correctly follow the manufacturer’s wiring diagram:
- Inspect the diagram and identify the labeled connection points for each wire.
- Refer to the color-coded labels on the wiring diagram to match them with the corresponding wires.
- Carefully connect each wire to its designated connection point according to the wiring diagram.
- Double-check your connections to ensure they align with the diagram before proceeding.
By diligently following the manufacturer’s wiring diagram, you can prevent any potential wiring errors and guarantee proper functioning of the indoor unit.
Connecting the Power Supply
Once you have successfully followed the wiring diagram, it’s time to connect the power supply to the indoor unit. This step is crucial to provide the necessary electrical power for the unit’s operation. Follow these guidelines to connect the power supply:
- Locate the power supply cable and ensure it is compatible with the indoor unit’s requirements.
- Identify the labeled power terminals on the indoor unit.
- Connect the respective wires from the power supply cable to the correct power terminals, adhering to the manufacturer’s recommendations.
- Tighten the connections securely to ensure a safe and reliable power supply.
It’s important to exercise caution and ensure each wire is connected to the proper terminal, avoiding any mix-ups. In case of uncertainty, refer to the manufacturer’s instructions or consult a professional technician to avoid any potential electrical hazards.
By following the recommended steps to wire the indoor unit, including adhering to the manufacturer’s wiring diagram and properly connecting the power supply, you can successfully complete the installation of your mini split heat pump and enjoy its efficient performance in heating and cooling your space.
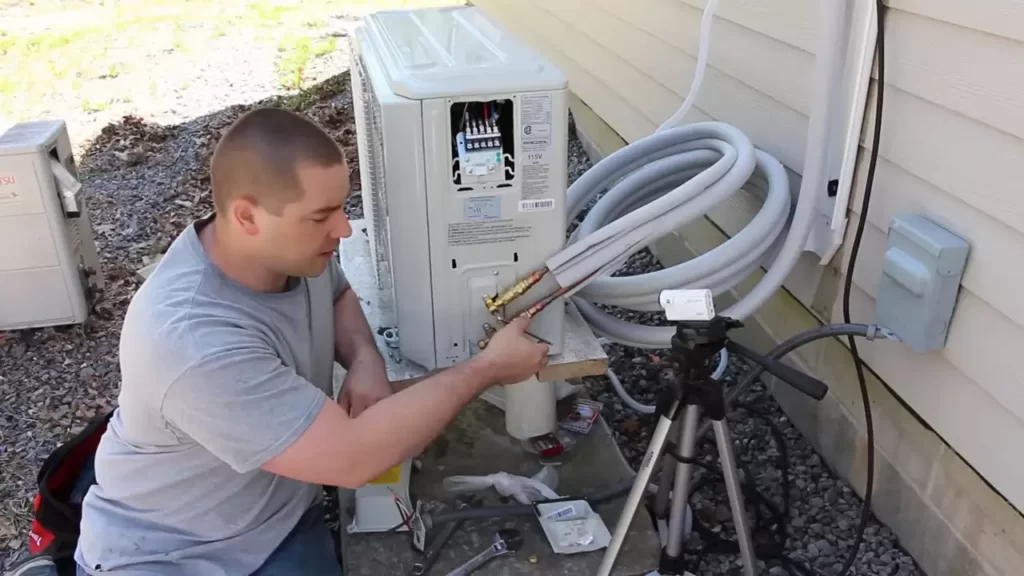
Mounting The Outdoor Unit
Mounting the outdoor unit is a crucial step in the installation process of a mini split heat pump. The outdoor unit houses the compressor and fan and is responsible for releasing hot or cold air into the surrounding environment. It is important to ensure that the unit is mounted correctly to maximize its performance and efficiency. In this section, we will discuss the steps involved in mounting the outdoor unit, including determining a suitable location, using a concrete pad or wall bracket, and ensuring proper clearance.
Determining a Suitable Location
Before mounting the outdoor unit, it is essential to determine a suitable location that meets specific requirements. Here are some factors to consider:
- Accessibility: Choose a location that provides easy access for maintenance and repairs.
- Distance from Obstructions: Ensure that the unit is not obstructed by nearby trees, shrubs, or other structures that could restrict airflow.
- Noise Considerations: Keep in mind the noise produced by the outdoor unit and avoid locating it in close proximity to windows, bedrooms, or outdoor seating areas.
- Drainage: Select a location that allows for proper drainage of condensate water.
Using a Concrete Pad or Wall Bracket
Once you have determined a suitable location, you can proceed with mounting the outdoor unit. There are two common methods for mounting the unit: using a concrete pad or a wall bracket.
If you choose to use a concrete pad, follow these steps:
- Prepare the Area: Clear the area where the unit will be placed and ensure that it is level and free from debris.
- Install the Pad: Pour a concrete slab slightly larger than the dimensions of the outdoor unit and allow it to cure according to the manufacturer’s instructions.
- Secure the Unit: Place the outdoor unit on the concrete pad and use appropriate anchor bolts or brackets to secure it in place.
If you opt for a wall bracket, follow these steps:
- Choose an Appropriate Wall: Select a sturdy wall that can support the weight of the outdoor unit.
- Install the Bracket: Attach the wall bracket to the wall using screws or other recommended fasteners.
- Mount the Unit: Lift the outdoor unit and securely mount it on the wall bracket, following the manufacturer’s instructions.
Ensuring Proper Clearance
Proper clearance around the outdoor unit is essential for optimal performance and longevity. Here are some guidelines to follow:
- Adequate Space: Leave enough space around the unit for sufficient airflow and maintenance access.
- Distance from Walls: Maintain a minimum clearance of several inches between the unit and any nearby walls to allow for proper air circulation.
- Vertical Clearance: Provide enough vertical clearance above the unit to prevent obstructions and ensure proper heat dissipation.
By carefully determining a suitable location, using a concrete pad or wall bracket, and ensuring proper clearance, you can effectively mount the outdoor unit of your mini split heat pump. This will enhance its performance, increase its lifespan, and create a comfortable indoor environment.
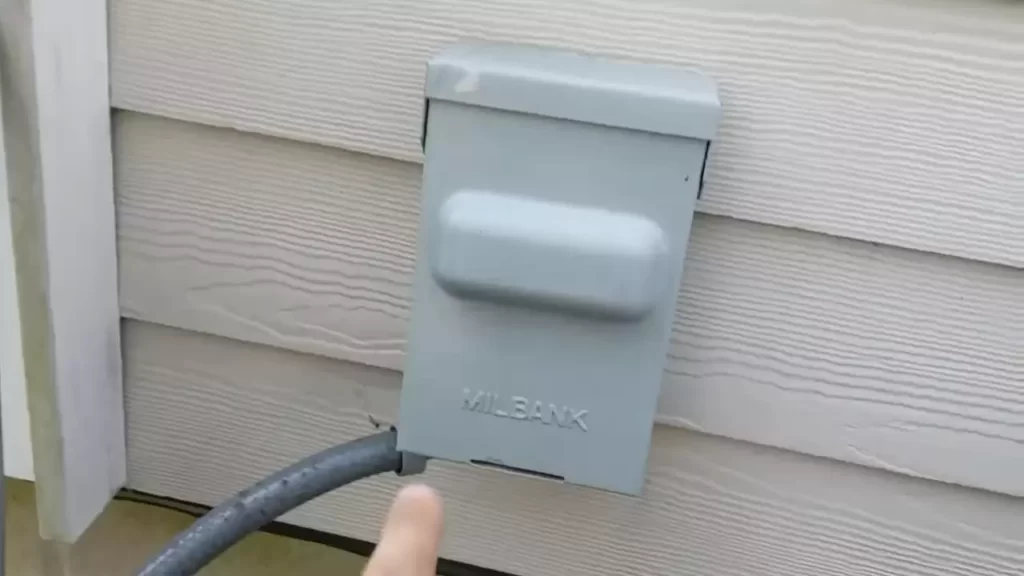
Wiring The Outdoor Unit
When it comes to installing a mini-split heat pump, one crucial step is wiring the outdoor unit. This step ensures that the electrical connections are correctly established, enabling the system to function optimally. In this article, we will guide you through the process of wiring the outdoor unit, including connecting the electrical wires and testing the power supply.
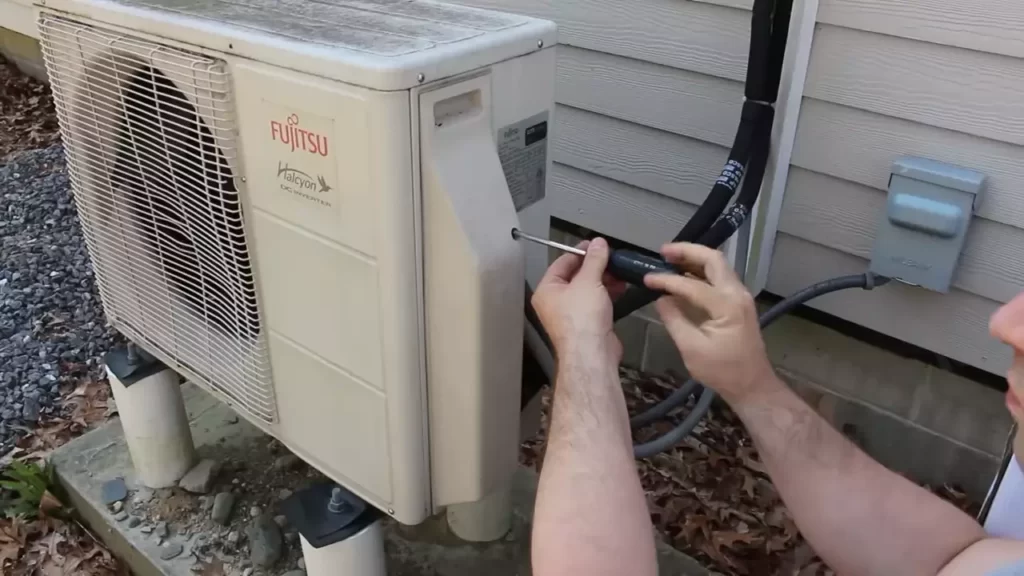
Connecting the Electrical Wires
Before proceeding, ensure that the power supply to the outdoor unit is turned off for safety reasons. Begin by identifying the electrical wires from the indoor unit that need to be connected to the outdoor unit. These wires typically include the power supply wire, refrigerant line wires, and communication wires.
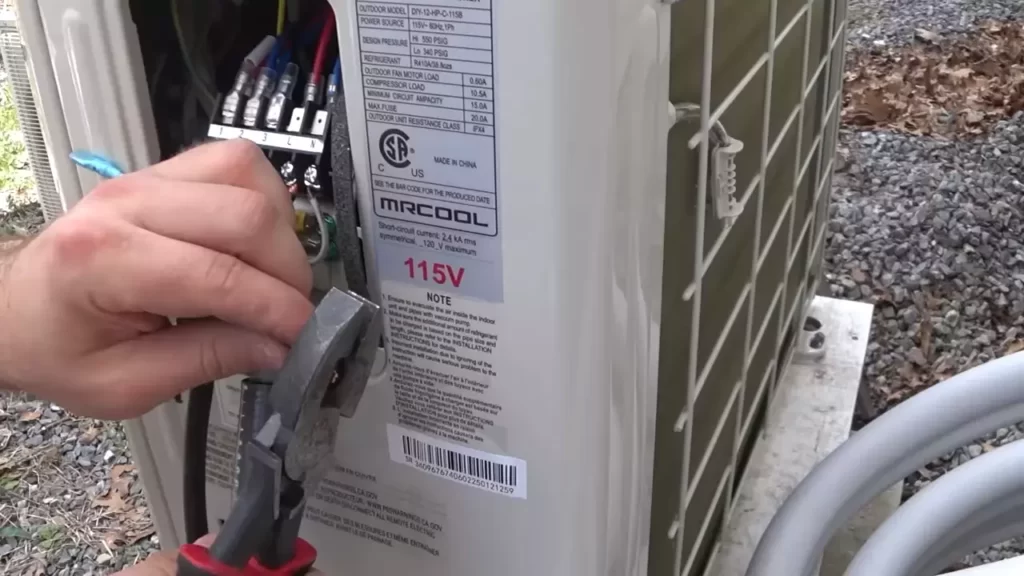
Once you have identified the necessary wires, carefully strip the insulation from the ends of each wire, ensuring that the exposed copper is clean and free from any debris. Next, match the corresponding wires from the indoor and outdoor units based on the manufacturer’s instructions or wiring diagram.
Note: It is essential to follow the correct wiring configuration to prevent any electrical damage or system malfunctions. If you are unsure about the wiring connections, consult a professional electrician or refer to the manufacturer’s guidelines.
After matching the wires, connect them securely using wire nuts or electrical connectors. Make sure to tighten the connectors properly to ensure a solid connection and prevent any loose or exposed wires.
Testing the Power Supply
Once the electrical connections are made, it is crucial to test the power supply to ensure everything is functioning as expected. Turn on the power supply to the outdoor unit and check for any sparks or unusual sounds. If everything appears normal, use a multimeter to measure the voltage between the different connectors.
Refer to the manufacturer’s specifications for the correct voltage range and compare it with the readings on your multimeter. If the voltage readings fall within the specified range, it indicates that the power supply is working correctly.
In addition to testing the power supply, ensure that the control wiring and communication between the indoor and outdoor units are also functioning correctly. This can be done by checking if the system responds to commands from the thermostat or remote control.
Note: If you encounter any issues during the wiring or testing process, it is advisable to seek professional assistance to prevent any damage to the system or potential electrical hazards.
Evacuating The System
When it comes to installing a mini split heat pump, one crucial step is evacuating the system. This process involves removing air and moisture from the system to ensure optimal performance and efficiency. In this post, we will guide you through the steps of evacuating the system, emphasizing the importance of removing air and moisture. To achieve this, we will explain how to use a vacuum pump effectively.
Removing Air and Moisture
Before installing your mini split heat pump, it is vital to remove any air and moisture from the system. Air and moisture can impact the performance of your heat pump, leading to reduced efficiency and potentially damaging the system. Proper evacuation will ensure the long-term functionality and effectiveness of your mini split heat pump.
Using a Vacuum Pump
To effectively evacuate the system, you will need to use a vacuum pump. This device creates a vacuum within the system, removing air and moisture. Here are the steps to follow when using a vacuum pump:
- Make sure all fittings and connections are secure, minimizing any potential leaks.
- Connect the vacuum pump to the high and low-pressure ports of the mini split heat pump unit.
- Turn on the vacuum pump, allowing it to run for at least 30 minutes. This extended duration will ensure a thorough evacuation.
- Monitor the pressure gauge on the vacuum pump to ensure it reaches the manufacturer’s recommended vacuum level.
- Once the desired vacuum level is reached, close the suction and liquid line valves on the mini split heat pump unit.
- Turn off the vacuum pump and disconnect it from the unit.
- Inspect the pressure gauge to ensure that the vacuum level is maintained. If it drops, there may be a leak that needs to be addressed before proceeding further.
By following these steps and using a vacuum pump properly, you will effectively remove air and moisture from your mini split heat pump system. This will contribute to improved performance, energy efficiency, and overall longevity of your heat pump.
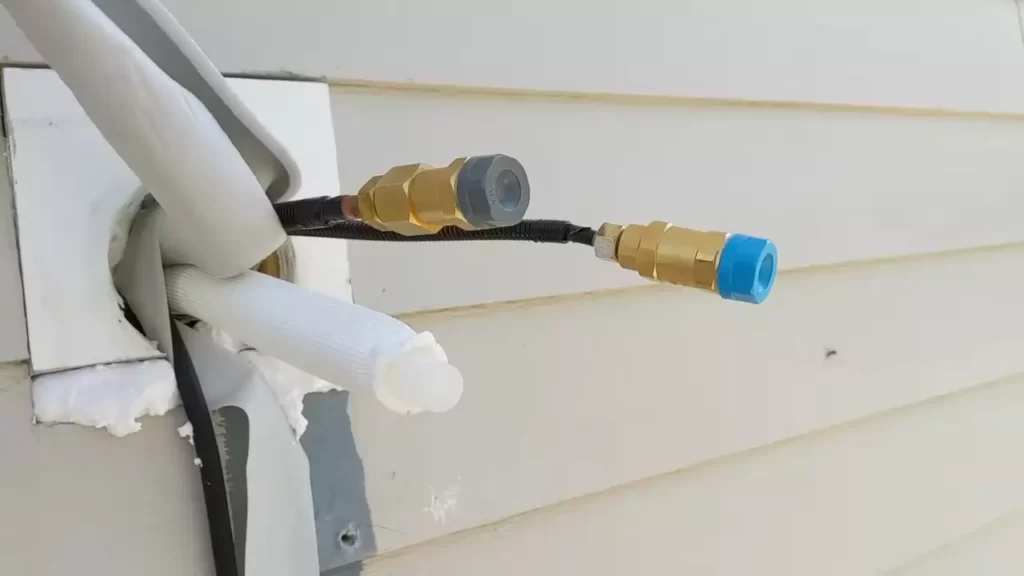
Charging The System
Once you have successfully installed your mini split heat pump, the next step is to charge the system. This crucial step ensures that the refrigerant levels are at the optimal range for the unit to function effectively. In this section, we will discuss the process of adding refrigerant, as well as the importance of avoiding overcharging or undercharging.
Adding Refrigerant
Adding refrigerant to your mini split heat pump requires precision and careful attention to detail. It is recommended to refer to the manufacturer’s instructions for the specific refrigerant type and weight required for your unit. Here is a step-by-step guide on how to add refrigerant:
- Start by turning off the power to the unit.
- Locate the service valves on the outdoor unit. These valves are typically labeled as the high-side and low-side service valves.
- Attach the refrigerant gauge set to the service valves, ensuring a secure connection.
- Open the valves on the gauge set to allow the refrigerant to flow into the system. Be sure to open the valves slowly and steadily to avoid any sudden pressure surges.
- Monitor the gauges as the refrigerant flows into the system. The gauges will indicate the pressure levels, allowing you to track the progress.
- Continue adding refrigerant until the pressure levels reach the recommended range specified by the manufacturer.
- Once the desired pressure levels are achieved, close the valves on the gauge set and carefully disconnect the gauges from the service valves.
- Double-check all the connections and ensure that there are no leaks before turning the power back on.
Avoiding Overcharging or Undercharging
It is crucial to avoid overcharging or undercharging the refrigerant in your mini split heat pump. Overcharging can lead to excessive pressure, causing damage to the system and reducing its efficiency. On the other hand, undercharging can result in insufficient cooling or heating capabilities. Here are a few tips to help you avoid these issues:
- Refer to the manufacturer’s guidelines and specifications to ensure that you are adding the correct amount of refrigerant.
- Take regular pressure readings during the charging process to monitor the levels and avoid overcharging.
- Check for any leaks or potential issues that may affect the refrigerant levels.
- If you are unsure about the charging process, it is always best to seek professional assistance to ensure accurate and safe charging of your mini split heat pump.
By following these guidelines and taking the necessary precautions, you can confidently charge your mini split heat pump and enjoy reliable and efficient heating and cooling in your space.
Checking For Proper Operation
After successfully installing a mini split heat pump, it is crucial to check for its proper operation. This step is essential to ensure that the unit is functioning efficiently, providing both cooling and heating as intended. By following the steps below, you can verify that your mini split heat pump is ready to keep your space comfortable all year round.
Testing the Cooling and Heating Functions
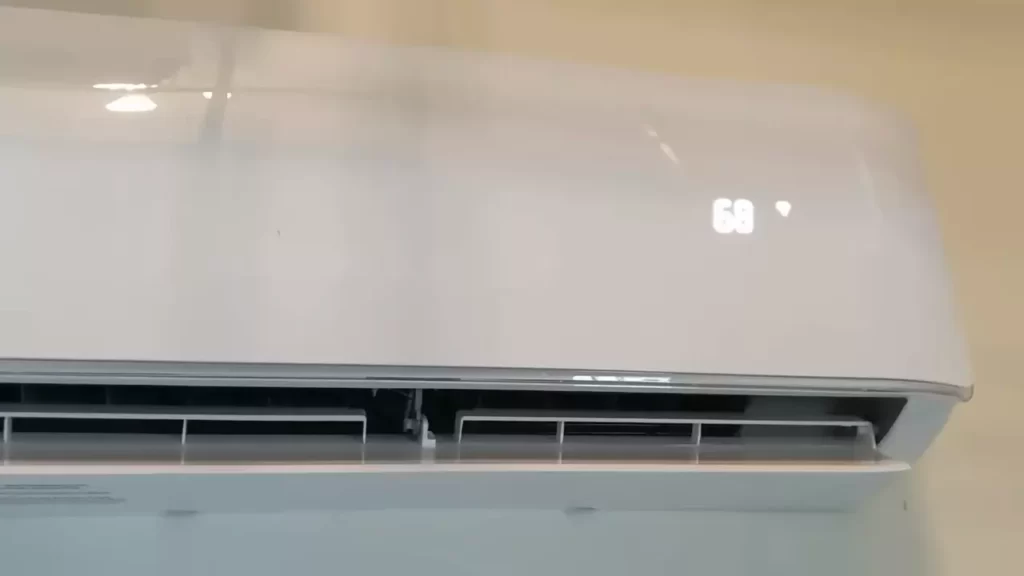
To test the cooling function of your mini split heat pump, simply set the temperature to a lower setting, typically around 60 degrees Fahrenheit. Allow the unit to run for a few minutes and feel the air coming out of the vents. The air should be significantly cooler than the surrounding room temperature. Additionally, you can use a thermometer to measure the air temperature. It should be close to the desired cooling temperature you set on the unit.
To test the heating function, set the temperature to a higher setting, such as 80 degrees Fahrenheit. Again, let the unit run for a few minutes and feel the air coming out of the vents. This time, the air should be warm, indicating that the heat pump is functioning correctly. Use a thermometer to verify that the air temperature matches the desired heating temperature.
Adjusting Airflow and Temperature
Once you’ve confirmed that both the cooling and heating functions are working properly, you may want to adjust the airflow and temperature settings to suit your preferences. Most mini split heat pumps allow you to control both of these factors through a remote control or a control panel on the unit itself.
Adjusting Airflow
Start by checking if the unit has adjustable louvers. These can be manually adjusted to direct the airflow in a specific direction or to disperse it evenly across the room. Experiment with different louver positions to find the most comfortable airflow pattern for your space.
Next, consider the fan speed. Many mini split heat pumps have multiple fan speeds to choose from, typically ranging from low to high. If the air feels too forceful or too weak, try adjusting the fan speed to find the right balance.
Adjusting Temperature
Changing the temperature setting is as simple as using the remote control or control panel. Start by setting the desired cooling or heating temperature and observe how the unit responds. If you’re finding it uncomfortably cold or warm, adjust the temperature accordingly until you achieve the desired level of comfort.
Remember, small adjustments are often more effective than dramatic changes, so be patient when fine-tuning the temperature.
By following these steps, you can ensure that your mini split heat pump is not only installed correctly but also operating efficiently. Regularly checking for proper operation will ensure that your unit functions optimally and provides reliable cooling and heating whenever you need it.
Frequently Asked Questions On How To Install A Mini Split Heat Pump
Can I Install A Mini Split Heat Pump Myself?
Yes, you can install a mini split heat pump yourself. Just ensure you follow the manufacturer’s instructions, have the necessary tools, and possess basic electrical and HVAC knowledge. If you’re uncertain, it’s best to hire a professional to avoid any potential risks or complications.
Can You Install Heat Pump Yourself?
Yes, you can install a heat pump yourself. However, it is important to note that installing a heat pump requires electrical knowledge and experience. It is recommended to hire a professional to ensure proper installation, performance, and safety. Hiring a professional also ensures compliance with local building codes and manufacturer warranties.
How To Install Mini Split Step By Step?
To install a mini split, follow these steps:
1. Choose the appropriate location for the indoor and outdoor units.
2. Install the mounting plate for the indoor unit on the wall.
3. Connect the refrigerant lines and electrical wiring between the indoor and outdoor units.
4. Secure the outdoor unit on a stable surface.
5. Test the system and ensure it is working properly.
How Many Square Feet Can A Mini Split Heat Pump?
A mini-split heat pump can cool or heat a specific area of around 400 to 1,200 square feet efficiently.
Conclusion
Installing a mini split heat pump can provide you with efficient heating and cooling for your home. By following the step-by-step guide provided in this blog post, you can successfully install a mini split heat pump and enjoy its benefits.
Remember to consult the manufacturer’s instructions and seek professional help if needed. With a little patience and attention to detail, you can have a comfortable and energy-efficient home. Happy installing!