To install a retractable awning on vinyl siding, you need to locate the studs in the siding and make sure the awning brackets are securely attached to them. Then, simply follow the manufacturer’s instructions to mount the awning on the brackets.
Now, let’s dive into how to install a retractable awning on vinyl siding in more detail. A retractable awning provides the perfect solution for adding shade and protection to your outdoor space. Whether you want to relax on your patio or enjoy a barbecue with friends, a retractable awning can help create a comfortable and enjoyable outdoor environment.
However, installing a retractable awning on vinyl siding requires some careful steps to ensure a secure and long-lasting installation. We will guide you through the process of installing a retractable awning on vinyl siding, step by step. So, let’s get started!
Understanding The Basics Of Retractable Awnings
Retractable awnings are a popular choice for homeowners looking to enhance the functionality and aesthetics of their outdoor spaces. These versatile structures provide shade and protection from the elements, allowing you to enjoy your patio or deck even on hot sunny days or during light rain showers. If you have vinyl siding on your home, you might be wondering how to go about installing a retractable awning on it.
In this article, we’ll walk you through the basics of retractable awnings, discuss the different types available, explain why they are a great choice for vinyl siding, and highlight the important factors to consider before installing one.
Different types of awnings and their benefits
Retractable awnings come in various types, each with its own set of advantages. Understanding the different options available can help you make an informed decision when choosing the right awning for your vinyl siding.
Here are some common types of retractable awnings:
- Straight-arm awnings: These awnings feature a straightforward design with retractable arms that extend outward. They are perfect for providing shade over small to medium-sized areas, such as windows or doors.
- Lateral arm awnings: Lateral arm awnings are known for their ability to offer extended coverage, making them ideal for larger outdoor spaces like patios or decks. These awnings use specially engineered arms to provide a wide projection, effectively shading a significant area.
- Pergola awnings: If you have a pergola in your backyard, pergola awnings can be a perfect addition. These awnings are specifically designed to fit on top of pergolas, providing shade and protection.
Benefits of installing a retractable awning include:
- Versatility: Retractable awnings offer flexibility, allowing you to extend or retract them based on your preferences and weather conditions.
- UV protection: Awnings are designed to shield you from harmful UV rays, preventing sunburns and protecting your outdoor furniture from fading.
- Energy efficiency: By reducing direct sunlight, retractable awnings can help keep your home cooler during hot summer months, potentially lowering your energy bills.
- Enhanced outdoor living: With a retractable awning, you can create a comfortable and inviting outdoor space that can be enjoyed even during inclement weather.
Why choose a retractable awning for vinyl siding
Vinyl siding is a popular choice among homeowners due to its durability, low maintenance, and aesthetic appeal. When it comes to installing an awning on vinyl siding, a retractable option is highly recommended. Here’s why:
- Preserves the siding: Retractable awnings mount directly onto your home’s exterior without penetrating the vinyl siding. This means you don’t have to worry about damaging or compromising its integrity.
- Adjustable coverage: With a retractable awning, you have control over the amount of shade or sunlight you want. You can extend the awning during the hottest parts of the day and retract it at other times to let in natural light.
- Aesthetic appeal: Retractable awnings come in various colors, patterns, and fabrics, allowing you to select one that complements your vinyl siding and enhances the overall look of your home.
Factors to consider before installing a retractable awning
Before diving into the installation process, there are a few factors you should take into account:
- Size and location: Consider the size of the area you wish to cover and make sure you have adequate space for the awning to extend fully. Take note of any nearby trees, electrical outlets, or other potential obstructions.
- Budget: Decide on a budget that aligns with your expectations and research different awning brands and models to find the best option within your price range.
- Installation method: Familiarize yourself with the installation process and determine whether you will be able to install the awning yourself or if you need to hire professionals.
- Maintenance requirements: Some awnings may require regular cleaning and maintenance. Consider the time and effort you are willing to invest in keeping the awning in good condition.
By understanding the basics of retractable awnings, their benefits, and the factors to consider before installation, you’ll be well-equipped to make an informed decision and enjoy the many advantages that a retractable awning can provide for your vinyl siding.
Preparing The Vinyl Siding For Installation
Before you begin installing a retractable awning on your vinyl siding, it is essential to properly prepare the surface. By inspecting the vinyl siding for any damage, cleaning it to ensure a smooth surface, and measuring and marking the installation area, you can ensure a successful and secure installation. Follow these simple steps to prepare your vinyl siding for the installation of a retractable awning.
Inspecting the Vinyl Siding for Any Damage
The first step in preparing your vinyl siding for the installation of a retractable awning is to thoroughly inspect it for any damage. Look out for cracks, holes, or other signs of wear and tear that could affect the installation process or compromise the integrity of the siding. By identifying any issues upfront, you can address them before proceeding with the installation.
Cleaning the Siding to Ensure a Smooth Surface
Once you have inspected the vinyl siding and made any necessary repairs, the next step is to clean the surface. This helps remove dirt, debris, and any other substances that might interfere with the installation. To clean the siding, you can use a mild detergent mixed with water and a soft brush or sponge. Gently scrub the siding in a circular motion, paying special attention to areas that are heavily soiled or have stubborn stains.
After cleaning, rinse the siding thoroughly with water to remove any residue. This will leave you with a clean and smooth surface, ensuring optimal adhesion for the installation of the retractable awning.
Measuring and Marking the Installation Area
Before installing the retractable awning, it is crucial to measure and mark the installation area on your vinyl siding. This step helps ensure that the awning is centered and level, providing an aesthetically pleasing appearance and optimal functionality.
Start by determining the desired height and width of the awning. Measure the area carefully, ensuring accuracy. Once you have the measurements, use a pencil or a piece of chalk to mark the top and bottom edges of the installation area, as well as the sides.
By measuring and marking the installation area beforehand, you can eliminate any guesswork or errors during the installation process, ensuring a precise and professional result.
By following these steps—inspecting the vinyl siding for any damage, cleaning the siding to ensure a smooth surface, and measuring and marking the installation area—you can properly prepare your vinyl siding for the installation of a retractable awning. This preparation work lays the foundation for a successful and secure installation, allowing you to enjoy the benefits of your awning for years to come.
Gathering The Necessary Tools And Materials
Before you begin the installation process of a retractable awning on your vinyl siding, it is crucial to gather all the necessary tools and materials to ensure a smooth and successful installation. By having everything you need on hand, you can avoid interruptions and delays in the process. Let’s take a look at the essential tools needed, the required materials for attaching the awning to the vinyl siding, and the additional equipment for securing the awning properly.
Essential tools needed for the installation process
Installing a retractable awning on vinyl siding requires the use of specific tools to ensure precision and efficiency. Here are the essential tools you should have:
- Tape measure: Accurate measurements are crucial for a perfect fit, so make sure to have a reliable tape measure at hand.
- Level: Maintaining a level position throughout the installation process is essential for proper functionality and appearance.
- Drill: A drill is necessary for creating holes in the vinyl siding to attach the necessary hardware securely.
- Screwdriver: You will need a screwdriver to tighten the screws and secure the awning brackets in place.
- Hammer: A hammer can come in handy for any minor adjustments or if you need to tap the brackets into place.
- Pencil or marker: Marking where the holes and brackets should be placed is crucial for a clean and accurate installation.
Required materials for attaching the awning to the vinyl siding
The successful attachment of the retractable awning to the vinyl siding relies on the appropriate materials. Ensure you have the following materials in hand before starting the installation:
- Awning brackets: These brackets play a crucial role in securely attaching the awning to the vinyl siding, so make sure you have the correct ones for your awning model.
- Screws: High-quality screws are necessary to withstand the weight and stress that the awning will place on the brackets and the siding.
- Wall anchors: If the vinyl siding is not thick enough to support the weight of the awning, wall anchors can provide additional stability.
Additional equipment for securing the awning properly
While the essential tools and materials will get you started with the installation, there are some additional equipment and accessories that will ensure a secure and long-lasting awning attachment. These include:
- Sealant: Applying a weather-resistant sealant around the brackets and screws will help prevent water infiltration, protecting the integrity of the vinyl siding.
- Ladder: Depending on the height of the installation area, you may need a sturdy ladder to reach and work comfortably.
- Assistant: Having a helping hand can make the installation process smoother and safer, especially when dealing with larger awnings.
By gathering all the necessary tools and materials, you are now ready to move on to the next step in the installation process, which involves preparing the vinyl siding for the awning attachment. Remember to double-check that you have everything you need before proceeding, ensuring a hassle-free and successful installation of your retractable awning on your vinyl siding.
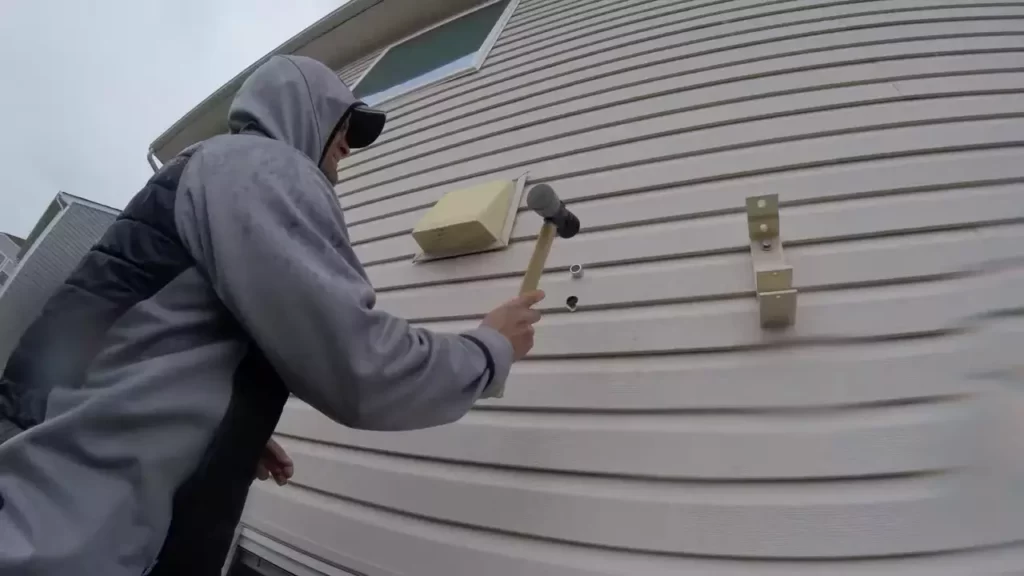
Attaching The Awning Mounting Brackets
Attaching the mounting brackets to your vinyl siding is a crucial step in the installation process of a retractable awning. These brackets serve as the anchor points for the awning, providing stability and support. To ensure a secure and durable installation, follow these steps:
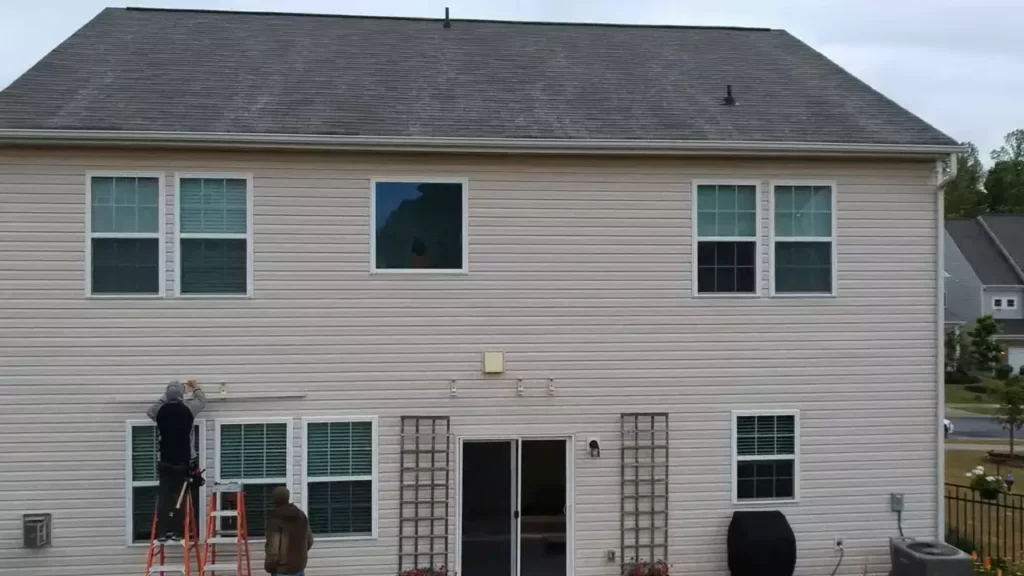
Positioning and aligning the mounting brackets on the siding
Proper positioning and alignment of the mounting brackets are essential for a successful installation. Start by determining the desired height and placement of your awning. Consider factors such as clearance above doors and windows, as well as any obstructions that may hinder the awning’s functionality.
Once you have identified the ideal location, mark the spot on the vinyl siding where the brackets will be attached. Using a level, ensure that the marks are perfectly straight and aligned. This will help you achieve a professional-looking result.
Drilling pilot holes for secure installation
Before drilling any holes, it’s important to ensure that you have the necessary tools and safety equipment. You will need a power drill, drill bits suitable for vinyl siding, and safety goggles to protect your eyes from debris.
Start by selecting an appropriate drill bit size for your pilot holes. It should be slightly smaller than the diameter of the mounting screws you will be using. This will help provide a secure grip and prevent the vinyl siding from cracking or splitting.
Proceed to carefully drill pilot holes at the marked positions on the vinyl siding. Be mindful of the depth and angle of the holes to ensure they align with the mounting brackets. Once the pilot holes are complete, remove any debris or fragments from the drilling process.
Installing and tightening the mounting brackets
Now that you have prepared the pilot holes, it is time to install and tighten the mounting brackets. Begin by aligning each bracket with its respective pilot hole, ensuring they are level and flush against the siding.
Insert the mounting screws through the holes on the brackets and into the pilot holes. Use a screwdriver or a drill with a screwdriver bit to tighten the screws firmly but avoid overtightening, as it may cause damage to the vinyl siding.
Mounting The Retractable Awning
Mounting the retractable awning is a crucial step in the installation process. By securely attaching the awning to the vinyl siding, you can ensure its stability and functionality for years to come. In this section, we will guide you through the process of mounting the retractable awning, from preparing the awning frame for installation to testing its movement and functionality.
Preparing the awning frame for installation
Before mounting the retractable awning, it’s important to prepare the awning frame for installation. Here are the steps to follow:
- Carefully unpack the awning frame and inspect all the components to ensure everything is in good condition.
- Identify the mounting brackets that came with the awning. These brackets are designed to be attached to the vinyl siding.
- Using a tape measure and level, determine the proper positioning and height for the brackets. This will ensure that the awning is mounted at the correct angle and provides sufficient shade.
- Mark the positions of the brackets on the vinyl siding using a pencil or marker.
Securing the awning to the mounting brackets
Once the awning frame is prepared, it’s time to secure it to the mounting brackets. Follow these steps:
- Drill pilot holes into the marked positions on the vinyl siding to accommodate the screws that will secure the brackets.
- Align the brackets with the pilot holes and firmly attach them to the siding using the provided screws.
- Ensure that the brackets are securely fastened to the siding, as they will bear the weight of the awning.
- Once the brackets are attached, carefully position the awning frame onto the brackets. Make sure it is level and centered.
- Secure the awning frame to the brackets using the provided screws or bolts, following the manufacturer’s instructions.
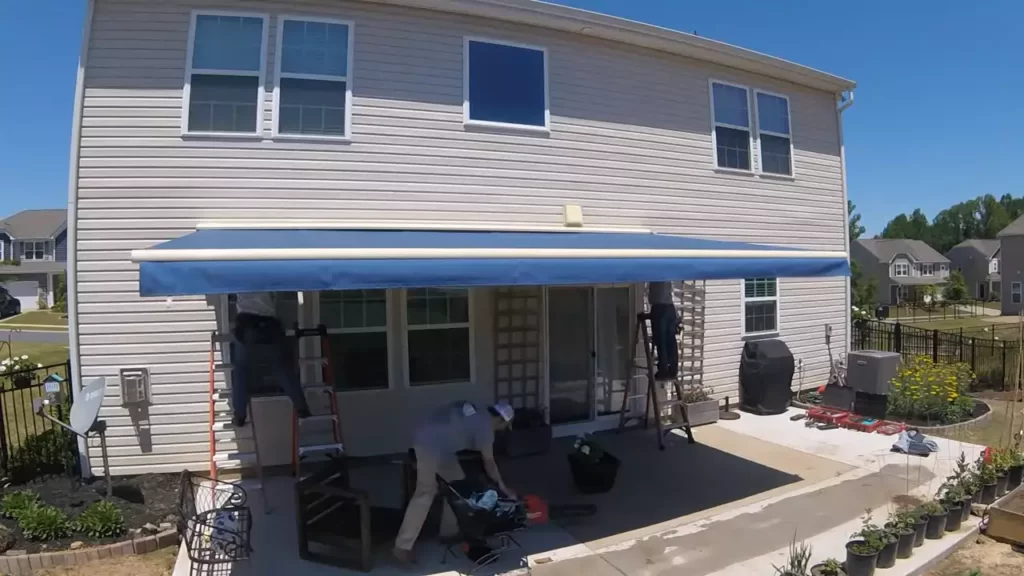
Testing the movement and functionality of the awning
With the awning securely mounted, it’s important to test its movement and functionality before fully completing the installation. Follow these steps:
- Extend the awning fully and check that it moves smoothly without any obstructions.
- Retract the awning partially and ensure that it locks into position securely.
- Repeat the extension and retraction process several times to verify the awning’s stability and reliability.
- If the awning includes additional features such as adjustable pitch or motorized operation, test these functions as well.
- Address any issues or concerns with the awning’s movement or functionality before proceeding with the final steps of the installation.
By following these steps, you can confidently mount your retractable awning on your vinyl siding, creating a shaded and comfortable outdoor space for relaxation and enjoyment.
Connecting The Awning To Power Source
Running electrical wiring from the awning to the power supply
Connecting your retractable awning to a power source is essential for enjoying the convenience of motorized operation. Running electrical wiring from the awning to the power supply is a crucial step in ensuring seamless functionality. Here are the steps to follow:
- Start by finding the nearest power source to your awning installation area. This could be an outdoor power outlet or a junction box that you can safely tap into.
- Measure the distance from the power source to the awning and purchase the appropriate length of electrical wire.
- Next, carefully run the electrical wire along the exterior surface of your vinyl siding, making sure to keep it neat and secure.
- Use cable clips or clips designed specifically for electrical wires to fasten the wire to the siding.
- If necessary, use a fish tape or a similar tool to guide the wire behind obstacles such as downspouts or landscaping features.
- Ensure that the wire is positioned safely away from any sharp edges or potential hazards.
Connecting and securing the power cables
Once you have successfully run the electrical wire from the awning to the power supply, it’s time to connect and secure the power cables. Follow these steps to ensure a safe and reliable connection:
- Begin by assessing the connection points. If your awning comes with a pre-attached power cord, you’ll be connecting it to a compatible power outlet. If not, you may need to make a hardwired connection.
- For a hardwired connection, strip the protective covering from the end of the electrical wire and carefully expose the individual wires.
- Align the exposed wires with their corresponding connectors, typically color-coded for easy identification.
- Secure the connection by twisting the wires together, ensuring they are tightly bound and insulated.
- Wrap the connections with electrical tape to provide an additional layer of protection against moisture, ensuring the longevity of your awning’s electrical system.
- Safely tuck any excess wire and connections away, using cable clips or conduit if necessary to keep everything neat and tidy.
Testing the motorized retractable feature
After connecting and securing the power cables, it’s important to test the motorized retractable feature of your awning to ensure everything is functioning properly. Follow these simple steps:
- Turn on the power supply to provide electricity to your awning.
- Use the provided remote control or wall switch to activate the motorized mechanism.
- Observe the awning as it extends and retracts, taking note of any unusual noises or resistance.
- Ensure that the awning moves smoothly and without any obstructions.
- If you encounter any issues, refer to the manufacturer’s troubleshooting guide or contact customer support for assistance.
By following these steps, you’ll successfully connect your retractable awning to a power source, ensuring hassle-free operation and enjoyment of your outdoor space.
Adjusting And Fine-Tuning The Awning
Adjusting the pitch and angle of the awning
Correctly adjusting the pitch and angle of a retractable awning is crucial to ensure proper water runoff and provide optimal shade. Follow these steps to make the necessary adjustments:
- Locate the pitch adjustment mechanism: Start by finding the pitch adjustment mechanism on your retractable awning. This could be in the form of a crank or a handle.
- Extend the awning partially: Extend the awning partially to give yourself enough space to comfortably access the pitch adjustment mechanism.
- Use the adjustable pitch mechanism: Rotate the crank or handle in the appropriate direction to adjust the pitch. This will change the angle at which the awning extends from the wall.
Setting the awning extension and retraction limits
Setting the correct extension and retraction limits for your retractable awning ensures smooth and safe operation. Here’s how you can set the limits:
- Access the limit adjustment settings: Look for the limit adjustment settings on your awning motor or control panel. These settings may be labeled as “extension limit” and “retraction limit.”
- Extend and retract the awning: Use the awning control to extend the awning fully and then retract it completely.
- Adjust the extension limit: Using the limit adjustment settings, set the extension limit by stopping the awning when it reaches the desired extension length.
- Adjust the retraction limit: Next, set the retraction limit by stopping the awning at the desired retracted position.
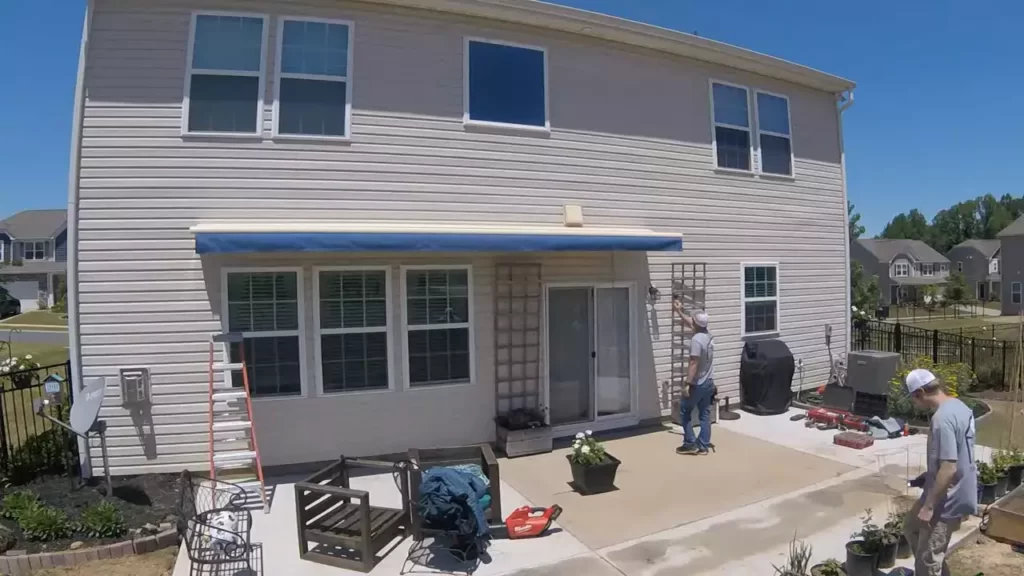
Testing the awning for proper operation and stability
Once you have adjusted the pitch, angle, and limits of your retractable awning, it’s important to test it to ensure proper operation and stability. Follow these steps:
- Extend and retract the awning: Using the control panel or remote, extend and retract the awning multiple times to check if it moves smoothly and without any issues.
- Observe stability: While the awning is fully extended, check for any sagging or instability. Ensure that it maintains a level position without swaying excessively.
- Inspect mounting brackets: Examine the mounting brackets to ensure they are securely attached to the vinyl siding. Look for any signs of damage or looseness that could affect stability.
By following these steps to adjust and fine-tune your retractable awning, you can optimize its performance and strengthen its longevity. Remember to be cautious and refer to the manufacturer’s instructions for your specific model throughout the process.
Maintenance And Care For Longevity
Proper maintenance and care of your retractable awning on vinyl siding is crucial to ensure its longevity and keep it looking its best. By following a few simple steps, you can ensure that your awning remains in top condition for years to come.
Cleaning and maintaining the awning fabric and frame
Regular cleaning of the awning fabric and frame is essential to keep it free from dirt, debris, and stains. Here are some important tips for cleaning and maintaining your awning:
- Start by removing any loose dirt or debris from the fabric using a brush or a vacuum cleaner with a soft brush attachment.
- Mix a mild soap or detergent with warm water and use a soft-bristle brush to gently scrub the fabric, paying special attention to any stained areas.
- Rinse the fabric thoroughly with water to remove any soap residue.
- Allow the fabric to air dry completely before retracting the awning to prevent mold and mildew growth.
- Inspect the frame for any signs of damage or corrosion, and repair or replace any damaged parts as necessary.
Inspecting and lubricating moving parts regularly
The moving parts of a retractable awning, such as the joints, arms, and springs, need regular inspection and lubrication to prevent wear and tear and ensure smooth operation. Follow these steps to inspect and lubricate the moving parts:
- Check all the joints and connections for any signs of looseness or damage. Tighten any loose screws or bolts.
- Apply a silicone-based lubricant to all the moving parts, including the arms, joints, and springs. This will help reduce friction and ensure smooth operation.
- Operate the awning a few times to distribute the lubricant evenly and ensure that all the moving parts are working properly.
Protecting the awning during extreme weather conditions
Extreme weather conditions such as heavy rain, strong winds, and snow can cause damage to your retractable awning. Taking the following precautions will help protect your awning during such conditions:
- Retract the awning during heavy rain or snow to prevent water from pooling on the fabric, which can lead to stretching or tearing.
- In strong winds, make sure to secure the awning properly by using tie-down straps or retracting it completely.
- Consider installing a wind sensor that automatically retracts the awning when strong winds are detected.
- If you live in an area with harsh winters, consider using a protective cover or storing the awning indoors during the winter months.
By following these tips for maintenance and care, you can extend the lifespan of your retractable awning on vinyl siding and enjoy its benefits for many years to come.
Frequently Asked Questions Of How To Install Retractable Awning On Vinyl Siding
Can You Install An Awning On Vinyl Siding?
Yes, you can install an awning on vinyl siding.
How Do You Attach An Awning To Side Of House?
To attach an awning to the side of your house, you can follow these steps:
1. Determine the location and height of the awning.
2. Mark and drill holes into the wall where the brackets will be installed.
3. Attach the brackets securely to the wall using screws.
4. Connect the awning to the brackets, ensuring it is level and secure.
5. Test the awning to make sure it opens and closes smoothly.
How Do You Attach A Retractable Awning To A House?
To attach a retractable awning to a house, begin by selecting the ideal mounting location on the exterior wall. Use a stud finder to locate the studs or ceiling joists for sturdy support. Secure the awning brackets to the wall using appropriate screws or bolts.
Ensure the awning is level and securely attached for safe and effective use.
What Holds Up Retractable Awning?
A retractable awning is held up by a strong and durable frame that is typically made of aluminum or steel. The frame is designed to support the weight of the awning fabric and keep it securely in place.
Conclusion
To conclude, installing a retractable awning on vinyl siding is a straightforward process that can greatly enhance your outdoor space. By following the step-by-step guide mentioned above, you can ensure a seamless installation experience. With the right tools and careful attention to detail, you’ll be enjoying the benefits of shade and convenience in no time.
So go ahead, transform your patio or deck into a comfortable retreat with a retractable awning.