To install Suntop Roof Panels, begin by gathering the necessary materials and tools. Then, measure and cut the panels to the desired size and shape.
Next, align the first panel along the roof’s edge and secure it in place using the recommended fasteners. Continue this process for the remaining panels, overlapping each one to ensure water resistance. Finally, trim any excess panels and add flashing to prevent leaks.
Suntop Roof Panels provide an excellent solution for enhancing the durability and aesthetics of your outdoor space. These durable, lightweight panels are easy to install and offer protection against the elements. Whether you’re looking to create a new roofing system for a patio or shed, or simply want to replace your existing roof, this step-by-step guide will walk you through the installation process. By following these instructions, you can ensure a secure and watertight installation that will withstand the test of time. So, let’s dive in and learn how to install Suntop Roof Panels like a pro.
Factors To Consider For Your Roofing Project
When it comes to installing Suntop roof panels, there are several factors that you need to take into consideration for a successful roofing project. These factors include climate and weather conditions, roofing material compatibility, and aesthetics and design options. By carefully considering these factors, you can ensure that your roof will not only be functional but also visually appealing. Let’s explore each factor in more detail.
Climate and Weather Conditions
The climate and weather conditions in your area play a crucial role in determining the type of roofing material you should choose. Different regions experience varying levels of temperature, humidity, rainfall, and wind speed. Understanding the climate in your area will help you select a suitable roof that can withstand the elements. For instance, if you live in an area with heavy rainfall, you may want to consider a roofing material that is highly resistant to water and prevents leaks. Similarly, in areas with high wind speeds, it is important to choose a roofing material that is durable and can withstand strong gusts.
Roofing Material Compatibility
When selecting a roofing material, it is important to consider its compatibility with the Suntop roof panels. The compatibility of the roofing material will determine the overall performance and longevity of your roof. Suntop roof panels are designed to be used with a variety of roofing materials such as asphalt shingles, metal sheets, and PVC membranes. Before making a final decision, make sure that the roofing material you choose is recommended by the manufacturer and compatible with Suntop roof panels to ensure a secure and efficient installation.
Aesthetics and Design Options
In addition to functionality, the aesthetics and design of your roof are also important factors to consider. The roof is one of the most visible parts of your home, and its design should complement the overall appearance of your property. Suntop offers a range of design options to suit different architectural styles and personal preferences. From traditional to modern designs, you can choose the style that best reflects your taste. Additionally, Suntop roof panels are available in various colors, allowing you to customize the look of your roof to match the existing exterior of your home.
Gathering The Necessary Tools And Materials
When it comes to installing Suntop roof panels, gathering all the necessary tools and materials is the first step towards a successful installation. By ensuring you have everything you need beforehand, you can streamline the process and avoid unnecessary delays. Here are the essential tools and materials you will need:
Suntop Roof Panels
The most crucial element in this installation project is the Suntop roof panels themselves. These panels are crafted from high-quality materials and provide excellent durability and protection for your roof. Ensure you have enough panels to cover the desired area of your roof before starting the installation.
Measuring Tape
Accurate measurements are essential for a precise and secure installation. Using a measuring tape, make sure to measure the dimensions of your roof accurately. This will help you determine the number of Suntop roof panels required and ensure a proper fit.
Circular Saw
A circular saw with a fine-tooth blade is necessary for cutting the Suntop roof panels to the desired size. This power tool provides precise and clean cuts, ensuring the panels fit perfectly on your roof.
Drill with Screwdriver Attachment
A drill with a screwdriver attachment will be your go-to tool for securing the Suntop roof panels in place. Use it to create pilot holes and drive the screws through the panels and into the roof structure. This tool will ensure a secure and firm attachment, preventing any movement or damage during extreme weather conditions.
Roofing Nails
While the screws provide the main fastening mechanism, roofing nails are essential for added security. Use roofing nails to secure the edges and ridges of the Suntop roof panels, reinforcing their stability.
Roofing Sealant
To further protect your roof from water infiltration, it is crucial to have roofing sealant on hand. Apply roofing sealant on the edges and overlaps of the Suntop roof panels to create a watertight seal. This additional layer of protection will prevent any potential leaks and ensure the longevity of your roof.
By gathering all these necessary tools and materials beforehand, you will be well-prepared to begin installing Suntop roof panels. With the right resources at your disposal, you can complete the installation process efficiently and with confidence.
Assessing And Preparing The Roof
Before installing Suntop roof panels, it is crucial to thoroughly assess and prepare your roof to ensure a successful installation process. This involves inspecting the roof for damage, removing old roofing material, cleaning and repairing the roof surface, and ensuring proper ventilation. By following these steps, you can create a sturdy foundation for your new Suntop roof panels.
Inspecting the Roof for Damage
Begin the preparation process by inspecting your roof for any signs of damage. This includes checking for cracks, leaks, or any loose or missing shingles. If you notice any issues, it is important to address them before proceeding with the installation. Repairing any damage ensures that your new Suntop roof panels are installed on a secure and stable surface.
Removing Old Roofing Material
Next, remove any old roofing material that may be present on your roof. This typically involves carefully stripping away any existing shingles or tiles. Be sure to use the appropriate tools and follow safety precautions throughout this process. Removing the old roofing material will provide a clean slate for the installation of your Suntop roof panels.
Cleaning and Repairing the Roof Surface
Once the old roofing material has been removed, it is essential to clean and repair the roof surface. This step ensures that the Suntop roof panels adhere properly and create an airtight seal. Thoroughly clean the roof surface to remove any debris or dirt that may hinder the installation. Additionally, inspect the surface for any cracks or damage and repair them promptly. A smooth and solid roof surface is key to a successful installation.
Ensuring Proper Ventilation
Proper ventilation is crucial for maintaining the integrity and longevity of your roof. Ensure that your roof has adequate ventilation by checking for vents and ensuring they are not obstructed or damaged. Good ventilation prevents moisture buildup and reduces the risk of mold or rot. Make any necessary repairs or adjustments to ensure that your Suntop roof panels have proper ventilation for optimal performance.
Measuring And Cutting The Panels
In the process of installing Suntop roof panels, one crucial step is measuring and cutting the panels to the appropriate size. This ensures that the panels fit perfectly on the roof, providing a secure and aesthetically pleasing installation. To help you navigate through this process effectively, we have divided the task into two main sections: Taking Accurate Roof Measurements and Cutting the Panels to Size. Let’s delve into each step and understand how to achieve precise measurements and flawless panel cuts.
Taking Accurate Roof Measurements
Taking proper measurements is the foundation of a successful roofing project. Here are some steps to ensure your roof measurements are accurate:
- Begin by determining the length and width of the roof area where you intend to install the Suntop roof panels. Use a tape measure to measure these dimensions precisely. Remember to measure from the outer edges of the roof, accounting for any overhangs.
- Next, calculate the total area of the roof by multiplying the length and width measurements. This will give you the square footage required for purchasing the appropriate number of Suntop roof panels.
- Take note of any obstructions on the roof, such as vents or skylights. Measure and record their locations accurately, as these areas will require special attention during the installation process.
Cutting the Panels to Size
After obtaining precise roof measurements, the next step is to cut the Suntop roof panels to fit the specific dimensions. Follow these guidelines to ensure accurate panel cuts:
- Begin by marking the measurements on the panels using a measuring tape and a pencil. Make sure to use a straight edge or a square to ensure straight and precise lines.
- Use a suitable cutting tool, such as a circular saw or a jigsaw, to cut the panels along the marked lines. Ensure the blades are sharp for clean and accurate cuts. It’s recommended to wear safety goggles and gloves during this process.
- Double-check the measurements and cuts before installing the panels on the roof. Accuracy is crucial to achieve a seamless fit and a professional-looking result.
- In case of any edges that need to be trimmed further for a perfect fit, use a fine-toothed saw or a utility knife to make the necessary adjustments. Take caution to avoid damaging the panels or creating jagged edges.
By diligently following these steps, you can ensure accurate panel measurements and clean cuts that will contribute to a successful installation of Suntop roof panels. Remember to prioritize safety while handling cutting tools and always double-check your measurements before proceeding. Now that you have mastered the art of measuring and cutting the panels, you are one step closer to enjoying the numerous benefits these durable and stylish roof panels have to offer.
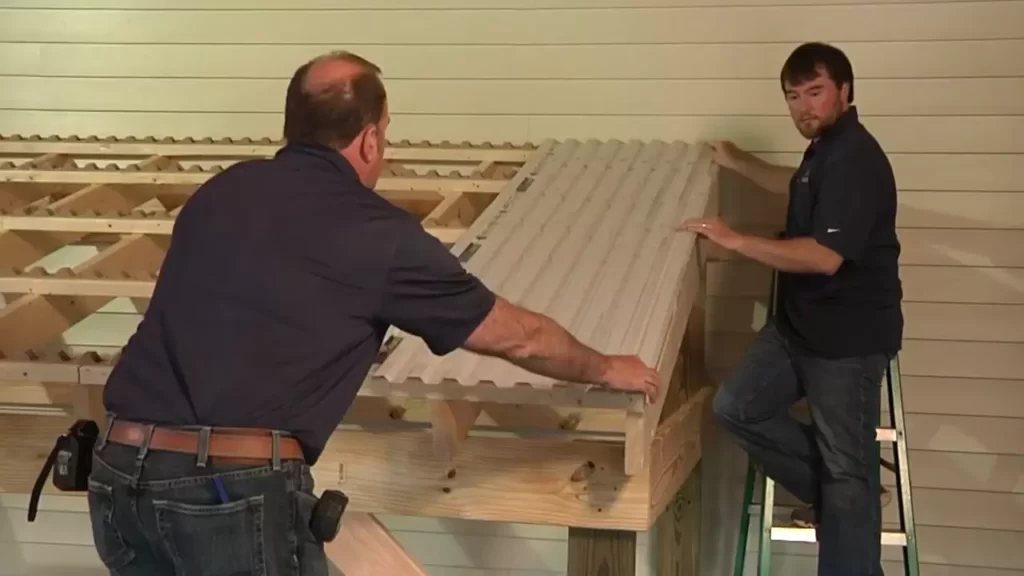
Placing And Securing The First Panel
Installing Suntop roof panels is an effective way to provide durable and reliable protection for your structure. However, it’s crucial to start the installation process correctly to ensure a seamless finish. In this section, we will guide you through the steps of placing and securing the first panel, ensuring a sturdy foundation for the rest of the installation.
Positioning the First Panel at the Bottom Edge
To begin, start by positioning the first panel at the bottom edge of your roof structure. Ensure that the panel is aligned parallel to the edge, allowing for proper water drainage. For an optimal fit, trim the panel to the required length using a saw or a utility knife, keeping safety precautions in mind.
Aligning and Leveling the Panel
Next, align the panel with the underlying rafters or purlins to maintain structural integrity. It is crucial to check for squareness, making sure the panel is aligned properly to prevent any distortion or unevenness during the installation.
- Use a level tool to ensure the panel is perfectly horizontal, and adjust as necessary.
- Double-check the alignment by measuring the distance between the panel and the edge of the roof structure at various points. Make any adjustments needed to achieve consistent spacing.
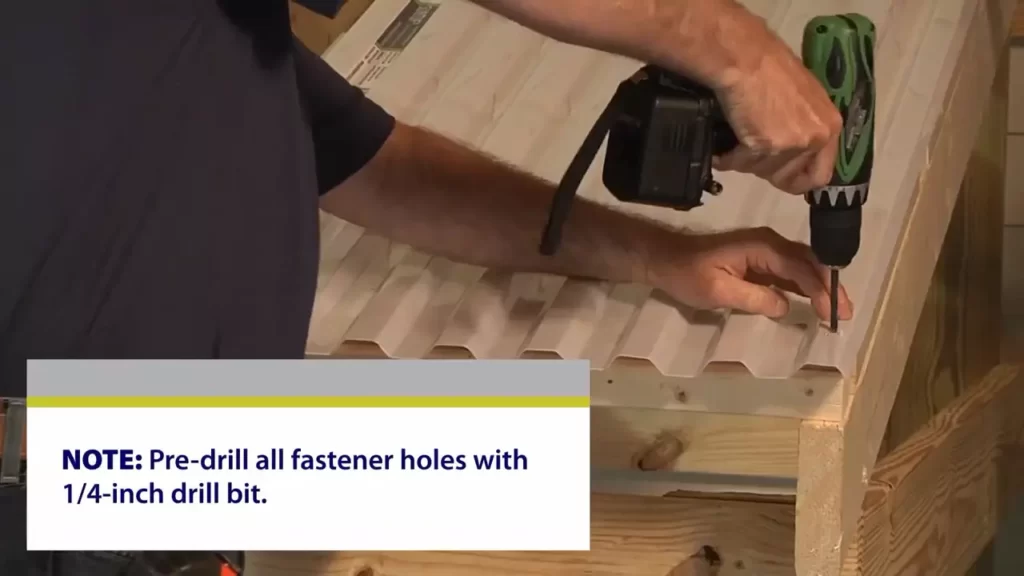
Securing the Panel with Roofing Nails
Once the panel is in the correct position, it’s time to secure it in place using roofing nails. Roofing nails are specially designed for this purpose, providing optimum fastening and preventing leaks. Follow these steps to ensure a secure attachment:
- Starting at the top edge, secure the panel to each underlying rafter or purlin using roofing nails.
- For maximum stability, place the nails approximately every 12-16 inches along the edge of the panel.
When inserting the roofing nails, be cautious of the panel’s corrugations. Drive the nails through the flat portions of the panel to avoid damaging the protruding corrugations.
Repeat this process for subsequent panels, ensuring that each panel is securely fastened to the underlying structure.
By following these steps and taking the necessary precautions, you can successfully place and secure the first panel of your Suntop roof installation. This ensures a strong foundation for the remaining panels, allowing for a seamless and long-lasting roofing solution.
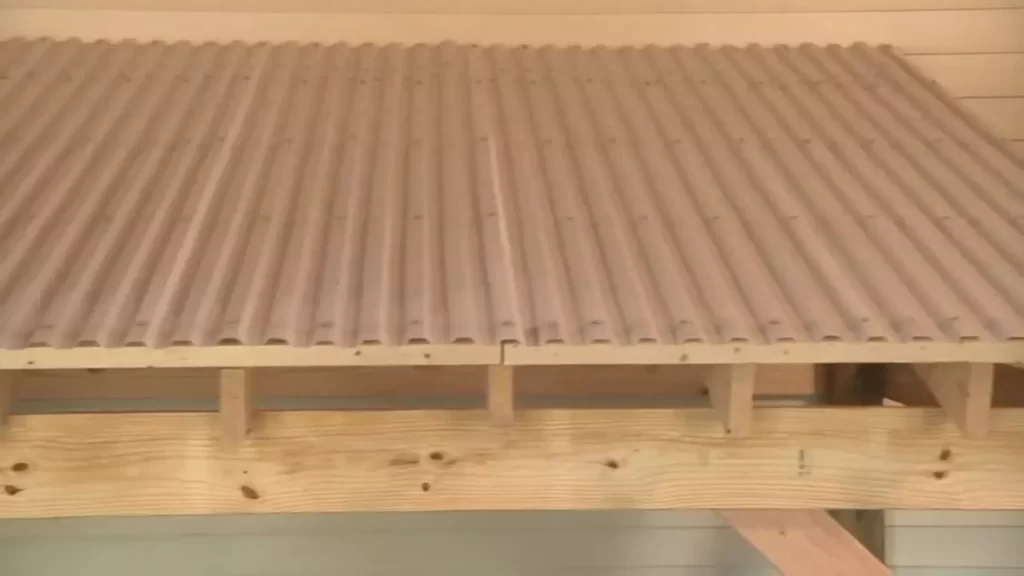
Connecting And Overlapping Panels
Connecting and overlapping panels correctly is essential for the successful installation of Suntop roof panels. This process ensures that the panels are aligned properly and allows for proper water drainage, preventing any potential leaks or damage. In this section, we will guide you through the steps of aligning subsequent panels with the first panel, ensuring proper overlap for water drainage, and securing the panels with roofing nails.
Aligning Subsequent Panels with the First Panel
To align subsequent panels with the first panel, follow these steps:
- Start by placing the second panel next to the first panel, ensuring that the panels are perfectly aligned.
- Use a level to confirm that the panels are straight and at the desired angle.
- If needed, make minor adjustments by sliding the panels horizontally or vertically.
- Ensure that the top edge of the second panel overlaps the bottom edge of the first panel by the specified amount (refer to the installation instructions or manufacturer’s recommendations for the correct overlap).
- Once the panels are properly aligned and overlapped, move on to securing them.
Ensuring Proper Overlap for Water Drainage
Proper overlap between the panels is crucial for effective water drainage. Follow these steps to ensure proper overlap:
- Verify the recommended overlap distance specified by the manufacturer. This will ensure that water can easily flow from one roof panel to the next without infiltrating the roof.
- Double-check that the top edge of the subsequent panel covers the bottom edge of the previous panel. This overlap creates a continuous barrier against water infiltration.
- Inspect the overlap visually and run your hand along the joint to confirm a secure connection.
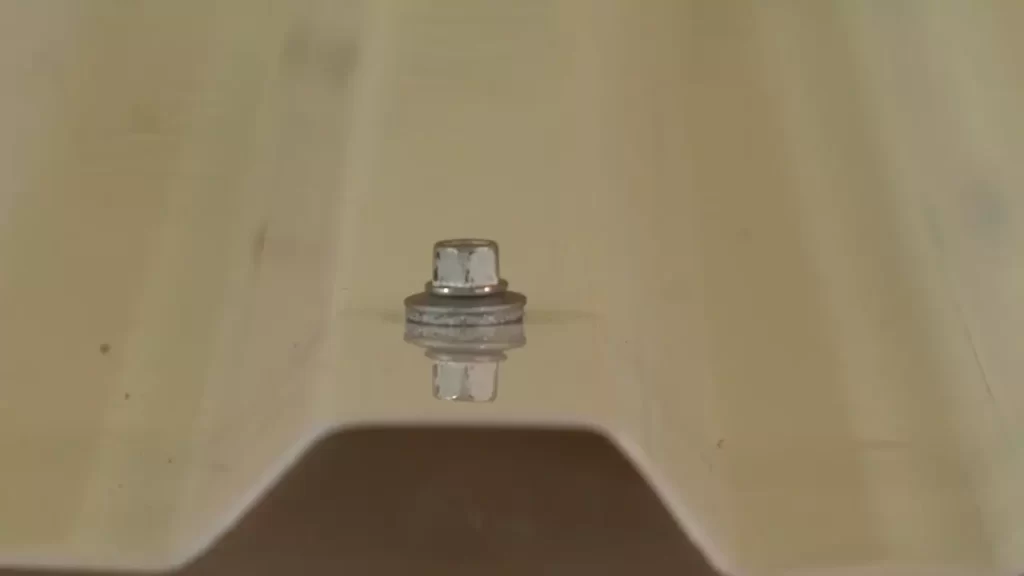
Securing Panels with Roofing Nails
Securing the roof panels with roofing nails ensures they stay in place and withstand any weather conditions. Here’s how:
- Using the recommended type of roofing nails, position them near the top edge of each subsequent panel.
- Drive the nails through the pre-drilled holes in the panels and into the underlying roof structure.
- Make sure the nails are driven flush with the surface of the panel, but be cautious not to overdrive them and damage the panel.
- Continue this process for each subsequent panel, ensuring that they are aligned, overlapped correctly, and securely fastened.
By following these steps for connecting and overlapping Suntop roof panels, you’ll achieve a secure, watertight installation that will protect your property for years to come.
Finishing Touches
Welcome to the final section of our guide on how to install Suntop roof panels – the finishing touches. In this section, we will cover the essential steps for ensuring a secure and professional installation. From sealing the panel joints with roofing sealant to installing edge flashing and checking for proper installation, these steps are crucial for the longevity and effectiveness of your new roof. Let’s dive in!
Sealing Panel Joints with Roofing Sealant
Once you have securely installed the Suntop roof panels, it’s important to seal the panel joints with high-quality roofing sealant. This step is vital for preventing any water or moisture from seeping in between the panels and causing damage or leaks. To seal the joints:
- Carefully inspect each joint between the panels for any gaps or openings. Ensure they are clean and free from debris.
- Apply a generous bead of roofing sealant along the joint, covering the entire length. Make sure to use a sealant that is compatible with the Suntop roof panels.
- Smooth out the sealant using a caulking gun or a putty knife to create an even and watertight seal.
By sealing the panel joints with roofing sealant, you will provide an additional layer of protection against the elements and ensure a secure and leak-free roof.
Installing Edge Flashing
Edge flashing plays a critical role in protecting the edges and corners of your Suntop roof panels. It helps to prevent water infiltration and keeps your roof secure. Follow these steps to install edge flashing:
- Measure the length of each edge where the flashing will be installed, ensuring you have enough flashing material for each section.
- Cut the edge flashing to the appropriate length using tin snips or a saw, following the manufacturer’s guidelines.
- Position the flashing along the edges, ensuring it overlaps the roof panels sufficiently to provide adequate coverage.
- Secure the edge flashing to the roof panels using roofing nails or screws, making sure it is firmly attached.
- Repeat this process for all edges and corners of the roof.
By installing edge flashing, you will add an extra layer of protection to vulnerable areas, safeguarding your Suntop roof panels against potential problems.
Checking for Proper Installation
Now that you have completed the installation and the finishing touches, it’s time to ensure everything is in order. Pay attention to the following checkpoints to confirm proper installation:
- Inspect the roof panels for any visible gaps, buckling, or misalignments. If you notice any issues, address and resolve them promptly.
- Check the sealant applied to the panel joints for any signs of cracks or gaps. Reapply sealant as necessary.
- Verify that the edge flashing is securely fastened and provides complete coverage along the edges and corners of the roof.
- Perform a water test by lightly spraying the roof with water and observing for any leaks or water infiltration. Make any necessary adjustments or repairs.
By conducting a thorough check for proper installation, you can have peace of mind knowing that your Suntop roof panels are installed correctly and ready to protect your home or building for years to come.
Congratulations! You have successfully completed the installation of your Suntop roof panels, including the important finishing touches. By following these steps, you have ensured the longevity, durability, and effectiveness of your new roof. Now, sit back and enjoy the benefits of a reliable and attractive Suntop roof!
Regular Inspection And Cleaning
Regular inspection and cleaning are crucial for maintaining the quality and longevity of your Suntop roof panels. By performing these tasks, you can ensure that your roof is free from any damage or debris that could potentially impact its performance.
Checking for Loose Panels or Nails
One of the first steps in your regular inspection should be checking for any loose panels or nails. Over time, panels can become loose due to weather conditions or improper installation. By carefully examining each panel, you can identify any that need to be tightened or replaced.
Clearing Debris and Dirt from Panels
Another important aspect of regular maintenance is clearing debris and dirt from your panels. Leaves, branches, and other types of debris can accumulate on the roof, hindering its functionality. Using a soft-bristle brush or a leaf blower, gently remove any debris from the surface of the panels. Remember to exercise caution and avoid applying too much pressure, as this could potentially damage the panels.
Cleaning with Mild Detergent and Water Solution
To keep your Suntop roof panels looking their best, it’s important to clean them regularly with a mild detergent and water solution. Begin by mixing a small amount of mild detergent with water in a bucket. Using a soft cloth or sponge, dip it into the solution and gently scrub the surface of the panels. Rinse the panels thoroughly with clean water to remove any residue.
During the cleaning process, be sure to avoid using abrasive materials, such as wire brushes or harsh cleaning chemicals, as these can cause irreparable damage to the panels. Always opt for a gentle approach to preserve the integrity of your roof.
By incorporating regular inspection and cleaning into your maintenance routine, you can ensure that your Suntop roof panels remain in excellent condition for years to come. Remember to check for loose panels or nails, clear debris and dirt, and clean with a mild detergent and water solution. By following these simple steps, you can extend the lifespan of your roof and enjoy its benefits for a long time.
Frequently Asked Questions Of How To Install Suntop Roof Panels
How Do You Cut Suntop Panels?
To cut suntop panels, follow these steps:
1. Measure and mark the desired size on the panel.
2. Use a circular saw or jigsaw with a fine-toothed blade.
3. Cut slowly and steadily along the marked line.
4. Wear protective goggles and gloves during the cutting process.
5. Smooth any rough edges with sandpaper if needed.
How Much Do You Overlap Suntuf Panels?
Overlap Suntuf panels by one corrugation to ensure proper water runoff and prevent leaks.
How Do You Fasten Polycarbonate Roofing Panels?
Fastening polycarbonate roofing panels requires following these guidelines:
1. Pre-drill holes on the panels and support structure.
2. Use aluminum or polycarbonate-compatible screws.
3. Attach the panels with the screws, leaving room for expansion.
4. Place the screws near the edges to prevent panel splitting.
5. Secure the panels tightly but avoid over-tightening.
What Kind Of Screws To Use On Polycarbonate Sheets?
For polycarbonate sheets, it is recommended to use screws made of stainless steel or polycarbonate. These types of screws provide the necessary strength and durability while preventing corrosion and damage to the sheets.
Conclusion
Installing Suntop roof panels is a straightforward process with long-lasting benefits. By following the step-by-step instructions provided in this blog post, you can successfully install these panels and enjoy their durability and aesthetic appeal. Remember to properly prepare the roof, measure and cut the panels accurately, and secure them with the recommended fasteners.
With Suntop roof panels, you can enhance the overall beauty and functionality of your roof while protecting your home from the elements. Happy installing!