To install heat tape, first, clean the area where it will be placed, then wrap the tape around the pipe or desired surface, securing it with zip ties or adhesive. Proper installation is crucial for efficient heat transfer and preventing damage from freezing temperatures.
Factors To Consider When Selecting Heat Tape
Installing heat tape can be an effective solution to prevent frozen pipes and ice dams. However, choosing the right heat tape for your specific application is crucial to ensure optimal performance and safety. There are several factors to consider when selecting heat tape, such as the type of heat tape suitable for different applications, considerations for outdoor or indoor installation, and finding the appropriate length and power rating. Let’s take a closer look at these factors and how they can help you make the right choice.
Type of heat tape suitable for different applications
When it comes to heat tape, there are different types available, each designed for specific applications. Selecting the right type of heat tape will ensure it is suitable for the intended use and provides efficient heating. Here are some common types of heat tape:
- Self-regulating heat tape: This type of heat tape automatically adjusts its heat output based on the temperature. It is ideal for applications where the heat tape needs to be in constant contact with the surface, such as for pipes and gutters.
- Constant wattage heat tape: Unlike self-regulating heat tape, constant wattage heat tape provides a consistent heat output, regardless of the temperature. It is typically used for applications where the heat tape does not need to be in direct contact with the surface, such as roof edges and downspouts.
Consider the specific requirements of your installation to determine which type of heat tape is most suitable.
Considerations for outdoor or indoor installation
Whether you are installing heat tape outdoors or indoors, there are certain considerations to keep in mind to ensure safety and effectiveness.
For outdoor installation, it is important to choose heat tape that is specifically designed for outdoor use. Outdoor heat tape is typically more durable and weather-resistant to withstand harsh conditions, such as exposure to UV rays, rain, and snow. Additionally, make sure the heat tape is properly rated for the desired temperature range and can withstand the expected weather conditions in your area.
Indoor installations may have different requirements, such as being compatible with electrical codes and regulations. The heat tape should also be suitable for specific indoor applications, such as preventing pipes from freezing in unheated basements or attics.
Finding the appropriate length and power rating
Finding the right length and power rating for your heat tape is crucial to ensure sufficient heat coverage and prevent overheating. Consider the following factors when determining the appropriate length and power rating:
- Measure the length of the area where the heat tape will be installed. Allow for extra length to ensure complete coverage, and consider any bends or corners that may require additional tape.
- Check the power rating of the heat tape to ensure it matches the requirements of your application. Higher power ratings are needed for longer lengths or areas with higher heat loss.
Remember to consult the manufacturer’s guidelines and recommendations to ensure you choose the appropriate length and power rating for your heat tape installation.
By considering these factors – the type of heat tape suitable for different applications, considerations for outdoor or indoor installation, and finding the appropriate length and power rating – you can confidently select the right heat tape for your specific needs.
Understanding The Heat Tape Components
The Role of the Heating Element in the Tape
One of the key components of a heat tape is the heating element. The heating element is responsible for generating the warmth that prevents freezing and ice buildup. It is usually made of a conductive material, such as metal alloy or carbon, that can efficiently convert electrical energy into heat.
The heating element runs the entire length of the heat tape, ensuring that heat is evenly distributed. This is crucial as it helps to melt any ice formation and keep the pipes or surfaces at a safe temperature level. Without the heating element, the heat tape would be ineffective in preventing freezing and potential damage.
Importance of the Thermostat for Heat Regulation
A thermostat plays an essential role in regulating the heat generated by the heat tape. It acts as a temperature control mechanism, ensuring that the heat tape operates at optimal levels. The thermostat constantly monitors the temperature of the pipes or surfaces and adjusts the power supply to the heating element accordingly.
By using a thermostat, you can ensure that the heat tape operates only when necessary. This energy-efficient feature saves electricity and extends the lifespan of the heat tape. Additionally, it helps to maintain a consistent temperature, preventing overheating or inadequate heating.
Insulation Materials and Their Significance
An often overlooked but crucial component of heat tape installation is insulation. Insulation materials serve to enhance the effectiveness of the heat tape by minimizing heat loss. They act as a protective barrier, preventing the dissipation of heat to the surrounding environment.
High-quality insulation materials, such as foam or rubber sleeves, are typically used to wrap the heat tape and the pipes or surfaces it is applied to. These materials provide an extra layer of insulation, ensuring that the heat tape’s performance is maximized. They also help to reduce energy consumption by preventing the need for constant heat generation.
Gathering The Necessary Tools And Materials
To properly install heat tape and ensure it functions efficiently, you will need a specific set of tools and materials. By having everything ready beforehand, you can save time and complete the installation with ease. Below is a list of essential tools and materials required for installing heat tape:
List of tools needed for installation
- Measuring tape or ruler
- Scissors or utility knife
- Screwdriver (if applicable for your heat tape model)
- Wire strippers
- Electrical tape
- Heat shrink tubing or heat shrink tape
- Cable ties or zip ties
- Heat gun or hairdryer (if using heat shrink tubing)
- Heat-resistant gloves
- Electrical tester or multimeter (to check the electrical connection)
Before you start gathering the materials, it’s a good idea to evaluate the specific requirements for your heat tape installation. Different manufacturers and models may have varying recommendations. Make sure to follow the manufacturer’s instructions, as they may suggest additional tools specific to their products.
Required materials for securing and insulating the heat tape
Securing and insulating the heat tape properly is crucial to ensure its efficiency and longevity. The following materials are essential for this purpose:
- Heat-resistant adhesive tape
- Insulation material (such as foam pipe insulation)
- Aluminum foil tape or electrical tape (for sealing connections)
- Mounting brackets or clips (for attaching the heat tape to the surface)
- Electrical outlet or junction box (if necessary)
By gathering these materials, you will be well-prepared to secure and insulate your heat tape effectively, providing the necessary protection to prevent freezing and damage to your pipes or other surfaces.
Planning The Installation Process
Before you start installing heat tape, it’s crucial to plan the process properly. In this section, we’ll discuss how to assess the area for installation, determine the layout of the heat tape, and measure and cut the tape to fit the space. Following these steps will help you ensure a successful and effective installation.
Assessing the Area for Installation
The first step in the planning process is to assess the area where you intend to install the heat tape. Take a close look at the pipes or gutters that need to be protected and identify any problem areas. Look for signs of existing damage, such as cracks, leaks, or areas where ice is forming. These areas will require extra attention during the installation process.
Additionally, consider the accessibility of the area. Determine if there are any obstacles or tight spaces that could make the installation more challenging. This will help you prepare for any potential difficulties that may arise.
Determining the Layout of the Heat Tape
Once you’ve assessed the area, the next step is to determine the layout of the heat tape. Plan the path the heat tape will take, ensuring it covers the vulnerable areas of the pipes or gutters. Keep in mind that the heat tape should be installed in a way that allows for optimal heat distribution and avoids any overlapping or gaps.
Consider the length of the heat tape and ensure you have enough to cover the entire area. It’s better to have a little extra tape than to run out midway through the installation process.
Measuring and Cutting the Tape to Fit the Space
With the layout determined, it’s time to measure and cut the tape to fit the space precisely. Measure the length of the pipes or gutters and cut the heat tape accordingly, following the manufacturer’s instructions. Remember to account for any corners or bends in the pipes or gutters, ensuring the tape can navigate these areas smoothly.
Make sure to use sharp scissors or a utility knife for a clean cut. Take your time and measure twice to avoid any mistakes.
Once the tape is cut, ensure that it fits the space snugly and wraps securely around the pipes or adheres to the gutters. This will guarantee proper contact with the surface and maximum heat transfer.
Now that you have planned the installation process, you’re ready to move on to the next step: actually installing the heat tape. Stay tuned for our next blog post, where we’ll walk you through the installation process, step by step.
Ensuring Proper Surface Preparation
Before installing heat tape, it is crucial to ensure that the surface is properly prepared. Failure to do so may result in subpar performance and potential complications down the line. In this section, we will discuss the essential steps to follow when preparing the surface for heat tape installation.
Cleaning the area thoroughly
To begin with, it is important to clean the area where the heat tape will be installed. This step involves removing any dirt, dust, or grime that may have accumulated on the surface. A thorough cleaning not only promotes better adhesion but also eliminates any potential obstructions that may hinder proper tape installation and functionality.
When cleaning the area, it is recommended to use a suitable cleaning solution or detergent along with a soft-bristle brush or sponge. Gently scrub the surface, paying attention to any hard-to-reach spots or crevices. Rinse off the cleaning solution thoroughly to avoid leaving behind any residue that may impact the adhesion of the heat tape.
Removing any debris or obstructions
In addition to cleaning, it is important to remove any debris or obstructions that may interfere with the proper installation of the heat tape. This includes removing loose particles, such as pebbles, leaves, or twigs, as well as any existing tape or adhesive residues from previous installations.
Inspect the entire area and carefully remove any loose debris using a broom, brush, or vacuum cleaner. For stubborn residue, you may consider using an adhesive remover or a similar product recommended by the heat tape manufacturer. Ensure that the surface is completely clear, smooth, and free of any obstructions before proceeding with the installation process.
Key Takeaways:
- Cleaning the area thoroughly before heat tape installation is crucial for optimal performance.
- Use a suitable cleaning solution or detergent along with a soft-bristle brush or sponge to clean the surface.
- Ensure the area is free from any debris, leaves, or tape residues that may obstruct proper installation.
- Inspect the surface carefully and remove any stubborn residue using appropriate cleaning or adhesive removal products.
By taking the time to properly prepare the surface before installing heat tape, you can ensure a more efficient and effective installation process. This, in turn, will help maximize the performance and longevity of your heat tape, providing you with the desired heating solution for your needs.
Mounting And Securing The Heat Tape
Mounting and securing the heat tape is a crucial step in the installation process. Proper attachment ensures that the tape stays in place, maximizing its effectiveness in preventing frozen pipes and ice dams. In this section, we will discuss the methods for securely attaching the heat tape and positioning it for maximum effectiveness.
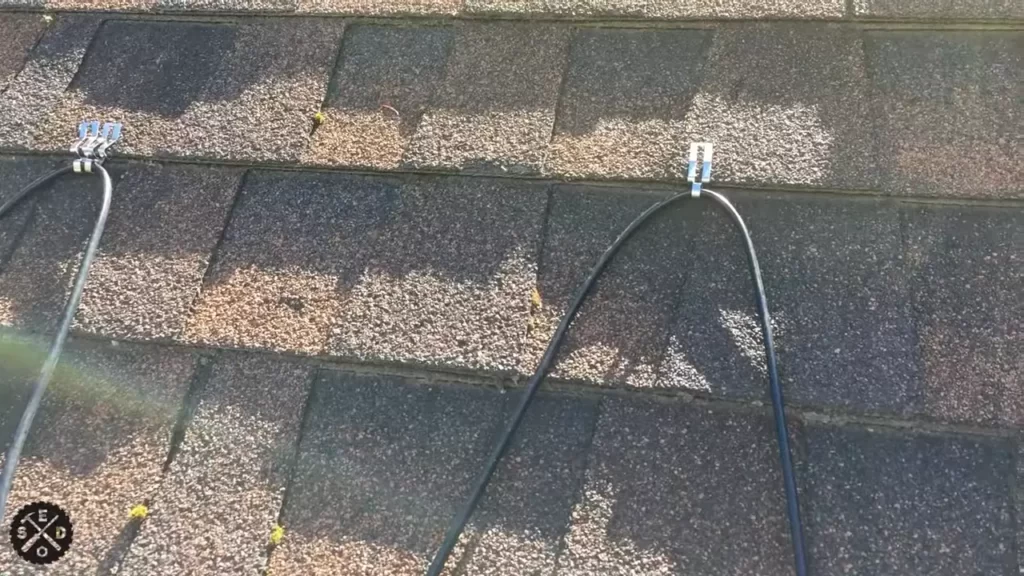
Methods for securely attaching the tape
There are several methods you can use to securely attach the heat tape to your pipes or roof edges. It’s important to choose the method that works best for your specific application. Here are some common options:
<td</td| Method | Description |
|---|---|
| Rubber or silicone adhesive | Apply a generous amount of rubber or silicone adhesive along the length of the tape. Press the tape firmly against the surface and allow the adhesive to dry completely. This method provides a strong bond and is ideal for long-term installations. |
| Cable clips or clamps | Use cable clips or clamps specifically designed for heat tape attachment. Secure the tape in place by snapping the clips or clamps over the tape and onto the surface. This method allows for easy removal and reinstallation if needed. |
| High-temperature tape can be wrapped around the heat tape and the pipe or roof edge. This creates a secure bond without the need for adhesives. Make sure to use tape that can withstand the temperature of the heat tape. |
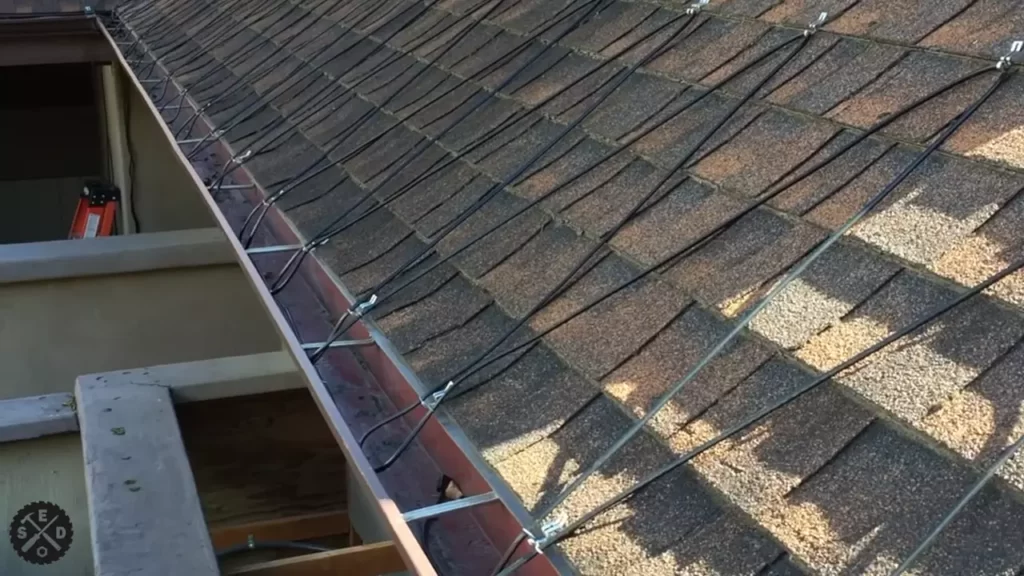
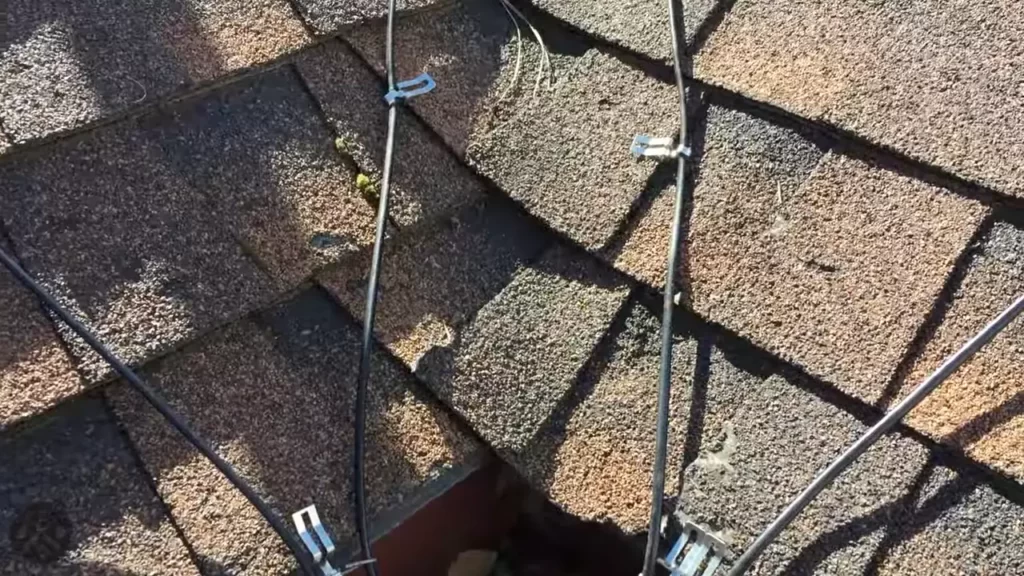
Positioning the tape for maximum effectiveness
Proper positioning of the heat tape is essential to maximize its efficiency in preventing freezing and ice buildup. Follow these guidelines to ensure the tape is positioned correctly:
- Start at the lowest point of the pipe or roof edge where ice is most likely to form.
- Ensure the tape runs in a straight line along the entire length of the exposed area.
- Wrap the tape around the pipe or roof edge evenly, with no gaps or overlaps.
- Secure the ends of the tape to prevent unraveling.
- Avoid crossing the heat tape over itself as it can create hot spots and potential damage.
- Leave a small space between each wrap to allow for proper heat distribution.
With these tips for securely attaching and positioning the heat tape, you can ensure that your pipes and roof edges are protected from freezing temperatures and ice buildup. Take the time to follow these guidelines carefully, and you’ll enjoy the peace of mind that comes with a well-installed heat tape system.
Connecting And Testing The Heat Tape
Properly connecting and testing your heat tape is crucial to ensure it functions effectively and efficiently. By following these simple steps, you can connect the heat tape to the power source and test it for functionality.
Properly connecting the heat tape to the power source
Before connecting the heat tape to the power source, it is important to gather all the necessary tools and materials. You will need a power outlet, electrical tape, and a junction box. Once you have everything ready, you can proceed with the following steps:
- Make sure that the heat tape is unplugged and turned off before you begin the installation process.
- Locate the power outlet nearest to the area where the heat tape will be installed. This outlet should be compatible with the voltage requirements of the heat tape.
- Cut a length of electrical tape and wrap it firmly around the exposed wires of the heat tape. This will provide extra protection and insulation.
- Connect the wires of the heat tape to the power outlet by following the manufacturer’s instructions. Typically, this involves connecting the hot wire (usually black) to the live terminal and the neutral wire (usually white) to the neutral terminal.
- Once the connections are made, secure them by using electrical tape or wire nuts. This will ensure that the wires do not come loose and cause any electrical hazards.
- If using a junction box, place the connected wires inside and fasten the box securely to the wall or surface. This will protect the connections from any environmental factors.
Testing the tape for functionality and efficiency
Testing the heat tape is a critical step to ensure that it is functioning correctly and efficiently. To test the heat tape, follow these simple steps:
- Plug in the heat tape and turn it on.
- Observe the tape closely to ensure that it heats up evenly and consistently along its entire length. Look out for any signs of overheating or malfunctioning, such as burnt smells or melting plastic.
- Using a digital thermometer or an infrared temperature gun, measure the temperature of the tape at various points. The temperature should reach the desired level specified by the manufacturer.
- Closely inspect the surrounding area for any hot spots or areas that are not being heated properly. This could indicate a problem with the installation or the heat tape itself.
- After thorough testing, unplug the heat tape and make any necessary adjustments or repairs before proceeding with the final installation.
By following these steps and ensuring that your heat tape is properly connected and tested, you can have peace of mind knowing that it will effectively prevent ice dams and protect your property from potential damage. Remember to always refer to the manufacturer’s instructions for specific guidelines and safety precautions.
Insulating The Heat Tape For Better Efficiency
Insulating the heat tape is a crucial step in maximizing its efficiency and ensuring optimal performance. The right insulation materials and methods can help prevent heat loss, reduce energy consumption, and protect the tape from external elements. In this section, we will discuss the appropriate insulation materials to choose and the methods for applying them to the heat tape.
Choosing Appropriate Insulation Materials
Before you start insulating your heat tape, it’s important to select the right insulation materials that can withstand high temperatures and effectively trap the heat produced by the tape. Here are some suitable options:
| Insulation Material | Benefits |
|---|---|
| Fiberglass Insulation | – Excellent thermal resistance – Easy to handle and install – Resistant to moisture and mold |
| Foam Pipe Insulation | – Provides excellent insulation – Easy to cut and fit around the heat tape – Resistant to moisture and UV rays |
| Self-Adhesive Insulation Wrap | – Self-sealing for a tight fit – Offers good thermal insulation – Ideal for irregular-shaped pipes |
By choosing the appropriate insulation material based on your specific needs, you can enhance the effectiveness of the heat tape and minimize heat loss.
Methods for Applying Insulation to the Tape
Once you have the right insulation materials, it’s time to apply them to the heat tape securely. Here are a few methods you can use:
- Wrapping with Insulation Tape: Begin by wrapping the heat tape with the selected insulation material, ensuring a snug fit. Secure the insulation in place by wrapping it with insulation tape. This method is ideal for straight sections of heat tape that run parallel to the pipe.
- Using Insulation Foam Tubes: If your heat tape is installed on a curved or irregular-shaped pipe, it’s best to use insulation foam tubes. Cut the foam tubes to the appropriate length and wrap them around the heat tape, making sure they completely cover the tape. Secure the foam tubes with zip ties or insulation tape.
- Applying Heat Shrink Tubing: Another effective method is to use heat shrink tubing. Slide the heat shrink tubing over the heat tape and use a heat gun or hairdryer to shrink it tightly around the tape. This creates a seamless and secure insulation layer.
Remember to follow the manufacturer’s instructions and guidelines for each insulation method to ensure proper installation.
By taking the time to insulate your heat tape with the appropriate materials and applying them correctly, you can significantly improve its efficiency, reduce heat loss, and ultimately save energy and money. Insulation plays a vital role in maintaining consistent heat distribution and protecting the heat tape from external factors, contributing to its longevity and overall performance.
Monitoring And Maintenance Of Heat Tape
Once you have successfully installed the heat tape, it is crucial to regularly monitor and maintain it to ensure its efficiency and longevity. Regular inspection for any damage or wear, as well as troubleshooting common issues and performing necessary repairs, are essential steps in maintaining your heat tape system. In this article, we will discuss these steps in detail to help you keep your heat tape in optimal condition.
Regular inspection for any damage or wear
To ensure the effectiveness of your heat tape system, it is important to conduct regular inspections for any signs of damage or wear. These inspections will help you identify and resolve potential issues before they escalate and cause damage to your pipes or property. Here are a few key areas to check during your inspection:
- Visual examination: Look for any visible signs of wear, such as cracks, frays, or exposed wires. It is crucial to address these issues promptly and repair or replace the damaged section if necessary.
- Testing the heat tape: Turn on the heat tape and verify that it is functioning correctly. Check if it is generating enough heat along the entire length and compare the temperature against the manufacturer’s specifications.
- Inspecting the insulation: Ensure that the insulation around the heat tape is intact and free from any damage. It plays a vital role in preventing heat loss and maximizing the heat tape’s efficiency.
In addition to the regular inspections, it is important to keep an eye out for any sudden increase in your energy bills, as this may indicate a potential issue with the heat tape system.
Troubleshooting common issues and repairs
Despite regular maintenance, your heat tape system may encounter common issues that require troubleshooting and repairs. It is important to identify and address these issues promptly to prevent further damage. Here are a few common issues you may encounter:
- Malfunctioning thermostat: If your heat tape is not turning on or off at the desired temperature, there may be an issue with the thermostat. Check the thermostat settings and ensure it is functioning properly. Replace it if necessary.
- Inadequate heat generation: If your heat tape is not generating enough heat to protect your pipes, it may be due to various reasons such as a damaged heating element or insufficient power supply. Consult the manufacturer’s guidelines or seek professional assistance for troubleshooting and repairs.
- Excessive heat generation: If your heat tape is overheating or causing damage to the surrounding area, it may indicate an issue with the thermostat or insulation. Address this issue immediately to prevent any potential hazards or fire risks.
It is advisable to refer to the manufacturer’s instructions or consult a professional for troubleshooting and repairs, especially if you are unsure about handling electrical components.
In conclusion, regular monitoring and maintenance of your heat tape system are essential to ensure its effectiveness and avoid potential issues. By conducting regular inspections for any damage or wear and troubleshooting common issues promptly, you can maintain the efficiency and longevity of your heat tape system.
Understanding Safety Precautions
Understanding safety precautions is crucial when it comes to installing heat tape for your home. This ensures not only the successful installation of the tape, but also keeps you and your property safe. In this section, we will discuss the importance of following safety guidelines as well as handling electrical components with care.
Importance of following safety guidelines
When it comes to working with electricity, safety should always be the top priority. Following safety guidelines not only protects you from potential harm but also reduces the risk of accidents and property damage. The following safety guidelines must be followed:
- Before starting the installation process, ensure that the power supply to the area where you will be working is turned off. This helps prevent electrical shocks.
- Wear insulated gloves and safety goggles to protect yourself from any potential electrical hazards.
- Make sure to read and understand the manufacturer’s instructions and safety guidelines provided with the heat tape. This will help you identify any specific precautions that need to be taken.
- Avoid installing the heat tape in areas where it may come into contact with flammable materials or where it can get wet. This reduces the risk of fire hazards and short circuits.
- If you are unsure about any aspect of the installation process or if you encounter any issues, it is always recommended to seek professional help. Remember, it’s better to be safe than sorry.
Handling electrical components with care
When working with electrical components, it is important to handle them with care to avoid any accidents and ensure the proper functioning of the heat tape. Here are some tips to handle electrical components safely:
- Before touching any electrical components, make sure to turn off the power and disconnect any power sources.
- Never use bare hands to handle electrical components. Always use insulated tools to protect yourself from electrical shocks.
- Inspect electrical components for any damages or defects before installation. If you notice any issues, do not use them and replace them with new ones.
- Avoid placing excessive strain on electrical wires while installing the heat tape. This helps prevent wire damage and potential electrical hazards.
- Securely fasten all the electrical connections to ensure proper electrical conductivity. Loose connections can lead to heat tape malfunction and safety risks.
Remember, taking safety precautions while installing heat tape is essential for both your own safety and the longevity of the tape. By following safety guidelines and handling electrical components with care, you can confidently complete the installation process and enjoy the benefits of a well-functioning heat tape system.
Frequently Asked Questions Of How To Install Heat Tape
Is Heat Tape Easy To Install?
Yes, heat tape is easy to install. It requires minimal effort, and you can easily follow the instructions provided. Just wrap the tape around the desired area and connect it to a power source. It’s a simple process that doesn’t require professional help.
So, you can easily install heat tape on your own.
Can You Leave Heat Tape Plugged In?
Yes, it is safe to leave heat tape plugged in. However, make sure it is in good condition, not twisted or damaged, and that it is being used properly. Regularly check for any signs of wear or overheating to ensure safety.
Does It Matter What Side Of The Heat Tape Is On?
The side of the heat tape does matter. Ensure proper installation by following the manufacturer’s instructions.
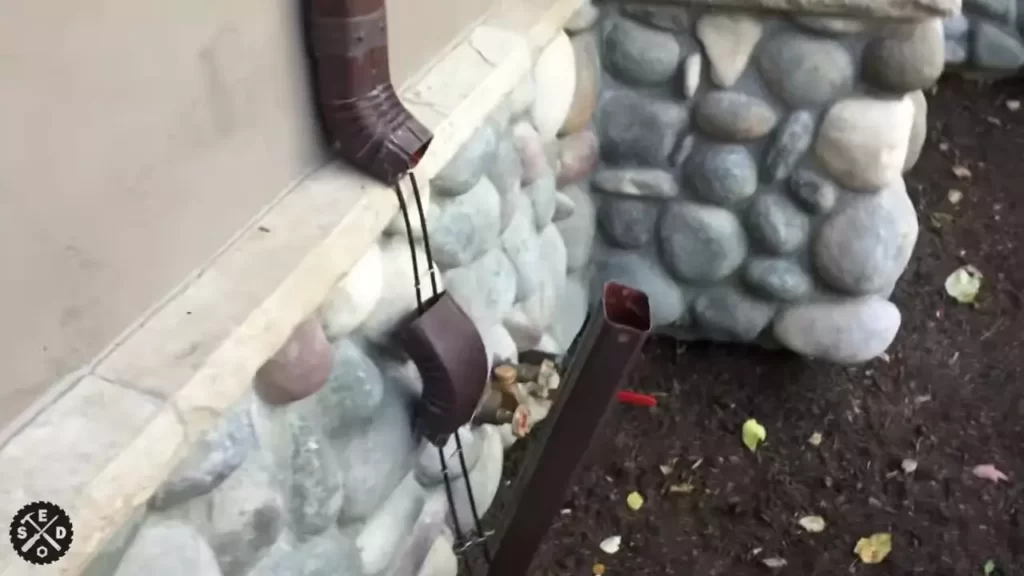
Where Do You Put Heat Tape On Pipes?
Heat tape should be applied to pipes in areas that are susceptible to freezing, such as exterior walls, crawl spaces, and unheated basements. It should be wrapped tightly around the pipe, ensuring complete coverage, and it is recommended to insulate the pipe afterward for added protection.
Conclusion
To sum it up, installing heat tape is a straightforward process that can help protect your pipes and prevent freezing. By following the steps outlined in this guide, you can ensure that your heat tape is installed correctly and efficiently.
Remember to choose the right type of heat tape for your needs, properly measure and prepare your pipes, and carefully follow the manufacturer’s instructions. By taking these precautions, you will have a reliable and effective solution to combat freezing temperatures and keep your plumbing system in optimal condition.