To install an antenna on a roof, first, identify the optimal location and mount the antenna using brackets or a mast, ensuring it is securely fastened. Then, connect the coaxial cable from the antenna to the TV or a tuner box, and perform a channel scan to receive a signal and enjoy a clear TV reception.
Installing an antenna on the roof can enhance your TV viewing experience by providing better signal reception. By following a few simple steps, you can have your antenna up and running in no time. In this guide, we will walk you through the process of installing an antenna on your roof, from finding the right location to mounting the antenna securely.
We will also cover connecting the coaxial cable and performing a channel scan to ensure optimal signal reception. So, let’s get started and discover how to install an antenna on your roof.
Choosing The Right Antenna For Your Roof
Installing an antenna on your roof can greatly improve your television reception, giving you access to a wide range of channels and programs. However, with so many options available, it’s important to choose the right antenna for your specific needs.
Factors such as location, signal strength requirements, and the type of antenna all play a crucial role in determining the effectiveness of your installation. In this article, we will explore these factors in detail, helping you make an informed decision when selecting an antenna for your roof.
Factors to consider when selecting an antenna
When it comes to choosing an antenna, there are several factors that you need to take into account. These factors will help you determine the most suitable antenna for your roof. Here are some of the key considerations:
- Your location: The reception quality will vary depending on where you live. Certain areas have stronger signal strengths, while others may have obstacles such as trees or buildings that can interfere with the signal. Assessing your location will help you determine the type of antenna you need.
- The distance to broadcasting towers: The distance between your home and the broadcasting towers also affects signal strength. The farther you are from the towers, the more powerful the antenna you’ll need to pick up the signals.
- Signal strength requirements: Some areas have stronger signals than others. Consider the signal strength in your location to determine whether you’ll need a high-gain antenna or a standard one.
- Local terrain: The landscape surrounding your home can impact the effectiveness of your antenna. For instance, if you live in a hilly or mountainous area, you may require a more powerful antenna to overcome any obstructions caused by the terrain.
Understanding the different types of antennas available
There are various types of antennas available in the market, each designed for different purposes. Understanding these different types will help you choose the right antenna for your specific needs. Here are some of the most common types:
| Type of Antenna | Description |
|---|---|
| Indoor Antennas | Designed for use indoors, these antennas are suitable for areas with strong signals or close proximity to broadcasting towers. They are compact and easy to install. |
| Outdoor Antennas | These antennas are designed to be mounted on the roof or attic and are ideal for areas with weak signals or longer distances from broadcasting towers. Outdoor antennas offer greater range and signal capture. |
| Directional Antennas | Directional antennas are designed to focus on signals coming from a specific direction. They are ideal for situations where the broadcasting towers are located in the same direction. |
| Multi-Directional Antennas | Multi-directional antennas capture signals from multiple directions simultaneously. They are suitable for locations where the broadcasting towers are spread out in different directions. |
Assessing your location and signal strength requirements
Before installing an antenna on your roof, it’s essential to assess your location and signal strength requirements. This will help you determine the most suitable antenna for your needs. Consider the factors we discussed earlier, such as your location, the distance to broadcasting towers, and the local terrain. By understanding these aspects, you can make an informed decision and choose an antenna that will provide you with optimal signal reception.
Remember, choosing the right antenna is crucial for a successful installation. By taking into account factors like your location, and signal strength requirements, and understanding the different types of antennas available, you can ensure that your antenna installation on your roof yields the best possible results.
Preparing Your Roof For Antenna Installation
Performing a Roof Inspection and Ensuring Structural Integrity
Before installing an antenna on your roof, it is crucial to perform a thorough inspection to ensure that your roof is in good condition and can bear the added weight of the antenna. A roof inspection involves checking for any existing damage, loose shingles, or signs of water leakage. Additionally, ensure that the roof structure is sturdy and doesn’t have any weak spots that could compromise the installation process.
Start by visually inspecting your roof for any signs of wear and tear. Look for missing or damaged shingles, cracks, or any obvious signs of damage. Pay extra attention to areas surrounding chimneys, vents, and gutters, as they are common trouble spots. If you spot any issues, it’s best to address them before proceeding with the installation.
To ensure the structural integrity of your roof, you can perform a physical inspection by gently walking across the roof to check for any sagging or soft spots. While doing so, take note of any areas that feel weaker than others. These weak areas could indicate underlying structural problems that need to be addressed before proceeding with the installation.
Assessing the Best Location for Antenna Placement
Choosing the right location for antenna placement is crucial for optimal signal reception. To determine the best spot, you need to consider several factors, such as the proximity to broadcasting towers, potential obstructions, and the height of your roof.
Begin by identifying the direction of broadcasting towers in your area. This information can be obtained through online resources or by using a signal strength app on your smartphone. Once you know the tower’s direction, position your antenna to face it directly for the best signal reception.
Next, consider potential obstructions that may interfere with the antenna’s reception. These obstructions can include tall buildings, large trees, or even nearby construction. Keep in mind that antennas perform best when they have a clear line of sight to the broadcasting towers.
Lastly, consider the height of your roof as it can affect the strength of the received signal. Generally, the higher the antenna placement, the better the signal reception. However, make sure to adhere to local building codes and regulations regarding antenna height.
Gathering the Necessary Tools and Equipment for Installation
Before starting the installation, gather all the necessary tools and equipment to ensure a smooth process. Having everything on hand will save time and make the installation more efficient. Here is a list of essential tools and equipment you may need:
| Tools | Equipment |
|---|---|
| Screwdriver | Coaxial cable |
| Drill | Antenna mount |
| Adjustable wrench | Mast |
| Level | Grounding wire |
| Rooftop safety equipment | Grounding rod |
Make sure these tools and equipment are easily accessible to minimize any unnecessary delays during the installation process.
By preparing your roof for antenna installation, assessing the best location, and gathering the necessary tools and equipment, you’ll be well-prepared to successfully install your antenna and enjoy optimal signal reception. So let’s get started and enhance your TV-viewing experience!
Installing The Antenna On Your Roof
When it comes to getting a great TV signal, installing an antenna on your roof is often the best option. Not only does it help to avoid any potential obstructions, but it also allows for optimal signal reception. However, before diving into the installation process, there are a few important steps to take. In this section, we will guide you through the steps of preparing the mounting location, assembling and mounting the antenna according to the manufacturer’s instructions, and securing the antenna to the roof safely and securely.
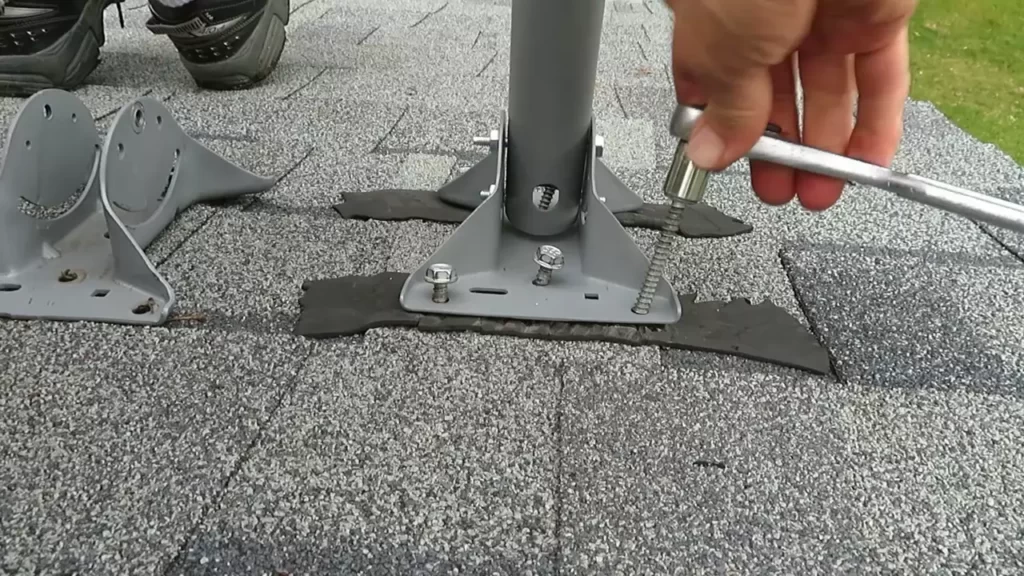
Preparing the Mounting Location and Ensuring Stability
Before you start installing the antenna, it is crucial to find the perfect location on your roof for maximum signal reception. Here are the key steps to follow:
- Using a compass or a signal strength meter, determine where the signal source is coming from. This will help you position the antenna in the right direction for optimal reception.
- Locate a spot on your roof that is free from obstructions such as trees, buildings, or any other objects that may interfere with the signal.
- Ensure that the mounting location is strong and stable enough to support the weight of the antenna. This may require reinforcing the area with additional brackets or using a mast to provide the necessary stability.
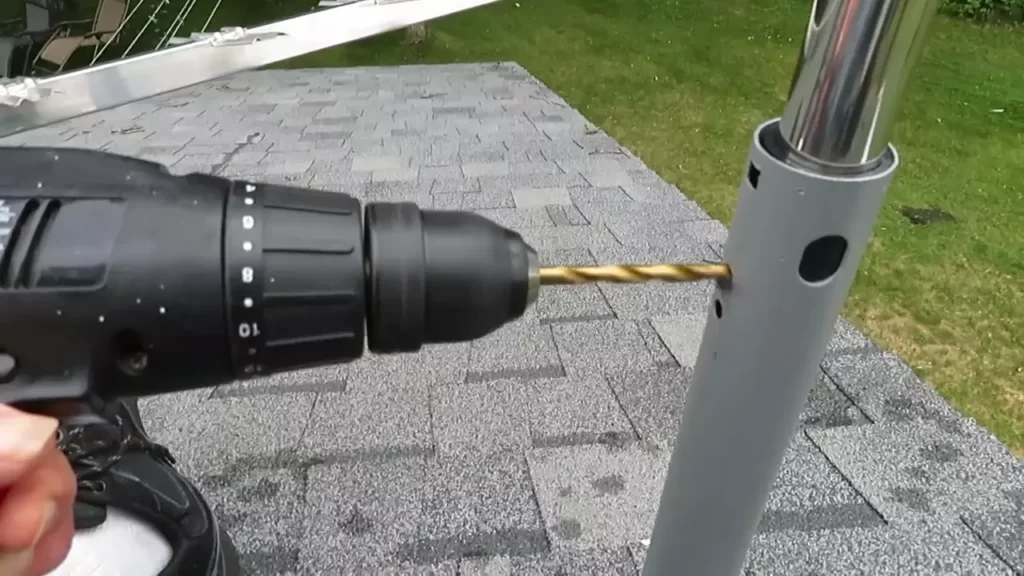
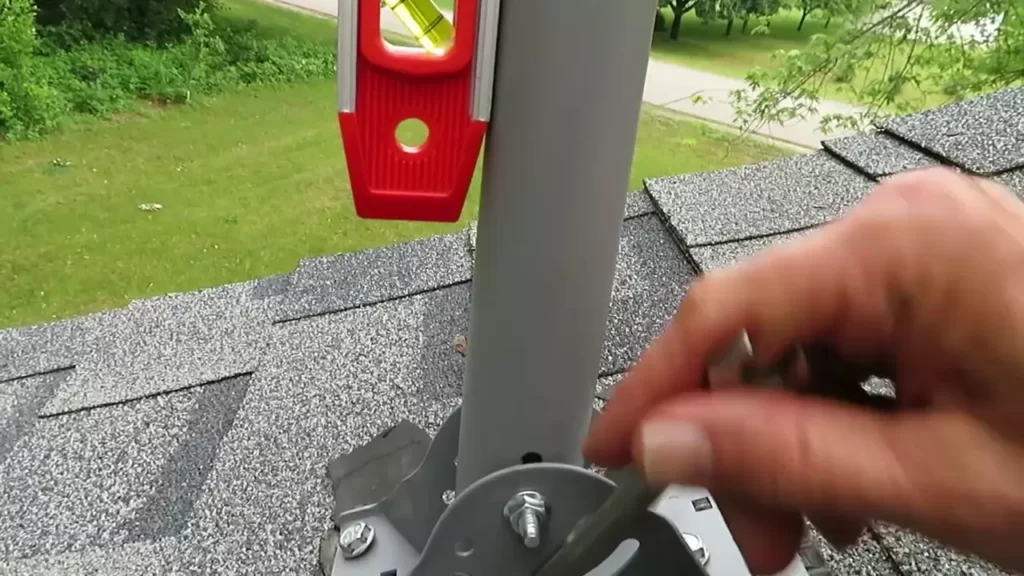
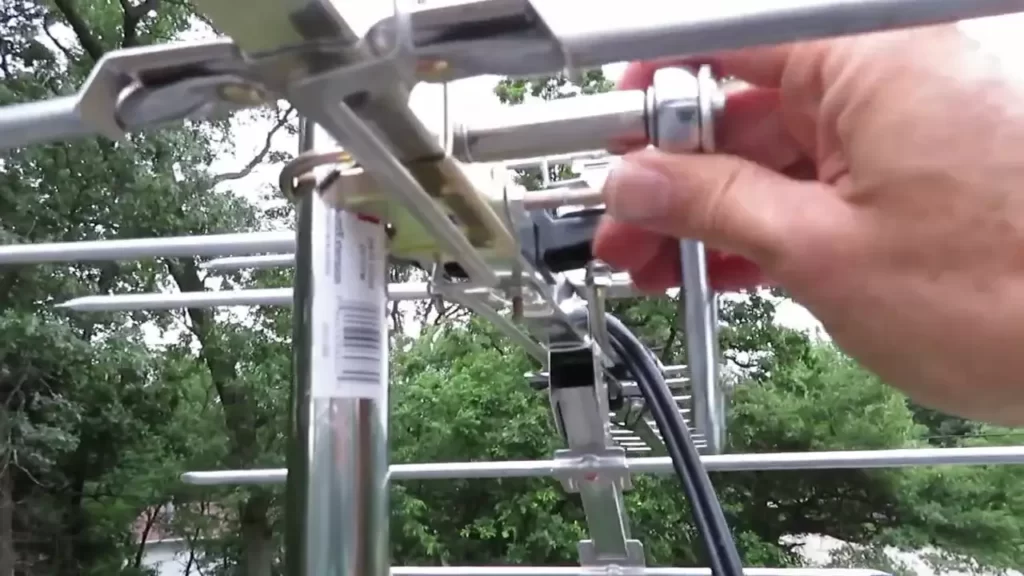
Assembling and Mounting the Antenna According to Manufacturer Instructions
Once you have prepared the mounting location, it’s time to assemble and mount the antenna. Here’s how:
- Read the manufacturer’s instructions carefully to understand the specific steps and requirements for assembling the antenna.
- Identify the various components and parts of the antenna and follow the instructions to properly assemble them. This usually involves attaching the elements, reflector, and any necessary brackets.
- Follow the manufacturer’s guidelines to mount the antenna securely to the mast or mounting bracket. Make sure to tighten all the bolts and screws properly to ensure stability.
Securing the Antenna to the Roof Safely and Securely
Now that the antenna is mounted, it’s essential to take the necessary precautions to secure it safely on your roof:
- Use weatherproof sealant to waterproof any connections or entry points where cables or wires enter the house. This will help prevent any moisture from damaging the antenna or your TV reception.
- Secure any loose cables or wires neatly using zip ties or cable clips. This will not only protect the cables from damage but also keep the installation looking tidy.
- Consider reinforcing the antenna’s mounting with additional support, such as guy wires or clamps, especially if you live in an area prone to strong winds or storms.
- Perform regular maintenance checks to ensure that the antenna remains in good condition. Check for any signs of damage or loose components and make any necessary repairs promptly.
By following these steps and taking the time to properly install and secure your antenna, you can enjoy a reliable and high-quality TV signal, right from the comfort of your own home.
Connecting The Antenna To Your Tv
Once you have successfully installed the antenna on your roof, the next step is to connect it to your TV. This crucial step ensures that you can enjoy all your favorite over-the-air channels without any interruption. In this section, we will cover everything you need to know about connecting the antenna to your TV, including choosing the right coaxial cable, running the cable from the antenna to your TV, and testing and troubleshooting the signal quality.
Choosing the right coaxial cable for your setup
When it comes to connecting your antenna to your TV, choosing the right coaxial cable is essential. A coaxial cable serves as the medium through which the signal is transmitted from the antenna to your TV, so it is crucial to select a high-quality cable that can handle the frequencies required for optimal reception.
Here are a few key factors to consider when choosing the right coaxial cable:
- Cable type: There are different types of coaxial cables available, such as RG6 and RG59. RG6 is generally recommended for its better signal carrying capacity and lower signal loss.
- Cable length: Measure the distance between your antenna and TV to determine the length of the coaxial cable you will need. Ensure that you choose a cable with enough length to reach your TV without stretching or straining.
- Connectors: Look for cables with high-quality connectors that ensure a secure and reliable connection between the antenna and your TV.
Running the cable from the antenna to your TV
Once you have selected the right coaxial cable for your setup, it is time to run the cable from the antenna to your TV. This process may vary depending on the layout of your home and the location of your TV.
Here is a simple step-by-step guide to help you run the cable properly:
- Determine the route: Identify the best path to run the cable from the antenna to your TV. You may need to drill holes or use existing cable conduits to hide the cable.
- Secure the cable: Use cable clips or zip ties to secure the cable along the chosen route. This will prevent any accidental damage or tripping hazards.
- Connect the cable: Attach one end of the coaxial cable to the antenna’s output port and the other end to the input port on your TV.
Testing and troubleshooting the signal quality
After connecting the antenna to your TV, it is essential to test and troubleshoot the signal quality to ensure optimal reception. Here are some steps to help you:
- Scan for channels: Use your TV’s channel scan function to detect available channels. Ensure that your TV is set to receive signals from the antenna.
- Check signal strength: Access the signal strength indicator on your TV’s menu or settings. Aim for a high signal strength for the best possible reception.
- Adjust antenna position: If you notice weak or pixelated signals, try adjusting the position of your antenna. Experiment with different angles and locations to find the optimal signal reception.
- Consider an amplifier: If you are experiencing poor signal quality, you may need to invest in a signal amplifier. This device can boost weak signals and improve reception.
By following these steps, you can ensure a seamless and reliable connection between your antenna and TV, enhancing your television viewing experience. Now you are ready to sit back, relax, and enjoy all the free over-the-air channels available to you.
Maintaining And Adjusting Your Antenna
Your antenna is not only responsible for capturing TV signals but also for maintaining a clear and uninterrupted reception. Regular maintenance and adjustments are essential to ensure optimal antenna performance. In this section, we will discuss some effective tips for maintaining your antenna, troubleshooting common signal issues, and making adjustments for improved reception.
Regular maintenance tips for optimal antenna performance
Proper maintenance of your antenna plays a vital role in ensuring that you enjoy the best possible reception. Here are some useful tips:
- Inspect the antenna regularly to ensure it is securely mounted and there are no signs of damage or corrosion.
- Clean the antenna elements and connections using a soft cloth or brush to remove any debris or buildup that may impact the signal quality.
- Check the cable connections for any loose or damaged connections. Tighten them if necessary and replace any damaged cables.
- Consider using weatherproofing materials like silicone sealants or electrical tape to protect the connections from the elements.
- Keep an eye on nearby trees or foliage that may grow and obstruct the antenna’s line of sight to the broadcasting tower. Trim or remove any obstacles if needed.
- If you live in an area with harsh weather conditions, such as heavy rain or strong winds, ensure your antenna is properly reinforced to withstand these elements.
Troubleshooting common issues with your antenna signal
Despite regular maintenance, you may encounter some signal issues with your antenna. Here are a few common problems and their possible solutions:
| Issue | Solution |
|---|---|
| Poor signal quality or weak reception | Check the direction of your antenna and adjust its position for optimal signal strength. Consider using a signal amplifier to boost weak signals. |
| No signal or channels missing | Ensure all connections are secure and cables are not damaged. Perform a channel scan on your TV or receiver to detect and add missing channels. |
| Interference or pixelation | Identify potential sources of interference, such as electrical devices or nearby buildings, and try to minimize their impact on your antenna’s reception. You can also consider shielding your cables to reduce electromagnetic interference. |
Making adjustments for improved reception
If you’re experiencing subpar reception, there are a few adjustments you can make to enhance your antenna’s performance:
- Experiment with the direction of your antenna. Consult online tools or apps to identify the broadcasting tower locations and adjust the antenna accordingly. Small adjustments can make a significant difference in signal strength.
- Consider using a rotator or motorized mount to easily change the direction of your antenna and capture signals from different towers.
- If you live in a crowded or urban area, installing a higher-gain antenna can help overcome obstacles and improve reception.
- Upgrade your coaxial cable to a high-quality one with low signal loss. This can minimize signal degradation and result in a better viewing experience.
- Consult with a professional antenna installer if you’re facing persistent signal issues or if you need assistance in finding the perfect antenna setup for your location.
By following these regular maintenance tips, troubleshooting common issues, and making necessary adjustments, you can ensure that your antenna provides you with a crystal-clear reception and a seamless viewing experience.
Frequently Asked Questions Of How To Install Antenna On Roof
How Do You Anchor An Antenna To A Roof?
To anchor an antenna to a roof, follow these steps:
1. Choose a suitable location on the roof for optimal signal reception.
2. Use a mounting bracket or mast to attach the antenna securely to the roof.
3. Ensure good grounding by connecting a grounding wire from the antenna to a grounding rod.
4. Use appropriate bolts, screws, or straps to fix the antenna firmly in place.
5. Check for any loose connections or potential hazards regularly.
Can You Put A TV antenna on the Roof?
Yes, you can install a TV antenna on your roof. It provides better reception and coverage compared to indoor antennas. Ensure it is properly mounted and aimed towards the nearest broadcasting tower for optimal performance.
What Direction Should An Outdoor Antenna Face?
An outdoor antenna should face toward the direction of the nearest broadcast tower for optimal reception.
Are Roof Antennas Worth It?
Yes, roof antennas are worth it. They provide better signal strength and can access more channels for free. They are also cost-effective, easy to install, and require no monthly fees. Enjoy high-quality reception and a wide range of programming with a roof antenna.
Conclusion
Installing an antenna on your roof may seem daunting at first, but with the step-by-step guide provided in this blog post, you can easily achieve success. By following the tips and techniques mentioned, you can ensure a strong and reliable signal for your television.
Remember to choose the right location, properly mount the antenna, and perform thorough cable connections. By taking these necessary steps, you will be able to enjoy uninterrupted and high-quality television reception. Start your installation process today and enhance your TV viewing experience.